Chapter 27
Programming with Servlets
Web applications can serve static or dynamic content. Some examples of static content are text files with HTML markup, images, and video. Dynamic content is formed on the fly. Think of a web application that enables you to browse the inventory of an online store. The content you see on your screen is being created based on your queries — in other words, dynamically.
In the Java EE world, web content is served either by a program running in a container with deployed servlets, JSP, JSF, or a third-party framework, or it’s a SOAP or RESTful Web Service. Servlets, JSP, and JSF not only return the data, but also present it as formatted HTML pages, hence the term presentation layer (refer to Figure 26-1). Web Services, on the other hand, return just the data (see Lesson 34).
A servlet is a Java program written by certain rules and deployed in a Java EE–compliant servlet container of your choice. The client program can be a lightweight HTML, JavaScript, applet, or JavaFX program. In this lesson I’ll be explaining the most widely used means of web communication: HTTP requests and responses. HTTP stands for Hypertext Transfer Protocol.
All examples in this lesson will work in any Java EE container supporting the Servlet 3.0 specification. I use GlassFish v3.
Figure 27-1 shows a web browser making HTTP requests to MyServlet, a servlet written by you or another developer, and receiving HTTP responses that MyServlet sends back.

Before you even learn how to create servlets, let’s look at the components and the workflow of an imaginary online store, www.MyBooks.com, developed with Java servlets.
- The client’s machine just needs a web browser. The bookstore will consist of a number of HTML web pages for getting user input. The Web browser sends it to the server with the name MyBooks.com in the form of an HTTPRequest object.
- The MyBooks.com computer has to run some web server software, usually on port 80. For secure communication with HTTPS (HyperText Transfer Protocol Secure) the port 443 is used. The web server will “listen to” the users’ requests. If a web server receives a simple request for static HTML content, the web server will process the request without needing to engage any additional software, and it’ll send back HTTPResponse with the requested static content.
- The website MyBooks.com will also run a servlet container with deployed servlet(s). If the web server receives a user request to find books based on some criteria, it’ll create and pass HttpServletRequest to the appropriate servlet, FindBooks, which is deployed and running in the servlet container. The next section shows sample HTML containing a form that explicitly lists FindBooks.
- The servlet creates (on the fly) the HTML page listing the found books that meet the requested search criteria, and sends it to the web server in HttpServletResponse, which wraps it inside the HttpResponse object and sends it back to the user’s web browser.
- The user’s browser displays the received page without knowing if it is an old static HTML page or a freshly baked one.
Listing 27-1 shows a simple HTML file with a form containing a text input field and a Submit button, which users can use to find a book by its title.

Listing 27-1: HTML that gives 404
<html>
   <head>
    <title>Find a book</title>
   </head>

   <body>
     Enter a word from the book title:
     <form action=http://www.MyBooks.com/servlet/FindBooks method=Get>
       <input type=Text name=booktitle>
       <input type=Submit value="Search">
    </form>
   </body>
</html>
Create a file called BookSearch.html containing the code from Listing 27-1. Open this file in a web browser (File Open), enter any text in the input field, and press Search. You’ll get an error message because there is neither a server nor a servlet called FindBooks at this address. But now you see what the thinnest client can look like.
Clients communicate with servlets using HTTP protocol, and when no requested network resource is found, the HTTPResponse object comes back with an error. If the server responds, but the requested resource (the FindBooks servlet) is not there, the error code 404 is returned. If the server doesn’t respond, the web client will show an appropriate error code. If the client’s request successfully received the needed resource from the server, the HTTPResponse contains the status code 200. The list of all possible HTTP status codes is available at www.w3.org/Protocols/rfc2616/rfc2616-sec10.html.
To create a servlet, write a class that extends from HTTPServlet and annotate it with the @WebServlet annotation. The class HTTPServlet extends GenericServlet, which defines the method service(). The method service() receives the client’s response and directs it to one of the methods of your class that’s a descendant of HTTPServlet. You have to override either of the methods doGet() or doPost(). Which one to override? This depends on the client’s request method. If the client uses the method Get (see Listing 27-1), override the callback doGet(), as in Listing 27-2.
Listing 27-2: Your first servlet
import javax.servlet.ServletException;
import javax.servlet.annotation.WebServlet;
import javax.servlet.http.HttpServlet;
import javax.servlet.http.HttpServletRequest;
import javax.servlet.http.HttpServletResponse;
import java.io.PrintWriter;

@WebServlet(urlPatterns="/books", name="FindBooks" )
public class FindBooks extends HttpServlet {

  @Override
  public void doGet(HttpServletRequest request,
                    HttpServletResponse response) throws ServletException {
        // The code processing request goes here
        // The resulting Web page will be sent back via the
        // I/O stream that response variable contains
        PrintWriter out = response.getWriter();
        out.println("Hello from FindBooks");
  }
}
If you properly deploy this servlet on MyBooks.com, the HTML client from Listing 27-1 will get as a response a web page containing the text “Hello from FindBooks.” Note that the import statements include classes from the javax.servlet package, which is not included with Java SE — you need Java EE 6 SDK installed. GlassFish Server comes with Java EE 6, but if you are using a different container you can get it from www.oracle.com/technetwork/java/javaee/downloads/index.html.
The annotation @WebServlet is where you specify servlet deployment parameters. Prior to Java EE 6 you needed to specify deployment parameters in an XML file, but now that’s optional. Our FindBooks servlet uses the deployment parameters urlPatterns, and name. The former is used to match one of the servlets deployed on the server to the URL. The value /books means that whenever the client sends a request containing the pattern books in its URL, the request has to be redirected to the FindBooks servlet. For example, the servlet container will send the request http://localhost:8080/books to the FindBooks servlet.
Each application server and servlet container has a directory known as a document root. It is used not only for servlet-based websites, but also for the deployment of static HTML files. For example, if you put the HTML file TermsAndConditions.html in the subfolder legal of the document root of the server MyBooks.com, users would need to direct their web browsers to www.mybooks.com/legal/TermsAndConditions.html.
In the GlassFish application server the default document root is the directory /glassfish/domains/domain1/docroot. In Apache Tomcat it’s the directory webapps. If you are planning to create a servlet, its deployment directory will also be located in the document root, but it will contain the subdirectories WEB-INF and META-INF.
WEB-INF will have the subdirectories classes and lib and the optional file web.xml. The latter is optional if you can specify all deployment parameters in annotations. But if you have both annotations and web.xml, the values in this file will override the corresponding values in the annotations. This allows changing deployment parameters without requiring recompilation of the servlets. The WEB-INF directory also may have some container-specific files. For example, GlassFish has the file sun-web.xml, in which it stores the context root, which is the root directory of your Web application as well as the part of the URL that’s used to access your application in the Web browser (/Lesson27 in our case).
The directory META-INF may have files containing metadata about this web application, like manifest.mf or other data specific to a third-party framework or application server content. For example, Apache Tomcat has a file called context.xml where you may find information about the JDBC driver. This directory may also contain the file web-fragments.xml, which is a module of deployment mainly used by third-party frameworks to store their specific deployment parameters.
This is what the directory structure of the application deployed in the document root directory can look like:
document root dir
     WEB-INF
          Classes
             Com
                Practicaljava
                  lesson27
                     FindBooks.class
           Lib
     META-INF
         manifest.mf
The class com.practicaljava.lesson27.FindBooks was compiled into the directory classes. If you had some third-party jar files you could add them to the lib directory.
When your web application is complete, most likely it’ll consist of multiple files, and typically the entire directory structure is deployed as one compressed file with the extension .war, which stands for web archive. Such files can be created manually, by your IDE plug-ins, or by one of the build tools like Ant or Maven. Later in this lesson I’ll show you how to create a war file with Eclipse for Java EE Developers.
Installing the GlassFish Plug-In for Eclipse
It’s a lot more convenient to develop and deploy Web applications when you don’t need to leave the IDE. Eclipse for Java EE is a good fit for the development of web projects. NetBeans IDE and IntelliJIDEA are also good tools for Java EE developers. Because I’ll be using GlassFish Server, let’s install the GlassFish plug-in that’s available for Eclipse IDE Helios or later.
From Eclipse’s Help menu select Eclipse Marketplace. A new window will pop up: Enter GlassFish in the Find field. This search will return several GlassFish-related plug-ins; pick the Tools Bundle for Eclipse. This is a bundle that comes as two plug-ins. Press Install and follow the instructions. At the end of the installation, Eclipse will restart showing a GlassFish welcome window; close it and switch to the Java EE perspective.
Now configure GlassFish Server. The Eclipse view will allow you to start and stop the server and deploy applications without needing to leave Eclipse. Select File New Other and pick Server in the opened window. Select the option GlassFish Open Source Edition 3 (Java EE 6).
The next pop-up will ask you about a default JRE (it must be Java 1.6 or above) and where GlassFish Server should be located. According to my installation (see Lesson 26) I specified /Users/yfain11/glassfishv3/glassfish and pressed Next. Accept default parameters for domain1 in the next window and press Finish. Eclipse will start GlassFish Server, asking you for the administrator’s ID and password that you specified when installing GlassFish in the previous lesson.
If you did everything right your Eclipse Servers view should look like Figure 27-2, and the Console view should show output similar to the following:
Waiting for DAS to start ...............
Started domain: domain1
Domain location: /Users/yfain11/glassfishv3/glassfish/domains/domain1
Log file: /Users/yfain11/glassfishv3/glassfish/domains/domain1/logs/server.log
Admin port for the domain: 4848
Command start-domain executed successfully.

How to Create a Servlet with Eclipse
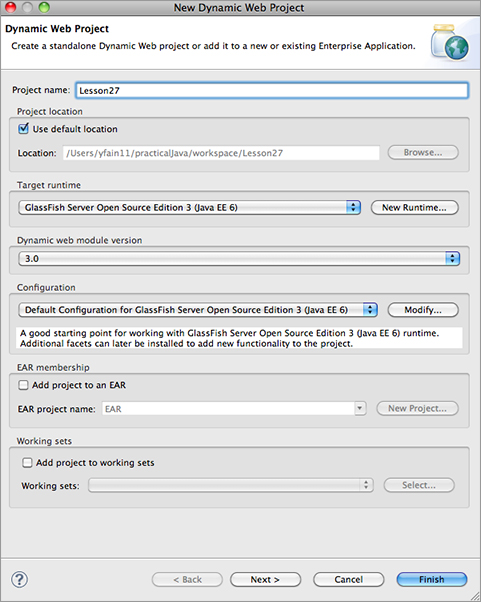
In the File New menu of Eclipse, select the option Create Dynamic Web Project. In the pop-up window name it Lesson27. Note that by default the GlassFish target run time has been selected (see Figure 27-3). If you have another servlet container configured in your Eclipse installation, you can deploy it under a different run time (such as Tomcat).
Click Finish, and it’ll create a new Eclipse project, which is not the same as the projects you’ve been creating so far. It has a subfolder called WebContent that contains the WEB-INF and META-INF directories that will be used for deployment in the servlet container of your choice.
Right-click the project name and select New Servlet, then specify com.practicaljava.lesson27 as the name of the package, and the class name as FindBooks. Click Next and edit the URL mapping field to be /book. Click Next again. The next window will ask you which method stubs you’d like to have auto-generated; keep the default doGet() and doPost(). Finally, click Finish, and the code in Listing 27-3 will be generated (I removed the comments).
Listing 27-3: Generated FindBooks servlet
package com.practicaljava.lesson27;

import java.io.IOException;
import javax.servlet.ServletException;
import javax.servlet.annotation.WebServlet;
import javax.servlet.http.;
import javax.servlet.http.HttpServletRequest;
import javax.servlet.http.HttpServletResponse;

@WebServlet(description = "The servlet that searches for books",
            urlPatterns = { "/books" })
public class FindBooks extends HttpServlet {
      private static final long serialVersionUID = 1L;

    public FindBooks() {
        super();
        // TODO Auto-generated constructor stub
    }

      protected void doGet(HttpServletRequest request,
         HttpServletResponse response) throws ServletException, IOException{
            // TODO Auto-generated method stub
      }

      protected void doPost(HttpServletRequest request,
         HttpServletResponse response) throws ServletException, IOException{
            // TODO Auto-generated method stub
      }
}
Add the following two lines in the doGet() method to get access to the output stream and send the message “Hello from FindBooks”:
PrintWriter out = response.getWriter();
out.println("Hello from FindBooks");
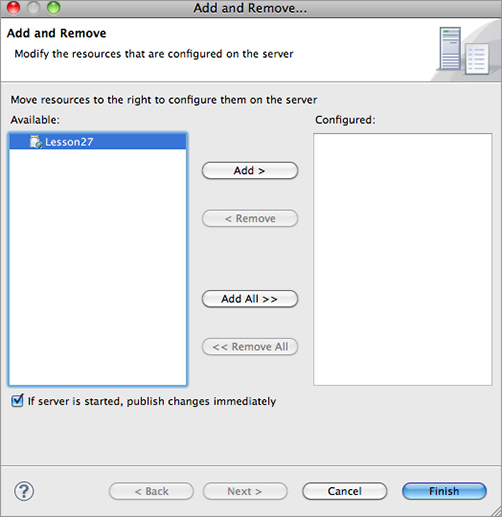
Don’t forget to add the import statement for PrintWriter. The final step is to deploy the servlet under GlassFish Server. Open the Servers view, right-click the server, and select Add and Remove from the menu. Select the Lesson27 project in the left panel and add it to the right one (see Figure 27-4). Click Finish.
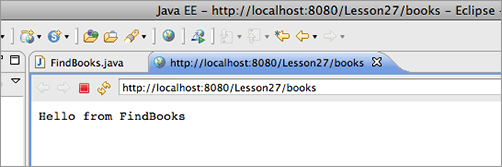
The servlet deployment is finished. Now right-click FindBooks in the Eclipse project, select Run on Server GlassFish and click Finish. Eclipse will run its internal web browser and will display the message shown in Figure 27-5. Please note that the URL ends with /books according to the specified urlPatterns parameter, http://localhost:8080/Lesson27/books.
Because servlets belong to the presentation layer, let’s change the presentation a little bit. This code in doGet() will show the output in a larger font and in the header <H2> style:
PrintWriter out = response.getWriter();
out.println("<html><body bgcolor=yellow>");
out.println("<h2>Hello from FindBooks</h2>");
If you want to create a war file deployable on any servlet container, find the Deployment Descriptor section in your Lesson27 project, right-click it, and select Export to WAR. In a couple of seconds you’ll have Lesson27.war, a file that you can deploy in any Java EE 6–compliant container.
One servlet can serve multiple users, so let’s review the entire process of client-servlet communication. Java Servlets run in a container, which automatically spawns a new thread for every client’s request without requiring you to do any thread programming.
The web browser can use an HTML form, a link, or another program that can send, say, a Get or Post request to the server. In the very beginning, when the first user’s request hits the FindBooks servlet, the container will check if this servlet is up-and-running. If not, the container will start it and call the servlet’s method init() — even if you didn’t override this method, it exists in the superclass HttpServlet.
Then the container calls the method service() of the servlet’s superclass, which redirects the request to doGet(), doPost(), or similar doXXX(), passing the arguments HttpServletRequest and HTTPServletResponse. Your code can get the data entered by the user from the HttpServletRequest object with the method getParameter().
After you get the parameter(s), process it in the business layer, which can be implemented either as POJOs talking to some data store or as an EJB. Return the result to the client by getting the reference to the PrintWriter object — it knows how to send text data to the user. For non-textual results use the class OutputStream instead of PrintWriter. Don’t forget to set the content type by calling setContentType(). For example, if you are sending an object containing PDF content and want the browser to automatically open Acrobat Reader, call the function Response.setContentType("application/pdf");.
The servlet container controls when the servlet is loaded, and when its init(), service(), and destroy() methods are called. The method destroy() is called when a server administrator decides to unload the servlet, or the server is gracefully shutting down, or the server needs to free some resources. The following code retrieves the name of the book entered by the user and responds with the price of 65 dollars:
 public void doGet(HttpServletRequest req, HttpServletResponse res)
                     throws ServletException, IOException  {

  String title = req.getParameter("booktitle");;
  PrintWriter out = res.getWriter();
  res.setContentType("text/html");
  out.println("<html><body>");
  out.println("<h2>the book "+title+" costs only $65");
  out.println("<p>Please enter your credit card number");
  out.println("</body></html>");
 }
HTTP specification defines several methods for data exchange on the Web, but Get and Post are the most widely used ones. If you don’t specify the method, Get is used by default. Because the HTML tag <form> in Listing 27-1 used method=Get, the FindBooks method doGet() will be invoked by the container. In this case the web browser will append the values entered in the form to the end of the URL after the question mark. For example, if the user enters the word Apollo as a book title, the URL may look like this:
http://www.mybooks.com?booktitle=Apollo
If a form submits multiple values, the URL will include several key/value pairs after the question mark. With Get it’s easy to copy and paste or bookmark the URL with parameters. On the other hand, with Get the data is not protected — you can see it in clear text.
The method Post is typically used to send larger amounts of data to the server. It’s always used to send binary data to the server. Of course, the log-in forms should use Post because you don’t want the user’s ID and password to be shown in the URL. To process Post requests, servlets have to override the method doPost().
It’s common to use Get for data retrieval and Post for both data retrieval and modification.
HTTP is a stateless protocol. If a user retrieves a web page with a list of books from the FindBooks servlet or any other server-side program as a result of an HTTP request, and then goes to another web page, this second page does not know what was shown on the first one. To preserve data to more than one web page, session tracking has to be implemented.
A session is a logical task, which the user is trying to complete by visiting a website. For example, the process of buying a book may involve several steps: book selection, input of billing and shipping information, and so on. All of these steps combined to form an example of a session. When a purchase order is placed, the session is over. To create a session, call the method request.getsSession(true). Calling this method without an argument will give you either a reference to the existing session or null.
The session information can be stored either on the client or on the server side. On the client side the user’s session data can be stored using cookies (defined in the next section) or URL rewriting. The server-side alternative for storing session data is a session tracking API that implements the interface javax.servlet.http.HTTPSession.
Cookies
A cookie is a small piece of data that a container sends to the web client to be stored on the disk. On every subsequent request from that client, the cookie is returned to the server, uniquely associating the request with a given session. The cookies are persistent, but the user may disable them by selecting the appropriate option in the web browser. When the session is created, a special cookie, JSESSIONID, is sent to the client. Here’s how the servlet can send a business-related cookie (javax.servlet.http.Cookie) to the client:
Cookie myCookie = new Cookie("bookName","Java Programming 24-hour trainer");
// Set the lifetime of the cookie for 24 hours
myCookie.setMaxAge(60*60*24);
response.addCookie(myCookie);
This is how a servlet can retrieve a client’s cookies that arrive with HttpServletRequest:
Cookie[] cookies = request.getCookies();
for (i=0; i < cookies.length; i++){
  Cookie currentCookie = cookie[i];
  String name = currentCookie.getName();
  String value = currentCookie.getValue();
}
Even though you can store multiple cookies on the client, as in the preceding code, it’s not a good idea to send the application data back and forth over the network. Typically the session data is stored in the HTTPSession object described later in the section “Server-Side HTTPSession.”
URL Rewriting
If a client disables cookies, the URL rewriting may be used for session tracking. In this case the session ID and other required session data are attached to the URL string. If you’ve noticed something such as jsessionid=12345 in the URL string of any website, it means that URL rewriting is being used.
Server-Side HttpSession
You should keep the data that belong to a user’s session (such as the shopping cart) inside the javax.servlet.http.HttpSession object in the servlet container, which creates one such object per client. The servlet can store there any Serializable objects. The following line creates a session object (or finds a previously created one):
HttpSession mySession = request.getSession(true);
The call getSession(true) means “find this client’s session object or create a new one if no object is found.” Usually the shopping process consists of a number of subsequent servlet calls (list an inventory, add an item to the shopping cart, enter shipping information, etc.). The method call getSession(true) should be used in the very first servlet that opens the business process that can be called a user session. At this moment the application server generates a unique session ID and sends it to the user’s web browser using either a cookie or URL rewriting.
The call getSession(false) means “find my session object,” assuming that it has been created in the previous steps of the session. If this call returns null, the session object has been destroyed and you might want to display a message saying that the session has expired, and the user has to start the process from scratch. Let’s assume that the following class represents a book on the server side:
class Book  {
   String title;
   double price;
}
This is what you can do in the method doGet() of the servlet to create a session and a shopping cart:
HttpSession session = request.getSession(true);

// This sample uses Vector object here to store selected books.
// Try to get the shopping cart that might have been
// created during previous calls to this servlet.

Vector myShoppingCart=session.getAttribute("shoppingCart");

if (myShoppingCart == null){
   // This is the first call – instantiate the shopping cart
    myShoppingCart = new Vector();
}

// create an instance of a book object
Book selectedBook = new Book();

selectedBook.title=request.getParameter("booktitle");
selectedBook.price= Double.parseDouble(request.getParameter("price"));

// Add the book to our shopping cart
myShoppingCart.addElement(selectedBook);

// Put the shopping cart back into the session object
session.setAttribute("shoppingCart", myShoppingCart);
When the book order has been placed the program should close the session by making the following call:
session.invalidate();
If the session has not been invalidated explicitly, the application server will do it automatically after a specific period. This period is called timeout and is a configurable parameter.
Filters
Even after a servlet is deployed you still can change the way it processes requests and responses without modifying the servlet’s code. You can create filters — code that can be configured to process HTTP requests before they are passed to the servlet, or right after the servlet returns the request. Filters are good for adding such functionality as authentication, logging, encryption, data compression, and audit reporting.
None of these actions depend on the business logic implemented by servlets. Besides, why write code with compressed logic over and over again in each servlet if you can create one filter and apply it to all of them before the data is sent to the client? What if you need to compress and encrypt? Write two filters and chain them so both are applied to the same servlet.
To create a filter, write a class that implements the interface javax.servlet.Filter annotated with @WebFilter. There are three methods in this interface: doFilter(), init(), and destroy(). Here’s a sample of a filter class to be used with two servlets, FindBooks and RemoveBook:
@WebFilter(servletNames={"/FindBooks", "/RemoveBook"})
public class MyAuthenticationFilter implements Filter {

      @Override
      public void doFilter(ServletRequest request, ServletResponse response,
                    FilterChain chain)throws IOException, ServletException {

        // user authentication code goes here

       //Call the next filter, if any
       chain.doFilter(request, response);

      }
    }

    @Override
    public void init(FilterConfig filterConfig) throws ServletException {}

    @Override
    public void destroy() {}

}
The container gives the filter both request and response objects. You can check passed parameters by the client (such as by checking ID/password), perform authentication, and, if the user is not valid, call response.getWriter() and send the user the message “You don’t belong here” without even passing control to the servlet.
The method destroy() is called once before the container removes the filter; if the filter has created some resources such as DBMS connections, close them in the filter’s code. The method init() is invoked on the filter only once during its instantiation. The filter gets the FilterConfig object, which gives you access to the servlet context and initialization parameters if these are specified in the @WebFilter annotation or in the file web.xml:
@WebFilter(servletNames={"/FindBooks", "/RemoveBook"},
           initParams={name="community", value="adults"})
Several important events happen to a servlet during its life cycle. You can write code reacting to these events in custom event listener classes. For example, the container fires events when the servlet context is created, and if you are interested in processing this event, create a class that implements the ServletContextListener interface. To catch the moment when the session has been created, invalidated, or timed out, use HttpSessionListener. To catch the beginning of the processing of the servlet request, create a class implementing ServletRequestListener.
Imagine that you need to gather statistics on the usage of the bookstore servlet and log the date and time when each user’s session was created and destroyed. Listing 27-4 prints the session ID on creation and invalidation of every user’s session.
Listing 27-4: HttpSession listener
import javax.servlet.http.HttpSessionListener;
import javax.servlet.http.HttpSessionEvent;
import javax.servlet.http.HttpSession;
import javax.servlet.ServletConfig;
import javax.servlet.annotation.WebListener;

@WebListener
public class BookStoreSessionListener implements HttpSessionListener{

    public void init(ServletConfig config){
    }

    public void sessionCreated(HttpSessionEvent event){
      HttpSession    session = event.getSession();
      System.out.println("BookStore session created; id:"+ session.getId());
    }

    public void sessionDestroyed(HttpSessionEvent event){
      HttpSession    session = event.getSession();
      System.out.println("BookStore session destroyed; id:"+ session.getId());
    }
}
To test this listener, modify the code of doGet() in the servlet FindBooks from Listing 27-4 to create and destroy the session. (In more realistic scenarios the session creation and destruction would be performed in different methods.)
      protected void doGet(HttpServletRequest request,
HttpServletResponse response) throws ServletException, IOException {
            // Get or create the session
            request.getSession(true);

            PrintWriter out = response.getWriter();
            out.println("<html><body bgcolor=yellow>");
            out.println("<h2>Hello from FindBooks</h2>");

            //Destroy the session
            request.getSession(true).invalidate();
      }
To emulate the multiple-users scenario, make the first request to the FindBooks servlet from Eclipse IDE, and another one from the web browser by copying the URL http://localhost:8080/Lesson27/books into the address bar. You should see the creation and destruction of two sessions with different IDs in the Eclipse Console view, which runs the server:
INFO: BookStore session created; id:104903c1dd6a8306cb33a116257a
INFO: BookStore session destroyed; id:104903c1dd6a8306cb33a116257a

INFO: BookStore session created; id:104f16ba2e714bdd8981c7ea2e87
INFO: BookStore session destroyed; id:104f16ba2e714bdd8981c7ea2e87
It’s great that servlets automatically create and allocate a separate thread for each user’s request, but each thread takes up system resources (both memory bytes and CPU cycles), and after a certain number of concurrent requests the server will simply stop responding. Imagine if thousands of users simultaneously hit the FindBooks servlet that has to perform a three-second DBMS search for each request. During these three seconds the container will hold the lock on each thread, doing nothing but waiting for the result of the DBMS query (running on another server!).
The idea of asynchronous servlets is to minimize the time of thread locking. If User A makes a request that takes three seconds on a DBMS server, the container’s thread will be given to the request of User B, and, when User A’s result comes back from the DBMS, the container will allocate this (or another) thread to return the result to User A. This architecture can substantially increase the number of concurrent requests that can be processed on the same server.
In the past, vendors of servlet containers offered their proprietary solutions for asynchronous processing. Jetty implemented its version of reusing thread via a concept called continuations, whereby the thread given to a request is suspended for the time required for the business logic to complete, and then is resumed when the result is ready. Apache Tomcat and GlassFish implemented technology based on the event-based model called Comet, whereby an HTTP connection to the servlet container is maintained, and the server pushes the data to the client via this connection.
The Servlets 3.0 specification has introduced a standard, Comet-based way of creating asynchronous Java EE web applications. In doGet() or doPost() you can instantiate the object javax.servlet.AsyncContext, which creates an asynchronous worker thread and doesn’t lock the client’s thread while preserving the client’s request and response objects. Asynchronous processing is out of the scope of this tutorial, but you can find a detailed example of programming an asynchronous servlet at http://bit.ly/b0iBcr.
Write a simple HTML client with one text input field that has a Submit button. The user will enter the stock symbol she wants to get a price quote for. Generate a random quote and return a web page with the quote. Reuse the code from StockServerImpl from Listing 25-2 to generate the price quotes.
Lesson Requirements
You should have Java installed.
You can download the code and resources for this Try It from the book’s web page at www.wrox.com. You can find them in the Lesson27 folder in the download.
Hints
You can find several examples of Servlet 3.0 web applications at www.oracle.com/technetwork/java/javaee/documentation/code-139018.html.
Step-by-Step
1. Create an HTML client similar to the one from Listing 27-1 to allow the user to enter the stock symbol.
2. Create a servlet called StockServerServlet that will take one parameter, the stock symbol, and instantiate a class called StockQuoteGenerator that should have the code similar to Listing 25-2. There’s no need to implement Remote interface though.
3. Pass the stock symbol received from the client to StockQuoteGenerator and get the price.
4. Return the dynamically created HTML page to the client via the request object.
5. Test the servlet in Eclipse IDE first, and then create the war file and deploy it in the document root of GlassFish Server, installed in Lesson 26.
6. Start GlassFish Server.
7. Open the HTML file you created in Step 1 in your web browser and test the servlet by entering various stock symbols.
Please select Lesson 27 on the DVD with the print book, or watch online at www.wrox.com/go/fainjava to view the video that accompanies this lesson.