Chapter 23
Swing with JTable
In this lesson you’ll learn how to work with a Swing control that is advanced and popular for enterprise applications: JTable. This UI component enables you to present data in a grid with rows and columns. After learning the basics of working with JTable, in the Try It section you’ll apply these new skills to display the portfolio data that, as of Lesson 22, is stored in the database.
In other words, you’ll build a client-server application, where the Swing-based GUI is a client and the RDBMS is a server. Such architecture was pretty popular in the mid-nineties. Rich clients were developed in Visual Basic, PowerBuilder, Delphi, Java, or C++, and they connected directly to database servers such as Oracle, DB2, Sybase, Microsoft SQL Server, and Informix.
In the late nineties, thin clients (plain-looking HTML-based web pages with almost no code implementing business logic) became the trend. These days applications with rich UIs are coming back, but typically you’ll be using an application server as a middleman between the client and the data storage. I’ll describe such middlemen starting in Lesson 26, but your UI skills would be incomplete without your knowing how to program data grids.
The Swing class JTable is a powerful UI component created for displaying tabular data like a spreadsheet. The data is represented as rows and columns; that’s why the JTable component is often used to display data from relational databases, which store data similarly. JTable was designed according to the Model-View-Controller (MVC) design pattern, according to which components responsible for presentation (or the view) are separated from components that store data (or the model) for that presentation. In general, design patterns suggest language-independent solutions for common programming tasks.
JTable is responsible for the visible portion of the grid (the V part of MVC), but the data has to be stored in a different Java class that implements the TableModel interface (the M part). Any other UI component can play the role of the controller (the C part) and initiate some actions that will move the data from model to view or vice versa. For example, a click on the JButton can initiate the population of the table model from the database and display the data in JTable.
Swing includes the classes DefaultTableModel and AbstractTableModel, which implement the TableModel interface and have methods to notify a JTable when the data is changing.
A programmer usually creates a model as a subclass of AbstractTableModel, and this class has to contain the data in some collection, for example ArrayList. When JTable needs to be populated, it requests the data from a class that implements TableModel, invoking such callback methods as getColumnCount() and getValueAt(). When a Swing program creates an instance of JTable it has to assign to it a corresponding table model class. Listing 23-1 shows how the class MyTableModel (created by you) is given to the constructor of JTable.
Typically, the UI class that creates JTable defines one or more listeners that are notified of any changes in the table’s data. The incomplete class MyFrame in Listing 23-1 implements the TableModelListener interface that defines just one method - tableChanged(). This method should contain the code performing data modifications, for example code to save the data in the database.

Listing 23-1: A window with JTable
package com.practicaljava.lesson23;

import javax.swing.*;
import javax.swing.table.AbstractTableModel;
import javax.swing.event.TableModelEvent;
import javax.swing.event.TableModelListener;

public class MyFrame  extends JFrame implements TableModelListener{

  private MyTableModel myTableModel;
  private JTable myTable;

  MyFrame (String winTitle){
  super(winTitle);

  myTableModel = new MyTableModel();
  myTable = new JTable(myTableModel );

  //Add the JTable to frame and enable scrolling
  add(new JScrollPane( myTable));

  // Register an event listener
   myTableModel.addTableModelListener(this);
 }

 public void tableChanged(TableModelEvent e) {
  // Code to process data changes goes here
 }

 public static void main(String args[]){
  MyFrame myFrame = new MyFrame( "My Test Window" );

  myFrame.pack();
  myFrame.setVisible( true );

}

  class MyTableModel extends AbstractTableModel {
    // The data for JTable should be here
  }

}
In very simple cases you can create a JTable without declaring a table model class (JTable has a no-argument constructor), but Java will internally use its DefaultTableModel class anyway. My sample class MyFrame, though, will use the data model that’s a subclass of the AbstractTableModel.
Note that the class MyTableModel is an inner class declared inside the class MyFrame. Having a model as an inner class is not a must, but if the data model will be used with only one specific JTable, its model might as well be declared inside the same class.
The code in Listing 23-1 is not complete; it doesn’t include any data yet, and the table model must include the mandatory callbacks described in the next section.
Mandatory Callbacks of Table Models
The class that implements the TableModel interface and feeds data to JTable must include at least three callback methods: getColumnCount(), getRowCount(), and getValueAt().
The method getColumnCount() must return an integer value — the number of columns in this JTable. This method will be called once by a JTable. For example, if you are planning to display orders, each of which consists of four fields — order ID, stock symbol, quantity, and price — just put one line in this method:
return 4;
The method getRowCount() must return an integer — it will also be called only once. The data has to be placed into an array or a data collection (such as ArrayList MyData) before it appears on the screen, and the code for this method could look like this:
return myData.size(); //myData is an ArrayList in this sample
The method getValueAt(int row, int col) returns an Object and will be called once for each cell (each intersection of a row and a column). You have to write the code that will return the value for the requested row and column.
Let’s say you have a class called Order, as shown in Listing 23-2, and you want to store instances of this class in ArrayList myData. This is going to be your data storage.
Listing 23-2: The Order class
public class Order {
 private int orderID;
 private String stockSymbol;
 private int quantity;
 private float price;

    public Order(int id, String stockSymbol, int quantity, float price){
          orderID=id;
          this.stockSymbol=stockSymbol;
          this.quantity=quantity;
          this.price=price;
    }
}
Whenever the callback getValueAt(int row, int col) is called on the model, you have to return the cell value based on the passed row and column. The inner class MyTableModel from Listing 23-3 includes the method getValueAt() working with myData, which is an ArrayList of Order objects.
Listing 23-3: The JFrame window with implemented table model
public class MyFrame  extends JFrame implements TableModelListener{

      MyTableModel myTableModel;
      JTable myTable;

 MyFrame (String winTitle){
  super(winTitle);

  myTableModel = new MyTableModel();
  myTable = new JTable(myTableModel );

  //Add the JTable to frame and enable scrolling
  add(new JScrollPane( myTable));

  // Register an event listener
   myTableModel.addTableModelListener(this);
 }

 public void tableChanged(TableModelEvent e) {
  // Code to process data changes goes here
 }

 public static void main(String args[]){
  MyFrame myFrame = new MyFrame( "My Test Window" );

  myFrame.pack();
  myFrame.setVisible( true );

}

// Inner class for data model
class MyTableModel extends AbstractTableModel {

 ArrayList<Order> myData = new ArrayList<Order>();

MyTableModel(){

      myData.add(new Order(1,"IBM", 100, 135.5f));
      myData.add(new Order(2,"AAPL", 300, 290.12f));
      myData.add(new Order(3,"MOT", 2000, 8.32f));
      myData.add(new Order(4,"ORCL", 500, 27.8f));
}

public int getColumnCount() {
 return 4;
}

public int getRowCount() {
 return myData.size();
}

public Object getValueAt(int row, int col) {

      switch (col) {
        case 0:   // col 1
          return myData.get(row).orderID;
        case 1:   // col 2
              return myData.get(row).stockSymbol;
        case 2:   // col 3
              return myData.get(row).quantity;
        case 3:   // col 4
              return myData.get(row).price;
        default:
          return "";
      }
 }
}
}
Note the use of generics in the declaration of the myData collection. Another Java feature not to be missed here is autoboxing — the primitive Order fields int and float are automatically converted into the corresponding wrapper objects Integer and Float.
Running the program from Listing 23-3 will display the window shown in Figure 23-1. Have you noticed that the window looks a bit unusual? The reason is that I decided to run this program on my MacBook laptop under the Mac OS. Java is a cross-platform language and this code will run without changes under Windows too — the look and feel will be different, though.
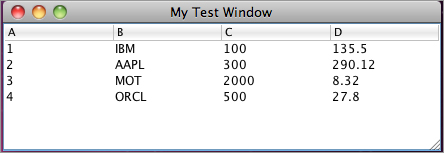
Optional Callbacks of Table Models
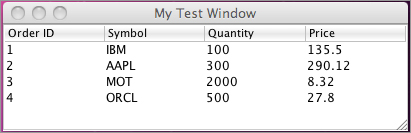
The JTable shown in Figure 23-1 doesn’t show the proper titles of the columns — the auto-generated A, B, C, and D don’t count. You can fix this easily by overriding the getColumnName() method in the table model class. This callback, if present, will be called (once for each column) to render the column titles. Add the following code to the class MyTableModel and the window will look as it does in Figure 23-2:
  String[] orderColNames = { "Order ID",   "Symbol", "Quantity", "Price"};

 public String getColumnName(int col) {
      return orderColNames[col];
  }
If you want to make some of the columns or cells editable, just override the isCellEditable() method and return true from this callback for the editable columns. Here’s how to make the third column of our JTable editable:
public boolean isCellEditable(int row, int col) {

  if (col ==2){
      return true;
  } else {
    return false;
  }
}
If your table has editable columns you need to override the method setValueAt(Object value, int row, int col) and include the code that will copy the data from the UI component — JTable — to the appropriate field in its model objects. This method is called automatically when the user changes the value in a table cell and moves the cursor out of that cell by pressing the Enter or Tab key or by clicking a different cell.
The following method, setValueAt(), will take the modified order quantity and set the new value for the quantity field in the appropriate Order in the model. By default, all the data shown in JTable’s cell has the String data type, and it’s your responsibility to do proper casting.
 public void setValueAt(Object value, int row, int col){

   if (col== 2){
    myData.get(row).quantity=(Integer.valueOf(value.toString()));
   }

   //Notify listeners about the data change
    TableModelEvent event = new TableModelEvent(this, row, row, col);
    fireTableChanged(event);
}
The fireTableChanged() method has been placed in the setValueAt() method to notify any listener(s) who want to know about the data changes. For example, if the quantity on any order has been changed and has gone over a certain threshold, the application may need to immediately perform some actions to report this to some authority.
Review the code in Listing 23-3. The class MyFrame implements TableModelListener, so the method tableChanged() will be invoked as a result of the fireTableChanged() method call. Add the following line to the tableChanged() method:
System.out.println("Someone modified the data in JTable!");
Now run the program and modify the quantity in any row of JTable. The message will be printed on the system console. But JVM fires a table changed event with a payload — TableModelEvent — that carries useful information about what exactly has changed in the table model.
TableModelEvent has several constructors; I’ve chosen the one that takes modified rows and columns as arguments. For example, if you change the quantity in the last row, as shown in Figure 23-2, the method tableChanged() will receive an instance of TableModelEvent that will encapsulate the reference to the entire model encapsulating the following values describing the change:
column=2    //  the third column
firstRow=3  //  starting from the row #4
lastRow=3   //  ending with the row #4
Based on this information you can implement any further processing required by the functional specification of your application. If you need to apply the UI changes to the database, the method tableChanged() can be the right place to use the JDBC API or other communication with the server-side code to persist the changes.
There are several functions with names that start with the word fire. For example, to apply each cell’s change to the database, call the method fireTableCellUpdated(). To apply all changes at once, call the method fireTableDataChanged(). Refer to the documentation of the class AbstractTableModel to decide which method fits your needs.
The process of transferring data from the table model to JTable is performed by cell renderers. When the user is modifying the content of the cell, the cell editor is engaged. By default, the content of each cell in a JTable is rendered using one of three default renderers, based on the type of data in the column. Boolean values are rendered as checkboxes, javax.swing.Icon is rendered as an image, and any other object is rendered as a string of characters.
To change the default rendering (for example, if you don’t want to see checkboxes for Boolean values) you can either override the callback getColumnClass() or define a custom cell renderer. The latter option gives you a lot more flexibility. For example, you may need to display a photo of a person and his or her name in each cell. Or you may need to show cell values that meet certain criteria in a different color. To do something like one of these, you need to create a custom renderer.
The UI portion of each column is represented by the class TableColumn, which has a property, cellRenderer, of type TableCellRenderer, which defines the only method: getTableCellRendererComponent(). This method prepares the content for each column’s cells of JTable and returns an instance of the Component class to be used for the cell rendering. This process will use DefaultTableCellRenderer unless you create a custom renderer. Custom renderers give you full control over how the cell is displayed.
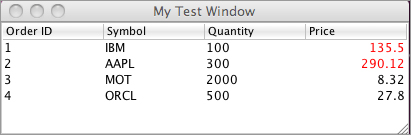
The class DefaultTableCellRenderer extends JLabel and is Swing’s implementation of the TableCellRenderer interface. Let’s look at an example that formats the text in the Price column shown in Figure 23-2 to be right-justified and to display in red all prices greater than $100.
First the code fragment from Listing 23-4 gets a reference to the fourth column of JTable (remember, column numbering is zero-based). Then it needs to call the method setCellRenderer() on this column, provided that the custom renderer class was defined and instantiated. But you can define, instantiate, and set the custom renderer in one shot by using the mechanism of anonymous inner classes.
The anonymous inner class in Listing 23-4 extends the class DefaultTableCellRenderer and overrides the callback method getTableCellRendererComponent(). The latter sets the cell value to be right-justified and to be red if it is greater than 100. At the end, the method getTableCellRendererComponent() returns a JLabel object to be rendered in the current cell of JTable.
Listing 23-4: Custom rendering of the Price value
  //Assign custom cell renderer to the Price column
  // Get the reference to the fourth column - Price

  TableColumn column = myTable.getColumnModel().getColumn(3);

  // Create a new cell renderer as an anonymous inner
  // class and assign it to the column price

  column.setCellRenderer(
        new DefaultTableCellRenderer(){
    public Component  getTableCellRendererComponent(
             JTable table, Object value, boolean isSelected,
                       boolean hasFocus, int row, int col) {

         JLabel label = (JLabel) super.getTableCellRendererComponent(
               table, value, isSelected, hasFocus, row, col);

       // right-align the price value
       label.setHorizontalAlignment(JLabel.RIGHT);

       // display stocks that cost more than $100 in red
       if (((Float) value)>100){
          label.setForeground(Color.RED);
       } else{
             label.setForeground(Color.BLACK);
       }

       return label;

      } // end of getTableCellRendererComponent
     }  // end of new DefaultTableCellRenderer
  );    // end of setCellRenderer(...)
Add this code fragment at the end of the constructor in the class MyFrame from Listing 23-3 and run the application. The screen will show the text in the Price column right-justified and the first two prices printed in red (see Figure 23-3).
This lesson was a high-level overview of the JTable component, which is probably the most advanced UI component that deserves serious study if you are planning to develop Java Swing applications. You can continue studying all the features of JTable by following the official Oracle tutorial at http://download.oracle.com/javase/tutorial/uiswing/components/table.html.
Create an application that will display your portfolio, stored in the database table. You’ll need to use the database and the Portfolio table you created in the Try It section of Lesson 22.
Lesson Requirements
You should have Java installed.
You can download the code and resources for this Try It from the book’s web page at www.wrox.com. You can find them in the Lesson23 folder in the download.
Hint
In Windows, the Java installation directory includes several examples of JTable, which can serve as good complementary material to this lesson. Just go to the folder demojfcTableExample and follow the instructions in the Readme document.
Step-by-Step
1. Create the Eclipse project Lesson23. Copy there the classes MyFrame and Order from the accompanying DVD. Compile and run the program to ensure that it displays hard-coded portfolio data, as shown in Figure 23-2.
2. Replace the hard-coded table model ArrayCollection myData with the JDBC code to connect to the database Lesson22, run the appropriate SQL Select statement, and populate myData with data from the received result set.
3. Test this program.
Please select Lesson 23 on the DVD with the print book, or watch online at www.wrox.com/go/fainjava to view the video that accompanies this lesson.