Chapter 35
Introduction to Spring MVC Framework
At the beginning of the century Java EE was called J2EE, and it was a heavy and over-engineered standard. Programming EJBs was difficult and required writing a lot of boilerplate code. Java annotations had not been invented yet. Having a Java container that would take care of multi-threading, transactions, persistence, and security was nice, but developers needed a lighter container and a simpler programming model.
Rod Johnson, a talented software engineer, wrote a book titled Expert One-on-One J2EE Design and Development, which was published by Wrox at the end of 2002. A year later the book’s code samples and development recommendations were released as the Spring Framework.
The Spring Framework is a Java container that provides a living space for an application’s objects, wired to each other in a loosely coupled way in XML configuration. This loose coupling comes at a price, though — configuration files are quite large in size.
Spring Framework was built based on the inversion of control (IoC) principle: The container is responsible for the instantiation and location of the objects. IoC is also known as the Hollywood principle: “Don’t call us, we’ll call you.”
Instead of having a class called Customer reach out to some container’s registry trying to find an Order, under the Spring Framework the container would use a system of callbacks to instantiate the Order and inject it into the instance of the Customer object. This is an example of the dependency injection pattern — the Customer gets an injection of required resources. You saw resource injection in action in the Java EE lessons.
Don’t forget that even five years ago the injection of resources was not implemented in Java EE application servers. Today not only is resource injection implemented, but Java EE 6 has yet another injection mechanism known as contexts and dependency injection (not covered in this book), which will make future Java EE applications even lighter. But don’t forget that some ideas implemented in the current Java EE specification were originally introduced by the Spring Framework.
Over the last several years the Spring Framework has served as an alternative solution for developing enterprise Java applications. It has provided an infrastructure that allows you to easily plug in third-party frameworks and components. For example, the combination of Spring and the persistence framework Hibernate (see Lesson 36) is a popular architecture for lots of production-grade applications.
Serious improvements in the Java EE 6 specification may reduce the number of applications developed with Spring/Hibernate, but as of today this duo certainly remains a nice infrastructure for developing enterprise Java applications.
In the Spring Framework, beans are configured in XML files, and if a class called Customer needs an Order bean you can either look for this bean by issuing getBean(“Order”) on an instance of the main Spring factory, ApplicationContext, or, better yet, configure injection of the Order into Customer, as in the following code:
<?xml version="1.0" encoding="UTF-8"?>
<beans xmlns=http://www.springframework.org/schema/beans
xmlns:xsi=http://www.w3.org/2001/XMLSchema-instance
xsi:schemaLocation="http://www.springframework.org/schema/beans
http://www.springframework.org/schema/beans/spring-beans-3.0.xsd">

   <bean id="customerBean" class="com.practicaljava.lesson35.Customer">
   <property name="order" ref="ord" />
   </bean>

   <bean id="ord" class="com.practicaljava.lesson35.Order"/>
</beans>
This is an example of configuring injection of one object into the field of another one in a loosely coupled way. The class Customer knows that someone will provide an Order when the time is right. This makes it easy to test the Customer’s functionality alone by wiring orders with hard-coded values — just change the value in the preceding XML from com.practicaljava.lesson35.Order to com.practicaljava.lesson35.FakeOrder. When the real data is available, change it back. In simple cases you can inject simpler values into Spring bean properties via setters or constructor arguments. You can provide the name of the file with configured beans to the constructor of ApplicationContext during instantiation.
The Spring Framework consists of a number of modules that can be categorized as web, core, and data access. And the good part is that they can be used à la carte as you need them. The web module simplifies development of web applications. The core module provides the infrastructure and wiring for Java components living in the Spring container. Data access enables you to create an abstraction layer for data access so that no Java code needs to be changed if you decide to use a different JDBC driver or DBMS.
In this lesson you’ll get familiar with the Spring MVC module that was created for the development of web applications. Like Java application servers, Spring manages your Java classes, so I’ll be using the term Spring container. The classes that are going to be managed by the Spring container can be referred to as Spring beans.
The Spring Framework offers a solution for building web applications. It includes a number of modules: Spring Faces, Spring Web Flow, Spring JavaScript, Spring Security, and Spring BlaseDS. And you don’t have to use all these modules to build a web application — just use what you need.
There are two main models for building web applications with HTML clients:
- The client connects to a server-side presentation object (such as JSP) that is responsible for further routing and processing the request and for forming the next view to be returned to the client.
- The client connects to a server-side controller object (has no UI code) that performs the routing and processing of the request and for selection of the proper view to be returned to the client.
Building a web application in the Spring Framework represents the second model, where DispatcherServlet intercepts client requests and passes them to the appropriate Java controller to handle the request. The controller creates a ModelAndView object and gives it to a view resolver, which finds the view component to return to the client. The entire dataflow is shown in Figure 35-1.
This architecture is supported by the easily extendable Spring MVC layer. Other frameworks can be plugged into the Spring infrastructure. It’s popular to integrate Spring and Hibernate for data persistence, but there are other examples of framework integration. For example, Adobe’s BlaseDS framework or the Apache Struts legacy framework can be plugged into Spring.
HTML forms with data validation and error processing are also supported, and you’ll see how to develop such applications in the next section.
In this section I’ll show you a simple web application using the Spring Web MVC framework. You’ll see how to do the following:
- Configure the controller ServletDispatcher.
- Configure the UrlBasedViewResolver bean.
- Create a simple controller called HelloWorldController to produce data for presentation by a JSP.
- Handle the request of a “contact us” HTML form with the Spring JSP tag library.
Understanding the Spring Web MVC Workflow
To start, create an Eclipse Dynamic Web Project named Lesson35. Now you’ll need to download several jar files from the Spring framework and copy them to the WebContent/WEB-INF/lib folder. Register at the SpringSource website www.springsource.com/download/community and download the latest zip file of the Spring Framework. At the time of this writing it’s spring-framework-3.0.5.RELEASE.zip.
Unzip the archive and add the following jars to the build path of your Eclipse project. Also copy these jars to the WebContent/lib directory so they are visible at the deployment time.
- org.springframework.asm-3.0.5.RELEASE.jar
- org.springframework.beans-3.0.5.RELEASE.jar
- org.springframework.context-3.0.5.RELEASE.jar
- org.springframework.core-3.0.5.RELEASE.jar
- org.springframework.expression-3.0.5.RELEASE.jar
- org.springframework.web.servlet-3.0.5.RELEASE.jar
- org.springframework.web-3.0.5.RELEASE.jar
For logging support you’ll also need to download and add to the lib folder the Commons Logging API commons-logging-api-1.1.1.jar, which you can download from the same website — it’s in org.apache.commons in the archive with dependencies.
Now you need to deploy the Spring Framework as a web application under GlassFish. Create the file web.xml with the content shown in Listing 35-1 and add it to the WEB-INF folder. This file instructs GlassFish to load the Spring’s DispatcherServlet on startup and to redirect any *.html requests to it.

Listing 35-1: web.xml with DispatcherServlet
<?xml version="1.0" encoding="UTF-8"?>
<web-app xmlns:xsi="http://www.w3.org/2001/XMLSchema-instance"
xmlns=http://java.sun.com/xml/ns/javaee
 xmlns:web=http://java.sun.com/xml/ns/javaee/web-app_2_5.xsd
 xsi:schemaLocation=
"http://java.sun.com/xml/ns/javaee
http://java.sun.com/xml/ns/javaee/web-app_2_5.xsd"
id="WebApp_ID" version="2.5">

  <display-name>Lesson35 Sample</display-name>
  <welcome-file-list>
    <welcome-file>index.jsp</welcome-file>
  </welcome-file-list>

  <servlet>
        <servlet-name>springServletDispatcher</servlet-name>
        <servlet-class>
          org.springframework.web.servlet.DispatcherServlet
       </servlet-class>
        <load-on-startup>1</load-on-startup>
  </servlet>

  <servlet-mapping>
        <servlet-name>springServletDispatcher</servlet-name>
        <url-pattern>*.html</url-pattern>
  </servlet-mapping>
</web-app>
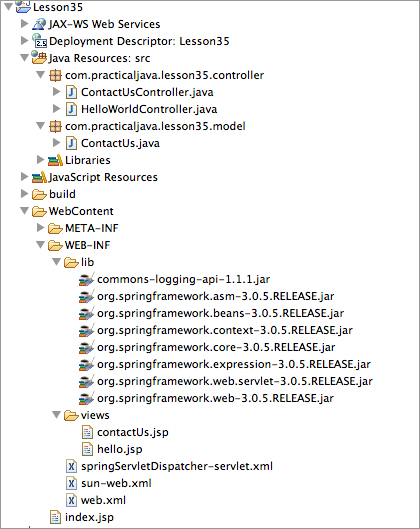
In our example the MVC pattern will be represented by the following: for the model a Java class called ContactUs; for the view two JSP pages, hello and contactUs; and for the classes two Java controller classes, HelloWorldController and ContactUsController. Figure 35-2 shows a snapshot of my Eclipse project to give you an idea of where the files are located.
HelloWorldController is shown in Listing 35-2. It includes the @RequestMapping annotation that instructs the controller to call the method sayHello() for any requests with the /hello pattern.
Listing 35-2: HelloWorldController
import org.springframework.stereotype.Controller;
import org.springframework.web.bind.annotation.RequestMapping;
import org.springframework.web.servlet.ModelAndView;

@Controller
public class HelloWorldController {

    @RequestMapping("/hello")
    public ModelAndView sayHello(){

        String greetings = "Hello people";
        return new ModelAndView("hello", "greetings", greetings);
    }
}
The view resolver of our application is an XML configuration file named springServletDispatcher-servlet.xml, shown in Listing 35-3. Note that the prefix of this file name matches the value in the tag <servlet-name> in Listing 35-1. This application uses one of the view resolvers provided by Spring, UrlBasedViewResolver, which creates the appropriate view based on the URL.
Listing 35-3: springServletDispatcher-servlet.xml
<?xml version="1.0" encoding="UTF-8"?>
<beans xmlns="http://www.springframework.org/schema/beans"
       xmlns:xsi=http://www.w3.org/2001/XMLSchema-instance
 xmlns:p="http://www.springframework.org/schema/p"
      xmlns:context="http://www.springframework.org/schema/context"
      xsi:schemaLocation="http://www.springframework.org/schema/beans
            http://www.springframework.org/schema/beans/spring-beans-3.0.xsd
            http://www.springframework.org/schema/context
            http://www.springframework.org/schema/context/spring-context-3.0.xsd">

      <context:component-scan
            base-package="com.practicaljava.lesson35.controller" />

   <bean id="viewResolver" class=
"org.springframework.web.servlet.view.UrlBasedViewResolver">
       <property name="viewClass"
         value="org.springframework.web.servlet.view.JstlView"/>
        <property name="prefix" value="/WEB-INF/views/" />
        <property name="suffix" value=".jsp" />
   </bean>
</beans>
The preceding file is configured to add the prefix WEB-INF/views and the suffix .jsp to the value specified in the @RequestMapping of the controller. As an example, for HelloWorldController the URL of the view given to the response object becomes WEB-INF/views/hello.jsp. The source code for hello.jsp is shown in Listing 35-4.
Listing 35-4: hello.jsp
<%@ page language="java" contentType="text/html; charset=ISO-8859-1"
    pageEncoding="ISO-8859-1"%>
<!DOCTYPE html PUBLIC "-//W3C//DTD HTML 4.01 Transitional//EN"
"http://www.w3.org/TR/html4/loose.dtd">
<html>
<head>
<meta http-equiv="Content-Type" content="text/html; charset=ISO-8859-1">
<title>Insert title here</title>
</head>
<body>
 ${greetings}
</body>
</html>
What does ${greetings} mean? Look at the code of HelloWorldController in Listing 35-2. It contains the following lines:
String greetings = "Hello people";
return new ModelAndView("hello", "greetings", greetings);
This is how the Spring controller tells the view resolver what to do with the view before it is returned to the client. The first argument of the ModelAndView constructor contains the name of the view, and the second one contains the name of the JSP element to be replaced with the content of the third argument. Basically, the name of the class reflects the fact that it contains elements of both the model and the view.
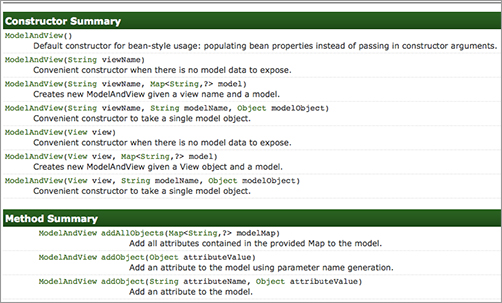
The class ModelAndView has a number of overloaded constructors (see Figure 35-3) that enable you to pass multiple values to the view object. You can also populate ModelAndView with data by using the method addObject().
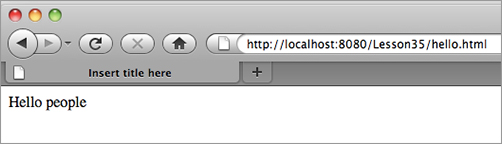
Add the project Lesson35 to GlassFish in the Eclipse Servers view and start the server. Direct your web browser to http://localhost:8080/Lesson35/hello.html and you’ll see something like what’s shown in Figure 35-4. Just to recap, because of the *.html mapping in web.xml, Spring’s ServletDispatcher was invoked. The .html part was stripped off, the word hello was identified, and the HelloWorldController was instantiated and its method sayHello()invoked. The view resolver found hello.jsp, and its variable greetings was replaced with the text “Hello People” as per the content of the ModelAndView instance.
Processing HTML Forms
Processing HTML forms with Spring is just a little bit more complex than the “Hello People” example. The Spring Framework comes with integrated tag libraries with a tag corresponding to each HTML element. In particular, there is the form tag library for processing HTML forms. Listing 35-5 shows ContactUs.jsp, which includes the appropriate <%taglib> directive.
Listing 35-5: ContactUs.jsp
<%@ page language="java" contentType="text/html; charset=UTF-8"
    pageEncoding="UTF-8"%>
       <%@taglib uri="http://www.springframework.org/tags/form" prefix="form"%>
<!DOCTYPE html PUBLIC "-//W3C//DTD HTML 4.01 Transitional//EN"
 "http://www.w3.org/TR/html4/loose.dtd">
<html>
<head>
<meta http-equiv="Content-Type" content="text/html; charset=ISO-8859-1">
<title>Insert title here</title>
</head>
<body>
<h2>Contact Manager</h2>

<form:form method="post" action="addQuestion.html">

      <table>
      <tr>
            <td><form:label path="author">Who are you?</form:label></td>
            <td><form:input path="author" /></td>
      </tr>
      <tr>
            <td><form:label path="subject">Subject</form:label></td>
            <td><form:input path="subject" /></td>
      </tr>
      <tr>
            <td><form:label path="message">You Question</form:label></td>
            <td><form:textarea path="message" /></td>
      </tr>
      <tr>
            <td colspan="2">
                  <input type="submit" value="Submit your question"/>
            </td>
      </tr>
</table>

</form:form>
</body>
</html>
When the user clicks Submit, the request is posted to the server with addQuestion.html in the URL. Then DispatcherServlet maps addQuestion with the method addUserQuestion() in the controller shown in Listing 35-6.
Listing 35-6: ContactUsController.java
package com.practicaljava.lesson35.controller;

import org.springframework.stereotype.Controller;
import org.springframework.validation.BindingResult;
import org.springframework.web.bind.annotation.ModelAttribute;
import org.springframework.web.bind.annotation.RequestMapping;
import org.springframework.web.bind.annotation.RequestMethod;
import org.springframework.web.bind.annotation.SessionAttributes;
import org.springframework.web.servlet.ModelAndView;

import com.practicaljava.lesson35.model.ContactUs;

@Controller
@SessionAttributes
public class ContactUsController {

    @RequestMapping(value="/addQuestion", method=RequestMethod.POST)
    public String addUserQuestion(@ModelAttribute("contactUs") ContactUs
                                         contactUs, BindingResult result){

       System.out.println("New message:
Subject:"
                                            +contactUs.getSubject());
       System.out.println("Author " + contactUs.getAuthor());
       System.out.println("Message "+ contactUs.getMessage());

       return "redirect:contactUs.html";
    }

    @RequestMapping("/contactUs")
    public ModelAndView contactUs(){
        return new ModelAndView("contactUs", "command", new ContactUs());
    }
}
@ModelAttribute binds the method parameter to the named model attribute (see the model class in Listing 35-7). The Spring Framework maps the attributes from the model to corresponding attributes in ContactUs.jsp, shown in Listing 35-5.
Listing 35-7: ContactUs.java
public class ContactUs {
    private String subject;
    private String message;
    private String author;

    public String getSubject() {
        return subject;
    }
    public void setSubject(String subject) {
        this.subject = subject;
    }
   public String getMessage() {
        return message;
    }
    public void setMessage(String message) {
        this.message = message;
    }
    public String getAuthor() {
        return author;
    }
    public void setAuthor(String author) {
        this.author = author;
    }
}
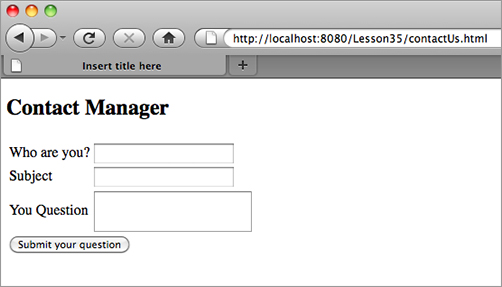
Open your web browser and enter the following URL: http://localhost:8080/Lesson35/contactUs.html. The @RequestMapping("/contactUs") annotation in Listing 35-6 responds to the client with ContactUs.jsp, which looks as in Figure 35-5.
Enter some values in the form and click Submit. This time the /addQuestion action will be matched with the method addUserQuestion() of ContactUsController. Received values from the client will be printed in the log file of GlassFish Server, located in logs/server.log under your domain directory.
Modify the code of hello.jsp to accept more than one variable. Change the code of ModelAndView so that it carries a Map of values.
Lesson Requirements
You should have Java and GlassFish v3 installed.
You can download the code and resources for this Try It from the book’s web page at www.wrox.com. You can find them in the Lesson35 folder in the download.
Step-by-Step
1. Modify hello.jsp to add one more variable in addition to $greetings:
2. Modify HelloWorldController to create a Map with two Strings:
Map helloModel = new HashMap();
helloModel.put("Hello Mary");
helloModel.put("My name is John");
3. Use the two-argument constructor of ModelAndView and pass the Map as the second argument.
4. Direct your web browser to http://localhost:8080/Lesson35/hello.html and observe that hello.jsp shows the values from the Map.
Please select Lesson 35 on the DVD with the print book, or watch online at www.wrox.com/go/fainjava to view the video that accompanies this lesson.