Chapter 36
Introduction to Hibernate Framework
In Lesson 33 you got familiar with the Java Persistence API, which is part of Java EE 6. But JPA wasn’t created from scratch. It took many ideas from Hibernate — an open-source object-relational framework started by Gavin King in 2001. Hibernate version 3.5 and above support the JPA 2.0 specification.
The official website of Hibernate is www.hibernate.org, where you can find documentation, code samples, and tools. Plenty of books and online articles are published about this popular framework. I prefer using SQL and JDBC for all data-related processing, but these days knowledge of Hibernate is required in many job postings. That’s why I decided to include this brief overview of Hibernate even though it’s not a part of the Java specification but a third-party framework.
If you are going to use Hibernate for work, consider using the Eclipse plug-ins available at www.hibernate.org/subprojects/tools.html.
The main idea behind any ORM framework is to replace writing SQL with manipulating the objects. In the Java world, this means putting a layer on top of JDBC that will enable you to simply create a POJO, assign values to its fields, and tell it “Persist yourself in the database.” This is what Hibernate is for.
Proponents of this approach argue that removing the dependency on vendor-specific SQL syntax provides easy switching from one DBMS to another without the need to modify the Java code responsible for querying and persisting data. To me this doesn’t sound like a compelling reason to move away from SQL, because it’s very seldom that you need to switch from one DBMS to another in real-world projects. Besides, if you’ll be working on projects that require swift query execution, the ability to tune SQL manually and use tricks specific to DBMSes can be helpful.
On the other hand, Hibernate offers such goodies as lazy loading and the ability to easily configure the in-memory cache to greatly minimize disk access, which is a lot slower than memory access.
Lazy loading is easy to explain with an example. Suppose the user is presented with a list of customers, each of which may have multiple orders. With lazy loading only the list of customers is initially loaded, and only when the user selects a customer will the query to retrieve the corresponding orders be sent to data storage.
The process of retrieving data with Hibernate is very similar to what you saw in Lesson 33. You create the mapping of entities to database tables, then instantiate the Configuration object needed to create a SessionFactory and Session. After this is done you execute queries on these entities using Hibernate Query Language (HQL), Criteria queries, or native SQL.
The rest of this lesson is a step-by-step walkthrough that demonstrates how to write a simple application that will get the data from a DBMS using Hibernate.
Installing and Configuring Hibernate
In this section you’ll download required jars and create the configuration file hibernate.cfg.xml. I’ll continue using Derby, which is included with GlassFish, as our sample DBMS, but the application server GlassFish is not needed here. The idea is to look at Hibernate as an alternative persistence solution that doesn’t require the Java EE application server.
Hibernate is an open-source framework hosted on the web at SourceForge (http://sourceforge.net/projects/hibernate/files/hibernate3/). At the time of this writing, the latest release of Hibernate is 3.6; you need to download the file hibernate-distribution-3.6.0.Final-dist.zip. This distribution includes required jar files, a well-written reference manual, and a folder with libraries that might be used to support memory caching.
Adding Hibernate Jars to an Eclipse Project
Now create a new Eclipse project called Lesson36 by selecting File⇒ New⇒ Other⇒ Java Project. Note that this is a Java SE project — I’m not going to use any Java EE application server here. Make sure your Eclipse Java project includes hibernate3.jar, all the jars from the required folder, and the jar from the jpa folder. There is one more logging-related file, slf4j-1.6.1.zip, that for some licensing reason has to be downloaded from www.slf4j.org/download.html. You need to add to the build path just one file from there: slf4j-simple-1.6.1.jar.
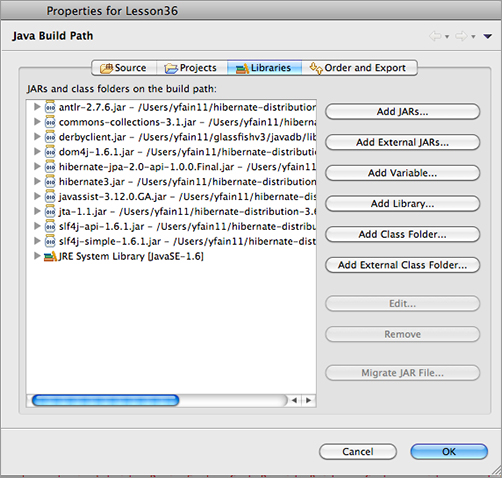
You can add these external jars in the tab Libraries of the Java Setting window while you’re creating the project, or you can add them after the project is created via Properties⇒ Java Build Path⇒ Libraries⇒ Add External Jars. Figure 36-1 shows which libraries are included in the build path of my Eclipse project.
Testing the Database Connection
In this lesson I’ll keep working with the database that was initially created in Lesson 22 and then reused in Lesson 33. It contains a table called Employee and the connection is already configured (see Figure 33-4). This connection uses the Derby JDBC driver located in derbyclient.jar. Add this jar, located in glassfish/javadb/lib, to the build path of the new Eclipse project.
Now right-click the database connection Lesson22 in Eclipse and select Properties⇒ JDBC Connection Properties. Keep the user ID as user and change the password to password123. Now copy the connection URL (refer to Figure 33-3) to a text editor — you’ll need the connection parameters in the next section. You can also check the properties of the selected DerbyDB driver by clicking the small button with an asterisk on it — copy the name of the JDBC driver class too.
Configuring Hibernate with a DBMS
Now it’s time to add the DBMS-related entries to the file hibernate.cfg.xml. You don’t need to create this file from scratch; copy to the src folder of your Eclipse project one of the files that come with Hibernate, such as the one located in the folder documentation/quickstart/tutorials/basic/src/test/resources. Modify the driver class and connection URL with the values from the previous section. Make sure that this file doesn’t have a setting to drop and re-create the database schema on startup. You won’t need any mapping files because our entity will use annotations.
Every DBMS implements standard SQL plus some additional features meant to give it a competitive edge. To deal with these extras Hibernate includes configurable dialects that hide the differences from the application developer. That’s why the configuration file has to specify the dialect that the current application has to support. Each dialect is a class located in the package org.hibernate.dialect inside hibernate3.jar, and you can find the name of the dialect that matches our database, which is DerbyDialect.
You might remember that the table Employee was originally created in the database schema APP. Because I specified that the connection ID is user, by default the queries will try to find the referenced database objects in the schema USER, which doesn’t exist. To fix this situation let’s specify in the configuration file that the default schema is APP.
Finally, we want Hibernate to print in the Eclipse console the underlying SQL statements that it’ll use in communication with the database.
After you make all these changes your hibernate.cfg.xml file should look like Listing 36-1.

Listing 36-1: Hibernate.cfg.xml
<?xml version='1.0' ?>
<!DOCTYPE hibernate-configuration PUBLIC
        "-//Hibernate/Hibernate Configuration DTD 3.0//EN"
        "http://www.hibernate.org/dtd/hibernate-configuration-3.0.dtd">

<hibernate-configuration>

    <session-factory>

        <!-- Database connection settings -->
        <property name="connection.driver_class">
            org.apache.derby.jdbc.ClientDriver
        </property>

        <property name="connection.url">
            jdbc:derby://localhost:1527/Lesson22;create=true
        </property>

        <property name="connection.username">user</property>
        <property name="connection.password">password123</property>

        <!-- Set the default schema to be APP, where table Employee was
                                                             created-->
        <property name="hibernate.default_schema">APP</property>

        <!-- JDBC connection pool (use the built-in) -->
        <property name="connection.pool_size">1</property>

        <!-- SQL dialect -->
        <property name="dialect">org.hibernate.dialect.DerbyDialect</property>

        <!--  Enable Hibernate's current session context -->
        <property name="current_session_context_class">thread</property>

        <!-- Disable the second-level cache  -->
        <property name="cache.provider_class">
                 org.hibernate.cache.NoCacheProvider
        </property>

        <!-- Echo all executed SQL to stdout -->
        <property name="show_sql">true</property>

    </session-factory>

</hibernate-configuration>
Retrieving Data with Hibernate
Now we need to create a Java Employee entity, which in this simple example corresponds to the database table Employee. The good news is that because Hibernate supports JPA 2, we can simply reuse the Employee entity from Lesson 33. Listing 36-2 shows this entity after we copy it into the package com.practicaljava.lesson36.
Listing 36-2: Employee entity
package com.practicaljava.lesson36;

import java.io.Serializable;
import javax.persistence.*;

@Entity
public class Employee implements Serializable {

  private static final long serialVersionUID = 1L;

  @Id
  private int empno;

  private String ename;

  @Column(name="JOB_TITLE")
  private String jobTitle;

  public Employee() {}

  public int getEmpno() {
    return this.empno;
  }

  public void setEmpno(int empno) {
    this.empno = empno;
  }

  public String getEname() {
   return this.ename;
  }

  public void setEname(String ename) {
   this.ename = ename;
  }

  public String getJobTitle() {
   return this.jobTitle;
  }

  public void setJobTitle(String jobTitle) {
   this.jobTitle = jobTitle;
  }
}
The code to retrieve employees comes next. The program HRManager shown in Listing 36-3 will do this job. It starts by loading the configuration file hibernate.cfg.xml and creating a Hibernate session. We didn’t provide any arguments to the method configure() — by default this method assumes that the configuration file is called hibernate.cfg.xml.
Then SessionFactory creates an instance of the Session. The transaction is opened, and createQuery("from Employee") means that we’re interested in Employee entities. In this sample, the name of the entity and the name of the database table are the same. If this weren’t the case we’d have had to specify the table name in the @Entity annotation in Listing 36-2.
Listing 36-3: Retrieving Employee entities
import java.util.List;
import org.hibernate.*;
import org.hibernate.cfg.Configuration;
import com.practicaljava.lesson36.Employee;

public class HRManager {

public static void main(String[] args){

  Configuration config = new Configuration().configure();
  config.addAnnotatedClass(Employee.class);

  SessionFactory sf = config.buildSessionFactory();
  Session session = sf.getCurrentSession();

  session.beginTransaction();

  List<Employee> employee = session.createQuery("from Employee").list();

  session.getTransaction().commit();

  for (Employee emp: employee){

       System.out.println("Got " + emp.getEmpno() + ", "
                            + emp.getEname() + ", "+ emp.getJobTitle());
  }
 }
}
The method addAnnotatedClass(Employee.class) tells Hibernate that there is an entity called Employee configured using annotations. After running, HRManager prints the following in Eclipse’s Console view:
Hibernate: select employee0_.empno as empno0_, employee0_.ename as ename0_,
 employee0_.JOB_TITLE as JOB3_0_ from APP.Employee employee0_

Got 7369, John Smith, Clerk
Got 7499, Joe Allen, Salesman
Got 7521, Mary Lou, Director
Retrieving data with Hibernate is pretty trivial. Persisting the data in the database is not rocket science either. You’ll have a chance to see such persisting for yourself when you work on the assignment in the “Try It” section.
This lesson shows you how Hibernate creates database objects from Java entities. You will have to declare the Java entity Address and have Hibernate create and populate the corresponding table in the database.
Lesson Requirements
You should have Java and GlassFish v3 installed.
You can download the code and resources for this Try It from the book’s web page at www.wrox.com. You can find them in the Lesson36 folder in the download.
Hints
In the toolbar of the Data Source Explorer view is an icon that opens SQL Scrapbook. It enables you to select the DBMS and the database and to execute SQL statements. For example, enter Select * from APP.Employee, then right-click and select Execute All. The SQL statement will be executed and you’ll see the content of the table Employee.
Step-by-Step
1. Create the following Java entity, Address:
package com.practicaljava.lesson36;

import javax.persistence.*;

@Entity
public class Address {

   private long addressID;
   private String streetAddress;
   private String city;
   private String zip;

   @Id
   public long getAddressID() {
      return addressID;
   }

   public void setAddressID(long addressID) {
      this.addressID = addressID;
   }

   public String getStreetAddress() {
      return streetAddress;
   }

   public void setStreetAddress(String streetAddress) {
      this.streetAddress = streetAddress;
   }

   public String getCity() {
      return city;
   }

   public void setCity(String city) {
      this.city = city;
   }

   public String getZip() {
      return zip;
   }

   public void setZip(String zip) {
      this.zip = zip;
   }
}
2. Create a class called AddressCreator. It should look like this:
import java.util.List;

import org.hibernate.*;

import org.hibernate.cfg.Configuration;
import org.hibernate.tool.hbm2ddl.SchemaExport;

import com.practicaljava.lesson36.Address;

public class AddressCreator {

      public static void main(String[] args){
         Configuration config = new Configuration().configure();
         config.addAnnotatedClass(Address.class);

         //Create the Address table
         new SchemaExport(config).create(true,true);

         SessionFactory sf = config.buildSessionFactory();
         Session session = sf.getCurrentSession();

         session.beginTransaction();

         // Instantiate and Populate the entity Address
         Address addr1 = new Address();
         addr1.setStreetAddress("123 Main St.");
         addr1.setAddressID(1);
         addr1.setCity("New York");
         addr1.setZip("10001");

       session.save(addr1);

       // Save the new entity in the database
         session.getTransaction().commit();

      }
}
3. Run the program AddressCreator. Observe the output in the Eclipse console. You should see the following SQL statements generated by Hibernate:
drop table APP.Address
create table APP.Address (addressID bigint not null, city varchar(255),
 streetAddress varchar(255),
zip varchar(255), primary key (addressID))

Hibernate: insert into APP.Address (city, streetAddress, zip, addressID)
values (?, ?, ?, ?)
4. Go to the Data Source Explorer view, reconnect to the Lesson22 database, and observe the table Address in the schema APP. Right-click the Address table and select Data Sample Contents — you’ll see one row with the New York address specified in AddressCreator.
Please select Lesson 36 on the DVD with the print book, or watch online at www.wrox.com/go/fainjava to view the video that accompanies this lesson.