
The subject of e-mail is a somewhat controversial one. On the one hand, e-mail can act as a great boon to personal productivity, serving as an efficient communication tool by enabling knowledge workers to stay in touch with each other and save valuable work time by focusing their responses to the specific topics and questions that the messages present.
On the other hand, e-mail can act as a great impediment to personal productivity, serving as a consummate time waster by relentlessly vying for knowledge workers' attention and then forcing them to wade through inordinate amounts of data to separate the spam from the important mail so that they can respond accordingly.
The love/hate relationship that so many knowledge workers seem to have with their e-mail Inboxes is a true reflection of e-mail's dual nature as both a technological boon and the bane of their existence. It also explains why so many workers regard getting a handle on their e-mail as such a crucial first-step in achieving personal productivity at work.
As I see it, effectively dealing with your e-mail is a two-step process. First, you need to do some radical Inbox housecleaning. Second, you need to learn how to perform regular Inbox housekeeping that will keep it that way.
This chapter takes on the first step by leading you through basic strategies for getting rid of all the messages you don't need and won't ever do anything with and then organizing the messages that remain so that you can effectively deal with them.
The next chapter (Chapter 8) then covers how to keep your newly cleared out and spiffed up Inbox organized so that you can stay on top of the new messages that arrive and don't have to perform this type of radical Inbox housecleaning in the future.
Okay, so you've got what appear to be a million or so messages in your Inbox and you no longer have a clue as to what's really the important stuff and what's the junk you can safely delete. In fact, your Inbox is so stuffed with messages that you don't even want to go any further than the first few hundred that have just come in this morning!
Well, today's your lucky day because regardless of what season the calendar says it is, for you it's Spring Cleaning day (at least as far as e-mail is concerned). So, roll up your sleeves before you sit down and get to work cleaning out that long-neglected Inbox of yours.
Note
Make it your goal that by the end of this workday, your Inbox will be empty of all messages besides those few hundred that come rolling in while you're doing this Inbox housecleaning.
The first thing to do in your quest to clean out your Inbox is to use Outlook's own nifty Mailbox Cleanup tool (bet you never heard of that one) to delete old messages you no longer need and to archive those you may have some future use for.
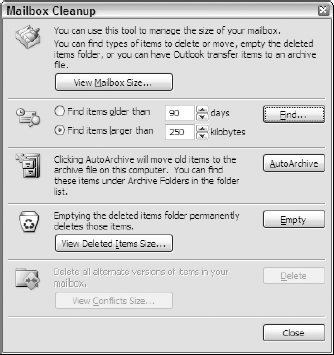
Figure 7-1 shows you the Mailbox Cleanup dialog box as it appears after you open it by choosing Tools
As you can see in this figure, the Mailbox Cleanup dialog box contains options that enable you to identify messages in your Inbox so that you can then get rid of them:
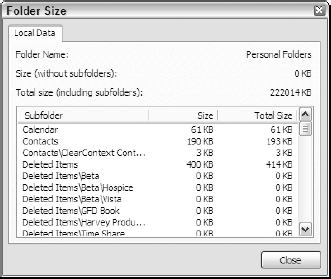
View Mailbox Size: Click this button to open the Folder Size dialog box (see Figure 7-2) that lists the size in kilobytes of all the Mail folders except for Archive Folders. (If your Outlook configuration saves e-mail messages using the
.pstfile format, then the Folder Size dialog box calculates the size of your Personal Folders.) The Size column in this dialog box shows the folder size without counting the size of the subfolders it contains, whereas the Total Size column shows the folder size including the size of all subfolders.Find Items Older Than: Click this option button to identify all the items in your Mail folders that are older than the number of days listed in the associated text box (90 by default). After you set the number of days, click the Find button to display the results in the Advanced Find dialog box.
Find Items Larger Than: Click this option button to identify all the messages in your Mail folders that are larger than the number of kilobytes listed in the associated text box (250 by default). After you set the size, click the Find button to display the results in the Advanced Find dialog box.
AutoArchive: Click this button to move the older messages out of your regular Mail folders and place them into your Archive folders (thus clearing your Inbox of a lot of mail without actually deleting it from your computer).
View Deleted Items Size: Click this button to open the Folder Size dialog box showing the size in kilobytes of all the messages marked for removal in your Deleted Items folder. Then, after closing this dialog box, click the Empty button to permanently remove these messages from your computer (thus freeing some hard drive space).
View Conflict Size: Click this button to open the Folder Size dialog box showing the size in kilobytes of all the messages marked that are duplicates of another message and therefore placed in your Conflicts folder. Then, after closing this dialog box, click the Delete button to permanently remove these messages from your computer (thus freeing some hard drive space).
Very often, if you haven't looked at or done anything with an e-mail message for some time, by default the message becomes junk e-mail — chances are, you'll never have the time to open it again. If this is your situation, you can use it to good advantage for the initial housecleaning of your e-mail Inbox.
Rather than archive older messages you'll probably never look at again, you can just round them up and get rid of them. That way, you kill two birds with one stone: You get them not only out of your Inbox but off your hard drive as well.
To round up and delete older e-mail, you can use the Mailbox Cleanup feature as follows:
Choose Tools

Outlook displays the Mailbox Cleanup dialog box. (Refer to Figure 7-1.)
Click the Find Items Older Than option button and then type in the number of days in the associated text box or select the number with its spinner buttons and then click the Find button.
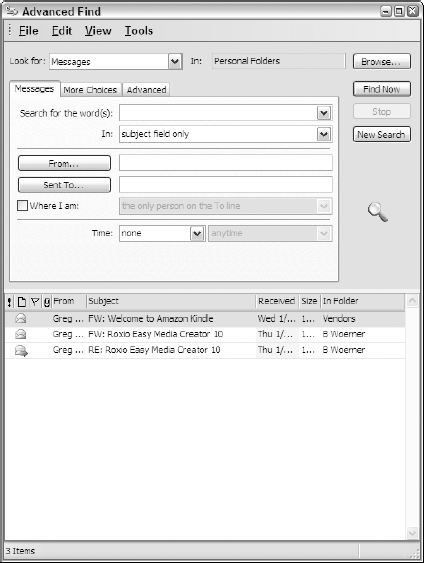
Outlook opens the Advanced Find dialog box (similar to the one shown in Figure 7-3) containing the messages in your Personal Folders that are older than the number of days you specified in the Mailbox Cleanup dialog box.
Select all the messages listed in the Results pane of the Advanced Dialog box by clicking the first message and then pressing Ctrl+A. Next, choose Edit
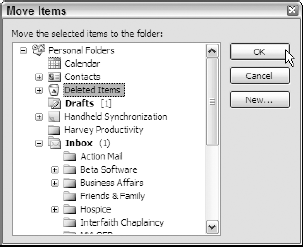
Outlook opens the Move Items dialog box, similar to the one shown in Figure 7-4.
Click the Deleted Items recycle bin folder icon in the Move the Selected Items to the Folder list box and then click the OK button or press Enter.
Outlook moves the selected items into the Deleted Items folder. Note, however, that even though Outlook has indeed moved the selected messages to the Deleted Items dialog box, they remain listed in the Results pane of the Advanced Find dialog box.
Click the Close button in the top-right corner of the Advanced Find dialog box.
Before permanently deleting the messages you've moved into the Deleted Items folder, you may want to check some out to make sure that they don't contain information you'd be really sorry to lose forever.
(Optional) Click the Deleted Items trash bin icon in the Navigation Pane and then click each message you want to double-check before deleting so that you can look over its contents in the Reading Pane.
If you find messages in the Deleted Items folder that you in fact do need to keep, you need to move them to appropriate subfolders of the Inbox before permanently deleting the rest.
(Optional) Select the message or messages you don't want permanently deleted and then move them to the appropriate Inbox subfolder by dragging and dropping them on that subfolder's icon in the Navigation Pane.
Warning
Only after you're sure that every message in your Deleted Items folder is spam clogging your Inbox and taking up valuable drive space, and you therefore want to vaporize them all, proceed to Step 8.
Choose Tools
Outlook deletes all the messages in the Deleted Items folder, thus completely emptying the Mail module's Information Viewer, which now displays the message, "There are no items to show in this view."
Running Outlook's AutoArchive feature on your Inbox in the Mail module is great for reducing the number of older messages the Inbox contains without actually deleting messages from your hard drive. When Outlook archives messages, it merely moves them from your active Mail folders to Archive folders. That way, you don't have to worry about inadvertently getting rid of messages that, to your dismay, you find you need to refer back to at some later date.
To use AutoArchive to move older messages out of your Inbox and into your Archive folders, follow these steps:
Launch Outlook if it's not already running and then click File
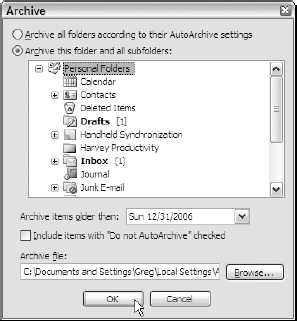
Outlook opens the Archive dialog box similar to the one shown in Figure 7-5. By default, Outlook archives everything in your Personal Folders (including appointments on your calendar, names in your contact list, notes, and journal entries) as well as the e-mail contained in your Inbox, Drafts, and Deleted Items mail folders.
To have Outlook archive only the e-mail messages in your Inbox (and all its subfolders) that are older than the specific date you set, you need to select just the Inbox folder as outlined in Step 2.
Make sure that the Archive This Folder and All Subfolders option button is selected and then click the Inbox folder icon in this list box to select it.
Next, you need to select the cutoff date. All e-mail messages with dates before this cutoff date are moved and stored in your Archive folder, whereas those messages with dates on or after this cutoff date remain in your Inbox.
Click the Archive Items Older Than option's drop-down button and then use the date picker with its drop-down mini calendar to select the new cutoff date: First, click the Back or Forward buttons displayed at the top of the mini calendar (the triangles pointing to the left and right, respectively, of the name of the current month and year) until the calendar for the new cutoff month and year is displayed below; then click the precise cutoff date on this mini calendar.
As soon as you click the cutoff date, Outlook closes the drop-down mini calendar and lists the day of the week plus the complete date in the Archive Items Older Than drop-down list box. Now you're ready to archive your e-mail messages using the settings you've selected in the Archive dialog box.
Click the OK button or press Enter.
Outlook displays an Archiving message on the Status bar of its program window showing each of the messages that it is moving to the various subfolders within your Archive folders (mirroring those in your Inbox).
If you ever need access to some of the e-mail messages that you've moved to the Archive folder in this manner, you can look through or search your archived messages and restore any of them to active duty by following these simple steps:
Choose File
Outlook displays the Open Outlook Data File dialog box, similar to the one shown in Figure 7-6.
Click to select the name of your archive file (
archive.pstif Outlook stores its data in a.pstfile) and then click OK or press Enter.Outlook opens the archive file, adding the folders and subfolders to the Archive Folders in All Mail Folders sections of the Navigation Pane. To display actual archived e-mail messages you have moved out of your Inbox folder, you need to select the Inbox subfolder under Archived Folders.
Click the Expand button (the one with the plus sign) in front of the Archive Folders icon in the Navigation Pane and then click the Inbox folder icon underneath it.
Outlook displays the messages archived from your Inbox folder arranged by date with the oldest messages on top. You can then peruse or search them to find the ones you're interested in.

Figure 7-6. Opening the file containing the messages you've archived in the Open Outlook Data File dialog box.
Tip
If you locate messages in an archive folder containing information to which you need ready access, you can move these messages out of the archive Inbox folder or subfolder into your active Inbox or appropriate subfolder. Select the messages in the Information Viewer and then drag and drop them onto the active Inbox folder icon or one of its subfolders in the Navigation Pane.
After deleting all the spam messages in your Inbox and moving all the old messages you don't need to access any time soon to your archive folder, you're ready to tackle the last big job in cleaning out your e-mail Inbox. Namely, you need to organize the remaining e-mail messages by putting them into appropriate subfolders of the Inbox.
Grouping the e-mail messages you still need to respond to or refer to into Inbox subfolders offers several advantages:
With subfolders, you're usually facing much smaller and easier-to-deal-with groups of e-mail messages (say, hundreds rather than thousands).
Subfolders tell you immediately where to find the e-mail you still need to respond to in some manner.
A subfolder containing only the e-mail you need to respond to is much easier to prioritize, thus enabling you to more accurately estimate the total processing time so that you can better accommodate your busy schedule.
Subfolders containing just the different types of e-mail you use for reference make finding the information you need at any given moment faster and easier.
Subfolders can be tailored precisely to the type of business you conduct and the kinds of e-mail you generally receive.
These benefits not only make dealing with your e-mail less intimidating overall but also make it possible to dispense with said e-mail in a lot less time. And although these benefits may not go as far as making you love dealing with e-mail, they can't help but make processing e-mail a lot more manageable and, therefore, a lot less distasteful and stressful.
The first step in organizing your wanted e-mail messages is to create all the Inbox subfolders needed to store them. The process for creating a new Mail folder within your Inbox is a simple one. The process for deciding exactly which subfolders you need to create is a bit more involved.
Here are the steps for creating a new Inbox subfolder:
Launch Outlook as you normally do and be sure that the Inbox of the Mail module is selected in the Navigation Pane.
Selecting the Inbox before you open the Create New Folder dialog box saves you time because Outlook automatically creates the new mail folder right inside your Inbox folder.
Press Ctrl+Shift+E or File
Outlook opens the Create New Folder dialog box with the Inbox selected in the Select Where to Place This Folder list box.
Type the name you want to give your new folder into the Name text box and then click OK or press Enter.
When naming the new subfolder, keep in mind that Outlook automatically alphabetizes the Inbox subfolders. If the order is important to you, you need to name your new folders appropriately.
Now that you know the process for creating an Inbox subfolder, all you have to do is come up with folders for all the categories of e-mail messages that you receive and want to store until the messages are old enough to remove from active service by archiving.
In deciding upon the folders you need to create, be sure that you create an Inbox subfolder for the messages that you need to respond to in some manner but don't have to process (and for pointers on the most efficient way to go about this, see Chapter 8). After that, you need to consider the categories of the particular types of e-mail that you need to keep around for reference purposes.
In my primary job as a For Dummies author, I need subfolders in which to store the reader feedback I get. I also need subfolders for correspondence on beta software programs I participate in as well as correspondence with the various editors I deal with. Sometimes I also need Inbox subfolders for particular book projects that I'm working on (this book being the most recent example).
In my job on the side as a hospice volunteer and Interfaith Chaplaincy student, I need folders for correspondence concerning hospice and my ministerial studies. In addition, I need to maintain a few subfolders for personal and business orders and correspondence (especially online orders).
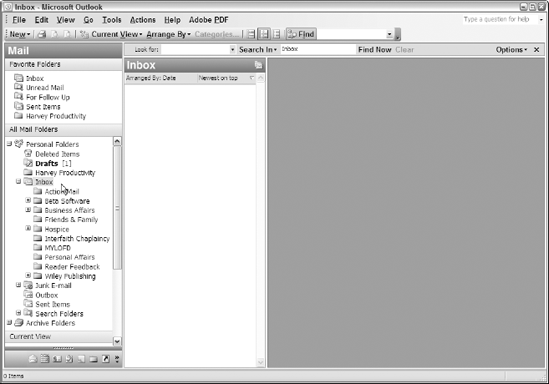
Figure 7-7 shows my expanded Inbox with a partial list of the subfolders I maintain, both for e-mail that still requires action as well as the messages that I need to keep active for reference purposes.
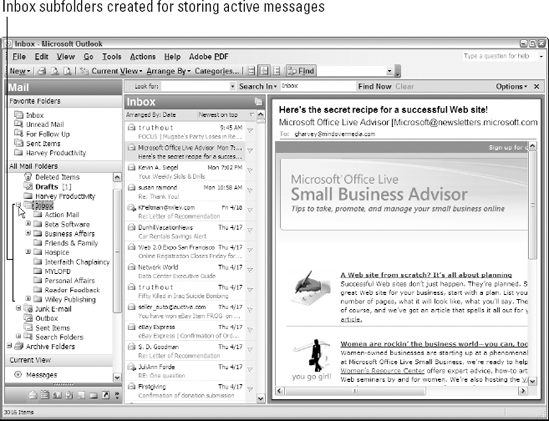
Figure 7-7. Expanded Inbox in the Navigation Pane of my Outlook showing the list of the subfolders I use for organizing e-mail.
And here's a list of all the main category Inbox subfolders I maintain, with a brief description of the contents of each:
Action Mail: This folder contains all the messages that require a response but that I don't have time to deal with at present. The most common response is to reply to each message, although the response can end up being to forward the message to someone else better suited to deal with it.
Beta Software: This folder contains all the messages regarding software beta testing that I'm involved in at this time. These messages are stored in their own subfolders named for the various software manufacturers. Currently, this Beta Software folder contains Adobe and Microsoft subfolders.
Business Affairs: This folder contains messages concerning business transactions, vendors, and service providers with whom my business conducts business. It contains various subfolders for each business entity.
Friends & Family: This folder contains all personal messages from friends and family members. I divide the main folder into subfolders bearing the names of friends and family members.
Hospice: This folder contains all the messages concerning my involvement with hospice and palliative care. It contains subfolders for the various organizations to which I belong as well as the hospice with which I volunteer.
Interfaith Chaplaincy: This folder contains all the messages concerning my involvement with interfaith chaplaincy.
MYLOFD: Stands for Manage Your Life with Outlook For Dummies. This folder contains all the messages concerning the various phases of this book project.
Personal Affairs: This folder contains messages concerning personal transactions, vendors, and service providers.
Reader Feedback: This folder contains messages from readers of my various books to which I've replied but which aren't yet old enough to archive.
Wiley Publishing: This folder contains all the messages from various editors. It contains a bunch of its own subfolders with the name of each editor I deal with.
When creating your own folders, you need to think about the major and minor categories of e-mail messages you deal with. One way to help this thought process along is to consider all the paper folders you maintain and how they're organized. Another way is to consider the keywords and various criteria that you'd use if you were to search for the different categories of e-mail that you need to store (something that you'll find out about in the very next section of this chapter and, I hope, doing shortly).
Note
Be sure to put every message to which you haven't yet replied but that definitely needs a response into your equivalent of my Action Mail Inbox subfolder. Then, after you've replied to the message or forwarded a copy of it to someone else for a reply, you can move that message into the appropriate category subfolder. That way, you always know where to look for all the mail that you still have to deal with and for which you still have to schedule time. See Chapter 8 for hints on how to go about prioritizing the e-mail that you put into your equivalent of this folder as well as hints on scheduling time to respond to them all.
The second step in organizing the e-mail messages that you want to store is to round them up so that you can then move them into the appropriate Inbox subfolders. The easiest way to do this is to conduct e-mail searches that find most of or all the messages that fall into a single category and therefore need to be moved into a particular Inbox subfolder you've created.
Performing basic e-mail searches
Outlook enables you to conduct basic searches using the Find bar that appears at the top of the Information Viewer when you press Ctrl+E (sEarch) or when you click the Find button on your Outlook 2003 custom Productivity toolbar (the Instant Search button in your Outlook 2007 Productivity toolbar).
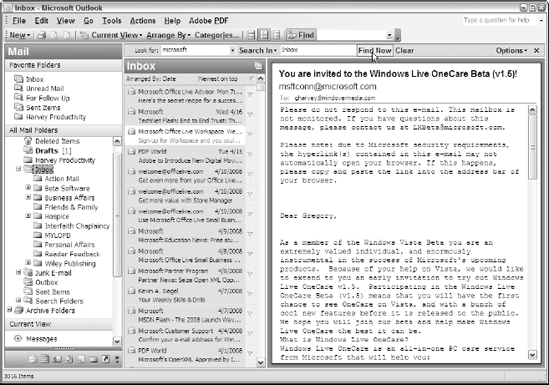
Basic searches from the Find bar are perfect for finding groups of messages that share certain keywords. For example, if you maintain an Inbox subfolder for a particular project or client, you can probably locate the messages in the Inbox that need to be moved to that subfolder by entering the project or client name in the Look For text box.
The great thing about the basic search in Outlook is how comprehensive such a search is. When you conduct a basic search, Outlook looks for matches to the keywords you enter in the Look For text box in all the fields of the e-mail message. This means that the program will find a message if the project or client name is mentioned in the message's From field or Subject field or even in the body of the message itself.
After you enter your keywords into the Look For text box on the Outlook 2003 Find bar, you still need to click the Find Now button to start the search and display matching messages in the Information Viewer. In Outlook 2007, however, because of its new Instant Search feature, Outlook begins trying to find matches for the keywords you enter — and begins displaying matching messages in the Information Viewer — as you type the words in its text box.
Figure 7-8 shows you the results of a basic search I conducted in my Inbox to round up all e-mail messages I've recently received from Microsoft regarding various software products and initiatives. To find all these messages so that I can move them into the appropriate Inbox subfolders, all I had to do was enter Microsoft into the Look For text box of the Find bar and then click its Find Now button.
Note
Keep in mind that, by default, during a basic search Outlook searches only the Inbox folder for the keywords you enter into the Look For text box of the Find bar. This is just fine when you're rounding up groups of messages so that you can move them to one of your Inbox subfolders. However, when you're searching for a particular e-message within one of your Inbox subfolders in Outlook 2003, you have to remember to change the Search In option so that Outlook either searches all Mail folders or just the subfolder you think contains the message (In Outlook 2007, you don't have to worry because the program automatically searches all subfolders). To have Outlook search all Mail folders, choose the All Mail Folders option from the Search In drop-down list. To search just a particular Inbox subfolder, choose the Choose Folders option from this drop-down list and then click the check box for that subfolder in the Folders list box of the Select Folder(s) dialog box before you click OK or press Enter.
Finding related e-mail messages
Sometimes you may want to round up all back-and-forth correspondence related to a particular e-mail message in your Inbox so that you can store all the related messages and replies in the same Inbox subfolder.
You can gather this correspondence very easily by conducting a search for all related e-mail messages. When you conduct this type of search, Outlook searches not only your Inbox folder but also your Sent Items and Draft folder, enabling it to root out all pertinent messages written to and received from clients, co-workers, and vendors.
To search for e-mail related to a particular message, follow these steps:
Click a message that you've received in your Inbox or have stored in one of your Inbox subfolders for which you want to find all your replies.
Outlook selects the message in the Information Viewer and displays its contents in the Reading Pane.
Right-click the message in the Information Viewer.
Outlook displays a drop-down contextual menu for the selected message.
Choose the Find All option from the drop-down contextual menu and then click the Related Messages option on the continuation menu that appears to right of the Find All item.
Outlook displays the Advanced Find dialog box; its Results pane at the bottom lists all the messages and replies related to selected message.
To move these related messages into a particular Inbox subfolder, select the messages in the Results pane of the Advanced Find dialog box and then press Ctrl+Shift+V or click Edit
Outlook displays the Move Items dialog box.
In the Move the Selected Items to the Folder list box, click the name of the Inbox subfolder where the related messages are to be stored and then click OK or press Enter.
Outlook moves the selected messages to the subfolder you selected (without removing them from the Results pane of the Advanced Find dialog box).
Click the Close box in the top-right corner of the Advanced Find dialog box to close it.
Performing advanced e-mail searches
Outlook's Advanced Search feature is another very helpful tool when it comes to rounding up the e-mail messages you want to move out of the Inbox. This type of search enables you to locate groups of messages by conducting more targeted keyword searches than are possible with a basic search. The Advanced Search feature also allows you to conduct searches using multiple criteria targeting attributes well beyond just keywords.
Figure 7-9 shows you the Messages tab of the Advanced Find dialog box that appears when you press Ctrl+Shift+F (Find) or choose Tools
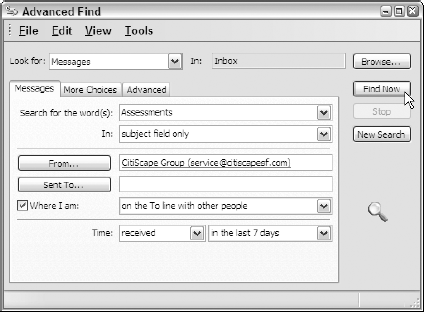
Figure 7-9. Using the options on the Messages tab of the Advanced Find dialog box to round up particular messages.
You can use the options on the Messages tab of the Advanced Find dialog box to perform a targeted text search of your e-messages that can also include other conditions.
The Messages tab contains the following options for conducting an advanced text search of your e-mail messages:
Search For the Word(s): Enter the text you want Outlook to search for in this field's drop-down text box.
In: By default, Outlook searches only the Subject field for the text you specify in the Search For the Word(s) field described previously. Select the Subject Field and Message Body option on the In field's drop-down list to have Outlook also search for the text in the body of the message. Select the Frequently-Used Text Fields option to have Outlook search numerous fields for the text (including To, From, Subject, and the body of the message).
From: Use this field to have Outlook search for messages from particular people. When you click the From button, Outlook opens the Select Names dialog box, where you can type the name(s) of the senders in the Type Name or Select From List text box (be sure to separate multiple names with semicolons) or select them from the list box below by clicking the names and then clicking the From button before you select OK.
Sent To: Use this field to have Outlook search for messages you've sent to particular people. When you click the Sent To button, Outlook opens the Select Names dialog box, where you can type the name(s) of the recipients in the Type Name or Select From List text box (again, separate multiple names with semicolons) or select them from the list box below by clicking the names and then clicking the Sent To button before you select OK.
Where I Am: Select this check box to have Outlook search messages where your name appears alone in the To field (by selecting the Only Person on the To Line option in the associated drop-down list), in the To field along with the names of other recipients (by selecting the On the To Line with Other People option), or in the CC field along with the names of other recipients (by selecting the On the CC Line with Other People).
Time: Use the two Time drop-down list boxes to specify the timeframe that you want Outlook to use when conducting the text search of your messages. Specify the significance of the time by clicking the Received, Sent, Due, Expires, Created, or Modified option in the first Time drop-down list box. Next, specify the period by clicking the Anytime, Yesterday, Today, In the Last 7 Days, Last Week, This Week, Last Month, or This Month option in the second Time drop-down list.
Figure 7-10 shows you the options that appear on the More Choices tab of the Advanced Find dialog box. These options enable you to conduct the search using a smorgasbord of criteria besides the text entered in the body and various fields of the messages. These additional criteria include the following:
Categories: Click this button to open the Categories dialog box, where you can click the check boxes for all the categories you want included in the search.
Only Items That Are: Select this check box and use its related drop-down list box to specify that Outlook find only messages marked either as Unread or Read.
Only Items With: Select this check box and use its related drop-down list box to specify that Outlook find only messages with One or More Attachments or with No Attachments.
Whose Importance Is: Select this check box and use its related drop-down list box to specify that Outlook find only messages whose importance is marked as Normal, High, or Low.
Only Items Which: Select this check box and use its related drop-down list box to specify that Outlook find only messages that have been marked with a particular type of flag (including distinct colors ranging from red to purple, any colored flag, any completed flag, or having been flagged by someone else) or have no flag.
Match Case: Select this check box to have Outlook use exact case matching for the text you specified in the Search For the Word(s) field on the Messages tab of the Advanced Find dialog box.
Size (Kilobytes): Use this option's drop-down list box and the related text boxes to specify the size range (in kilobytes) of the messages to find. Select the condition — Equals (Approximately), Between, Less Than, or Greater Than — in the drop-down list box and then specify the number of kilobytes in the text box to the right. (You enter values in both text boxes when you select the Between option.) For example, to have Outlook find messages smaller than 25K, you select Less Than in the drop-down list box and then type 25 in the text to its immediate right.
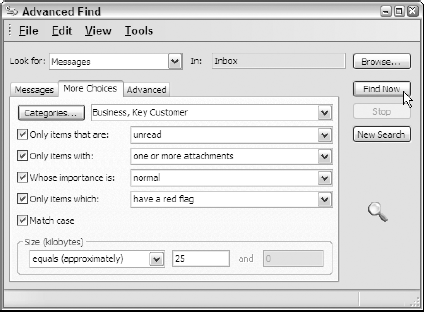
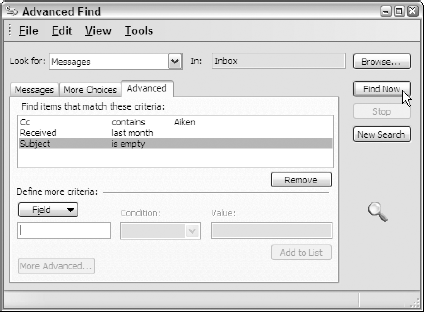
Figure 7-11 shows you the options on the Advanced tab of the Advanced Find dialog box. These options enable you to carry out very precise searches using multiple criteria directed toward particular message fields.
The options offered on the Advanced tab include the following:
Field: Use this drop-down list to specify the field to search in the e-mail messages by selecting one of the following categories: Frequently-Used Fields, Address Fields, Date/Time Fields, All Mail Fields, or All Post Fields in Outlook 2003. In Outlook 2007, you have several other choices including, All Document Fields, All Contact Fields, All Appointment Fields, All Task Fields, All Journal Fields, and All Notes Fields.
Condition: The options available on the Condition drop-down list depend on the type of field you select from the Field drop-down list to its immediate left. If you specify a text field, these options include Contains, Is (Exactly), Doesn't Contain, Is Empty, and Is Not Empty. If you specify a date field, these options include Anytime, Yesterday, Today, Tomorrow, In the Last 7 Days, In the Next 7 Days, Last Week, This Week, Next Week, Last Month, This Month, Next Month, On, On or After, On or Before, Between, Exists, and Does Not Exist.
Value: Specify the text or value that matching messages must have (or not have) to meet the condition you specified in the Condition drop-down list box in the field you specified in the Field drop-down list box.
Add to List: Click this button to add the field criterion you just created using the Field, Condition, and Value fields to the Find Items That Match These Criteria list box. Keep in mind that when you add multiple field criteria to this list box, all the conditions must be met in order for Outlook to display the message in the Results pane of the Advanced dialog box when you finally conduct the search by clicking the Find Now button.
Moving groups of messages into the appropriate Inbox subfolder
After you've located a group of messages you need to move, you have a choice in how you move them:
Drag and Drop: If the Inbox subfolder into which you want to move the messages is displayed in the Navigation Pane of the Mail module, you can move the messages by selecting them in the Information viewer and then dropping the selection on the subfolder icon in the Navigation Pane.
Move to Folder: If the Inbox subfolder into which you want to move the messages isn't displayed in the Navigation Pane, or you need to move messages listed in the Results pane of the Advanced Search dialog box, use the Move to Folder command (press Ctrl+Shift+V).
All you have to do to move the messages in the Move Items dialog box (refer to Figure 7-4) is to click the subfolder in the Move the Selected Items to the Folder list box (remembering that you may have to click an Expand button — with the plus sign — to display the subfolder you want to use) and then click OK or press Enter.
Tip
Sometimes, instead of moving a reply out of the Sent Items folder into an Inbox subfolder, you may want to just send a copy of the reply to that subfolder. To retain the original reply messages in the Sent Items folder and place a copy in one of your Inbox subfolders, select the messages and then choose Edit
Congratulations on your nice clean, empty Inbox that should now look just like my Inbox shown in Figure 7-12 — unless some groups of new messages snuck in while you were finishing moving your last messages to their rightful subfolders! Doesn't it feel really good and downright liberating to have an empty Inbox (even if it's only a very transitory situation)?
An empty Inbox can, however, also feel scary, especially if you're not used to seeing it in that condition and you're afraid you'll forget about all those messages that are now conveniently hidden in your equivalent of my Action Mail subfolder (creating that that old "out of sight, out of mind" conundrum).
This is where good Inbox maintenance habits become critical. It's not sufficient simply to hide away your e-mail in a bunch of subfolders. (That's not much different from hiding all your stuff in closets and under the bed when company comes over at home.) You also have to develop habits that help you prioritize and tackle the messages that you put there.
Moreover, as much fun as doing this Inbox housecleaning has been [:(], you can't expect to spend this much time in the future cleaning out accumulated e-mail messages and hope to achieve anything close to stress-free productivity. But your Inbox will fill up again as bad as or worse than before if you just let it go.
To keep your Inbox lean and under control, you have to put Outlook to work for you, automatically routing as many incoming e-mail messages as electronically possible to their correct locations. In addition, you have to develop some new habits that lead you to tag messages as soon as they come in with categories and priorities. The idea is to that make dealing with them appropriately and then rounding them up and moving them to their appointed Inbox subfolders as easy as child's play. All the information you need for learning to live happily ever after with an empty Inbox with only the lightest Inbox housekeeping lies right ahead of you in Chapter 8.