
Chapter 3. 99-Cent Film School: Shooting, Editing, and Rendering
Choosing Your Weapons
To have a chance at being viral, your YouTube videos must have some quality to their look, feel, editing, and audio. They don’t need to have stellar technical qualities, but they need to have those considerations not distract from the story and the acting. People don’t need to say, “What stunning cinematography!” when they see your video, but if they say, “It’s blurry, and the sound is horrible,” it will probably never go viral.
Here we’ll talk about the first thing to consider in this: choosing your weapons, that is, picking and buying a camera, microphone, and computer. We’ll cover the different formats for different budgets—mini-DV, cheap webcam, video with still camera, and video on cell phone, as well as how to get good-looking shots out of any of them and a bit on making video from stills.
Mini-DV
Mini-DV filmmaking turned the world of motion art on its ear when it was introduced in the late 90s. Mini-DV gave filmmakers something that looked almost as good as expensive film, made it cheap to shoot hours and hours, and made it editable on a home computer.
The first mini-DV cameras cost a lot, as much as $4,000, and you can still pay that much (or more) for professional-grade three-chip mini-DV cameras. But the price of consumer cameras (one-chip) has come way down.
One recommendation I have is the SONY DCR-HC48.
| http://tinyurl.com/52ytnk (URL 3.1) |
This unit costs about $400 new and about $300 used (give or take, depending on where you look and what the market is like that day).
Alan uses this model; it’s good enough for him, and his stuff goes viral.
Note
This camera does not come with a FireWire cable. It does, however, come with a docking station that will allow USB or FireWire to connect with it, and it comes with a USB 2 cable. USB 2 transfers data almost as fast as FireWire.
You can get better audio if you plug an external mic into a camera, but you can’t do that with the DCR-HC48 because it does not have a mic input.
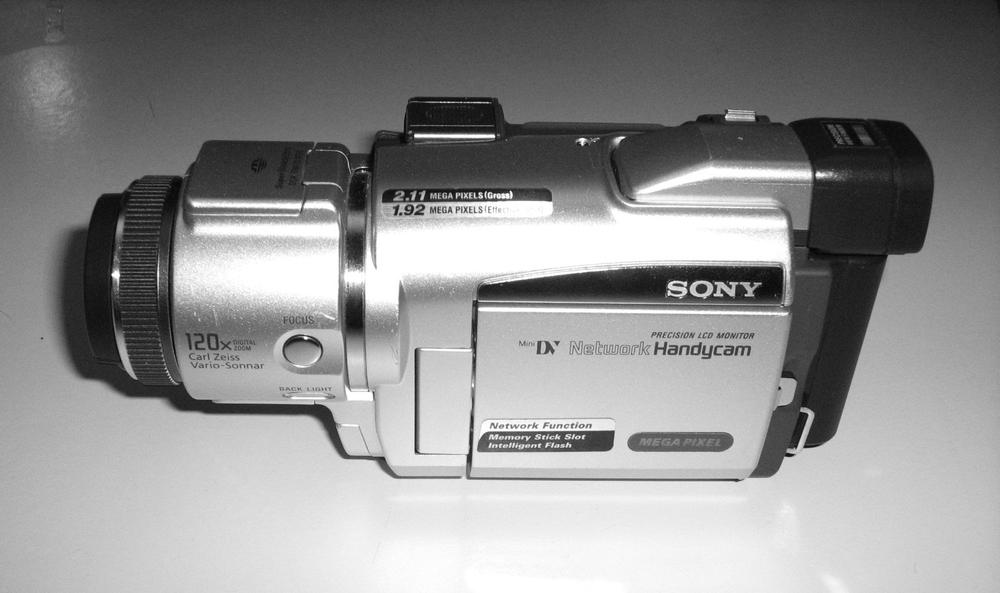
The Sony DCR-HC96 mini-DV camera (see Figure 3-1) is no longer manufactured, but it has a mic input, is a great camera, and is widely available used from eBay or Amazon.
| http://tinyurl.com/4bdcmz (URL 3.2) |
I generally don’t recommend buying cameras used, if you can afford it. When you do that, you’re probably inheriting someone else’s problems and a lot of wear and tear. The problem, however, is that this good camera is no longer made. It seems that Sony, and other camera manufacturers, have quit making one-chip cameras with mic inputs. I think the idea is that they want to sell only low-end (less than $300) and high-end (more than $3,000) cameras, with little or no middle ground, because offering the middle ground was keeping people from buying the expensive pro models. So if you want to buy a used camera, I recommend buying it from a reputable dealer, one that offers a return policy of at least 30 days on used gear. If big problems show up in used gear, they are, in my experience, likely to show up in the first month of use. If they make it past that, they’re probably good for a few years more.
For external mics, I recommend the Audio-Technica ATR35S as a good cheap ($23) lavaliere (clip-on) mic.
| http://tinyurl.com/4fzk7g (URL 3.3) |
The Audio-Technica has decent sound, and the price is certainly right. Lots of online stores sell them. Search for Audio-Technica ATR35S on Amazon or eBay, and get a new one. They rock. You can plug them directly into a mini-DV camera, clip it unobtrusively onto the shirt collar of anyone you’re shooting (including yourself), and get much better sound than you would get with the onboard mic.
The Basic Features of Most Consumer Cameras
Most consumer cameras include at least the ability to zoom and some kind of shot stabilization. Many also include night-vision capacities.
Zooming
Zooming is the ability to zoom in, that is, twist a dial or push a lever to bring your shot in tighter. This is good for framing your shot. (These camera shots are related to, but slightly different from, the establishing shot, over-the-shoulder shot, and other shots discussed in Chapter 2. Those are part of the language of storytelling; the shots we’re talking about in this chapter are part of the mechanics of using a camera. For instance, not all wide shots are establishing shots. A wide shot can be used to establish location, but it can also be used to end a scene. And not all zoomed-in shots are close-ups of actors. You could show a zoomed-in shot to indicate detail on an object, or purely for artistic considerations that have little to do with plot or storytelling.) Figures Figure 3-2, through Figure 3-5 show the finer points of zooming.
Shot stabilization
Shot stabilization is built-in software and hardware that makes jittery handheld camera work appear less jittery. The amount of stabilization differs from camera to camera, so experiment with your own camera to find how it works, and consider using it when doing handheld camera work. Not all lower-end cameras have this option. The SONY DCR-HC48 does not. The SONY DCR-HC96 does. (On Sony cameras, it’s called “Super SteadyShot.”)
Shot stabilization can also be done in post (postproduction or editing) with software. Here’s a video with an excellent side-by-side comparison of before and after:
| www.youtube.com/watch?v=aX-UxxM_6sI (URL 3.4) |
This was done in post, but the effect is pretty much the same when it’s done in the camera. Here’s a page with more info about postproduction, or editing:
| www.doceo.com/pro_editors/pro_corrective.htm (URL 3.5) |
Night vision
Night vision is just that…the ability to shoot in settings with very low light. It produces a creepy “security camera” feel that is mostly green, black, and white. Not all cameras have night vision, and the location of the control for it varies in those that do. (Night vision is called “NightShot” on Sony cameras. NightShot is Sony’s trademarked term for night vision.)
Here’s a video that shows night vision well:
| www.youtube.com/watch?v=2hDXFx-vxr0 (URL 3.6) |
Shooting Video on a Cheap Webcam
I recently purchased a Logitech QuickCam Communicate STX Webcam.
www.newegg.com/Product/Product.aspx?Item=N82E16826104066 (URL 3.7)
It’s not perfect, but it’s a perfect way to start shooting on YouTube if you’re on a very limited budget. And it’s better for vlogging than for shooting stories.
My total out-of-pocket expense was $46, with shipping. It’s visually a good camera, but the included software, which you must install in order to use the camera, messed up some of the sound drivers in my computer, and it took a bit of work to get it right. I recommend that when you install it, you choose the custom install feature and opt not to use the sound drivers with the camera. Just record audio separately like I do; you get much better sound that way anyway.
This camera has a built-in microphone, shoots 640 x 480 30 frames per second (fps). (Thirty fps is the same as mini-DV, although the 640 x 480 pixel image size is lower than the 720 x 480 size of mini-DV. And the color capture and overall image quality is higher with mini-DV.) Basically, if you light yourself well, you can get somewhat decent footage from it. If you don’t use an external mic, don’t mount the camera on or near your computer; if you do, it will pick up the noise from your computer fan.
The Logitech QuickCam has a USB interface and works on any recent flavor of Windows, including Vista. It comes with a basic capture and editing utility, or you can record directly into another program (like Sony’s Vegas Movie Studio, which will be discussed later in this chapter). Or you can capture using the included basic video software and then import your footage into your editing program.
There are cheaper webcams on NewEgg.com. Check out the user reviews before buying a webcam (or anything) on that, or another, site.
| www.newegg.com/store/SubCategory.aspx?SubCategory=152&Tpk=web+cam (URL 3.8) |
Shooting Video on a Still Camera
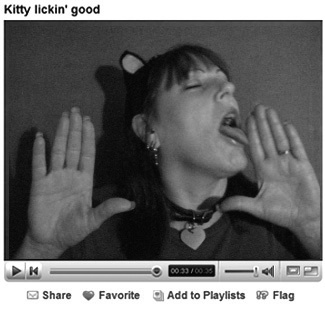
Many still cameras (that is, normal “nonmovie” digital cameras for taking still images) have the added feature of being able to shoot some video. It doesn’t look fantastic, but it can look pretty good, especially if you’re shooting close up and there’s not tons of motion. Here’s a video called "Kitty Lickin’ Good” (Figure 3-6) that I shot on my Canon PowerShot still camera. My wife, Debra Jean Dean, and I did the music for it:
| www.youtube.com/watch?v=Bc1eW7D42t4 (URL 3.9) |
I shot it with my still camera, which also shoots video with audio. I attached my camera on a tripod to get a steady shot and then plugged the camera into the computer with USB. The camera mounts (shows up on the computer screen) as another drive. Then I simply dragged the file with my mouse from the camera to the desktop and then into Vegas Movie Studio so I could edit it. (You’ll learn more about Vegas Movie Studio later in this chapter.)
Here’s motion video called "Mr. Peep’s Wild Ride” done with the same Canon still camera. Since it’s in a moving car, it doesn’t look as good:
| www.youtube.com/watch?v=0zY2uL55Zss (URL 3.10) |
But for close-up stuff, like "Kitty Lickin’ Good,” and for vlogging, shooting video on a still camera is OK, and really cheap.
Some cheap still cameras have built-in flash memory but not much of it. They shoot only about 3 minutes of grainy video. You actually could shoot something on these and put it on YouTube, and if you have nothing else to work with and no money for a better camera, I say go ahead and get started with whatever you have. But with better still cameras (like my Canon PowerShot), you can shoot video that doesn’t look as good as mini-DV but looks OK.
The better still cameras use removable memory cards, so you can buy a larger-capacity memory card (make sure you get the right format; there are a few of them) and shoot longer clips. My Canon PowerShot A460 cost only $110 and came with a 16 MB memory stick. But with the $10 512 MB SD card I bought on Amazon, it can shoot about 20 minutes of video.
Shooting video for YouTube on a still camera can work well, especially if you record the audio separately. The microphones on most still cameras suck, and the encoding rate is low. It’s a little more work, but it’s worth it if you’re using a really cheap still camera or a cell phone camera and want to have a chance of going viral on YouTube.
Recording sound separately
You can record sound separately in several ways. You can plug a lavaliere microphone into your computer and record directly into your video-editing program and sync up with the video later. (You’ll learn more about this in “The Importance of Audio” section, later in this chapter.) Or you can record your audio on a dedicated digital recorder and later import the audio and video separately and sync it in your editing program. I’m fond of this method and record on my Zoom H2.
The Zoom H2 is an amazing portable digital recorder. I call it the “studio on a stick.” (It comes with a detachable handle that sort of makes it look like an ice cream bar, and with an alternate stand, a little tripod for table use.)
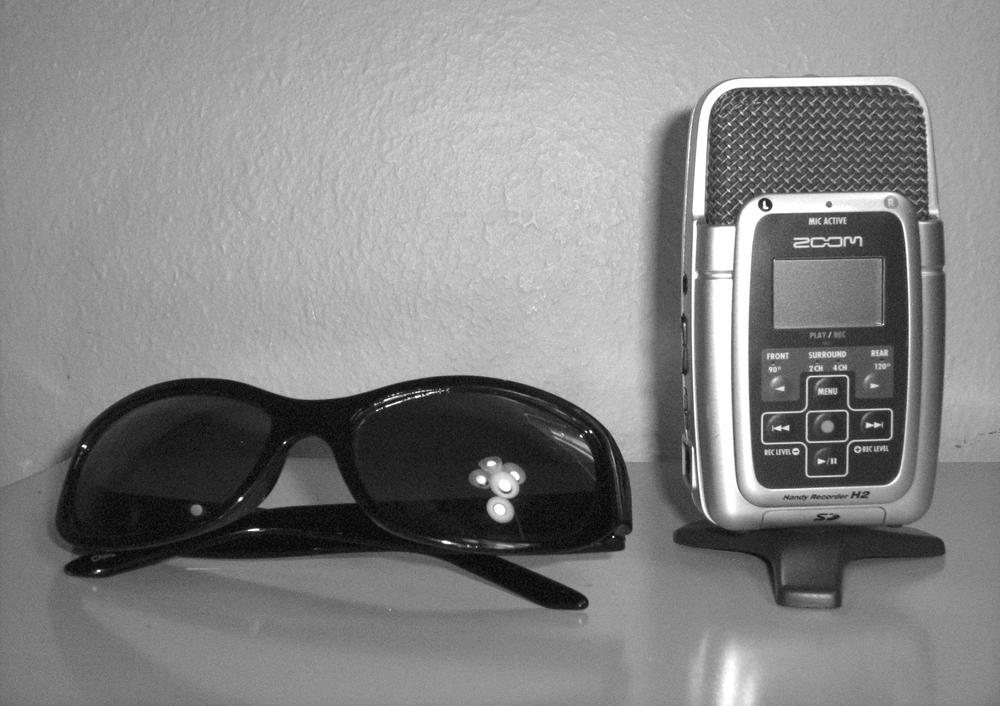
The Zoon H2 (Figure 3-7) is $179 and available from:
| www.zzounds.com/item--ZOMH2 (URL 3.11) |
The Zoom H2 is about the size of an electric razor (and looks rather like one) and records CD-quality sound (44.1 Hz 16-bit stereo WAV files) to an SD card. (Again, if you want to record anything of length, you’ll need to get a bigger card than the one that ships with it. I got a 4 GB card for 40 bucks and can record six hours of CD-quality sound on the amazing built-in condenser mics.) You can record stunning sound on this thing using the built-in mics and then sync it later to your video.
Here’s a blog post I did with a review of the mighty H2:
| www.stinkfight.com/2007/08/31/my-review-of-the-new-zoom-h2-portable-digital-recorder/ (URL 3.12) |
Here’s a 55-second video I made that shows the difference between the sound of using a webcam’s built-in mic and using sync sound from the H2:
| www.youtube.com/watch?v=QOcrwDFZGOo (URL 3.13) |
The H2 can also record much longer program material on the same drive if you change the settings to record MP3 instead of WAV files, but you don’t want to do that. MP3s are a compressed, degraded format. WAV (and AIFF) are uncompressed. You want the highest-quality sound you can have, especially since YouTube degrades the audio even further when it compresses it to MP3 (within the Flash video interface it uses). MP3s made from MP3s sound horrible.
You don’t need to use the MP3 setting on the H2 anyway, because you’re shooting short films for YouTube. The 512 MB card that ships with the H2 will record only about 5 minutes of WAV audio, so you might want to invest in a 1 or 2 GB card. You want to be able to record more than one take of your show, because you will have more to work with when you edit that way.
When I do a vlog, I usually have my wife hold the camera and put the H2 on a mic stand. You could also tape the handle to a broom handle and stick it in a milk crate if you don’t have a mic stand. Make do with what you have.
If I’m alone, I put the camera on a tripod or a mic stand. If someone is in the house with me, I’ll ask her to hold the camera for me. Having a person hold a camera, even if they hold it as still as they can, will add a bit of nonstatic feel, of movement, to the shoot. This can be useful with shooting a person talking, especially if the “human tripod” doesn’t overdo it.
Here’s another video that is a good demonstration of handheld camera work:
| www.youtube.com/watch?v=_kxT8S-Er0g (URL 3.14) |
Note
Being good at one thing in life, especially art skills, will make you better at everything else. Acting will make you a better director, and editing audio and video will make you a better writer; your skill in one art is transferable to other art forms. That’s one of the secrets to life. The other secret to life, the main secret to life, is that it’s “better to give than to receive.” Seriously. That’s the secret to life. And you thought this was just a tech book. Ha! Tech books are for nerds. This is a book for entry-level geniuses. Keep reading. You’ll see.
You can get mic stands (and a lot of other great musical gear) cheap here:
| www.musiciansfriend.com (URL 3.15) |
One mic I used in that video is probably overkill for what you’ll need to do, but I’m a music snob. The mic is a condenser MXL M3-B, a prototype of the MXL M3. The MXL M3-B was never released, and I’m honored to own one. A cool guy from the Marshall guitar amp company gave it to me. (They make MXL mics.)
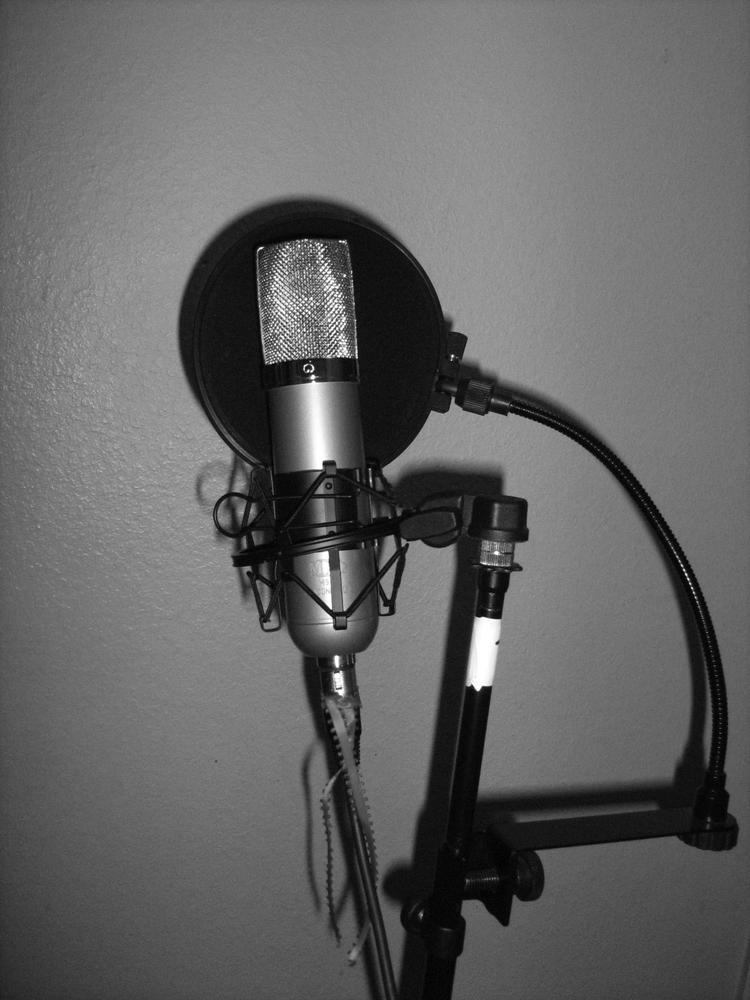
Large condenser mics like this (Figure 3-8) require an external power source, are very fragile, and are very susceptible to moisture, smoke, and dust. I don’t recommend them for entry-level YouTube video making, but if you have one and know how to use it, your videos can only sound better.
Keep in mind that these mics (and all mics) are very sensitive and pick up everything, from the air conditioner in the next room to the truck out on the street. So, they’re kind of overkill unless you’re an audio expert. But with any mic, any video recording that includes audio, you should try to minimize background noise as much as possible, because it’s nearly impossible to completely remove it in post, and removing it affects the overall sound negatively. So, before you do a video shoot of any kind, even a vlog, turn off the air conditioner, get as far away as possible from your computer fan, have your roommate turn down her music, and shut the windows. Your audience will thank you. Even if they don’t know what they’re hearing, they’ll know it sounds better and like the video more, your video will get more views, you’ll get more subscribers, and you’ll have a better chance at going viral.
The Importance of Audio
Audio, believe it or not, is the most important technical aspect of motion art. The audio is even more important than the video. If you take two clips, the first with great video and crappy audio and the second with shaky video but great audio, and show them to a random selection of people, most people will enjoy the shaky one with great audio more. And if you take two clips with equally good video and one has better audio, people will like the one with better audio more. Even if they don’t know what great audio is or how to describe it, they will appreciate the difference. Great audio just really pumps up the professionalism of how video is perceived.
My biggest recommendation for filmmaking (and it’s one that’s mostly ignored on YouTube but not on the viral videos) is this: Use an external microphone. The microphones built into most consumer cameras suck. Moreover, you’ll pick up the sound of the camera’s motor with the onboard mic. And the mic will be too far away from the subject’s mouth to get great sound.
Again, your Audio-Technica ATR35S lavaliere mic comes to the rescue.
The sound recorded by most still cameras is horrible. You cannot use the sound from a still camera and expect to compete on YouTube. And you can’t plug a lavaliere mic into them. They don’t have an input jack.
For getting great sound with a cheap still camera, I recommend using the lavaliere mic to record the audio separately, directly into your computer, into Vegas Movie Studio.
| www.sonycreativesoftware.com/moviestudio (URL 3.16) |
After you import your video into your editing program, you then import your audio, sync the good audio with the crappy camera audio in the timeline, then mute the crappy camera audio before you edit, and render. (You’ll learn more editing in the “Editing” section, later in this chapter.)
Background Music
Background music contributes immensely to the feel of a video. Your choice of music can make or break the video.
You have to be careful with copyrights when using music by other people. I recommend getting music from the Podsafe Music Network to use in your videos.
| http://music.podshow.com/ (URL 3.19) |
It’s free to use, with attribution. Putting a link to the composer in the “More Info” section of your video’s YouTube page should satisfy this requirement, but read the terms of service on the Podsafe site, and on the individual music, because this can change.
The mood is not the only thing that’s important with your music choice. It’s also important to choose music that doesn’t compete with talking and use it at a volume that supports the story, rather than distracts from it.
The "Background Music” sidebar is reprinted from something I wrote for the O’Reilly Digital Media website, www.oreillynet.com/pub/au/3220 (URL 3.20). It has some great info on background music choices.
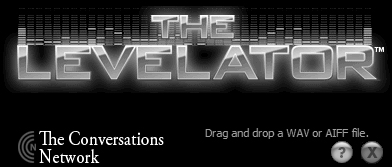
Levelator
The Levelator (Figure 3-9) is an audio secret weapon that is very useful to filmmakers. It’s made and given away free by a very cool company called the Conversations Network. Originally made for podcasters, it’s great. I use it for film. The Levelator is free software for Windows, Mac, or Linux that does only one thing and does it very well. It takes files of spoken audio and evens out the sound. It makes stuff that’s too quiet a little louder and stuff that’s too loud a little quieter.
It works only on speech. It won’t improve the sound of speech mixed with music or other sounds; in fact, it will make that sound worse. But you want to have more control over your audio, so you should record the talking first and add the music later anyway. That just makes for better overall sound.
The Levelator is drag and drop, with no controls. You can’t adjust anything. You just open it and drag a WAV or AIFF audio file onto it. It starts processing the audio and gives you a status bar showing the percent of progress. When the bar reaches 100 percent and goes away, your media is done cooking, and there’s a new file with “.output” added at the end of the filename. That’s the one you want to use.
| www.conversationsnetwork.org/levelator/ (URL 3.21) |
Video from stills
Stills can be used to great effect in video. You can drag them in and use them with video, or you can make video entirely out of stills. Used sparingly, you can stand out by using stills to spice up an otherwise static vlog or other video. With a book, you can show the cover for a few seconds while you talk about it. Use your imagination to think of unique ways to use stills, and you’ll be ahead of what most people are doing.
Here’s a three-part article, "Put Your Photos on TV,” that I wrote about making video from stills. (Part 3 was cowritten by David Battino.)
| www.oreillynet.com/pub/a/oreilly/digitalmedia/2008/02/28/put-your-photos-on-tv-pt1.html (URL 3.22) |
| www.oreillynet.com/pub/a/oreilly/digitalmedia/2008/03/06/put-your-photos-on-tv-pt2.html (URL 3.23) |
www.oreillynet.com/pub/a/oreilly/digitalmedia/2008/04/17/hi-res-youtube-hacks.html (URL 3.24)
Cell Phone Cameras to Capture the Breaking Story
Most cell phones shoot video these days. Some shoot really good-looking video. Any of it can be converted, edited, and uploaded to YouTube.
Cell phones are often used to capture breaking news—events like fights, hangings, unrest, or celebrities doing things that someone, for some reason, finds interesting.
But you don’t have to use a cell phone for breaking news only. If your cell phone is the only camera you have, you can use it as your primary video capture source. No matter what type of camera you use, everything you learn making films will help you later making better films. And you’ll also get used to navigating and promoting on YouTube. So if you don’t have money for a better camera but have a cell phone that shoots video, start now anyway.
My friend George Earth, does some amazing low-fi cell phone movies of his series "Cheap Comix” on YouTube.
| www.youtube.com/user/candymachinegeorge (URL 3.25) |
| www.georgeearth.com (URL 3.26) |
George writes the stories out as comic strips, which you can download here:
| www.stinkfight.com/2007/09/11/cheap-comix-2-up-for-download-now/ (URL 3.27) |
Then he makes cardboard cutouts of his characters and films them with his cell phone, while doing the voices live. He even makes little sets and towns for them. He is, by his own admission, not very good at drawing, but the dialogue and execution make them particularly compelling. Here’s one of them, called “What’s Performance Art?”
| www.youtube.com/watch?v=XTPLHXFKsQg (URL 3.28) |
Cell phones usually use proprietary formats and can take a lot more fluffing than mini-DV to get the video into your editing program. But this can be great if you shoot a breaking story on your cell phone because it’s the only available camera, or if you have a cell phone that shoots video and can’t currently afford another camera.
What Not to Shoot and Why
YouTube doesn’t need another video of a tin can in a microwave. And it certainly doesn’t need another video of some guy wrecking his family jewels on a railing while falling off a skateboard. Sure, this stuff gets lots of hits. But it’s not going to help you bring people back again and again.
After you’ve made and uploaded your first few videos of…well, anything, and gotten over the tiny technical hurdles of making stuff look and sound good, then get original. Figure out how to bring something original out of your own twisted little mind and make it fly. Don’t worry too much at first about writing for an audience; that comes later, after you’ve done more experimentation. Just try to do something that reflects you.
Look on YouTube, and see what’s been done to death. Then do anything else. The only reason I can see to do something that’s been done to death is to parody it. So, find something unique or that expresses a unique viewpoint, and do a drama, comedy, or vlog about that.
Location
Locations for YouTube videos can be anywhere. Many are shot in people’s bedrooms or yards. But it can be more fun to get “out in the world” and “away from the nest” to experience and film more of what the world has to give. You want your videos to be special, so don’t limit them to your room.
When Hollywood film crews shoot in public, they have to pay for permits. Some cities require this even for independent filmmaking. (Santa Monica, California, comes to mind.) I would never recommend you break the law, but I will say this: I’ve never gotten a permit for anything I’ve filmed. And I’ve never gotten in trouble. And there’s a good chance that anything filmed for YouTube is so far “below the radar” that it probably isn’t an issue.
Basically, I just film anywhere. In stores, in churches, in parking lots, in people’s front yards. I’m respectful, quick, and if asked to leave, I do, and do so politely.
Lighting
Mini-DV cameras, still cameras, and webcams are pretty forgiving on a wide range of light levels, much more so than most film movie cameras. Even so, it can’t hurt to brighten up indoor shoots with some lights. And you don’t need fancy movie lights. Little $10 halogen lights from Target or any place similar are more than enough.
Lights will bring out colors more. You can experiment with light placement to cast interesting shadows. People look evil when lit from below and angelic when light from above. Also try lighting a face in a dark room from one side only so one side is lit and one side is dark or almost dark. It’s a nifty effect. Colored lights can also make cool effects. You can get sheets of colored gel at any art-supply store and hold them over lights. (Don’t do this with halogen lights, though, which get too hot and will melt or burn the gels. And be careful with halogen lights in general. They get really hot. And if the quartz glass covering over the lighting element ever cracks, throw the light away, because that quartz filters out the part of the light that can damage your eyes.)
I bought some cheap halogen lights at Target. The vlog I did of my “50 things” had these lights shining on my face.
Props
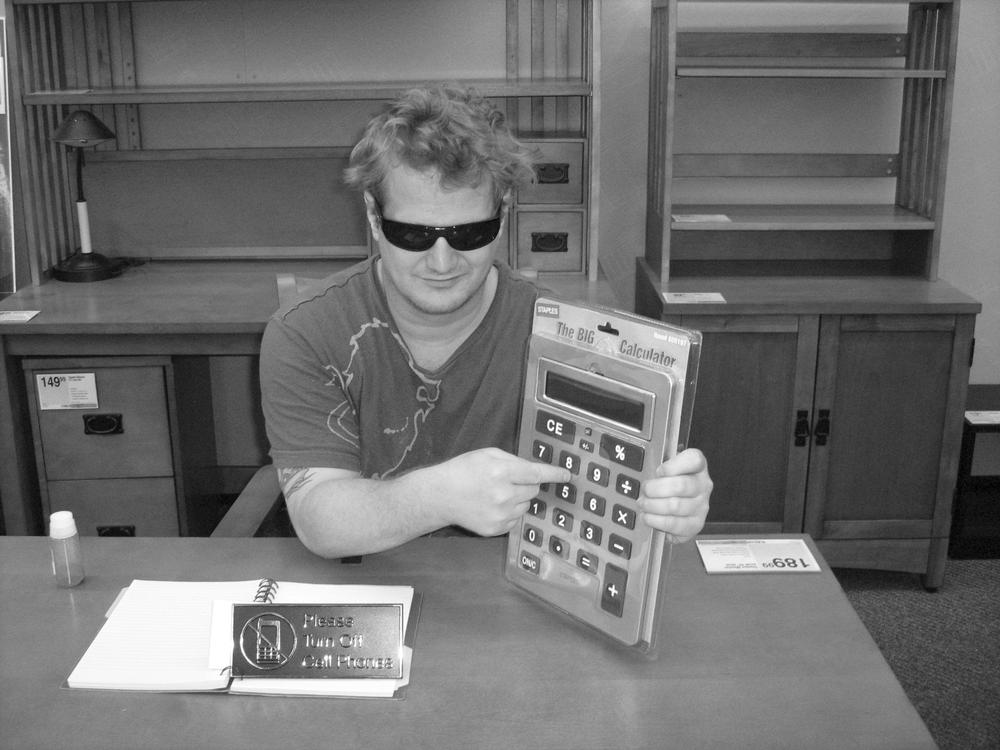
Ikea, Staples, The Home Depot, and the 99-cent store are great places to buy props, gear, sets, and even lights. Walk around, look at things, and let your imagination run. Bring your camera. I can think of no reason not to write and shoot a story on the fly, even in the store, if you aren’t obnoxious and if you stop if they ask.
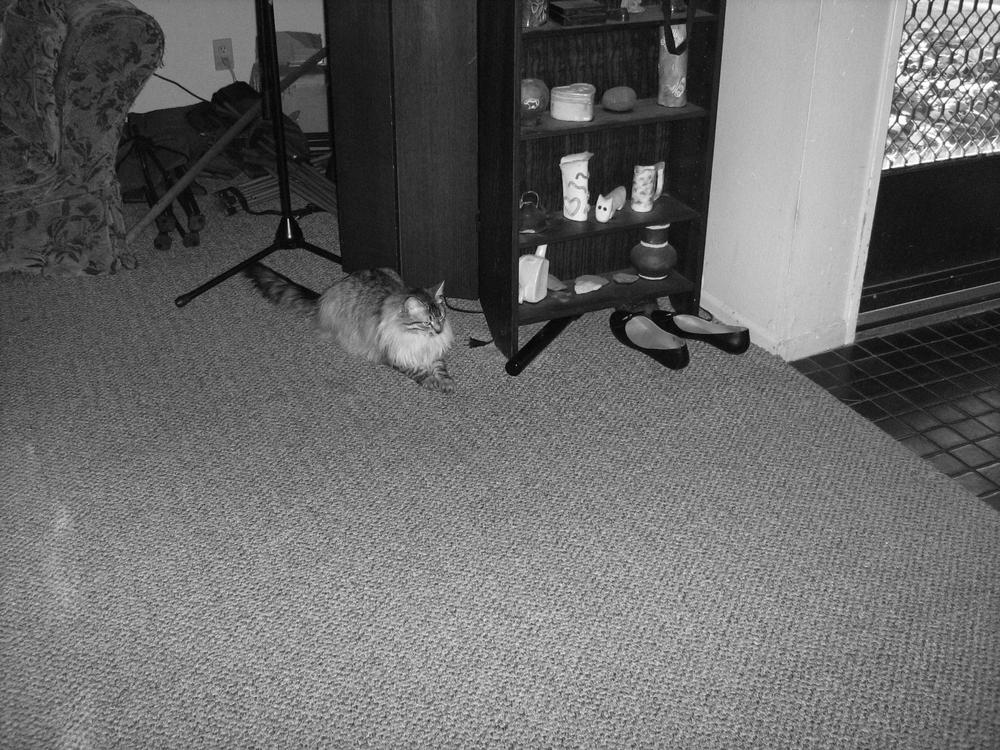
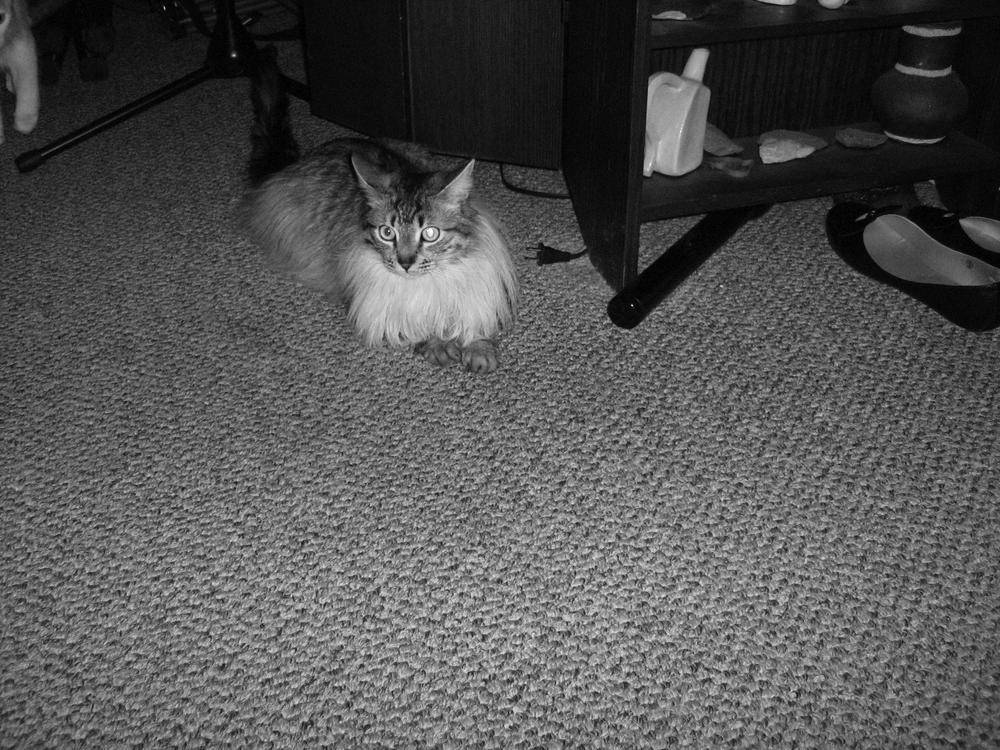
I often spontaneously think of short plots when I have a handheld fan or a power drill and I’m looking at sheet rock. Or petting a giant calculator. Or palming a fork with fuzzy oven mitts. (See Figure 3-10 and Figure 3-11.)

Computers
In my mind, the war between PC and Mac is over. They’re both so similar now, from years of PCs trying to look like Macs and Macs now running on Intel chips, that they’re the same. (Except Macs look sexier, they cost a lot more, and there’s not as much software for them.)
Alan and I use PCs because it’s what we started on and because, since they’re cheaper, we’ve seen no reason to switch.
Another good reason to stick with PCs is that Vegas Pro and Vegas Movie Studio run only on PCs. Here are the system requirements for Vegas Pro:
Microsoft® Windows® XP SP2 or Windows Vista™
1 GHz processor
200 MB hard-disk space for program installation
1 GB RAM
Most new PCs have all of this, but check when buying a computer.
Here are the system requirements for Vegas Movie Studio:
Microsoft® Windows® XP SP 2 or Windows Vista™
800 MHz processor
200 MB hard-disk space for program installation
256 MB RAM
If you already have a Mac, you can use iMovie, which now comes on all Macs. If you have a PC and cannot afford Vegas Movie Studio, PCs come with Windows Movie Maker.
The interfaces for most editing programs are pretty similar, with File/Open/Edit; some sort of cut, chop, and move function; and a timeline for your media, with separate tracks for video and audio.
Editing
Now that you’ve gotten your brilliance into your camera, you need to get it out of your camera, chop out the parts that don’t work, and distill it down to its happy, perfect goodness. So, take a break, get up, stretch, walk around, have a soda, and we’ll meet you back here in a minute.
Free, Cheap, and Pro Audio and Video Software
Alan is going to take over for the rest of the chapter to cover basic editing on the inexpensive Sony editing program, Vegas Movie Studio ($74.95).
Later Alan will cover some advanced editing techniques with Vegas Pro in Chapter 8.
Vegas Pro costs $549 or $305 with a student ID from Academic Superstore.
| www.academicsuperstore.com/ (URL 3.35) |
Vegas Movie Studio looks and works much like Vegas Pro, without all the bells and whistles, and it does everything you would need for basic editing of vlogs and short videos. It can also export to WMV. And that’s a good thing, because the WMV format optimizes well for YouTube.
Basic Editing
Alan Lastufka
Editing neither is as overwhelming as it sounds nor is it as overwhelming as it looks when you first open your chosen piece of software. Most nonlinear editing (NLE) software contains multiple windows or docks and numerous, colorful, but unlabeled icons. However, given the content you’ll most likely be working with and the small number of edits and transitions you’ll need, you’ll be editing like the pros in no time.
Why Bother Editing?
As you’ve no doubt watched a few YouTube videos before picking up this book, you may have noticed that some YouTubers don’t edit their videos at all. You may ask, why should I bother? Well, some videos require no editing. A three-minute vlog, recorded in one take with little or no mistakes, requires no editing at all, unless you want to remove the “ums” and “uhs.” Other videos may require numerous edits for time restrictions, content, or pacing. Editing involves chipping away at all of the material you have, until only the best footage remains.
Style is another important factor when discussing why you should edit your videos. Most of the “popular” vloggers have perfected the jump cut and use it effectively for funny or quirky transitions. I’d estimate that 90 percent of the edits you’d see on a typical YouTube viewing day are jump cuts. Jump cuts will be defined in the following section.
The final factor in why you may need to edit instead of just uploading a raw take is whether you plan to add any music, text, or collaboration clips into your video. While expensive equipment exists to do this in real time, it is out of the budget for almost all vloggers, so these elements must be added after you record, in postproduction.
Basic NLE Editing
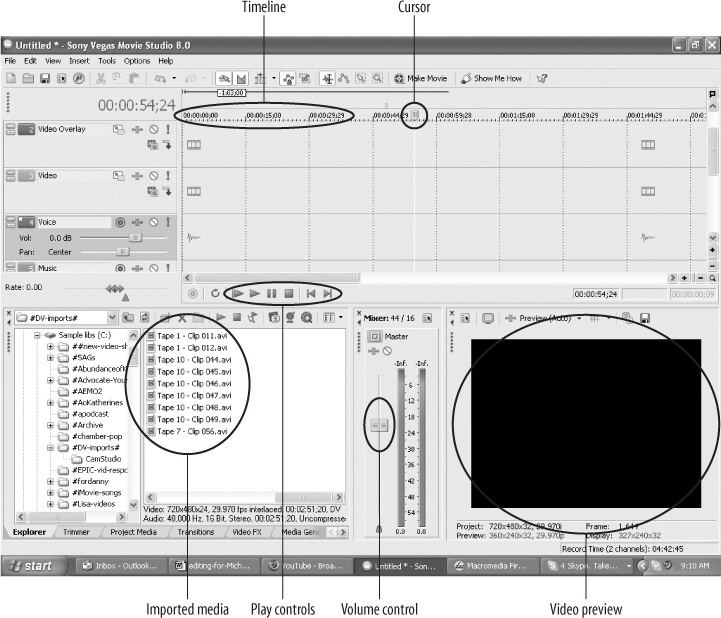
For the basic editing demonstrations in this book, I will be using Sony Vegas Movie Studio. Movie Studio is a very affordable yet powerful NLE aimed at the YouTube crowd of video makers (see Figure 3-12).
You could always spend more, or less, depending on your means and needs, but I’ve found Movie Studio to be a good price-to-feature value. While some of the keyboard commands in Movie Studio may differ from your editing software, the techniques and fundamentals will remain across programs and platforms.
Capturing Video from Your Camera
Before you can begin editing your footage, you must “capture” it from your video camera. Some cameras come with video-capturing software prebundled, but these programs are usually limiting or capture in a proprietary format (a media type that you can’t easily import into other programs). It’s better to use the capturing feature found within your NLE.
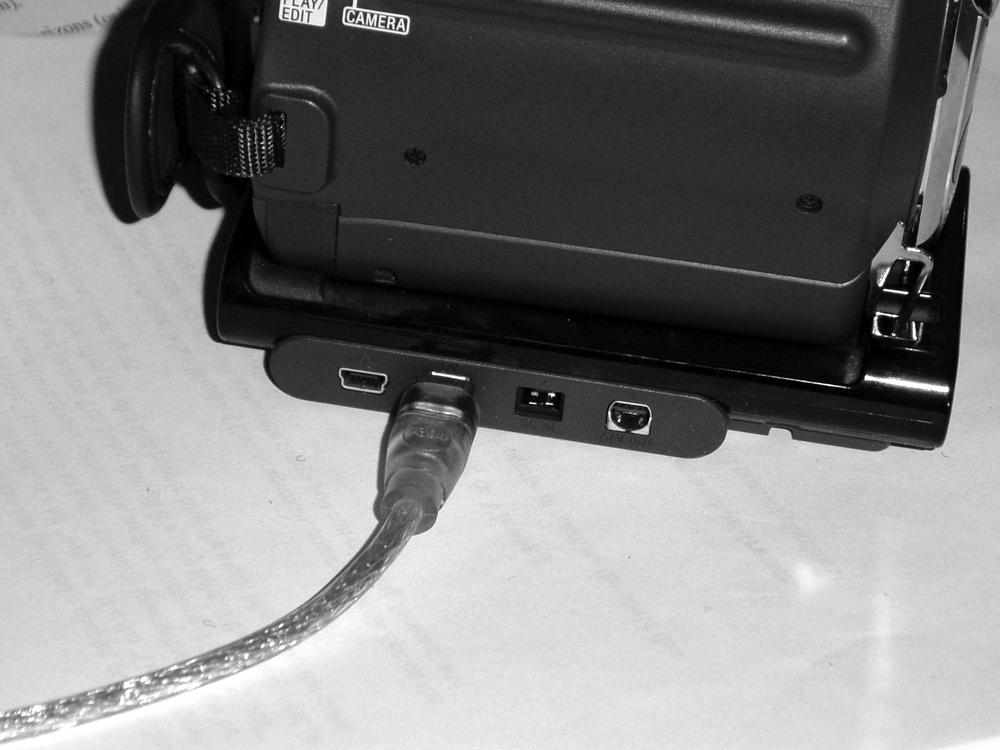
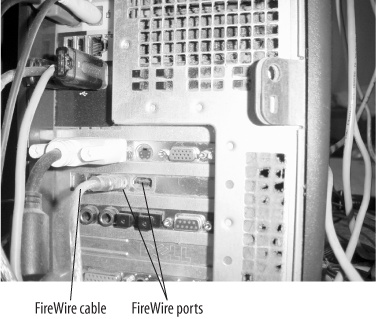
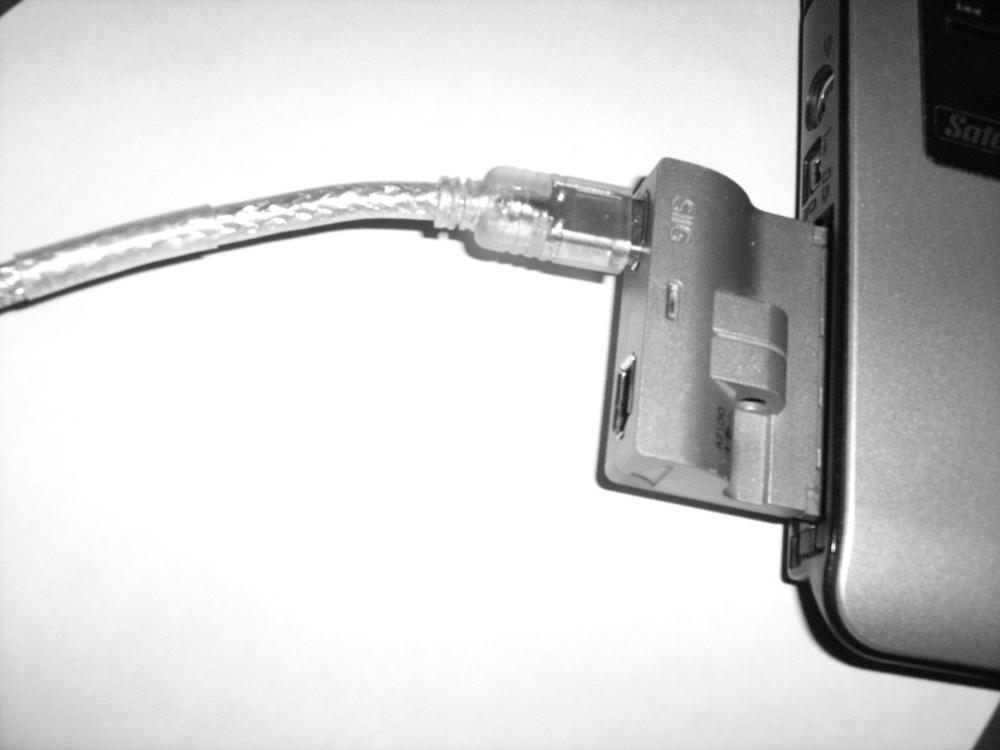
To capture video, make sure your camera is correctly connected to your computer via FireWire or USB, as shown in Figure 3-13 and Figure 3-14 (or Figure 3-13 and Figure 3-15, if you’re on a laptop). FireWire ports may be found on the front or back of your computer if you have a tower computer and are usually on the side if you have a laptop. If your laptop doesn’t have FireWire ports, you’ll need a FireWire card, as shown in Figure 3-16. Also, keep in mind that your camera may require you to use a certain setting when transferring or capturing video; please consult your camera’s owner’s manual if you run into any trouble.
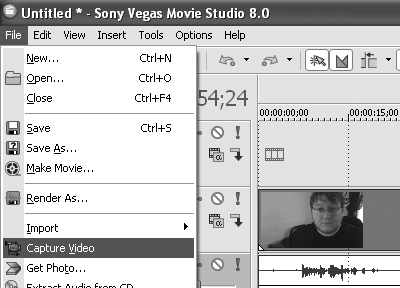
Then, from the File menu, choose Capture Video, as shown in Figure 3-16. This opens a new window or dialog box, as shown in Figure 3-17 and Figure 3-18.
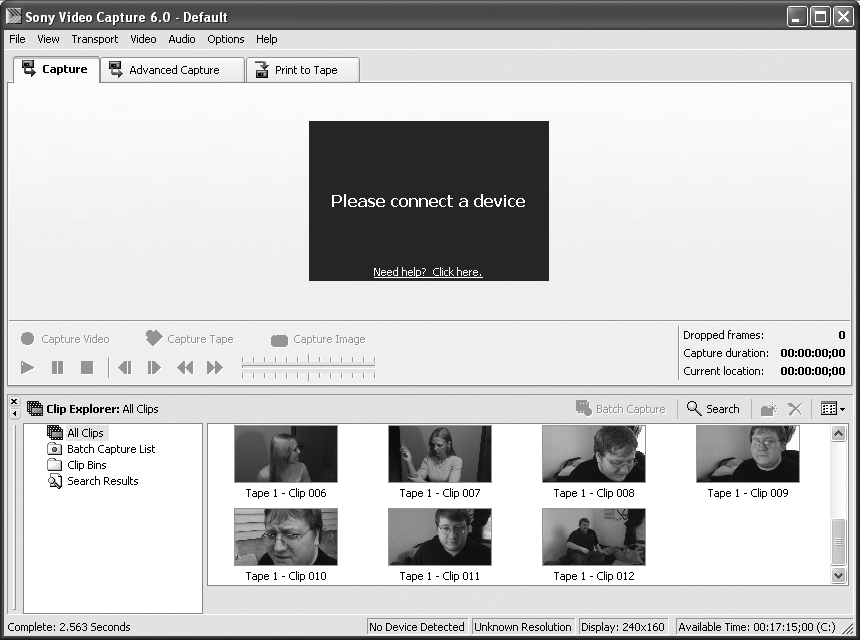
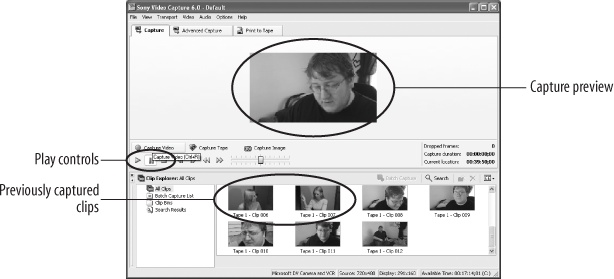
This video-capturing dialog box may contain simple Play, Rewind, and Fast-Forward functions to find the spot from which you’d like to begin rendering (and giving yourself a bit of preroll—that is, capturing a few seconds before the spot at which you want your video to begin—might help you while editing). Once you find the spot, hit the Capture button.
If recording to DV tape (the most popular method), you will have to transfer your video in real time. This means you can watch your video playback as it’s captured and stop it when the scene ends. If you’re using some sort of memory card or flash drive, you can transfer your entire video to your hard drive much more quickly.
After the capturing is complete, you are ready to view and edit your footage.
Importing Media
You may want to use media beyond what you’ve captured with your camera in your videos. Perhaps your friend’s band has allowed you to use their music, you make your own music, or you’ve designed a really neat title card in Adobe Photoshop. Either way, you’re going to have to import that media as well. Thankfully, because you’ll be doing this a lot, most programs have made this function just a one-click process.
In Vegas Movie Studio, you simply click the Import Media button, found right above the Project Media window, as shown in Figure 3-19.
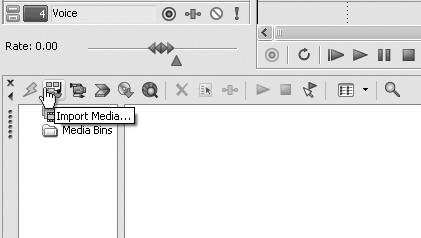
The Import Media button will allow you to browse your computer for any file that Vegas Movie Studio can handle, from still images to animated GIFs to video files and audio, including AIFFs, WAVs, and MP3s.
Once imported into Vegas Movie Studio, you can simply drag and drop your files into the timeline just like the footage you captured earlier in this chapter.
Editing Choices
Editing has very few hard and fast rules. You certainly can get away with using various transitions like wipes (where one scene slides over another, bumping it off the screen) or cross-dissolves (where one scene fades into the next). But these transitions get in the way and usually distract from the material you’re presenting. In other words, people notice these types of edits more than the content. People new to editing tend to do fancy transitions because they can, not because they should. It’s usually a mistake.
The best edits are seamless. This doesn’t mean the trained eye can’t see them; they are, after all, cuts that remove frames from the continuous motion, but if done with care, most viewers won’t even notice a new camera angle or position. You can achieve this in a variety of ways, some of which are outlined here:
Jump cut: A jump cut is a transition that simply “jumps” from one scene to the next. In most vlogs, you will typically see the YouTuber jump around in the frame as they cut from one sentence or paragraph to the next. This may be used to cut out mistakes to shorten the overall video length by cutting out pauses or for comedic effect, such as cutting to a new standing position after the punch line of each joke.
L-cut: An L-cut is used a lot in Hollywood blockbusters during conversations, especially phone call conversations. If we were to jump cut from one piece of dialogue to the next, the conversation feels very distant and separated, like two people delivering lines. However, if you overlap the video and audio tracks (which visually form an L-like shape in your NLE) during a conversation, your viewers can now see reactions from the person not speaking, while hearing the voice of the speaker. These reactionary shots can be short and hold only for a moment or two before you cut to the matching video, but they will really sell two separate shots as one continuous conversation.
Other cuts: Depending on which NLE software you’ve chosen, you may have an array of other premade transitions available to you, such as the wipes or dissolves I mentioned earlier, along with flashes, pushes, and other reveals (which are fancy forms of transitions). Use these transitions sparingly, though; overusing these effects is the mark of an amateur, and they really distract from your material.
OK, so now that you know what’s available, let’s go ahead and look at how to perform the most common edits.
The jump cut
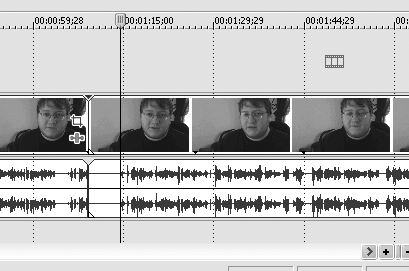
The simplest, most effective, and most used of the three edits discussed earlier, is the jump cut. To perform a jump cut, you are simply going to remove a given number of frames between two points in your video. Perhaps you stumbled over your words and started a line of dialogue over, or perhaps you received a phone call and had to pause your recording for a moment. Either way, to perform a jump cut, place your cursor at the point where you want to make your first cut and, with the track selected, hit the S key on your keyboard, as demonstrated in Figure 3-20 and Figure 3-21.
Note
Be sure to first select the piece of footage you’d like to cut. If more than one file is beneath the cursor and neither is selected, pressing S on your keyboard will cut/slice both pieces of footage.
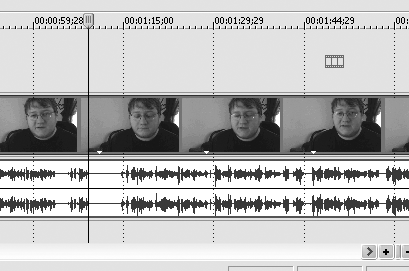
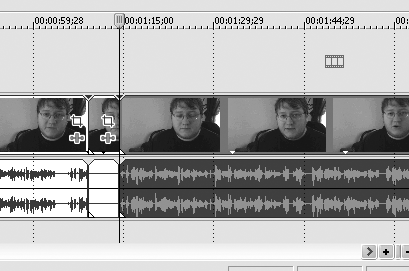
Now, move the cursor forward through your footage until you find the start of your next scene/sentence/topic. Place the cursor right where you’d like the next piece to come in, and again hit the S key on your keyboard to cut/slice it, as demonstrated in Figure 3-22 and Figure 3-23.
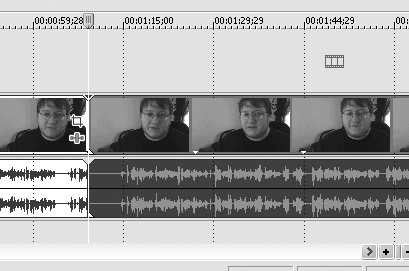
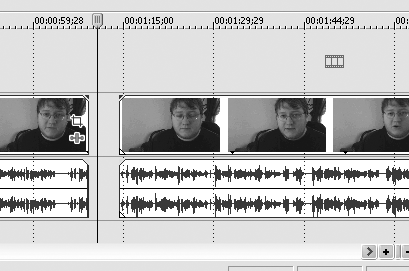
Now we are going to remove the unwanted frames between the first and second cuts. To delete these frames, simply click anywhere between the two cuts, and hit the Delete key on your keyboard, as shown in Figure 3-24.
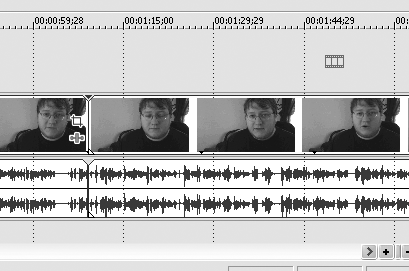
Now, we are going to use the mouse to slide the remaining frames over in the timeline to butt up against each other, as shown in Figure 3-25.
The L-cut
L-cuts are performed in a way similar to jump cuts, with one additional step: you must separate, or ungroup, the video from its audio track.
When you capture or import a new video file, its audio track is automatically grouped to it, so, as you move around the video frames, the audio remains in perfect sync. However, when we perform an L-cut, we want to actually remove frames, without removing the audio.
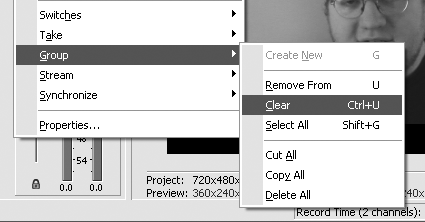
To ungroup any tracks in Sony Movie Studio, right-click either of the tracks (which will open a contextual menu) and choose Group > Clear, as shown in Figure 3-26.
Now you can freely move (or cut/slice) the video independent of the audio. Be careful to not slide the video out of sync with your audio. Use the ungrouping feature only to cut the edges of the video and audio independently, and then regroup the video and audio tracks.
To regroup the video and audio tracks, repeat the process of selecting both tracks by Shift-clicking them and then right-clicking either of the tracks. Then choose Group > Create New.
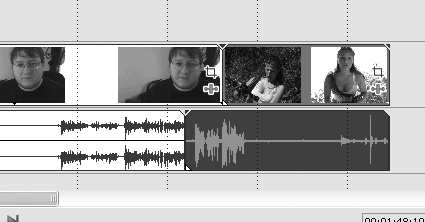
Figure 3-27 shows what a typical L-cut edit should look like. You’ll notice that the audio from our second clip extends beneath the video of our first clip, so, as you play back the edit, you would hear the audio of the second clip play while still seeing the video from the first clip. Then, the second clip would appear as a jump cut, and the audio would then be in sync with the second clip.
Other cuts
Depending on your choice of NLE software, you may also have additional transition options available. These could include fancy wipes, flash transitions, and numerous other playful elements. I won’t go into detail here about using these effects because the application and their functions will vary greatly across programs, but searching for the word transitions in your user’s guide or manual will provide you with all the information you’ll need for applying these effects.
Again, as I cautioned earlier, use these effects sparingly. They are exciting at first but can be very overused, which will make you look amateurish.
Rendering
Once your video is edited the way you’d like, you must take all the pieces and put them together into one file. This process is called rendering. Picture rendering as “cooking” the ingredients into the finished cake. Rendering essentially takes all the clips of audio and all the clips of videos, including transitions, effects, and other elements, and it squishes them into one, uneditable file. I stress the “uneditable” because if you throw away your raw footage files, you can’t easily use your rendered file to extract individual pieces of footage or audio.
Rendering is the final step in the editing process before you upload. When you render, you will also be compressing your files using a codec. You don’t need to understand codecs to understand why they are useful. Various codecs exist to compress your footage into a useable-sized file. Uncompressed video is huge…very huge. Uploading uncompressed video would take hours or days depending on your connection. So when we render, we choose a compression format, lose a little bit of quality, but save a lot of hard drive space.
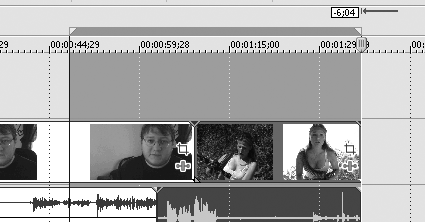
To render your footage, first set beginning and ending markers in your NLE by clicking and dragging your cursor directly above the timeline, as shown in Figure 3-28.
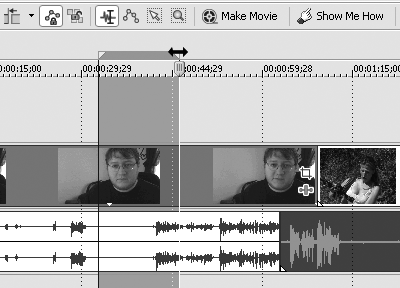
This tells the program which part of the project is to be rendered. Again, this will vary for each NLE, but you should have markers similar to those shown in Figure 3-29. You can also hit the I key for the in point, or start, and the O key for the out point, or end. This works on many other NLE programs, including Vegas Pro.
From the File menu, choose Render As. (This may also be labeled as Export, depending on which editing software you’re using.) This will open a dialog box with various rendering options. From this dialog box you can choose the file format you’d like to render to (.wmv, .mov, and .avi are the most popular choices), and you can set the compression settings as shown in Figure 3-30.
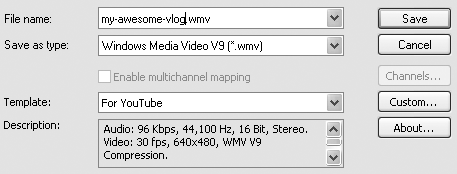
I work on a PC and therefore use .wmv for my file format. As for compression settings, I’ve found that the following settings work well for me in a quality to file size ratio. You can adjust these settings after clicking the Custom button, as shown in Figure 3-30.
Video Rendering Quality: Good
Video Mode: Quality VBR
Video Quality: 90%
You may have additional fine-tuning options available, but I’d leave most of those set to the default setting unless you know what you’re doing.
When you’re finished, add a title to your file, and click Save, which will begin the rendering process. Rendering can take anywhere from 2 to 10 times the amount of running time of the video; it all depends on your computer’s processor, the number of effects and transitions, and your computer’s free memory. For instance, a 4-minute video can take between 8 and 40 minutes to render.
The resulting rendered file should now be about 10 MB in size for every 1 minute of video (a 4-minute video would total roughly 40 MBs). This rendered file is the one you should be uploading to YouTube. As mentioned earlier, you should hang on to your larger, uncompressed, raw files if you believe you will ever need to reedit or reuse any video or audio elements in a future project. To save space on your hard drive, you can back them up to data DVD or get an external FireWire drive to back up many projects.
Your editing program has numerous other features. Be sure to thumb through your owner’s manual, or check out a few online tutorials. Websites like
| www.creativecow.net (URL 3.36) |
have wonderful, free video tutorials that cover Vegas, AfterEffects, and many other popular video-editing software. As with any hobby, the more you do it, the better you become.
With that in mind, let’s move on to Chapter 4, where you’ll learn how to set up your YouTube profile so you can begin uploading videos.