
Chapter 2. Start with SharePoint
I recommend you use the 30-day free trial of SharePoint before installing it on Windows Server 2003, because it’s free, painless, and quick. Then, if you like it, go ahead and put it on your server. To get a trial SharePoint site:
Follow the sign-up instructions.
Wait for email confirming that your site has been created.
After you’ve signed up for the free trial, you’ll want to:
Add members to the site
Customize the site’s home page
Add content to the site
The following sections provide a quick tutorial. You may want to follow along using your own trial site to get a better understanding of SharePoint.
Adding Members
To add members to a SharePoint site:
From the home page navigation bar, click Site Settings → “Manage users” → “Add users”. SharePoint displays the screen shown in Figure 2-1.
Enter the usernames you want to add, select a group for the new members, and click Next.
Type a greeting to send to the new SharePoint members and click Finish to complete the task. Each new member will receive an email that includes her username and an automatically generated password for the site.
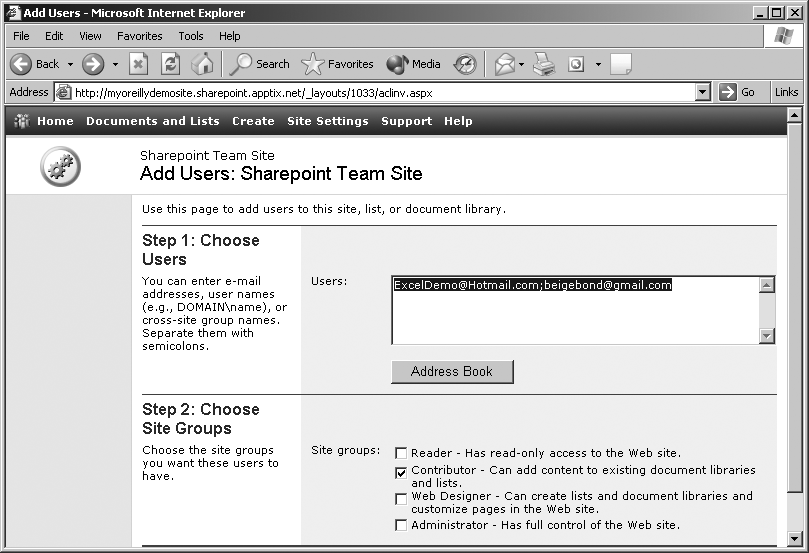
Adding members by site group lets you add new members in batches rather than one at a time. Table 2-1 lists SharePoint’s built-in groups.
Group | Access allowed |
Guest | No access by default, but can be granted access to specific items |
Reader | Read-only access to the site |
Contributor | Add content to existing document libraries and lists |
Web Designer | Create lists and document libraries and customize pages in the site |
Administrator | Full control of the site |
Changing Pages
Administrators and web designers can change the appearance of pages on the SharePoint site by applying themes, by designing an existing page, or by using FrontPage. Table 2-2 summarizes those different techniques.
To apply a theme, click Site Settings → “Apply Theme to site” and choose a theme. Themes only affect the current site. Subsites and workspaces subordinate to the site are not affected.
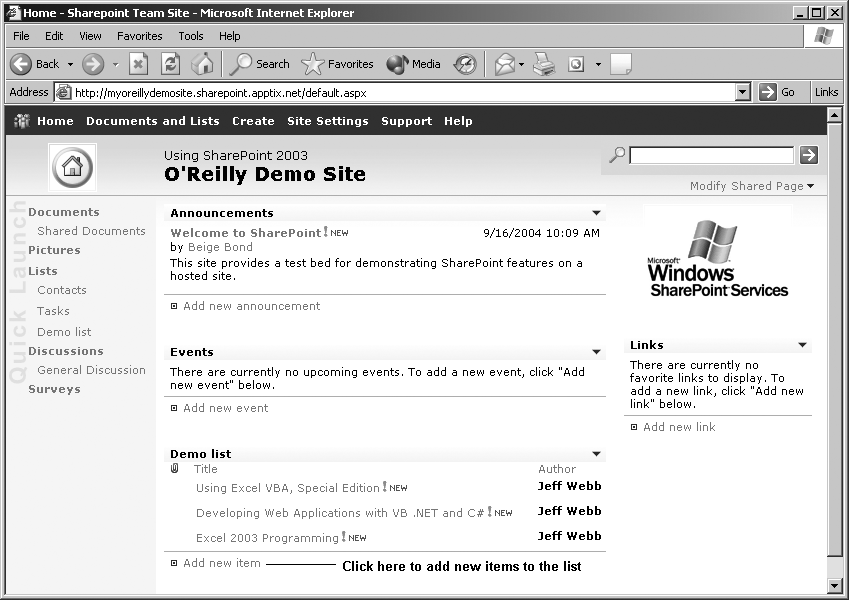
To design a page, click Modify Shared Page → “Design this page”, in the upper-right corner (Figure 2-2). SharePoint displays the page in edit mode, showing the web part zones. You can drag web parts from one zone to another or select Modify Shared Web Parts to change a web part.
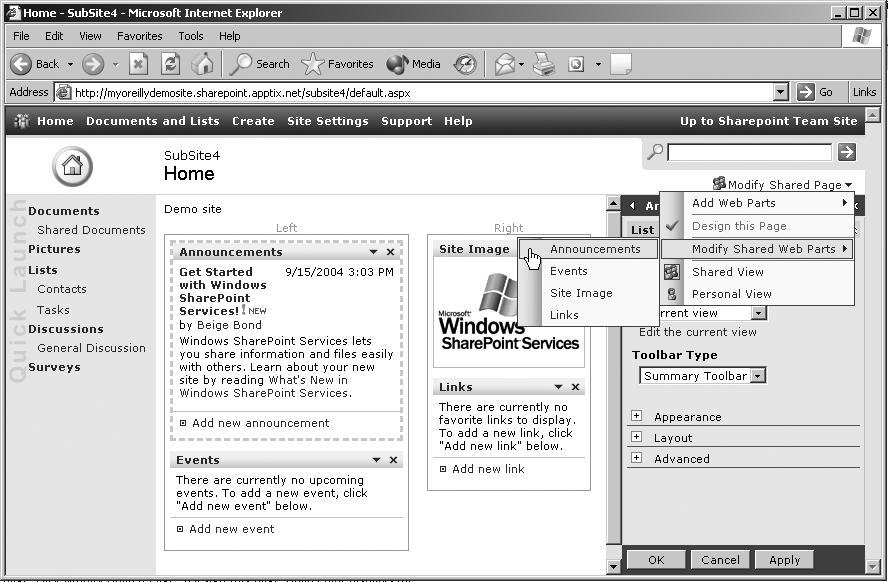
This technique is handy for minor modifications, such as changing the text in a titlebar of a web part. For example, to change the “Announcements” title bar in Figure 2-2 to “Quote of the day,” you would do the following:
Click Modify Shared Page → Modify Shared Web Parts → Announcements. SharePoint displays the Announcements web part in edit mode.
In the task pane, click Appearance and change the Title to “Quote of the day”; then click OK. SharePoint makes the change.
Several of the elements on the home page can’t be changed through the browser. The navigation bar, Quick Launch, page title, and search box are static web parts. The easiest way to change these items is by editing the page in FrontPage.
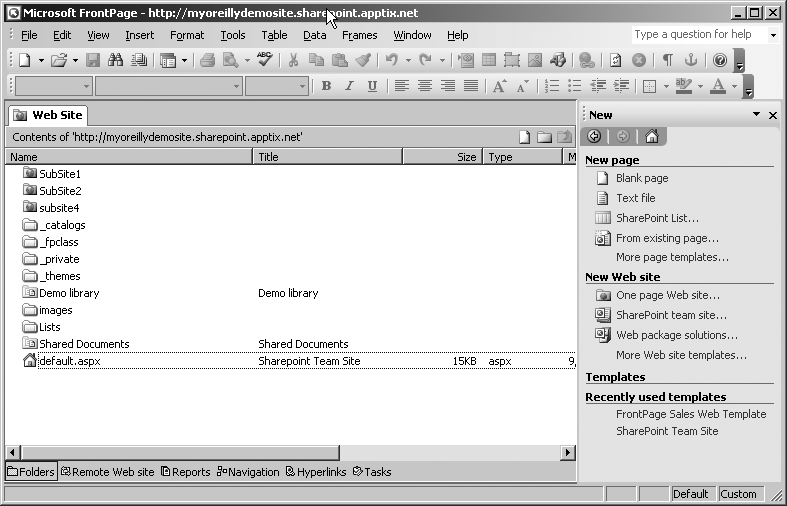
To open a SharePoint web site from FrontPage, choose File → Open Site and enter the address of the site you want to open. For example, http://myoreillydemosite.sharepoint.apptix.net/.
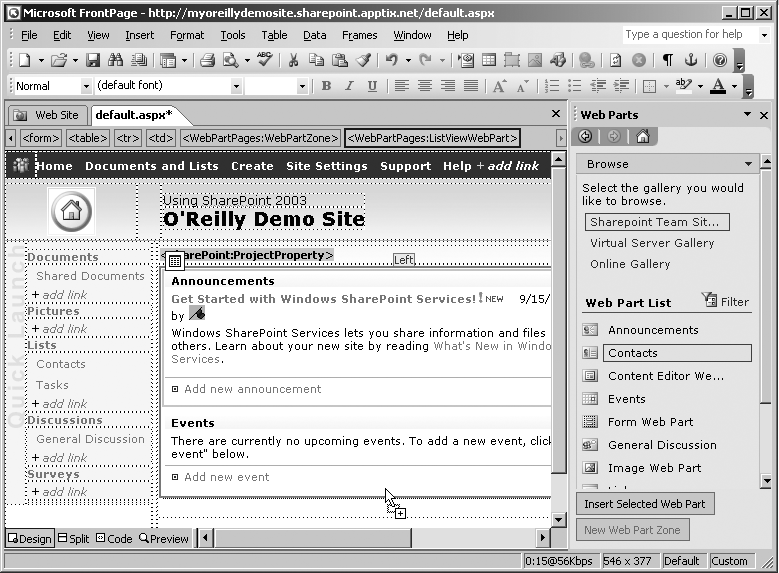
Using FrontPage, you can edit text directly on the SharePoint home page, add or remove links, and edit web parts (the web part tasks are a little hard to locate; they are found in the Data menu). For example, to add a web part to the SharePoint page in FrontPage:
Choose Data → Add Web Part. FrontPage displays the Web Parts task pane.
Drag web parts from the task pane to web part zones on the SharePoint page, as shown in Figure 2-3.
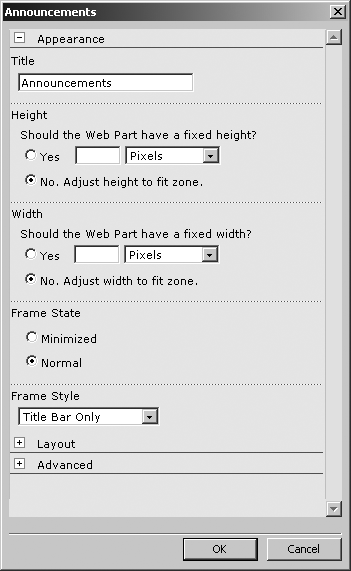
To edit a web part in FrontPage, right-click the web part and select Web Part Properties. FrontPage displays the part’s properties in a new window, as shown in Figure 2-4.
Adding Content
There are many ways to add content to a SharePoint site depending on the type of content you want to add. The following sections walk you through the various ways to add lists, libraries, pages, and workspaces to a SharePoint site and explain when to use each approach.
Adding Lists
At the simplest level, you can add content to the home page by clicking “Add new announcement”, “Add new event”, or “Add new link”. Clicking on any of these displays a form view for adding items to the SharePoint list, as shown in Figure 2-5.
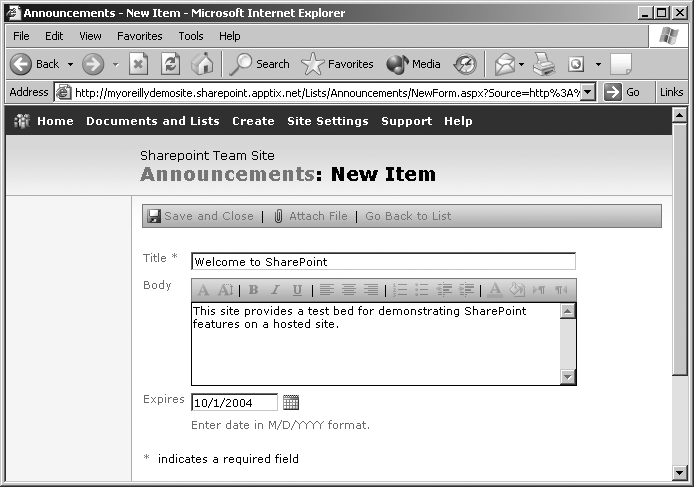
When you click “Save and Close”, SharePoint adds the announcement to the list currently displayed on the home page in the Announcements web part.
To create your own lists from the browser:
Click “Documents and Lists” → Create → Custom List. SharePoint displays the New List page.
Enter the list information and click Create. SharePoint displays the new list in its default view.
Click “Modify settings and columns” → “Add new column” to add columns to the list. SharePoint displays the page shown in Figure 2-6.
Add column information and click OK.
Repeat steps 3 and 4 for each column in the list.

To display the new list on the home page:
From the home page, click Modify Shared Page → Add Web Parts → Browse. SharePoint displays the page in edit mode and shows the new list as a web part in the task pane.
Drag the new list from the task pane to a web part zone on the home page.
Click Modify Shared Page → Modify Shared Web Parts →
list nameto change the properties of the displayed list. For example, select Toolbar Type → “Summary toolbar” and click OK.You can now add items to the list by clicking “Add new item” on the list’s web part, as shown in Figure 2-7.
To close a web part on the home page:
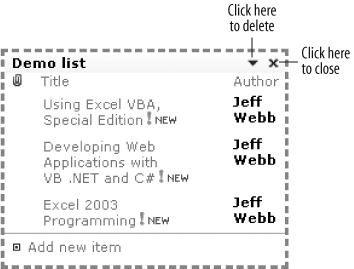
Choose Modify Shared Page → Modify Shared Web Parts →
web part name. SharePoint selects the list and places around it a dashed border like that in Figure 2-8.Click the × in the upper-right corner to close the web part.
Closing the web part hides it, but does not remove it from the page. Instead, the web part is moved to the Web Part Page Gallery in the Web Parts task pane. You can drag web parts from the Web Part List back onto the page to restore them.
To delete a web part from a page:
Choose Modify Shared Page → Modify Shared Web Parts →
web part name, or choose Modify Shared Page → Add Web Parts → Browse.Click the down arrow in the upper-right corner of the web part and choose Delete.
Building Libraries
A library is a type of list that includes documents and version histories. Team sites include one built-in library, named Shared Documents. To add documents to that library, follow these steps:
From the home page, click Shared Documents → Upload document.
Click Browse to upload documents one at a time or “Upload multiple files” to upload a group of files from a single folder on your computer.
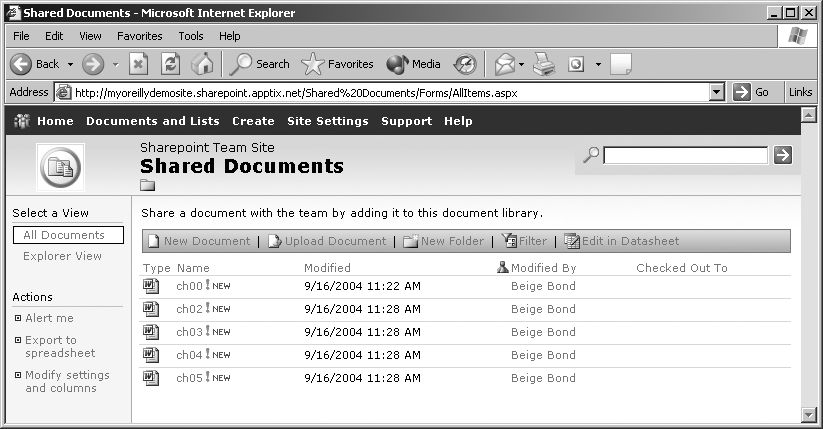
Click “Save and Close”. SharePoint uploads the documents and adds them to the library, as shown in Figure 2-9.
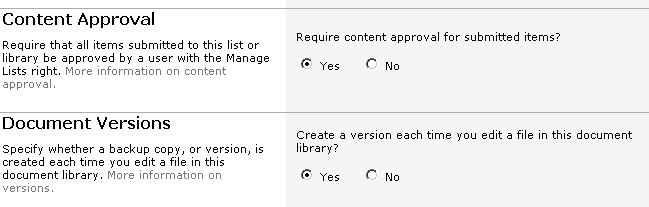
The Shared Documents library doesn’t keep track of version history by default. You can change this settling by clicking “Modify settings and columns” → “Change general settings” → “Create a version each time you edit a file in this document library?” → Yes. You can also require approval before documents are accepted to the list, as shown in Figure 2-10.
Once documents are uploaded to a library, you can perform a variety of tasks by clicking the down arrow next to the document name, which brings up the Edit menu, as shown in Figure 2-11.
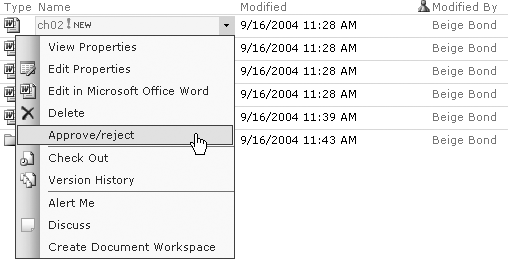
Members may not be able to perform all of the tasks they see on the Edit menu. For instance, a member of the Reader group can’t edit a document in Word.
To create a new library in a SharePoint site:
Click Create → Document Library. SharePoint displays the New Library Page.
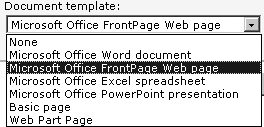
Enter the library name, description, navigation, versioning, and template information and click Create.
The template list in step 2 includes a number of interesting settings, as shown in Figure 2-12.
Constructing New Pages
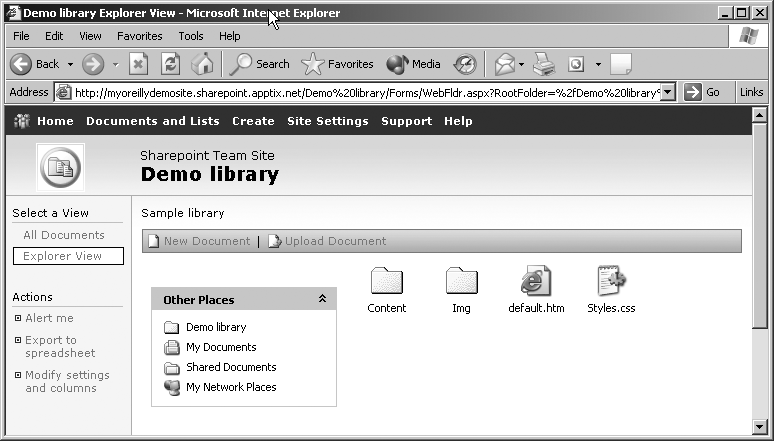
As you just saw, you can create new web pages on a site using document libraries. It’s pretty easy to create a library for web pages and to add folders and other content to create a web site, as shown in Figure 2-13.
Libraries are stored as folders within the site, so to navigate to a web page, use the address where the page is stored. For example:
| http://myoreillydemosite.sharepoint.apptix.net/SampleSite1/default.aspx |
You can even omit default.aspx since Microsoft Internet Information Services (IIS) automatically looks for a default page if you omit the file name.
There are a couple things you can’t include in a library, however:
Executable components (.exe, .dll, .com, etc.) are rejected as a security precaution.
ASP.NET pages containing server-side scripts are allowed in a library, but the scripts are disabled (again, a security precaution).
Libraries provide a browser-based interface for adding and editing web pages. In some cases, you may want to add the pages directly to the site rather than going through a library. To add web pages directly to the site:
Open the SharePoint site in FrontPage.
Click File → New. FrontPage displays the “New page” task pane (Figure 2-14).
Select one of the page types or click “More page templates” to see a list of templates that include web part pages.
FrontPage is the most flexible way to add or edit pages in the site; however, pages won’t have a revision history unless they are part of a document library.
Creating PDF Libraries
Document libraries are a great way to publish PDF documents. PDF files can be uploaded the same way as other files (see the earlier section "Building Libraries“). However, PDF files don’t appear with the Adobe icon in SharePoint. To fix this, take the following steps:
Note
This task requires administrative privileges, so you may need to ask for a system administrator’s help.
Get a copy of the Adobe PDF icon file. You can find it by searching Google images for PDF16.gif.
Copy PDF16.gif to the C:Program FilesCommon FilesMicrosoft Sharedweb server extensions60TEMPLATEIMAGES folder on the SharePoint server.
Open C:Program FilesCommon FilesMicrosoft Sharedweb server extensions60TEMPLATEXMLDocIcon.xml and add the following line to the
<ByExtension>element:<Mapping Key="pdf" Value="pdf16.gif"/>
Save and close DocIcon.xml.
Run iisreset.exe from the command line to initiate your changes.
You can take similar steps to make SharePoint display the correct icon for other non-Microsoft file types, such as Autodesk DWF files. Why doesn’t SharePoint include these icons by default? My guess is, they are owned by other companies and Microsoft can’t distribute them without permission. I don’t know whether or not they asked.
PDF files aren’t automatically included in SharePoint search results either. To enable searching on PDF files, see "Searching Within PDFs" in Chapter 5.
Creating Workspaces
A workspace is a type of subsite within a team site. When multiple members need to have input on one or more related documents, you can create a workspace from a document library, an Office application, or the SharePoint navigation bar.
To create a workspace from Word, Excel, or PowerPoint:
Open the document.
Choose Tools → Shared Workspace. The application displays the Shared Workspace task pane.
Enter the name and location of the workspace and click Create. The application connects to the SharePoint site and creates a workspace for the open document.
Creating a workspace in this way links the local copy of your document to the copy stored in the SharePoint workspace. The next time you open the local copy, the application checks for updates from the SharePoint site. Similarly, changes you make are automatically sent to the SharePoint site.
To create a workspace from a document stored in a SharePoint library:
Select the document and choose Create Document Workspace from the context menu shown in Figure 2-11.
SharePoint displays a confirmation page. Click OK to create the workspace.
Creating a workspace from a library allows members to publish the document back to the library when they have completed their changes.
To create a workspace from the browser using the SharePoint navigation bar:
Click Create → “Sites and Workspaces”. SharePoint displays the New SharePoint Site page.
Enter the workspace name and description and click Create. SharePoint displays the Template Selection page.
Choose Document Workspace and click OK. SharePoint creates an empty workspace and displays its home page.
Some companies restrict the ability to create a workspace to certain users. In this case, you may need to ask a system administrator to create a workspace for you (he may let you look over his shoulder if you’re polite). Administrators usually create the workspace using the navigation bar.
Tip
If you open a document from a workspace and save it to your local computer, you will be asked if you want to be able to update the workspace copy. Choose Yes to link your local copy to the workspace copy.
It might seem strange that workspaces created from an Office application or a library may contain only a single document. Why create a whole web site for a single Word or Excel file? I’m not sure I know the answer, but you can add documents to the workspace fairly easily.
To add documents to a workspace from an Office application:
Open a document that is part of the workspace.
From the Shared Workspace task pane, choose the Documents icon and click “Add new document”.
To add documents from the workspace home page, simply click “Add new document”.
Setting Client Security
You will encounter two security issues the first time you use a SharePoint site over the Internet:
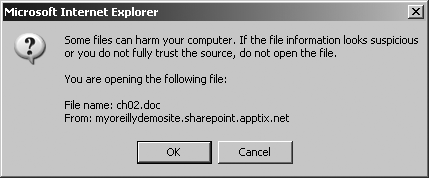
Opening files from a library or workspace displays a security warning, as shown in Figure 2-15.
You can’t create workspaces from Office applications.
Note
If you open the file using Office rather than the browser, you won’t see this warning.
This security warning refers to the risk of opening Office documents that contain macros. Macros sometimes include viruses that can infect your computer, so it is a very bad idea to allow macros to run if you don’t know exactly who created the file. The Office macro security settings can prevent macros from running. To check those settings in your Office application, choose Tools → Macro → Security.
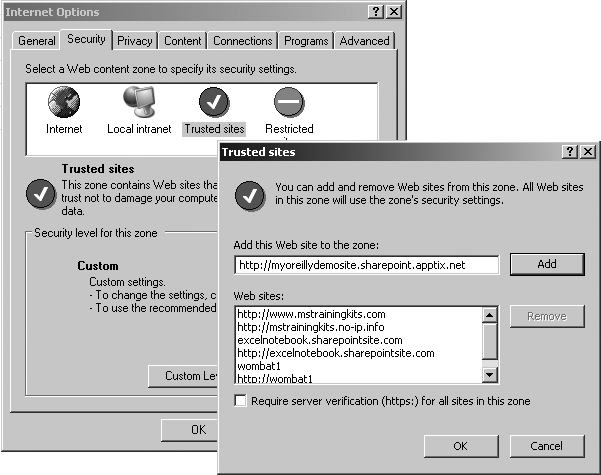
To allow Office to create workspaces across the Internet, add your SharePoint site to the list of trusted sites in Internet Explorer:
Choose Tools → Internet Options → Security → Trusted Sites → Sites. Internet Explorer displays a list of the trusted sites for your local computer (Figure 2-16).
Type the address of your site and click Add → OK → OK to close the dialog.
Once the SharePoint site is trusted, Office applications can create workspaces on the site from the Shared Workspace task pane. Neither of these security issues arise regarding SharePoint sites on your local area network; those sites are included in the Local intranet zone, which has a higher level of trust.