Chapter 7. Business Basics: Word Processing and More
Got a quarterly report, monster spreadsheet, or 100-slide presentation you need to check over while you’re on the road? Netbooks may not have the most powerful videogame-churning processors, but there’s more than enough mojo under the keyboard to handle standard office chores like word processing, number crunching, and slideshow creation.
As described in earlier chapters, netbooks come with the basic software like WordPad to let you do light word processing and other texty stuff. But you’re not stuck with only these simple tools—you can use much more powerful productivity software (like the nearly universal Microsoft Office) on your netbook. Ubuntu Linux machines come with the OpenOffice.org suite (think Microsoft Office, but free) already installed and ready for you to dig into a document or worksheet.
But you don’t have to limit yourself to using programs installed on your netbook. With the Web within reach, you can do your office homework online and even keep it there using tools like Google Docs & Spreadsheets and other free services designed to let you stay productive on the run. This chapter shows you what’s out there, software-wise, if you need to get a little work done between Facebook visits.
Microsoft Office for Windows Netbooks
The core programs in Microsoft Office’s suite—Word, Excel, and PowerPoint—have been around in some form for 20 years and have enjoyed something close to world domination for much of them. For much of the corporate and academic world, Microsoft Word is the standard for word processing; Excel owns the spreadsheet world, and even third-graders in suburban America are composing their book reports exclusively in PowerPoint.
So it’s probably safe to say that if you have a Windows netbook for business travel or school use, you might want to run at least one or two of the Office programs on it. You can write your papers or reports and format them nicely in Word, check your inventory in Excel, or proofread the latest company sales presentation in PowerPoint.
Microsoft Office has gotten more diverse since the early days of the suite. Programs in the various Office versions can include:
Word for word processing, basic graphic design, and simple Web-page creation.
Excel for spreadsheets, charts, formulas, and other ways to sort and manage data.
PowerPoint for creating slideshows and presentations.
Outlook for email, contact management, and appointment scheduling.
Publisher for creating custom flyers, brochures, stationery, and other company-branded materials.
OneNote for creating a digital shoebox where you can stash and organize text, images, and other files for the projects you’re working on.
Although you don’t have to have Office installed on your netbook to open and view Office files you’ve been sent, having the suite makes it easier, since you have the full Office toolbox at your disposal. (See Using OpenOffice.org 3 to Open Microsoft Office Files for instructions on how to open Office files without actually having Office.)
Tip
Although it’s the most common, Microsoft Office isn’t the only business software game in town. ThinkFree Office (http://product.thinkfree.com) has a $50 suite that works with Office file formats and even comes in a netbook edition (Social Networking Sites). Corel makes the WordPerfect word processing program and has its own office suite (you can get a free trial version at www.corel.com). And if you want something free that lasts longer than 30 or 60 days, OpenOffice.org also comes in a Windows version at www.openoffice.org. See OpenOffice.org: Free Word Processing, Spreadsheets, and More for details.
Installing Microsoft Office
Before you go to Installationtown, there are a few things to keep in mind about putting Office on your netbook, namely speed and space.
On the speed side, although the system requirements for Office 2007 say you need at least 256 MB of memory in the netbook, 512 MB makes the program less sluggish. More memory is also recommended for Office features like Instant Search, so having more memory installed in your netbook helps zip things along.
As for space matters, the Office installation files need at least 1.5 GB of your netbook’s disk space. If you have a regular 80 or 160 GB hard drive, this isn’t as painful as someone with an 8 or 16 GB solid-state drive. (After you install Office, though, you can dump the downloaded installer files and grab some of that disk turf back. Just trash the Downloads folder left behind on your desktop or in whichever folder you use to store downloaded files.)
You have at least a couple ways to get the Office programs on your little laptop:
Use the Office installation disc and an external disc drive. You also need a valid license code, so check your particular edition to see on how many computers you can install the software; the Home and Student Edition of Office 2007, for example, lets you install the programs on up to three non-commercial home computers. Insert the installer disc into the netbook’s attached drive and follow the onscreen guide.
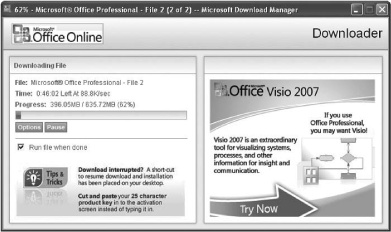
You can download the whole enchilada from Microsoft at office.microsoft.com, use it free for 60 days, and then pay for it if you decide to keep it. The process works like this: You fill out a short form on the Office download site, Microsoft emails you a temporary activation code, and you download a small file called the Microsoft Download Manager to your netbook’s desktop. If it doesn’t automatically run after it downloads, double-click this file to kick off the download marathon and get the other 650 MB or so of Office program files. Downloading can take a couple of hours, depending on the speed of your broadband connection. When the download is complete, the installer asks you if you’d like to install Microsoft Office.
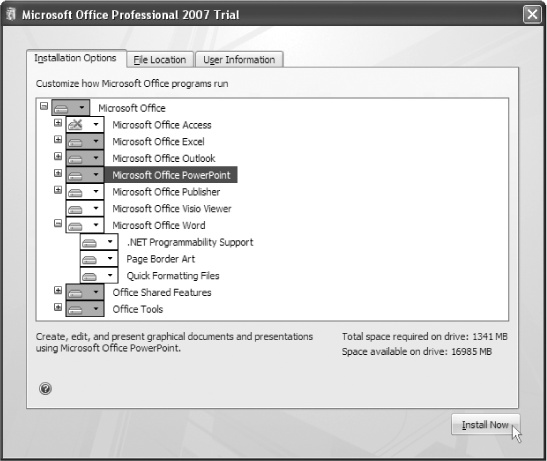
Microsoft has a thing for multiple editions of its programs: two editions of Windows XP, four main editions of Windows Vista, six assorted worldwide editions of Windows 7, and four versions of Microsoft Office 2007. The Office editions vary by the different combinations of included programs. But even the most basic one—Home and Student Edition—comes with Word, Excel, and PowerPoint. The more expensive business-oriented Office packages include corporate tools like the Access database program.
But remember that you can choose what gets installed. Click the Install Now button if you want to put everything on the netbook. Click the Customize button on the installer’s dialog box if you want to get picky. Want Word but feel the need to leave Excel and PowerPoint at home? Just tell the installer so.
Tip
If you downloaded Office as a free trial and want to go ahead and buy it before your 60 days are up, you can pay anytime. Just click the round Office button in the top-left corner. Click the Options button (which is called Word Options, Excel Options, and so on, depending on which room in the suite you happen to be in). Click Resources in the left pane and then, next to Activate Microsoft Office, click the Activate button to open the Activation Wizard. Click the Convert button and get out your credit card to pay for your official product key that unlocks the Office software permanently.
Getting Around Microsoft Office
Once you install Office, summon your program of choice from Start→All Programs→Microsoft Office→Microsoft Office Word 2007 (or Excel, or PowerPoint) to get rolling. Or, if you want to add your most-used programs to your Start menu where you can easily find them, right-click each program’s name in the All Programs submenu and choose “Pin to Start Menu.”
Microsoft Office on the netbook works just like Microsoft Office on a desktop or full-sized laptop except that you have less of a screen to see it on. And it may be a tad slower, depending on the amount of memory you have installed on the netbook.
If you’re already an Office power user, you’re ready to jump right in now. If you’re still a bit of a novice, check out one of many large, heavy books on the subject, like Office 2007: The Missing Manual (www.missingmanuals.com). No matter what your familiarity, here are some quick tricks you can do right now to make Office 2007 on the netbook a little easier to use:
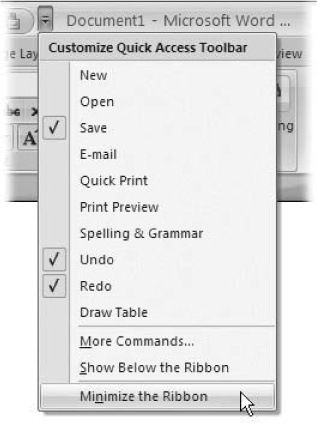
Minimize the ribbon. The ribbon is that massive dashboard-like panel of icons and menus along the top of the screen in Office programs like Word and Excel. See how much of your netbook’s screen that stuff takes up? To roll up the ribbon while you work, click the small black arrow at the top of the screen on the left and choose “Minimize the Ribbon” to make all that stuff disappear until you go back to this menu and reverse course.
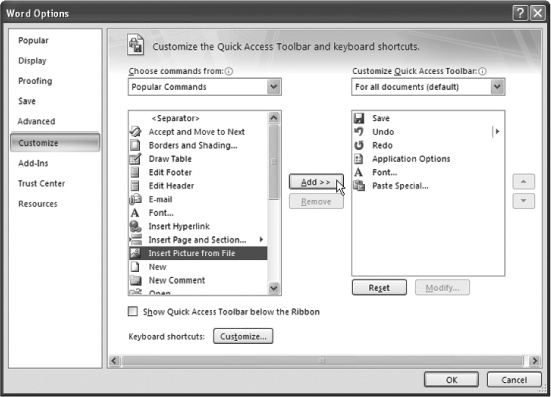
Make keyboard shortcuts. Office programs have more menu items than an all-night diner, but the good news is that you can assign many of them to keyboard shortcuts. This means you can just press a couple of keys to, say, check spelling or call up the box where you can add a border to a document. To make your own keyboard shortcuts—or see which ones Microsoft has already assigned—click the round Office button in the upper-left corner and then click the Options button at the bottom of the box. Click Customize in the left panel. At the bottom of the box next to Keyboard Shortcuts, click the Customize button there to see all the menu items that are (or can be) assigned to keyboard shortcuts. Select a menu item—if it has a shortcut, it’s displayed in Current Keys area. If it doesn’t have a shortcut, click in the Press New Shortcut Key box and press the key combination you want to use.
Customize toolbars. You can also design your own toolbars and opt to display only the icons you want to see in the Quick Access Toolbar at the top of the screen. To do so, click the round Office button in the upper-left corner and then click the Options button at the bottom of the box. Click Customize in the left panel. In the left column, select the commands and icons you want to see in the Quick Access Toolbar and click the Add button. If you make a mistake, in the right column, select the one you don’t want and click Remove. Click OK to add your selections to the tiny toolbar at the top of the screen. (The Quick Access Toolbar stays up there even if you minimize the Ribbon.)
Older versions of Office let you swap different toolbars on and off the screen, depending on what you want to see. Check under the View menu for each program to see what your options are.
Tip
Microsoft offers several other free programs you can download and try out for a couple months. These include Groove for collaborating, Visio for making flowcharts and other business graphics, and Project for managing complex projects. You can find them all at http://us20.trymicrosoftoffice.com/default.aspx.
Microsoft Office Live Workspace
Ever run off to a meeting on Monday morning and realize that the massive Word report you spent all weekend slaving over is…still at home on the netbook? The downside to working on multiple computers is that you tend to have files scattered across various machines. Sure, you can email them to yourself or pop them onto a USB pocket drive to tote around, but Microsoft has another solution for you.
It’s a little something they call Microsoft Office Live Workspace. And it’s free. You get your own little corner on one of Microsoft’s servers to store your Word, Excel, and other Office files. You can get to them from any Internet-connected computer—or even give other people permission to see or edit your files.
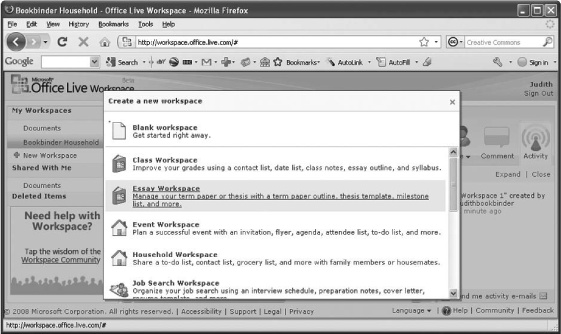
You can also create workspaces—shared online collections of documents, calendars, and other files—and collaborate with coworkers or family members. You don’t even have to think too hard about what to put online—the Office Live site has a number of preconfigured workspaces, like a household-themed one with a grocery list, calendar, emergency contact sheet, and so on. Workspaces for sports teams, office projects, school classes, events, job searches, travel, and other situations are also available on Office Live Workspace.
Setting Up Your Office Live Workspace
Getting your own chunk of the Office Live Workspace action is simple:
Point your web browser to www.officelive.com and sign up.
If you already have a Windows Live ID (that is, an account with Microsoft, like a Hotmail address, Xbox Live account, or other Microsoftian product), sign in. If you don’t have an account, head over to www.live.com and sign up. Next, click the Get Started Now button. You need to be using either Internet Explorer or Firefox for Windows. (Sorry, Linux peeps.) Once you get your Office Live account set up, you can store up to 5 MB of stuff there, courtesy of Microsoft.
After you land in your newly created Office Live account, download the Microsoft Office update offered on the main page.
Click the onscreen button for the Microsoft Office update. This downloads a small setup program that gives you menu options in your netbook’s Office programs to save files right to your online workspace instead of having to copy them manually.
Create a new workspace.
The main screen offers a three-step tutorial and little explanatory videos on making workspaces and adding files to them. You can follow along there or just go rogue by clicking the green plus (+) button next to Add Workspace in the left pane of the browser window. A window pops up, asking what type of workspace you want to create and offering you several preformatted choices—or even a free-form blank workspace to get you started.
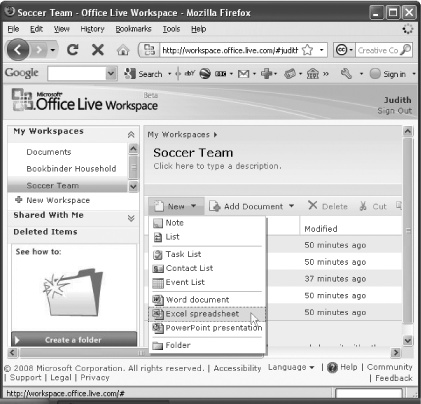
Add documents.
On the top row of your workspace, click the Add Document button. From the menu, you can choose to add a single file—or multiple documents. A box pops up and asks you to locate the files on your hard drive. You can upload Office files, pictures, audio clips…just about anything. You can even make your own files right here in the Office Live Workspace. Click the New button and choose the type of file you want to make, like an Excel spreadsheet, an Event list, or even a Note to yourself.
Note
Microsoft plans to replace both Office 2007 and Office Live Workspace in the first half of 2010 with Microsoft Office 2010. In addition to the new desktop software, Office 2010 will have a free-for-everyone Web component with stripped-down versions of Word, Excel, and the gang. Take that, Google Docs! Keep tabs on the software at http://www.microsoft.com/office/2010.
Share with others.
Chapter 8 of this book is all about sharing documents and collaborating with others online, but who wants to wait until Chapter 8? Click the Share icon on your workspace page. Here, you can give friends, family, or coworkers permission to visit your workspace, share your files, and see what you’re up to. Choose Share Workspace (unless you want to Share the Screen with someone, which is your other option here) and when the message form pops up, add the people’s email addresses. They get a message with a link to your workspace, and soon everyone’s sharing.
When you’re in the message form, you can also set privileges for people to edit or just view the files—handy if you want to prevent the kids from adding unhealthy items to the grocery list.
When you’re done using your workspace for the day, log out. You can always come back to it by signing in at http://workspace.officelive.com with the name and password you used when you set up your Office Live Workspace account.
Tip
If you have questions about how Office Live Workspace works or what you’re allowed to do with it, visit the question-and-answers page at http://workspace.officelive.com/FAQ.
OpenOffice.org: Free Word Processing, Spreadsheets, and More
As powerful and ubiquitous as Microsoft Office is, it still costs money—about $100 to $150, and that’s for the bargain-basement edition. But what if you don’t have that kind of cash, or don’t need complete compatibility with other people’s Office files?
Consider OpenOffice.org, a free, open-source alternative to Microsoft’s ubiquity. But don’t worry, being a maverick won’t make you a pariah: Open-Office.org can open and save files in Microsoft Office’s own formats. You can exchange those files with people using Word or Excel without having to buy those programs yourself. Pretty cool, eh?
So what programs do you get with the OpenOffice.org suite? As with Microsoft Office, you get the standard toolbox for business work:
Writer. An alternative to Microsoft Word, Writer is a powerful word processor that includes plenty of text and document formatting tools and other writing aids like auto-correction. You can insert graphics, tables, and other images into your documents—or just use it to make an artfully styled family holiday newsletter.
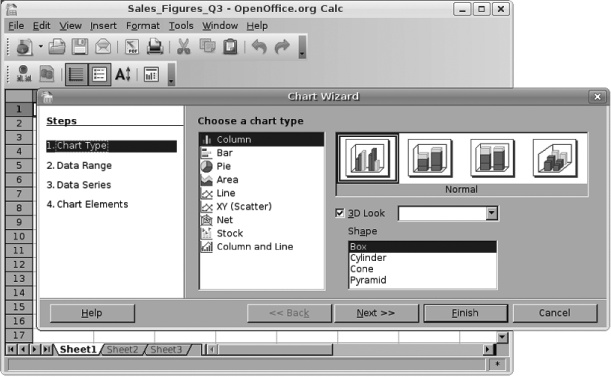
Calc. If you need to crunch numbers, run formulas, make charts, and generally mine the depths of your data, use Calc instead of Microsoft Excel.
Impress. You can create multimedia presentations that rival those of Microsoft PowerPoint with Impress, which lets you use animations, fonts, drawing tools, plus 2-D and 3-D clip art in your work.
Draw. Edging into Microsoft Visio territory, Draw is a graphics program that you can use to make diagrams, flowcharts, org charts, and even free-form illustrations. You can open files in common formats like JPG, TIF, GIF, BMP, and PNG, and save your work in the OpenDocument format, which Microsoft Office (and most other office-software collections) can open.
Base. If you have a database or want to make one, the Base program that comes with OpenOffice.org can handle the job. Due to its more corporate nature, Base is sometimes not included in OpenOffice.org on some netbooks, but you can certainly download and install it from the Internet.
If you’ve been using similar programs, OpenOffice.org will seem vaguely familiar, as the text-formatting tools of Writer, rows and cells of Calc, and the slides of Impress all work basically the same way as those in other business programs. And face it: You can’t beat the price.
Tip
Need a spell checker for ancient Greek or an Australian medical dictionary to enhance your OpenOffice.org productivity? Programmers have come up with lots of little helper apps and other cool tools that work as add-ons to OpenOffice.org. Visit the collection at http://extensions.services.openoffice.org to see the vast range of stuff you can add to your suite.
Installing OpenOffice.org
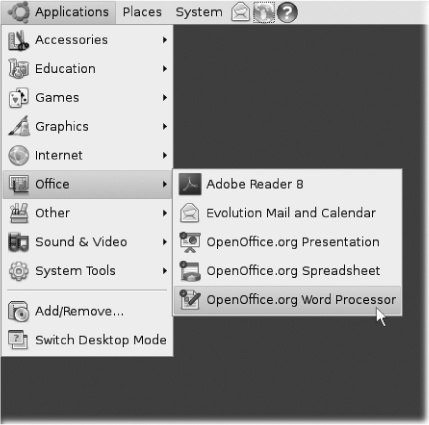
The good news for Ubuntu Linux netbookers is that OpenOffice.org is already installed on your computer. It’s part of Ubuntu, and you can find it on your system at Applications→Office (or Applications→Graphics if you’re looking for the Draw program).
If you have a Windows netbook, you can download the suite at http://download.openoffice.org. You need at least 650 MB of drive space to handle the installation files, but after you install Open-Office.org, you can toss those installers and only give up 44 MB. The suite can run on 256 MB of memory, but 512 MB is recommended. Once you install it, choose Start→All Programs→OpenOffice.org and open the program within the suite you want to use.
As with an open-source software project, there are a couple things to remember when using OpenOffice.org. First, the software is still a work-in-progress—a very advanced work-in-progress, but a few bugs and glitches may remain. Second, there’s no free 90-day phone and email support like Microsoft offers.
OpenOffice.org has tons of support documents, forums, and a Frequently Asked Questions page at http://support.openoffice.org/index.html, but no nice person on the other end of the telephone line to gently guide you through your problem, even at $49 a call like Microsoft charges after the first 90 days. (The OpenOffice.org support page lists consultants you can hire, though.)
Tip
Need some training? You can find free OpenOffice.org tutorials online for everything from installing the software to using specific programs in the suite at www.tutorialsforopenoffice.org.
Using OpenOffice.org 3 to Open Microsoft Office Files
With so many major corporations, schools, and individuals using Microsoft Word, chances are someday someone will send you a Word doc. If you have Version 3 of OpenOffice.org, double-click the document and see if Writer jumps up to open it. If it doesn’t, choose File→Open in Writer, navigate to the document, and open it that way. Documents in older versions of Word should open just fine in OpenOffice.org 3 as well.
But while OpenOffice.org lets you open and edit the files, it doesn’t let you save files in Word 2007’s .docx format. You can, however, save them in the old standby .doc format, which just about every version of Microsoft Word can open.
Tip
As handy as OpenOffice.org is, it sometimes has trouble translating intensive formatting, charts, and other complex things Word lets you do to a document. You may find borders and tables messed up, fonts looking weird, and other anomalies. If that’s the case, take a browser stroll to the OpenOffice.org Ninja site at www.oooninja.com. In addition to tips and tutorials, you can also find converter programs that make heavily formatted Word 2007 files translate more accurately, plus versions of Office 2007 fonts for Linux and Windows XP.
Google Docs: An Online Alternative
Google started out as a simple, powerful search engine in the late 1990s, and boy, has it grown. Google now offers dozens of web-based services and an online warehouse of free software like Google Earth and Picasa (Photo Editing with Picasa).
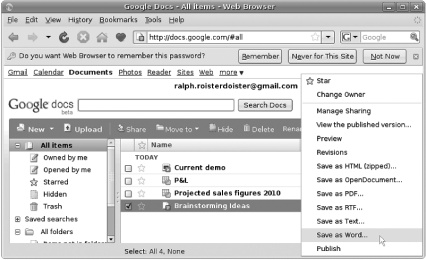
Among these goodies is Google Docs & Spreadsheets, an online word-processor, spreadsheet, and presentation suite that lets you make and edit files right in your web browser. Your files live on the Web, where you can get to them from any Internet-connected computer. From here, you can send files by email, share them with other users, or save them on your netbook in several common formats like plain text, PDF (Viewing PDFs with Adobe Reader), Web-page code, or Microsoft Word’s own .doc format.
You can even collaborate with coworkers on the same file at the very same time (Tracking Revisions to Documents) while chatting over Google Talk (Setting Up Instant Message Software)—eliminating the need for expensive long-distance phone calls. As flexible as it is, Google Docs doesn’t yet have the advanced features that Microsoft Office and OpenOffice.org give you for complex documents.
Like OpenOffice,org, Google Docs & Spreadsheets is free as long as you sign up for an equally free Google account. (If you have a Gmail address, you can use that.) Then all you need is a compatible web browser, like the current versions of Internet Explorer and Firefox. Hop to docs.google.com and get started.
Using Google Docs & Spreadsheets
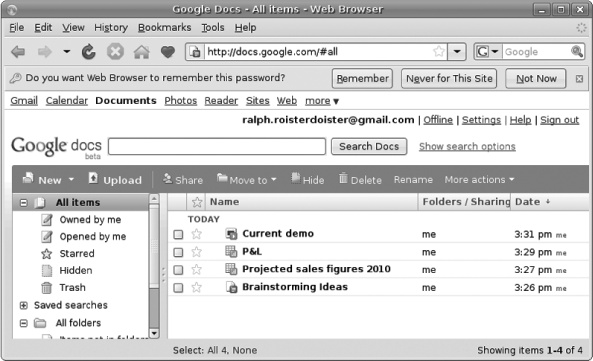
Once you log in, you see your own little workspace. The pane on the left shows the location and ownership of all your files, while the main part of the browser window displays all the file names. The blue menu bar above it all offers the following choices:
New. Click here to create a new document, presentation, spreadsheet, or form—or a folder to keep them all in. The last option, From Template, lets you make a new file based on a collection of online templates created by Google and other companies.
Upload. Select this option to move copies of existing files like Word documents, Excel spreadsheets, or PowerPoint presentations to Google Docs. If you don’t actually own Microsoft Office, this feature gives you a way to open and see files created in Office apps.
Share. Click this button to invite other people via email to view selected files. You can make them collaborators (which means they can make changes to your files) or mere viewers (look, don’t touch). More on all that on Tracking Revisions to Documents.
Move to. Use this command to shift documents into other folders you’ve created on your Google Docs workspace.
Hide. Sweep selected files out of sight (from you and others) with the Hide command. You can always undo this move if you change your mind.
Delete. Dump the selected file into the Trash bin. You need to empty the Trash to flush the discarded file out to the virtual sea.
Rename. Choose this command to change the name of the selected file.
More actions. This collection of commands lets you control the sharing of a file (and who’s in charge of it), see the revisions made to it, or save it in a number of different formats.
When you create a new document, spreadsheet, or presentation, the browser window becomes a blank canvas, ready for you to type text or enter formulas. The menus along the top of the screen offer most of the standard commands you’d expect to find in office software (cut, copy, paste, save, check spelling, word count, and so on), plus text-formatting tools and commands for inserting tables, comments, images, and links into the file.
Google Docs Offline
“Sure,” you say, “Google Docs is great—as long as you have an Internet connection. But when you can’t get on the Web, you’re toast.”
Well, not exactly. Thanks to some nifty technology powered by the Google Gears software, you can have copies of your Google Docs files synchronized between the Web and your hard drive. So if the Internet goes down (or you’re on an airplane), you can still work on your documents.
To use Google Docs offline, first get Google Gears going on your netbook:
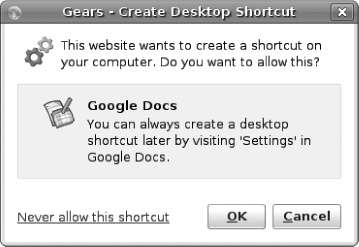
Log into your Google Docs page and click the Offline link up at the top of the screen.
A box pops up offering to install “offline access” for Google Docs.
At the bottom of the box, click the “Get Google Gears now” button.
A box pops up asking you to allow https://docs.google.com as a trusted site. Turn on the checkbox saying you trust the site and click Allow. When the process is finished, the site asks if it can put a shortcut for Google Docs on your desktop as well.
Google Gears is now ready to go, snagging copies of your files behind the scenes as you work. Even if you’re cut off from the Internet, you can still get to your files by clicking the Google Docs shortcut on your desktop or by pointing your web browser to http://docs.google.com. When you regain Internet access, the document on your netbook updates itself on the Google Docs site.
Working with Contacts
Unless you’re talking about corrective eyewear, the word contacts sounds impersonal and businesslike. Sure, a contact can be a potential client you met at the sales conference last month, but a contact can also be your brother, mother, or sorority sister. A contact is pretty much anybody you email, call, or visit.
A contact file for someone can contain as little or as much information as you can cram in about the person, including:
First and last name
Email addresses
Postal addresses (work, home)
Phone numbers (home, work, cell, weekend cabin in Tahoe)
Fax number
Instant message screen name
Depending on the program, you may also have places to fill in other random bits of information about the person like a birthday, anniversary, or short notes like “use Vero Beach phone number from November to April.”
Just about every computer operating system has some sort of built-in program that saves and sorts contact information like an electronic Rolodex. Contacts programs let you look someone up by typing in the name (or part of the name), and you can often set up an email message to the selected contact with just a click.
Making New Contacts
Whether you realize it or not, your netbook has at least one address book on it already. Here, you can add new contacts or import ones from other computers and programs (Managing Contacts Between Web and Netbook).
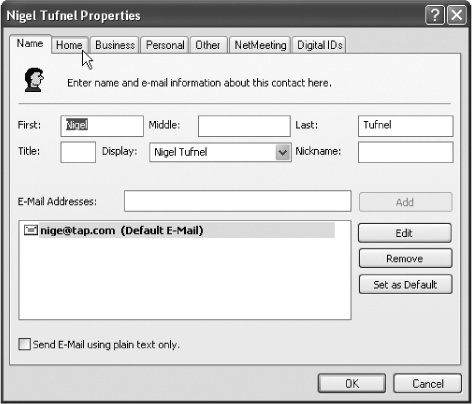
Windows XP. The Windows Address Book (which integrates with Outlook Express) comes with XP; later versions of Windows have Windows Contacts. To see it, choose Start→All Programs→Accessories→Address Book. When you open it, you see the names of people you’ve collected with the “Add Sender to Address Book” command in Outlook Express. To make a new contact file for someone, choose New→New Contact and fill in as much (or as little) information as you want about the person by clicking through the Name, Home, Business, Personal, and Other tabs along the box. To add more information (or update existing info), double-click the entry. When it’s time to clean out the Address Book, select unwanted entries and click the Delete button at the top of the window.
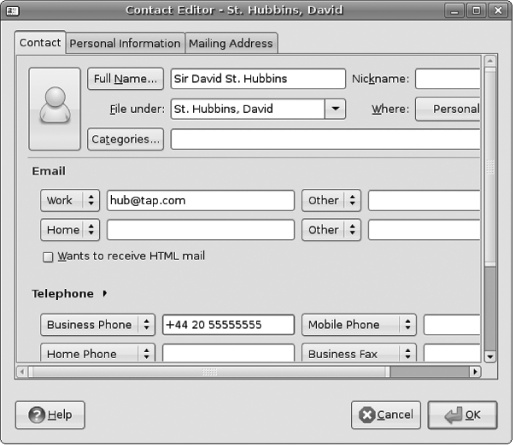
Ubuntu Linux. Evolution, the email program that comes with Ubuntu Linux, keeps its own contacts file. To see it, choose Applications→Internet→Evolution Mail and click the Contacts button on the left side of the screen. To make a new contact file for someone, choose New→Contact. A tabbed box pops up where you can fill in details like name, email address, various phone numbers, and plenty of miscellaneous information like the contact’s spouse’s name or a video chat screen name. To edit or add information, just double-click the entry. To remove a contact, select it and click the Delete button.

If you have Microsoft Office on your netbook, you probably use Outlook, the suite’s email and personal organizer program. If you haven’t used Outlook before, start up the program and click the Contacts button, then choose New→Contact to create a contact file.
If you use a web-based email service like Yahoo Mail, Hotmail, America Online, or Gmail, your contacts are right there, whenever you log into your account. In fact, web-based mail is the easiest way to corral your contacts, because they live in the magic cloud and you can get the same fully updated information with your netbook, or indeed, any Internet-connected computer.
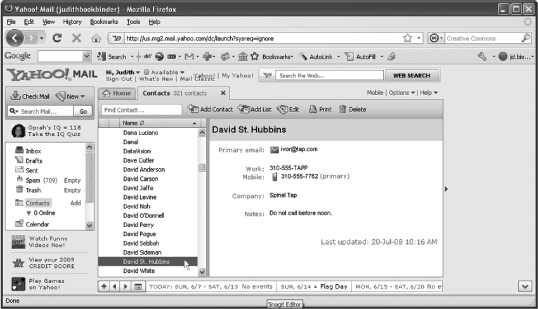
To get to the contacts area of most webmail services, log into your mail account and click the Contacts link or tab. To add a new person to the list, click the Add or New button in the contacts area to pull up a blank form that you can then fill in with all of the person’s information.
Managing Contacts Between Web and Netbook
Are your contacts where you need them to be? If you want to get existing contacts onto your netbook, you probably fall into one of three categories:
Your contacts are on the Web. If you’ve been using Yahoo Address Book or whatever contacts program comes with your Webmail account, you can use that on your netbook with no extra work.
Your contacts are on another computer, and you want to move them to the netbook. You have a little work to do. See the next section for instructions on exporting your contacts from their current program and into the contacts program on your netbook.
Your contacts are on another computer and you want to move them up to the Web. Even if you have your contacts in a program on your netbook, putting them on the Web as well lets you see them whenever you have an Internet connection. See Syncing Contacts and Calendars to Devices for instructions. You can also find online services that let you keep everything in sync between the computer and the Web.
The next few pages tell you how to sling that address book around to the Web and back—or just onto the netbook if you want.
Transferring Contacts Between Computers
If you use the same email-and-contacts program in both places, copying your contacts between computers is a breeze. For example, you may have Microsoft Outlook on both your desktop PC and your spiffy little netbook. If so, moving a copy of your contacts files goes something like this:
Open Outlook on the first computer (the one with all the contacts files), and choose File→Import and Export.
Select “Export to a file” and click Next.
Since you’re going from Outlook to Outlook, choose “Personal Folder File (.pst)” and click Next.
From the list of stuff in Outlook’s Personal Folders list, select Contacts, and click Next.
Save the file to a USB drive or to the desktop so you can transfer it by email or server.
Move the exported file to the netbook via USB drive, email, or network server.
Open Outlook on the netbook and choose File→Import and Export.
Select “Import from another program or file” and click Next.
Select “Personal Folder File (.pst)” from the list and click Next.
Locate the file on the netbook and import it into its copy of Outlook, which now has all of the contacts from your desktop’s version of Outlook.
The steps are slightly different if you’re transferring contacts between different programs, but the concept is the same. There’s a format that most contacts program can read, called Comma Separated Values, or CSV for short. (As you might expect from the name, the individual bits of information in a .csv file—like first name, last name, email address, and so on—are separated by commas.)
In many cases, you can export your contacts as a big .csv file from one program, copy it onto a USB drive, connect that drive to the netbook, and then use the mail program’s import command to pull in that same .csv file.

Tip
Another format you may encounter in the contacts world is vCard, or .vcf. You often see vCard (also known as electronic business cards) stuck to the end of messages as attachment files. When you get one of these in Outlook or any program that can import vCards, right click the vCard attachment and choose “Add to Contacts” to add the person to your address book.
Transferring Contacts from Computer to Web
Having your contacts on your netbook’s hard drive means they’re always at your fingertips, even without an Internet connection. But say you want to put them up on the Web too, either as a backup or to move more of your life online. Even if you haven’t done much with the contacts in your Gmail, AOL, Yahoo, or Hotmail account, you can pull the contacts out of Outlook (or wherever you keep them) and import the names and addresses into your webmail account.
Gmail, Yahoo, and Hotmail let you import contacts from other programs as long as you’ve exported the information as a .csv file. Here’s how:
Open your contacts file in your email program or address book. Look for an Export option under the File menu and choose Comma Separated Values or CSV as the file type.
Export the file to the computer’s desktop or another easy-to-find location.
Log on to your webmail account and click the Contacts link or tab.
Click the Import or Import Contacts link. In Gmail, for example, the Import link is on the upper-right side of the Gmail contacts window.
The site asks you to locate the .csv file you exported from your mail program.
Select the .csv file and import the contacts into your webmail account.
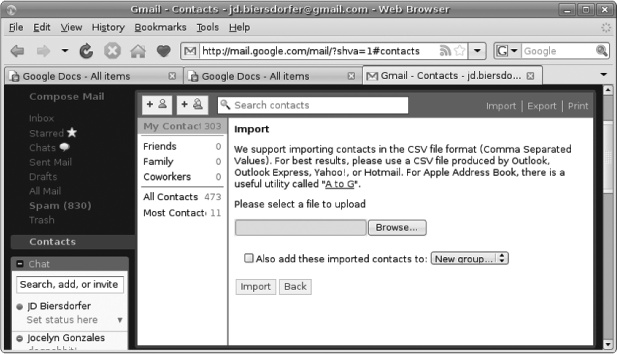
Now, when you open your webmail’s contacts file, you should find plenty of friends there.
Syncing Contacts and Calendars to Devices
If you have a smartphone or personal organizer that you want to connect and sync to your Windows netbook, you shouldn’t have a problem as long as you can run the device’s synching software on your netbook. If you don’t have a CD drive for the netbook, you can download the software:
Blackberry Desktop Manager (http://na.blackberry.com/eng/services/desktop)
Palm Desktop for Palm and Treo devices (http://kb.palm.com/wps/portal/kb/common/article/33529_en.html)
Microsoft ActiveSync for Windows Mobile smartphones (http://www.microsoft.com/windowsmobile/en-us/help/synchronize/activesync-download.mspx)
iTunes for iPhone (http://www.apple.com/itunes)
If you want to sync the gadget with two computers (the netbook and your other one), check the sync program’s settings or manual for using the device with multiple machines. Some may just sync up automatically and use timestamps to sort things out, while others may need more fiddling to add the device and, say, have it work with multiple Outlook profiles.
Note
Palm’s latest smartphone, the Palm Pre, skips desktop synchronization in favor of keeping your online data up-to-date. The support area of Palm’s website has information about setting that up at www.palm.com/us/support/downloads/pre/migration/index.html. If you pine for a way to keep your data closer to home on the netbook, companies like Chapura (www.chapura.com) and CompanionLink (www.companionlink.com) have desktop sync solutions for the Pre.
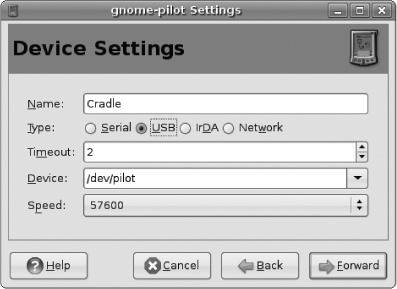
Connecting a phone or PDA to an Ubuntu Linux netbook is considerably trickier, and some devices like the Blackberry don’t work at all (unless you do some major tinkering). However, Ubuntu does come with a program called the Gnome Pilot for setting up and syncing with Palm devices with the Evolution program. Connect your Palm handheld and choose System→Preferences→PalmOS Devices to get started with the Gnome Pilot setup assistant.
Tip
If you have an iPhone that you’ve been syncing on another PC through iTunes, you can use the iPhone itself to copy all the contacts onto the netbook. First, install iTunes on the netbook if you haven’t already. Make sure the iPhone is freshly synchronized with the first PC and then connect it to the netbook. When iTunes pops up, select your iPhone in the Source list and click the Info tab. Turn on the checkbox to sync Contacts and choose your address-book program from the pop-up menu (Outlook, Windows Address Book, Yahoo Address Book, or Google Contacts). Click the Sync button. A box pops up asking if you want to Replace or Merge the existing data on the iPhone with your chosen program. Pick Merge to copy all of the iPhone’s contacts onto your netbook.
Online Contact Syncing
Even if you don’t use a webmail service, there are plenty of ways to keep your address book online where you can always get to it. There are also services, both free and paid, that synchronize your contacts across multiple computers so your address book is current, no matter where you update it.
Here are some of the options out there:
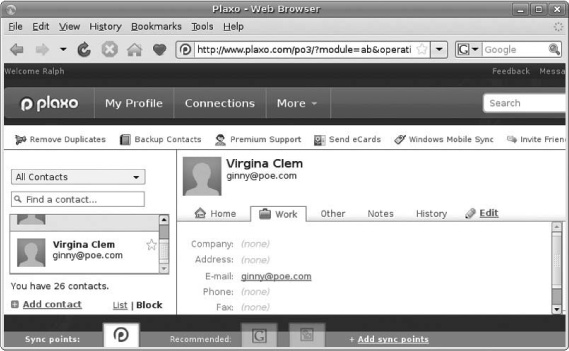
Plaxo. A free service, Plaxo has an online address book that synchronizes with Outlook Express, Outlook, Gmail, LinkedIn, Hotmail, the Mac OS X Address Book, America Online, and Windows Mail. The Pulse feature serves as a dashboard for all your social-networking sites, pulling in updates from your friends on Facebook, Flickr, and other popular gathering places (Social Networking Sites). Plaxo has software for Windows netbooks and a version for Linux machines using the Mozilla Thunderbird email program. (www.plaxo.com)
MobileMe. At $100 a year, Apple’s life-syncing service that keeps contacts, calendars, and mail all up to date between PCs, Macs, and iPhones is not cheap. But you also get 20 GB of space on Apple’s servers to use for online galleries to show off your photos and videos, plus mail and file storage. MobileMe, however, does not play well with Linux browsers. (www.apple.com/mobileme)
Google Sync. Although it’s still in the early stages, Google now has a service that synchronizes online Gmail contacts and Google Calendar information with your iPhone, Blackberry, Windows Mobile device, and a number of other smartphones You don’t need to sync the phone to the netbook to transfer the info because Google Sync keeps track of new entries no matter where you make them. And it’s free. (www.google.com/sync)
Plenty of other online address books are out there, and your mobile phone carrier may even have a syncing solution as well, like Nokia’s Ovi service (www.ovi.com). And where there are contacts, there are usually calendars.
Staying on Track with Calendars
In addition to serving as your electronic address book, the netbook can also step up to the plate as your personal appointment diary. Even if you don’t have a dedicated calendar program on the computer to keep track of events and schedules, you have plenty of options on the Web.
Desktop Calendar Programs for Windows
Windows XP doesn’t include a calendar program (Outlook Express is sadly lacking in this department compared to its beefier, more expensive cousin, Outlook), but you can find plenty of freebies at shareware download sites.
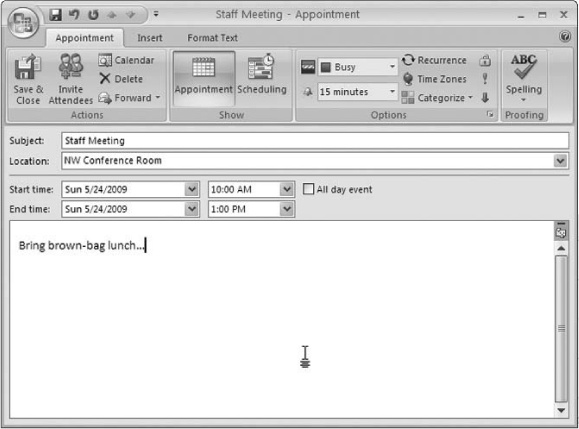
If you’ve ponied up the big bucks for Microsoft Office, then you have the mighty Outlook at you disposal. You can see your daily, weekly, and monthly schedules with the click of the Outlook window’s Calendar button. You make a new entry on the calendar by choosing New→Appointment and filling out the box with the date, time, name of the event, notes, and so on.
The toolbar in the Appointment window has controls that let you set an alarm to warn you—five minutes to two days ahead of time—that this event’s looming. If it’s a standing meeting or appointment, click the Recurrence button in the toolbar to schedule it in advance—and all at once.
Outlook has a handy search box that lets you rifle through your schedule to see where you were on a given day or where you’ll be a few days from now. Like contacts, Outlook calendars can sync up with a number of portable gadgets, including Windows Mobile devices and iPhones.
Tip
You can use Google Calendar Sync to keep your Outlook and online Google Calendars (Staying on Track with Calendars) up to date with each other. Just download and install the Google Calendar Sync software—you can find a link to it, along with thorough instructions, at http://snipurl.com/ims8g. Type your Google name and password when prompted to get Google Calendar and Outlook sharing nicely. Don’t have a Google Calendar? See Online Calendars.
Evolution Calendar for Ubuntu Linux
Basically the open-source version of Outlook for Linux, Evolution handles mail, contacts, and calendars—plus other digital scraps of information like memos and task lists. If you need to start making sense of your schedule, choose Applications→Office→Evolution and click the Calendars button in the main window. Choose New→Appointment to make a new entry and fill out all the pertinent information like date, time, and location.
If the event is a regular one, like a staff meeting or therapy session, click the Recurrence button at the top of the window. A box opens where you can automatically schedule the appointment at the proper intervals instead of plotting it on the calendar one instance at a time.
Buttons along the top of the Evolution Calendar toolbar let you see your day, work week, overall week, and month. You can search for appointments by name, flip through the calendar day by day with the Next and Previous buttons, and jump back to the present by clicking the Today button.
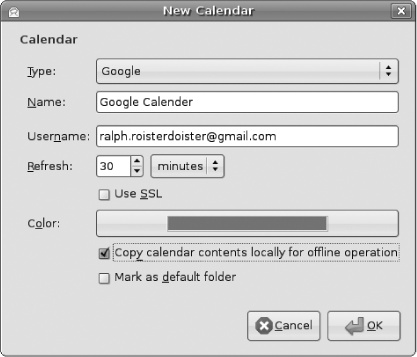
If you have one already, you can also pull in a synchronized copy of your online Google Calendar (Online Calendars) to display within Evolution, too:
In the Calendars area of Evolution, choose File→New→Calendar.
A box pops up, inviting you to select a type of calendar to make.
Choose Type: Google.
Give the calendar a name to display in Evolution’s list—My Google Life or something will do. Next to Username, type your Gmail address. Under Refresh, pick a frequency for how often Evolution updates itself with your Google Calendar information. Turn on the checkbox for SSL (it’s a security thing) and pick a color for your calendar to make it stand out against others in Evolution. Turn on the checkbox next to “Copy calendar contents locally for offline operation” if you want to see your schedule without being connected to the Internet. Finally, click OK.
Enter your Gmail password when prompted.
Providing you typed the password correctly, Evolution now pulls in your Google Calendar events and displays the events onscreen in its main window.
Because they’re accessible from any number of computers and by any number of people, online calendars have become very popular over the past few years. The next section describes some of the more popular options, in case you’d like to sign up for one yourself.
Online Calendars
If you gather your mail through Yahoo, Gmail, America Online, or Microsoft Hotmail, you’ve probably noticed a link to a calendar somewhere on your mailbox page. It makes sense—say you get an email dinner invitation and want to mark it down. Boom! The calendar program’s right there within reach.
And needless to say, the online part of online calendars makes them incredibly convenient for viewing on a number of machines. You can update your daily schedule on your netbook before you leave the hotel for the day and then check your appointments on your mobile phone. Most online calendar services now have streamlined views that fit nicely on mobile phones and wireless organizers.
If you don’t use webmail, you can still sign up for a free account just to use the calendar part of the package.
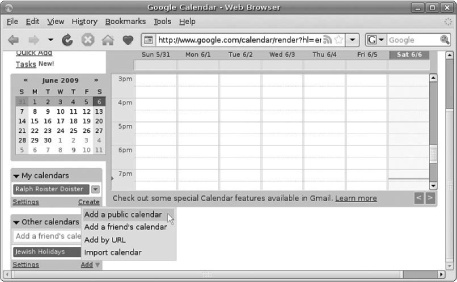
Google Calendar. Like everything Google, Calendar is full of nice touches, like icons displaying the four-day weather forecast. There’s also a Quick Add box: You type in a short phrase like “dinner at Brick Lane Curry House Monday at 7pm” and Google automatically sticks the event right in there the following Monday at 7:00 p.m., without you having to navigate to that day square to make the entry. If you use Gmail, Google also notices things that look like invitations and events in your messages and gives you a link to add them to the calendar with one click. (http://calendar.google.com)
Yahoo Calendar. Just a click away from your Yahoo mailbox, Yahoo Calendar has some nice features of its own—once you’re in the Calendar area, click the Options link to check them out. You can easily add horoscopes, weather, and holidays. You can import and export Yahoo Calendar information to Palm and Outlook. (http://calendar.yahoo.com)
America Online. AOL’s calendar offering is fairly uncomplicated, making it easy to add events like holidays and moon phases. You can also install a plug-in that syncs up the calendar between AOL, Outlook, and a Windows Mobile phone, iPod Touch, or iPhone; click the Sync button on the main calendar screen to get the software. (http://calendar.aol.com)
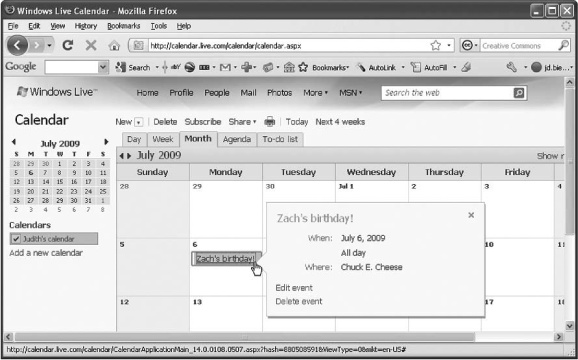
Windows Live Calendar. Microsoft’s online calendar comes with a clean design and big easy-to-click tabs for showing your different views. You can make a Birthday Calendar for your contacts to keep those special days in mind ahead of time. The Outlook Connector plug-in lets you see your Live calendar events alongside your boring old work calendar in Outlook. (http://calendar.live.com)
Once you get used to the portability and convenience of online calendars, you’ll probably never want to deal with the spiral-bound paper versions again.
Calendars: Sharing and Subscribing
Another thing online calendars are good at? Sharing. Each one described in the previous section offers a link or tab that lets you share your calendar online with specified friends, people on your contacts list, or the world at large.
With most calendar sites, you can also subscribe to public calendars other people have put on the Web. These calendars can be of anything—shared calendars from friends and family, Federal holidays, religious holidays, World Cup match schedules (which are religious holidays for some people), rock-band tour dates, and more.
You can also add public calendars (even to programs like Outlook and Evolution) by supplying the calendar’s URL when you add a new calendar. Apple’s iCal program has inspired a number of public calendars that you can download as an .ics file, (the common format used for shared online calendars) and import into other online calendar sites at http://www.apple.com/downloads/macosx/calendars/.
To add a public calendar, look for a Subscribe link on your calendar page and see what the site has to choose from. In Google Calendar, for example, you add a public calendar in the Other Calendars area on the left side of the screen. Click the Add button and choose “Add a public calendar” to see a catalog of calendars you can subscribe to. In Windows Live Calendar, click the Subscribe link at the top of the page to go to a page that lets you paste in a public calendar’s URL or import an .ics file.
Viewing PDFs with Adobe Reader
Way back in the closing years of the 20th century, sending and sharing files around the Internet was something of challenge. Even if you were just emailing a document in a common format like Microsoft Word, you had to worry about the little things: Does my recipient have the same fonts that are in the document? Do they have the right version of Word? Do they even have Word?
Fortunately, Adobe Systems came along and invented the Portable Document Format, or PDF for short. When a file is converted to a PDF, it retains the look of the original layout, fonts, and other graphic elements used in whatever program was used to make it in the first place—and it can do so in a much smaller file size that’s usually pretty manageable for email. (Adding a USB Printer in Ubuntu Linux tells you how to make your own PDF files from your documents.)
Almost everyone—including the U.S. government—is using PDF files now, doing things like converting forms to PDF files that you can download, print, fill in, and mail. Music labels are putting CD liner notes in PDF files.
And thanks to free software called Adobe Reader, you can easily open and view PDF files on your netbook and in your web browser. Adobe Reader comes preinstalled on many netbooks, but you can always snag the latest version at www.adobe.com. Check your All Programs or Applications menus to see if it’s listed.
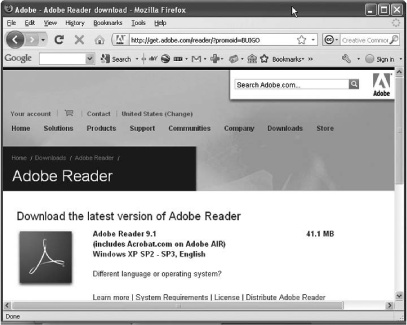
As long as you have Reader installed, you’re set. Now you don’t have to worry if someone emails you a PDF file, or if you need to grab the 1040EZ on April 14th from www.irs.gov. Just double-click the file to open it in all its glory.
Versions of Adobe Reader are available for just about every operating system out there (which adds to the format’s near-universal compatibility), including Linux. But it’s not the only thing that can open and display PDF files these days, either.
There are plenty of other PDF programs for Windows out there like Foxit Reader at www.foxitsoftware.com/pdf/reader. Ubuntu users can install a variety of other PDF reader programs by choosing Applications→Add/Remove and searching for pdf in the Search box to see what’s in the software repository. (Adding and Removing Programs has more information on installing Linux software.)
Working with Graphics
Graphics can be anything from a basic bar chart to a complex illustration, so the programs that make graphics tend to range widely in price and power. The netbook’s small screen (and low-powered processor) may not make it the best choice for doing detailed work, but for times when you need to whip out a quick graph or illustration, you do have some options beyond Window’s XP’s simple Paint program (Accessories).
Here are some options:
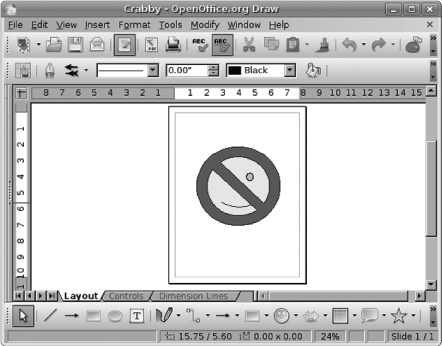
OpenOffice.org Draw. The Open-Office.org suite included in Ubuntu includes a full-featured graphics program called Draw (OpenOffice.org: Free Word Processing, Spreadsheets, and More), which can save images in the OpenDocument format. OpenOffice.org comes in a Windows version as well, available for download from www.openoffice.org.
Microsoft Visio. If you need to make flowcharts or map data, Microsoft’s Visio software for Windows might be your best buddy. At $260, it’s not cheap, but you can download a free 60-day trial version or test it out in sample form in a web browser at http://office.microsoft.com/visio.
SmartDraw. Need a Windows business graphics program? Organizational charts, project timelines, forms, floor plans, and charts? SmartDraw can handle all of that, and you can insert these files into Microsoft Office or Corel WordPerfect documents. The program costs $200, but you can download a free trial at www.smartdraw.com.
DrawPlus. If you need a simple drawing program to make hand-drawn illustrations on your Windows netbook, DrawPlus 4 might do the trick—and it’s free. For a mere $10, you can upgrade to DrawPlus 6, which includes more filters, effects, and features. Free Serif Software also has free 3-D graphics and page-layout software at www.freeserifsoftware.com.
Scribus Desktop Publishing. Scribus is a free, open-source page layout program for Windows and Linux. A Windows installer is available, and the site has instructions for installing Scribus in Ubuntu, which is a little more complicated. (www.scribus.net)
KompoZer. For budding web designers, this free program lets you make web pages without having to wade around in a river of HTML code or expensive programs. (http://kompozer.net)
Google Docs Draw. If you need a simple set of lines, charts, or free-form squiggles for a Google Doc in progress, just choose Insert→Drawing to open up the Drawing Editor palette. (docs.google.com)
Inkscape. An open-source alternative to Adobe Illustrator and CorelDraw, Inkscape can create art like company logos, maps, web page graphics, diagrams, and freeform illustrations. It’s available in versions for Windows, Linux, and the Mac OS. (www.inkscape.org)
The GIMP. Although it’s more of a photo-manipulation program, the GIMP (the Gnu Image Manipulation Project) can make photo illustrations by adding type and funky effects. It’s included with Ubuntu Linux; a work-in-progress version for Windows is available at http://gimp-win.sourceforge.net/stable.html.
Chapter 9 has more about working with photos and the GIMP. One word of caution, if you plan to do a lot of graphics work on your netbook: Get a mouse, trackball, or tablet (Adding a Basic Mouse: The Easy Way) to save your clicking hand from turning into a cramped claw from doing detailed work on such a tiny machine.
Tip
If you already have Microsoft Office installed on your netbook, don’t overlook the page-layout and drawing tools built into Word. Although it’s not as powerful or as flexible as a full-blown graphics and layout collection like Adobe Creative Suite (Illustrator, Photoshop, Flash, and Dreamweaver for a mere $1800), Word’s basic toolbox is often enough. To get a taste, click the Insert tab in Word 2007 to see the types of clip art, tables, charts, and other graphic elements you can put into a Word document.
Welcome to the Free World: Software
Free software is not an unknown concept to Linux people. After all, the system is available for free all over the world and it’s been updated, improved, and lovingly distributed by thousands of people over the years. And adding new free software is easy in Ubuntu: Choose Applications→Add/Remove and search the repository for new and cool programs. (If you don’t find what you’re looking for there, search through the repository at System→Administration→Synaptic Package Manager, which lets you find and install new programs in a similar way.)
Since it’s the most popular and widely used operating system in the world, Windows has even more software to choose from. Although there are some really, really expensive programs for Windows out there, many of the available programs are free (or really inexpensive).
Unlike open source software in the Linux world, however, free and cheap Windows programs tend to be demo or stripped-down versions of larger, more expensive programs or software written by independent developers. Some programmers charge a fee; others give away their software but humbly ask for a small donation.
You can find many of these gems, usually referred to as shareware or freeware, on websites called shareware archives. These sites collect free or nearly free programs—everything from games to business tools like currency converters—for Windows and other systems.
There are a few things to remember with freeware and shareware, though. For starters, you’re probably not getting any one-on-one technical support aside from a Frequently Asked Questions Page or maybe a simple user guide posted on the programmer’s website. Then again, many free programs have dedicated mailing lists, active discussion forums on the developer’s website, or links to ask the programmer a question directly. So with a little extra effort, you might actually get better help than from Big Software’s technical support representative on the other side of the world.
More importantly, however, are safety concerns. Malicious software gets passed around the Web disguised as cool games or helpful utilities and can wreck your netbook—or even steal valuable information like bank-account passwords and Social Security numbers.
To help keep yourself safe, only download shareware from well-known sites (like the ones listed here) that test the programs for spyware. And by all means, if you plan to download a lot of software, install antivirus and antispyware programs on your netbook (Keeping Viruses at Bay).
That said, here are some of the better-known shareware archives to explore:
Download.com. The name says it all, and this site (owned now by CBS Interactive) is a vast treasure trove of free and cheap software for Windows, Mac, mobile phones, and even Web-based wares. (www.download.com)
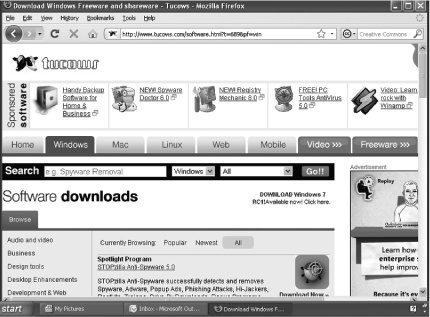
TuCows. With its distinctive double-headed bovine logo (Two Cows, get it?) is one of the oldest and largest shareware sites on the Web, hosting 40,000 programs from around the world. Not everything is free here, but it’s easy to find the stuff that is—just click the Freeware tab. (www.tucows.com)
VersionTracker. Neatly designed with minimal graphics, VersionTracker is a great site to browse for Windows, Mac, Palm, and iPhone freeware, with links to news and reviews from the world of software. (www.versiontracker.com)
SourceForge. This site has information on many open-source software projects. It’s a little geekier than most software sites, but you can find really inventive and interesting works-on-progress here. (http://sourceforge.net)
Remember, if you really like a piece of software you find on the Web—open-source project or a free program—making a small contribution to the developer (through PayPal, for example) can help show your appreciation. Shareware and free software sites often provide links to the programmer’s own website, where most will cheerfully accept donations.