Chapter 3. Getting to Know Your Linux Netbook
If you’re stopping by this chapter, you probably just bought a Linux-based netbook—or you’re weighing the purchase of one against a Windows XP model. This chapter will give you an overview of Ubuntu Linux, an open-source operating system, which means that everyone is free to edit its code and potentially make it better. Linux was one of the first systems to join the netbook party.
Linux started out as one man’s hobby and has grown into a robust modern operating system, complete with its own Windows-like interface. And it’s an ideal system for a netbook. Thanks to the efforts of thousands of volunteers, corporate backing, and brilliant programmers writing (mostly free) software for it, Linux lets you do all the standard computing tasks: email, Web browsing, instant messaging, word processing, games, and so on.
Later, you’ll learn about the software you can run on your Linux netbook. This chapter is a guided tour of the Linux system itself: how to get started with it and where to find stuff. So grab your netbook to see how Linux looks and works.
Which Type of Linux?
Unlike Windows and Mac OS X (which are created, updated, and sold exclusively by either Microsoft or Apple), Linux is available from many different sources. Linux is an open-source program—crafted, improved, and spun off in its early years by an army of volunteers in a software version of an Amish barn-raising. These days, big companies like Oracle and IBM are developing Linux for corporate and professional use.
Because of this freedom to create, many different flavors or distributions of Linux have popped up over the years. Linux distributions are often colorfully named: BlueCat Linux, Yellow Dog Linux, or Red Hat Linux. Then there’s Mandriva Linux, Linpus Linux, Debian/GNU Linux, SuSE Linux, Slackware Linux, and the list goes on. (You can see the list yourself at http://www.linux.org/dist/list.html.)
An open source program’s source code (or digital DNA, if you will) is open for anyone to look at and potentially tinker with. By contrast, closed or proprietary software prohibits modification and has strict licenses stating what you can do with the program. Windows falls into this camp.
But open source doesn’t always mean free. Yes, open source programs can cost money. Richard Stallman, a software developer, writer, and activist has an essay on the difference between open source and free software at http://www.gnu.org/philosophy/open-source-misses-the-point.html.
The version of Linux you get on your netbook depends on whom you bought it from. This book focuses on Ubuntu Linux, specifically version 8.0.4.
Why Ubuntu? Mainly, it’s one of the most popular distributions available. For example, Dell offers it as an option on its Inspiron Mini netbooks and HP has a variation of Ubuntu powering the Linux editions of its HP Mini netbooks. The Web is full of stories from people who’ve replaced whatever distribution of Linux came on their netbook with Ubuntu. The system even inspired a distribution called MinBuntu, crafted just for the HP 2133 Mini-Note. (If your netbook came with a different flavor of Linux and you want to try Ubuntu instead, see Installing (or Reinstalling) Ubuntu.)
Tip
Ubuntu isn’t just for netbooks—the system works great on older PC hardware that’s often considered too outdated to run the latest versions of Windows. Ubuntu’s suggested system requirements—384 megabytes of memory, 8 gigabytes of hard-drive space, and a 700-megahertz processor—are well within range of many older computers and can give them a new life. You can order a free CD or download a disk image from www.ubuntu.com, which also has instructions for installing the system.
Ubuntu is free to anybody who downloads it. Even though your netbook maker may have paid a little bit for it, you paid less for your netbook than your Windows XP buddy did. And it’s updated regularly. Ubuntu includes all the software you need to get started, including the Firefox browser, an email program, the OpenOffice.org business software suite, and more.
Note
And it has a totally cool and inspiring name. According to its official website (www.ubuntu.com), the word ubuntu is an African word that means “humanity towards others” or “I am what I am because of who we all are.”
Setting Up a Linux Netbook
The exact steps for getting your Linux netbook up and running depends on which netbook you bought and which version of Linux the manufacturer decided to use on it. But all models have certain things in common.
First, take the battery out of the box and snap it into the netbook. Next, fish out the AC power adapter, plug the matching end into the power jack on the back or side of the netbook, and plug the other end into a wall outlet so the new battery can start to get juiced. Press the Power button to fire it up.
If you have a wired network cable from, say, your home network or an extra Ethernet connection at work, plug it into the netbook before you turn it on. This way, you can get on the Internet immediately for registering the computer and downloading updates.
If you don’t have a wired network connection available, don’t worry—you can get your netbook on your wireless network almost as quickly; Chapter 5 has the details. Just be sure to turn on the netbook’s wireless radio button (it’s usually the one with a radio tower or radio-wave symbol).
Note
Many laptops have a wireless-radio button or special keystroke-combination to toggle the WiFi and Bluetooth connections on and off. In addition to letting you easily shut down the radios when you need to conserve battery power, the buttons offer a quick way to turn off the wireless connections on airplanes. (Although with more airlines adding in-flight Internet access, you can keep that WiFi connection up and running in the sky—for a fee.)
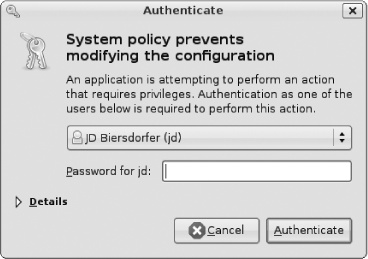
Before you start using the netbook, Linux will likely ask you to set up a user name and password. This step is important because:
To install new software or make certain changes to the way the system works, you have to type your password. Password-protection makes it harder for malicious software to install itself on the computer.
If more than one person uses the netbook, all of them can have their own user accounts on it. This arrangement keeps their system settings separate, so not everyone has to look at the desktop wallpaper of frolicking golden hamsters that you so enjoy. And user accounts help keep the system safer—unless you’re logged on (or know the password) for the all-powerful administrator account, you can’t make major changes to the system. This super user account is also known as the root account.
During the setup process, Linux asks other questions, like what language you’d like to use, what type of keyboard you have, and where you’re located so the system can set its date and time.
Once you’ve completed the basic netbook setup process, you can start exploring the Linux desktop. If you’ve used Windows or the Mac OS before, much of it will feel familiar.
Exploring the Linux Desktop
Before netbooks hit the scene, some people had no idea what a Linux was—a European luxury car? A rare African antelope? The Windows and Mac faithful considered it a hobbyist computer system requiring tricky typed commands. But the small population of Linux junkies knew it was an open-source, grassroots operating system that was becoming more flexible and friendly with each passing day.
Linux has come a long way, baby.
Sure, it started out as a typed-command kind of system, like DOS—or any pre-1984 computer. But over the years, Linux has acquired a graphical user interface of its own, much like Windows. Now you can travel around Linux’s menus and windows with point-and-click convenience.
The basic motif of the interface is the desktop environment. Linux, having come up as a community project, has several desktop environments to choose from, with names like KDE and Gnome. Ubuntu uses the Gnome desktop, which you’ll learn more about on Gnome Desktop.
Which Netbook Desktop?
In an attempt to make Linux seem more attractive and accessible, some netbook makers put their own simplified interfaces over the standard desktop. For example, your netbook may have a glossy translucent toolbar or screen that puts icons for all your favorite programs and websites right up front.
Dell adds its Dell Desktop Launcher to its Ubuntu-based netbooks. The Launcher features five buttons along the top of the screen, grouping the netbook’s programs into categories like Web, Communication, Entertainment, Productivity, and Games.
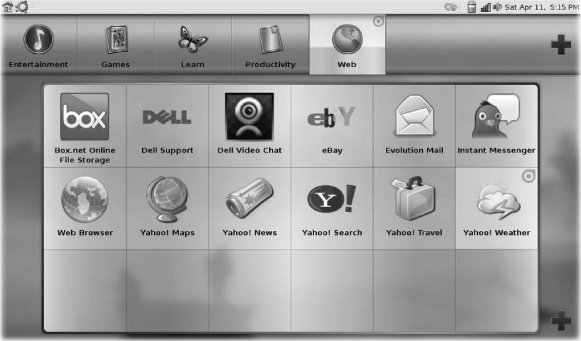
If you want to do something productive, say, like writing a novel, just click the Productivity icon to open a window revealing all the programs in the Productivity category. Click the Document icon there to start the OpenOffice.org word processor.
Tip
Click the big + button on the right side of the Dell Launcher to add your own categories or shortcuts to the window. Click the + at the top of the screen to add a Category (Shooting Games or Music, say), or click the + in the lower-right corner to add a shortcut like a bookmarked website to the category you’re in.
But Ubuntu has its own perfectly nice desktop, too. It’s not as simple or as slick as the one the manufacturer may have slapped on top, but it keeps icons to all the netbook’s programs, folders, and settings under smaller, more discreet icons. In fact, it looks quite a bit like the Windows Start menu, with access to your programs, settings, and files all tucked neatly away on the edge of the screen.
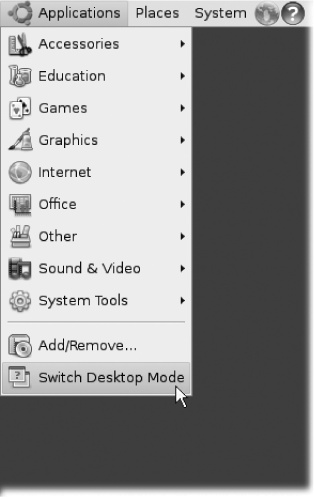
To get to the real Ubuntu desktop, look for an icon in the top menu bar that lets you switch desktop modes. On the Dell Inspiron Mini 9, for instance, click the small black triangle under the house icon in the top-left corner of the menu bar and choose Switch Desktop Mode; the next box lets you pick Classic Desktop, which is Dellish for “the standard Ubuntu/Gnome desktop.” You can also stay in the standard desktop and pop into the Ubuntu menus by clicking the small orange-and-red Ubuntu icon in the top panel.
Gnome Desktop
The desktop is Linux’s main workspace. Keeping with the office metaphor, files are all the documents, spreadsheets, digital pictures, programs, audio tracks, and so on that make up the computer’s contents. A folder is a graphical representation of a directory—a dedicated area of the computer for storing files. Ubuntu gives you several folders to start out with under the Places menu—like Documents, Music, Pictures, and Videos.
Your desktop can be as tidy or as messy as you want. You can make it a serene vista to meditate upon or use it as a launching pad for opening files and programs. You can leave files out on the desktop and double-click them to open them, instead of selecting them from the Applications or Places menu.
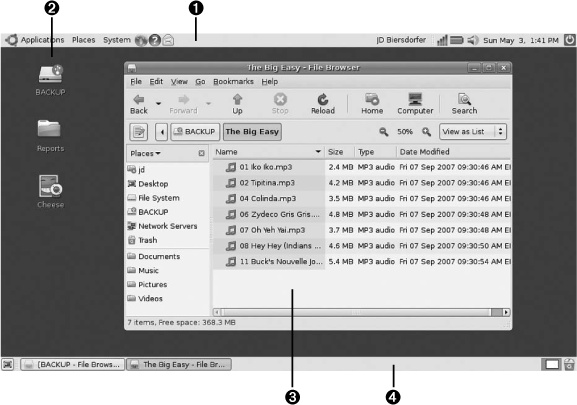
With the desktop in the background, these are the other parts of the Ubuntu’s Gnome desktop workspace:
The top panel. This gray strip running along the top of the screen contains a number of menus (Applications, Places, Systems) and some program shortcuts, along with other information like the netbook’s current battery strength and sound level. There’s more on the top bar on Top Panel Menus.
Desktop icons. Files, folders, and programs can move beyond the Places menu. The files themselves can hang out on the desktop.
Windows. Like their counterparts in the real world, windows give you a glimpse inside. Except instead of a house, you’re peeking into files, folders, and programs. To open a window, just double-click a file, folder, or program on the desktop or choose it from the Start menu.
The bottom panel. The tiny icon at lower-left that looks like a TV screen is the Show Desktop button. Click it to hide all open windows and get back to your desktop. The middle section of the gray bar running along the bottom of the main window shows open programs and hidden windows. The second icon from the right is the Desktop Switcher: If you have multiple desktop windows open, you can click here to switch between them. The icon on the far right corner is the Trash can, which serves as a virtual container for files you want to delete. To actually remove the files from your netbook, right-click the Trash can icon and choose Empty Trash from the shortcut menu.
Managing Windows
Windows on Linux work much like windows on, er, Windows. You can drag them around, shrink them into tabs on the bottom bar, and resize them in a number of ways.
Here are the basic parts of a window:
Title bar. The text in the strip at the top of the window is the name of the open folder or folder. You can rearrange small windows around the screen by dragging them by their title bars.
Buttons. The three square buttons at top-right control the window’s size—or close it completely. Click the minus (–) button to minimize the window—that is, shrink it down into just a title in the bottom bar. Click its title in the bottom bar to maximize it on the desktop. Click the middle button to expand the current window to the full screen, or click it again to return to the original size. Click the X button to close the window.
Menu bar. The top of the window has its own menus and controls, depending on what type of window it is.
Scroll bar. If the window contains more than you can see at one time, a scroll bar appears on the right side. Click or hold down the mouse button on the scroll bar to zip down deeper into the window.
Top Panel Menus
When you get right down to it, many versions of Linux sort of look like recent versions of Windows: a desktop with a few icons and a collection of menus. In Ubuntu Linux, these all live at the top of the screen, whereas the Windows Start menu and taskbar are found on the bottom. But they all work the same way: You click a menu to see what’s in it and then pick what you want.
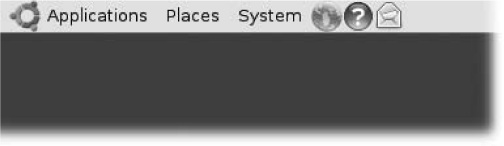
The bar at the top of the Ubuntu desktop has three menus:
Applications. All of the netbook’s programs are listed here, grouped into categories like Graphics or Internet. Ubuntu gives you a lot: a photo-editing program called the GIMP (Advanced photo editing in Ubuntu), a Microsoft Office-like collection of business programs called OpenOffice.org (OpenOffice.org: Free Word Processing, Spreadsheets, and More), plus plenty of Web and multimedia programs. To launch a program, just choose it from the Applications menu.
Places. This menu offers elements similar to Windows’ Explorer, Start menu, and My Computer. Here, you can quickly jump to built-in folders called Documents, Music, Pictures, and Videos that store specific types of files. You can also browse files on a connected USB drive, connect to a network server, or search for files on the netbook.
System. All the netbook’s settings and administrative tools live in this menu, which roughly corresponds to the Windows Control Panel or the Mac OS X System Preferences. Here, you can pick a default printer, change the time and date settings, fiddle with the netbook’s screen saver preferences, and so on.
Next to the three menus are three icons of a globe, an envelope, and a question mark. These are shortcuts to the Firefox Web browser, Ubuntu’s built-in Help, and the Evolution email program, respectively.
Tip
You can easily add or remove panel icons—right-click a program icon to removeit from the panel. If you’re in the Applications menu, right-click and choose the option to add it to the panel.
On the right side of the screen, Ubuntu’s menu bar displays the name of who’s logged onto the netbook (that would probably be you), plus a few icons for:
Network. If you’re on a wireless network, the current signal strength is displayed in cellphone-like bars. A small icon of two computers means you have a wired connection.
Battery. Click the battery icon to see the amount of time left on your current charge. There’s also a menu option for Suspend, which puts the netbook to sleep. (Press the Power button to wake it up again.)
Sound. Volume controls and a Mute option are under this speaker-shaped icon.
Date and Time. The netbook’s calendar day and clock are clearly visible in the menu bar. Click the date to get a mini-calendar of the whole month, a graphic showing which areas of the world are currently in daylight or darkness, and a chance to edit your clock preferences. Right-click the Date and Time menu to copy the current date or time (to paste into a document), adjust the preferences, or stop displaying the date and time.
Shut Down. Click the Shut Down icon in the top-right corner of the menu bar to turn the netbook off, log out, change users, lock the screen, restart the netbook, or put it to sleep. See Online Backup for more on this particular menu.

If your netbook is automatically set to check for software updates, an additional icon may appear in the menu bar just to the left of your name. When it’s time to check for updates, you usually see an exclamation point inside a yellow alert triangle. Right-click it to see your update options. Chapter 12 has more on updating and maintaining your Linux netbook.
Applications Menu: All Your Programs
One of the reasons the Ubuntu version of Linux is so popular is because you not only get a fast, flexible operating system, you get a ton of useful programs with it. Having a spreadsheet program, an image-editing application, and a handy electronic dictionary right there is a comforting sight indeed. Sure, you get a lot of that stuff—or trial versions of it, anyway—when you buy a new Mac or Windows machine, but with Ubuntu, you get it all for free.
As one would expect, all of these programs are kept under the Applications menu in the upper-left corner. The menu contains several categories of programs:
Accessories. Here you have lots of helpful little programs for those moments when you need to do math or find an umlaut on the keyboard. Some of the applications here include Calculator, Character Map, Dictionary, Disk Usage Analyzer, and Text Editor, all of which are self-explanatory. Wonkier applications include Manage Print Jobs, Password and Encryption Keys, Take Screenshot, and Terminal. (Don’t worry, Terminal here isn’t referring to the health of your netbook—it’s just the name of the command-line program that comes with Linux.)
Education. Ubuntu has whole editions designed for schools, and the Education menu has several learning programs on board. Some of these include Kanagram (an anagram game), programs for learning math and vocabulary, and the stunning Stellarim, a full-screen astronomy application for viewing the night skies.
Games. No computer system is complete without a collection of video games. Ubuntu includes golf, marbles, and a penguin racing game.
Graphics. Programs devoted to managing your digital photos, image editing, and creating your own graphics are found here. The F-Spot Photo Manager and the GIMP Image Editor (both discussed in Chapter 9) let you organize and fine-tune pictures, while the XSane Image Scanner can import new images from a connected scanner. OpenOffice.org’s drawing program is also here for anyone wanting to whip up come computer-generated artwork.
Internet. Online apps abound on this menu. You’ll find the usual suspects—web browsing, email, and instant-messaging—in Mozilla’s Firefox browser (Using a Web Browser), the Evolution Mail program (Setting Up an ISP Mail Account), and Pidgin Internet Messenger (The Buddy List/Contacts List). Other programs that let you reach out and communicate include the Ekiga Softphone Internet telephone and videoconferencing program, and the Remote Desktop Viewer for connecting to other Ubuntu machines.
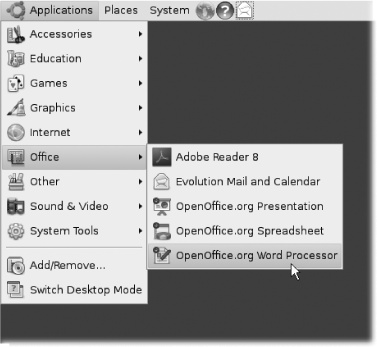
Office. When it’s time to stop playing games and goofing off on the Internet, the more business-like programs live under this menu. The word processing, spreadsheet, and presentation programs in the OpenOffice.org suite (OpenOffice.org: Free Word Processing, Spreadsheets, and More) live here, as does the Adobe Reader software for reading PDF files, and the calendar component of the Evolution Mail program.
Sound & Video. Ubuntu includes programs for converting audio tracks and burning CDs, which may not be useful if your netbook doesn’t have an external disc drive. However, you can watch and play video and audio files downloaded from the Internet with the Movie Player and Rhythmbox Music Player. The Sound Recorder program lets you import or record your own audio.
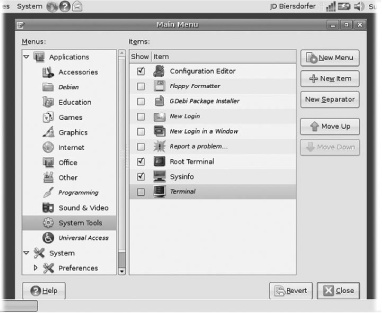
System Tools. Depending on which version of Ubuntu you have and how you have it configured, this menu may be empty or full. If it’s empty, you can add programs like the Configuration Editor by choosing System→Main Menu→System Tools and turning on the checkboxes for the system utility programs you want to see.
At the bottom of the Applications menu are two options for customizing the menu. The first is Add/Remove, which lets you download and install new games and programs from online software archives; the next section has the details. The last item on the menu is Switch Desktop Mode, explained back on Which Netbook Desktop?.
Tip
Hate having to go up to the menu to get the programs you use all the time? You can drag icons (which Ubuntu calls launchers) from the menus and drop them on the Linux desktop to create clickable shortcuts. You can also right-click a program icon in the menu and choose either “Add this launcher to panel” to stick a shortcut icon in the menu-bar panel at the top of the screen or “Add this launcher to desktop” to make a desktop icon.
Adding and Removing Programs
As you can see, Ubuntu Linux comes with preinstalled programs for everything you need to browse the Web, send and receive email messages, write documents, create spreadsheets, view pictures, and play digital audio and video. But there’s a whole universe of software out there and you may want more.
Installing software for Linux can be tricky for beginners. This section shows you the easy way to install software on your Ubuntu netbook by tapping into program collections that live on the Internet. Make sure you have an Internet connection, and then:
Choose Applications→Add/Remove.
A progress bar pops up to scan for software in the online Ubuntu repositories, and then the Add/Remove Applications window appears.
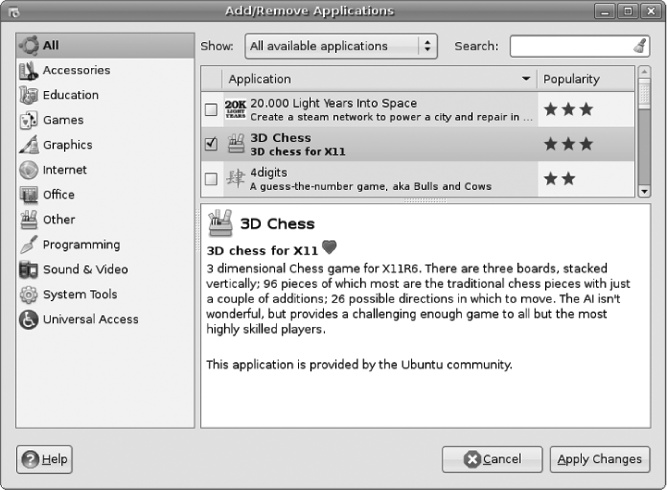
On the left side, choose a program category, like Games or Sound & Video.
A list of available programs in that category pops up in the top part of the window. Use the Show pop-up menu to see a list of all available applications, or winnow the list down to all open-source applications, all supported applications, or all third-party applications. You can also see a list of what applications are already installed.
Turn on the checkboxes next to the programs you want to install.
Each program entry has a brief description of what it does and a star rating showing its popularity among Ubuntu fans.
Click the Apply Changes button.
A box asks if you’re sure.
Type your administrator password.
Type the password you picked when you were setting up the netbook for the first time.
Wait as Linux installs the software.
Linux downloads the software and installs it on your netbook. A final box asks if you want to add or remove more applications or close the box.
Repeat steps 2–6 to add more programs. If you choose Close, the Add/Remove Applications window goes away and you can go find your new program under the Applications menu in the same category you found it online (Games, Sound & Vision, or whatever).
There are a few other ways to install software, and some of them are rather complicated, involving package manager programs (to corral all the little pieces of an application), typed commands, and other things that contribute to Linux’s lingering geeky reputation. Ubuntu also includes the Synaptic Package Manager (Seeing How Much Hard Drive Space Is Left), another program for installing programs that works much the same as the Add/Remove Applications option. Synaptic is a little more versatile and is often better for clearing old programs off your drive (Ubuntu Remote Desktop).
Removing software
If you want to clean up your Applications menu and get some space back on your netbook’s drive, you can remove programs in almost the same way you install programs. Just choose Applications→Add/Remove. In the Add/Remove Applications box’s Show pop-up menu, choose “Installed applications only.” Turn off the checkboxes next to the programs you don’t want anymore before clicking the Apply Changes button. You must confirm your decision and type your administrator password again, but then the unwanted apps are safely removed from your system.
Installing software from a disc
You’ll find most Ubuntu-friendly programs come from either the Web or an online repository, but it’s possible to install additional programs from a disc, like an Ubuntu installation CD, if you have a CD drive connected to the netbook. Pop in the disc, and then choose System→Administration→Software Sources. Click the Third-Party Software tab. At the bottom of the window, click Add CD-ROM so the system can see which programs from the disc you want to install.
Places Menu: Organizing and Finding Files
If you’re looking for a file, the Places menu is a good place to start looking. Here, you have a tidy list of folders and other locations on your netbook (including the Desktop). You can peek into a place just by selecting one of them from the menu. Need a text file? Try choosing Places→Documents.
Your Home folder, the place where all the files associated with your user account live on the netbook, is another good place to look, although it can be rather large depending on what you have on there. To go Home, just choose Places→Home folder.

External drives, USB keychain drives, and connected file servers also show up in the Places menu.
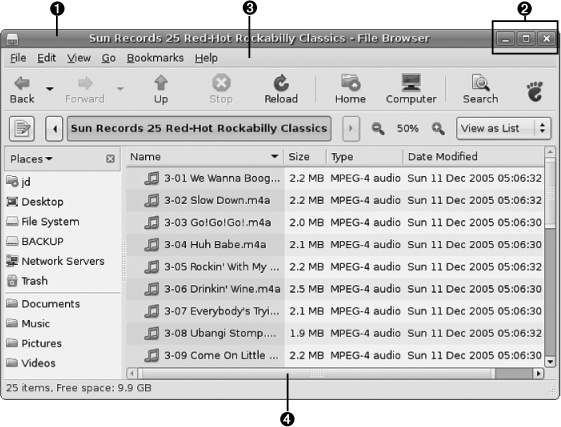
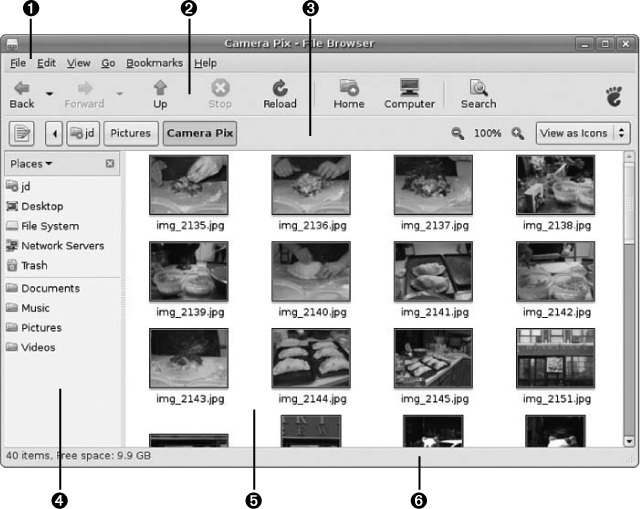
But when you open one of these places, you get a special type of window: the Nautilus File Browser, which helps navigate your way around Ubuntu. The file browser, sort of a cross between a web browser window and Windows Explorer, has its own distinct parts.
Menu Bar. Six options are listed here:
— File lets you open and close new windows, create new folders or documents in the current window, empty the Trash, or view a file’s properties.
— Edit offers cut, copy, and paste functions. It also lets you select some or all files on view, duplicate files, and control the look and feel of the file browser (under Preferences).
— View contains all the controls for adding or removing elements on the file browser, the main toolbar, or side pane. You can also zoom in or out, or choose to see files as icons or in list form.
— Go is a set of navigational options that let you step back through previous open folder windows or jump to specific locations like your Home user folder or recently used folders. Choose “Search for Files” if you’re on the hunt for a certain file.
— Bookmarks is a nifty menu with a command to add a bookmark for a specific folder to the file browser—making it easy to jump back there quickly instead of burrowing down through layers of folders. Saved bookmarked locations live here, too.
— Help contains the Nautilus user guide.
Toolbar. Much like the buttons on a web browser (Using a Web Browser), the Back and Forward buttons on this toolbar let you retreat or advance through folders you’ve visited, or use the Up button to pop back to the previous folder level. Stop halts the window’s contents from loading and Reload refreshes the view. The Home, Computer, and Search buttons are shortcuts to those screens.
Location Bar. The Location bar is just below the main toolbar, and it shows you where you are in the file system. You can choose to see these coordinates represented as a traditional computer file path or as a series of icons that you can click to change your current location. Controls for increasing or decreasing the size of the icons in the window—and a pop-up menu where you can choose between looking at icons or looking at a list of files in the main window—are on the right.
Side Pane. The panel on the left side of the window lets you see your netbook’s contents in a number of ways, including a vertical tree view that shows which folders are inside other folders. Or you can view files by place (Installing software from a disc). You can also see a history of your recent travels through folders or get information about selected ones, like the number of items in that folder and when it was last modified.
Main Window. This big central part of the file browser window displays the contents of a selected folder.
Status Bar. The strip at the bottom of the Nautilus window shows the number of items in the selected place or folder, and also displays the amount of space left on the netbook’s drive.
Tip
The Places menu also lets you see what’s on the netbook (Installing software from a disc). Need to connect to a file server on a home or office network? Chose Places→Connect to Server.
Searching for Files
If you’ve browsed files until you’re cross-eyed with Nautilus and still can’t find what you’re looking for, it’s time to call in the expert: Ubuntu’s Search feature. You can get to it a couple of different ways:
Either way, you’ll see a search box where you can type the name of the file you’re looking for.
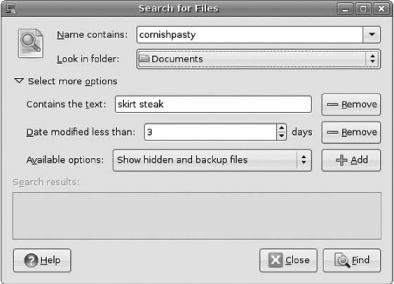
If you are using the “Search for Files” menu command, you have more options for narrowing down the quest. In addition to the name (or part of the file’s name), you can instruct the system to look in a certain folder. Click the flippy triangle next to “Select more options,” and you can type a bit of text that the document might contain. Other searchable options include the date you think the file might have been last modified and the size of the file—helpful if you’ve misplaced a giant video file somewhere on your netbook.
Click the Find button when you’re done filling in fields. The Search program hunts through the system and brings back any files matching your search criteria.
System Menu: Preferences and More
The System menu in the top panel contains two major submenus and links to more information about the system software installed on the netbook, namely the Gnome desktop and Ubuntu itself. If you’re interested in the free software movement, checking out these menu items is definitely worth a look.
But Preferences and Administration are the two items that you’ll use most of the time. The exact items in each menu depend on the netbook model and what’s installed on it, but this section will give you a rough idea of what to expect.
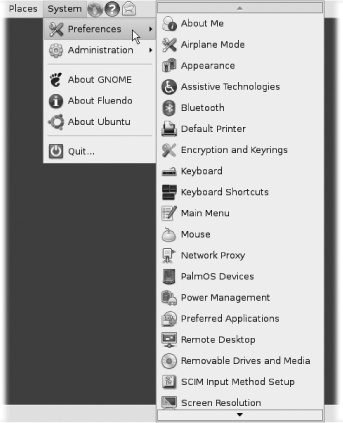
Preferences
The items in this menu are a bit like Windows’ Control Panel or Mac OS X’s System Preferences. You go here when you want to do things like adjust the netbook’s trackpad for a left-handed user or change the color scheme of Ubuntu’s windows.
About Me. This section contains a virtual address card where you type your personal contact info. There’s also a button to click if you want to change your password.
Airplane Mode. As the name implies, go here when the cabin crew tells you to turn off your electronic devices. Just type your password to turn off the Bluetooth and WiFi radios.
Appearance. Personalize your netbook’s look by changing the Theme, Background, Fonts, and Interface settings. These settings are also helpful if you need to make the system type bigger or choose window colors that are easier on the eyes.
Assistive Technologies. These settings help you make your netbook easier to use if you’re visually or hearing impaired. You can, for example, create your own keyboard shortcuts and choose preferred applications for certain tasks. If you have a repetitive-motion injury like carpal tunnel syndrome, click the Keyboard Accessibility button and turn on the Typing Break tab to set up a locked screen timeout that enforces rest periods.
Bluetooth. You’ll find settings for wireless Bluetooth file transfers and other hardware connections like Bluetooth mice and headsets here.
Default Printer. Lets you choose a primary printer on the network (or one that’s directly connected to the computer) to handle your hardcopy needs.
Encryption and Keyrings. If you scramble files with PGP (Pretty Good Privacy), the settings and password keyrings live here.
Keyboard. Contains tabs where you can select a specific keyboard layout, adjust the sensitivity of the keys, or even allow cursor control from the keyboard.
Keyboard Shortcuts. Lets you see (and learn!) your netbook’s keyboard shortcuts. For example, you can close an open window by pressing Alt+F4 or hide all open windows and hop to the desktop with Ctrl+Alt+D. You can also assign clickable tasks to keystrokes of your choice.
Main Menu. Change the programs you see listed in your netbook’s menus—or make new menus of your own—in this box.
Mouse. Adjust the mouse orientation for southpaws or right-handers, change the double-click speed, and see your touchpad settings here.
Network Proxy. If you have to use a special configuration to get on the network, you can add or edit the settings for it here.
Palm OS Devices. If you want to sync data from a Palm-based digital organizer or smartphone, you can configure them in this box.
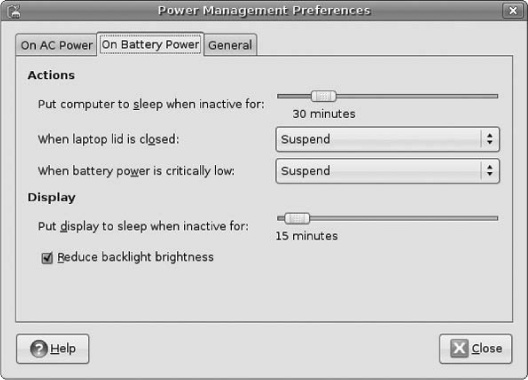
Power Management. Here’s where you’ll find the netbook’s settings for how it behaves when running on electrical power or the battery. To save juice, for example, you can have the computer turn off the screen after 30 minutes of inactivity or put the machine to sleep if the battery power gets dangerously low.
Preferred Applications. Lets you pick which programs you want to handle different types of files. Want to use Mozilla Thunderbird instead of Evolution Mail as your email program? Choose it here.
Remote Desktop. In this section, you can choose to let someone else on Ubuntu see what’s on your netbook’s desktop—or go see what’s on theirs. Remote desktop is the way to go if you have another Ubuntu computer at home that you want to tap into from your netbook. Tech-support people may also ask you to let them work on your machine via remote desktop. See Connecting to Windows machines for more information.
Removable Drives and Media. Here’s where you control how the netbook behaves when you plug something into it, like a USB flash drive, portable music player, a digital camera, a printer, or just about any other piece of hardware. For example, if you don’t want the Nautilus file browser to pop up when you plug in a USB drive (Storing Data on External Drives), you can turn off that behavior.
SCIM Input Method. The Smart Common Input Method preference lets you use non-Western characters from languages like Chinese, Japanese, and Korean.
Screen Resolution. Lets you choose specific screen settings that some programs require.
Screensaver. Although they once served to stop images on the desktop from burning permanently into the computer’s screen, animated screen saver programs are now mainly just for fun and privacy. (There’s a version of the old favorite Flying Toasters, for example.) You can also set the amount of time it takes until the screen saver kicks in.
Sessions. Mainly for Gnome desktop hounds, the Sessions tool lets you control which programs and services start up when you start up the netbook.
Sound. Settings for all the computer’s connected audio devices are here. You can also choose to hear system alert beeps and other warning noises for certain types of dialog boxes.
Sun Java 6 Plugin Control Panel/Java Policy Tool. You can adjust the behavioral and security preferences for applications in Sun’s Java programming language here.
Switch Desktop Mode. Like the option at the bottom of the Applications menu, this option lets you change between the standard Ubuntu/Gnome view of the system or the slick, simplified interface your netbook’s maker may have provided.
Windows. Settings for window behavior live here. For example, choose “Roll up” in the “Titlebar action” area to make window contents snap up and hide like a window shade when you double-click the window’s title bar. There’s also an option for selecting windows when the mouse passes over them.

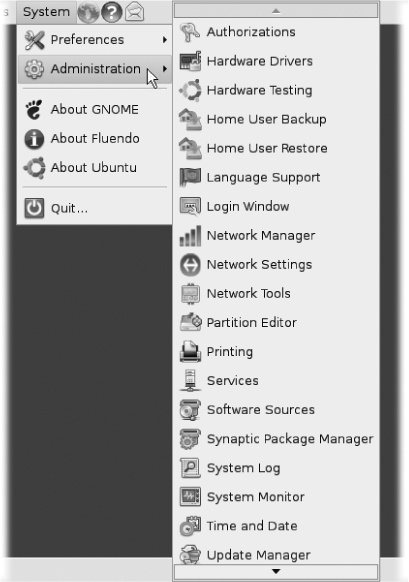
Administration
When you need to adjust your network settings, add new users, change the computer’s time and date, or make other system tweaks, visit the Administration menu. Linux doesn’t like unauthorized people touching its stuff, so in order to get to many of these settings, you need to click the Unlock button and type your password.
Authorizations. A tool for the system administrators, the Authorizations box lets you control who can change what on the computer and which actions need passwords.
Hardware Drivers. This box contains a list of proprietary device drivers for added hardware like WiFi radios and LCD screens. Unlike open-source software, proprietary drivers are controlled by the people who make the hardware.
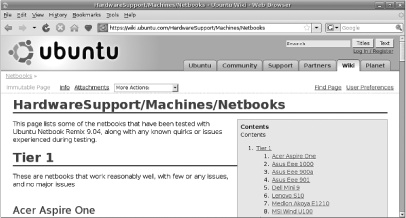
Hardware Testing. Ubuntu maintains its own hardware database, and you can contribute to it by running the Hardware Testing program here. You run various tests to prove your hardware works (or doesn’t work) with Ubuntu, and then upload the information to the Launchpad hardware database.
Language Support. Lets you choose the language Ubuntu uses to display your menus and dialog boxes.
Login Window. If you’re security-minded, you can choose to have the netbook ask you for your user name and password each time you turn it on. You can also change the look of the login screen, and even change its welcome message.
Network Manager. See the available wired or wireless network connections here, set up a VPN (virtual private network) connection with your office, and delete outdated network connections you never use anymore (like the one from that conference last month).
Network Settings. In these settings, you can specify how your netbook connects to the Internet—with or without wires. Click the Unlock button and type your password to adjust the settings for the types of networks you connect to. You can choose to have the netbook automatically discover available wireless networks or restrict it to a specific one.
Network Tools. This box is a Swiss Army knife of programs to test and troubleshoot network connections.
Printing. Set up a new printer connection, add a network printer, or share a printer connection here.
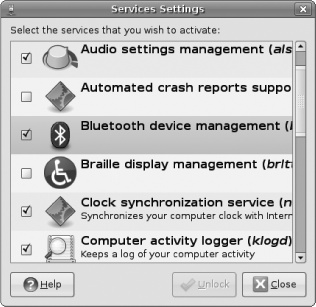
Services. A somewhat geeky menu that lets you activate little helper programs here, like computer activity logs. It’s best not to dabble in the Services box without knowing exactly what you’re doing, as accidentally shutting down the wrong services makes for a very unhappy netbook.
Software Sources. This box lets you set how often your Ubuntu system checks back to the Ubuntu mothership for system updates, as well as which software repositories it gets its wares from.
Synaptic Package Manager. Like the Add/Remove box in the Applications menu, the Synaptic Package Manager lets you search, add, and remove software on the netbook safely, although the Add/Remove option is simpler.
System Log. A sort of up-to-the-minute diary of everything your netbook’s operating system has done lately, the System Log is helpful for troubleshooting techies but may not make much sense to Linux newcomers.
System Monitor. Visit this box if you want to know specifics about your netbook, like what version of Ubuntu you’re using, how much memory is in the machine, the type of processor, and how much disk space is left. You can also see a list of processes, or running programs (and force an unresponsive application to quit), as well a graphic depiction of how hard your processor is working.
Time and Date. Set your netbook’s date, time, and time zone here, or choose to have the system clock set itself to an Internet time server like the one at Purdue University or Penn State.
Update Manager. Select the Update Manager when you want to manually check for system software update and patches.
Users and Groups. Here, you can add new user accounts to the netbook (or gather a certain set of accounts into a group with restricted powers to keep the system safe) and also change system passwords.
Seeing How Much Hard Drive Space Is Left
Ubuntu gives you a quick way to see how much space you have left on your netbook: In any Nautilus file browser window, look at the bottom-left corner. The amount of free space is listed right there.
You have a couple of additional ways to see what’s left on your drive:
In a Nautilus window, right-click any folder and choose Properties from the shortcut menu.
Choose System→Administration→System Monitor and click the File Systems tab to see how much disk space has been used and how much is available. (A file system is the way files are named, stored, and organized on a hard drive. Here, it can also refer to the hard drive and its partitions—separate areas divided up within the hard drive—as well.)
If you fancy yourself a command-line sort of person, choose Applications→Terminal for command-line fun. At the command-line prompt, type df and press Enter to see a list of used and available disk space. (To do major system-changing commands, you need to type the administrator password.)
Tip
If you don’t see the Terminal program in your Applications→Accessories menu, you may need to add it using the steps on Adding and Removing Programs.
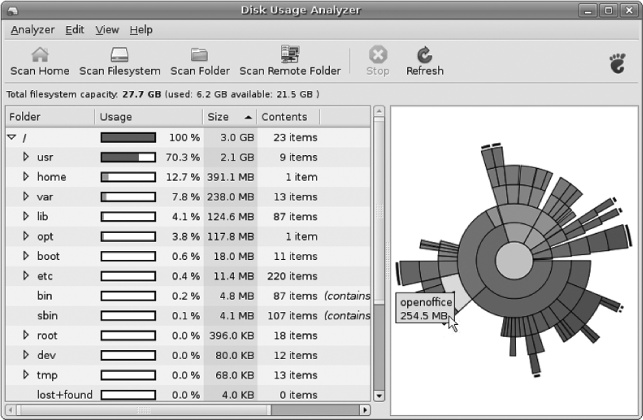
Ubuntu also comes with an extremely helpful program called the Disk Usage Analyzer that not only scans your drive space, but shows you exactly what’s taking up all that room. To use it, choose Applications→Accessories→Disk Usage Analyzer and click the Scan Filesystem button on the toolbar. (You can also scan your Home folder or another folder using the toolbar’s other buttons.)
The information is displayed in a colorful, circular graphic of a disc divided into blocks. Wave the cursor over a block to see what it is and how much real estate it’s taking up. If you see that applications you never use are taking up precious hard-drive space, the decision to remove them (Installing software from a disc) becomes that much easier.
Backing Up Your Linux Netbook
If you live online in web-based mail and other applications while keeping relatively few files on your netbook’s drive, backing up the computer may seem like a waste of time. But if you like to keep documents, photos, and music close to your Home folder (because you never know when the café WiFi will go down), backing it up is the sensible thing to do.
There are several ways and places to back up your stuff, each described below.
External Drive Backup
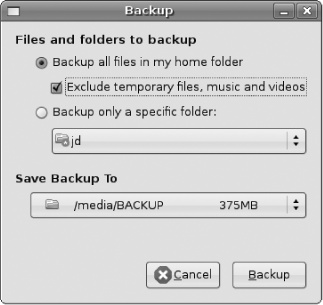
If the version of Ubuntu on your netbook doesn’t include a backup program in the Applications menu, you can snag one from the Ubuntu repository. Just choose Applications→Add/Remove. Using the software-installation steps described on Adding and Removing Programs, search for backup and pick the program of your choice from the list of Ubuntu-friendly backup programs like Home User Backup. Once you install a backup program, choose System→Administration, find it in the list of programs, and fire it up. You need to point the program to an external drive or another location where you plan to back up your files. If you need to restore files from the backup, return to System→Administration and choose the backup program’s Restore component to retrieve the files.
USB Flash Drive Backup
If you just have a few files you want to back up, plugging in one of those tiny USB flash drives and copying the files to it is one quick way to back them up. When you plug in a flash drive to the netbook’s USB port, the Nautilus file browser pops up to display the drive’s contents and the drive itself appears in the Places pane.
In the Places pane, click your Documents folder (or wherever you keep the files you want to back up). Drag those files onto the USB drive’s icon to copy them over. When you’re done, right-click the drive’s icon in the Places pane and choose Unmount. Wait until the drive’s icon disappears from the desktop to make sure it’s done copying any large files you may be moving. You can then yank the drive out of the netbook’s USB port.
Online Backup
Renting space on someone else’s server is another way to store your netbook’s valuable files. Several online companies offer software and services especially for Linux backups. Some netbook makers, like Dell, even include online file storage and backup from sites like Box.net (www.box.net) to help add space to computers with small solid-state hard drives. Other Linux-friendly services include JungleDisk (www.jungledisk.com), which provides a network drive and backup software to get it there. Prices start at $2 a month, plus 15 cents per gigabyte stored. SpiderOak (www.spideroak.com) gives away 2 GB of online storage for free and will be happy to sell you more.
Closing Down Your Linux Netbook
When it’s time to stop using the netbook for a while—when you’re going to bed, getting on a plane, leaving for vacation without it—Ubuntu gives you several options for powering down. You can get to these options in a few different ways. Here are two of them:
Choose System→Quit.
Click the red Power icon in the top-right corner of the screen.

In either case, you’ll see a box containing six different icons. The icons in the bottom row are the ones you want if you’re ready to close down the netbook. Here’s what they do:
Suspend. Click this icon to put the netbook is a low-power “sleep” mode that turns off the screen and hard drive to consume much less power. Open files are still there when you press the Power key to wake up the netbook—unless there’s been an electricity blackout that caused the computer to dump what was in its memory.
Restart. Restart isn’t really a power option. It shuts down all files and programs before turning the computer off and on again so you start out with fresh, clean memory. You might use Restart when troubleshooting (Troubleshooting Common Problems), or right after you install new software.
Shut Down. This option closes all files and programs before turning the computer completely off.
Note
Some netbooks may also have a Hibernate option, which saves open files and programs before cutting off pretty much all the netbook’s power.
But what about those icons in the top row of the Shut Down box? These three apply when you’re sharing the computer with someone else. (Like Windows and Mac OS X, Linux lets you have multiple accounts on the same machine so all can have their own user names, passwords, and files.) Here’s what they do:
Log Out. When you are done using your account and want to make sure your files and settings are safe, choose Log Out to shut down your little corner of the netbook. This sends the machine back to its login screen without turning it off.
Lock Screen. If you’re not done using the netbook but need to step away, choose Lock Screen (or press Control+Alt+L on the keyboard) to password-protect your account. The netbook’s screen saver descends and won’t let anyone in without your password.
Switch User. Lets you switch between netbook accounts, so you can quickly hand the machine over to your netbook-sharing buddy or jump between two accounts of your own.
Ubuntu is a versatile and ever-evolving system. If you want more information on the version you’re using, click the question-mark-shaped Help icon in the top panel or visit www.ubuntu.com/support.