Chapter 2. Getting to Know Your Windows Netbook
Although the early netbooks that appeared before 2008 ran on modified versions of Linux or their own operating systems, it didn’t take long for Microsoft to get in on the action. By spring of 2009, about 90 percent of netbooks sold were running Windows.
The vast majority of these netbooks aren’t running the latest version, Windows Vista, either. Thanks to Vista’s greedy hardware requirements and somewhat intrusive approach to security, many people don’t even want it on their desktop computers, let alone their netbooks. Instead, Windows XP Home Edition—which Microsoft attempted to retire during the summer of 2008—made a comeback as the netbook operating system of choice.
If you’re a die-hard Mac fan with no Windows experience, this chapter will give you a basic guide to the system. Even for those rare times when you’re not tapped into a wireless connection, Windows XP Home has enough built-in features to keep you busy and productive when your head’s not in the Cloud. Or if it’s been awhile since you’ve used good ol’ Windows XP Home, you can use this chapter as a refresher course.
Tip
If you need more thorough instruction, consider picking up a copy of Windows XP Home Edition: The Missing Manual by David Pogue (O’Reilly) or any of the dozens of Windows XP tomes out there.
Which Windows?
When it comes to Windows on a netbook, Windows XP Home Edition is the most widely available choice. For now, anyway. Thanks to the “low-power, low-weight, low-cost” mantra of the netbook makers, installing Windows Vista on one of your average netbook models is like trying to stuff an elephant into a Honda Civic. In October 2009, Microsoft is planning to release netbook-friendly versions of its new system, Windows 7.
Note
Microsoft’s stripped-down versions of Windows, like Windows CE and Windows Mobile, have been largely confined to devices even tinier than netbooks, like personal organizers and smartphones.
Windows XP
When Windows XP was released in 2001, it came in two flavors: Windows XP Home Edition and Windows XP Professional. The Pro edition adds business-oriented features like Multi-Lingual User Interface, Scheduled Tasks Console, and more advanced security and networking features, but if you just want to use your netbook for email, web surfing, and updating your Facebook page, Windows XP Home is perfectly fine.
For people nervous about netbooks’ ability to be real computers, Windows XP Home can be a comforting presence. It sports pretty much all the features of Windows XP Professional, but on sized-down hardware.
Note
To avoid cutting into its Windows Vista sales, Microsoft places restrictions on where computer makers can install Windows XP. The netbook’s screen must be smaller than 14.1 inches, and the hard drive smaller than 160 GB. The processor can’t be any more powerful than a single-core chip running at 1 gigahertz, and the machine can have only 1 GB of memory installed. Hardware any more robust than that has to use Windows Vista as its preinstalled operating system.
Windows 7
Windows XP may not last long at the top of the netbook heap, though. Microsoft has said that its post-Vista system, Windows 7, will have versions that work on netbooks.
Windows 7 brings better built-in security and a slick new interface to the PC experience. Among the improvements are:
Jump Lists. These are sort of like the XP Start menu’s Recently Used list, but divided up by programs. For example, to see your most recent Excel documents, right-click the Excel icon to see the jump list for spreadsheets. And, as with the Start menu, you can permanently anchor specific programs within easy reach with the ability to “pin” frequently-used documents or files to a jump list.
Enhanced taskbar. Bigger, bolder, and more translucent than the taskbar in previous editions of the system, the Windows 7 taskbar can also show full-screen previews of open (but hidden) windows.
Improved hardware management. Big clear icons show all your connected devices, from printers to smartphones.
Windows Live Essentials. This free set of programs you can download in one fell swoop includes instant-messaging, email, and blogging programs. You also get photo- and video-editing tools that let you easily share your creations online.
Windows 7 is expected to arrive in October 2009 and may be the system that finally retires Windows XP once and for all. The one major disadvantage that might crash the netbook party? The new state-of-the-art operating system is probably going to show up in the price tag, making that netbook a “low-power, low-weight, not-quite-as-low-cost-as-it-used-to-be” PC.
Seven Things You Should Know About Windows 7
On the fence about getting a Windows 7 netbook or upgrading your current Windows XP model to the newer system? Here are some points to ponder:
Windows 7 is more advanced than Windows XP. Windows XP, as beloved as it is, has been around since 2001 and has been showing its age for years. In addition to the glossy Aero look (which debuted on Windows Vista), Windows 7 brings with it overhauled versions of Paint and WordPad, zippier performance, and much tighter system security.
Windows 7 takes up more hard-drive space than Windows XP. Plan to give up about 16 gigabytes of netbook drive space for the Windows 7 operating system. That’s not too much of a pain for netbooks with roomy hard drives, but it can be a tight squeeze for those with solid-state drives.
Windows 7 needs at least a gigabyte of memory to run. If a netbook has Windows 7 preinstalled, you can assume it has enough memory. But if you want to upgrade an older Windows XP netbook to upgrade to Windows 7, make sure it has at least a gig. For even better performance, add as much memory as you can. Windows 7 is, after all, Windows.
Windows 7 comes in many different editions. Microsoft says netbooks can run any version of Windows 7. Two main editions of the new operating system will be the most popular—Windows 7 Home Premium (aimed at the consumer home crowd) and Windows 7 Professional (aimed at businessfolk). Even more advanced (and costlier) editions, known as Windows 7 Enterprise and Windows 7 Ultimate, are also available at the higher end of the pricing scale. There’s also a low-end edition called Windows 7 Starter.
Windows 7 Starter = Windows 7 Stripped Down. Even though it may come preinstalled on some new netbooks, Windows 7 Starter’s limitations may have you pondering an upgrade to Windows 7 Home Premium right out of the box. For example, Starter doesn’t include the glossy Aero interface, DVD playback ability, multiple monitor support, or even the ability to change your desktop background and system sounds. If you just want to surf the Web, you may not care about these features, but if you’re a long-time Windows maven, you’ll itch for more control.
There’s no easy way to upgrade directly from Windows XP. If you decide to put Microsoft’s newest baby on your XP netbook, block out a whole afternoon to do it. You’ll have to do a clean installation, which means copying your netbook’s current files to an external drive, erasing everything on the netbook, and then installing Windows 7. Then you have to put all your files and programs back on the netbook. You’ll also need an external DVD drive to run the Windows 7 installation DVD—unless you can download the system from Microsoft’s website or install it from a USB drive.
Windows 7 may not be able to run older Windows XP programs. And you may not find out until you try to run an old favorite program on the new system. Fortunately, though, Windows 7 includes a Compatibility Mode that can sometimes tricks programs into thinking they’re running on an older operating system. The Professional and Ultimate editions of Windows 7 include an optional virtual Windows XP Mode that can handle XP software, but your netbook’s modest processor may not be able to handle this mode.
Tip
Still not sure if your netbook can run any edition of Windows 7? Download Microsoft’s free Windows 7 Upgrade Advisor program, which scans your current hardware and gives you an onscreen report on the netbook’s ability to run Windows 7. Download it at www.microsoft.com/windows/windows-7/get/upgrade-advisor.aspx.
Setting Up a Windows XP Netbook
Pull your Windows netbook out of the box, snap the battery in, and plug the whole thing into the wall with the AC power adapter so it can get some juice (Setting Up Your Netbook). After you plug it in, press the Power button—usually in the top-left corner or centered above the keyboard—to start it up.
If it’s your first time starting the netbook, you have to go through the initial Windows XP setup procedure. As you may recall if you’ve set up other Windows XP machines, this process is quick. You just answer questions on a few screens as tinny, techno-Muzak plays in the background. (The din may inspire you to find your netbook’s mute button; look for the key with a pictograph that looks like a speaker horn with an “X” or a slash on it.)

As you click the green Next button to advance through the setup screens, Windows asks basic questions, like:
What is your name and address?
Microsoft uses this information to register this copy of Windows XP in your name. You have the choice to sign up for “free news and offers” from the company here as well.
What do you want to call the computer?
Give the netbook a short name (MINI_ME is a popular choice). This name is what your netbook goes by when you connect it to a network. It’s the name that appears to other connected people, security software, or the network administrator.
Do you want to protect the new computer by automatically turning on Microsoft’s Windows Update feature?
Turning on automatic updates is a good idea, mainly so you don’t have to remember to check for them. These updates to the system software also often include the latest and greatest security patches.
What are the names of the users who need accounts on this computer?
If it’s going to be just you using the netbook, type your name or nickname in the first box. Congratulations, you are now the computer’s Administrator, or boss account. If you plan to share the netbook with other family members, you can type their names in the boxes below to give them their own accounts.
If you have a spare Ethernet network cable connected to your home network’s router, or by your desk at work, plugging it in before you start the setup process can speed things along. This quick Internet lifeline lets Windows send off your information and download updates instead of complaining that you don’t have a network connection.
Later, once you get out of the setup screens and land on the Windows desktop, you can configure your netbook to use a wireless network; Chapter 5 explains how. If you don’t have a wired Ethernet connection to temporarily use during the Windows setup process, fill in the screens anyway, and Windows will send it all off when you do get the netbook online.
Once you finish with the XP setup screens, the system deposits you on the Windows desktop, ready for action.
Note
Some netbook makers include a trial subscription of antivirus and other security software. You may be asked to set up this software right after you finish the basic setup screens for Windows XP. Chapter 11 covers security software and practices in detail. If you agree to use the preinstalled software now, that software runs through its own setup, downloading updates and scanning your system. If this trial software pesters you to sign up for an account that wants to do more than just download updates and you don’t want to do it, try clicking the Next button three or four times without filling in the requested personal information until the box goes away.
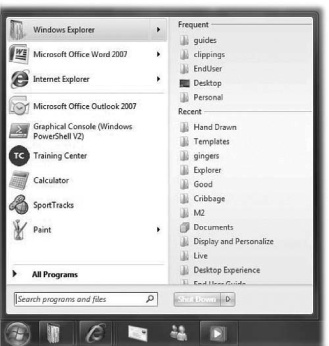
The Start Menu: Where It All Begins
That big green Start button in the lower-left corner of the Windows XP screen is the first daily stop for many people. Unless you have a bunch of desktop shortcuts scattered around the screen (Managing Windows), the Start menu is where you, well, start.
The concept is simple: Choose the Start menu, select what you want from its lists or submenus, and off you go. It’s sort of like one-stop shopping for all the stuff on your PC.
So click the Start button and up pops your Windows world. The Start menu is divided into two columns, each with its own collection of things.
Left column, starting from the top:
Your email and web browser programs of choice, all ready to launch when you select the appropriate icon.
Programs you’ve recently used appear in the lower part of the Start menu. This list changes and shifts as you use different programs.
The All Programs menu, easily recognizable by its big green triangle pointing the way to the rest of the applications installed on the netbook.

Tip
Want to make a frequently used program always appear in the Start menu, no matter what else you use? In the lower part of the Start menu, right-click the program’s icon and choose "Pin to Start Menu” from the shortcut menu. This moves a permanent icon for the program up to the top half of the Start menu. If the program you want to pin isn’t currently on the Start menu, choose Start→All Programs. Find the program’s icon in the list, right-click it, and choose “Pin to Start Menu.”
Right column, starting from the top:
All “My” folders—the places Windows uses to store certain kinds of files. There’s My Documents, My Music, and My Pictures, where Windows usually tries to save, respectively, your word processing documents, your MP3 and WMA music files, and your digital photos. After you’ve opened some documents, a My Recent Documents menu appears. You can also get to the hardware information listed in My Computer (Checking Hard Drive Space) from here.
Control Panel, Set Program Access and Defaults, and Connect To are all jumping-off points for adjusting the settings for the way Windows XP looks and feels, and how it handles various bits of hardware and software.
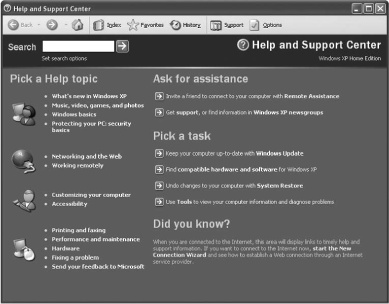
Help and Support, Search, and Run are three self-explanatory items. Select Help and Support to get to the electronic guidebook for Windows XP. (The Help and Support center can answer a lot of questions or show you how to accomplish certain tasks like connecting a digital camera.) Search is a file finder that lets you hunt down just about anything, from documents stored on the netbook’s hard drive to information on the Web. Run is the box for typing wonky commands to open files and programs. Type telnet in the Run box, for example, and the Windows XP telnet program opens, ready to connect you to a remote computer.
Your netbook’s manufacturer usually owns the last menu item in the right side. It may be a shortcut to the company’s own help guide or the netbook’s System Properties box, which displays information like the amount of memory and the type of processor inside the machine.
Tip
Want to change the size of the icons, the number of items, or what’s shown on the Start menu? Right-click the green Start button and choose Properties from the shortcut menu. In the Properties box, click the "Start menu” button and then click Customize. The General tab lets you change the way the Start menu looks. The Advanced tab has the settings for how the Start menu behaves, like opening submenus or highlighting newly installed programs. Click OK after you’ve made your changes.
Windows Desktop Basics
Back in the early days of computers, you had to type all instructions to the machine in cryptic commands. Some systems—notably Unix—still work this way.
Things got better for people without computer-science PhDs in 1984, when Apple released its first Macintosh computer. Now, instead of typing instructions on a command line, you had a graphical user interface. On this type of system, you use a mouse to point and click to tell the computer what you want to do. Twenty-five years later, GUIs dominate the computer landscape, and Windows XP is no exception.
The basic motif of any GUI is the desktop. This screen is your most visible working surface on the computer. Keeping with the office theme, files are all the documents, spreadsheets, digital pictures, programs, audio tracks, and so on that make up the computer’s contents. A folder is a graphical representation of a dedicated area of the computer to store files. Windows gives you several folders to start with, like My Documents.
The desktop can be as clean or as cluttered as you want it to be and can even serve as a launching pad for opening files. You can leave files out on it and double-click them to open them, instead of selecting them from the Start menu.
With the desktop in the background, these are the other parts of the Windows workspace.
Taskbar. Nestled between the Start button and the system tray, the taskbar displays the names of currently open windows and documents. Click the name to switch around between windows. Because netbooks have such small screens, you can set the taskbar to auto-hide so it only appears when you wave the mouse over the bottom edge of the screen. Right-click the Start button, choose Properties, and click the Taskbar tab. Turn on the checkbox next to “Auto-hide the taskbar” and click OK.
System tray/Notification area. Shortcut icons to common system settings like sound and the battery level sit on the right side of the taskbar. Small icons for frequently used programs can live here as well. When Windows XP wants to alert you to something minor (like unused icons on your desktop), a yellow notification balloon pops up from this area.
Desktop icons. Files, folders, and programs don’t have to live only in the Start menu. The files themselves can hang out on the desktop, as can shortcuts. Shortcuts are special icons with a black arrow in the corner; they open up a program or folder without you having to find the actual program or folder.
Windows. Like their counterparts in the real world, windows let you look inside something. Except instead of a house, you’re peeking into files, folders, and programs. To open a window, just double-click a file, folder, or program on the desktop—or choose it from the Start menu.
Recycle Bin. Don’t worry—no separating paper from plastic here. The Recycle Bin is where you drag unwanted files or shortcuts to get rid of them. You can also click an icon to select it and then press Delete to send it to the Recycle Bin. Accidentally toss something? Double-click the Recycle Bin icon to open it, right-click the file you need to retrieve and choose Restore from the shortcut menu.
Note
Just because you’ve sent something to the Recycle Bin doesn’t mean it’s gone forever. If you accidentally toss out something you still need, you can get it out of the bin. This phenomenon can work against you if someone else using the computer finds something incriminating you thought you’d gotten rid of. To permanently flush the files out of the Recycle Bin, right-click its icon and choose Empty Recycle Bin. Once you’re done, the only way to retrieve the contents is with special file-recovery software.

Managing Windows
Unlike windows in houses, desktop windows are easy to move. You can drag them around the desktop, resize them, and even reduce them to tiny labels on the taskbar. Doing all this on a netbook may feel a little cramped due to the small screen size, but your windows work the same way as on the past six versions of Windows.
Here are the basic parts of a Windows window:
Title bar. The text in the blue strip at the top of the window is the name of the open folder or folder. You can rearrange small windows around the screen by dragging their title bars.
Buttons. The three square buttons at top-right let you control the window’s size—or close it all together. Click the minus (-) button to minimize the window; that is, shrink it down to just a title in the taskbar. Click its title in the taskbar to bring it back out on the desktop. Click the middle button to maximize the current window to full-screen size; or click it again to return it to the original size. Click the red X to close the window.
Menu bar. The top of the window has menus and controls for navigating folder windows.
Scroll bar. If the window contains too much to see all at once, you can use the scroll bar on the right side of the window. Click or hold down the mouse button to zip down deeper into the window.
Task pane. The blue-shaded area on the left side of an open window suggests specific activities for the contents in the main part of the window. For example, “Play all” or “Shop for music online” are task pane items for the My Music folder. If you don’t need Windows making suggestions, you can turn this feature off. Open any folder and choose Tools→Folder Options→General and click the button next to “Use Windows classic folders.”
Changing Your Window Views
Windows XP gives you a lot of ways to look at the same stuff. If you like the linear precision of a list, you can look at your folders and files in long lists. If you prefer colorful, easy-to-spot icons, you can view them that way instead.
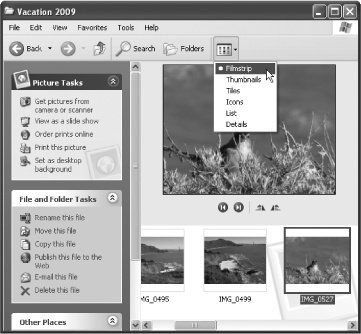
To change how a window displays its contents, choose a folder from the Start menu (My Documents is a good one). From the toolbar at the top of the folder’s window, choose View and then select the option you want from the middle of the menu. Your choices are:
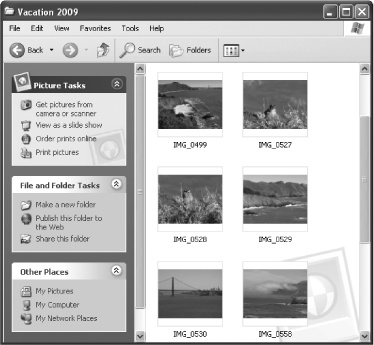
Thumbnails view shows a miniature preview image of the file. This thumbnail reflects the file’s contents—a small version of a photo or graphic file, say, or a tiny representation of the contents of a PDF file. If Thumbnails view can’t come up with a preview, it just shows a generic icon.
Tiles view has large icons that show you details like the file’s date or size.
Icons view displays a pictograph of the file or folder with its name listed underneath.
List view shows very small icons in multiple rows across the screen, with each file’s name listed next to the icon.
Details view looks much like List view, except the small icons and names are arranged in a single vertical column along with file type, size, and date.
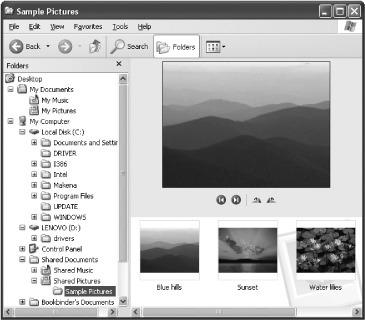
Filmstrip view is available only for picture folders. It displays a large preview of the selected photo above a row of smaller previews of the other pictures in the folder. You can move through the pictures by tapping the netbook’s left and right arrow keys or by clicking the onscreen arrows. The two other buttons underneath the big preview image let you rotate photos clockwise or counterclockwise so you can get your vertical shots oriented the right way.
Taking Control with Control Panel
Anytime you need to adjust a setting or add hardware like a printer to your netbook, you inevitably end up in the Start menu’s Control Panel area. For control freaks, this panel is a trip to Disneyworld.
To get there, choose Start→Control Panel. Now, depending on which view you’ve selected, the Control Panel looks very different:
Category View groups all the Windows settings into themed categories, like “Printers and Other Hardware” or “Performance and Maintenance.” This scheme makes for a very tidy screen, but you kind of have to know what you’re looking for. For example, if you want to change the setting that automatically turns off the netbook’s screen after a period of inactivity, you have to know that the Power Options control panel is grouped in the Performance and Maintenance category.
Classic View shows all the control panels as separate icons in a window—with the effect of tons of little colorful objects scattered all over the screen. This view can cause sensory overload for some people. On the other hand, you don’t have to guess at categories and can zero in on the one control panel you need, like Display or Fonts.
To switch back and forth between views, click an option in the Task pane at the left side of the Control Panel window.
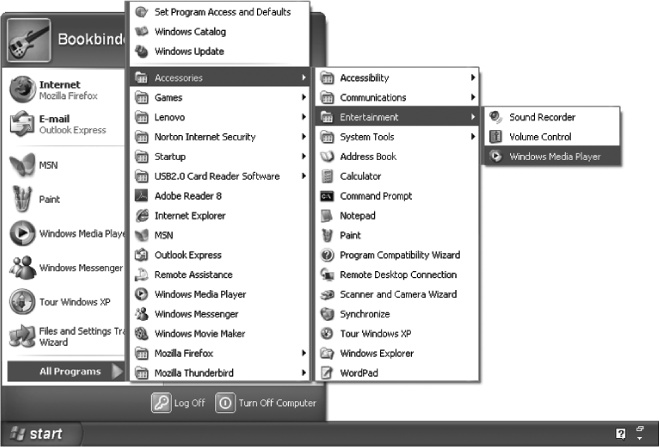
A Tour of the Windows Programs Menu
Even before you add your own software, your netbook’s All Programs menu has plenty of preinstalled applications programs to get you rolling. The programs in the list vary based on which netbook you have, as some companies may add things like antivirus software or the Microsoft Works suite of home-office applications. This section lists the programs that come standard with Windows XP.
Accessories
The folder in the All Programs menu reveals a nestled subfolder with all kinds of helpful little apps. These include:
Address book. An electronic Rolodex for storing contact information.
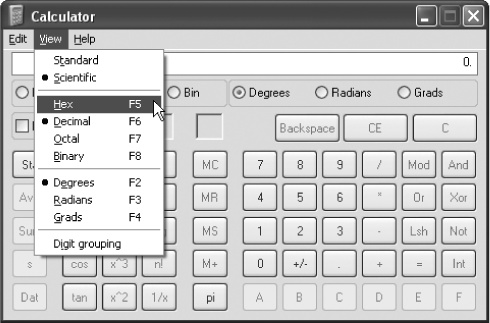
Calculator. On the surface, this program looks like a simple little adding machine for tallying up, say, a batch of checks for deposit. But choose View→Scientific, and the calculator transforms itself into a math nerd’s best friend, capable of working in the Hex, Decimal, Octal, and Binary numeral systems.
Command Prompt. If you miss typing DOS commands to find files and jump around the PC, relive the glory days here.
Notepad. Need to jot down a quick bit of text like a shopping list? Notepad is just the thing. It lets you create plain-text files virtually any word processing program out there can open.
Paint. It’s no high-end Photoshop-type program, but humble little Paint can create hand-drawn graphics and do basic photo-editing tasks like cropping or resaving files in different image formats.
Windows Explorer. More like a helicopter ride than a program, Windows Explorer (Finding Files with Windows Explorer) shows your netbook’s contents as a vertical tree of folders and documents, making it easy to see how Windows itself is organized.
WordPad. More technically sophisticated than Notepad, WordPad can handle basic text formatting and open documents created in older versions of Microsoft Word. Unlike Word, WordPad doesn’t include a lot of editing features like a built-in spellchecker, thesaurus, and 37 different toolbars.
In addition to various wizard programs that walk you through chores like connecting a photo scanner, the Accessories folder contains its own subfolders. These store different applications like:
Accessibility. Built-in tools for people with special visual and audio needs are grouped here, like a screen magnifier and a program that reads text on screen out loud.
Communications. Software for setting up network connections.
Entertainment. Here lives the Windows Media Player program for listening to digital music and watching video, plus the Sound Recorder app for doing your own recording.
System Tools. Utility programs like Disk Defragmenter and Disk Cleanup—intended to help keep the computer running well—are stored here (and explained in greater detail in Chapter 12). This toolbox also contains the Character Map for finding special symbols on the keyboard, the Files and Settings Transfer Wizard (Using the Windows XP Files and Settings Transfer Wizard), and the bacon-saving System Restore tool (Using Windows System Restore).
Games
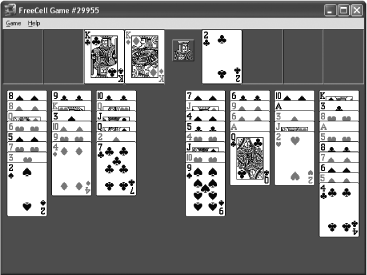
It’s not a personal computer unless it has a solitaire program, and Windows XP includes three: Solitaire, Spider Solitaire, and the free-form FreeCell (pictured). There’s also Hearts, MineSweeper, and Pinball. Windows XP also includes five online games that let you pit your skills against other players over the Internet: Backgammon, Checkers, Hearts, Reversi, and Spades. Chapter 10 has more on netbook gaming.
Startup
This folder shows you what programs automatically start up when you turn on the netbook. You can add or delete shortcuts in this folder (Managing Windows), but remember: The more stuff you have starting up all at once, the longer it’ll take Windows to lumber into action when you boot up the netbook.
Tip
Want a quick way to open a program, folder, or file without having to dig around in folders or the All Programs menu? Make a desktop shortcut of it. Right-click the item’s icon and choose Send To→Desktop (create shortcut) from the menu. Just double-click the new shortcut on the desktop to open the item.
Other programs
Applications included with Windows XP, like Outlook Express for email and Internet Explorer (both in Chapter 5), are full-time residents on the main level of the All Programs menu. The Windows Messenger instant-messaging program (Setting Up Instant Message Software) and the Windows Movie Maker video-editing software (Editing Video on a Netbook) are also neighbors on the All Programs list. Depending on which netbook you have, you may also find Internet security software (Keeping Viruses at Bay), the Adobe Reader program for viewing PDF files (Viewing PDFs with Adobe Reader), and other surprises from your netbook company as well.
And, of course, any new software you install yourself ends up in the All Programs menu as well.
Tip
As you add new applications to the netbook, the All Programs menu may get a little disorganized and your most frequently used items will get lost in the crowd. If you don’t have room to pin them all in the Start menu (The Start Menu: Where It All Begins), you can rearrange the menu to your liking instead of keeping it in the order of programs installed. With the All Programs menu open, drag the applications you want to move to more convenient places on the list. If you’d rather use the organizational power of the alphabet, right-click any program title and choose “Sort by Name” from the shortcut menu. The programs regroup themselves in alphabetical order, so you just have to remember that Picasa comes after iTunes.
Adding More Programs
Windows XP comes with all the programs you need to browse the Web, write and send email, compose documents, and enjoy digital photos, audio, and video. But unless you plan to use online applications (Using Google Docs & Spreadsheets) for the stuff Windows lacks, odds are you’ll install additional software on your netbook.
You can install software either from a CD or DVD (using an add-on disc drive), or from a Web download. Before you buy any new software, check the program’s system requirements. Some programs may require a certain processor speed or take up a huge chunk of drive space, so make sure your netbook can handle it. You don’t want to end up with a program that won’t even launch and takes up a gigabyte of precious netbook real estate as it silently mocks you for not reading the system requirements page.
Installing programs from the Web
Installing programs from the Web
Downloading programs straight from the Web is currently the quickest and most popular way to get software for any computer. You can find everything from antivirus utilities to word processors to robust photo-editing programs ready to download to your netbook. Many of these are free, inexpensive, or cheaper than they would be if you bought them on disc.
Software company websites are good places to check for downloadable wares. Shareware archives are also great places to find free or inexpensive programs written by developers who don’t have the financial oomph or marketing muscle to get their software boxed, shrink-wrapped, and placed on a store shelf. Sites like www.download.com, www.versiontracker.com, and www.tucows.com are bursting at the seams with software for Windows XP. And, unlike some less-than-reputable shareware sites out there, these three have scanned their goods to make sure the programs don’t contain viruses and spyware.
Once you find a program you want and click the Download link on its web page, you may see a box asking if you want to Run the program installer you’re downloading or Save it. Choose Run to immediately install the program on your netbook with minimal fuss.
Windows typically sticks the program’s Installer files in its temporary files folder and flushes them when it empties the Temp folder (which you can schedule with the Disk Cleanup tool described on Disk Cleanup).
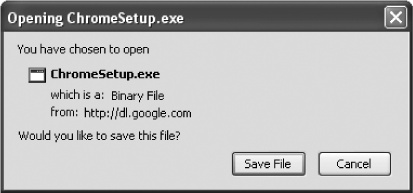
Choose Save if you don’t want to install the program right away. The installer file lands on your Windows desktop (or whatever folder you directed it to). Once the file arrives, double-click its icon to start the installation process. The advantage to picking Save here means that you get to add the program when you feel like it and hang on to the installer file in case you need to reinstall later.
Installing software from a disc
With regular desktops and laptops, many larger programs like Microsoft Office come on install discs that you just pop into the CD/DVD drive. You can install software on your netbook this way, too, by hooking up an external USB-based disc drive. Dumping the built-in disc drive is one way netbook designers make their machines smaller, lighter, and more power-efficient. You’ll only miss the drive on three occasions: backing up to disc, watching movies, and, well, installing software.
So if you sprung for a disc drive, connect it to the netbook’s USB port, slide in the install disc, and follow the onscreen instructions to install the software on the netbook. See Storing Data on External Drives for more on connecting an external disc drive to your netbook.
Got another Windows computer with a working disc drive on your home network? With a little tinkering, you might be able to tap into it to get files off discs or run installer programs. Start by putting the disc you want to use into the other computer’s disc drive. Open the My Computer icon and right-click the drive’s icon. Choose Sharing and Security from the pop-up menu and turn on the checkbox to share the folder or drive on the network.
On the netbook, open Windows Explorer (Finding Files with Windows Explorer) and choose Tools→Map Network Drive. Click the Browse button and locate the disc drive from the other computer that you just shared. Click OK when you find it. Then click Finish in the Map Network Drive box. You should be able to get to any files on the disc—as long as it’s in the drive. (Microsoft has more on all kinds of file sharing at http://support.microsoft.com/kb/304040.)
Removing Programs
If a program you’ve installed needs to come off the netbook because it’s crashing, outdated, annoying, or taking up too much space on the drive, it’s time to uninstall it.
You can remove programs in a couple of ways. Dragging the program’s icon into the Recycle Bin or right-clicking its icon on the All Programs menu and choosing Delete may seem obvious, but they aren’t the best or safest ways to dispense with a program. You may be leaving behind all the program’s internal files on your drive or merely deleting the desktop shortcut (Managing Windows) that points the way to the real program file.
Once you’ve decided which program or programs you want to remove from your netbook, try one of these removal methods instead:
In the All Programs menu, find the program you want to remove and look in its folder for an uninstall option. If it has its own Uninstaller application, launch it and follow the onscreen steps.
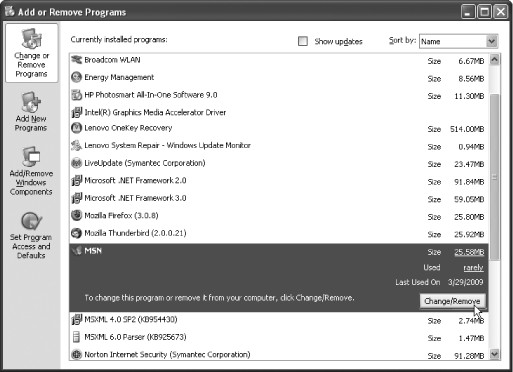
If the program doesn’t have its own uninstaller application, go to Start→Control Panel→Add or Remove Programs. Wait for the “Add or Remove Programs” box to gather up a list of all the software you have on your netbook—and how much space each application is taking up on your drive. It may take a few seconds, but once the list appears, find the program you want to delete. Click its name in the list and then click the Remove or Change/Remove button. If a box pops up to ask if you’re sure, say Yes and proceed with the uninstallation.
Organizing and Finding Files
Like brand-new houses, new computers start out relatively fresh and uncluttered. But as you inhabit a computer, like a house it tends to accumulate various souvenirs of life—documents, music, video, photos, and so on. Depending on your personal level of organization, finding things may be easy or hard. But on the netbook you have some handy tools to track down what you’re looking for—without turning the house upside down.
How to Organize Your Files
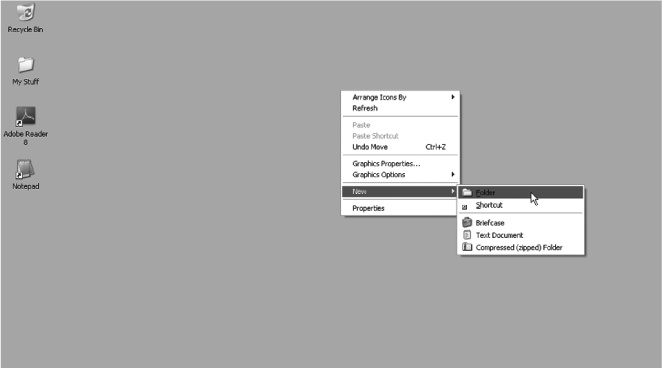
As mentioned earlier in this chapter, a folder is the basic organizational unit of Windows XP (and any other operating system where you work on a desktop). If you have a bunch of files scattered all over the desktop, here’s one way to corral them:
Right-click the desktop and choose New→Folder.
A new yellow folder called New Folder appears on the desktop. The words “New Folder” are highlighted in blue, meaning you can edit them.
Type to name the folder something more descriptive, like Recipes.
Drag all the loose documents cluttering up the desktop on top of the new folder to put them inside it.
With all the files now in the Recipes folder, you can move the whole thing at once off the desktop and put it in, say, the My Documents folder. For example, choose Start→My Documents to open the My Documents folder window on the desktop, and then drag the Recipes folder onto the open window.
Tip
Need to rename a file? Right-click its icon, choose Rename from the shortcut menu, and then type the new name.
You can have folders inside of folders like Russian nesting dolls. For example, within My Documents, you could have a folder called Taxes, and inside that, separate folders for 2008 Taxes, 2007 Taxes, and 2006 Taxes. Inside the 2008 Taxes folder, for example, you could have files called Deductions List and Form 1040. It’s just a matter of how organized you want to be.
Finding Files with Windows Explorer
One way to get a good overall look at the contents of your netbook is to summon Windows Explorer. Not to be confused with Internet Explorer (Microsoft’s web browser) or MSN Explorer (Microsoft’s other web browser that integrates Windows Live Hotmail and other applications), Windows Explorer is your netbook’s file-management program.
Windows Explorer lets you see all the files and folders on your netbook at a glance, including what files are inside which folders and where everything lives on your netbook’s drive. In addition to seeing how all your stuff is organized, you can use Windows Explorer to copy, move, and rename files on the netbook.
Getting to Windows Explorer is easy:
Right-click the green Start menu button and choose Explore from the shortcut menu.
Choose Start→All Programs→Accessories→Windows Explorer.
Once you open Windows Explorer, it pops up and displays all the contents of your computer, neatly laid out in a vertical family tree. A plus sign (+) next to an icon or folder means there’s more stuff inside. Click the plus button to see what’s in there, and click the minus (–) button to close it back up again.
As you click file and folder names on the left pane of the Windows Explorer window, the right pane displays its contents. This arrangement makes it all very easy to see where everything lives on the netbook.
Searching for Files
When you really can’t find what you’re looking for, it’s time to use Windows XP’s Search function. Search can track down everything from a downloaded MP3 of “It’s a Long Way to Tipperary” on your hard drive to the song’s original lyrics on Google.
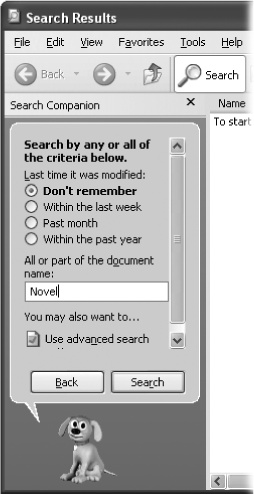
Choose Start→Search.
The Windows XP Search Companion pops up in the left pane of the window, complete with a list of search options and a small animated dog to keep you company. Next, click the green arrow next to the type of file you’re looking for—like a music track or a word processing document. On the next screen, the Search Companion prompts you for more information about the file you seek. What type of file is it? Do you have the name or part of the name? Click the icon for advanced search options to get even more results-narrowing questions. When you have entered all the information you know, click the Search button.
The Search Companion scours the netbook’s drive for any files that match your criteria and displays them on the right side of the window for your inspection.
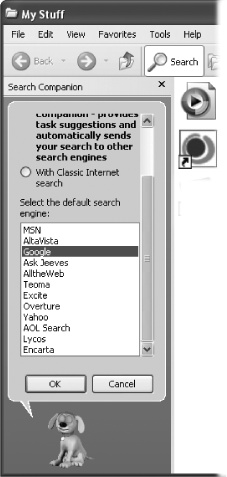
Need to find information on the Web? Click the "Search the Internet” option, type your query, and click Search. Windows XP will probably display your results on an MSN page, but you can pick your favorite search engine like Google or Yahoo instead.
To change your default Search engine, click Change Preferences on the main Search Companion screen. On the next screen, click “Change Internet search behavior.” On the resulting screen, you can choose how you want to search—with the Search Companion’s suggestions, or with a regular search engine page. At the bottom of the pane, you can pick your preferred search engine from the list. Click OK when you’ve made your choice.
Checking Hard Drive Space
If you plan to store a lot of files on your ultraportable PC, you’ll have to keep an eye on your internal drive space. Netbooks don’t have the biggest drives to begin with, especially if you opted for a solid-state drive. And it’s amazing how quickly space disappears once you start installing programs or adding digital photos, video, and music.
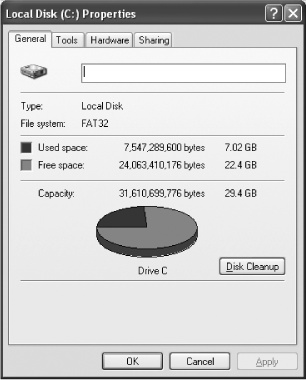
To take a quick peek at how much drive real estate you have left, choose Start→My Computer. When the My Computer window opens, right-click your netbook’s C: drive icon and choose Properties from the shortcut menu.
Note
Some netbooks have a D: partition. The manufacturer set up this special area of the hard drive as a system recovery rescue plan.
On the General tab in the box that pops up, you see the amount of space you’ve used and the amount of space you have left on your netbook’s drive. You also see a blue and magenta pie chart visually depicting the same information.
You don’t have to worry about hard drive space until you have less than 20 percent of your drive is free. Once the hard drive gets too full, you may start to notice sluggish performance or have insufficient space to install any more programs.
If you find your netbook doesn’t have enough room to maneuver, Disk Cleanup explains how you can take back some turf on your drive.
Backing Up Your Windows Netbook
Of all the things you can do on a computer, backing it up is one of the most important—but overlooked—tasks. Some netbook owners may not have much of anything on their drives. These are the folks that prefer to just keep the operating system and a couple of programs on there, while storing their email, text files, and photos online, for example, in the repositories of Gmail, Google Docs & Spreadsheets, and Picasa web albums.
But then there are others who like to have all their stuff with them. And if you have your life on the netbook’s drive, backing it up can be a real lifesaver. There are several ways to back up your netbook:
Built-in backup
Built-in backup
Depending on your make and model, your netbook may come with all the backup you need right on the drive in an extra partition, or separate section, reserved for making backups of your netbook’s data. Lenovo, for example, includes its OneKey Rescue System on its IdeaPad netbooks; Samsung includes a similar utility. The downside: If your netbook gets stolen or your hard drive fails, your backup disappears, too.
USB flash drive
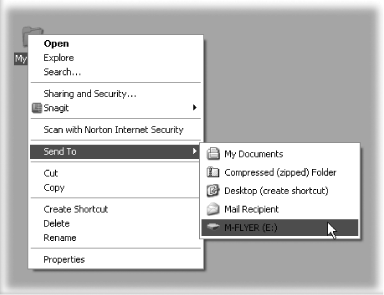
Say you just have a handful of files you need to back up each night—for example, the folder you’re using to store your current project spreadsheets. One quick way to back up the folder is to plug a USB flash drive, right-click the folder, and then choose Send To→[Name of USB Drive] from the shortcut menu. Large capacity USB flash drives come in sizes like 16, 32, and 64 GB these days, so you can back up a lot of data on one stick.
External drive backup
If you want to back up the whole netbook at once, connecting an external USB hard drive and using dedicated backup software is a time-honored tradition. You can set the software to back up part or all of the netbook’s drive daily, weekly, or whenever you want.
Most external drives include their own backup software, but you can also buy your own preferred program to use with the drive. Western Digital ( www.wdc.com), Iomega (http://go.iomega.com), and Maxtor ( www.maxtor.com) all sell backup drives. Just make sure to buy one large enough to hold all the stuff on your netbook. As for software, Genie Backup manager ($50 at www.genie-soft.com) and NTI Backup Now ($30 to download at www.ntius.com) are among the many programs out there.
Online backup
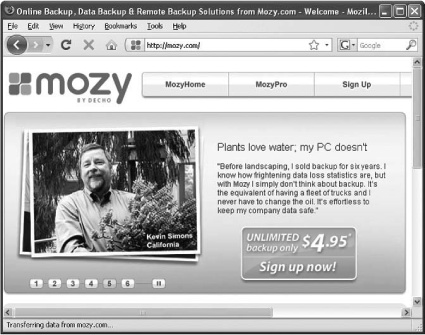
Netbooks—small, light, and built to be online—can store their files online, too. This method has its advantages, mainly in that your files are safely backed up on servers, no matter where you or the netbook happen to be. On the downside, copying files over the Internet can be slow, especially the first time you back up your entire drive at once. (Later backups, which just copy over new or modified files, take much less time.) Several companies offer online backup services. Mozy ( www.mozy.com), for example, offers 2 GB of online server space free, and unlimited amounts of backup space for $5 a month. SOS Online Backup ( www.sosonlinebackup.com) charges $20 a year to back up 2 GB of data and goes up to $50 a year to back up 15 GB.
Note
Windows XP Home Edition has its own Backup program, but you must manually install it from the Windows disc that came with the computer. Your netbook may have not come with a disc drive, and you may not even have a Windows disc if its maker decided to put backup and recovery utilities on a hard drive partition instead. Still, if you have the Windows disc, a disc drive, and the desire to use Microsoft’s backup software, connect the drive, pop in the disc, and look in the ValueAdd folder for the Ntbackup.msi file. Microsoft has its own page of instructions at http://support.microsoft.com/kb/302894.
Closing Down Your Netbook
When it’s time to quit for the day, Windows XP gives you several options for closing down your netbook. Each way saves power by turning off the screen and hard disk; the differences are in how long it takes to start back up again.
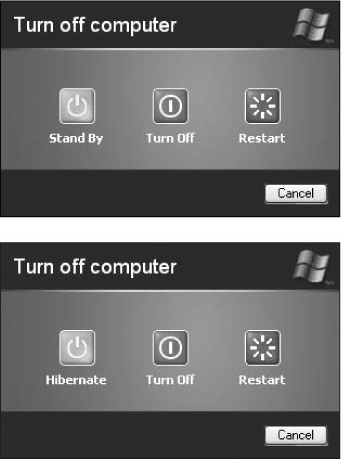
Choose Start→Turn Off Computer. The box that pops up gives you three (or four) options: Stand By (or, if you hold down the Shift key, Hibernate), Turn Off, or Restart.
Note
Choosing Restart shuts down all your programs before turning the netbook off and on again, and it’s a great way to reset a cranky machine. The other three choices are the ones that actually power down the netbook in some form.
Stand By. Choosing Stand By keeps your currently open programs open, but settles the netbook into a low-power mode where it consumes much less energy. In this state, the netbook can wake up again pretty quickly. The hard drive, fans, and screen are turned off, but the computer still uses a bit of power to store your current work in its memory. (If you have a power blip or failure, though, all the information stored in the netbook’s memory is flushed out.) When it’s time to get back to work, tap the netbook’s Power button to instantly bring it out of Stand By mode.
Hibernate. This mode is similar to Stand By, but the computer saves all the information from open files and programs currently in its memory to the hard drive. This way, it can completely power off and save more battery life. Since it has to pull everything out of the hard drive’s temporary storage, waking up from Hibernate takes a little longer than from Stand By mode.
Two other considerations: You need to have enough drive space left to store the hibernated system, and you may have to turn on the Hibernate feature before you can use it. To do so, choose Start→Control Panel→Power Options→Hibernate and turn on the “Enable hibernation” checkbox. (Choose Start→Control Panel→ Performance and Maintenance→Power Options→Hibernate if you’re using the Category view instead of the Classic view of the Control Panel.) Then, when you’re ready to Hibernate, choose Start→Turn Off Computer and press Shift to turn the yellow Stand By button into a yellow Hibernate button. Press the netbook’s Power button to pop it out of Rip Van Winkle land.
Turn Off. Choosing the red button in the middle shuts down the computer entirely. This choice is appropriate if you plan to be away for a while or just want to make sure the netbook is completely off. To start up the netbook again, press the Power button and wait for it to boot up.
Now that you know a bit about how Windows XP works on a netbook, it’s time to get that netbook working for you. Skip over the next chapter (unless you really want to learn the basics for Linux on a netbook) and proceed to Chapter 4 to learn how to outfit your netbook with a mouse, printer, external drive, and more.