Chapter 4. Connecting Devices to Your Netbook
Netbooks are built for portability. You grab yours and go—off to class, the coffee shop, the airport, wherever. But the tiny computer doesn’t have to be just a lightweight way to browse the Web when you’re out and about. As detailed in Chapter 1, most netbooks include USB ports, audio jacks, video connectors, and other places to plug in the same kind of hardware you use with a laptop or desktop computer.
Mice, printers, external monitors, music players, and USB drives—you can hook up just about any piece of hardware that works with a full-size machine. Attaching external devices is a bit more challenging on a computer that lacks a CD drive for installing driver software, but this chapter walks you through all of the steps. And since that netbook was meant for travel, you’ll also find out what you need to take with you for comfortable computing no matter where you go.
Mice, Trackballs, and Tablets
Let’s face it: That netbook’s trackpad can feel a little small if you’re using it for hours on end. Also, it may not be the most precise way to get around the screen if you’re doing something like touching up digital photos or making art with a drawing program. Alternative input devices—mice, trackballs, and stylus-based tablets (like the ones Wacom makes for digital artists)—can ease the pain and give you more control over where you point on the screen.
Adding a Basic Mouse: The Easy Way
If you find yourself missing the mouse, there’s no reason you can’t add one to your netbook, as long as you have a spare USB port. The simplest (and cheapest) route is to plug in a regular ol’ three-button USB mouse. With either Windows XP or Ubuntu Linux, it works right off the bat. You can point and click your way to netbook glory, and, in some cases, the scroll wheel works, too.

Adding a Mouse, Trackball, or Tablet
Fancier mice, trackballs, and tablets with programmable buttons are more complicated. Getting one of these to work correctly often involves installing the device’s own driver software. The driver tells the operating system how to handle the special features of these devices—like the programmable buttons on a mouse.
On a Windows XP netbook, there are a few ways to get the hardware playing nicely together:
If you have an external disc drive for your netbook, install the driver software from the CD that came with the mouse, trackball, or tablet, just as you would on any other computer.
If you don’t have a disc drive, take a stroll to the manufacturer’s website. All device makers have them; check the packaging for the URL, but it’s often something simple like www.logitech.com, www.kensington.com, or www.wacom.com. Check the Support area for a driver downloads page. You may have to click through a couple of screens and select your model number, but you’ll eventually land on the download page for your device’s driver. Just make sure you grab the one for your specific version of Windows XP. When the installer file finishes downloading, double-click it to install the driver software on the netbook.
Using another computer, you may be able to copy installer files (usually a program called Setup.exe or something similar) from a CD onto a USB drive—and then connect the USB drive to the netbook to run the software. It may not work with all installers, though, as some are more complicated than others or need to be installed by CD for verification purposes.
On Linux, things can get a little more complicated since there are a lot of mice out there—and each one may have different needs. If you’re buying a new mouse, check its specifications to see if it works on Linux.
Whether you’re on the driver hunt for Windows or Linux machines, sites like www.driverguide.com and www.softpedia.com are great places to do a little research and maybe even pick up the software you need.
Tip
Other good sites to check for Linux hardware and information include Ubuntu’s community-supported hardware page at https://wiki.ubuntu.com/HardwareSupport and the Linux-USB Device Overview page at www.qbik.ch/usb/devices.
One of the challenges of adding extra hardware to any Linux system is that there’s a ton of mice, trackballs, and other input devices out there and the method for getting a particular one working with your netbook hardware and Ubuntu version can vary widely. In some cases, you have to do a bit of command-line work in the netbook’s Terminal program (Applications Menu: All Your Programs). Still, there are plenty of instructions written by thoughtful people. Visit www.missingmanuals.com/cds for a roundup focused on the most popular makes and models.
Tip
Trying to get a Wacom pen and tablet working with your Ubuntu netbook? There’s an entire open-source project devoted to the topic with helpful documentation at http://linuxwacom.sourceforge.net.
Adding a Bluetooth Mouse
Bluetooth—the wireless technology used to connect computers to hardware like mice, phones, and printers—is a feature of some netbook models. If your netbook has a Bluetooth chip, you can cut the cords.
To connect a Bluetooth-equipped netbook to a Bluetooth-equipped mouse or other gadget, you have to pair them. This process is sort of like introducing two friends at a party for the first time so they’ll recognize each other every time they meet afterward.
Follow the instructions included with your mouse for putting it in pairing mode, which makes it visible to Bluetooth computers. Next, you have to help the netbook see and bond with the mouse.
Bluetooth in Windows XP
For Windows XP netbooks sporting a nifty Bluetooth radio under the hood:
Start the pairing by choosing Start→Control Panel→Bluetooth Devices (Classic view) or Start→Control Panel→Printers and Other Hardware→Bluetooth Devices (Category view).
When the dialog box pops up, go to the Options tab.
Turn on the checkbox next to “Turn discovery on.”
This step lets the netbook discover (that is, notice) other Bluetooth devices within range of your netbook (usually 30 feet or less). While you’re here, also turn on the checkboxes next to “Allow Bluetooth devices to connect to this computer” and “Alert me when a new Bluetooth device wants to connect” so your mouse can connect to the netbook. Click OK when finished.
Click the Devices tab.
After you’ve made sure the netbook can discover the mouse, you can add the mouse to the mix.
Click the Add button.
When the Add Bluetooth Device Wizard pops up, turn on the checkbox next to “My device is set up and ready to be found.” Click the Next button.
Select the mouse from the list of devices.
Click the Next button to move on.
The passkey, which is included with the mouse’s documentation, is its secret code that you need to share with the computer so the two can fully bond. Passkeys are often not too complicated (like 0000 or 1000).
Once you type in the passkey and the netbook accepts it, the computer and mouse are united in holy Bluetooth matrimony. If you want, you can also turn off the discovery mode on your way out of the wizard so no one else will discover your netbook when you’re out and about.

Bluetooth in Ubuntu Linux
If you have an Ubuntu Linux netbook with a built-in Bluetooth radio, you’re just a few steps away from your own wireless fun.
To pair up a Bluetooth mouse in Ubuntu, follow the mouse-maker’s instructions for putting it into pairing mode and then:
In the top panel, right-click the Bluetooth icon and choose Preferences.
The Bluetooth icon is at the right side of the top panel; it looks like a Viking rune version of the letter B.
Make sure the button next to “Visible and Connectable for Other Devices” is turned on. Click Close.
This option means that other devices—like your mouse—can see the netbook.
Right-click the Bluetooth icon in the top panel and choose Browse Device.
Select the mouse from the list and click Connect.
When a window appears asking for a passkey, type in the one provided by the manufacturer and click OK.
Once you’ve provided the passkey, the mouse and netbook should be paired. However, if nothing happens, you may have to take the long way around: the command line. Again, make sure both the mouse and the netbook are in discover mode, and then:
Choose Applications→Accessories→Terminal. Type the following command:
sudo gedit /etc/default/bluetooth
Note
If you happen to already be using your powers of root, use this command instead:
gksu gedit /etc/default/bluetooth
A document opens in the text editor. It looks geeky, but brace yourself and look for a line that reads:
HIDD_ENABLED=0
And change the 0 to a 1 so that it looks like:
HIDD_ENABLED=1
Save the file.
In the top panel, right-click the Bluetooth icon and then choose Preferences.
On the line for Input Services, turn on the checkbox next to Running.
Click the Input Services line in the list.
An Input Devices section opens at the bottom of the box.
Click the Add button.
Choose the mouse in the Select Device list and click Connect.
Click the Enter Passkey button in the box that pops up.
Once you type the passkey, the mouse and netbook should be paired. Close the Bluetooth preferences box and mouse away. If it doesn’t work immediately, try rebooting the netbook.
Note
You may notice the word root in the command line when you use the Terminal program. No, it has nothing to do with trees or genealogy—root is the superuser account on any Linux system. Unlike other accounts on your netbook, the superuser has the power to change anything and everything on the system. Typing sudo before entering a command temporarily switches your user powers to root for just that one action.

Adjusting the Mouse
Want to fine-tune the mouse to adjust the double-click timing or configure it for a left-handed person? A quick trip to your netbook’s mouse settings should take care of things. In Windows, choose Start→Control Panel→Mouse (in Classic view) or Start→Control Panel→Printers and Other Hardware→Mouse (in Category view) to get to the box with all your mouse-adjusting needs.
In Ubuntu, choose System→Preferences→Mouse to get to the settings.

Connecting an External Monitor or TV
Let’s face it: Netbook screens, even the larger ones, aren’t all that big. And after staring at one all day, it can seem smaller and smaller by the minute. But if you have a spare external monitor or even a television and the right cables, you can connect the netbook to the big screen and stop squinting for a while.
As mentioned on Ports of Call: Your Netbook’s Jacks, most netbooks have a video port. This port can take a standard 15-pin VGA connection, which is the type of plug used on many external monitors and projectors. Connecting the monitor’s cable to the netbook is the first step, but if your monitor or TV doesn’t have a VGA connector, you can buy an adapter that bridges the gap. If your monitor has a DVI (digital video interface) connection, for example, get a VGA-to-DVI adapter.
Once you’ve connected the external monitor to the netbook, it’s time to inform the operating system.
Connecting a Monitor in Windows XP
You tell Windows XP what you want to use for a monitor by editing the desktop settings.
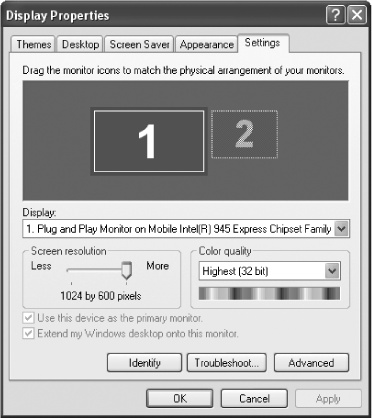
Right-click the desktop and choose Properties from the shortcut menu. In the dialog box that opens, click the Settings tab.
You’ll see two rectangles: one representing your netbook screen and the other representing the external monitor.
Click Identify to have Windows assign a number to each monitor so you can tell which is which.
For example, you might see a “1” on the rectangle for your netbook screen, and a “2” on the rectangle for your external monitor.
Now that you know which numbered monitor is which, click the menu under Display and choose between screens from the pop-up menu.
You can also drag the screen icons into a new order that matches how the monitors are physically arranged on the desk.
Set your screen.
If you just want to use the external monitor’s screen right now, turn on the checkbox next to “Use this device as the primary monitor.” If you want to use both monitors at the same time for a really expansive screen, turn on the box next to “Extend my Windows desktop to this monitor” and click OK.
Ubuntu Linux
If you bought a netbook with Ubuntu preinstalled, your manufacturer should have made sure that the video card can handle connecting an external monitor. In general, using multiple monitors in Ubuntu is notoriously unreliable, and with certain video cards you may have to do some serious tweaking to get the extra monitor working. If you’re having problems for some reason, visit www.missingmanuals.com/cds for links to solutions for common video cards—or complain to your netbook’s maker.
The following steps are how it’s supposed to work:
Choose Applications→Preferences→Screen Resolution.
The Monitor Resolution Settings dialog box opens. If the Mirror Screens or Clone Screens checkbox is turned on, the dialog box shows one monitor called something like “Laptop 9.”
Turn off this checkbox, and then drag the two monitor graphics to arrange them just as they are in front of you on the desk.
Adjust the screen resolution to that of the smaller screen. Click Apply.
A warning box may appear to announce that the xorg.conf file will have to be changed. Click OK.
Log out and back into Ubuntu to see the changes take effect.

Setting Up a Printer
If you got your netbook to serve as your ultraportable window to online applications (Using Google Docs & Spreadsheets), you probably don’t care too much about weighing yourself down with printed material. But there may be times when you do have to actually squeeze a piece of paper out of the machine—a report, a spreadsheet, or a PDF form to fill out and mail the old-fashioned way.
There are tons of printers out there, from inexpensive inkjets to pricey color laser machines. Although the parallel port used to rule the printer world, most printers these days come with USB connections, Ethernet ports, or both—just like your netbook. (The one thing the printer probably won’t come with is a USB cable, which you have to purchase separately.)
This section shows you how to set up printers for both Windows XP and Linux. And since you may be on the go or on a wireless network, it also covers getting that netbook to see printers that aren’t physically connected to it.
Adding a USB Printer in Windows XP
Most printers come with their own CDs for Windows XP that include the proper driver software and other utility programs—especially those high-falutin’ models that also scan and copy as well as print. If you have an external disc drive attached to your netbook, install this software before you connect the printer. The installation program on the disc usually takes care of all your printer-adding needs for you.
If you don’t have a disc drive, snag the drivers and installation software from the Support area of the manufacturer’s website, as described back on Customizing and Buying Your Netbook. If fact, installing the software from the Web usually means you’re getting the absolute latest version of the drivers for your computer, because who knows how long that CD has been sitting around since it was made.
Adding a printer manually
If Windows XP doesn’t recognize the printer or you can’t find a downloadable installation program for it from the manufacturer, there’s always the manual way:
Choose Start→Control Panel→Printers and Other Hardware→Add a Printer (Category view) or Start→Control Panel→Printers and Other Faxes and then, in the task pane, click Add a Printer.
The Add a Printer Wizard appears.
Click the option for “Local printer attached to this computer.”
If your printer is advertised as a Plug-and-Play model, turn on the checkbox next to “Automatically detect my Plug-and-Play printer” to have Windows try to find the printer on its own.
If Windows doesn’t recognize the printer, click Next.
This button starts you on your journey with the wizard. Select a printer port (Windows XP recommends one in the box) and click the Next button.
On the next screen, choose your printer’s make and model.
Click the Windows Update button if you want Windows to download what it finds for your printer. If you downloaded a driver, click the Have Disk button and direct the wizard to the files. Click Next.
On the wizard’s final screen, name the printer and add other info.
You can also tell Windows if this will be your default printer, and also if you plan to share it with other network users. You can also print a test page to make sure it all works.

Adding a Network Printer in Windows XP
A printer can be part of a network in several different ways. It can be connected to a computer on the network and shared with the rest of the network. Or, the printer can be connected directly to the network, which actually makes it harder for your netbook to find it.
Adding a shared printer
If a computer on your home network is sharing a printer with your other computers, here’s how to access it with your netbook:
Choose Start→Control Panel→Printers and Other Hardware→Add a Printer (Category view) or Start→Control Panel→Printers and Other Faxes and click Add a Printer from the task pane.
The Add a Printer Wizard appears, just as it does when you want to add a local printer.
Click the button next to “A network printer, or a printer attached to another computer” and click Next.
Click “Browse for a printer.”
When you click the Next button, Windows XP searches for a shared printer on your network.
Select the shared printer and click Next.
Windows asks if you’re sure you want to connect to this printer. If you click Yes, the program installs the printer driver for you. Click Finish to wrap things up.
Adding a networked printer
Some printers are on the network through print servers or wireless devices like Apple’s AirPort Express, which provides a handy USB port to give a regular ol’ USB printer the powers of networking. To connect to one of these types of printers, you need to first get the printer’s Internet Protocol (IP) address. An IP address is a series of numbers like 192.161.204.226 and is used to identify a device on a network. Here are some ways to find the printer’s address:
In office situations, the IP address is often taped to the side of the printer, or listed when you print out a test or configuration page.
On AirPort networks, you can see the printer’s IP address by using the AirPort Admin Utility program that came with the AirPort router.
Try choosing Start→All Programs→Accessories→Command Prompt. Type in net view and press Enter. If the printer is visible, type ping [name of printer] and press Enter to see the IP address.
Once you have the printer’s IP address, follow these dance steps:
Choose Start→Control Panel→Printers and Other Hardware→Add a Printer (Category view) or Start→Control Panel→Printers and Other Faxes and, in the task pane, click Add a Printer.
The Add Printer Wizard appears. Click the Next button to get started.
On the next screen, click the button for “Local printer attached to this computer” and turn off the checkbox for “Automatically detect and install my Plug and Play printer.” Click Next.
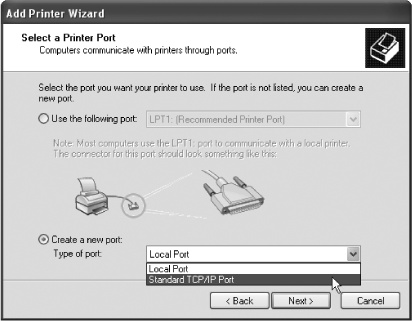
On the Select a Printer Port screen, choose “Create a new port.”
In the pop-up menu, choose Standard TCP/IP Port and then click Next. Then click the following Next button to start off the Welcome to the Add Standard TCP/IP Printer Port Wizard.
In the Add Port box, type the printer’s IP address, which you collected earlier. Just type it in the first box, the one called “Printer Name or IP Address”; the Port Name box will fill in by itself. Click Next.
Windows XP hunts around the network, finds the printer at the address you gave it, and adds it.
Click Finish to leave that wizard and go back to the one where you pick the printer driver and provide other information as described in steps 4 and 5 on Adding a Network Printer in Windows XP.
Once you’ve added the printer, it’s there, and you shouldn’t have to do all these steps ever again.
Tip
Have a web page onscreen that you really want to print—but have no actual printer in sight? Install the free CutePDF Writer (www.cutepdf.com) on your netbook. Then, when you choose File→Print, you have the option to save the web page as a PDF file, which you can print out later when you finally get back to a printer. (You also need to install a small converter file called Ghostscript as well, but there’s a link to it on the Cute PDF Writer download page.)
Adding a USB Printer in Ubuntu Linux
Ubuntu automatically recognizes most standard printers when you plug the printer’s cable into the computer’s USB port.
Adding a USB printer automatically
If Ubuntu recognizes your printer right off the bat, a small printer icon appears on the right side of the top panel. The system automatically configures itself to work with the new hardware and pops up a message when it’s done. If Ubuntu can’t find the exact driver for your printer model, it suggests a substitute. To see if that actually works, take the suggestion and print a test page to see if it looks normal. If it does, you’re all set.

Adding a USB printer manually
If the easy road to Printerville doesn’t work for you—or you want to have some control over the setup—you can also configure a printer manually:
Choose System→Administration→Printing. In the Printer Configuration box that opens, click the New Printer button.
The Add a Printer Wizard starts up and searches for your connected printer. If yours is listed in the pane on the left side of the window, select it and click the Forward button. The system now searches for the correct printer driver.
Select the printer manufacturer and model number.
The system usually selects the correct manufacturer for you, but you can choose another if needed. Choose the model number for your printer (listed on the top or front of the device) and click Forward. (If it’s a really old or obscure model and you happen to have a PPD—PostScript Printer Description—file for it, you can also copy that file onto the netbook and then select it in this screen.)
Fill in the name and location of the printer (if you want to) on the last screen.
In case you have multiple printers or plan to make the printer available for network sharing, you can give this newly added printer a name (like “HP 1012”) and location (“Basement office”). Click the Apply button when finished. The freshly added printer now appears in the printers list.
Print a test page.
Just to make sure the selected printer driver and your netbook are all good to go, select the new printer in the list and click the Print Test Page button. If the page (a series of grayscale boxes) looks funky, try another printer driver.
If you’re still having printer woes, there are several online resources to consult for reference and driver information, including https://help.ubuntu.com/community/Printers and www.linuxfoundation.org/en/OpenPrinting.
Tip
Ubuntu also lets you save web pages and other open documents as PDF files for later printing. With the web page or document open, choose File→Print and then select PDF from the list of printers. After you click Print, Ubuntu saves the file in Home→PDF, where you can read it, print it, or delete it whenever you want.
Adding a Network Printer in Ubuntu Linux
If you’re on a home network with Windows machines, and one of them has a shared a printer, you can use it with your Linux netbook—unless the printer is incorrectly configured. If you see the shared printer available on your netbook without having to do anything, Ubuntu may have even sensed it on the network and automatically set it up for you. In that case, start printing!
But if you see no shared printer and you know it’s out there, it’s time for some manual labor:
Choose System→Administration→Printing.
This command brings up the Printer Configuration box.
In the Printer Configuration window, click the New Printer button to start up the Add a Printer Wizard.
Ubuntu searches for your connected printer. If it doesn’t find one, the New Printer window appears.
Select the option for “Windows Printer via SAMBA.” Then, at top right, click Browse.
The SMB Browser box pops up.
Select the shared printer you want to use and click OK.
Click the Verify button to make sure you’re allowed to use the printer. If you get rejected, you may need a user name and password. Ask whoever set the printer up for this information, and then turn on the Authentication Required checkbox and type the user name and password.
Now you just have to select the printer driver and all that other stuff in steps 2–4 on Adding a Network Printer in Ubuntu Linux.
If you have a printer on the network shared by way of a print server or its own connection with an Apple AirPort base station or other router, you can connect to it via its IP address; Adding a shared printer has tips for finding it.
Note
Many laser printers made by Brother use the LPD (Line Printer Daemon) protocol for printing. The New Printer box in Ubuntu offers a LPD/LPR Host or Printer option and Brother itself has a page of Linux setup and troubleshooting tips for its assorted printing and scanning devices at http://solutions.brother.com/linux/en_us.
Once you have the IP address written down:
Choose System→Administration→Printing. When the Printer Configuration box pops up, click the New Printer button to start up the Add Printer Wizard.
Ubuntu searches for your connected printer. When it doesn’t find one, the New Printer window appears.
Select the option for AppSocket/HP Jet Direct. In the Host box, type the printer’s IP address.
The default Host number—probably 9100—should work fine. Click Forward when you’re done.

Once the netbook finds the printer, you can select the printer driver and related options in steps 2–4 back on Adding a Network Printer in Ubuntu Linux.
Storing Data on External Drives
Most external drives are USB-based these days, which means it’s easy to connect them to your Windows XP or Linux netbook. In most cases, you just plug them in and the system recognizes the drive. This feature works for both the small, pocket-sized flash-memory drives as well as the larger, hard-drive based USB drives meant for system backups (Built-in backup, Windows; External Drive Backup, Linux).
Windows XP
Adding an external drive in Windows is almost as easy as plugging a lamp into an electrical outlet. Connect the drive to a USB port on the netbook and wait for it to go through the Found New Hardware dance and show up in My Computer (Checking Hard Drive Space).
You can then drag files onto the drive’s icon to copy them over. You can also right-click files and folders and choose Send To→[Name of Drive] to copy them to the external drive.
When it comes time to disconnect the external drive, however, do it safely, by clicking the Safely Remove Hardware icon in the taskbar. Simply yanking the drive’s USB connection from the netbook can lead to scrambled files and an unhappy external drive.
Ubuntu Linux
Make sure the drive you’re using is formatted with the FAT32 file system so Linux can read it. Most drives are, which means you can also connect the same drive to Windows or Mac computers to transfer large files between machines or back up each one to the drive.
Plug the drive into the netbook. The Nautilus file browser pops up to display the drive’s contents in a window of its own. (If you close the file browser window or have turned off this preference, you can find the drive in Places→[Name of Drive].) With the Nautilus file browser open, you can navigate through your netbook’s drive and drag files onto the external drive’s icon to copy them.
You can also use those time-honored copy-and-paste moves to transfer files. Just right-click a file or folder you want to copy to the drive and choose Copy from the shortcut menu. Jump to the external drive by choosing Places→[Name of Drive] or by navigating there in Nautilus; right-click and choose Paste to deposit a backup of the item to the external drive.
When you’re ready to disconnect the drive, right-click its icon in the Nautilus window or on the desktop and choose Unmount Drive from the shortcut menu before you unplug the USB connection.
Tip
If you intend to use the USB hard drive only with your Linux netbook, reformatting it from FAT32 to the ext3 file system will make it faster. One way to reformat the drive—and even divide it up into different partitions (Built-in backup)—is to use GParted, or the Gnome Partition Editor program. GParted is available in the Ubuntu software repository; just search for it with Applications→Add/Remove and install it. When it’s up and running, GParted displays all the drives you can partition or reformat. Make sure you’ve selected the external USB drive and choose Partition→Reformat→ext3 to reformat it. You can learn all about using GParted at http://gparted.sourceforge.net.
Connecting an External CD/DVD Drive
If you plan to install a whole bunch of software from discs or plan to burn your own CDs, think about buying an external CD/DVD drive. If you didn’t buy the drive when you bought your netbook (Setting Up Your Netbook), buying it from same manufacturer helps ensure compatibility with your system. If the company doesn’t sell one as an accessory, just shop for one that lists your operating system in its specifications. (Most USB disc drives usually just work, but Amazon sells several external models aimed specifically at netbook owners.)
Both Windows XP and Ubuntu Linux should be able to recognize modern external USB-based disc drives when you plug them in—most external drives are designed to work Plug-and-Play with Windows anyway and often come with their own slick disc-creation software. While these programs generally don’t run on Linux, Ubuntu is fairly good at automatically recognizing USB hardware and comes with its own CD/DVD Creator program (Applications Menu: All Your Programs) to handle the burning chores.
Capturing Images: Connecting Scanners and Webcams
Digital photos and videos have become a part of everyday life for the average computer user, and there’s no reason to miss out just because you have a netbook. If your camera or scanner is USB-based, you can probably get it working on the little laptop. And many netbooks even include their own built-in webcams for videochat on the go.
Adding a Scanner in Windows XP
Installing a scanner in a Windows XP netbook is much like installing a printer (Setting Up a Printer). In fact, with all the multifunction (and cheap) printer-scanner-copiers out there, you may have already done the installing when you hooked up the printer. In any case, it’s basically a two-step process:
Find the driver from the CD and connected external disc drive or download it from the manufacturer’s site on the Web.
Connect the hardware so Windows can find it. Review the steps on Adding a Network Printer in Windows XP for manually installing a printer if you have trouble installing a scanner.
Once you get the scanner connected to the netbook and the photo or document you want to scan on the glass, you can use either the scanner’s own software or Windows’. If you want to go the Windows way, here’s how:
Choose Start→All Programs→Accessories→Scanner and Camera Wizard.
Click Next to move things along.
In the Scanning Preferences window, choose the type of picture you’re trying to scan.
Here, you can select a color picture, a gray scale photo, a black-and-white photo (which is also the setting for B&W text documents), or Custom Settings if you want more control over the final product.
Click the Custom Settings button.
In this box, you can adjust the scanning resolution, brightness,and other factors.
Click the Preview button.
Before you commit to the full-on scan, you can see a small thumbnail preview of what you’re scanning. If you want to crop out part of the photo or scan a specific part of it, drag the handles on the corners of the dotted line around the preview image to make those adjustments. Click Next.
Name the scanned image, pick a file format to save it in, and choose where to save it.
If you are scanning photographs to email or post on the Web, choose the JPEG format, which gives you a nice compact file size. Click Next.

After you scan, a Windows dialog box gives you a chance to publish the pictures to the Web, order prints, or quit.
Adding a Scanner in Ubuntu Linux
Remember the XSane program back on Applications Menu: All Your Programs during the Ubuntu Linux menu tour? It comes into play here as your netbook’s scanner helper—unless you installed something else when setting up the scanner.
XSane is a good place to start, though. Connect the scanner (or multifunction printer) to the netbook, put a photo or document on the scanner’s glass bed, and then fire up XSane.
Choose Applications→Graphics→XSane Image Scanner.
The XSane program opens and attempts to find your connected scanner. Some scanners automatically work with XSane, some don’t. Check at www.sane-project.org/sane-supported-devices.html. If XSane can’t see your scanner, you get a “no devices available” message. Once XSane recognizes your scanner, a whole bunch of windows pop up for your scanning and adjustment pleasure.
In the Preview window, click the Acquire Preview button.
The scanner captures a quick preview of the item you want to scan.
Select the part of the image you want to scan by moving the dotted line around the live area.
In the options on the left side, you can choose your scan settings.
Choose your desired resolution, file size, and color settings.
The Color pop-up menu lets you choose gray scale, black-and-white line art, or artsy halftones. You can also specify a file name and place to save the final scan.
Click the Scan button.
The scanner goes to work, popping up the finished image in a Viewer window. XSane saves the scanned image to your selected location.

XSane lets you do some basic image-tweaking here, but you can really spruce up your photos with a proper photo-editing program (Chapter 9).
Tip
You may be able jumpstart XSane into seeing your scanner by dipping into Terminal (Applications Menu: All Your Programs). It’s not a sure shot to scanning glory, but if you want to give it that ol’ college try, choose Applications→Graphics→Terminal. When the command-line window pops up, type:
sudo xsane
Press Enter. If XSane finds the scanner (and complains about the dangers of running it this way as root), it should start up and let you get down to business.
Adding a Webcam to Windows XP
Many Windows laptops sold these days—including netbooks—come with a tiny webcam embedded in the computer’s lid, right over the top of the LCD screen. It’s a wonderful thing because (a) you don’t have to buy extra equipment and (b) you don’t have to install extra equipment.
All you really need to do here is fire up software that uses the webcam and give it a go. For example, choose Start→All Programs→Accessories→Scanner and Camera Wizard. Take a close look—that’s you in the little video window. Instant-messaging programs like AIM (Setting Up Instant Message Software) that allow video chat are also a good way to take that webcam for a spin.

If you need to install an external webcam, you have your pick of models, as the majority of them out there are USB-based and designed to work with Windows. If you need to install driver software for the webcam and don’t have an external disc drive, try any of the driveless software installation tips on Adding More Programs.
Adding a Webcam to Linux
If your Linux netbook came with a built-in webcam—look for the little circular lens peeping out above the screen—you don’t have to worry about adding any new hardware. You can test our your camera with whatever webcam program the manufacturer included (Applications→Internet→Dell Video Chat, for example). Just fire up the program and let it find the webcam.
You can also try out the netbook’s integrated web-cam with programs that come with Ubuntu like Applications→Internet→Ekiga Softphone, or install a different one from the Ubuntu software repositories (Adding and Removing Programs). Some of these programs include VLC, xawtv, and the aptly named Cheese.

If your netbook didn’t include a webcam, adding an external USB-based model isn’t too difficult, thanks to a bit of webcam driver software included on Ubuntu. This software is called the Universal Video Class, so when shopping for a webcam to add to your netbook, getting one that’s listed as UVC-compatible will save you a lot of headaches. Logitech (www.logitech.com) makes several Linux-compatible webcams, and you can find a list of others at http://linux-uvc.berlios.de/. Once you have a compatible camera, plug it into the USB port and Ubuntu will recognize it.
Tip
If the netbook and webcam aren’t playing nicely together, you can find additional help at https://help.ubuntu.com/community/Webcam and www.linuxwebcam.org.
Listening to Music: MP3 Players and External Speakers
Along with pictures and video, your netbook can also play digital music files. Both Windows XP and Linux include at least one music-playing program and it’s easy to get more. And if you have a portable music player like an iPod, Zune, or Creative Zen, you can even use it with your netbook. And thanks to the headphone jack, you can play your music privately with headphones or publicly with external speakers. Chapter 9 has more on netbook music management, but this section explains what types of players you can use with a netbook and where to find music.
MP3 Players with Windows XP
All major brands of portable digital music players work with Windows XP, so if you’re thinking about buying one, the sky’s the limit. Pretty much all of them connect with a USB cable and use software like Windows Media Player (included with Windows XP) or Apple’s iTunes program (free to download at www.apple.com/itunes).
Tip
If you need to install custom software from a disc, say from a Phillips Electronics player or similar brand and don’t have a CD drive, go to another computer and copy the CD’s contents onto a USB drive. Then connect the USB drive to the netbook and run the software’s setup program from there.

Depending on the player you have, you may have to load music onto it with a special program—like iTunes for an iPod. Some simple MP3 players let you add songs by dragging them from the computer into the player’s Music folder.
In the early days before legal online music stores really took off in 2003, most people got music on their players by either ripping (that is, converting) songs from compact discs or illegally downloading MP3 files. If you don’t have a CD drive (or a friend who’s willing to rip for you), converting tracks from discs is a tad difficult, but there are plenty of online music stores to buy and download music from: Amazon, eMusic, iTunes, Rhapsody, the Zune Marketplace, and so on.
MP3 Players with Ubuntu Linux
Linux can also work with many MP3 players designed for Windows, including iPods. The iPod, however, must be formatted to work with Windows, not Mac, which uses a different file system.
When it senses an iPod getting plugged into the computer’s USB port, Ubuntu’s Rhythmbox Music Player jumps up to play the iPod’s music. (Copy-protected files from the iTunes Store, however, don’t play.) Another iPod-friendly music-management tool for Ubuntu is a program called gtkpod, which you can get from the Ubuntu software repository (Adding and Removing Programs).

With some simple MP3 players—especially those that are basically just USB flash drives with folders for organizing music files, you may not even need a program like Rhythmbox. Just connect it to the netbook and drag the music files from your hard drive to the portable player in the Nautilus file browser (Places Menu: Organizing and Finding Files).
Adding Headphones or External Speakers to the Netbook
To get started, just plug a pair of earbuds or headphones with a standard 3.5-millimter stereo connector into the netbook’s headphone jack.
Some portable external speakers designed for laptops also connect to the computer’s headphone jack—and many don’t require any special software. These extra speakers may need batteries or electrical power to properly amplify the sound. Others may use USB connections and require more setup and fiddling, so check the documentation that came with your speakers.
You adjust the sound levels either in the music program you’re using or by changing the netbook’s overall volume. Most netbooks have shortcut keys on the keyboard for lowering and raising the volume—look for a little speaker horn with sound waves coming out of it. (The pictograph with lots of sound waves increases the volume and the one with one sound wave lowers it.)
You can also change the volume level onscreen:
Windows XP. In the taskbar, click the speaker-shaped Volume Control icon and adjust the slider to raise or lower the volume. If you right-click this icon, you can set sound levels for headphone jack, speaker, and other audio components in the Volume Control panel.
Ubuntu. In the top panel, click the speaker icon and drag the slider for quick volume adjustment. Right-click the icon to get independent sliders for the various audio components.

On the Road: Cases and Cables
Netbooks were made to be light. While you probably don’t want to haul around five pounds of extra stuff with your three-pound computer, you may need to have a few accessories on hand when you’re working on the road.
Here are a few items to consider, and all of them can be found in your local computer-supply store:
A case or slipcover. Your trim netbook doesn’t really require a computer bag—just slip it into your purse, backpack, or briefcase. But to keep the netbook from getting scuffed up, you can get a slipcover to protect the netbook in transit. You can find these simple covers where laptop supplies are sold, and they come in everything from sporty, water-resistant neoprene to leather.
Ethernet cable. Most hotels and airports now have their own wireless networks, but some offices, hotels, and other places still use wired Ethernet cables to get onto the network. For times like these, a three- to six-foot retractable Ethernet cable can save the day.
Extra power cord. An extra AC cord means you don’t have to drag cords back and forth between home and office. Buy one from the netbook’s manufacturer to make sure you get the right one.
USB hub. If you have a lot of USB devices to plug into your netbook and only two or three USB ports, using a small travel hub can give you enough places to connect everything.
Travel mouse. Smaller than the typical mouse, and not tricked out with tons of programmable buttons, a travel-sized mouse takes up less room inside your bag. It’s the computer pointer version of those tiny shampoo bottles in the drugstore. Many also have retractable cables so you don’t spend your travel time untangling mouse cords.
Security cable. If your netbook has a Kensington or security slot in the side (Transferring Files to Your Netbook), you can get a custom-fitted metal cable to connect to it and anchor the computer to a desk or chair so thieves have a much harder time making off with your laptop.
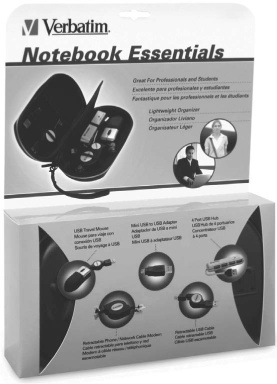
You can even find many of these items in one package like the Lenmar Laptop Computer Accessory Kit, which includes a retractable Ethernet cable, mini-mouse, 4-port USB hub, security cable, and one-gigabyte flash drive for about $70 or less. Verbatim’s Notebook Essentials kit has a travel mouse, 4-port USB hub, and retractable USB, Ethernet, and phone cables, all for about $40.