
Software testing is the formal process of evaluating an application. Testing compares expected results to actual results, where a deviation indicates that the test failed. Testing can test the correctness of an application but is also used for validating security, scalability, and customer expectations. Typically a software test accepts inputs as the parameters of the test. You execute the test, which exercises the application. The output is then compared with the expected result. Input can be functional parameters, user interaction, database input, and so on. Test failures, if any, are recorded in a bug tracking system. Except for the simplest application, more than a single test is required to adequately test an application. A test suite consists of multiple tests, where each test verifies or validates a different aspect or perspective of the application. In this manner, the test suite provides a complete analysis of the application. Testing is verification and validation. Verification verifies that some part of the application is technically or functionally correct. For example, verification would confirm the return value of a specific function. Validation validates the expectation of the application. A test of the user interface against customer expectation would be an example of a validation test.
When possible, test suites should be automated. This creates a convenient and consistent means of executing a series of tests. Consistency is important for benchmarking and comparing a series of tests over a period of time. Database-driven tests are useful for increasing consistency. Each data record would contain input parameters for a single test. This is ideal for consecutive tests with multiple input values. Tests can also be automated using scripts. There are a variety of products available for this.
Both software testers and developers build tests. Actually, the collaboration of software testers and developers often result in the best tests. However, developers are sometimes solely responsible for generating tests. This is the case in a test-driven programming methodology. In that methodology, developers write a test first and then the code to pass the test second. With the test-driven approach, testing is an integral part of the coding process.
Testing should begin early in the software development cycle. As soon as there is enough of an application to be hoisted into a test harness, testing should start. You must accurately access and incorporate in the project plan time for testing. This includes the initial tests and later regression tests. Problems found later in the software development life cycle may require re-architecting the application, which is expensive late in the development process. This is one reason to use a test-driven development (TDD) approach, where testing starts even before coding and continues throughout the development process. Excluding the TDD, you should begin testing after the code base is stabilized. Testing an application before then can be daunting because the code base is constantly changing.
What is a regression test? The pesticide paradox, as defined by Boris Beizer, states, "Every method you use to prevent or find bugs leaves a residue of subtler bugs against which those methods are ineffective." Regressions tests test previously working software for failures. There are several reasons to run regression tests:
Changes made to the code because of a previous failed test
Changes to the testing environment
Changes to the operating environment
Refactoring
Creating a test is usually straightforward. However, creating tests that reflect the real-world operating modality (stress, user interaction, data input, and more) can be more challenging. This is especially important because developers often have an ideal development environment: computers faster than lightning, a monitor the size of a Volkswagen, and disk storage capacity best described as redefining the bounds of the nature. This can be significantly different from the production environment where an application is deployed. For example, when testing a high-traffic Web application, creating an environment that accurately reflects the typically load can be difficult. For intensive database applications, simulating the breadth and randomness of data content can be challenging. Visual Studio offers some assistance in this area and supports Web, load, unit, and manual tests.
You should test functional and non-functional activities. A common test provides input to a function and compares the output to a known result. Any discrepancy is an indication of a bug. However, some tests are less conventional. For example, sometimes external factors needed to be considered. You could have an application that predicts earthquakes by detecting subtle tremors through remote sensors. This type of application might require a manual test. It is hard to automate an earthquake. Here is one potential test. Start the application, leave the office, and jump up and down in the middle of the street. Assuming that you are not hit by a car, you can return to the office and verify whether a tremor was detected by the software application. Manual tests are supported in Visual Studio. Other categories of tests are scalability, usability, security, and more. It is important to test the various aspects of your application.
Although testing should be rigorous, you cannot test everything. Testing every permutation in some circumstances is impossible. Look at the following formula, which is a simple equation:
x=y+z;
Assuming x, y, and z are integers, there are several million permutations of the preceding equation. You cannot, and it is not necessary, to test each of these permutations. You should determine and test the limits of the equation, where failure is much more likely. This is a handful of tests, which is more manageable.
Testing is a feature of Visual Studio Team System. It is convenient to have the test harness (test project) and code project saved in the same solution. This is particularly convenient for a test-driven development approach to programming.
TDD is a test first and code second approach to programming. You create a test for an outstanding requirement or some portion of a requirement (each test should comprise only a few lines of code). The test will initially fail because the code is not implemented. Implement the code and rerun the test, which should now pass. If so, you can proceed to the next test. This is an incremental approach to creating an application and melds testing and development. This is not a different style of testing but a different style of programming. Test-driven programming is the reverse of traditional programming, where code is implemented first and then tested.
In TDD, you create a test suite incrementally that provides coverage for the entire application. Most of the test suite consists of unit tests that test specific code in the application. However, it can also include acceptance tests. Acceptance tests reflect customer expectations of the product and encompass processes as compared with specific code. In an accounting system, an acceptance test could be entering an accounting transaction.
There are several advantages to the TDD programming methodology:
Reliability is enhanced since all code is encompassed by a test. Naturally, 100 percent code coverage reduces the probability of a bug.
The emerging test suite provides continual feedback on the stability of the application.
TDD promotes compiling and testing code in small increments, which emphasizes decomposition.
TDD also promotes implementing and testing components separately. This enforces a high level of isolation and reduces dependencies between classes and components.
Increased awareness of the requirements means developers are more knowledgeable about the code.
Finally, each test further documents the code. This is helpful in maintaining the application into the future.
Test-driven development is more of a challenge for graphical user interface (GUI) applications. The primary focus of TDD is functional tests. With an advanced GUI application, there is a portion of the application that is user driven and outside the scope of a functional test. Functional tests are typically code based and discrete, while GUI tests are process related and span one or more functions. For TDD, it is more appropriate to have a functional foundation with the user interface as a thin veneer. This makes it easier to emulate the user interface in relation to functionality. Another drawback to TDD is the expanded code base. TDD requires an extensive testing infrastructure, which translates into considerably more code. This code must also be maintained and kept current with the implementation.
TDD requires a higher level of discipline and commitment. Developers must adhere to the test first and then code philosophy. You create a test to move the development process forward, rather than write code. This is foreign to most developers. In addition, developers dislike writing tests and may be tempted to subjugate the process. The temptation is heightened when faced with an impending deadline. Management must be included in the decision to adopt TDD and understand the value proposition for the development team. Management needs to adjust developer assessment and incentives to reward developers for properly executing the TDD process.
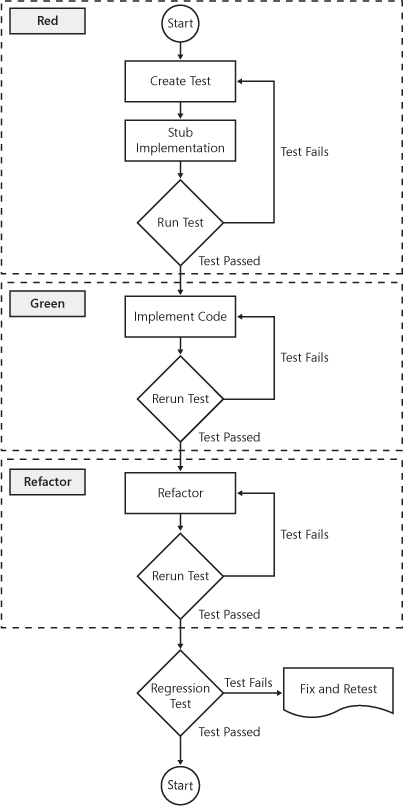
Here are the details of the test-driven development process. First, evaluate the current requirement. Next, write a failed test for that requirement, which is added to the test suite. Stub the code to confirm that the test fails. Implement minimal code to make the test pass. Remember, each test should encompass only a handful of code. After the test passes, refactor the code. Refactoring includes removing redundancies, optimizing algorithms, or otherwise improving the code. Next, rerun the individual test. If the test passes, run regression tests to validate the overall health of the application. Repeat the process for the next requirement. TDD is divided into three phases: Red, Green, and Refactor. In the Red phase, the test fails. In the Green phase, the code is implemented and the test passes. In the Refactor phase, the code is perfected. 8-2 shows the TDD process.
Testing is as effective as the percentage of code touched. Testing that does not exercise a larger portion of your code does not provide quality assurance. For this reason, defensive programming requires that the majority of your code be tested. Code that is not tested may contain uncovered problems. As the percentage of untested code increases, so does the likelihood of undiscovered problems. Code coverage reports how much code is included under the testing umbrella. Code coverage is considered white-box testing and not black-box testing. White-box testing is testing on the internals of an application and requires code-level understanding of the application. White-box testing is also referred to as glass-box testing. It’s called "glass box" because you are seeing through the exterior of the application to test the details. Black-box testing is essentially functional or aspect testing. With black-box testing, inputs are defined, functionality is executed, and then outputs are compared with expected results. This requires little or no knowledge of the internal workings of the application. Black-box testing is also called functional testing.
Technically speaking, code coverage does not test an application. It does not explicitly improve the reliability or correctness of an application. Code coverage is not a direct indicator of problems in an application. Therefore a high percentage of code coverage does not guarantee a quality application. Conversely, low code coverage is not a definite indicator of a buggy application. Code coverage is simply a barometer of the breadth of testing relative to the overall application. Code coverage highlights possible lapses in testing (code that is not touched). You can then design additional tests for those areas of the program. It is better to view code coverage as an indirect confirmation of the reliability of an application. High code coverage indicates that the majority of the program is covered by a test. This means the vulnerabilities are much more likely to have been discovered now and into the future. Low coverage means potential problems may lurk simply because the code has never been tested.
Code coverage can be more or less granular depending on the level of code coverage desired. Here are the more commonly types of code coverage:
Functional coverage Functional coverage reports on whether a function is exercised and the frequency. You are basically testing function inputs and outputs.
Statement coverage Statement code coverage reports on whether a line of code is touched and how often.
Path coverage Path code coverage reports on whether paths of execution have been exercised. In a typical application, there are multiple paths of execution.
With the exception of TDD, you should not expect 100 percent code coverage. For a normal application, code coverage of 85 percent to 90 percent is viewed as adequate. Reaching code coverage at this level is not easy. The appropriate level of code coverage depends on the type of application. For example, mission critical applications may indeed require 100 percent code coverage. In these circumstances, an error in a single line of code could cause serious problems (even beyond the application). Software for the main system of the space shuttle might require 100 percent code coverage. Software for a heart monitoring system might require similarly high code coverage; a single mistake in a heart monitoring system could be fatal. However, 100 percent code coverage is typically not possible or necessary. If you are writing a game application, that level of code coverage is probably not required. The level of code coverage should be set before programming begins. This level of code coverage must be communicated to and agreed upon by everyone on the team. For source control, source code not meeting that standard should not be checked in.
Code coverage is available in Visual Studio Team System and as command-line tools. The command-line tools are located in the install directoryMicrosoft Visual Studio 9.0Team ToolsPerformance Tools directory. Command-line code coverage tools are convenient for scripting and automating the test environment. Following is a list of the tools.
VSInstr.exe. VSInstr instruments an application and .pdb file.
VSPerfCmd.exe. VSPerfCmd can perform a variety of code coverage tasks, including starting code coverage, returning the current status of code coverage, and stopping code coverage.
VSPerfMon.exe. VSPerfMon is the actual tool that collects code coverage data from instrumented applications that are running. This tool is called from VSPerfCmd to start code coverage.
VSPerfReport.exe. VSPerfReport creates a report from the code coverage data, which is saved to a .vsp file.
VSPerfCLREnv.cmd. VSPerfCLREnv sets environment variables in support of manual code coverage for .NET applications.
Many developers are less than passionate about commenting their code. For this reason, comments are provided but are often incomplete and most likely not maintained. One solution is self-documenting code. Self-documenting code is readable code. When you read self-documenting code, it reads like a story complete with plot twists and protagonists. The amount of separate commenting required for code is inversely proportional to the readability of that code. Basically, the more readable the code, the less comments are needed.
This is guaranteed. If you cannot understand your program, another developer will not. This leads to programming errors. Be kind to developers who might maintain your application in the future. Remember, one day you may be in the role of maintenance programmer. Most programs spend the majority of their lifetime being maintained. Therefore, self-documenting code is an important defensive programming technique.
Look at the following code. What does the code accomplish? The code is nearly unreadable because the variable names are abbreviated. Despite this, the code is correct. However, the context is lost. Maintaining this code would be difficult. Inadvertently introducing problems to this code would be easy.
int i= 1250;
double d= .05;
int u= 2;
int f= 100;
const double t= .065;
double t2= (i + u);
t2 = t2 - (t2 * d);
t2 = t2 * (1 + t);
t2 = t2 + (f* u);
Functionally, the following is identical to the previous code—except descriptive long names have been substituted for the short names. The expressions and the context are now both transparent, which makes the code clearer and more maintainable. Actually, an error is now apparent. This is an error that was impossible to detect in the preceding code. The expression purchaseprice + units, which calculates the total price, is incorrect. It should be purchaseprice*units. This is an example of defensive programming.
int purchaseprice = 1250;
double discount = .05;
int units = 2;
int installationfee = 100;
const double tax = .065;
double total = (purchaseprice + units);
total = total - (total * discount);
total = total*(1 + tax);
total = total + (installationfee*units);
Proper naming conventions enhance code readability and contribute to self-documenting code. These are helpful rules for naming elements of an application.
Classes represent a person, place, or thing. As such, class identifiers should be nouns.
Member functions imply some sort of action. For this reason, verbs are usually used as function identifiers. Verbs, such as start, stop, or delete, indicate action and are perfect for function names.
Like a class, data members are also a person, place, or thing. Therefore, data members should be assigned a noun as the name.
Namespace names should also be nouns.
Class and namespace names should be Pascal case, while class members should be camel case. For a complete explanation of capitalization of identifiers, refer to MSDN. The book Code Complete (Microsoft, 2004), by Steve McConnell, also provides excellent information on naming identifiers. In general, Code Complete is also a great resource for techniques on defensive programming.
Use long names. Do not sacrifice readability to save a character or two. Not every developer is a good typist. Unbelievably, this is frequently the reason for short names. Take typing lessons! The overall cost of unreadable code is more expensive than a typing class and affects many others. Code should not require cryptanalysis to interpret. Of course, balance is the key. Your code should not read like a Tolstoy novel.
Prefixes further describe a variable or the name of a data member. As such, although optional, prefixes are a common artifact of many programs. Consistency is the primary benefit, which is important in a collaborative environment. When you have several people working on the same project, a common set of prefixes helps to avoid improper use of data members and variables. A type prefix indicates the type of the entity. For example, nVar indicates an integer variable. Context prefixes highlight the usage of a variable. For example, gVar indicates a global variable. Do not concatenate multiple prefixes at the start of an identifier. This can be confusing. You do not want developers to spend their valuable time deciphering alphabet soup. This is important—prefixes must be kept current. The refactoring feature of Visual Studio makes this easy. Prefixes document the code and benefit readability. Invalid prefixes are a form of misdocumentation and contribute to coding errors.
Most paintings start life as a rough sketch. An artist creates a sketch to explore a concept, dabble with a color scheme, explore different media (for example charcoal versus chalk), and more. The sketch, not the final work, is where the artist experiments. Artists will often refer back to the sketch as necessary while completing the actual work. In this way, the sketch documents what the artist intends. Pseudo code is to the developer what the sketch is to the artist.
Developers sketch their program in pseudo code. This should be done in an incremental manner as portions of the software application are written. What is pseudo code? Pseudo code is a blend of natural language and software language, with an emphasis on substance. It may have some but not all the detail or syntax of a programming language. Pseudo code is intended to be informal. There is no reference manual or universal set of rules to follow. The most important rule is that pseudo code should be readable. However, there should be sufficient details to make translation from pseudo code to programming language trivial.
Pseudo code fulfills a role similar to flow charting—except developers will actually use pseudo code. Most developers abandon flow charting as an integral part of the development process once they leave the hollowed grounds of the university parking lot the final time. However, developers will sketch algorithms on the back of a napkin at lunch, write a complex formula on the palm of their hands while in yet another boring meeting, and write stored procedures with crayons on the back of furniture while playing with their kids. All of this is pseudo code and is useful for documenting an application.
Here are the steps for using pseudo code:
Write the pseudo code first.
Use the pseudo code as a roadmap to writing the actual code. The names of identifiers for classes, variables, and other entities can be derived from the pseudo code. Because pseudo code is a mixture of an informal description and programming syntax, the translation should be straightforward.
Insert pseudo code into the source code as comments.
For developers who loathe writing detailed comments, pseudo code is a reasonable solution for code-level comments. The following is pseudo code for sample code presented earlier in the chapter:
initialize the variables
total = purchase price * number of units
total = total minus any discount
total = total + tax rate
total = total plus any installation fees
display results
The following is the actual code with pseudo code inline as the comments. I did not have to write any additional comments. I took the pseudo code, which already existed, and converted them to comments. This is defensive programming with a bonus. Pseudo code is a best practice for defensive programming. Converting that into comments, which is convenient and quick, is a bonus.
// initialize the variables

int purchaseprice = 1250;
double discount = .05;
int units = 2;
int installationfee = 100;
const double tax = .065;

// total = purchase price * number of units

double total = (purchaseprice + units);

// total = total minus any discount

total = total - (total * discount);

// total = total + tax rate

total = total*(1 + tax);
// total = total plus any installation fees
total = total + (installationfee*units);

// display results
Comment, comment, and more comments. If in doubt, add even more comments. Source code cannot have too many comments. Comments are the narrative for source code. Write comments for the future maintenance programmer, the person conducting the code review, and, most important, yourself. Have you ever reviewed your own code after a few months? Without comments, you might as well be reading Galwegian Gaelic—an extinct language once spoken in a region of Scotland. Despite all efforts to improve the readability of code, source code is often neither readable nor clear. When this occurs, it can be as difficult as interpreting an extinct language. Comments solve this problem.
The Hong Kong Airport is more of a shopping center than an airport. There are so many stores that it is sometimes difficult to find the gates. I remember wandering the airport looking for my gate, lost among an impressive menagerie of stores: Christian Dior, Lanvin Paris, Gucci, Giordano, Bvlgari, Tiffany and Company, and many more. Surround your source with comments equally well. The comments should almost be a nuisance.
Ample comments are necessary. However, comments should not simply repeat source code. This often occurs when programmers are attempting to close out a project and must add comments in haste. Comments, but not effective comments, are added. More thought must be put into commenting. Comments should add the context, assumptions, limits, and, in general, clarity as to the intent of the code.
Keep the format simple and comments close to the documented code. I have seen beautiful comments, where a developer obviously invested considerable time in the format. However, someone must maintain that format. This can be time consuming when the code base changes regularly. For comments, invest your time in clarity and not formatting. Even if you have a sophisticated tool that automatically formats comments, keep the format simple. Your successor may not have access to that tool.
As a convenience, some developers place comments at the top of a source file. This creates a single location where all comments can be found and maintained relative to that file. The problem is that a particular comment may not be near the related source code. As the source file grows, this problem will only worsen. A disconnect is created between the comments and the source code, which will inevitably cause problems.
Do not comment hacks. Change the code! Honestly, hacks still retain some value in C++. For performance and brevity, sometimes a C++ hack may have benefit. However, that is becoming less true as compilers improve. For C#, no hack is a good hack. Focus on the solution and leave everything else to the C# compiler and the Common Language Runtime (CLR). Every team has a developer who has perfected the art of hacks. Send that person for sensitivity training. From a defensive programming perspective, hacks are inevitably hard to maintain and also hurt productivity, which is expensive.
Every important aspect of the program should be commented. Ask yourself this question. Without this comment, is the code transparent? If it is transparent, a comment is probably unnecessary. However, make sure it is transparent to someone else. If in doubt, always add a comment.
At a minimum, comment these areas of a program:
Program. Comments should describe the application and application design. In addition, the comments should include company information, copyright, build detail, and a brief description of the project files.
Source file. Comment on the version control information, the context of the file, and the relationship of classes defined in the file.
Classes. Comment on the purpose of the class, the class interface, assumptions, and dependencies.
Functions. Comment on the behavior, parameters, return value, assumptions, and any limitations.
Fields and properties. Comment on the extents of the data, initialization, and code usage. Also, document scope and visibility if applicable, such as whether the member is global or static.
Algorithms. Comment on the basis of the algorithm, such as academic references. Also, document the reason this particular algorithm is used, any assumptions, and limitations.
Transfer of control. Comment on possible criteria and potential paths.
Performance. Comment areas of code that might affect performance or scalability. List the performance factors and measurements.
Comments must be kept current. If not, the related comment should be removed. Alternatively, the comment can be deprecated if clearly indicated. Outdated comments are misleading at best and can contribute to programming errors.
In Microsoft Visual C#, you can create documentation comments with triple forward slashes (///). Each documentation comment has a standard XML tag. The XML tag holds the specific comment. There are documentation tags for various aspects of the source code. For example, the <param> documentation tag describes a function parameter. In this way, documentation comments provide consistency to commenting. All classes, parameters, functions, and so on are documented in the same manner with separate XML tags. This is particularly important when several developers are collaborating on a project. Developers often have wildly varying styles of commenting, which can be confusing when combined in a single project. Documentation comments alleviate some of this inconsistency. Also, documentation comments augment IntelliSense with information on user-defined types, functions, and parameters. For library developers, this provides users with helpful added documentation.
Documentation comments precede the code that is being referenced. Visual Studio provides automatic insertion of documentation comments for certain language elements, such as classes and functions. Simply type /// on the source line prior to the target element. This was done in following code. Visual Studio then automatically inserts the summary comment. You can then complete this comment and add additional XML documentation tags as needed.
/// <summary>
///
/// </summary>
class TestClass
{
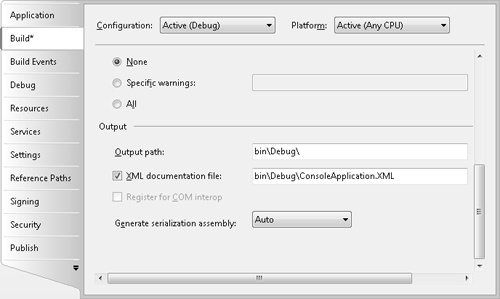
}As mentioned, from the documentation comments, you can create an XML documentation file. Open the project properties to create the file. Choose the Build pane. In the Output group, select XML Documentation File and specify the path and file name. See 8-3. The XML documentation can then be formatted and published as documentation for the application. This is another nice feature for developers supporting libraries and users.
Several XML tags are defined for documentation comments. 8-1 lists the primary tags.
Table 8-1. Primary Xml Tags and Their Descriptions
Description | |
|---|---|
Example | The <example> tag, and <code> sub element, assigns sample code to a comment. |
Exception | Each <exception> tag identifies an exception that can be thrown. The specific exception is identified with the cref attribute. |
Include | When the XML documentation file is created, the file referenced by the <include> tag is inserted inline. |
Param | Each <param> tag documents a function parameter. |
Permission | The <permission> tag describes the security permissions of a type member. The specific permission set is identified with the cref attribute. |
Remarks | Use the <remarks> element to provide a description of a type. |
Returns | The <returns> tag describes the return of a method, which includes properties. |
Seealso | The <seealso> lists a secondary reference for a comment. The reference is set with the cref attribute. |
Summary | Use the <summary> element to describe a member of a type, such as a field or property. |
We started the chapter with a reference to small things. Let us expand upon that conversation.