If we had to summarize the deployment process in one sentence, we could say that it is the set of actions that need to be performed to install software in environments where it can be put to use by users, be it during staging or in the production phase. Within the context of SignalR applications, deployment scenarios can vary a lot because of the large number of platforms that we can find on both the client side and the server side and the combinatorial explosion of these platforms. Obviously, deploying SignalR services inside an ASP.NET application executed on IIS is not the same as doing it in an operating system service or in a Windows Azure worker role. Nor is the deployment procedure of a Windows Phone 8 application that uses the SignalR client to access real-time notifications the same as the deployment process of an application for Windows 8 or a simple JavaScript client.
Each of these platforms has its own deployment procedures, which will remain intact with SignalR. That is, including SignalR components in a server-side application has no effect at all on the way in which it has to be deployed, nor does it affect the client side.
For example, in classic web systems, deployment consists of installing the application on the server, usually in the following ways:
Using publishing tools integrated in the development environment, such as the Visual Studio publishing utility
In the case of automated processes, using Web Deploy[31] or FTP, for example
Manually, using any type of transfer protocol allowing us to directly copy the files to the server
However, usually there are no specific actions to facilitate the deployment of components to the client side. They will be distributed on demand when accessing the different pages or features provided, and they will be executed on the user’s browser.
In web applications with SignalR, it is exactly the same. In fact, because all the server components of SignalR applications are compiled (hubs, persistent connections, configuration classes, and so on), it is sufficient to follow whatever publishing process we normally use to get our real-time services working on the operation environments. The client components—basically JavaScript files—will be included in the installation package and will be entered into the application as static files.
We frequently encounter ASP.NET applications deployed in this way, with the structure shown in Figure 8-1.
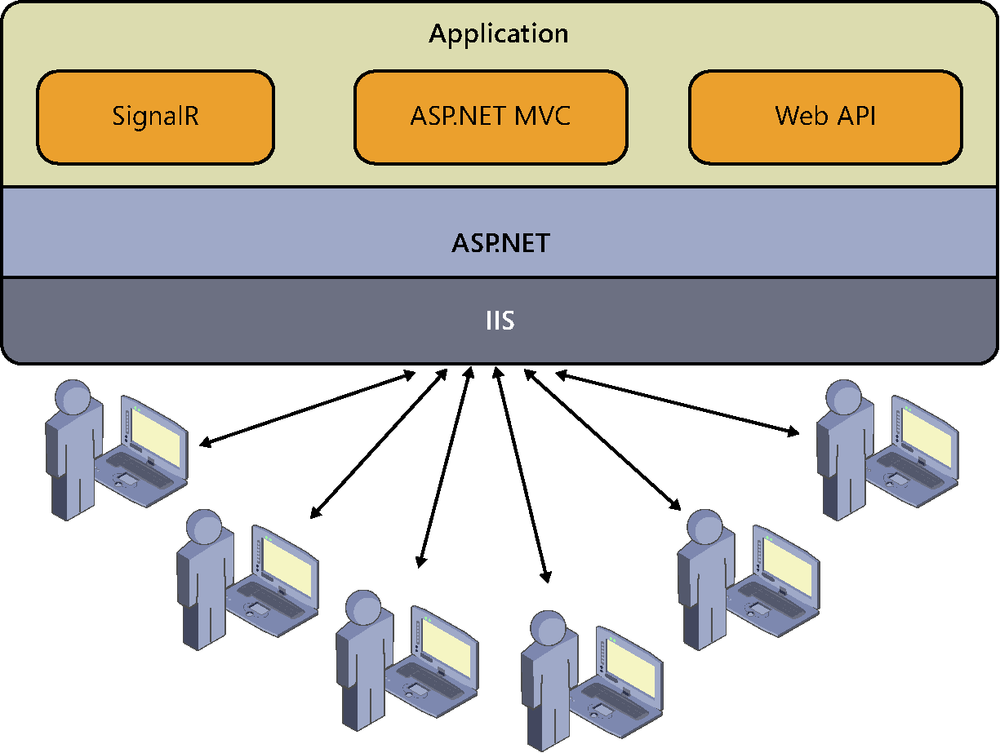
Our application can be written using frameworks such as ASP.NET MVC, ASP.NET Web Forms, or Web API, whose pages load the SignalR client components to consume services provided via the hubs or persistent connections defined in compiled classes inside the application itself. Of course, it could be accompanied by other assemblies, such as visual components, utility functions, model classes, or any type of content, but the schema would still be the same. This is the simplest deployment architecture that we can find.
Well, after endless hours of work, many weeks with virtually no rest and sleepless nights, we have finally launched our revolutionary social system in which, of course, we have employed SignalR to implement spectacular features that use push and real-time communications as mankind has never known before. Now we just have to reveal it to the world and begin to attract users by the hundreds. One might say that our problems are over. (Or you could say that they have just begun.)
From this point, basically two things could happen, intermediate states aside. In the first case, our super application would turn out not to be as necessary as we thought, or perhaps users would not understand its true value, and it would end up being used by no one and ultimately fading into oblivion.
Or we could have the exact opposite case: our application is a real hit. Attracted by the novelty and the promise of finally getting their lifelong-awaited online experiences, users begin registering timidly. Word of mouth and fast spread through social networks causes the number of registrations to grow exponentially after a few weeks. Users begin to number in the hundreds, then thousands, and then come the first complaints of slowness and problems with the service. This effect is often called “death by success,” and it is the reason for the demise of many interesting projects. It is a delicate moment, and the survival of our creature will depend largely on our ability to resolve these issues.
It is time to scale—that is, to find ways to provide quality service to a growing number of users.
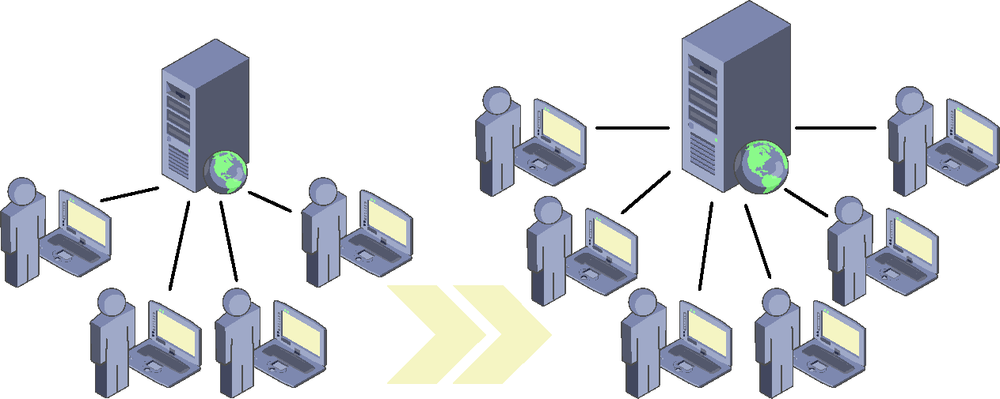
Fortunately, it is always possible to extend the server that we have rented to host our application, so our first approach in this case is normally to invest there: maximizing RAM, installing as many processors as the board or the virtual machine allows, and improving persistent storage in terms of speed and space. This way of increasing the capacity of our infrastructure to support more users is called vertical scalability. (See Figure 8-2.) It requires virtually no software changes or special precautions during development; it simply involves buying or renting more metal or adding more resources to our VM.
The more optimistic members of the team might think that this large investment in hardware would overcome the problem. And it would…at least for some amount of time. The problem with vertical scalability is that it is inherently limited: however much we want to extend a server, there will be a point beyond which it is physically impossible to increase its capacity. Here we would switch to a server whose architecture allowed for more expansion, but given the growth rate of our super app, this would serve only to give us some breathing space while we look for a more definitive solution. And we should not forget the cost either: adding memory or CPU to a system tends to be expensive, and normally there is a rather limited return on investment. It is also not a very flexible option. If we know that our users connect primarily in office hours, during the rest of the day all the power and resources of the server will be underused, so we will not be getting the most from our investment.
In short, vertical scalability is valid for closed or tightly controlled environments, such as corporate applications or systems that have a low number of users because of the very nature of the service and its context. After all, we are unlikely to need much more if we are creating a chat application for the die-hard fans of the synchronized swimming infant team of the local neighborhood—opting for more complex solutions in this scenario might be considered oversizing, over-engineering, or just overkill.
When vertical scalability is not enough, the solution comes via a much more powerful approach: horizontal scalability. Scaling horizontally consists in increasing the number of servers until they can respond to user demand.
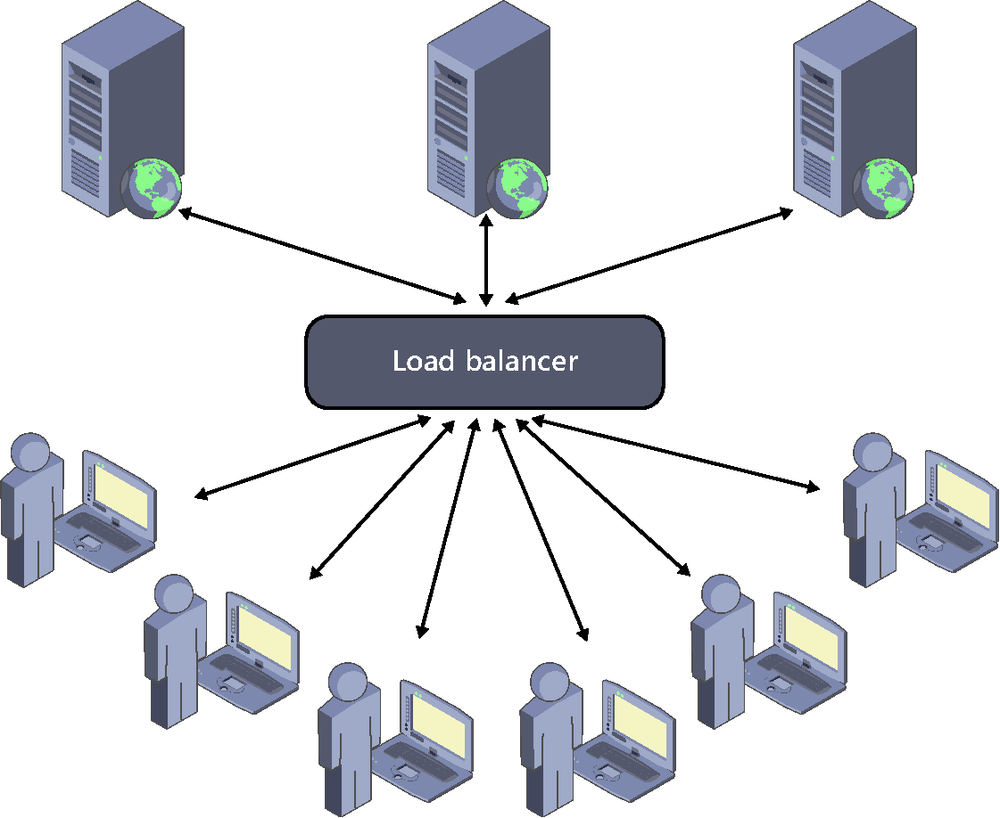
In traditional web environments, the ideal solution is to introduce a mechanism to automatically distribute the load among various nodes in a way that is fully transparent to the user, acting for all intents and purposes as if the application worked on a single server, although each request (even those from the same user) can be processed by a different node in the network. These elements, called load balancers, are located at the entrance to a server farm and redirect requests to the least busy server to be processed there. See Figure 8-3.
And, thanks to currently existing technologies, we could even use cloud services like those provided by Windows Azure[32] to dynamically adapt the number of servers to the actual demand at each time, thus obtaining the assurance that our application will always be available to serve its users, as well as achieving great ease of management of infrastructure and a good level of fault tolerance.
Also, to reduce latency and boost performance, it is possible to bring contents and services closer to the users who consume them, using CDN[33] (Content Delivery Networks) or strategically located servers. The main advantage in comparison to scaling up is that in scale-out there is a priori no physical limitation: we can always add new servers to withstand a greater load. However, to work on this architecture, applications have to be designed anticipating this possibility, because as each request can be processed by a different server, you cannot use the local resources of the latter (such as the memory or the file system) to store data persistently or to store the state of the application itself.
As a side note, there is an alternative called session affinity, which consists in making the load balancer always assign the requests coming from a certain user to the same server, whereby state information could be stored in the servers. Also known as sticky sessions, this technique is better than vertical scale-up but worse than the horizontal scale-out with a stateless approach.
We have explained that in horizontally scaled web environments we should not use local server resources such as the memory or disk. Things get even more complicated when it comes to SignalR applications.
When we looked at state maintenance techniques at the server in Chapter 5 we described the problems of having multiple SignalR servers serving in parallel and we gave some guidelines for solving them. But, as we also explained, SignalR poses a real challenge in horizontally distributed scenarios, especially because each server is aware of only the clients that are connected to it directly. The problem this presents is illustrated in the “minimalist” example shown in Figure 8-4: user A is connected to the SignalR service, and the load balancer allocates it to server #1. Then comes user B and it is allocated to server #2.
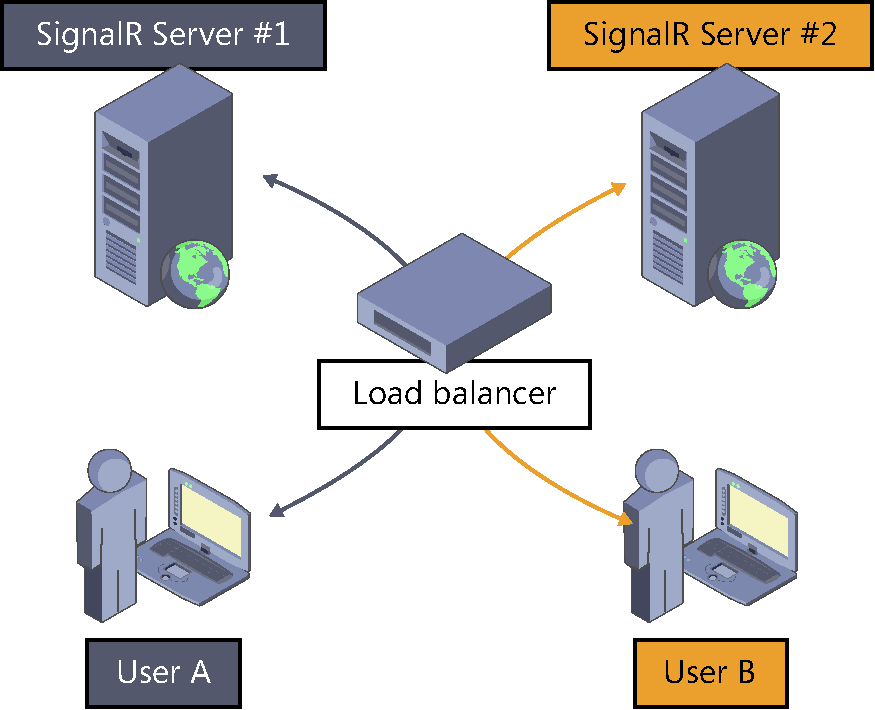
Although both users would theoretically be connecting to the same persistent connection or hub—there would be only one access URL—the balancer would have delegated its processing to a particular server, a different one in each case. And because each one would be physically connected to a different server, a broadcast message issued by server #1 would be received only by user A, and the same applies to the other server.
In addition, this allocation of clients to servers could change every time a new physical connection opens, generating situations that would be difficult to manage due to roaming. For example, imagine that user A is connected to server #1 and then experiences a time-out due to network problems, reconnects, and is allocated to server #2. From the perspective of server #1, user A has left the application, whereas from server #2, user A would be considered a new user. Moreover, during the time taken for the reconnection process, new messages that merit being sent to the user could have entered the system.
This same effect can take place with parallel connections made by the client to send information to the server in push one-way transports such as server-sent events or long polling. Each one could be processed by a different server, yet the main push connection would remain active and fixed from the start. As you can guess, these problems are not easy to tackle.
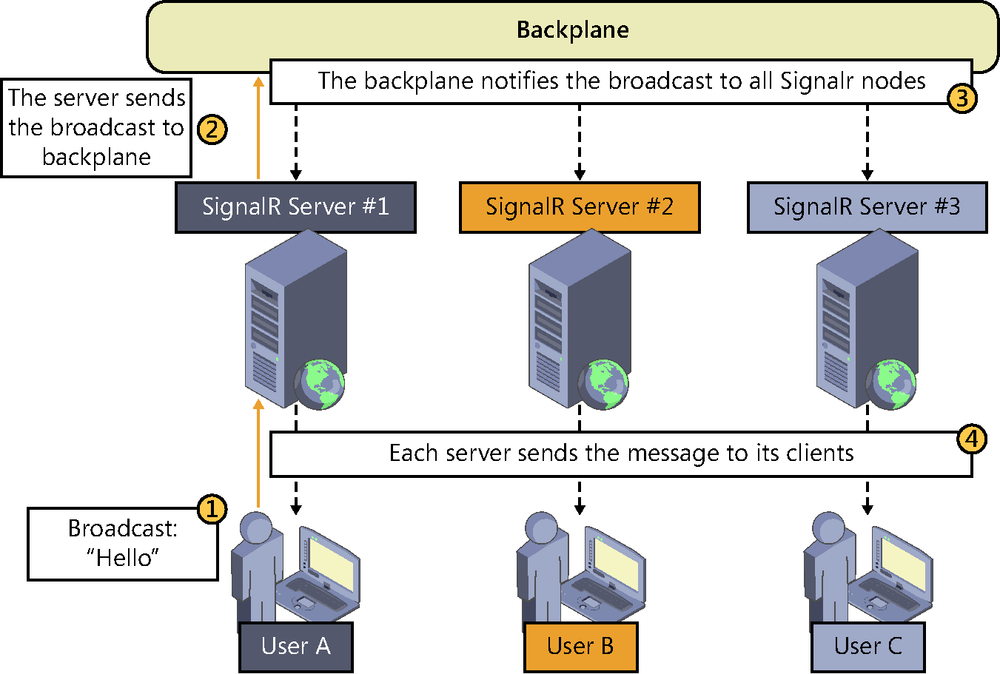
To address these scenarios, SignalR comes with a powerful out-of-the-box mechanism allowing the deployment of its server components in horizontally distributed environments through backplanes. As shown in Figure 8-5, a backplane is a component that acts as a messaging system between SignalR nodes, similar to a bus for internal communication between systems. When enabled on a server, all messages generated from it will be sent through the backplane, where the remaining servers will be listening to forward them to their clients.
There exist different backplanes, each using a different technology to manage publications and subscriptions internally used by the messaging system. Currently, SignalR officially offers backplanes for Windows Azure Service Bus, SQL Server, and Redis, but the developer community has provided some additional ones. We will describe each one in detail later on.
Although employing a backplane enables the use of SignalR in a server farm and the distribution of user load among its servers, doing so also has its limitations. The main limitation is that it will inevitably lead to an increase in the time required to send each message and hence to a significant decrease in the number of messages that can move through the system—that is, the throughput. Paradoxically, the same solution used to enable horizontal scalability of SignalR services could become a bottleneck in certain scaled out architectures. In fact, scalability is not synonymous with increased performance in this case.
Therefore, we should not think of backplanes as the ultimate solution to the scalability problems of all kinds of SignalR applications, but only as the mechanism that allows using this framework with balanced server farms, in the event that this were to be the deployment architecture finally chosen for our system.
The use of backplanes is recommended in applications where there is a server broadcasting the same message to several clients or groups of clients. This is because, in SignalR, messages are processed in such a way that sending the same message to many clients would not saturate the bus. Their use is also appropriate when there is a very low frequency of submissions, or where their amount is not directly related to the increase in the number of clients. In all these cases, a backplane could offer good performance and, potentially, at the same time, nearly unlimited scalability.
However, as soon as personalized information needs to be sent to each client or immediacy is critical, we have to resort to other solutions.
When designing a scalability strategy that offers appropriate performance for the type of application in question, there are as many solutions as types of systems and development teams trying to implement them. What would be the best way to design a scalable SignalR application? The best answer we can give is “it depends.”
In general, the formula for scaling our systems always consists in distributing the load across multiple servers, but if we want to maintain a good performance in SignalR-based real-time services, we have to design and implement our own solutions. And in this case, they will almost always involve searching for techniques for partitioning or distributing users following logical criteria that are specific to the domain of the application that we are developing, to group them into the same server. If all the users with whom we want to communicate as a group are found on the same server, submissions will be direct and we will avoid intermediaries that might introduce latency, such as when using backplanes. We will also achieve efficiency, and we will be able to scale out as much as the grouping strategy that we have chosen allows us, although usually at the cost of increased development effort.
The simplest and most basic approach could arise if we knew in advance and with certainty what users we are dealing with and their distribution, because we would be able to define a static architecture for them. We would just have to prepare an infrastructure of servers configured and adapted to the initial needs of the system, as shown in Figure 8-6, and adapt it according to the evolution of demand.
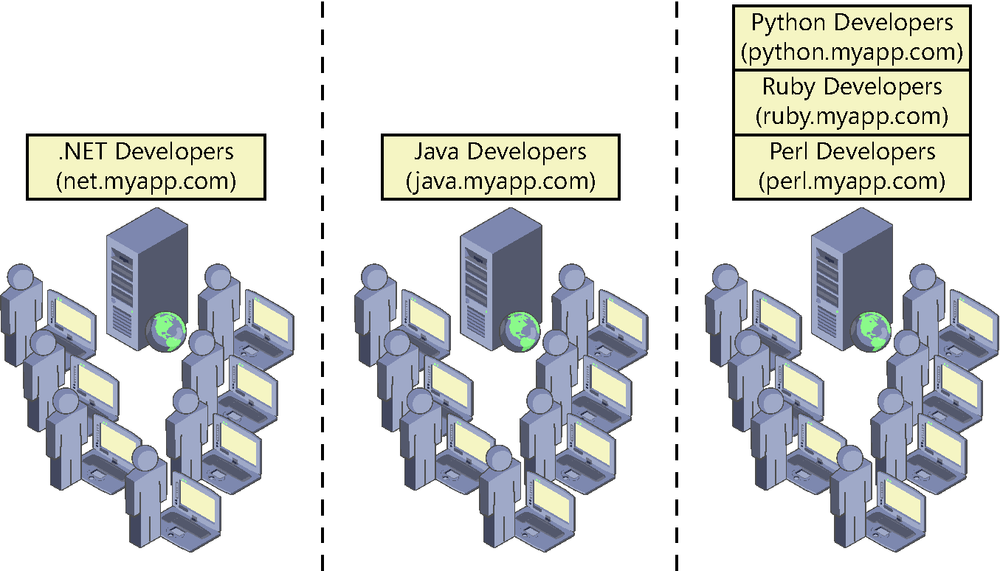
In this example, we could create new chat services as new technologies emerged in the future and host those services on servers with spare capacity or add new servers. However, to make this option possible, due to the very nature of the service, we should ensure that none of the partitions will grow beyond what has been assumed when planning the size of the infrastructure.
We can also take a more dynamic and flexible approach, which would be advisable in most scenarios. Conceptually, this would mean creating a “smart” balanced system, sensitive to the domain of the application, which could consist of a front service able to redirect clients to the appropriate server, based on certain criteria.
For example, in a collaborative text editing service, a user-grouping criterion could be the document itself. If a user entered the application and decided to open a document, a SignalR server could be assigned to them on the fly—the least busy server in a set of available servers. This mapping would be stored in a centralized persistence system, and the user would be redirected to said server so that she could start working on the document. If some other user accessed the same document later, the application would know that there is already a real-time server assigned to it and would redirect this new user to it. In this case, the criterion for partitioning or distributing users would be the document.
We could find another use in an internal messaging system on a multitenant ERP distributed as SaaS[34]. In this case, the criterion for allocating users could be the tenant itself—that is, the company using the services—because each of them would be completely independent of the others and, therefore, real-time services could be provided in separate servers.
Note that a similar approach is currently used in many applications. For example, there are many online games where users have a usable area to find opponents or to perform other activities, but at the time of starting the game, an existing server is assigned and all users associated with the same game are redirected to it. In this case, the partitioning criterion would be the game.
It would also be unfeasible to use backplanes in systems where it is essential to have real-time communications with a fixed frequency of updates per second, such as in a multiplayer shooter. This scenario, probably the most extreme one that we might face when developing a real-time application, can be approached in the same way: making all users involved in the action or game connect to the same server to be able to send their messages directly and without any middlemen.
Another possibility we might consider when using backplanes is trying to optimize the traffic generated in the messaging bus based on the needs of our application. For example, it would be possible to create a system to keep the subscriptions users should receive updated on every node, and implement a filtering system preventing messages that a node is not going to need from reaching that node through the backplane.
Of course, we can combine several of these techniques or devise new strategies that fit the exact needs of each application, but unlike with backplanes, we will have to implement our own solution.
The SignalR team has managed to make the activation of a backplane completely trivial. All that we have to do is install the specific package of the backplane using NuGet and insert a line of code to provide the basic configuration information that it needs. Now we will see how to configure and start the official backplanes available today: Windows Azure Service Bus, SQL Server, and Redis.
The Windows Azure bus is a scalable infrastructure for cloud messaging that offers various features for efficient communication of applications such as queues, topics (for publish/subscribe—pub/sub—schemes), relay, or push notifications, among other things. The backplane for SignalR uses topics to convey messages to the nodes connected to it.
This is a paid service, charged by the number of messages sent. Each call to a method of the hub enters a message into the bus, as do internal notifications of user connections or disconnections. However, the cost is not unreasonable. At the time of writing, you can send a million messages, or even more if you opt for an annual subscription, for one dollar.
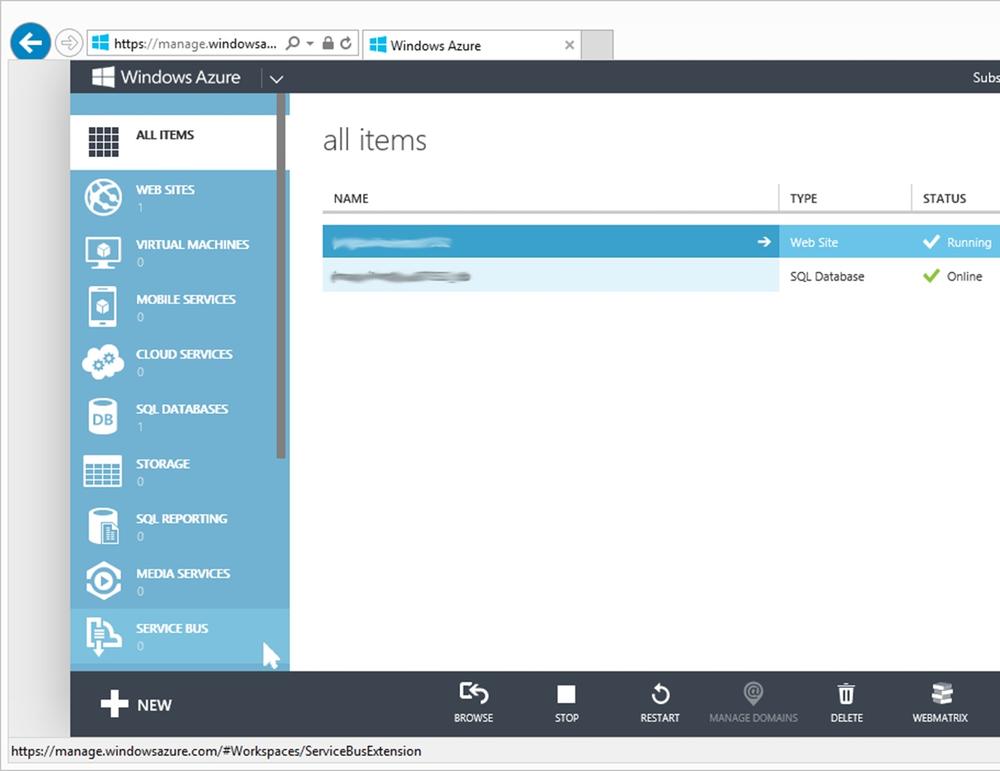
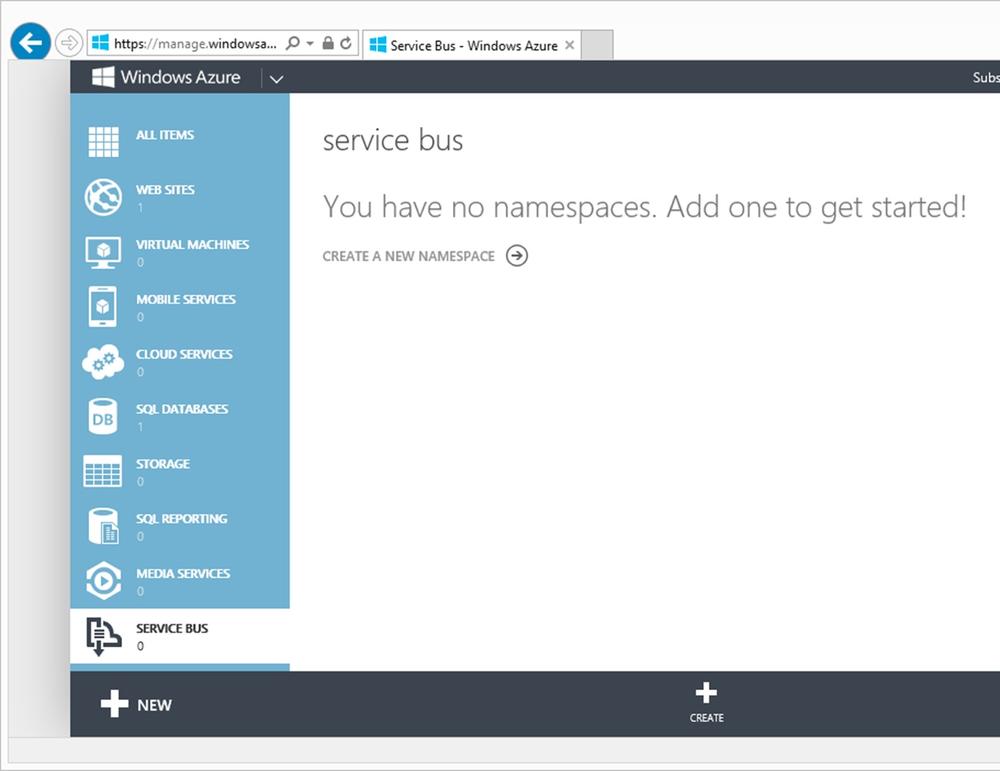
The bus service is created and configured through the Windows Azure management portal by accessing Service Bus in the main menu; see Figure 8-7.
If we have not used this feature before, a screen will appear, as shown in Figure 8-8, telling us that no namespace has been created and inviting us to create one. A namespace is a name used to identify the Service Bus when we reference it—for example, to connect from client applications.
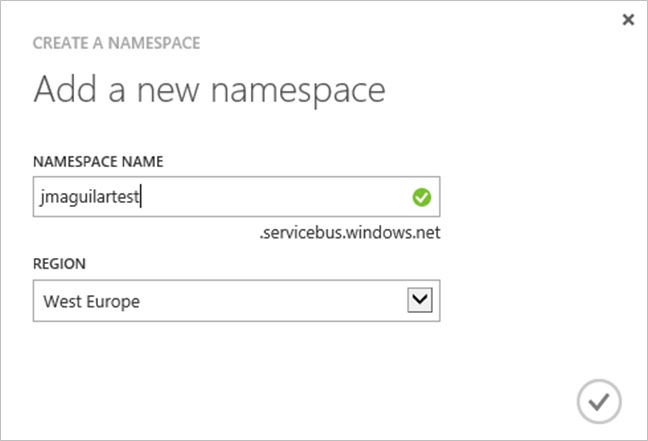
After clicking any of the various links available to create the namespace, we will just have to fill out a short form—see Figure 8-9—and it will be ready. We need to provide the following data:
The name of the bus that we are creating, which will serve to compose the URL to access it. The suffix .servicebus.windows.net will be automatically added to it, and it must be unique.
The region where the servers that will use the bus are located. The closer they are geographically, the more efficient the communication between them will be.
After the form is completed, the system will inform us that the namespace has been created correctly, and we will be able to use it from our application. See Figure 8-10.

Notice the Connection Information link at the bottom of the figure. We can use this link to get the connection string, which we will use later on when configuring the backplane in the SignalR application.
Thanks to the pluggable architecture with which SignalR has been designed, activation of the backplane is insultingly simple, as we will see now. For any SignalR application to use Service Bus as a backplane, first we have to install the following NuGet package:
PM> Install-Package microsoft.aspnet.signalr.ServiceBus
Next we have to tell SignalR that it must use said backplane, supplying it certain configuration parameters. This code must be found at a point that is executed during application startup, such as the Startup class:
public class Startup
{
    public void Configuration(IAppBuilder app)
    {
        var connectionString =
            "Endpoint=sb://jmaguilartest.servicebus.windows.net/;"
            + "SharedSecretIssuer=owner;"
            + "SharedSecretValue=YOURSECRETVALUEHERE>";
        GlobalHost.DependencyResolver.UseServiceBus(
            connectionString: connectionString,
            topicPrefix: "Broadcaster"
        );
        // ...
        app.MapSignalR();
    }
}
The first parameter of UseServiceBus() is the connection string to the server that we previously obtained from the Azure Management Tool. The second one is usually the name of the application, and it is used only to discriminate and group messages inside the bus. All SignalR nodes must use the same name so that they can share information, and it must be different than the name used by other applications that share the bus service.
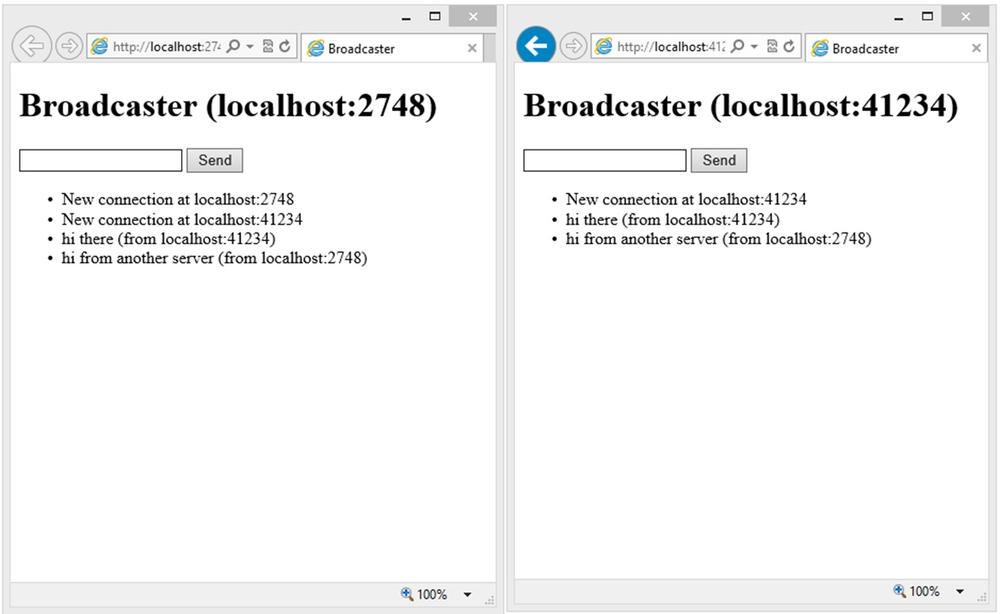
This is all that we need to provide horizontal scalability to our SignalR application. From this moment on, we can run two instances of the same site on different servers and both will be communicated in a transparent way; see Figure 8-11.
We can provide additional configuration information to the backplane through a ServiceBusScaleoutConfiguration type object. For example, in the following code, in addition to the connection string and topic prefix, we are setting the message life span to five seconds:
var config = new ServiceBusScaleoutConfiguration(
                              connectionString, "Broadcaster")
                {
                    TimeToLive = TimeSpan.FromSeconds(5)
                };
GlobalHost.DependencyResolver.UseServiceBus(config);
Additionally, it is worth noting that for the purpose of functional testing of web applications distributed across multiple nodes, a good way to do it is to launch additional IIS Express instances from the command line, as shown in the following example:
"c:Program Files (x86)IIS Expressiisexpress.exe" /port:5456
 /path:d:signalrdemosservicebusdemo
Obviously, both the port chosen and the path to the application must be adapted to the needs in each case. This way, we can have multiple instances of the server application on the local computer, each one running on a different port.
The Microsoft database engine is another option that we can use to horizontally scale our SignalR applications. As in the previous case, we shall see that the implementation is completely trivial.
The SQL Server–based backplane uses tables to store message queues circulating through the system and, optionally, the internal messaging broker for the optimized management of publications and subscriptions. It supports any version of SQL Server from 2005 onwards, both in the Express and server editions.
Creating the data structure is automatic. It will be done by the adapter when it detects that the tables and items that it needs do not exist in the database whose connection string we will supply at application startup.
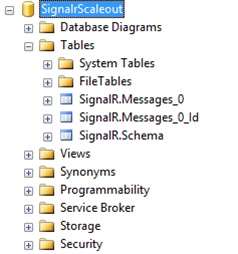
Therefore, all that we have to do is create a database and ensure that the accessing user has permissions to create schemas and tables on it. After this is done, when we run the application for the first time, we will see that the structure has been generated, as shown in Figure 8-12.
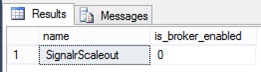
To improve performance, it is recommended that we check that the service broker is enabled on the database that we will use. This is easy to query using the following statement:
SELECT name, is_broker_enabled FROM master.sys.databases
       WHERE name='YOUR_DB_NAME_HERE'
The result could be something close to what is shown in the following screen shot of SQL Server Management Studio, where you can see that, as it often happens by default, the broker is not enabled for new databases. In this case, as you can see in Figure 8-13, we have named our database SignalrScaleout.
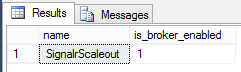
If this is the case, we can enable it just as easily:
ALTER DATABASE SignalrScaleout SET SINGLE_USER WITH ROLLBACK IMMEDIATE
ALTER DATABASE SignalrScaleout SET ENABLE_BROKER
ALTER DATABASE SignalrScaleout SET MULTI_USER
The second line of code is what enables the broker on the specified database. The first and last lines just ensure that no other users are connected when we modify the database, which would cause a concurrency deadlock. After the script is executed, if we execute the preceding query, we get the result shown in Figure 8-14.
For SignalR to make use of the infrastructure created on SQL Server, we must configure and activate the corresponding backplane. For this, we will first obtain the following package via NuGet:
PM> Install-package Microsoft.AspNet.SignalR.SqlServer
When the package is installed, we would just need to enter the following configuration code, with the information on the connection with SQL Server adapted to our execution environment:
public class Startup
{
    public void Configuration(IAppBuilder app)
    {
        var connectionString =
                 @"server=.SQLExpress;database=DB_NAME;"
                 +"Trusted_Connection=yes";
        GlobalHost.DependencyResolver.UseSqlServer(connectionString);
        // ...
        app.MapSignalR();
    }
}
If the connection string is not valid, if the user cannot log in, or if she is not allowed to create either schemas or tables in the database, an exception will be raised each time a client connection to the SignalR service is attempted.
We can also use a configuration object, which is useful for providing additional information. For example, the following code indicates that five tables must be created to store messages, which can improve performance by reducing contention caused by table locks in concurrent accesses. (The table structure is shown in Figure 8-15.)
var connectionString = @"..."; // Put your connection string here
var config = new SqlScaleoutConfiguration(connectionString)
             {
                TableCount = 5
             };
GlobalHost.DependencyResolver.UseSqlServer(config);
Redis[35] is a key-value open source storage system (with BSD license) that is popular in non-Microsoft environments and that has been ported to Windows by Microsoft Open Technologies.[36] Its main advantage is that it provides native mechanisms to publish and subscribe (pub/sub) on an in-memory store, which offers unmatched performance in systems that use this approach and require great immediacy, such as SignalR.
From the point of view of the SignalR server, there is no difference between using Redis installed on Linux or another operating system and doing so on Windows. Therefore, the choice of server to install this software is determined by the preferences or infrastructure requirements of the system to be rolled out.
If we choose to install it on Linux (as shown in Figure 8-16), we can download the source code from the repository used and build it on the server itself:
$ wget http://redis.googlecode.com/files/redis-2.6.14.tar.gz
$ tar xzf redis-2.6.14.tar.gz
$ cd redis-2.6.14
$ make
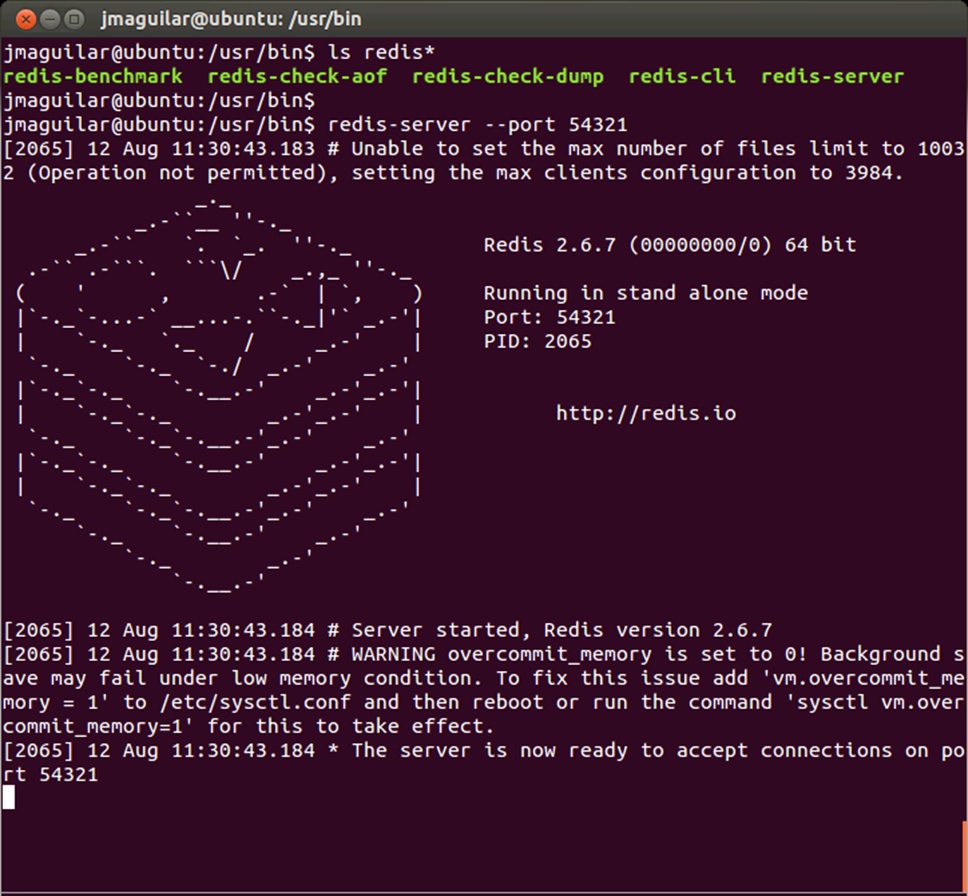
But if we want something simpler, we can also download the software from the repository of the distribution used. For example, in systems running on Ubuntu, the following statements would install and execute the server, putting it to listen on port 54321:
$ sudo apt-get install redis-server
[...]
$ redis-server --port 54321
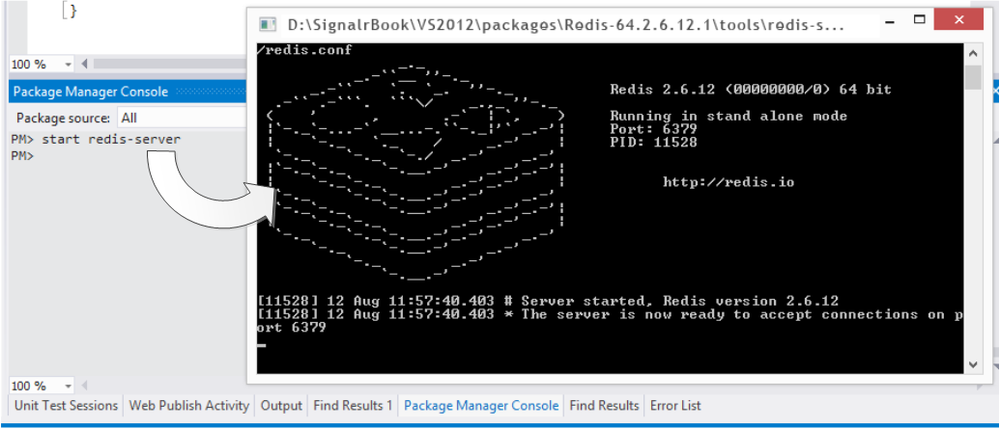
To execute it on Windows, we also have several alternatives. One is to download the source code from its GitHub repository[37] and build it using Visual Studio. Another (see Figure 8-17) is to use NuGet to get the executable file and launch it directly from the console:
PM> Install-Package Redis-64
Installing 'Redis-64 2.6.12.1'.
Successfully installed 'Redis-64 2.6.12.1'.
PM> start redis-server.exe
In either case, we could begin to connect clients to these instances of Redis openly. If we prefer to specify a particular port or a password for all the clients who will use them, we can do so at command-line level:
PM> start redis-server "--requirepass YOUR_PASSWORD --port 54321"
Better yet, we can enter this password in the configuration file of the component, redis.conf. However, in both cases, it is recommended that the password be very strong, because due to the high performance of Redis, it would be possible to perform an attack by brute force, testing tens of thousands of keys per second, and the more obvious or direct passwords would be discovered very quickly.
As in the rest of backplanes, the first thing to do is to download and install the appropriate component in the project:
PM> Install-package Microsoft.AspNet.SignalR.Redis
After that, as always, we specify at application startup that we will use Redis as support for horizontal scaling. The simplest way is by specifying the basic data of the Redis server: the host, port, password, and unique string that will be used to separate messages if the server is being used by more than one application.
public class Startup
{
    public void Configuration(IAppBuilder app)
    {
        GlobalHost.DependencyResolver.UseRedis(
            server: "localhost",
            port: 54321,
            password: "12345",
            eventKey: "Broadcaster"
        );
        app.MapSignalR();
    }
}
Again, this is all that we need to run our services on Redis. When we execute them, we will also see that the difference in performance compared to the other two mechanisms provided by SignalR is quite significant.
The developer community has also created some backplanes for SignalR that cover other serial technologies without out-of-the-box support, and their number is expected to increase with time. We must take into account the short age of the project and, more specifically, of scale-out mechanisms.
Obviously, in these cases, Microsoft does not provide official support, but these backplanes might be quite useful in scenarios not initially covered, such as those that use components such as NServiceBus or RabbitMQ.
If we have specific needs, nothing stops us from creating our own backplane. Although its creation is not overly complex, right now it is not very well documented and learning relies heavily on observing the code of existing adapters and trying to replicate them, adding the necessary customizations.
Very broadly speaking, the process consists of at least the following steps:
Creating a messaging bus inheriting from the
ScaleoutMessageBusclass provided by SignalR.Implementing the
Send()method, which will be invoked by SignalR when sending data to the backplane from the current node. In it, we should contact our bus and enter in it the messages that are received. This bus will be queried by all nodes connected to the server farm.Creating a process to retrieve the messages sent from persistence and entering them into the message flow of the local node. This can be a background process, or it can be code written in the event handler that receives data from the system used for persistence.
At application startup, telling SignalR that the messaging bus to be used must be the class that we created earlier.
The following code shows a backplane that uses the file system as persistence. Obviously, it is pointless outside the local computer and its sole purpose is to give an example of the smallest messaging bus that would allow sharing messages between nodes within the same computer. Therefore, it must not be used in real environments.
// File: FilesystemMessageBus.cs
public class FileSystemMessageBus : ScaleoutMessageBus
{
    // Uses the folder %temp%/backplane
    private readonly string BasePath =
                    Path.Combine(Path.GetTempPath(), "Backplane");
    private FileSystemWatcher _watcher;
    public FileSystemMessageBus(IDependencyResolver resolver,
                                ScaleoutConfiguration configuration)
        : base(resolver, configuration)
    {
        Open(0); // Use only one stream
        if (Directory.Exists(BasePath))
        {
            var files = new DirectoryInfo(BasePath).GetFiles();
            foreach (var file in files)
            {
                file.Delete();
            }
        }
        else Directory.CreateDirectory(BasePath);
        _watcher = new FileSystemWatcher(BasePath, "*.txt")
        {
            IncludeSubdirectories = false,
            EnableRaisingEvents = true
        };
        _watcher.Created += FileCreated;
    }
    // Process messages sent from the backplane to the server
    private void FileCreated(object sender, FileSystemEventArgs e)
    {
        byte[] bytes;
        while (true)
        {
            try
            {
                bytes = File.ReadAllBytes(e.FullPath);
                break;
            }
            catch                 // The file is still in use
            {
                Thread.Sleep(10); // Let's wait for a short while
            }                     // and try again
        }
        var scaleoutMessage = ScaleoutMessage.FromBytes(bytes);
        ulong id;
        string fileName = Path.GetFileNameWithoutExtension(e.Name);
        ulong.TryParse(fileName, out id);
        foreach (var message in scaleoutMessage.Messages)
        {
            OnReceived(0, id,
                  new ScaleoutMessage(new[] { message }));
        }
    }
    // Send messages from the server to the backplane
    protected override Task Send(int streamIndex,
                                    IList<Message> messages)
    {
        return Task.Factory.StartNew(() =>
        {
            var bytes = new ScaleoutMessage(messages).ToBytes();
            var filePath = BasePath + "\" +
                           DateTime.Now.Ticks + ".txt";
            File.WriteAllBytes(filePath, bytes);
        });
    }
    protected override void Dispose(bool disposing)
    {
        if (disposing)
        {
            _watcher.Dispose();
        }
        base.Dispose(disposing);
    }
}
As you can see, sending messages to the backplane is done just with the Send() method, serializing the message to a file in the “%temp%Backplane” folder.
To detect new messages from the backplane, we are using a FileSystemWatcher object on this same folder. When it detects new files—messages—the FileCreated() method is executed, which gets the new file, deserializes it, and enters it into the flow of messages of the current node.
To inform SignalR that it is the message bus to be used, we would just need to execute the following code during startup:
// File: Startup.cs
var bus = new Lazy<FileSystemMessageBus>(
              () => new FileSystemMessageBus(
                         GlobalHost.DependencyResolver,
                         new ScaleoutConfiguration())
);
GlobalHost.DependencyResolver.Register(
              typeof(IMessageBus),
              () => (object)bus.Value
);
In Chapter 9 we will learn what the Dependency Resolver is, and we will fully understand what we are doing with this code. For now, it will suffice to know that we are setting the object to be used internally when any component of SignalR needs to access the messaging bus.
In all applications, we have to be careful and prudent in the use of resources to ensure that the host they run on can work at its full potential, and even more so in SignalR applications, where real-time and immediacy are essential features. Moreover, sometimes this is purely a matter of survival, because these are applications that can keep hundreds of active sessions with thousands of messages circulating. A small mistake or neglect is significantly amplified and can be fatal.
The following are general recommendations to be carefully taken into account when developing systems using SignalR if we want to achieve the best performance and application stability:
Never use blocking calls, especially those that use external resources such as an invocation of a web service or a heavy query to a database. Use asynchrony whenever possible, as well as ASP.NET 4.5, to make better use of these features.
Do not send messages that are too long. A message several tens or hundreds of KB in size and distributed to thousands of clients adds a load in terms of memory and bandwidth that can hardly be supported on the server side. Minimize submissions as much as possible, and meticulously optimize the data structures used to reduce size. For example, we can modify the way messages are serialized so as to minimize their additional load:
public class MyMessage
{
    [JsonProperty("a")]
    public double Address { get; set; }
    [JsonProperty("n")]
    public double FullName { get; set; }
    [JsonIgnore] // Don't serialize this property
    public string OtherProperty { get; set; }
}
Minimize the number of messages circulating through the network. In certain scenarios, it is possible to group messages and send them all at once or to send them with a certain frequency and make the other end interpolate the intermediate states. For example, if we want to inform thousands of clients that an object is being moved across the screen in a multiuser game, it is not necessary to inform them of each pixel of movement so that they refresh their interface. Sending the information periodically each time the displacement reaches a certain number of pixels is enough, because the clients could infer the intermediate path given the old and new locations.
Also, it is sometimes possible to perform buffering, or server clustering, and send clients the result of actions performed only from time to time. For example, if there are several clients moving various objects across the screen, the changes could be stored at the server but only notified to the other clients connected every n seconds so that they could update their interfaces. Thus we could get a fixed ratio of state update submissions per second, regardless of the number of actions performed between each update, which could be useful for real-time high frequency scenarios, as in a multiplayer shooter.
Prevent memory leaks that in the medium term might bring the server to its knees. We must be always scrupulous with the release of resources used.
Never use session variables. Although this tool is widely used in other web applications, it involves serializing concurrent requests from the same user, which automatically involves the loss of SignalR’s high-performance ability to process in parallel. To maintain state, we must use other mechanisms, such as cookies, state via roundtrips in hubs, client storage, databases, or any other non-blocking systems.
Simplify as much as possible the processes that are performed at the server—for example, by moving as much logic as possible to the client side. Thus the processing load becomes distributed among all users, freeing the server from tasks that do not need to be performed on it.
Be aware of the transports used. Some consume more resources than others and are less efficient. WebSockets are by far the most efficient transport, making it convenient to execute systems in production on infrastructure that will support them, such as IIS 8 and ASP.NET 4.5.
Do not use the server edition of IIS on client computers such as those running Windows 7 or Windows 8, because they include a hard limit of 10 concurrent connections. In these cases, it is better to use IIS Express, but remember that the Express editions should not be used in production environments.
Following the preceding recommendations will certainly result in improved performance and robustness of services, but it is also possible to configure IIS and ASP.NET to optimize their use in SignalR applications. Normally, they are configured for scenarios very much oriented to the traditional web, whose operation is primarily based on the processing of short requests, rather than the long-lived connections that take place during the lifetime of a SignalR client.
In the case of IIS, we can increase the number of concurrent requests that this server can handle, which can be very useful in the case of long-lived connections. To do this, we simply have to open a command console with administrator privileges, go to the %windir%system32inetsrv folder, and run the following:
appcmd.exe set config /section:system.webserver/serverRuntime /appConcurrentRequestLimit:50000
The default value for this parameter is 5,000 for IIS 7 and above, which might be on the short side for certain types of SignalR applications.
However, by default, ASP.NET limits the number of concurrent connections that it can handle. In version 4.0 of this framework, this maximum number is set by default to 5,000 for every CPU available in the system. To increase this value, we can go to the aspnet.config file present in the folder of the .NET Framework version with which we are working and enter the new value:
<?xml version="1.0" encoding="UTF-8" ?>
<configuration>
       ...
    <system.web>
        <applicationPool maxConcurrentRequestsPerCPU="10000" />
    </system.web>
</configuration>
Note
In 64-bit environments, .NET 4 is found inside the system folder %windir%Microsoft.NETFrameworkv4.0.30319.
When the maximum number of connections has been exceeded, ASP.NET enters new connections into a queue, where they wait for the ones already in use to be freed. The default size of this queue is 5,000 connections. After the size is exceeded, the users begin to receive HTTP 503 errors indicating that it is not possible to deal with them.
The size of this queue can be controlled by tweaking the machine.config file, also present in the .NET Framework folder:
<?xml version="1.0"?>
<configuration>
  ...
  <system.web>
    ...
    <processModel enable="true" requestQueueLimit="15000" />
    ...
  </system.web>
</configuration>One of the main tools that we can use to monitor the performance of SignalR applications is the Windows Performance Monitor (Perfmon.exe). In addition to the performance counters that we regularly use in web and ASP.NET applications, we can also install on it a set of counters specific to SignalR that will help us get a precise view of what is happening inside our system.
To install these counters, we must use the Signalr.exe utility that we already employed to generate a static JavaScript proxy based on a hub. As we saw then, we can bring this tool to our computer by using NuGet:
PM> Install-package Microsoft.AspNet.SignalR.Utils
Upon completion of the download, the signalr.exe executable file is entered into the packages folder of our project under the name Microsoft.AspNet.SignalR.Utils-2.0.0Tools. To install the performance counters, we just need to execute the following command from a console with administrator permissions:
Signalr.exe ipc
The letters “ipc” stand for “install performance counters.” Likewise, we can uninstall them using the sequence “upc” (“uninstall performance counters”).
After the installation process has completed, we will have new counters available in the performance monitor that we can add to the monitoring session by clicking the “Add” button pointed to in Figure 8-18 (and also accessible via Ctrl+N).

Next we will get the Add Counters dialog box, like the one shown in Figure 8-19, in which we must select the counters that we want to query, as well as the specific application instances that are using them. The counters installed are found grouped under the name SignalR. After selecting them, we can also select the instances to be monitored, in the lower left of the dialog box.
After the counters to be included have been selected and we have clicked OK, we will be able to query their values in real time. See Figure 8-20.


The meaning of SignalR-specific performance counters is described in the following four sections.
Connection Messages Received Total. Total number of messages received by the connections (sent from the server to the client) since the application was started
Connection Messages Received/Sec. Number of messages received by the connections (sent from the server to the client) per second
Connection Messages Sent Total. Number of messages sent by the connections (from the client to the server) since the application started operating
Connection Messages Sent/Sec. Number of messages sent by the connections (from the client to the server) per second
Connections Connected. Total number of connections made since the application was started
Connections Current. Number of currently active connections
Connections Disconnected. Total number of disconnection events executed since the application was started
Connections Reconnected. Total number of reconnection events that have occurred since the application was started
Errors: All Total. Total number of errors generated since the application was started
Errors: All/Sec. Number of errors generated per second
Errors: Hub Invocation Total. Total number of errors of any type that have occurred during the invocation of hubs since the application was started
Errors: Hub Invocation/Sec. Number of errors occurring per second during the invocation of hubs
Errors: Hub Resolution Total. Number of hub name resolution errors that have occurred since the application was started
Errors: Hub Resolution/Sec. Number of errors relative to hub name resolution per second
Errors: Transport Total. Total number of errors that have occurred in transports since the application was started
Errors: Transport/Sec. Number of errors relative to transports occurred per second
Message Bus Allocated Workers. Number of processes in charge of managing the submissions created on the bus
Message Bus Busy Workers. Number of such processes that are currently making submissions on the bus
Message Bus Messages Published Total. Total number of messages that have been published on the messaging bus since the application started operating
Message Bus Messages Published/Sec. Number of messages that are being published on the bus per second
Message Bus Messages Received Total. Total number of messages received by subscribers since the application was started
Message Bus Messages Received/Sec. Number of messages that are being received by the subscribers per second
Message Bus Subscribers Current. Current number of connections subscribed to the messaging bus
Message Bus Subscribers Total. Total number of subscribers to the messaging bus since the application was started
Message Bus Subscribers/Sec. Number of new subscriptions made to the bus per second
Message Bus Topics Current. Number of topics currently defined on the messaging bus
Scaleout Errors Total. Total number of errors that have occurred in the scale-out system since the application was started
Scaleout Errors/Sec. Number of errors relative to the scale-out provider that are occurring per second
Scaleout Message Bus Messages Received/Sec. Number of messages per second that subscribers are receiving from the messaging bus of the scale-out provider
Scaleout Send Queue Length. Current size of the submission queue of the scale-out provider
Scaleout Streams Buffering. Number of streams that are currently entering information into the buffer
Scaleout Streams Open. Total number of streams configured on the bus that are currently open
Scaleout Streams Total. Total number of streams—logical channels—currently configured on the provider’s messaging bus
Besides SignalR’s own counters, which we have already mentioned, many other counters provide useful information about the state of our applications and help us detect problems. For example, it is usually crucial to know the CPU load that the computer is currently bearing. We can query it by adding the counter Processor information / % Processor time to our monitoring data.
It is also useful to know the evolution of memory footprint. For this, we have several counters grouped inside the Memory category. For example, the Available KBytes (or Available MBytes) counter can illustrate the situation quite plainly. We can also query .NET CLR Memory#bytes in all heaps on the execution process of the application to get the memory footprint in garbage collection heaps. Continual surveillance of these values can reveal memory leaks or other problems.
In the .NET CLR LocksAndThreads category we find counters that display information about the execution threads associated with the application. For example, # of current logical Threads gives the current number of threads managed by the CLR, while # of current physical Threads gives the number of threads actually in use at operating system level. Monitoring these counters could help us detect problems related to an excess of active threads and take actions such as modifying server parameters.
In the ASP.NET category we also find counters that provide a lot of valuable information. In particular, knowing the number of requests that are being processed and how many could not be processed (queued or rejected) due to saturation of the server can give us insight in many scenarios. We can obtain this information from the counters Requests Current, Requests Queued, and Requests Rejected.
The comprehensive reference of available performance counters can be reviewed at the following MSDN page: http://msdn.microsoft.com/en-us/library/w8f5kw2e.aspx.
[32] Windows Azure: http://www.windowsazure.com
[33] CDN: Content Delivery Network.
[34] SaaS: Software as a Service.
[35] Official Redis website: http://redis.io
[36] Official Microsoft Open Technologies website: http://msopentech.com/
[37] Redis for Windows in GitHub: https://github.com/MSOpenTech/redis