Chapter 23. Improving throughput by using tasks
After completing the chapter, you will be able to:
Use the Parallel class to parallelize some common programming constructs.
In the bulk of the preceding chapters in this book, you learned how to use C# to write programs that run in a single-threaded manner. By single-threaded, I mean that at any one point in time, a program has been executing a single instruction. This might not always be the most efficient approach for an application to take. Applications that can perform multiple operations at the same time might be able to make better use of the resources available on a computer. Some processes might run more quickly if you can divide them into parallel paths of execution that can run concurrently. This chapter is concerned with improving throughput in your applications by maximizing the use of the available processing power. Specifically, in this chapter, you will learn how to use the Task objects to apply effective multitasking to computationally intensive applications.
Why perform multitasking by using parallel processing?
There are two primary reasons why you might want to perform multitasking in an application:
To improve responsiveness. You can give the user of an application the impression that the program is performing more than one task at a time by dividing the program up into concurrent threads of execution and allowing each thread to run in turn for a short period of time. This is the conventional cooperative model with which many experienced Windows developers are familiar. However, this is not true multitasking because the processor is shared between threads, and the cooperative nature of this approach requires that the code executed by each thread behaves in an appropriate manner. If one thread dominates the CPU and resources available at the expense of other threads, the advantages of this approach are lost. It is sometimes difficult to write well-behaved applications that follow this model consistently. However, a major aim of Windows 8 and Windows 8.1 is to provide a platform that addresses these issues, and the Windows Runtime (WinRT) that implements the execution environment for Windows 8.1 supplies many APIs that are geared toward this mode of operation. Chapter 24 discusses these features in more detail.
To improve scalability. You can improve scalability by making efficient use of the processing resources available and using these resources to reduce the time required to execute parts of an application. A developer can determine which parts of an application can be performed in parallel and arrange for them to be run concurrently. As more computing resources are added, more operations can be run in parallel. Until relatively recently, this model was suitable only for systems that either had multiple CPUs or were able to spread the processing across different computers networked together. In both cases, you had to use a model that arranged for coordination between parallel tasks. Microsoft provides a specialized version of Windows called High Performance Computing (HPC) Server 2008, with which an organization can build clusters of servers that can distribute and execute tasks in parallel. Developers can use the Microsoft implementation of the Message Passing Interface (MPI)—a well-known language-independent communications protocol—to build applications based on parallel tasks that coordinate and cooperate with each other by sending messages. Solutions based on Windows HPC Server 2008 and MPI are ideal for large-scale, compute-bound engineering and scientific applications, but they are unsuitable for smaller-scale systems running on desktop or tablet computers.
From these descriptions, you might be tempted to conclude that the most cost-effective way to build multitasking solutions for desktop computers and mobile devices is to use the cooperative multithreaded approach. However, this mechanism was simply intended to improve responsiveness—to ensure that single-processor computers give each task a fair share of that processor. It is not well-suited for multiprocessor machines because it is not designed to distribute the load across processors and, consequently, does not scale well. When desktop machines with multiple processors were expensive (and as a result relatively rare), this was not an issue. However, this situation is changing, as I will briefly explain.
The rise of the multicore processor
Just over 12 years ago, the cost of a decent personal computer was in the range of $800 to $1,500. Today, a decent personal computer still costs about the same, even after 12 years of price inflation. The specification of a typical computer these days is likely to include a processor running at a speed of between 2 GHz and 3 GHz, 500–1000 GB of hard disk storage, 4–8 GB of RAM, high-speed and high-resolution graphics, and a rewritable DVD drive. Just over a decade ago, the processor speed for a typical machine was between 500 MHz and 1 GHz, 80 GB was a large hard disk, Windows ran quite happily with 256 MB or less of RAM, and rewritable CD drives cost well over $100. (Rewritable DVD drives were rare and extremely expensive.) This is the joy of technological progress: ever faster and more powerful hardware at cheaper and cheaper prices.
This is not a new trend. In 1965, Gordon E. Moore, cofounder of Intel, wrote a paper titled “Cramming More Components onto Integrated Circuits,” which discussed how the increasing miniaturization of components enabled more transistors to be embedded on a silicon chip, and how the falling costs of production as the technology became more accessible would lead economics to dictate squeezing as many as 65,000 components onto a single chip by 1975. Moore’s observations lead to the dictum frequently referred to as Moore’s Law, which basically states that the number of transistors that can be placed inexpensively on an integrated circuit will increase exponentially, doubling approximately every two years. (Actually, Gordon Moore was more optimistic than this initially, postulating that the volume of transistors was likely to double every year, but he later modified his calculations.) The ability to pack transistors together led to the ability to pass data between them more quickly. This meant we could expect to see chip manufacturers produce faster and more powerful microprocessors at an almost unrelenting pace, enabling software developers to write ever more complicated software that would run more quickly.
Moore’s Law concerning the miniaturization of electronic components still holds, even after nearly 50 years. However, physics has started to intervene. There comes a limit when it is not possible to transmit signals between transistors on a single chip any faster, no matter how small or densely packed they are. To a software developer, the most noticeable result of this limitation is that processors have stopped getting faster. Seven or eight years ago, a fast processor ran at 3 GHz. Today, a fast processor still runs at 3 GHz.
The limit to the speed at which processors can transmit data between components has caused chip companies to look at alternative mechanisms for increasing the amount of work a processor can do. The result is that most modern processors now have two or more processor cores. Effectively, chip manufacturers have put multiple processors on the same chip and added the necessary logic to enable them to communicate and coordinate with one another. Quad-core (four cores) and eight-core processors are now common. Chips with 16, 32, and 64 cores are available, and the price of dual-core and quad-core processors is now sufficiently low that they are an expected element in laptop and tablet computers. So, although processors have stopped speeding up, you can now expect to get more of them on a single chip.
What does this mean to a developer writing C# applications?
In the days before multicore processors, you could speed up a single-threaded application simply by running it on a faster processor. With multicore processors, this is no longer the case. A single-threaded application will run at the same speed on a single-core, dual-core, or quad-core processor that all have the same clock frequency. The difference is that on a dual-core processor, as far as your application is concerned, one of the processor cores will be sitting around idle, and on a quad-core processor, three of the cores will be simply ticking away, waiting for work. To make the best use of multicore processors, you need to write your applications to take advantage of multitasking.
Implementing multitasking by using the Microsoft .NET Framework
Multitasking is the ability to do more than one thing at the same time. It is one of those concepts that is easy to describe but that, until recently, has been difficult to implement.
In the optimal scenario, an application running on a multicore processor performs as many concurrent tasks as there are processor cores available, keeping each of the cores busy. However, there are many issues that you need to consider to implement concurrency, including the following:
How can you divide an application into a set of concurrent operations?
How can you arrange for a set of operations to execute concurrently, on multiple processors?
How can you ensure that you attempt to perform only as many concurrent operations as there are processors available?
If an operation is blocked (such as while it is waiting for input/output (I/O) to complete), how can you detect this and arrange for the processor to run a different operation rather than sit idle?
How can you determine when one or more concurrent operations have completed?
To an application developer, the first question is a matter of application design. The remaining questions depend on the programmatic infrastructure. Microsoft provides the Task class and a collection of associated types in the System.Threading.Tasks namespace to help address these issues.
Tasks, threads, and the ThreadPool
The Task class is an abstraction of a concurrent operation. You create a Task object to run a block of code. You can instantiate multiple Task objects and start them running in parallel if sufficient processors or processor cores are available.
Note
From now on, I will use the term processor to refer to either a single-core processor or a single processor core on a multicore processor.
Internally, the Common Language Runtime (CLR) implements tasks and schedules them for execution by using Thread objects and the ThreadPool class. Multithreading and thread pools have been available with the .NET Framework since version 1.0, and if you are building traditional desktop applications, you can use the Thread class in the System.Threading namespace directly in your code. However, the Thread class is not available for Windows Store apps; instead, you use the Task class.
The Task class provides a powerful abstraction for threading with which you can easily distinguish between the degree of parallelization in an application (the tasks) and the units of parallelization (the threads). On a single-processor computer, these items are usually the same. However, on a computer with multiple processors or with a multicore processor, they are different. If you design a program based directly on threads, you will find that your application might not scale very well; the program will use the number of threads you explicitly create, and the operating system will schedule only that number of threads. This can lead to overloading and poor response time if the number of threads greatly exceeds the number of available processors, or to inefficiency and poor throughput if the number of threads is less than the number of processors.
The CLR optimizes the number of threads required to implement a set of concurrent tasks and schedules them efficiently according to the number of available processors. It implements a queuing mechanism to distribute the workload across a set of threads allocated to a thread pool (implemented by using a ThreadPool object). When a program creates a Task object, the task is added to a global queue. When a thread becomes available, the task is removed from the global queue and is executed by that thread. The ThreadPool class implements a number of optimizations and uses a work-stealing algorithm to ensure that threads are scheduled efficiently.
Note
The ThreadPool class was available in previous editions of the .NET Framework, but it was enhanced significantly in the .NET Framework 4.0 to support Tasks.
You should note that the number of threads created by the CLR to handle your tasks is not necessarily the same as the number of processors. Depending on the nature of the workload, one or more processors might be busy performing high-priority work for other applications and services. Consequently, the optimal number of threads for your application might be less than the number of processors in the machine. Alternatively, one or more threads in an application might be waiting for long-running memory access, I/O, or a network operation to complete, leaving the corresponding processors free. In this case, the optimal number of threads might be more than the number of available processors. The CLR follows an iterative strategy, known as a hill-climbing algorithm, to dynamically determine the ideal number of threads for the current workload.
The important point is that all you have to do in your code is divide, or partition, your application into tasks that can be run in parallel. The CLR takes responsibility for creating the appropriate number of threads based on the processor architecture and workload of your computer, associating your tasks with these threads and arranging for them to be run efficiently. It does not matter if you partition your work into too many tasks because the CLR will attempt to run only as many concurrent threads as is practical; in fact, you are encouraged to overpartition your work because this will help to ensure that your application scales if you move it onto a computer that has more processors available.
Creating, running, and controlling tasks
You can create Task objects by using the Task constructor. The Task constructor is overloaded, but all versions expect you to provide an Action delegate as a parameter. Chapter 20 illustrates that an Action delegate references a method that does not return a value. A Task object invokes this delegate when it is scheduled to run. The following example creates a Task object that uses a delegate to run the method called doWork:
Task task = new Task(doWork);
...
private void doWork()
{
    // The task runs this code when it is started
    ...
}
Tip
The default Action type references a method that takes no parameters. Other overloads of the Task constructor take an Action<object> parameter representing a delegate that refers to a method that takes a single object parameter. With these overloads, you can pass data into the method run by the task. The following code shows an example:
Action<object> action;
action = doWorkWithObject;
object parameterData = ...;
Task task = new Task(action, parameterData);
...
private void doWorkWithObject(object o)
{
    ...
}
After you create a Task object, you can set it running by using the Start method, like this:
Task task = new Task(...);
task.Start();
The Start method is also overloaded, and you can optionally specify a TaskScheduler object to control the degree of concurrency and other scheduling options. You can obtain a reference to the default TaskScheduler object by using the static Default property of the TaskScheduler class. The TaskScheduler class also provides the static Current property, which returns a reference to the TaskScheduler object currently used. (This TaskScheduler object is used if you do not explicitly specify a scheduler.) A task can provide hints to the default TaskScheduler about how to schedule and run the task if you specify a value from the TaskCreationOptions enumeration in the Task constructor.
More Info
For more information about the TaskScheduler class and the TaskCreationOptions enumeration, consult the documentation describing the .NET Framework class library provided with Visual Studio.
Creating and running a task is a very common process, and the Task class provides the static Run method with which you can combine these operations. The Run method takes an Action delegate specifying the operation to perform (like the Task constructor), but starts the task running immediately. It returns a reference to the Task object. You can use it like this:
Task task = Task.Run(() => doWork());
When the method run by the task completes, the task finishes, and the thread used to run the task can be recycled to execute another task.
When a task completes, you can arrange for another task to be scheduled immediately by creating a continuation. To do this, call the ContinueWith method of a Task object. When the action performed by the Task object completes, the scheduler automatically creates a new Task object to run the action specified by the ContinueWith method. The method specified by the continuation expects a Task parameter, and the scheduler passes in to the method a reference to the task that completed. The value returned by ContinueWith is a reference to the new Task object. The following code example creates a Task object that runs the doWork method and specifies a continuation that runs the doMoreWork method in a new task when the first task completes:
Task task = new Task(doWork);
task.Start();
Task newTask = task.ContinueWith(doMoreWork);
...
private void doWork()
{
    // The task runs this code when it is started
    ...
}
...
private void doMoreWork(Task task)
{
    // The continuation runs this code when doWork completes
    ...
}
The ContinueWith method is heavily overloaded, and you can provide a number of parameters that specify additional items, such as the TaskScheduler to use and a TaskContinuationOptions value. The TaskContinuationOptions type is an enumeration that contains a superset of the values in the TaskCreationOptions enumeration. The additional values available include the following:
NotOnCanceled. and OnlyOnCanceled The NotOnCanceled option specifies that the continuation should run only if the previous action completes and is not canceled, and the OnlyOnCanceled option specifies that the continuation should run only if the previous action is canceled. The section Canceling tasks and handling exceptions later in this chapter describes how to cancel a task.
NotOnFaulted. and OnlyOnFaulted The NotOnFaulted option indicates that the continuation should run only if the previous action completes and does not throw an unhandled exception. The OnlyOnFaulted option causes the continuation to run only if the previous action throws an unhandled exception. The section Canceling tasks and handling exceptions provides more information on how to manage exceptions in a task.
NotOnRanToCompletion. and OnlyOnRanToCompletion The NotOnRanToCompletion option specifies that the continuation should run only if the previous action does not complete successfully; it must either be canceled or throw an exception. OnlyOnRanToCompletion causes the continuation to run only if the previous action completes successfully.
The following code example shows how to add a continuation to a task that runs only if the initial action does not throw an unhandled exception:
Task task = new Task(doWork);
task.ContinueWith(doMoreWork, TaskContinuationOptions.NotOnFaulted);
task.Start();
A common requirement of applications that invoke operations in parallel is to synchronize tasks. The Task class provides the Wait method, which implements a simple task coordination mechanism. Using this method, you can suspend execution of the current thread until the specified task completes, like this:
task2.Wait(); // Wait at this point until task2 completes
You can wait for a set of tasks by using the static WaitAll and WaitAny methods of the Task class. Both methods take a params array containing a set of Task objects. The WaitAll method waits until all specified tasks have completed, and WaitAny stops until at least one of the specified tasks has finished. You use them like this:
Task.WaitAll(task, task2); // Wait for both task and task2 to complete
Task.WaitAny(task, task2); // Wait for either task or task2 to complete
Using the Task class to implement parallelism
In the next exercise, you will use the Task class to parallelize processor-intensive code in an application, and you will see how this parallelization reduces the time taken for the application to run by spreading the computations across multiple processor cores.
The application, called GraphDemo, consists of a page that uses an Image control to display a graph. The application plots the points for the graph by performing a complex calculation.
Note
The exercises in this chapter are intended to run on a computer with a multicore processor. If you have only a single-core CPU, you will not observe the same effects. Also, you should not start any additional programs or services between exercises because these might affect the results that you see.
Start Microsoft Visual Studio 2013 if it is not already running.
Open the GraphDemo solution, which is located in the Microsoft PressVisual CSharp Step By StepChapter 23GraphDemo folder in your Documents folder. This is a Windows Store app.
In Solution Explorer, in the GraphDemo project, double-click the file GraphWindow.xaml to display the form in the Design View window.
Apart from the Grid control defining the layout, the form contains the following important controls:
An Image control called graphImage. This image control displays the graph rendered by the application.
A Button control called plotButton. The user clicks this button to generate the data for the graph and display it in the graphImage control.
A TextBlock control called duration. The application displays the time taken to generate and render the data for the graph in this label.
In Solution Explorer, expand the GraphWindow.xaml file and then double-click GraphWindow.xaml.cs to display the code for the form in the Code and Text Editor window.
The form uses a WriteableBitmap object (defined in the Windows.UI.Xaml.Media.Imaging namespace) called graphBitmap to render the graph. The variables pixelWidth and pixelHeight specify the horizontal and vertical resolution, respectively, for the WriteableBitmap object:
public partial class GraphWindow : Window
{
    // Reduce pixelWidth and pixelHeight if there is insufficient space available
    private int pixelWidth = 12000;
    private int pixelHeight = 7500;
    private WriteableBitmap graphBitmap = null;
    ...
}
Note
This application has been developed and tested on a desktop computer with 4 GB of memory. If your computer has less memory than this available, you might need to reduce the values in the pixelWidth and pixelHeight variables; otherwise, the application might generate OutOfMemoryException exceptions. Similarly, if you have much more memory available, you might want to increase the values of these variables to see the full effects of this exercise.
Examine the last three lines of the GraphWindow constructor, which look like this:
public GraphWindow()
{
    ...
    int dataSize = bytesPerPixel * pixelWidth * pixelHeight;
    data = new byte[dataSize];
    graphBitmap = new WriteableBitmap(pixelWidth, pixelHeight);
}
The first two lines instantiate a byte array that will hold the data for the graph. The size of this array depends on the resolution of the WriteableBitmap object, determined by the pixelWidth and pixelHeight fields. Additionally, this size has to be scaled by the amount of memory required to render each pixel; the WriteableBitmap class uses 4 bytes for each pixel, which specify the relative red, green, and blue intensity of each pixel and the alpha blending value of the pixel (the alpha blending value determines the transparency and brightness of the pixel).
The final statement creates the WiteableBitmap object with the specified resolution.
Examine the code for the plotButton_Click method:
private void plotButton_Click(object sender, RoutedEventArgs e)
{
    Random rand = new Random();
    redValue = (byte)rand.Next(0xFF);
    greenValue = (byte)rand.Next(0xFF);
    blueValue = (byte)rand.Next(0xFF);
    Stopwatch watch = Stopwatch.StartNew();
    generateGraphData(data);
    duration.Text = string.Format("Duration (ms): {0}", watch.ElapsedMilliseconds);
    Stream pixelStream = graphBitmap.PixelBuffer.AsStream();
    pixelStream.Seek(0, SeekOrigin.Begin);
    pixelStream.Write(data, 0, data.Length);
    graphBitmap.Invalidate();
    graphImage.Source = graphBitmap;
}
This method runs when the user clicks the plotButton button.
You will click this button several times later in the exercise, so that you can see that a new version of the graph has been drawn each time this method generates a random set of values for the red, green, and blue intensity of the points that are plotted (the graph will be a different color each time you click this button).
The watch variable is a System.Diagnostics.Stopwatch object. The StopWatch type is useful for timing operations. The static StartNew method of the StopWatch type creates a new instance of a StopWatch object and starts it running. You can query the running time of a StopWatch object by examining the ElapsedMilliseconds property.
The generateGraphData method populates the data array with the data for the graph to be displayed by the WriteableBitmap object. You will examine this method in the next step.
When the generateGraphMethod method has completed, the elapsed time (in milliseconds) appears in the duration TextBox control.
The final block of code takes the information held in the data array and copies it to the WriteableBitmap object for rendering. The simplest technique is to create an in-memory stream that can be used to populate the PixelBuffer property of the WriteableBitmap object. You can then use the Write method of this stream to copy the contents of the data array into this buffer. The Invalidate method of the WriteableBitmap class requests that the operating system redraws the bitmap by using the information held in the buffer. The Source property of an Image control specifies the data that the Image control should display. The final statement sets the Source property to the WriteableBitmap object.
Examine the code for the generateGraphData method, shown here:
private void generateGraphData(byte[] data)
{
    int a = pixelWidth / 2;
    int b = a * a;
    int c = pixelHeight / 2;
    for (int x = 0; x < a; x ++)
    {
        int s = x * x;
        double p = Math.Sqrt(b - s);
        for (double i = -p; i < p; i += 3)
        {
            double r = Math.Sqrt(s + i * i) / a;
            double q = (r - 1) * Math.Sin(24 * r);
            double y = i / 3 + (q * c);
            plotXY(data, (int)(-x + (pixelWidth / 2)), (int)(y + (pixelHeight / 2)));
            plotXY(data, (int)(x + (pixelWidth / 2)), (int)(y + (pixelHeight / 2)));
        }
    }
}
This method performs a series of calculations to plot the points for a rather complex graph. (The actual calculation is unimportant—it just generates a graph that looks attractive.) As it calculates each point, it calls the plotXY method to set the appropriate bytes in the data array that correspond to these points. The points for the graph are reflected around the x-axis, so the plotXY method is called twice for each calculation: once for the positive value of the x-coordinate, and once for the negative value.
Examine the plotXY method:
private void plotXY(byte[] data, int x, int y)
{
    int pixelIndex = (x + y * pixelWidth) * bytesPerPixel;
    data[pixelIndex] = blueValue;
    data[pixelIndex + 1] = greenValue;
    data[pixelIndex + 2] = redValue;
    data[pixelIndex + 3] = 0xBF;
}
This method sets the appropriate bytes in the data array that corresponds to x and y-coordinates passed in as parameters. Each point plotted corresponds to a pixel, and each pixel consists of 4 bytes, as described earlier. Any pixels left unset are displayed as black. The value 0xBF for the alpha blend byte indicates that the corresponding pixel should be displayed with a moderate intensity; if you decrease this value, the pixel will become fainter, while setting the value to 0xFF (the maximum value for a byte) will display the pixel at its brightest intensity.
On the Debug menu, click Start Debugging to build and run the application.
When the Graph Demo window appears, click Plot Graph, and then wait.
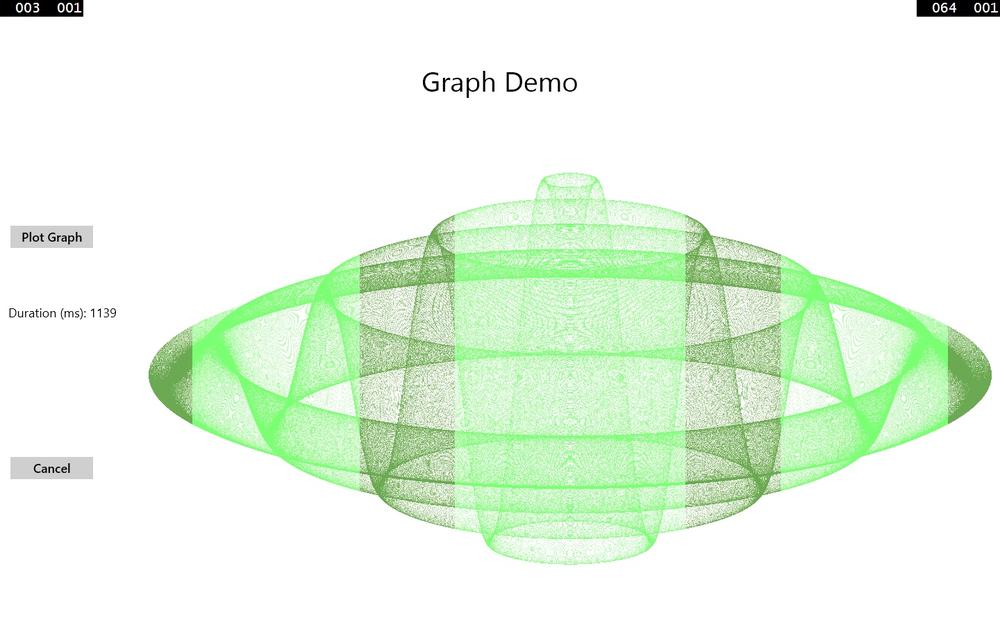
Please be patient. The application takes several seconds to generate and display the graph, and the application is unresponsive while this occurs (Chapter 24 explains why this is, and also instructs how to avoid this behavior). The following image shows the graph. Note the value in the Duration (ms) label in the following figure. In this case, the application took 4,938 milliseconds (ms) to plot the graph. Note that this duration does not include the time to actually render the graph, which might be another few seconds.
Click Plot Graph again, and take note of the time taken. Repeat this action several times to obtain an average value.
Note
You might find that occasionally it takes an extended time for the graph to appear (more than 30 seconds). This tends to occur if you are running close to the memory capacity of your computer and Windows 8.1 has to page data between memory and disk. If you encounter this phenomenon, discard this time and do not include it when calculating your average.
Leave the application running and switch to the desktop. Right-click an empty area of the taskbar, and then, on the shortcut menu that appears, click Task Manager.
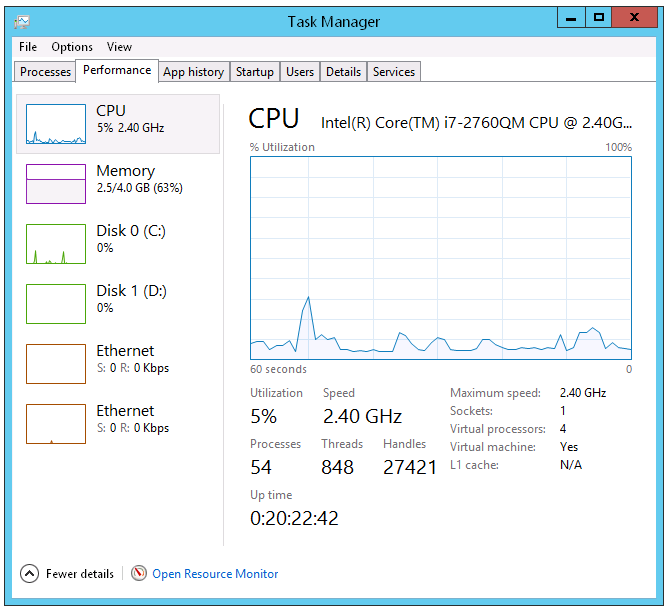
In the Task Manager window, click the Performance tab and display the CPU utilization. If the Performance tab is not visible, click More Details (it should appear). Right-click the CPU Utilization graph, point to Change Graph To, and then click Overall Utilization. This action causes Task Manager to display the utilization of all the processor cores running on your computer in a single graph. The following image shows the Performance tab of Task Manager configured in this way:
Return to the Graph Demo application and adjust the display to show the application in the main part of the screen with the desktop appearing in the left-hand side. Ensure that you can see the Task Manager window displaying the CPU utilization.
Wait for the CPU utilization to level off, and then, in the Graph Demo window, click Plot Graph.
Wait for the CPU utilization to level off again, and then click Plot Graph again.
Repeat Step 16 several times, waiting for the CPU utilization to level off between clicks.
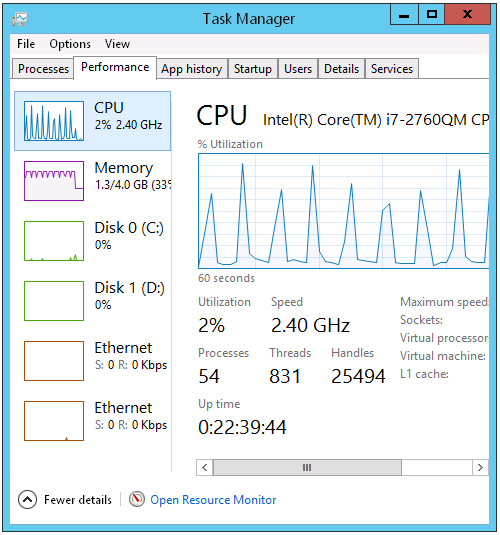
Switch to the Task Manager window and examine the CPU utilization. Your results will vary, but on a dual-core processor, the CPU utilization will probably be somewhere around 50–55 percent while the graph was being generated. On a quad-core machine, the CPU utilization will likely be somewhere between 25 and 30 percent, as shown in the image that follows. Note that other factors, such as the type of graphics card in your computer, can also impact the performance.
Return to Visual Studio 2013 and stop debugging.


You now have a baseline for the time the application takes to perform its calculations. However, it is clear from the CPU usage displayed by Task Manager that the application is not making full use of the processing resources available. On a dual-core machine, it is using just over half of the CPU power, and on a quad-core machine, it is employing a little over a quarter of the CPU. This phenomenon occurs because the application is single-threaded, and in a Windows application, a single thread can occupy only a single core on a multicore processor. To spread the load over all the available cores, you need to divide the application into tasks and arrange for each task to be executed by a separate thread running on a different core. This is what you will do in the following exercise.
Return to Visual Studio 2013, and display the GraphWindow.xaml.cs file in the Code and Text Editor window, if it is not already open.
Examine the generateGraphData method.
The purpose of this method is to populate the items in the data array. It iterates through the array by using the outer for loop based on the x loop control variable, highlighted in bold in the following example:
private void generateGraphData(byte[] data)
{
    int a = pixelWidth / 2;
    int b = a * a;
    int c = pixelHeight / 2;
    for (int x = 0; x < a; x ++)
    {
        int s = x * x;
        double p = Math.Sqrt(b - s);
        for (double i = -p; i < p; i += 3)
        {
            double r = Math.Sqrt(s + i * i) / a;
            double q = (r - 1) * Math.Sin(24 * r);
            double y = i / 3 + (q * c);
            plotXY(data, (int)(-x + (pixelWidth / 2)), (int)(y + (pixelHeight / 2)));
            plotXY(data, (int)(x + (pixelWidth / 2)), (int)(y + (pixelHeight / 2)));
        }
    }
}
The calculation performed by one iteration of this loop is independent of the calculations performed by the other iterations. Therefore, it makes sense to partition the work performed by this loop and run different iterations on a separate processor.
Modify the definition of the generateGraphData method to take two additional int parameters called partitionStart and partitionEnd, as shown in bold in the following example:
private void generateGraphData(byte[] data, int partitionStart, int partitionEnd)
{
    ...
}
In the generateGraphData method, change the outer for loop to iterate between the values of partitionStart and partitionEnd, as shown here in bold:
private void generateGraphData(byte[] data, int partitionStart, int partitionEnd)
{
    ...
    for (int x = partitionStart; x < partitionEnd; x++)
    {
        ...
    }
}
In the Code and Text Editor window, add the following using directive to the list at the top of the GraphWindow.xaml.cs file:
using System.Threading.Tasks;In the plotButton_Click method, comment out the statement that calls the generateGraphData method and add the statement shown in bold in the following code that creates a Task object and starts it running:
...
Stopwatch watch = Stopwatch.StartNew();
// generateGraphData(data);
Task first = Task.Run(() => generateGraphData(data, 0, pixelWidth / 4));
...
The task runs the code specified by the lambda expression. The values for the partitionStart and partitionEnd parameters indicate that the Task object calculates the data for the first half of the graph. (The data for the complete graph consists of points plotted for the values between 0 and pixelWidth / 2.)
Add another statement that creates and runs a second Task object on another thread, as shown in the following bold-highlighted code:
...
Task first = Task.Run(() => generateGraphData(data, 0, pixelWidth / 4));
Task second = Task.Run(() => generateGraphData(data, pixelWidth / 4, pixelWidth / 2));
...
This Task object invokes the generateGraph method and calculates the data for the values between pixelWidth / 4 and pixelWidth / 2.
Add the following statement shown in bold that waits for both Task objects to complete their work before continuing:
Task second = Task.Run(() => generateGraphData(data, pixelWidth / 4, pixelWidth / 2));
Task.WaitAll(first, second);
...
On the Debug menu, click Start Debugging to build and run the application. Adjust the display to show the application in the main part of the screen with the desktop appearing in the left side. As before, ensure that you can see the Task Manager window displaying the CPU utilization in the snapped view.
In the Graph Demo window, click Plot Graph. In the Task Manager window, wait for the CPU utilization to level off.
Repeat step 10 several more times, waiting for the CPU utilization to level off between clicks. Make a note of the duration recorded each time you click the button and calculate the average.
You should see that the application runs significantly quicker than it did previously. On my computer, the typical time dropped to 2,951 milliseconds—a reduction in time of about 40 percent.
In most cases, the time required to perform the calculations will be cut by nearly half, but the application still has some single-threaded elements, such as the logic that actually displays the graph after the data has been generated. This is why the overall time is still more than half the time taken by the previous version of the application.
Switch to the Task Manager window.
You should see that the application uses more cores of the CPU. On my quad-core machine, the CPU usage peaked at approximately 50 percent each time I clicked Plot Graph. This is because the two tasks were each run on separate cores, but the remaining two cores were left unoccupied. If you have a dual-core machine, you will likely see processor utilization briefly reach 100 percent each time the graph is generated.
If you have a quad-core computer, you can increase the CPU utilization and reduce the time further by adding two more Task objects and dividing the work into four chunks in the plotButton_Click method, as shown here in bold:
...
Task first = Task.Run(() => generateGraphData(data, 0, pixelWidth / 8));
Task second = Task.Run(() => generateGraphData(data, pixelWidth / 8,
pixelWidth / 4));
Task third = Task.Run(() => generateGraphData(data, pixelWidth / 4,
pixelWidth * 3 / 8));
Task fourth = Task.Run(() => generateGraphData(data, pixelWidth * 3 / 8,
pixelWidth / 2));
Task.WaitAll(first, second, third, fourth);
...
If you have only a dual-core processor, you can still try this modification, and you should notice a small beneficial effect on the time. This is primarily because of the way in which the algorithms used by the CLR optimize the way in which the threads for each task are scheduled.

Abstracting tasks by using the Parallel class
By using the Task class, you have complete control over the number of tasks your application creates. However, you had to modify the design of the application to accommodate the use of Task objects. You also had to add code to synchronize operations; the application can render the graph only when all the tasks have completed. In a complex application, synchronization of tasks can become a nontrivial process and it is easy to make mistakes.
With the Parallel class, you can parallelize some common programming constructs without requiring that you redesign an application. Internally, the Parallel class creates its own set of Task objects, and it synchronizes these tasks automatically when they have completed. The Parallel class is located in the System.Threading.Tasks namespace and provides a small set of static methods which you can use to indicate that code should be run in parallel if possible. These methods are as follows:
Parallel.For. You can use this method in place of a C# for statement. It defines a loop in which iterations can run in parallel by using tasks. This method is heavily overloaded (there are nine variations), but the general principle is the same for each: you specify a start value, an end value, and a reference to a method that takes an integer parameter. The method is executed for every value between the start value and one below the end value specified, and the parameter is populated with an integer that specifies the current value. For example, consider the following simple for loop that performs each iteration in sequence:
for (int x = 0; x < 100; x++)
{
    // Perform loop processing
}
Depending on the processing performed by the body of the loop, you might be able to replace this loop with a Parallel.For construct that can perform iterations in parallel, like this:
Parallel.For(0, 100, performLoopProcessing);
...
private void performLoopProcessing(int x)
{
    // Perform loop processing
}
Using the overloads of the Parallel.For method, you can provide local data that is private to each thread, specify various options for creating the tasks run by the For method, and create a ParallelLoopState object that can be used to pass state information to other concurrent iterations of the loop. (Using a ParallelLoopState object is described later in this chapter.)
Parallel.ForEach<T>. You can use this method in place of a C# foreach statement. Like the For method, ForEach defines a loop in which iterations can run in parallel. You specify a collection that implements the IEnumerable<T> generic interface and a reference to a method that takes a single parameter of type T. The method is executed for each item in the collection, and the item is passed as the parameter to the method. Overloads are available with which you can provide private local thread data and specify options for creating the tasks run by the ForEach method.
Parallel.Invoke. You can use this method to execute a set of parameterless method calls as parallel tasks. You specify a list of delegated method calls (or lambda expressions) that take no parameters and do not return values. Each method call can be run on a separate thread, in any order. For example, the following code makes a series of method calls:
doWork();
doMoreWork();
doYetMoreWork();
You can replace these statements with the following code, which invokes these methods by using a series of tasks:
Parallel.Invoke(
    doWork,
    doMoreWork,
    doYetMoreWork
);
You should bear in mind that the Parallel class determines the actual degree of parallelism appropriate for the environment and workload of the computer. For example, if you use Parallel.For to implement a loop that performs 1,000 iterations, the Parallel class does not necessarily create 1,000 concurrent tasks (unless you have an exceptionally powerful processor with 1,000 cores). Instead, the Parallel class creates what it considers to be the optimal number of tasks that balances the available resources against the requirement to keep the processors occupied. A single task might perform multiple iterations, and the tasks coordinate with each other to determine which iterations each task will perform. An important consequence of this is that you cannot guarantee the order in which the iterations are executed, so you must ensure that there are no dependencies between iterations; otherwise, you might encounter unexpected results, as you will see later in this chapter.
In the next exercise, you will return to the original version of the GraphData application and use the Parallel class to perform operations concurrently.
Using Visual Studio 2013, open the GraphDemo solution, which is located in the Microsoft PressVisual CSharp Step By StepChapter 23Parallel GraphDemo folder in your Documents folder.
This is a copy of the original GraphDemo application. It does not use tasks yet.
In Solution Explorer, in the GraphDemo project, expand the GraphWindow.xaml node, and then double-click GraphWindow.xaml.cs to display the code for the form in the Code and Text Editor window.
Add the following using directive to the list at the top of the file:
using System.Threading.Tasks;Locate the generateGraphData method. It looks like this:
private void generateGraphData(byte[] data)
{
    int a = pixelWidth / 2;
    int b = a * a;
    int c = pixelHeight / 2;
    for (int x = 0; x < a; x++)
    {
        int s = x * x;
        double p = Math.Sqrt(b - s);
        for (double i = -p; i < p; i += 3)
        {
            double r = Math.Sqrt(s + i * i) / a;
            double q = (r - 1) * Math.Sin(24 * r);
            double y = i / 3 + (q * c);
            plotXY(data, (int)(-x + (pixelWidth / 2)), (int)(y + (pixelHeight / 2)));
            plotXY(data, (int)(x + (pixelWidth / 2)), (int)(y + (pixelHeight / 2)));
        }
    }
}
The outer for loop that iterates through values of the integer variable x is a prime candidate for parallelization. You might also consider the inner loop based on the variable i, but this loop takes more effort to parallelize because of the type of i. (The methods in the Parallel class expect the control variable to be an integer.) Additionally, if you have nested loops such as those that occur in this code, it is good practice to parallelize the outer loops first and then test to see whether the performance of the application is sufficient. If it is not, work your way through nested loops and parallelize them working from outer to inner loops, testing the performance after modifying each one. You will find that in many cases parallelizing outer loops has the most impact on performance, whereas the effects of modifying inner loops becomes more marginal.
Cut the code in the body of the for loop, and create a new private void method called calculateData with this code. The calculateData method should take an int parameter called x and a byte array called data. Also, move the statements that declare the local variables a, b, and c from the generateGraphData method to the start of the calculateData method. The following code shows the generateGraphData method with this code removed and the calculateData method (do not try to compile this code yet):
private void generateGraphData(byte[] data)
{
    for (int x = 0; x < a; x++)
    {
    }
}
private void calculateData(int x, byte[] data)
{
    int a = pixelWidth / 2;
    int b = a * a;
    int c = pixelHeight / 2;
    int s = x * x;
    double p = Math.Sqrt(b - s);
    for (double i = -p; i < p; i += 3)
    {
        double r = Math.Sqrt(s + i * i) / a;
        double q = (r - 1) * Math.Sin(24 * r);
        double y = i / 3 + (q * c);
        plotXY(data, (int)(-x + (pixelWidth / 2)), (int)(y + (pixelHeight / 2)));
        plotXY(data, (int)(x + (pixelWidth / 2)), (int)(y + (pixelHeight / 2)));
    }
}
In the generateGraphData method, change the for loop to a statement that calls the static Parallel.For method, as shown in bold in the following code:
private void generateGraphData(byte[] data)
{
    Parallel.For(0, pixelWidth / 2, x => calculateData(x, data));
}
This code is the parallel equivalent of the original for loop. It iterates through the values from 0 to pixelWidth / 2 – 1 inclusive. Each invocation runs by using a task, and each task might run more than one iteration. The Parallel.For method finishes only when all the tasks it has created complete their work. Remember that the Parallel.For method expects the final parameter to be a method that takes a single integer parameter. It calls this method passing the current loop index as the parameter. In this example, the calculateData method does not match the required signature because it takes two parameters: an integer and a byte array. For this reason, the code uses a lambda expression that acts as an adapter that calls the calculateData method with the appropriate arguments.
On the Debug menu, click Start Debugging to build and run the application.
In the Graph Demo window, click Plot Graph. When the graph appears in the Graph Demo window, record the time taken to generate the graph. Repeat this action several times to get an average value.
You should notice that the application runs at a comparable speed to the previous version that used Task objects (and possibly slightly faster, depending on the number of CPUs you have available). If you examine Task Manager, you should notice that the CPU usage peaks closer to 100 percent regardless of whether you have a dual-core or quad-core computer.
Return to Visual Studio and stop debugging.
When not to use the Parallel class
You should be aware that despite appearances and the best efforts of the .NET Framework development team at Microsoft, the Parallel class is not magic—you cannot use it without due consideration and just expect your applications to suddenly run significantly faster and produce the same results. The purpose of the Parallel class is to parallelize compute-bound, independent areas of your code.
If your code is not compute-bound, parallelizing it might not improve performance. The overhead of creating a task, running this task on a separate thread, and waiting for the task to complete is likely to be greater than the cost of running this method directly. The additional overhead might account for only a few milliseconds each time a method is called, but you should bear in mind the number of times that a method runs. If the method call is located in a nested loop and is executed thousands of times, all of these small overhead costs will add up. The general rule is to use Parallel.Invoke only when it is worthwhile. You should reserve Parallel.Invoke for operations that are computationally intensive; otherwise, the overhead of creating and managing tasks can actually slow down an application.
The other key consideration for using the Parallel class is that parallel operations should be independent. For example, if you attempt to use Parallel.For to parallelize a loop in which iterations have a dependency on each other, the results will be unpredictable.
To see what I mean, look at the following code:
using System;
using System.Threading;
using System.Threading.Tasks;
namespace ParallelLoop
{
    class Program
    {
        private static int accumulator = 0;
        static void Main(string[] args)
        {
            for (int i = 0; i < 100; i++)
            {
                AddToAccumulator(i);
            }
            Console.WriteLine("Accumulator is {0}", accumulator);
        }
        private static void AddToAccumulator(int data)
        {
            if ((accumulator % 2) == 0)
            {
                accumulator += data;
            }
            else
            {
                accumulator -= data;
            }
        }
    }
}
This program iterates through the values from 0 to 99 and calls the AddToAccumulator method with each value in turn. The AddToAccumulator method examines the current value of the accumulator variable and, if it is even, adds the value of the parameter to the accumulator variable; otherwise, it subtracts the value of the parameter. At the end of the program, the result is displayed. You can find this application in the ParallelLoop solution, which is located in the Microsoft PressVisual CSharp Step By StepChapter 23ParallelLoop folder in your Documents folder. If you run this program, the value output should be –100.
To increase the degree of parallelism in this simple application, you might be tempted to replace the for loop in the Main method with Parallel.For, like this:
static void Main(string[] args)
{
    Parallel.For (0, 100, AddToAccumulator);
    Console.WriteLine("Accumulator is {0}", accumulator);
}
However, there is no guarantee that the tasks created to run the various invocations of the AddToAccumulator method will execute in any specific sequence. (The code is also not thread-safe because multiple threads running the tasks might attempt to modify the accumulator variable concurrently.) The value calculated by the AddToAccumulator method depends on the sequence being maintained, so the result of this modification is that the application might now generate different values each time it runs. In this simple case, you might not actually see any difference in the value calculated because the AddToAccumulator method runs very quickly and the .NET Framework might elect to run each invocation sequentially by using the same thread. However, if you make the following change (shown in bold) to the AddToAccumulator method, you will get different results:
private static void AddToAccumulator(int data)
{
    if ((accumulator % 2) == 0)
    {
        accumulator += data;
        Thread.Sleep(10); // wait for 10 milliseconds
    }
    else
    {
        accumulator -= data;
    }
}
The Thread.Sleep method simply causes the current thread to wait for the specified period of time. This modification simulates the thread, performing additional processing, and affects the way in which the Parallel class schedules the tasks, which now run on different threads, resulting in a different sequence.
The general rule is to use Parallel.For and Parallel.ForEach only if you can guarantee that each iteration of the loop is independent, and test your code thoroughly. A similar consideration applies to Parallel.Invoke: use this construct to make method calls only if they are independent and the application does not depend on them being run in a particular sequence.
Canceling tasks and handling exceptions
A common requirement of applications that perform long-running operations is the ability to stop those operations if necessary. However, you should not simply abort a task because this could leave the data in your application in an indeterminate state. Instead, the Task class implements a cooperative cancellation strategy. Cooperative cancellation enables a task to select a convenient point at which to stop processing and also enables it to undo any work it has performed prior to cancellation if necessary.
The mechanics of cooperative cancellation
Cooperative cancellation is based on the notion of a cancellation token. A cancellation token is a structure that represents a request to cancel one or more tasks. The method that a task runs should include a System.Threading.CancellationToken parameter. An application that wants to cancel the task sets the Boolean IsCancellationRequested property of this parameter to true. The method running in the task can query this property at various points during its processing. If this property is set to true at any point, it knows that the application has requested that the task be canceled. Also, the method knows what work it has done so far, so it can undo any changes if necessary and then finish. Alternatively, the method can simply ignore the request and continue running.
Tip
You should examine the cancellation token in a task frequently, but not so frequently that you adversely impact the performance of the task. If possible, you should aim to check for cancellation at least every 10 milliseconds, but no more frequently than every millisecond.
An application obtains a CancellationToken by creating a System.Threading.CancellationTokenSource object and querying the Token property of this object. The application can then pass this CancellationToken object as a parameter to any methods started by tasks that the application creates and runs. If the application needs to cancel the tasks, it calls the Cancel method of the CancellationTokenSource object. This method sets the IsCancellationRequested property of the CancellationToken passed to all the tasks.
The code example that follows shows how to create a cancellation token and use it to cancel a task. The initiateTasks method instantiates the cancellationTokenSource variable and obtains a reference to the CancellationToken object available through this variable. The code then creates and runs a task that executes the doWork method. Later on, the code calls the Cancel method of the cancellation token source, which sets the cancellation token. The doWork method queries the IsCancellationRequested property of the cancellation token. If the property is set, the method terminates; otherwise, it continues running.
public class MyApplication
{
    ...
    // Method that creates and manages a task
    private void initiateTasks()
    {
        // Create the cancellation token source and obtain a cancellation token
        CancellationTokenSource cancellationTokenSource = new CancellationTokenSource();
        CancellationToken cancellationToken = cancellationTokenSource.Token;
        // Create a task and start it running the doWork method
        Task myTask = Task.Run(() => doWork(cancellationToken));
        ...
        if (...)
        {
            // Cancel the task
            cancellationTokenSource.Cancel();
        }
        ...
   }
   // Method run by the task
   private void doWork(CancellationToken token)
   {
       ...
       // If the application has set the cancellation token, finish processing
       if (token.IsCancellationRequested)
       {
            // Tidy up and finish
           ...
           return;
       }
       // If the task has not been canceled, continue running as normal
       ...
   }
}
As well as providing a high degree of control over the cancellation processing, this approach is scalable across any number of tasks; you can start multiple tasks and pass the same CancellationToken object to each of them. If you call Cancel on the CancellationTokenSource object, each task will check that the IsCancellationRequested property has been set and proceed accordingly.
You can also register a callback method (in the form of an Action delegate) with the cancellation token by using the Register method. When an application invokes the Cancel method of the corresponding CancellationTokenSource object, this callback runs. However, you cannot guarantee when this method executes; it might be before or after the tasks have performed their own cancellation processing, or even during that process.
...
cancellationToken,Register(doAdditionalWork);
...
private void doAdditionalWork()
{
    // Perform additional cancellation processing
}
In the next exercise, you will add cancellation functionality to the GraphDemo application.
Using Visual Studio 2013, open the GraphDemo solution, which is located in the Microsoft PressVisual CSharp Step By StepChapter 23GraphDemo With Cancellation folder in your Documents folder.
This is a completed copy of the GraphDemo application from the earlier exercise that uses tasks to improve processing throughput. The user interface also includes a button named cancelButton that the user will be able to use to stop the tasks that calculate the data for the graph.
In Solution Explorer, in the GraphDemo project, double-click GraphWindow.xaml to display the form in the Design View window. Note the Cancel button that appears in the left pane of the form.
Open the GraphWindow.xaml.cs file in the Code and Text Editor window. Locate the cancelButton_Click method.
This method runs when the user clicks Cancel. It is currently empty.
Add the following using directive to the list at the top of the file:
using System.Threading;The types used by cooperative cancellation reside in this namespace.
Add a CancellationTokenSource field called tokenSource to the GraphWindow class, and initialize it to null, as shown in the following code in bold:
public class GraphWindow : Page
{
    ...
    private byte redValue, greenValue, blueValue;
    private CancellationTokenSource tokenSource = null;
    ...
}
Find the generateGraphData method and add a CancellationToken parameter called token to the method definition, as shown here in bold:
private void generateGraphData(byte[] data, int partitionStart, int partitionEnd,
CancellationToken token)
{
     ...
}
In the generateGraphData method, at the start of the inner for loop, add the following code shown in bold to check whether cancellation has been requested. If so, return from the method; otherwise, continue calculating values and plotting the graph.
private void generateGraphData(byte[] data, int partitionStart, int partitionEnd,
CancellationToken token)
{
    int a = pixelWidth / 2;
    int b = a * a;
    int c = pixelHeight / 2;
    for (int x = partitionStart; x < partitionEnd; x ++)
    {
        int s = x * x;
        double p = Math.Sqrt(b - s);
        for (double i = -p; i < p; i += 3)
        {
            if (token.IsCancellationRequested)
            {
                return;
            }
            double r = Math.Sqrt(s + i * i) / a;
            double q = (r - 1) * Math.Sin(24 * r);
            double y = i / 3 + (q * c);
            plotXY(data, (int)(-x + (pixelWidth / 2)), (int)(y + (pixelHeight / 2)));
            plotXY(data, (int)(x + (pixelWidth / 2)), (int)(y + (pixelHeight / 2)));
       }
   }
}
In the plotButton_Click method, add the following statements shown in bold that instantiate the tokenSource variable and retrieve the CancellationToken object into a variable called token:
private void plotButton_Click(object sender, RoutedEventArgs e)
{
    Random rand = new Random();
    redValue = (byte)rand.Next(0xFF);
    greenValue = (byte)rand.Next(0xFF);
    blueValue = (byte)rand.Next(0xFF);
    tokenSource = new CancellationTokenSource();
    CancellationToken token = tokenSource.Token;
    ...
}
Modify the statements that create and run the two tasks, and pass the token variable as the final parameter to the generateGraphData method:
...
Task first = Task.Run(() => generateGraphData(data, 0, pixelWidth / 4,
token));
Task second = Task.Run(() => generateGraphData(data, pixelWidth / 4,
pixelWidth / 2, token));
...
Edit the definition of the plotButton_Click method and add the async modifier as shown in bold here:
private async void plotButton_Click(object sender, RoutedEventArgs e)
{
    ...
}
In the body of the plotButton_Click method, comment out the Task.WaitAll statement that waits for the tasks to complete and replace it with the following statements in bold that use the await operator, instead.
...
// Task.WaitAll(first, second);
await first;
await second;
duration.Text = string.Format(...);
...
The changes in these two steps are necessary because of the single-threaded nature of the Windows user interface. Under normal circumstances, when an event handler for a user interface component such as a button starts running, event handlers for other user interface components are blocked until the first event handler completes (even if the event handler is using tasks). In this example, using the Task.WaitAll method to wait for the tasks to complete would render the Cancel button useless, because the event handler for the Cancel button will not run until the handler for the Plot Graph button completes, in which case there is no point in attempting to cancel the operation. In fact, as mentioned earlier, when you click the Plot Graph button the user interface is completely unresponsive until the graph appears and the plotButton_Click method finishes.
The await operator is designed to handle situations such as this. You can use this operator only inside a method marked as async. Its purpose is to release the current thread and wait for a task to complete in the background. When that task finishes, control returns to the method, which continues with the next statement. In this example, the two await statements simply allow each of the tasks to complete in the background. After the second task has finished, the method continues, displaying the time taken for these tasks to complete in the duration TextBlock. Note that it is not an error to await for a task that has already completed; the await operator will simply return immediately and pass control to the following statement.
More Info
Chapter 24 discusses the async modifier and the await operator in detail.
Find the cancelButton_Click method. Add to this method the code shown here in bold:
private void cancelButton_Click(object sender, RoutedEventArgs e)
{
    if (tokenSource != null)
    {
        tokenSource.Cancel();
    }
}
This code checks that the tokenSource variable has been instantiated. If it has, the code invokes the Cancel method on this variable.
On the Debug menu, click Start Debugging to build and run the application.
In the GraphDemo window, click Plot Graph, and verify that the graph appears as it did before. However, you should notice that it takes slightly longer to generate the graph than before. This is because of the additional check performed by the generateGraphData method.
Click Plot Graph again, and then quickly click Cancel.
If you are quick and click Cancel before the data for the graph is generated, this action causes the methods being run by the tasks to return. The data is not complete, so the graph appears with “holes,” as shown in the following figure. (The previous graph should still be visible where these holes occur, and the size of the holes depends on how quickly you clicked Cancel.)
You can determine whether a task completed or was canceled by examining the Status property of the Task object. The Status property contains a value from the System.Threading.Tasks.TaskStatus enumeration. The following list describes some of the status values that you might commonly encounter (there are others):
Created. This is the initial state of a task. It has been created but has not yet been scheduled to run.
WaitingToRun. The task has been scheduled but has not yet started to run.
Running. The task is currently being executed by a thread.
RanToCompletion. The task completed successfully without any unhandled exceptions.
Canceled. The task was canceled before it could start running, or it acknowledged cancellation and completed without throwing an exception.
Faulted. The task terminated because of an exception.
In the next exercise, you will attempt to report the status of each task so that you can see when they have completed or have been canceled.
In Visual Studio, display the GraphWindow.xaml file in the Design View window. In the XAML pane, add the following markup to the definition of the GraphWindow form before the penultimate </Grid> tag, as shown in the following in bold:
                   <Image x:Name="graphImage" Grid.Column="1" Stretch="Fill" />
                </Grid>
                <TextBlock x:Name="messages" Grid.Row="4" FontSize="18" HorizontalAlignment="Left"/>
            </Grid>
        </Grid>
    </ScrollViewer>
</Page>
This markup adds a TextBlock control named messages to the bottom of the form.
Display the GraphWindow.xaml.cs file in the Code and Text Editor window and find the plotButton_Click method.
Add to this method the code in bold that follows. These statements generate a string that contains the status of each task after it has finished running, and then they display this string in the messages TextBlock control at the bottom of the form.
private async void plotButton_Click(object sender, RoutedEventArgs e)
{
    ...
    await first;
    await second;
    duration.Text = string.Format(...);
    string message = string.Format("Status of tasks is {0}, {1}",
        first.Status, second.Status);
    messages.Text = message;
    ...
}
On the Debug menu, click Start Debugging.
In the GraphDemo window, click Plot Graph but do not click Cancel. Verify that the message displayed reports that the status of the tasks is RanToCompletion (two times).
In the GraphDemo window, click Plot Graph again, and then quickly click Cancel.
Surprisingly, the message that appears still reports the status of each task as RanToCompletion, even though the graph appears with holes.
This behavior occurs because although you sent a cancellation request to each task by using the cancellation token, the methods they were running simply returned. The .NET Framework runtime does not know whether the tasks were actually canceled or whether they were allowed to run to completion, and it simply ignored the cancellation requests.

So, how do you indicate that a task has been canceled rather than allowed to run to completion? The answer lies in the CancellationToken object passed as a parameter to the method that the task is running. The CancellationToken class provides a method called ThrowIfCancellationRequested. This method tests the IsCancellationRequested property of a cancellation token; if it is true, the method throws an OperationCanceledException exception and aborts the method that the task is running.
The application that started the thread should be prepared to catch and handle this exception, but this leads to another question. If a task terminates by throwing an exception, it actually reverts to the Faulted state. This is true, even if the exception is an OperationCanceledException exception. A task enters the Canceled state only if it is canceled without throwing an exception. So, how does a task throw an OperationCanceledException without it being treated as an exception?
This time, the answer lies in the task itself. For a task to recognize that an OperationCanceledException exception is the result of canceling the task in a controlled manner and not just an exception caused by other circumstances, it has to know that the operation has actually been canceled. It can do this only if it can examine the cancellation token. You passed this token as a parameter to the method run by the task, but the task does not actually check any of these parameters. Instead, you specify the cancellation token when you create and run the task. The code that follows shows an example based on the GraphDemo application. Notice how the token parameter is passed to the generateGraphData method (as before), but also as a separate parameter to the Run method.
tokenSource = new CancellationTokenSource();
CancellationToken token = tokenSource.Token;
...
Task first = Task.Run(() => generateGraphData(data, 0, pixelWidth / 4, token),
token);
Now, when the method being run by the task throws an OperationCanceledException exception, the infrastructure behind the task examines the CancellationToken. If it indicates that the task has been canceled, the infrastructure sets the status of the task to Canceled. If you are using the await operator to wait for the tasks to complete, you also need to be prepared to catch and handle the OperationCanceledException exception. This is what you will do in the next exercise.
In Visual Studio, return to the Code and Text Editor window displaying the GraphWindow.xaml.cs file. In the plotButton_Click method, modify the statements that create and run the tasks and specify the CancellationToken object as the second parameter to the Run method, as shown in bold in the following code:
private async void plotButton_Click(object sender, RoutedEventArgs e)
{
    ...
    tokenSource = new CancellationTokenSource();
    CancellationToken token = tokenSource.Token;
    ...
    Task first = Task.Run(() => generateGraphData(data, 0, pixelWidth / 4,
token), token);
    Task second = Task.Run(() => generateGraphData(data, pixelWidth / 4,
pixelWidth / 2, token), token);
    ...
}
Add a try block around the statements that create and run the tasks, wait for them to complete, and display the elapsed time. Add a catch block that handles the OperationCanceledException exception. In this exception handler, display the reason for the exception reported in the Message property of the exception object in the duration TextBlock control. The following code shown in bold highlights the changes you should make:
private async void plotButton_Click(object sender, RoutedEventArgs e)
{
    ...
    try
    {
        await first;
        await second;
        duration.Text = string.Format("Duration (ms): {0}", watch.ElapsedMilliseconds);
    }
    catch (OperationCanceledException oce)
    {
        duration.Text = oce.Message;
    }
    string message = string.Format(...);
    ...
}
In the generateDataForGraph method, comment out the if statement that examines the IsCancellationProperty of the CancellationToken object and add a statement that calls the ThrowIfCancellationRequested method, as shown here in bold:
private void generateDataForGraph(byte[] data, int partitionStart, int partitionEnd,
CancellationToken token)
{
   ...
    for (int x = partitionStart; x < partitionEnd; x++);
    {
        ...
        for (double i = -p; I < p; i += 3)
        {
            //if (token.IsCancellationRequired)
            //{
            //    return;
            //}
            token.ThrowIfCancellationRequested();
            ...
        }
     }
     ...
}
On the Debug menu, click Exceptions. In the Exceptions dialog box, clear the User-unhandled check box for Common Language Runtime Exceptions, and then click OK.
This configuration is necessary to prevent the Visual Studio debugger from intercepting the OperationCanceledException exception that you will generate when you run the application in debug mode.
On the Debug menu, click Start Debugging.
In the Graph Demo window, click Plot Graph, wait for the graph to appear, and verify that the status of both tasks is reported as RanToCompletion and the graph is generated.
Click Plot Graph again, and then quickly click Cancel.
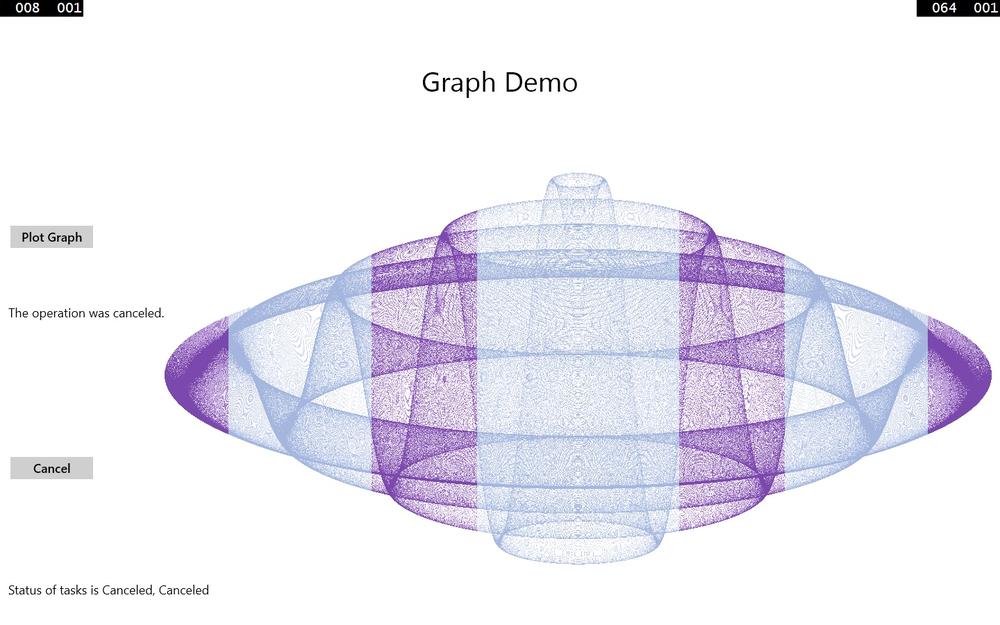
If you are quick, the status of one or both tasks should be reported as Canceled, the duration TextBox control should display the text “The operation was canceled,” and the graph should be displayed with holes. If you were not quick enough, repeat this step to try again.
Return to Visual Studio and stop debugging.
On the Debug menu, click Exceptions. In the Exceptions dialog box, select the User-unhandled check box for Common Language Runtime Exceptions, and then click OK.

Using continuations with canceled and faulted tasks
If you need to perform additional work when a task is canceled or raises an unhandled exception, remember that you can use the ContinueWith method with the appropriate TaskContinuationOptions value. For example, the following code creates a task that runs the method doWork. If the task is canceled, the ContinueWith method specifies that another task should be created and run the method doCancellationWork. This method can perform some simple logging or tidying up. If the task is not canceled, the continuation does not run.
Task task = new Task(doWork);
task.ContinueWith(doCancellationWork, TaskContinuationOptions.OnlyOnCanceled);
task.Start();
...
private void doWork()
{
    // The task runs this code when it is started
    ...
}
...
private void doCancellationWork(Task task)
{
    // The task runs this code when doWork completes
    ...
}
Similarly, you can specify the value TaskContinuationOptions.OnlyOnFaulted to specify a continuation that runs if the original method run by the task raises an unhandled exception.
Summary
In this chapter, you learned why it is important to write applications that can scale across multiple processors and processor cores. You saw how to use the Task class to run operations in parallel, and how to synchronize concurrent operations and wait for them to complete. You learned how to use the Parallel class to parallelize some common programming constructs, and you also saw when it is inappropriate to parallelize code. You used tasks and threads together in a graphical user interface to improve responsiveness and throughput, and you saw how to cancel tasks in a clean and controlled manner.
If you want to continue to the next chapter, keep Visual Studio 2013 running, and turn to Chapter 24.
If you want to exit Visual Studio 2013 now, on the File menu, click Exit. If you see a Save dialog box, click Yes and save the project.