Chapter 5. Device management
Enterprise companies today are more than ever facing the challenges presented by the BYOD trend and searching for ways to support users who bring their own devices to work while at the same time struggling with how to protect company data. To do this, employees must allow company IT departments to manage some aspects of their personal devices to ensure the security of corporate data and compliance with company policies. In general, more and more employees are beginning to use their personal devices to perform some aspects of their daily jobs with the awareness that the company they work for will need to perform certain actions to safeguard company data, including applying security policies, installing software, and performing basic hardware and software inventories of their devices.
As the device management component of EMS, Microsoft Intune is a cloud-based management solution that enables organizations to provide their employees access to business apps and d ata from almost anywhere on almost any device, while also helping to keep company information secure. Using Microsoft Intune you can manage Windows computers and mobile devices including iOS, Android, Windows RT, and Windows Phones. You can deploy policies to help secure corporate data on phones and tablets, perform hardware and software inventories, distribute software, and retire or wipe mobile devices.
Microsoft Intune provides you with a wide range of general PC and device management capabilities as well as functions specific to each. This chapter focuses on preparing you to enroll devices into management with Microsoft Intune and then introduces you to the following device management features of the service: policies, inventory, and selective wipe functionality.
Tip
You can learn more about the Mobile Device Management capabilities of Microsoft Intune on TechNet at http://technet.microsoft.com/en-us/library/dn600287.aspx.
Preparing for device enrollment
Before you can begin managing devices with Microsoft Intune, you must first configure the service and ensure that you have planned and prepared for the device types that you want to support.
This section describes several key elements of the Microsoft Intune service that you should be familiar with and that you should plan for as you begin preparing to enroll devices into management, including setting the Mobile Device Management (MDM) authority, understanding the device-specific enrollment prerequisites that must be met before your users begin enrolling devices, understanding how to create device enrollment profiles, learning about the Company Portal and how to customize it to create a seamless experience for your users, and finally, understanding how to write and publish custom terms and conditions for use of the service to your users.
Mobile Device Management authority
Before you can enroll mobile devices and begin managing them with Microsoft Intune, you must first prepare the service to accept devices into management. You do this by selecting the check box on the Manage Mobile Devices dialog that is displayed when you select the Mobile Device Management authority setting on the Mobile Device Management page of the Administration workspace in the Microsoft Intune administration console, as shown in Figure 5-1.
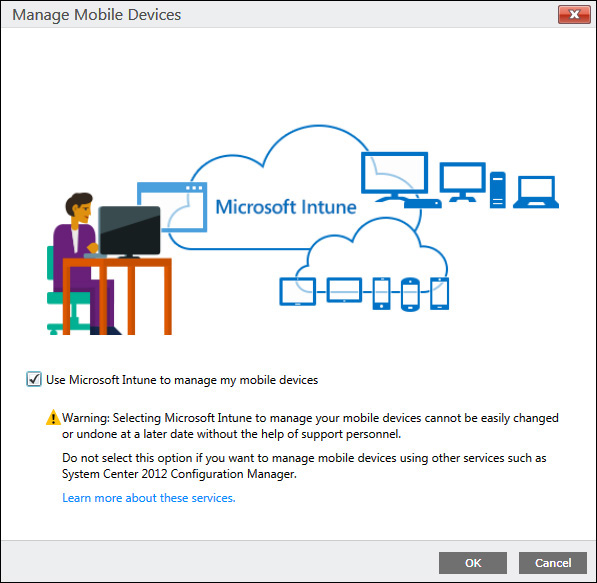
The Mobile Device Management authority setting determines whether you will manage mobile devices with Microsoft Intune or by using System Center 2012 Configuration Manager with Microsoft Intune integration.
Many organizations already use System Center Configuration Manager 2012 on-premises to manage servers, PCs, and other devices. In this situation, most organizations simply integrate Microsoft Intune with their existing Configuration Manager infrastructure to create a robust hybrid management solution for servers, PCs, and mobile devices when they purchase EMS or standalone Microsoft Intune subscription licenses. While the focus of this book is on using Microsoft Intune standalone, because that technology is included with EMS, you should also know that Microsoft Intune licensing provides non-perpetual use rights for on-premises use of System Center 2012 Configuration Manager and Endpoint Protection (SCEP) to manage as many as five devices per Microsoft Intune-licensed user. This means that you are entitled to install and use System Center 2012 Configuration Manager integrated with Microsoft Intune in a unified device management scenario for the duration of your valid Microsoft Intune subscription. However, if your Microsoft Intune subscription is not renewed in this licensing model, you will need to either stop using the on-premises software or purchase System Center 2012 Configuration Manager licenses.
Device management prerequisites
Before you can begin managing the different mobile device types supported for management with Microsoft Intune, you will most likely need to perform tasks that meet the operating system-specific requirements for the devices you need to support. For example, to manage iOS devices, you will need an Apple Push Notification service (APNs) certificate; to enroll Windows Phone 8.0 devices, you will need a code-signing certificate from Symantec. Other devices—such as Android devices, Windows RT devices, or Windows 8.1 computers enrolled as devices—have no specific device management prerequisites that must be met before your users can enroll them into management with Microsoft Intune.
There are other code-signing and key requirements that must be met when uploading signed application packages to deploy to devices using Microsoft Intune. This process, called sideloading, enables you to deploy line of business (LOB) apps to devices without having to go through a public application store. However, sideloading applications requires that you have the necessary code-signing certificate as well as sideloading keys obtained from the Microsoft Volume Licensing Service Center (VLSC) previously uploaded into the Microsoft Intune Admin Portal.
More Info
Sideloading apps is beyond the scope of this book, but you can learn more about it on TechNet at http://technet.microsoft.com/en-us/library/dn646972.aspx.
The information in this section will help you understand the requirements for iOS and Windows Phone devices as well as how to prepare the Microsoft Intune service to support and manage the mobile device types that your users are bringing to work.
Tip
The actual steps to configure the requirements in this section will be described in further detail in the next chapter.
Prepare to manage iOS devices
Before Microsoft Intune can be used to manage iOS devices, you must first obtain an APNs certificate. This certificate is used to establish an encrypted connection between the APNs and the MDM authority services hosted by Microsoft Intune to enable management of iOS devices.
Before you begin this process, you need an Apple ID associated with an email account from your company. Make sure that you will be able to access this account even if the person originally requesting the APNs certificate leaves the company. You will need that account ID and password not only when you first request the certificate but also when the APNs certificate needs to be renewed.
If your company does not already have an Apple ID to use, you can create an Apple ID at https://appleid.apple.com/account.
Configure DNS name resolution for Windows devices
There are several steps that need to be accomplished to manage Windows devices depending on the operating system that you need to support, but one thing these steps all have in common is the need to access an enrollment server during the enrollment process.
When your users try to enroll their devices, they will be prompted for their credentials and their devices must be able to access the enrollment server. Technically, they could manually enter their user names, passwords, and manage.microsoft.com to enroll their devices, but that will require all of your users to know the enrollment server name and how to use that name to enroll their devices. A better option is to simply create a CNAME DNS record with your domain registrar for the domain that you registered and that was previously verified in the Microsoft Azure administrator console, for use with your cloud services. Once that is completed, your users will need only their user names and passwords to enroll their Windows devices.
Prepare to manage Windows Phone 8.0 devices
Before you can enroll and manage a Windows Phone 8.0 device, you will need to purchase a code-signing certificate from Symantec using a Windows Phone app developer company publisher ID. You will need that code-signing certificate to sign the Company Portal app (ssp.xap) used by Windows Phone 8.0 devices during device enrollment as well as to sign any LOB apps that you want to deploy to Windows Phone devices.
To prepare for enrolling Windows Phone 8.0 devices, you need to download the Windows Phone 8.0 Company Portal app from the Microsoft download center, install the Windows Phone 8.0 SDK, code-sign the Company Portal app with SignTool.exe included with the SDK, and then upload the signed Company Portal app to the Microsoft Intune Admin Portal before enrolling any Windows Phone 8.0 devices.
Prepare to manage other Windows devices
At this point, you are ready to enroll the remaining supported Windows devices (currently Windows RT, Windows Phone 8.1 devices, and Windows 8.1 computers enrolled as devices) into management with Microsoft Intune without any further configuration required.
Remember that you will not be able to deploy (sideload) LOB applications to any of the Windows devices without first using a Symantec code-signing certificate to sign the application to be deployed and then using the sideloading keys as previously discussed. However, you can still enroll these Windows devices into management and deploy apps from the various app stores to them.
Device enrollment profiles
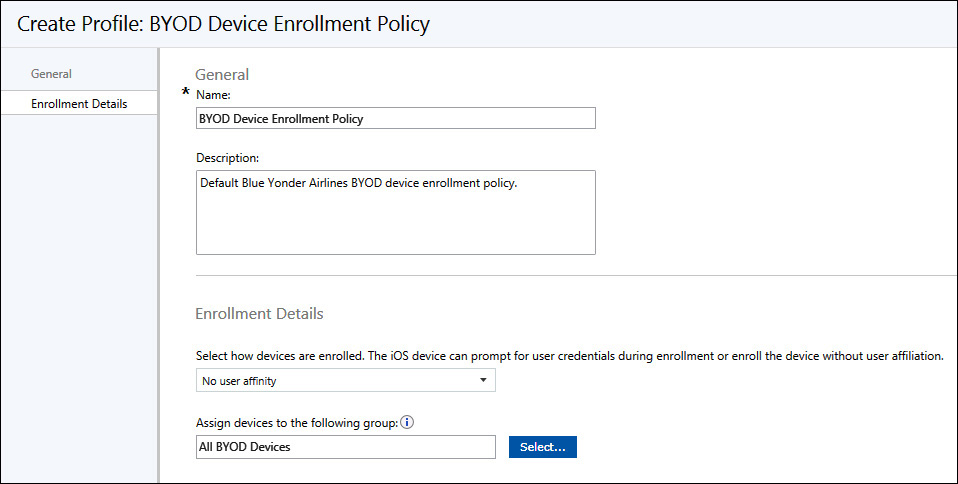
Device enrollment profiles are used by Microsoft Intune to control how devices are enrolled into the service. Using a device enrollment profile, you can predetermine which device group that devices will become members of and you can set user associations with newly enrolled BYOD devices. At least one device enrollment profile must be specified before devices can be enrolled in Microsoft Intune, so you must plan for, and create, a custom device group to use for the default enrollment profile before users begin enrolling their devices.
The first device enrollment profile you create automatically becomes the default policy applied to BYOD devices. Otherwise, you will need to specify which device enrollment profile to apply to devices enrolling in the service. The default profile will always be assigned to mobile devices enrolled in Microsoft Intune that don’t have another profile specified. Figure 5-2 shows an example Device Enrollment Policy configured to assign newly enrolled devices into the custom All BYOD Devices group.
The Company Portal
The Company Portal is available both as a website and as a mobile device app that is installed by users on BYOD devices. It enables users to search, browse, and install apps that administrators make available through the Microsoft Intune service; it also enables users to self-manage their devices and profiles. Apps displayed in the Company Portal can be accessed by enrolled devices whether you are connected to the company network or not.
The Company Portal app is available for Windows, Android, or iOS devices in each of the respective company’s app stores. Users must download and install the applicable version on their BYOD devices to self-enroll as many as five devices each into the Microsoft Intune management service and gain access to company-managed applications.
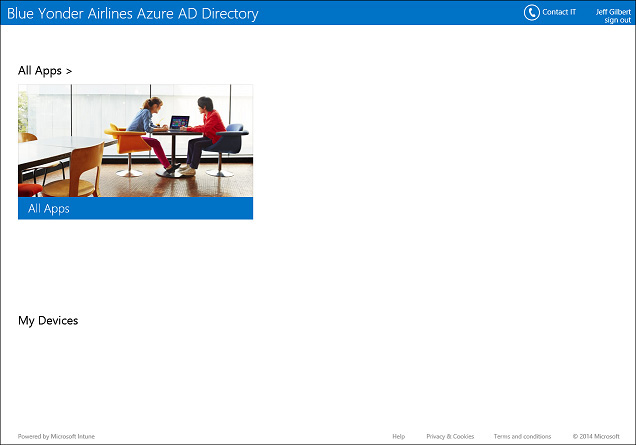
Regardless of the device type, or whether the portal is seen on the website or a mobile device app, the Company Portal is composed of three major sections, as shown in Figure 5-3:
![]() Apps In this section of the Company Portal, users can browse the apps that have been made available to them by their Microsoft Intune administrator. Apps can be sorted by new, by category, or they can simply view all available apps.
Apps In this section of the Company Portal, users can browse the apps that have been made available to them by their Microsoft Intune administrator. Apps can be sorted by new, by category, or they can simply view all available apps.
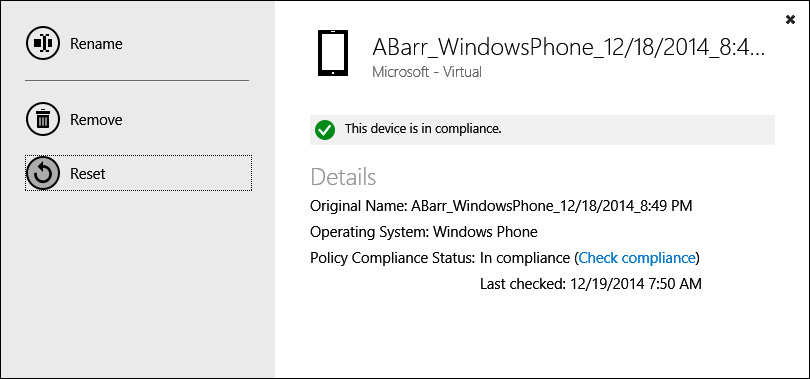
![]() My Devices This section of the Company Portal displays all of the devices that are currently enrolled into the Microsoft Intune service by the logged on user. As a logged on user, you can review the properties of each device, change the display name so that it is easier for you to recognize, perform a factory reset, remove the device from management, or force a policy synchronization to ensure your device has the most recent policy settings applied. You can also perform a remote wipe on certain device types.
My Devices This section of the Company Portal displays all of the devices that are currently enrolled into the Microsoft Intune service by the logged on user. As a logged on user, you can review the properties of each device, change the display name so that it is easier for you to recognize, perform a factory reset, remove the device from management, or force a policy synchronization to ensure your device has the most recent policy settings applied. You can also perform a remote wipe on certain device types.
![]() Contact IT In this section of the Company Portal, users can get helpdesk information so that they know whom to contact and how. This information includes not only the tech support person’s name but also their phone number, email links, and website information. You can also include additional tech support text to keep users informed of their troubleshooting options.
Contact IT In this section of the Company Portal, users can get helpdesk information so that they know whom to contact and how. This information includes not only the tech support person’s name but also their phone number, email links, and website information. You can also include additional tech support text to keep users informed of their troubleshooting options.
Customizing the Company Portal
Just as you need to customize the Azure App Panel to provide a smooth and company-centric experience for your users, you will probably want to do the same with the Company Portal. Many options are available for you to do just that from within the Microsoft Intune Admin Console. The customizations you make here apply equally to both the Company Portal App used by devices and the Company Portal website that is accessed by computers.
While the default Company Portal experience provides basic access to apps, device settings, and IT contact information, it is very basic and without any company branding. To avoid confusing your users and to provide a more seamless and branded experience, you can customize many aspects of the Company Portal, including additional information that will assist your users to get their jobs done and reduce the number of helpdesk calls they might otherwise make.
On the Microsoft Intune Admin Portal page at Admin, Company Portal, you can find the following sections and options for customizing the Company Portal experience for your Microsoft Intune service as described below:
![]() Specify Company Name, Company Contact Information And Privacy Statement. This section of the Company Portal settings allows you to customize the user experience by displaying the company name (displayed as the title of the Company Portal), IT Department Contact Name, IT Department Phone Number, IT Department Email Address, any additional tech support information you would like displayed (shown when a user clicks the Contact IT option in the top-right corner of the Company Portal), and a company privacy statement URL (this target URL will be opened when users click the Privacy link at the bottom of the Company Portal).
Specify Company Name, Company Contact Information And Privacy Statement. This section of the Company Portal settings allows you to customize the user experience by displaying the company name (displayed as the title of the Company Portal), IT Department Contact Name, IT Department Phone Number, IT Department Email Address, any additional tech support information you would like displayed (shown when a user clicks the Contact IT option in the top-right corner of the Company Portal), and a company privacy statement URL (this target URL will be opened when users click the Privacy link at the bottom of the Company Portal).
![]() Specify A Website That Users Can Contact For Support. This section of the customization page allows you to enter both an URL for a custom support website that is hidden from users as well as a website name title that is shown to them. Users can utilize this link to find ways to access online support without calling the helpdesk.
Specify A Website That Users Can Contact For Support. This section of the customization page allows you to enter both an URL for a custom support website that is hidden from users as well as a website name title that is shown to them. Users can utilize this link to find ways to access online support without calling the helpdesk.
![]() Customization. This section contains customization options similar to those used to customize the Microsoft Azure Access Panel in Azure AD. Here you can customize the Company Portal with your company logo (and the company name next to the logo if you want it there), a theme color, and either the default or white background for the Windows 8 Company Portal app.
Customization. This section contains customization options similar to those used to customize the Microsoft Azure Access Panel in Azure AD. Here you can customize the Company Portal with your company logo (and the company name next to the logo if you want it there), a theme color, and either the default or white background for the Windows 8 Company Portal app.
![]() Microsoft Intune Company Portal URLs. The last section of the Company Portal customization page displays the read-only Company Portal URLs that can be used to review your customizations in either the full Company Portal website (https://portal.manage.microsoft.com/) or the mobile Company Portal website (https://m.manage.microsoft.com/).
Microsoft Intune Company Portal URLs. The last section of the Company Portal customization page displays the read-only Company Portal URLs that can be used to review your customizations in either the full Company Portal website (https://portal.manage.microsoft.com/) or the mobile Company Portal website (https://m.manage.microsoft.com/).
Tip
You can learn more about customizing the Microsoft Intune Company Portal on TechNet at http://technet.microsoft.com/library/dn646983.aspx#BKMK_ConfigureCompanyPortal.
Custom company terms and conditions
In addition to providing a link to a custom privacy statement website at the bottom of the Company Portal, you can also publish custom terms and conditions that your users will see when they first log into the Company Portal. You can customize the terms and conditions for accessing the Company Portal on the terms and conditions page of the Microsoft Intune Admin Console at ADMIN, Company Portal, Terms And Conditions.
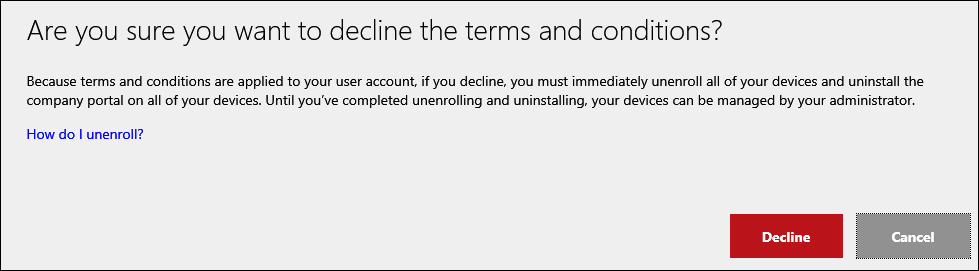
You can choose whether to force your users to accept the terms and conditions in order to access the Company Portal. If enforced, they will need to accept the terms to gain access regardless of whether the device they are using is already enrolled in management, but they will need to accept the terms and conditions only once regardless of how many devices they have enrolled into the Microsoft Intune service. If you require users to accept company terms and conditions, but they do not accept them, they will be denied access to the Company Portal and the apps and capabilities available there. They will also need to unenroll all of their devices in management, as shown in Figure 5-4.
You can easily update the terms and conditions to make a new version available at any time from within the Microsoft Intune Admin Console and require that users agree to the updated terms and conditions in order to continue accessing the Company Portal.
By using the built-in Terms and Conditions Report made available in the Reports workspace of the Admin Console, it is very easy to see which users have agreed to the terms and conditions, which version they agreed to, and when they agreed to them. If you need to keep a record of this information, you can also easily export it as either a .csv or .html file.
Deploying policies
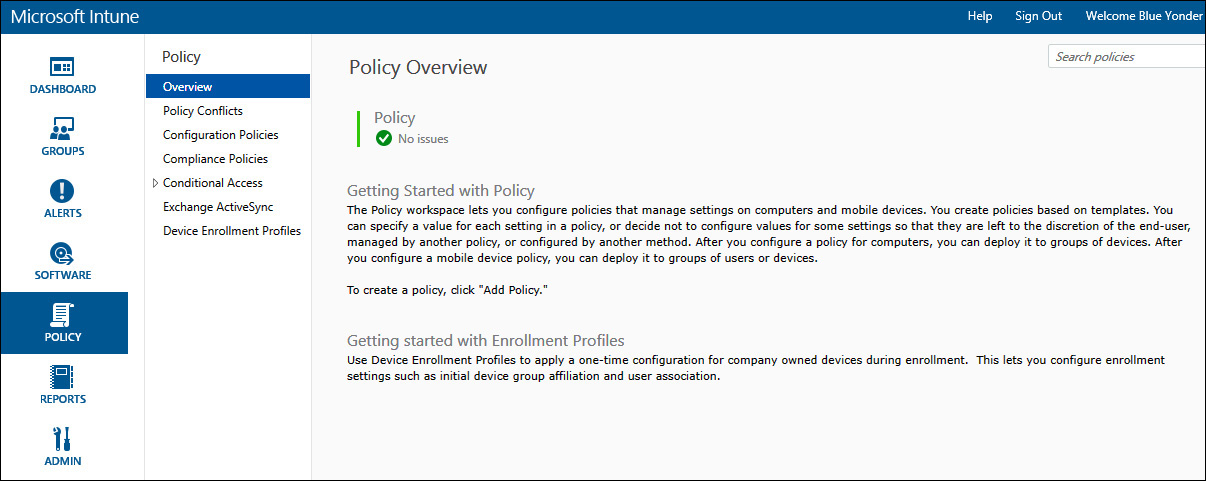
Microsoft Intune policies are really just groups of settings that control features on computers and mobile devices. These policies are easy to create and based on templates of either recommended or custom settings that enable you to configure common mobile device settings on Android, iOS, and Windows devices as well as configure software and computer management (including firewall settings) on PCs. You can also configure Conditional Access policies that block access to Microsoft Exchange email if the device in use is not enrolled into Microsoft Intune or not in compliance with other compliance policies that you set. You configure and deploy Microsoft Intune policies from within the Policy workspace in the Admin Console, as shown in Figure 5-5.
It is a good idea to create and deploy Microsoft Intune policies before your users begin enrolling their devices to ensure the process is as smooth as possible and they are not surprised when settings change after they enroll their devices into management. Read the following policy sections carefully and plan for the settings and policies that you will need to implement before you begin enrolling devices.
Tip
When you create a policy that uses the recommended settings, the name of the new policy is a combination of the template name, date, and time. When you edit the policy, the name updates with the time and date of the edit.
Configuration policies
Just as the name implies, Microsoft Intune configuration policies are used to manage expected configuration settings on computers and devices enrolled into the service. This section describes at a high level some of the available configuration policy capabilities of Microsoft Intune as an introduction to get you started planning for your deployment, but does not attempt to describe every policy template or setting in great detail.
More Info
You can learn more about the configuration policies available for Microsoft Intune, including software policy configurations, on TechNet at http://technet.microsoft.com/en-us/library/dn743712.aspx.
Common mobile device settings
This section of the Policy workspace in the Microsoft Intune Admin Console is where you configure the default Mobile Device Security Policy. This policy template contains Mobile Device Security Policy settings that are used to configure password settings and encryption requirements.
It’s probably a good idea to begin with this policy template as you start to plan how you will manage mobile devices in your enterprise. It covers most of the basic configuration requirements that enterprises want and need and it will apply to all mobile device types without the need to make separate configuration policies for each device type.
When you create and deploy a default Mobile Device Security Policy to your users, the following settings are enabled and applied by default:
![]() A password is required to unlock the mobile device. It can be either numeric or alphanumeric. If alphanumeric, it must include a minimum of one character set used (from the four available: uppercase, lowercase, symbols, or numbers).
A password is required to unlock the mobile device. It can be either numeric or alphanumeric. If alphanumeric, it must include a minimum of one character set used (from the four available: uppercase, lowercase, symbols, or numbers).
![]() The minimum password length is four characters.
The minimum password length is four characters.
![]() Simple passwords are not allowed (for example, passwords such as 1234 or 1111).
Simple passwords are not allowed (for example, passwords such as 1234 or 1111).
![]() The number of times an incorrect password can be entered before the device is automatically wiped is set to four.
The number of times an incorrect password can be entered before the device is automatically wiped is set to four.
![]() The time, in minutes, of inactivity that will be allowed before the screen turns off is set to 15.
The time, in minutes, of inactivity that will be allowed before the screen turns off is set to 15.
![]() Encryption is enforced on mobile devices.
Encryption is enforced on mobile devices.
![]() Devices that do not fully support the configured settings can still access Exchange ActiveSync. This should not be a problem with the default mobile device settings, but if you configure additional settings beyond the default settings, this setting might be necessary.
Devices that do not fully support the configured settings can still access Exchange ActiveSync. This should not be a problem with the default mobile device settings, but if you configure additional settings beyond the default settings, this setting might be necessary.
These are certainly not the only settings available to be configured in the default Mobile Device Security Policy, but they are the only ones that are enabled by default. These should be used as a baseline as you begin planning what policy settings you will need to configure to fully support the device types your users are bringing to work and what additional, device-specific configuration policies you will need to implement to meet your organizational goals and company security policy requirements.
More Info
You can read more about the available security policy settings on TechNet at http://technet.microsoft.com/en-us/library/dn646984.aspx.
Android devices
The configuration policies available for you to set for Android devices include the ability to specify apps that users should, or should not, use while enrolled in your Microsoft Intune service. To check compliance with this policy, you can view reports to see when noncompliant apps are installed or used. You can also configure kiosk mode for Android devices to lock them down and allow only certain features or applications to work.
Various profile options are also available to be configured for Android devices that make connecting to Exchange ActiveSync email (for Samsung KNOX 4.0 and later devices) possible without user interaction and enabling access to corporate resources via configurable trusted certificate, SCEP, VPN, and Wi-Fi profile policy options.
iOS devices
Just like with Android device policies, you can set iOS-specific policies to identify specific apps that users should, or should not, use while enrolled in Microsoft Intune. Again, you can use reports to view compliance with this policy setting and you can configure kiosk mode for iOS devices.
Similar to the available Android settings, you can use iOS configuration policies to configure email profiles for Exchange ActiveSync settings and you can configure network access with trusted certificate and SCEP profiles as well as configure VPN and Wi-Fi profile settings centrally without the need for users to configure these settings themselves.
iOS device configuration policies also include an option to deploy configuration profiles that you create using the Apple Configurator tool. This capability is useful when you want to set a configuration setting for iOS that is not included in the default options for configuration policy settings within Microsoft Intune. You can use the Apple Configurator to easily capture settings that you can then deploy to iPhone, iPad, and iPod touch devices.
More Info
You can learn more about the Apple Configurator and download it from the Mac App Store at https://itunes.apple.com/us/app/apple-configurator/id434433123?mt=12.
Windows devices
Again, very similar to Android and iOS policies, you can specify apps that users should, and should not use, but with Windows Phone devices (Windows phone 8.1 and later), rather than just reporting noncompliant apps from being installed or used, you can block the usage of those noncompliant apps.
The same email, trusted certificate, SCEP, and VPN profile configurations are available for Windows devices as for Android and iOS devices when creating a Windows device configuration policy.
Additionally, with Windows devices, you can create Windows Phone OMA-URI1 (Open Mobile Alliance Uniform Resource Identifier) policies to control functionality of Windows Phone devices. By using OMA-URI settings, you can set Windows Phone settings that are unavailable in the default configuration settings similar to the way you can use the Apple Configurator to set configuration settings on iOS for settings unavailable in the default configuration setting options for that device type.
1 You can learn more about OMA-URI settings for Windows Phones on TechNet at http://technet.microsoft.com/en-us/library/dn499787.aspx.
Computers
In addition to mobile devices, traditional computers can also be managed by installing the Microsoft Intune computer client agent on them. The configuration policy settings available for computers include settings for software updates, Endpoint Protection, Windows Firewall, and other information displayed to users on the Microsoft Intune Center that is installed with the Microsoft Intune client agent, as shown in Figure 5-6.
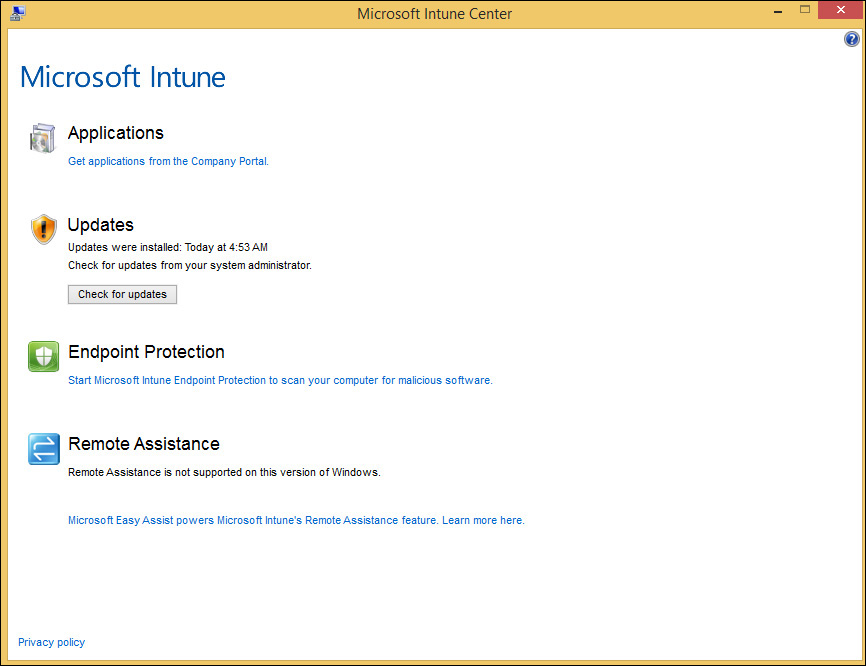
The Microsoft Intune Center runs in the system tray and allows users to request remote assistance, run anti-malware scans, and manage software updates for their computers. The configuration policy settings for the Microsoft Intune Center also include options for providing tech support or helpdesk information to users on managed computers similar to the support information displayed on the Company Portal.
Other Microsoft Intune computer agent settings are used to configure Endpoint Protection scans to help protect computers from malware infections, to exclude folders from virus scans, and to set the frequency for updating both Endpoint Protection and Windows updates.
The final computer configuration policy template setting is used to manage Windows Firewall settings on Microsoft Intune computer clients. The settings available in this template allow you to turn on Windows Firewall, block incoming connections, manage user notifications, and configure exceptions for specific network profiles.
Compliance policies
Compliance policies are used to enforce company compliance requirements when managing devices with Microsoft Intune. While configuration policies are used to configure features and device settings, compliance policies are meant to enforce certain settings to either allow or deny access to the Microsoft Intune service and company resources.
You can configure compliance rules that include advanced password settings, encryption, whether the device is jail-broken or rooted, and whether email on the device is managed by a Microsoft Intune policy. If a device is determined to be non-compliant with any of the compliance policy settings configured by the administrator, the device will be denied access to company resources, as shown in Figure 5-7.
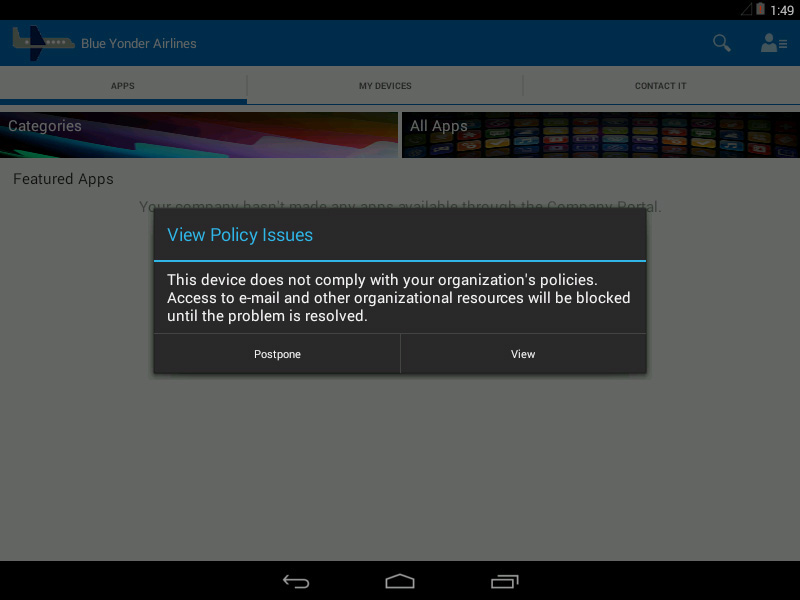
FIGURE 5-7 The View Policy Issues dialog box displayed when a device is noncompliant with company policy
Conditional access policies
Conditional access policies are used by Microsoft Intune to restrict access to Exchange email and ensure that corporate email and documents are synchronized only on phones and tablets that are managed by your company. They are configured and defined by rules, such as which user groups will be targeted to block email based on noncompliance with Microsoft Intune policies and how devices that cannot enroll with Microsoft Intune will or will not be allowed to access Exchange email. If a compliance policy is not deployed, the Conditional Access Policy will treat the device as compliant and allow access to Exchange email. Using conditional access policies, you can restrict access to either Exchange on-premises or Exchange Online (O365).
To use conditional access policies with Exchange on-premises, you must first deploy the on-premises Exchange connector that connects Microsoft Intune service to Microsoft Exchange on-premises to allow you to manage devices through the Microsoft Intune console. Then, to control access to Exchange on-premises for devices not managed by Microsoft Intune, enable the rules that block access by the users in the Microsoft Intune user groups that are specified in the Conditional Access Policy.
Exchange Online conditional access policies are used to block email apps from accessing Exchange Online when devices are either noncompliant with Microsoft Intune compliance policies or not managed by Microsoft Intune and belong to users who are in the Active Directory security groups targeted by the policy.
However, before you can configure the conditional access policies for Exchange Online, you must first configure the Microsoft Intune service-to-service connector. To configure this connector, you must be signed in to the Microsoft Intune Admin Console with an account that has Exchange Online administrative rights. The email address of the currently logged-on user will be used to complete the hosted connection between Microsoft Intune and Exchange Online.
Once the connection is established to either Exchange on-premises or Exchange Online, Microsoft Intune will synchronize new mobile devices and device management status and display those in the Groups workspace in the Microsoft Intune Admin Console. The management status is displayed in the Management Channel column and will define one of the following for each device accessing Exchange email:
![]() Managed By Exchange ActiveSync These devices are accessing Exchange email but they are not managed by Microsoft Intune.
Managed By Exchange ActiveSync These devices are accessing Exchange email but they are not managed by Microsoft Intune.
![]() Managed By Microsoft Intune These devices are managed by Microsoft Intune but they are not accessing Exchange email.
Managed By Microsoft Intune These devices are managed by Microsoft Intune but they are not accessing Exchange email.
![]() Managed By Microsoft Intune And Exchange ActiveSync These devices are both managed by Microsoft Intune and accessing Exchange email.
Managed By Microsoft Intune And Exchange ActiveSync These devices are both managed by Microsoft Intune and accessing Exchange email.
When a device is a member of a group to which a Conditional Access Policy is targeted, devices that display Managed By Exchange ActiveSync will be blocked unless they are in a group that has been marked exempt from the policy. To avoid blocking Exchange email access without notifying them first, you can run a mobile device inventory report to find email addresses for users with devices that are managed by Exchange ActiveSync who will soon be blocked so that you can notify them before enabling the Conditional Access Policy.
After you enable a Conditional Access Policy, you can easily see which devices have been blocked from accessing Exchange email from the Microsoft Intune dashboard. There, the Blocked Devices From Exchange tile shows the number of blocked devices and links to more information.
Exchange ActiveSync policies
The settings configured in this page of the Policy workspace are applied to mobile devices that are connected to Exchange with a service connector in place whether or not they are managed by Microsoft Intune. Here you can add platform exception rules based on mobile device families and models and configure a default rule for devices not covered by a platform exception rule.
When users are blocked from accessing Exchange due to a Conditional Access Policy, they will receive an email that provides instructions about how to enroll their devices. You can customize that email by defining a custom user notification message using HTML text that will be included in an email sent to users whose access to email has been blocked, as shown in Figure 5-8.
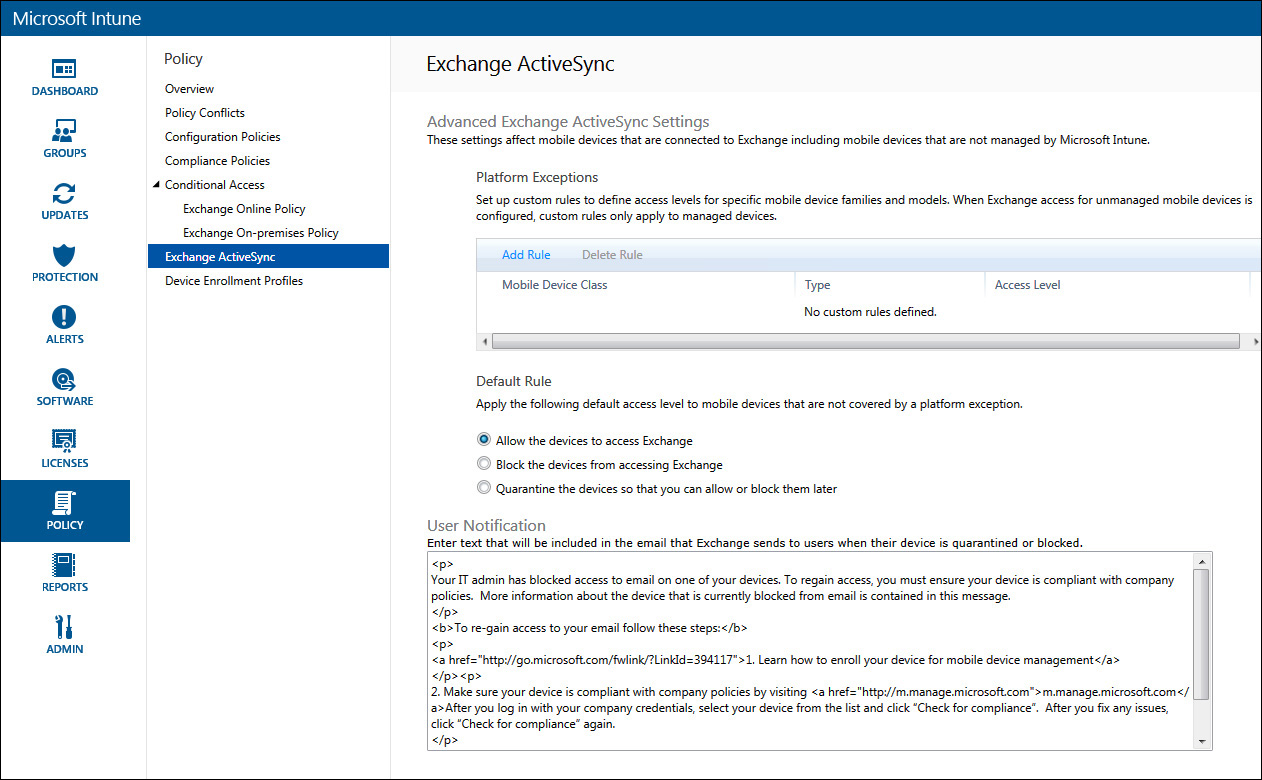
FIGURE 5-8 The Exchange ActiveSync page of the Policy workspace in the Microsoft Intune Admin Console
Policy conflicts
With so many policies being applied to user groups, it is almost inevitable that policies will eventually conflict. When that happens, the depth of the group in the Microsoft Intune group structure helps determine which policy will take precedence.
When policy settings have been configured for groups that conflict, and a user is in both groups, the policy applied to the group that is the deepest in the group structure as defined in the Groups workspace in the Microsoft Intune Admin Console wins and is applied. However, if two or more conflicting policies are applied to the same group, the policy that was updated last (and thus has the most recent Last Modified Time) will apply.
Managing inventory
Microsoft Intune collects information about both computers and mobile devices in use in your organization. You can use this data to discover hardware information about the devices you manage as well as the software that is being run on them.
You can also use the inventory information collected about computers and mobile devices in use for your organization to understand the hardware needs of your users and to plan for future hardware upgrades and replacement device purchases. Additional detected software reports can help you to better understand what software is installed on computers in your organization, including the software versions.
Computer inventory
Computer hardware inventory information is available for viewing by running the Computer Inventory Reports from the Reports workspace in the Microsoft Intune Admin Console. In addition to the name, make, and model of client computers, you can also review the following information about client computers in use in your environment from this report:
![]() Chassis type
Chassis type
![]() Operating system
Operating system
![]() TPM version
TPM version
![]() Disk space information (total, used, free, and OS disk name)
Disk space information (total, used, free, and OS disk name)
![]() Physical memory installed
Physical memory installed
![]() Processor information (name, architecture, and CPU speed)
Processor information (name, architecture, and CPU speed)
![]() IP address
IP address
![]() Serial number
Serial number
![]() Last user to log on
Last user to log on
![]() Last updated time stamp
Last updated time stamp
Mobile device inventory
The mobile device inventory report is used to review mobile device inventory information. Similar to the computer inventory report, the mobile device inventory report contains much more than just the name, make, and model of mobile devices enrolled in the Microsoft Intune service, including:
![]() Device operating system and version
Device operating system and version
![]() Manufacturer
Manufacturer
![]() Management channel
Management channel
![]() If the device is registered in Azure AD
If the device is registered in Azure AD
![]() If the device is compliant or not
If the device is compliant or not
![]() Email address for the user who enrolled the device
Email address for the user who enrolled the device
![]() Exchange ActiveSync ID
Exchange ActiveSync ID
![]() If the device is jail-broken or rooted
If the device is jail-broken or rooted
![]() Unique Device ID
Unique Device ID
![]() Serial number
Serial number
![]() Storage space (total and free)
Storage space (total and free)
![]() The last four digits of the telephone number for the device (if applicable)
The last four digits of the telephone number for the device (if applicable)
![]() IMEI (International Mobile Station Equipment Identity)
IMEI (International Mobile Station Equipment Identity)
![]() MEID (Mobile Equipment Identifier)
MEID (Mobile Equipment Identifier)
![]() Wi-Fi MAC address
Wi-Fi MAC address
![]() Subscriber (mobile phone carrier name)
Subscriber (mobile phone carrier name)
![]() Cellular technology (CDMA, GSM, and so on)
Cellular technology (CDMA, GSM, and so on)
![]() When the device was enrolled
When the device was enrolled
![]() When the inventory was last updated
When the inventory was last updated
Performing full and selective wipes
Microsoft Intune provides several capabilities to help protect your company data from falling into the wrong hands. If a device is lost or stolen, Microsoft Intune administrators can perform several remote actions on the device, including changing a compromised passcode or issuing a remote lock command.
However, by far the most powerful data protection feature that Microsoft Intune makes available to you and your users is the ability to remotely wipe a mobile device to remove company data or even just factory-reset the device. This feature can be very useful when you need to retire a device from use, either when you need to replace it or when a person leaves the company. If a device is lost or stolen, you will also want to be sure to get all company information off of the device as soon as possible and the data-wipe commands usually take only about 15 minutes or so to reach the device. Administrators can perform remote wipe functions from the Microsoft Intune Admin Console and users can perform wipes on their enrolled devices from the Company Portal to reset them to factory condition.
Selective device wipes
By compartmentalizing company data and personal data, Microsoft Intune is capable of selectively wiping only company data on users’ devices while leaving all of their personal information intact and untouched. This can be useful when a person leaves the company and the device is retired from management or when a user simply wants to replace his personal device and give that device to a friend or relative.
Microsoft Intune administrators can perform a selective wipe on a device simply by right-clicking a device name in the Admin Console and selecting the Retire/Wipe action. At that point, a dialog box similar to the one shown in Figure 5-9 is displayed, confirming the decision to wipe the device.
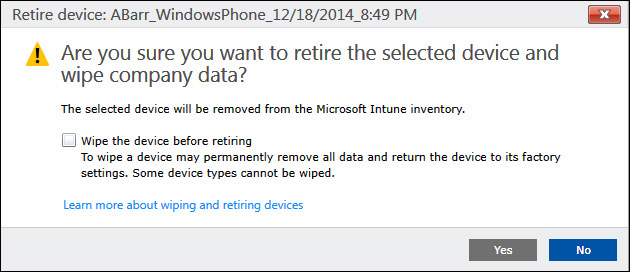
If there is a need to perform a full device wipe, then select the Wipe The Device Before Retiring check box before continuing. Otherwise, click Yes; a selective wipe of company data will occur, removing all company data from the device.
Full device wipes
If a user’s device is lost or stolen, there is no need to contact the helpdesk or wait until the weekend is over to deal with the issue. Users can simply log onto the Company Portal and perform a reset on their enrolled personal devices, as shown in Figure 5-10. This action will perform a full data wipe to restore the device to its factory settings without the user even having to know where the device is.