
Chapter 8. Implementing data protection
In Chapter 7, you learned about data access and protection, including the importance of leveraging built-in capabilities in the Windows operating system to help you protect data and how Azure Rights Management Services (RMS) can be used to provide another level of security for the data.
In this chapter, you take on the role of the senior enterprise administrator for the Blue Yonder Airlines IT department and implement data access and protection as the third phase of their EMS implementation plan as described at the end of Chapter 2. You will be responsible for implementing security controls to mitigate potential data leakage and also ensure that Blue Yonder Airlines’ data is classified according to the level of confidentiality.
Scenario description
As the senior enterprise administrator for Blue Yonder Airlines, you are responsible for planning, designing, and implementing the company’s EMS solution. You know that data access and protection is a fundamental part of the strategy to enable a mobile workforce, so you will start here.
The majority of company’s critical data is located on-premises; however, when users start consuming this data from mobile devices, the security of this data will be at a greater risk. Since the integration between the existing on-premises Windows Server Active Directory and Microsoft Azure AD is already complete, you can leverage a single identity as part of the process to authenticate and authorize users’ access to data.
Implementation goals
The goals for the third and final phase of the EMS implementation plan for Blue Yonder Airlines are:
![]() To protect and classify data
To protect and classify data
![]() To mitigate issues related to data leakage on mobile devices
To mitigate issues related to data leakage on mobile devices
Solution diagram
To meet the EMS implementation goals for the first phase of the project, you need to implement the solution shown in Figure 8-1.
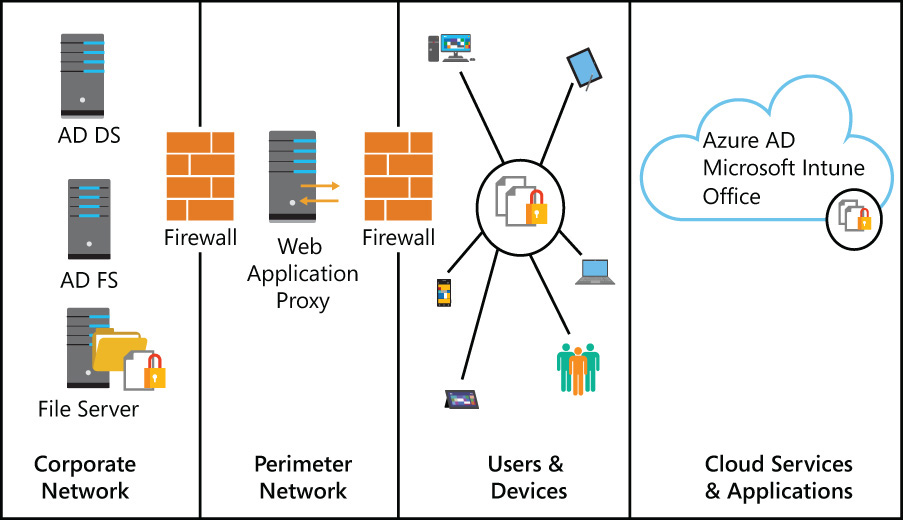
This solution diagram is meant to provide a high-level overview and basic description of the intended solution architecture. Planning and design considerations for each element of the solution are described in the next section, “Planning and designing the solution.”
Each quadrant of the solution represents an area with specific security risks and concerns. The diagram shows how users accessing applications and services from their personal devices are authenticated by on-premises Active Directory Federated Services (AD FS) and Active Directory Domain Services (AD DS) while keeping the data secure across all locations. The four quadrants of the solution diagram are:
![]() Corporate network The corporate network, corp.blueyonderairlines.com, is where the on-premises core infrastructure resides. Many files that will be accessed by remote users are located in the on-premises Windows Server 2012 R2 File Server.
Corporate network The corporate network, corp.blueyonderairlines.com, is where the on-premises core infrastructure resides. Many files that will be accessed by remote users are located in the on-premises Windows Server 2012 R2 File Server.
![]() Perimeter network The perimeter network (sometimes called a demilitarized zone or DMZ) is where the Web Application Proxy was installed in Chapter 4.
Perimeter network The perimeter network (sometimes called a demilitarized zone or DMZ) is where the Web Application Proxy was installed in Chapter 4.
![]() Users and devices This part of the solution diagram represents the Blue Yonder Airlines employees and the devices they use on a regular basis—both company-owned and employee-owned. Notice that the goal here is to keep data protected regardless of who owns the device.
Users and devices This part of the solution diagram represents the Blue Yonder Airlines employees and the devices they use on a regular basis—both company-owned and employee-owned. Notice that the goal here is to keep data protected regardless of who owns the device.
![]() Cloud services and applications This section represents the cloud services and Software-as-a-Service (SaaS) applications that Blue Yonder Airlines’ employees access using their devices. Company data must be protected when in the cloud.
Cloud services and applications This section represents the cloud services and Software-as-a-Service (SaaS) applications that Blue Yonder Airlines’ employees access using their devices. Company data must be protected when in the cloud.
Planning and designing the solution
Next, you want to build on the solution diagram by identifying the individual technologies and configuration requirements needed implement the mobility strategy. You need to completely understand the information in this section to plan and prepare for the configuration steps necessary to successfully complete this phase of the project.
This section is meant to provide you with additional details about the components and considerations while implementing the data access and protection pillar from EMS. The next section will guide you through the actual implementation steps and show you what each component looks like in more detail.
Leveraging Azure RMS
As already discussed in Chapter 7, Azure RMS is a cloud-based service that provides data protection capabilities for Azure resources as well as all Microsoft cloud services such as Microsoft Intune and Office 365. You will not use EMS’s full potential until you leverage Azure RMS capabilities to protect company data. The design process for Azure RMS starts with identifying which topology is the best fit for your business requirements. The topology that best fits the requirements for Blue Yonder Airlines is the centralized-in-the-cloud topology, where Microsoft manages the Master Key. Blue Yonder Airlines is also using Office 365, therefore the mail system is also located in the cloud and the integration with Azure RMS is automatically done once you enable this feature in Azure AD.
More Info
All other major design considerations for Azure RMS, including requirements, are presented in Chapter 7.
Preparing the environment
After identifying the topology, the next step is to prepare the environment that will support Azure RMS. IT administrators, or anyone else who is responsible for managing Azure RMS, should install the Azure Rights Management Administration Tool on their computers. This tool installs the Windows PowerShell module for Azure Rights Management, which you will need to manually perform some tasks and to automate others.
After installing this tool, you should be able to manage Azure RMS from the workstation where the tool was installed. However, before managing Azure RMS, you must activate Azure RMS using the Azure Management Portal.
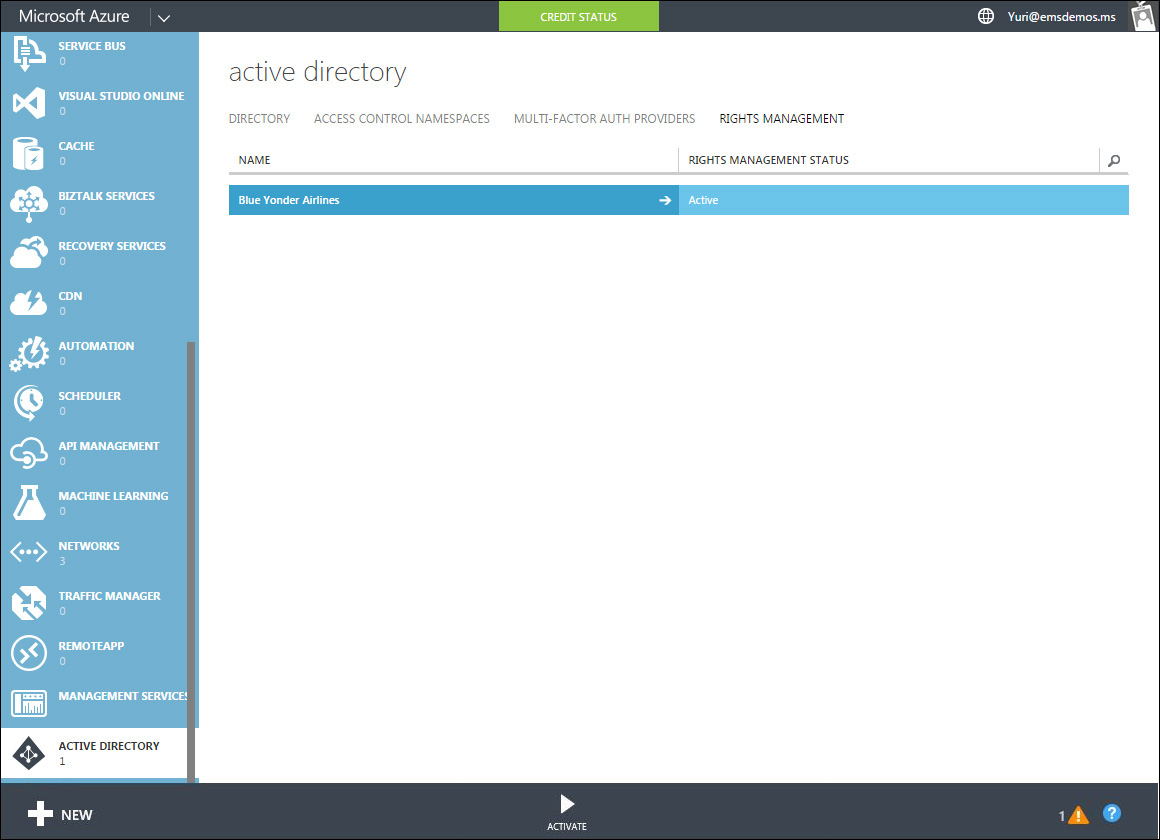
1. On the Azure Management Portal, sign in using your Azure account.
2. On the left pane, click Active Directory to open the Active Directory page.
3. Click the Rights Management tab, select the directory you want to manage for Rights Management, click Activate, and then confirm your action. When Azure RMS is activated, your directory is listed as Active, as shown in Figure 8-2.
Tip
At this point, you can go back to the computer where the Azure Rights Management Administration Tool was installed, open Windows as an administrator, and type Import-module –name aadrm to import the Azure RMS modules and Get-Command -Module aadrm to visualize the commands available. To test connectivity with Azure RMS from Windows PowerShell, use the command Connect-AadrmService. For more information about how this command works, visit http://msdn.microsoft.com/library/azure/dn629415.aspx.
After the activation is performed, you can click in the directory name under NAME and the Azure RMS options will appear, as shown in Figure 8-3.
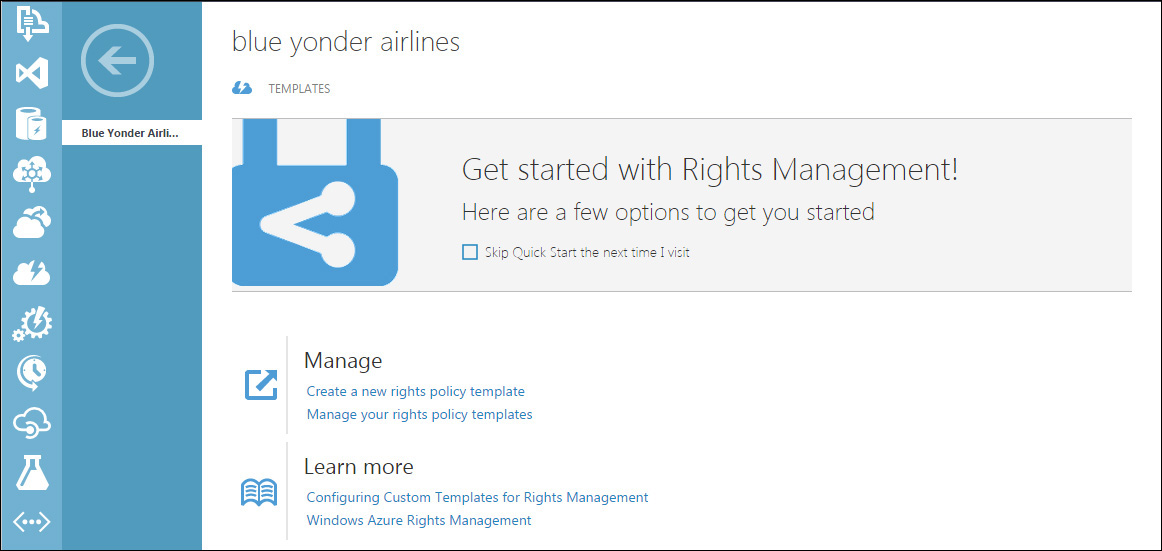
These options allow you to create new templates that can be consumed by applications, such as email (Outlook) or documents (Microsoft Office Word).
Implementing the solution
Azure RMS plays an important role in meeting the requirements for data protection. To implement the requirements for Blue Yonder Airlines, you must complete the following two sets of configurations:
![]() Configure a set of templates with settings that are more restrictive than the default template settings to protect docu ments and emails.
Configure a set of templates with settings that are more restrictive than the default template settings to protect docu ments and emails.
![]() Configure file classification to integrate the on-premises file server with the Azure RMS service.
Configure file classification to integrate the on-premises file server with the Azure RMS service.
Configuring Azure RMS templates
To protect company data that is located in files, Azure RMS can enforce policies by using rights policy templates that have predefined restrictions, such as user rights and content expiration. The advantage of using templates is that they provide a way for users to apply permissions to protected content. By default, the following two templates are available within Azure RMS:
![]() Confidential View Only This template is applicable for all users within the organization; it gives users with access to the data permission to view the content only.
Confidential View Only This template is applicable for all users within the organization; it gives users with access to the data permission to view the content only.
![]() Confidential This template allows all users to perform the following tasks: View Content, Save File, Edit Content, View Assigned Rights, Allow Macros, Forward, Reply, and Reply All.
Confidential This template allows all users to perform the following tasks: View Content, Save File, Edit Content, View Assigned Rights, Allow Macros, Forward, Reply, and Reply All.
Tip
The template name includes the name of the company that was specified when signing up for an Azure AD subscription.
Before creating custom templates, you should know what it is that you want to accomplish with these templates. For Blue Yonder Airlines, it is important to have a more restrictive policy for data protection that is applied to all users who are using their own devices. You can do this by creating a custom template that you will apply to these users only. One approach is to obtain a list of all users who have registered their own device and add them to a group in Active Directory. Once the group is created and members are added to it, you can enforce the Azure RMS template to that particular group only.
Important
After creating the custom template, users will not see it immediately. You need to publish the template to make it visible to users.
Creating a custom template
Since you have an EMS subscription, the tool that you will use to create a custom template is the Azure Management Portal. Sign in to the Azure Management Portal with global administrator credentials and complete the following steps to successfully create and publish your custom template:
1. In the left pane, click Active Directory.
2. On the Active Directory page, click Rights Management.
3. Select the directory to manage for Rights Management.
4. From the Get Started With Rights Management Quick Start page, click Create A New Rights Policy Template.
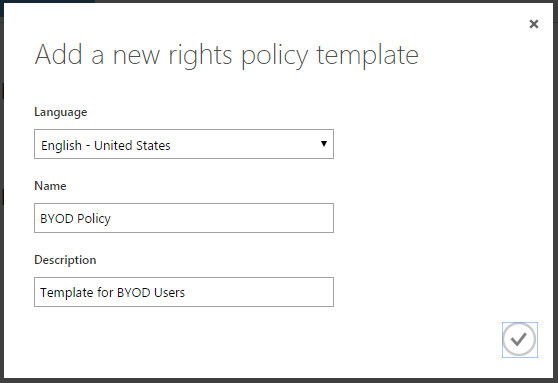
5. In the Add A New Rights Policy Template dialog box, choose the language in which you will type the template name and description that users will see. Type a unique Name and a Description, and then click the Complete (check mark) button, as shown in Figure 8-4.
6. On the Get Started With Rights Management Quick Start page, click Manage Your Rights Policy Templates.
7. On this new page, the new template that you just created appears with a status of Archived. Click the template to edit it.
8. From the Your Template Has Been Added Quick Start page, click Get Started, Configure Rights For Users And Groups.
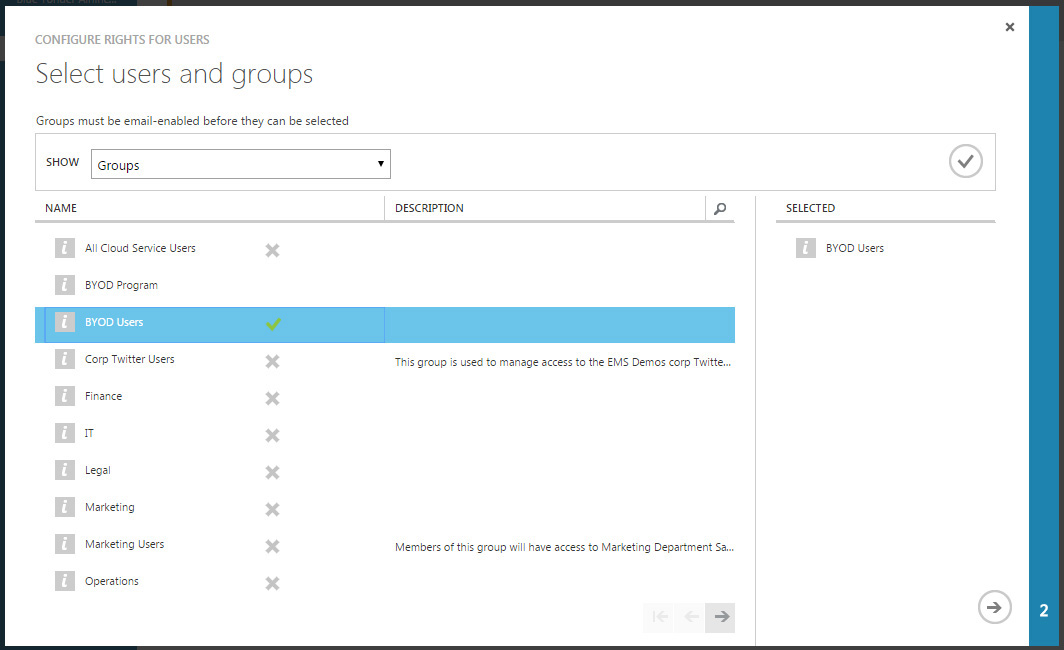
9. On the Select Users And Groups page, click the group that you want to add and it is added to the Selected pane on the right, as shown in Figure 8-5.
10. Click the Next (arrow) button, select Custom, and then click the Next button.
11. On the Assign Custom Rights page shown in Figure 8-6, select the rights you want to assign to the template.

12. Click the Complete (check mark) button.
Important
After you assign rights to the template, a page opens that states the following important information: “The author of a protected document always has Full Control rights.” In other words, even if the template is applied to the document, the author will always be able to perform all tasks because he owns the document.
13. In the proprieties of the template, click Configure.
14. Here you can add additional languages to the template, restrict content by expiration date, and restrict access to the content by always requiring the user to be online in order to be able to read the document in which the template is applied. For the purpose of this example, leave all options as-is and click Publish.
15. Click Save.
You can always change the template once is created and published. To edit it, select it and repeat steps 7 through 14. If you need to deactivate the template, you can use the Archive option instead of Save in Step 15.
Applying a custom template to a document
After the template is created and published, it is ready to be used. Different client apps will have different steps to implement the template. Microsoft Office 2013 has native support for Azure RMS; however, the first time you use the document protection feature in Microsoft Office 2013, there is an initial step that must be done, which is to connect to the Rights Management Server.
Using Microsoft Word 2013 as the sample application, follow these steps to perform this initial setup:
1. Open your document and select the File tab to access the Info page.
2. Click the Protect Document button, point to Restrict Access, and click Connect To Rights Management Servers And Get Templates, as shown in Figure 8-7.
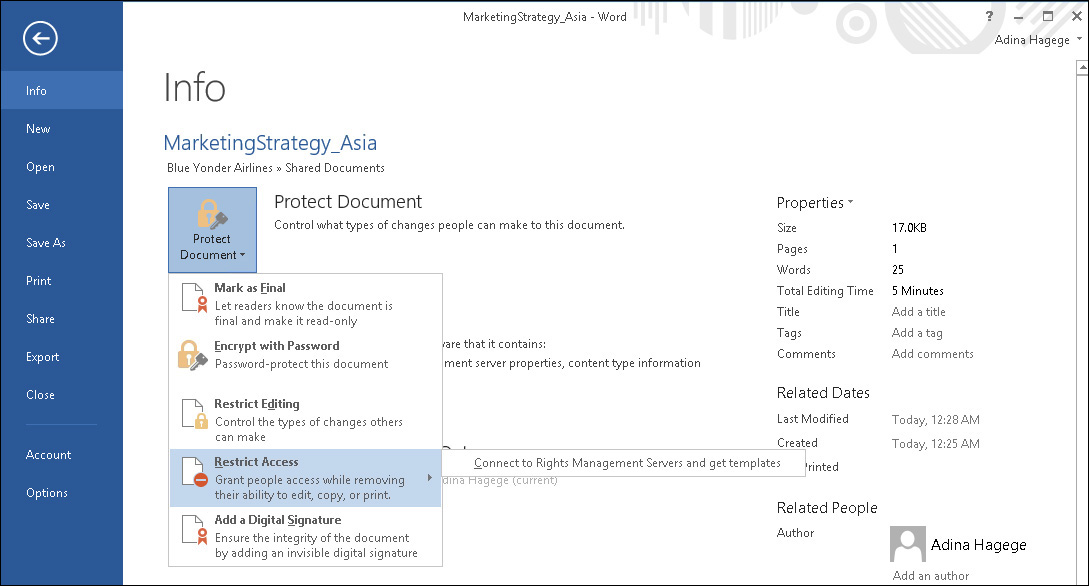
A message will appear stating that templates are being retrieved from the server; when this action finishes, the Microsoft Word interface is displayed again.
These steps are necessary only in the beginning. After your profile is configured and the application knows that it needs to obtain the templates from the server, you will not need to perform these steps again. The templates that appear in the Microsoft Office 2013 list of templates are automatically refreshed every 7 days.
If you need to change the behavior on the client side to receive a template immediately, change the registry value TemplateUpdateFrequency under HKEY_CURRENT_USERSoftwareClassesLocal SettingsSoftwareMicrosoftMSIPC to specify the frequency in days. Remember that you must be careful when making changes in the registry. If you use the Registry Editor incorrectly, you can cause serious problems that might require you to reinstall the operating system.
Important
Use the Registry Editor at you own risk. Microsoft policy states that they cannot guarantee that you can solve problems that result from using the Registry Editor incorrectly.
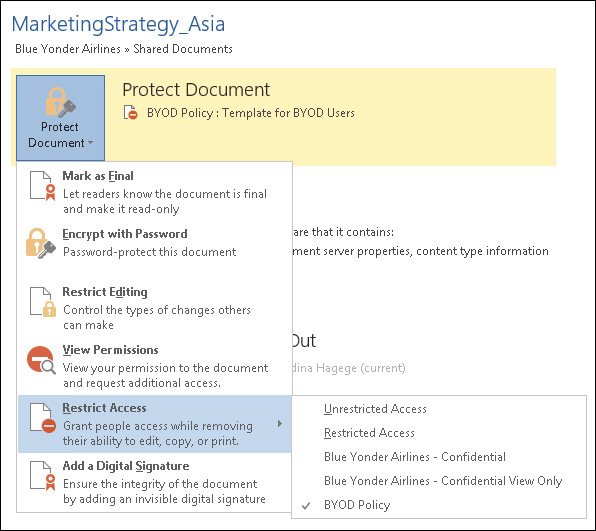
After the template is published, you can use the same Protect Document button and you will see the template that you created, as shown in Figure 8-8.
Important
Although this example uses Microsoft Word 2013, the RMS templates will be available for consumption from all supported platforms. For a list of other supported applications, see the article at http://technet.microsoft.com/library/dn339006.aspx.
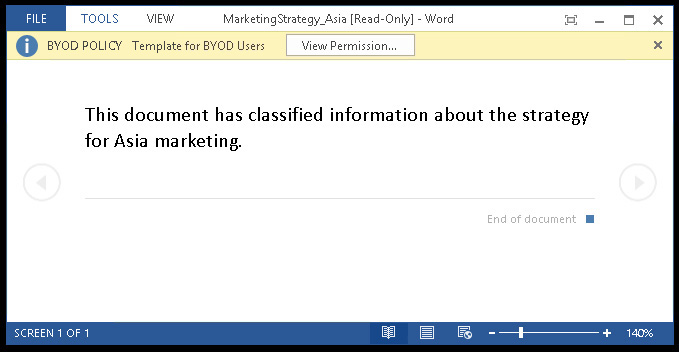
This document is saved in the Blue Yonder Airlines SharePoint shared documents folder. When a member of the BYOD Users group tries to open this document, she will receive a warning similar to the warning shown in Figure 8-9.
With this implementation you fulfill the first requirement for data protection, which is to configure a set of templates with restrictive settings to protect documents and emails. In the next section, you will work to fulfill the second requirement, which is to configure file classification to integrate the on-premises file server with the Azure RMS service.
Azure RMS connector
To fulfill the second data protection requirement established by Blue Yonder Airlines, it is necessary to install the Azure RMS connector on a dedicated server located on-premises. As mentioned in Chapter 7, the Azure RMS connector is required for scenarios in which you need to integrate Azure RMS with on-premises workloads, such as the File Server. For fault-tolerance purposes, it is recommended that you install the Azure RMS connector on at least two servers.
The File Server should be a domain member; it should have the File Server role installed and the File Server Resource Manager (FSRM) feature enabled. To install the Azure RMS connector on this server, you must have administrative privileges on the local machine. Although you can use HTTP for the RMS connector, consider obtaining a certificate for the RMS connector. The subject for this certificate must be resolvable by your internal DNS Server and, if you are using a load balancer between two Azure RMS connector servers, the name should resolve for the load-balance alias.
The server on which you are installing the Azure RMS connector requires Internet Information Services (IIS). If IIS is not already available, the installation process should add it as part of the setup.
Log on using a domain account with administrative privileges on the member server where the Azure RMS connector will be installed, download the Azure RMS connector from http://go.microsoft.com/fwlink/?LinkId=314106 onto this server, and complete the following steps:
1. Run the executable file RMSConnectorSetup to open the Microsoft Rights Management Connector Setup Wizard shown in Figure 8-10.
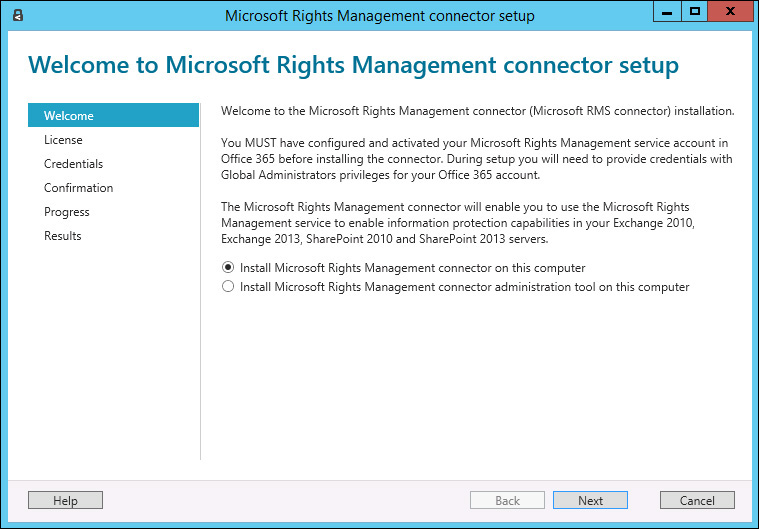
2. The default option is to install the connector on this computer. Leave this option selected (as shown in Figure 8-10) and click Next.
3. On the End-User License Agreement page, read the license terms, select I Accept The Terms In This License Agreement, and click Next.
4. On the Microsoft RMS Administrator Credentials page, type the credentials for an account that has administrator privileges on the Microsoft RMS tenant (Microsoft RMS Tenant Global Administrator) or an account in Azure Active Directory (Azure AD) that has been granted rights to install and administer the RMS connector for the organization (Microsoft RMS Connector Administrator). Click Next.
5. On the Ready To Install Microsoft Rights Management Connector page, click Install. Notice that the Install button has the symbol that represents a potential prompt for consent. If the user that you are installing this tool for does not have local administrative privileges, you will be prompted for credentials.
The Installing Microsoft Rights Management Connector page shows a progress bar with the elements that are getting installed. When it finishes running, you will see the Installation Of Microsoft Rights Management Connector Completed page, as shown in Figure 8-11.
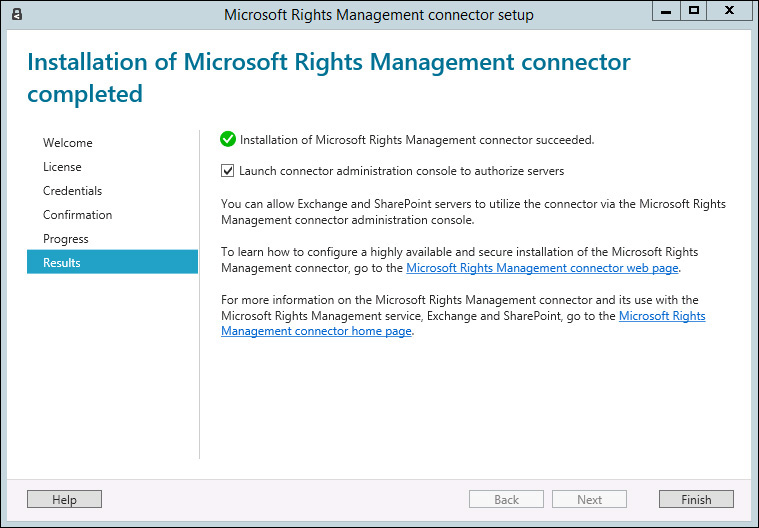
6. Assuming that your file server is already installed and ready to obtain RMS Templates from Azure, leave the Launch Connector Administration Console To Authorize Servers check box selected and click Finish. The Microsoft Rights Management Connector Administration Tool opens, as shown in Figure 8-12.
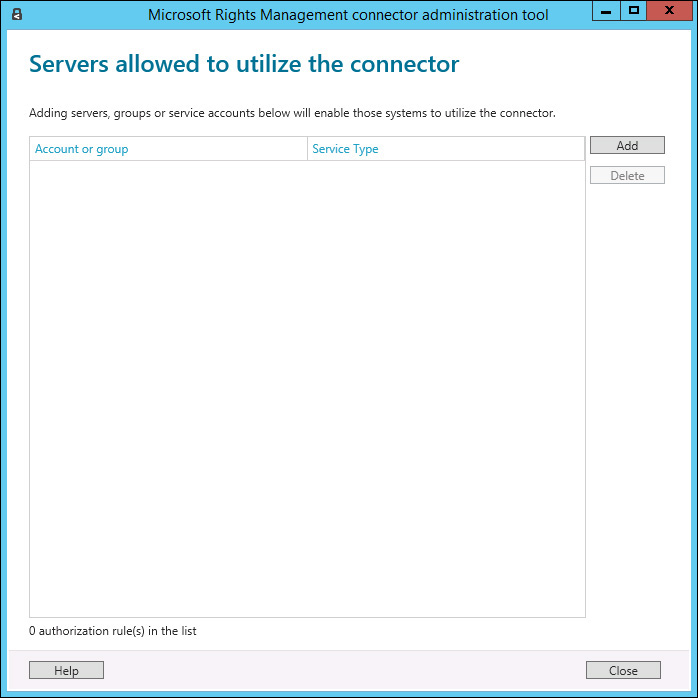
7. Click the Add button, and in the Allow A Server To Utilize The Connector page, select FCI Server from the Role drop-down list box, as shown in Figure 8-13.
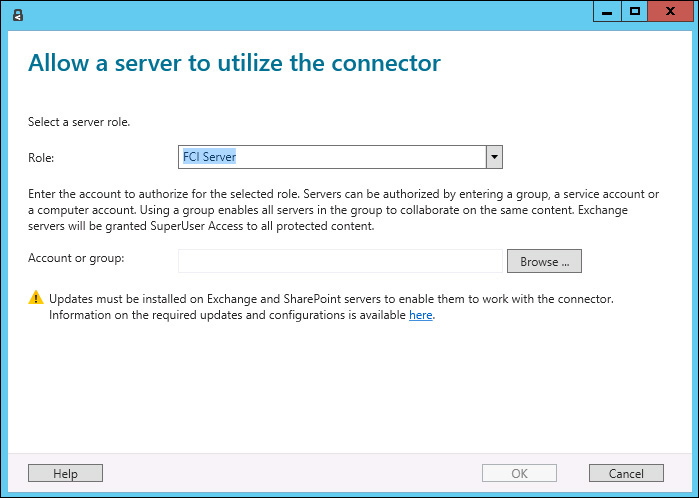
8. Click Browse next to Account Or Group and select the File Server that will be authorized to use this connector. Next, click OK twice and then click Close.
At this point the Azure RMS Connector is installed and configured on one server. For redundancy purposes, you should repeat this procedure and install the Azure RMS Connector on a second server.
9. To test your installation was successful, connect to the server using URL http://<connectoraddress>/_wmcs/certification/servercertification.asmx from the server where the connector is installed. After accessing this address, you should see a webpage similar to that shown in Figure 8-14.
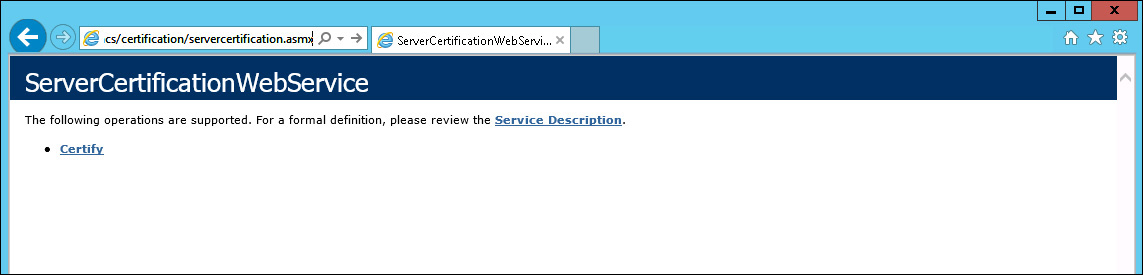
FIGURE 8-14 The Azure RMS connector webpage that can be used to validate the successful installation of the tool
Configuring File Server to use Azure RMS
To be able to leverage the Azure RMS templates for data protection, the File Server that will be configured to use Azure RMS must have the FSRM feature installed on it. Make sure you enable this feature because it is not enabled by default when you install the File Server role on a server.
After confirming that the FSRM feature is installed, download the GenConnectorConfig.ps1 tool from http://go.microsoft.com/fwlink/?LinkId=314106 on the file server. After downloading this tool, log on to this File Server using a domain account with administrative privileges in the local computer and complete the following steps:
1. Open Windows PowerShell with elevated privileges.
2. Type the command GenConnectorConfig.ps1 –SetFCI2012 –ConnectorUri http://FQDNfortheAzureRMSConnector.
3. If you receive the following warning message, press A.
File C: empGenConnectorConfig.ps1 is published by CN=Microsoft Corporation,
OU=MOPR, O=Microsoft Corporation, L=Redmond, S=Washington, C=US and is not trusted
on your system. Only run scripts from trusted publishers. [V] Never run [D] Do
not run [R] Run once [A] Always run [?] Help (default is "D"): A
4. The prompt should be available after pressing A and you can validate the inclusion of the URL by looking at the value in the registry key HKEY_LOCAL_MACHINESOFTWAREMicrosoftMSDRMServiceLocationEnterprisePublishing. It should match the URL that you typed in Step 2.
5. Open Services.msc and restart the FSRM service.
Configuring file classification
Now that the File Server is configured to use Azure RMS as its main repository for templates, you can create file management tasks that can leverage templates created in Azure RMS. There are many approaches that you can use to perform this task; this section covers the approach of using file classification. For example, all users who are storing files in the Financial folder located on this server will automatically have their documents classified as confidential. This will be accomplished by automatically applying a specific template from Azure RMS that has the required restrictions.
Before you can begin, you must complete the following prerequisite steps on the File Server.
![]() On your on-premises Active Directory, you need to:
On your on-premises Active Directory, you need to:
1. Enable the required attribute (in this case, Department) that will be used when evaluating the Dynamic Access Control (DAC) condition.
2. Configure the properties that will be downloaded by file servers and used to classify files. DAC rules will compare user attribute values with resource properties. You will enable the existing Department property to match the department claim.
3. Create a central access rule to describe which conditions must be met for file access to be granted. In this specific rule, you will require the Department attribute.
4. Create a central access policy to enforce the rule.
5. Publish the central policy using Group Policy.
![]() On the File Server, you need to use FSRM to:
On the File Server, you need to use FSRM to:
1. Validate that a classification policy was created as the result of the publication of the central policy using Group Policy.
2. Create a classification rule that uses the Department property to classify files that contain the string “confidential” in the file content and are saved in the C:Financial folder.
Important
To read more about how to configure DAC in Windows Server 2012 R2, visit http://technet.microsoft.com/en-us/library/hh846167.aspx. For more information about FSRM, visit http://technet.microsoft.com/en-us/library/hh831701.aspx.
After completing the prerequisite steps, use the FSRM to configure a file management task that will apply the Azure RMS template. Log on to the file server as a user with administrative privileges and complete the following steps:
1. Open Server Manager and click Tools, File Server Resource Manager.
2. In the File Resource Manager tool, click the File Management Tasks node in the left pane.
3. Right-click in the File Management Tasks node and click Create File Management Task.
4. On the General tab, type the name of this task (for this example, Financial).
5. Click the Scope tab, select User Files, click the Add button, and select the folder that you want to manage with this task. For this example, the folder is C:Financial.
6. On the Action tab, under the Type drop-down list, select RMS Encryption. The result should be the list of templates created in Azure RMS, as shown in Figure 8-15.
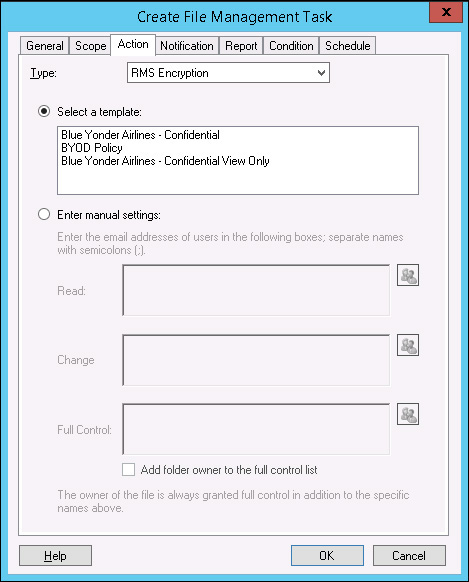
7. Select the template. For this example, the selected template is Blue Yonder Airlines – Confidential.
8. On the Schedule tab, select the days of the week on which this task will run. For this example, it will run all days, including Saturday and Sunday. Click OK to finish.
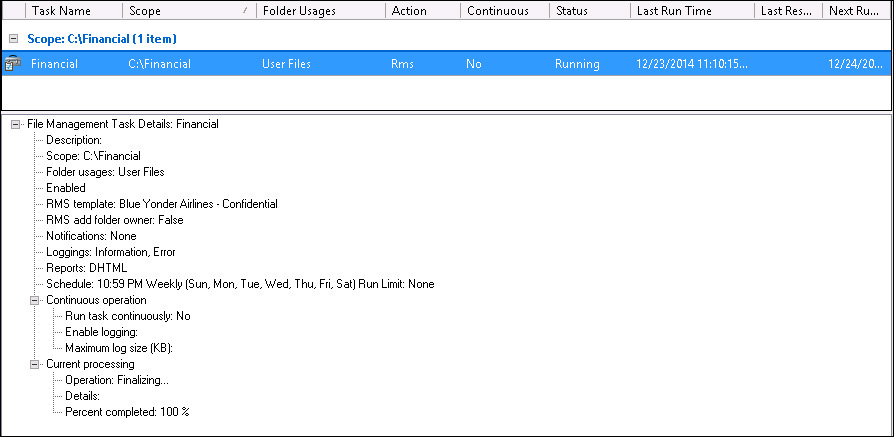
You can wait for the schedule to take effect or you can right-click the task in the main section of File Resource Manager and choose the Run File Management Task Now option. In the lower pane, you will see a summary of the task and also the current status, as shown in Figure 8-16.
Validating client access
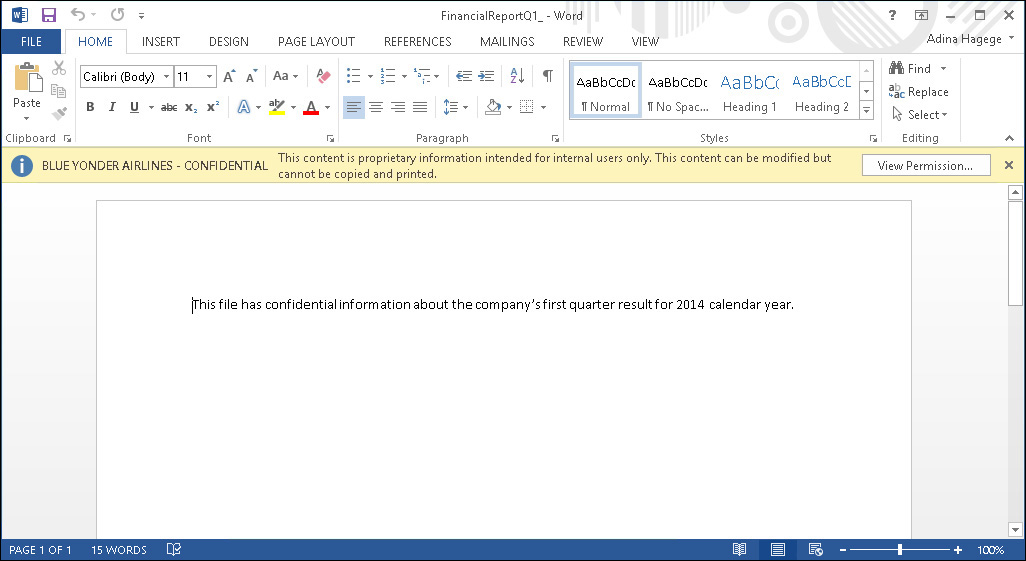
The infrastructure is now ready to automatically classify any new files created in this folder. When a user saves a file in this folder, she will not need to use the Protect Document capability in Microsoft Office 2013 to manually classify the document. Instead, the file server automatically applies the RMS template conditions to any new documents. When a user tries to open a file that was saved in the Financial folder, a message indicates that the template was already applied, as shown in Figure 8-17.
Integrating Azure RMS with Work Folders
You are making significant progress in the implementation goals that were established. Next, you need to address the last implementation goal for data protection, which covers data leakage. As was explained in Chapter 7, it is important to protect data while it is at rest in the user’s device because this can also be a source of data leakage. You will now leverage Windows Server 2012 R2 capabilities to enhance data protection and integrate them with Azure RMS.
In Windows Server 2012 R2, Work Folders allow users to store files on the File Server, making it possible to work with these files offline while keeping them protected. This feature can also take advantage of the Azure RMS templates that were created to protect documents. Figure 8-18 shows how this integration works.
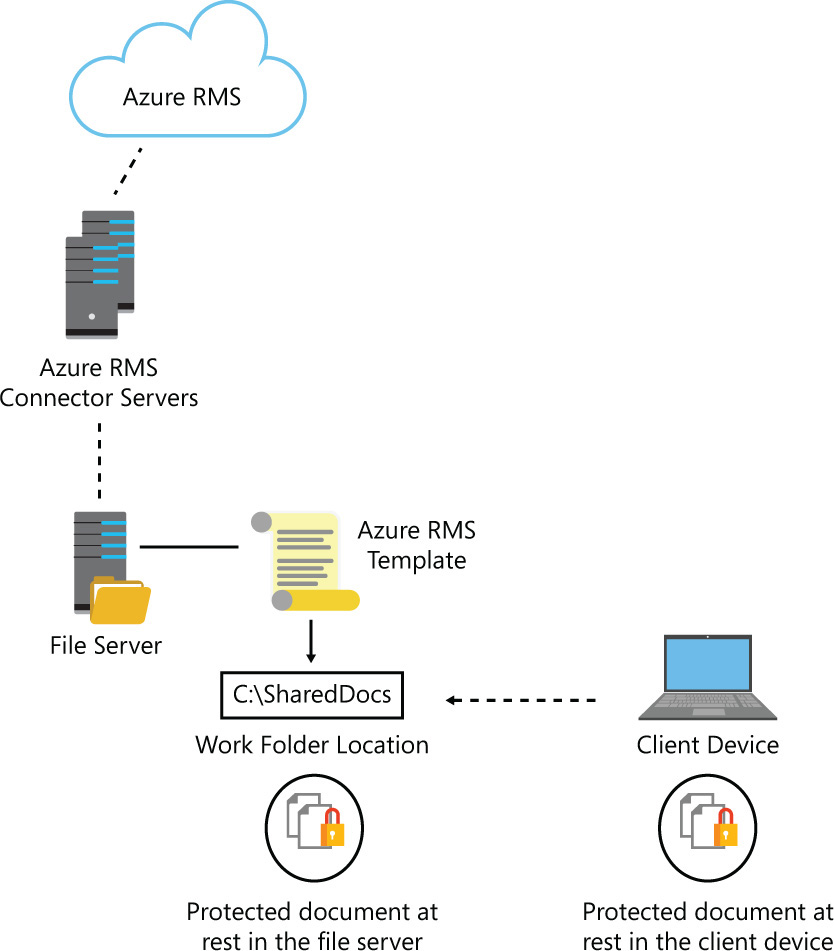
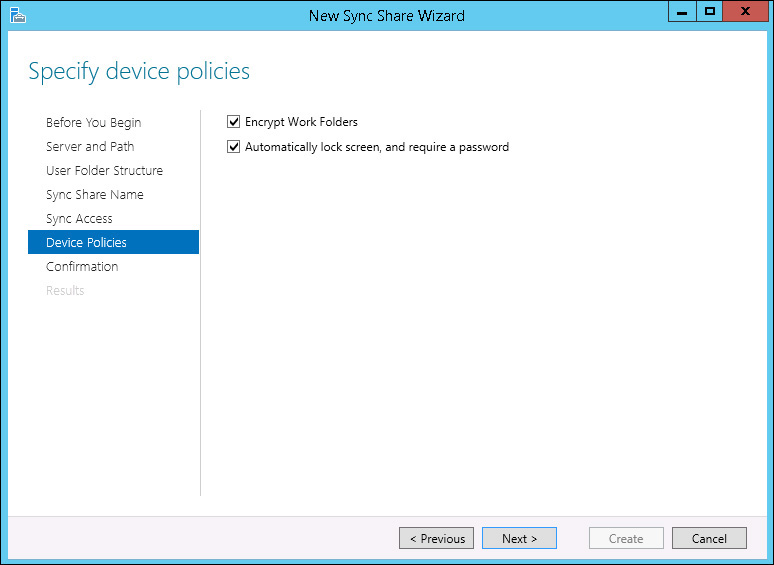
From the Azure RMS and File Server perspective, the steps are similar to the ones that were previously explained in the file classification section in this chapter. To enhance data protection for Work Folders, you should ensure that encryption is required. You can do that while enabling Work Folders in the File Server using the New Sync Share Wizard, as shown in Figure 8-19.
By using this capability in combination with the templates created in Azure RMS, you enhance the overall data protection strategy. Now data will be classified and encrypted while at rest in the file server and while at rest in the user’s device. The combination of these capabilities also reduces the risk of data leakage, which is another requirement from Blue Yonder Airlines.
Important
To read more about how to configure Work Folders in Windows Server 2012 R2, visit http://technet.microsoft.com/en-us/library/dn528861.aspx.