
Chapter 7. Data access and protection
At this point you have already implemented the identity solution that will be used for your mobile workforce. You also implemented device management giving you control of user-owned devices as well as company-owned devices. While these are critical components of Enterprise Mobility Suite (EMS), there is still one more pillar that must be addressed: data access and protection. Since data is at the center of your solution, and ultimately companies that are embracing mobility want to keep their data secure, it is vital to understand the ramifications of this last pillar before implementing it.
This chapter discusses how to leverage some built-in capabilities available in Windows Server 2012 R2 in combination with the last component of EMS, called Azure Rights Management Services (RMS), to build the proper data access and protection solution to embrace mobility.
Leveraging on-premises resources
When you are moving to a model where users will be accessing corporate information from different locations using different devices, it is important that security is not only part of the solution but that it is actually embedded in the data itself. The goal is to have security controls in place that can be attached to the data and, regardless of the data location, those controls can still be applicable. Imagine circulating a Microsoft Word document that contains confidential information about the company’s next generation of products to many users on various different devices. The chances of data breach will increase as the number of users and devices increases; however, you can mitigate this risk.
The Windows operating system includes multiple capabilities that can and should be used for data protection. As is described in Chapter 2, you must apply a defense-in-depth strategy for data protection and part of this strategy is to leverage capabilities that are natively available in Windows Server and Windows client devices. Throughout this section of the book, you will learn about these key capabilities that are natively available in Windows that should also be leveraged as part of your enterprise mobility strategy for data protection.
After you finish identifying these capabilities, you will learn how Azure RMS should be used to enhance data access and protection for your enterprise mobility adoption.
Windows Server Dynamic Access Control
A big part of protecting data is understanding how to translate business intent with proper use of the technology to reflect that intent. If the company determines that documents containing financial data should be read only by members of the Finance department, that’s the business intent for that particular data access. While this is the main intent, it can be extended to a more granular set of requirements. For example, the company might also say that members of the Finance department must only be able to access documents based on the physical location of those members. This feature can be very important for companies that have a worldwide presence and have users accessing information from different locations.
More Info
One example of use of this feature for compliance purposes is the Safe Harbor scenario, where the data falls under the US-European Union Safe Harbor regulation. For more information about this scenario, visit http://aka.ms/dacsafeharbor.
Dynamic Access Control (DAC) enables IT administrators to perform data governance across file servers to control who can access information and it enables administrators to audit who has accessed information. To perform this task, DAC uses a Windows authorization and audit engine that can process conditional expressions and central policies. It also leverages Kerberos authentication support for user claims and device claims. While this feature was first introduced in Windows Server 2012, it leverages capabilities that were first introduced in Windows Server 2008 R2, such as File Classification Infrastructure (FCI) and conditional access permission entry. The key factor in Windows Server 2012 R2 is that FCI is claims-aware; this allows FCI to present resource properties as classification properties.
Note
What is a claim? A claim is information a trusted source makes about an entity. The security identifier (SID) of a user or computer and the department classification of a file are all examples of a claim.
IT administrators use central access policies to create access policies that apply to Windows Server 2012 file servers that are using Group Policy. Each central access policy object can contain one or more central access rules. These rules are used to translate the policies you require into expressions. All rules created in the Central Access Policy page are stored in Windows Server Active Directory, which enables the organization to have a centralized approach to manage authorization on Windows Server 2012 file servers. To plan central access policy deployment, refer to http://technet.microsoft.com/en-us/library/hh831366.aspx#BKMK_1_2.
Tip
If you are not familiar with DAC, you can watch the demonstration shown at http://technet.microsoft.com/en-us/video/dynamic-access-control-demo-walkthrough.aspx.
Conditional Access Control
Chapter 6 describes the different levels of Conditional Access Control you can create via Microsoft Intune. From the DAC perspective, when you create access rules, what you are really doing is creating a set of conditions that will allow access to certain information. In previous versions of Windows, the mechanism to allow or deny access to resources is determined by searching for the permission entry’s trustee security identifier (SID) within the security principal’s access token. When the SID is present, Windows evaluates the permission and verifies whether that permission entry is applicable to the user and, if so, Windows includes that permission entry along with all other applicable permission entries when evaluating access.
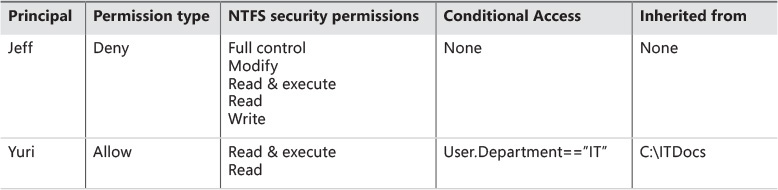
Starting in Windows Server 2012 and Windows 8, another layer of decision was introduced to evaluate conditional expressions. Considering that there are multiple conditional expressions, the results of all conditional expressions must evaluate to true for Windows to consider the entry for this permission and apply the proper authorization. Table 7-1 shows how this looks when compared to the traditional access-control entries.
Using conditional expression for auditing
While controlling the access to data is important, part of your mobility strategy is to monitor a user’s activities. Auditing resource usage is a critical element of an overall security plan. By using auditing, IT administrators can configure Windows to write events that relate to a specific action to the Windows event log. IT administrators can configure Windows to write an event when the action results in a success or when the action fails. Windows evaluates an audit entry’s applicability by considering the audit entry’s trustee, the action, that action’s result, and the conditional expression. When conditional expressions are used for auditing purposes, Windows evaluates all expressions in an audit entry to determine if the audit entry is applicable. Just like conditional expressions in permission entries, the conditional expression in an audit entry must evaluate to true for the audit entry to apply.
Web Application Proxy
For companies that are adopting enterprise mobility, it is important to balance which applications will be a fully cloud-based apps by leveraging Software-as-a-Service (SaaS) apps and which on-premises apps will be available for remote consumption. As you learned in Chapter 3 and Chapter 4, the use of hybrid identity with Azure AD Premium allows you to easily integrate with SaaS apps; however, the reality is that most companies have production apps on-premises. In many cases, these production apps will need to be accessed by mobile users.
In Windows Server 2012, a featured called Web Application Proxy was introduced to enable IT Administrators to securely publish applications that are located on-premises. Ideally, you should always deploy Web Application Proxy in conjunction with Active Directory Federation Services (AD FS) to enable conditional access and also Single Sign-On (SSO) capabilities. In Chapter 3 and Chapter 4, you installed Web Application Proxy as part of the Azure AD Connect Wizard configuration, but this role can be installed separately using Server Manager.
More Info
For more information about Web Application Proxy, read the article at http://technet.microsoft.com/en-us/library/dn584113.aspx. For more information about AD FS Conditional Access Control, read the article at http://technet.microsoft.com/en-us/library/dn280936.aspx.
Publishing on-premises apps
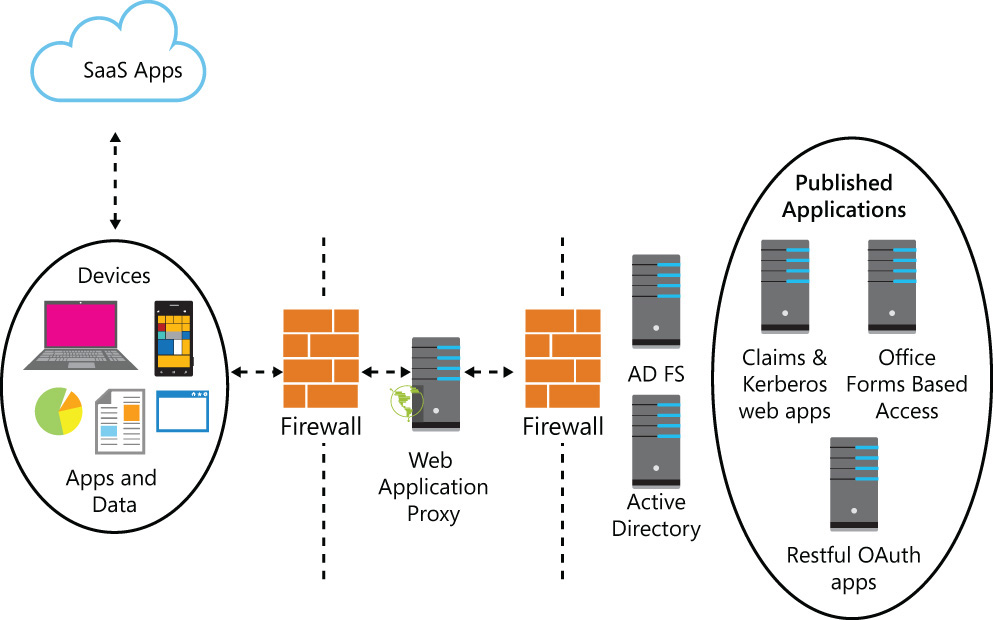
When you use Web Application Proxy to publish on-premises apps in combination with AD FS, the typical infrastructure is comprised of the AD FS located inside the boundaries of the corporate network, and the Web Application Proxy, which is also the Active Directory Federation Services Proxy, located at the perimeter of the corporate network. The Web Application Proxy directs all authentication traffic to the AD FS in the internal network and provisions for certificate-based authentication in particular. This means that the Web Application Proxy terminates the traffic and initiates a new request to the published applications. By performing this task, the Web Application Proxy acts as a session-level buffer between the external device and published applications. This behavior adds another layer of security since the user accessing the published application will not have direct access to the application itself; instead, the user accesses the application through Web Application Proxy. Figure 7-1 shows an example of a typical topology.
Tip
Windows Server Technical Preview introduced the capability to enable Preauthentication for HTTP Basic application publishing. For more information about this new feature, read the TechNet article at http://technet.microsoft.com/en-us/library/dn765483.aspx.
Device registration
Web Application Proxy is also used in scenarios where mobile users must register their devices before accessing internal resources. The Device Registration Service is integrated with the AD FS Server Role. When this capability is configured in the AD FS server, the only task that needs to be performed in the Web Application Proxy is to update the configuration using the Windows PowerShell command Update-WebApplicationProxyDeviceRegistration. You also need to register a public Domain Name System (DNS) CName for deviceregistration.
Protecting data at rest at the user device location using work folders
The likelihood of data leakage with mobility increases because mobility increases the threat landscape, but if correctly planned, it is possible to reduce this likelihood by adding countermeasures that will reduce the risk. One of the most challenging aspects of enterprise mobility is to properly deliver corporate data to users while maintaining control of this information and making it consistently available to users across all their devices. Often, mobile users tend to use cloud storage services such as OneDrive or even share corporate documents via personal email. The challenge with this is that a corporation loses all control of the information when this happens, both from a risk point of view (for example, the information falling into the wrong hands) or from a compliance point of view (with the information only being available on user devices and thus not backed up or discoverable from a regulatory compliance stance).
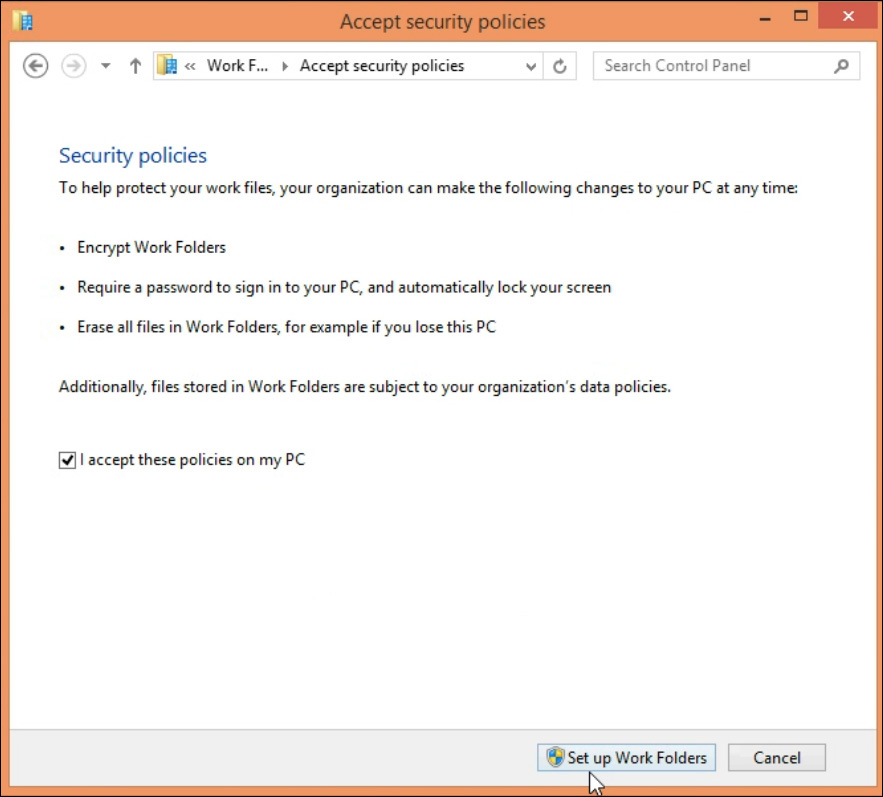
By using the Windows Server 2012 R2 featured called Work Folders, IT administrators enforce users to securely store and access work files on personal computers and devices in addition to corporate PCs. IT administrators will be able to maintain control over corporate data by storing the files on centrally managed file servers; they also can specify security policies to instruct user PCs and devices to encrypt Work Folders and use a lock screen password. By leveraging this built-in feature, you can protect data at rest at the user’s device location. If the user is setting up Work Folders using Windows 8, he will be notified about these policies, as shown in Figure 7-2.
More Info
You can read more about Work Folders in the TechNet article at http://technet.microsoft.com/en-us/library/dn265974.aspx. You can also use Work Folders in Windows 7; see the TechNet article at blogs.technet.com/b/filecab/archive/2014/04/24/work-folders-for-windows-7.aspx.
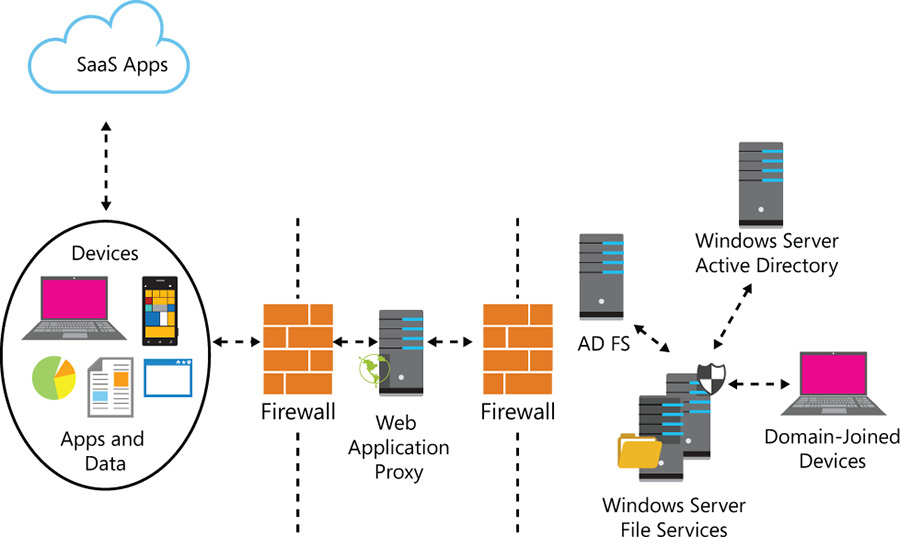
The infrastructure to support this functionality is shown in Figure 7-3. It enables both mobile users coming from outside of the corporate network and users who are using domain-joined computers located on-premises.
Active Directory Rights Management Services
For companies that have already invested in an on-premises infrastructure and want to keep managing their data classification under this infrastructure, they can use the Active Directory AD RMS. AD RMS is designed for companies that need to protect sensitive and proprietary information, such as financial reports, product specifications, customer data, and confidential email messages. AD RMS consists of modules that are located on the server as well as on the client side. The server component composed by multiple web services that run on an Internet Information Server (IIS). The module located in the client can be run on either a client or a server operating system. The module located on the client side contains functions that enable an application to encrypt and decrypt content, retrieve templates and revocation lists, acquire licenses and certificates from a server, and many other related tasks.
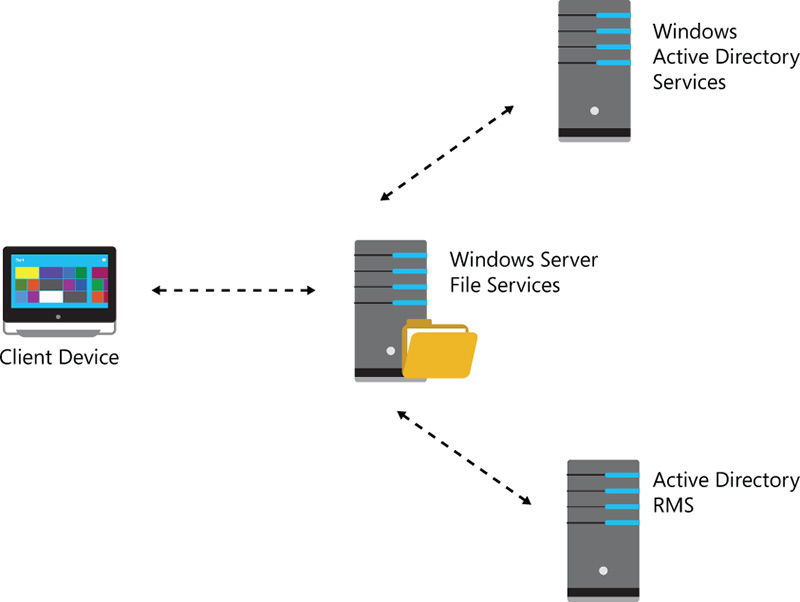
You can integrate the DAC feature that was previously described in this chapter with AD RMS to enhance your security by applying data classification for mobile users while they are accessing resources located on-premises. By using content scanning and classification policies, the AD RMS Server is able to verify if the content that is being accessed has rights management policies that must be applied to it and if there are it will execute these policies. You can also perform this task in a folder located in the file server, which can also be the location where the users that are storing their Work Folders data to access from their devices. The infrastructure for this solution is presented in the diagram shown in Figure 7-4.
More Info
For more information about AD RMS, read the TechNet article at http://technet.microsoft.com/en-us/library/hh831554.aspx.
Leveraging built-in client capabilities for data protection
As explained in Chapter 1, it is important to protect data at rest, not only on the servers located on-premises or in the cloud but also on the user’s device. In Chapter 5 and Chapter 6, you learned some device management capabilities to protect data at rest on the user’s device; however, you should also leverage built-in features in the client’s platform to enhance this data protection. Some security features available in Windows 8.1 are able to distinguish corporate data from user data. By leveraging Windows technologies to encrypt and control access to corporate data, you can enhance your enterprise mobility experience for devices using Windows operating system.
Mobile devices using the Windows Phone 8.1 operating system will natively have device encryption enabled based on BitLocker technology. This technology is used to encrypt the internal storage using Advanced Encryption Standard (AES) 128-bit encryption. By leveraging this capability, IT administrators can certify that the data is always protected from unauthorized users, even when unauthorized users have physical control of the phones. Companies that are using Exchange ActiveSync Mailbox Policies can enable the Require Device Encryption policy to prevent users from disabling device encryption on their devices.
More Info
For more information about what’s new in security for Windows 8.1, read the TechNet article at http://technet.microsoft.com/en-us/library/dn344918.aspx. For more information about Windows phone security, visit http://curah.microsoft.com/192722/windows-phone-security.
Azure RMS
Azure RMS comes with EMS to assist IT administrators to protect sensitive information from unauthorized access, and control how this information is used. Azure RMS requires an Azure AD directory, which you can create (refer to Chapter 4 for more details) because EMS provides you with a subscription for Azure AD Premium. Azure RMS uses encryption, identity, and authorization policies to help secure company data located in files and email messages.
Azure RMS is the closest protection of the data because, when you apply an Azure RMS template to the data, the rights stay with the file itself, regardless of where the file is located. This guarantees that the data is protected in place and in flight, in other words: it is protected all the time. IT administrators will remain in control of company data even when the data is shared with those outside of the organization. Although there are many flavors of RMS, the intent of this section is to focus on Azure RMS because this is the one that comes with EMS. (The available subscriptions for RMS are described at http://technet.microsoft.com/en-us/library/dn655136.aspx#BKMK_SupportedSubscriptions.)
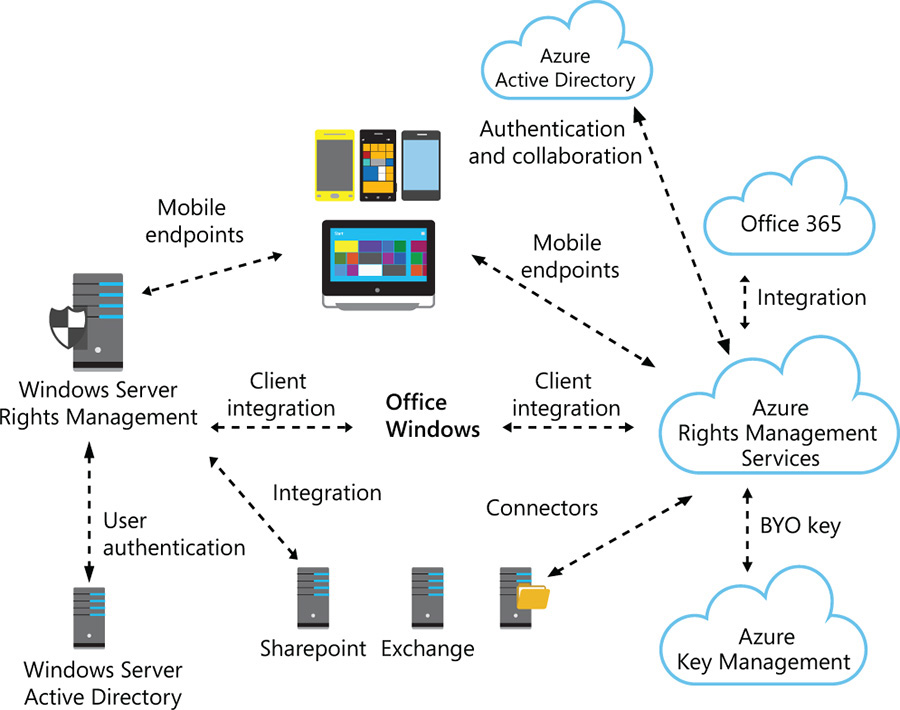
The Azure RMS service requires storage for the high-value tenant keys at the core of RMS. The Microsoft Key Management Service (KMS) used by Azure RMS stores these RMS tenant keys in a highly secure manner by using industry-proven, Federal Information Processing Standards (FIPS)-compliant Hardware Security Modules (HSMs)1. However, for companies that want to keep control of their keys, they can also use the Bring Your Own Key (BYOK) capability available in Azure RMS. (This functionality will be described in more detail later in this chapter.) Figure 7-5 shows a diagram the components that will be consuming the data protection capability provided by Azure RMS.
1 Azure RMS uses Thales HSMs to protect tenant keys. For more information, visit https://www.thales-esecurity.com/msrms/cloud.
With Azure RMS, you can protect not only Microsoft Office files but also other types of files, which are called generic files. When a generic file is protected using Azure RMS, an encapsulation is added to the file using pfile (protected file). This means that if the file has the TXT extension, the protected version will have the PTXT extension2. Another layer of security is also provided by including the authentication, which is used to verify whether a user is authorized to open the file.
2 To see a list of supported files, visit http://technet.microsoft.com/en-US/library/d9992e30-f3d1-48d5-aedc-4e721f7d7c25(v=ws.10)#BKMK_SupportFileTypes.
Important
Applications that understand Rights Management are called RMS-enlightened applications.
While the key focus of Azure RMS is to protect data handled by the end user, you can also integrate Azure RMS with servers located on on-premises servers. For example, if you have an Exchange Server 2013 on-premises server and you want to protect email messages by using Azure RMS, you need to use the Azure RMS connector to act as a communication relay between Exchange Server 2013 on-premises and Azure RMS.
Developers can also utilize Microsoft Software Development Kit (SDK) to provide a consistent user experience (UX) because the UX is integrated into the SDK itself. For more information about this, visit http://msdn.microsoft.com/en-us/library/dn133057%28v=vs.85%29.aspx.
How Azure RMS works
One of the main concerns that organizations have in using cloud services to encrypt their sensitive data is regarding data integrity and confidentiality. For this reason, it is critical for companies that are adopting EMS to understand that when they use Azure RMS, it does not see or store their data as part of the information protection process. The information itself that you protect using Azure RMS is never sent to or stored in Azure unless you explicitly choose to store in Azure or you use another cloud service that uses Azure storage.
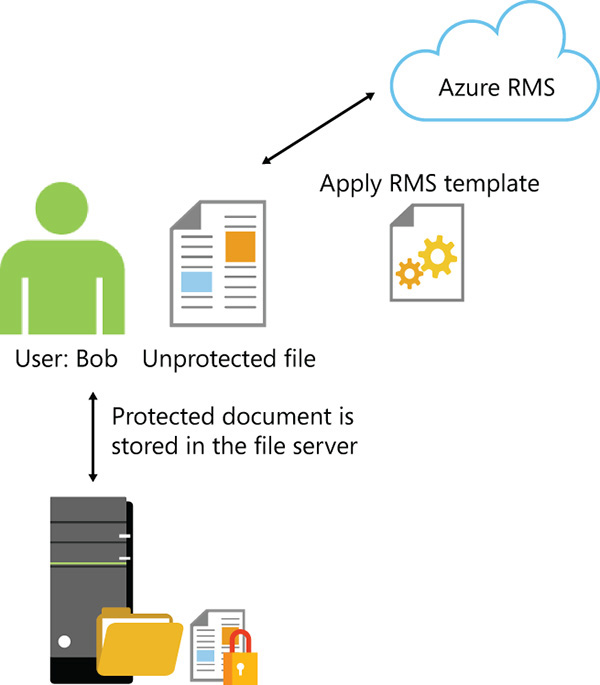
The data that will be protected by Azure RMS is encrypted at the application level and, once it is protected, it includes in the file’s header the policy that defines the authorized use for that data. When a protected document is used by a legitimate user or is processed by an authorized service, the data in the document is decrypted and the rights that are defined in the policy are enforced. Figure 7-6 shows how this process occurs for a user who wants to protect a document located in the on-premises file server by leveraging Azure RMS.
For a detailed explanation of this process, read “Walkthrough of how Azure RMS works: First use, content protection, content consumption” at http://technet.microsoft.com/en-us/library/jj585026.aspx#BKMK_Walkthrough.
In the particular scenario shown in Figure 7-6, the protection of the file could be simply done by applying one Azure RMS policy that was previously created by the IT administrator and published for the users. Figure 7-7 shows an example of a custom policy called “BYOD Policy” that is available using Microsoft Word after this application retrieves the templates from Azure RMS.
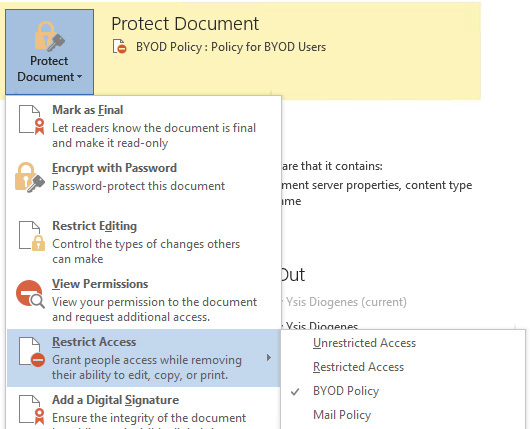
FIGURE 7-7 Document created using Microsoft Word with Azure RMS policy available to protect the data
When another user tries to open this file, she will see that this particular BYOD Policy was applied and this BYOD Policy was previously created with custom settings. When she verifies the permissions by clicking the View Permission button, she will be able to see what privileges she has on this file, as shown in Figure 7-8.
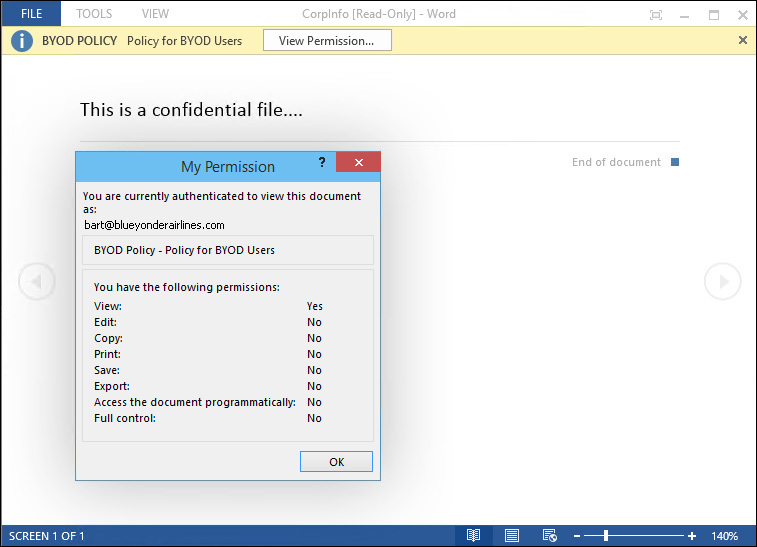
FIGURE 7-8 The user will be able to see what privileges she has to the file once the policies are applied
Real World: Anatomy of a rights-protected document
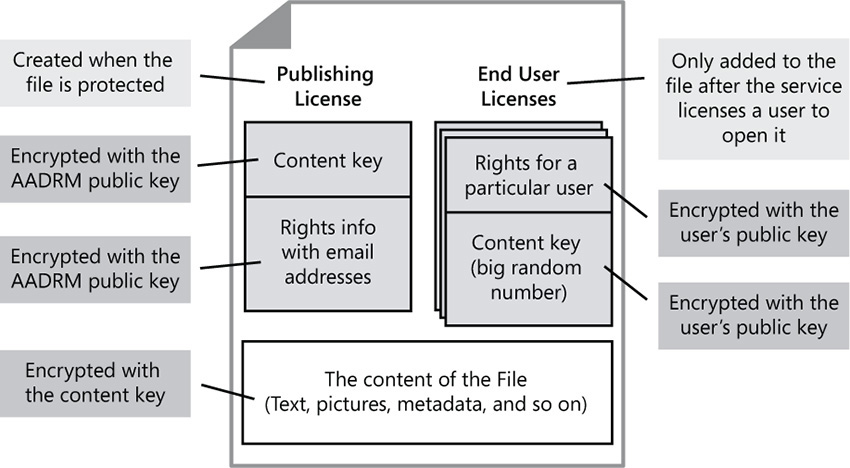
1. The client creates a random symmetric key (content key).
2. The client takes the body of the document it wants to protect and encrypts it with the content key. It ends up with an encrypted version of the original document, and it still has the content key used to encrypt it.
3. The client has a local copy of the Server Licensor Certificate (SLC) with its public key. It uses this public key to encrypt the content key, which means that this encrypted content key will be readable only by the service whose SLC was used.
4. The client then creates a list of rights expressing who can do what on the document.
5. After creating a list of rights, the client takes the encrypted content key (encrypted with the SLC), the public part of its own CLC, and the list of rights created before, encrypts them with the SLC’s public key along with some other information (such as the URL of the Licensing URL that should be used to acquire a license to consume the document), and builds what we call the Publishing License (PL) with them. This PL is then encrypted with the SLC’s public key so only the service will be able to decrypt it. The client also takes the private key from the user’s Client Licensor Certificate (CLC) and signs the encrypted object.
6. This is embedded into the original content encrypted with the content key to create a protected document. The content key is also stored encrypted with the CLC’s public key so the author can also decrypt the content without having to acquire a license.
Choosing the right deployment topology
When planning to adopt Azure RMS as part of your enterprise mobility strategy, you must first decide which tenant key topology is best for your company. The option that the company will choose will directly impact not only the adoption but also the maintenance of the cloud service. The available options are:
![]() Centralized in the cloud topology (Microsoft manages the master key)
Centralized in the cloud topology (Microsoft manages the master key)
![]() Hybrid topology (company manages the master key)
Hybrid topology (company manages the master key)
When you activate an EMS subscription and start using Azure RMS, the default tenant key topology used is fully cloud based. In this topology, Azure RMS generates the tenant key and manages most aspects of the tenant key lifecycle. The advantage of this option is the simplicity of configuration and the low administrative overhead of maintenance. The entire process is transparent for the company; the IT administrator doesn’t even know that there is a tenant key in place. In this topology, you simply sign up for Azure RMS and the rest of the entire key-management process is automatically handled by Microsoft. Figure 7-9 shows this topology.
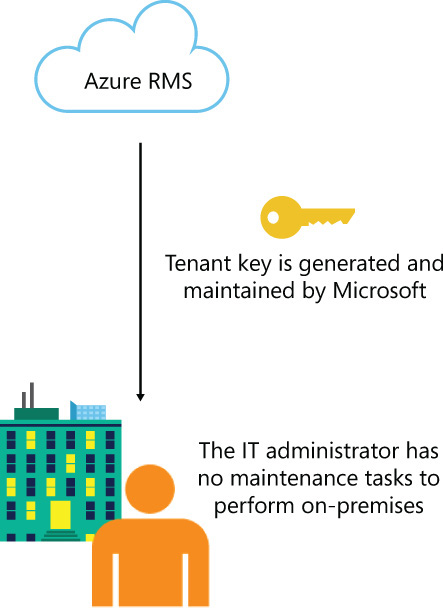
FIGURE 7-9 Tenant key management centralized in the cloud with no administrative overhead on-premises
In this topology, Microsoft keeps the master copy of your tenant key. However, companies can export the tenant key to store in an on-premises server if they want to keep a backup of this key on-premises. In addition to that, Azure RMS provides logging capabilities to ensure that IT administrators know how the data protection using the tenant key is being used.
This centralized topology is the default topology; it is appropriate for companies that don’t want to have an extra layer of administrative tasks to perform on-premises. However, some companies with more restrictive security policies or compliance requirements, or companies that are more skeptical about allowing the cloud provider to manage their protection key, might want to evaluate the hybrid topology. In the hybrid topology, the company is responsible for generating the master key on-premises, securing the key, and performing the appropriate level of backup for this key. (These are administrative tasks that you don’t have to deal with when you adopt the centralized topology.) After the key is generated on-premises, it needs to be securely transferred to the Microsoft HSM used by Azure RMS. The key can be transferred either in person by contacting Microsoft Customer Service and Support (CSS) or it can be transferred over the Internet. After this transference is performed, Azure RMS will use this key to protect company data. Figure 7-10 shows this topology.
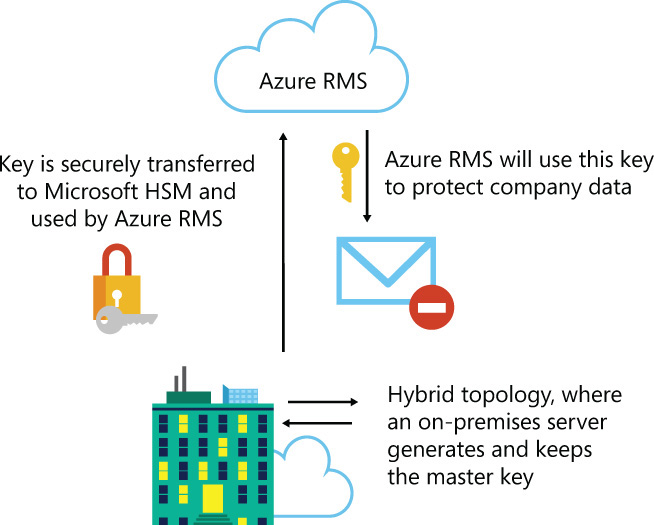
FIGURE 7-10 In the hybrid topology, the company is responsible for generating and maintaining the key
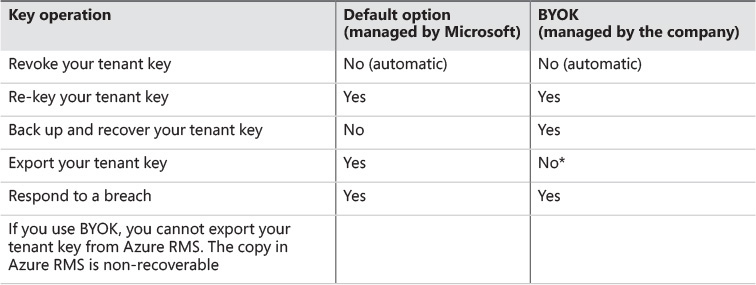
The adoption of this hybrid topology means that the company will bring its own key to be used by Azure RMS; this process is also known as Bring Your Own Key (BYOK). One key requirement to adopting BYOK is that the company must have access to a Thales HSM and have a local personal with enough knowledge to operate the Thales HSM3. Another factor that will impact the decision on which topology the company should use to adopt Azure RMS is the available operations for key lifecycle. Table 7-1 compares these two options.
3 For more information about how to use an on-premises (local) Thales nShield® HSM to generate cryptographic key for Azure RMS, visit http://aka.ms/AzureRMSHSM.
Tip
For the complete list of steps to adopt BYOK, read the TechNet article at http://technet.microsoft.com/en-us/library/dn440580.aspx#BKMK_ImplementBYOK.
Azure RMS connector
Another option for companies that want to leverage the Azure RMS capabilities by integrating them with on-premises servers is the use of the Azure RMS connector. With this connector, IT administrators and users can easily protect their data both inside the organization and outside, without having to install additional infrastructure or establish trust relationships with other organizations. The Azure RMS connector supports the following on-premises servers: Exchange Server, SharePoint Server, and file servers that run Windows Server and use File Classification Infrastructure (FCI). To use this feature, you must have directory synchronization between your on-premises Active Directory and Azure Active Directory (see Chapter 4 for more details on how to perform this synchronization).
For fault-tolerance purposes, the Azure RMS connector should be installed in at least two computers located on-premises. Although it is not required to have a dedicated computer to install the Azure RMS connector, you should not install the Azure RMS connector in your resource servers, such as Exchange Server, SharePoint Server, or a File Server with FCI. You should also plan to use HTTPS to secure the communication from on-premises servers using the Azure RMS connector with Azure RMS in the cloud. Ensure that each server that has the connector installed has a valid server authentication certificate and that they trust the root Certificate Authority (CA) that issued the certificate. In this setup, each server that has the RMS connector insta lled will have a certificate that contains the name that you will use for the connector (for example, rmsconnector.blueyonderairlines.com) and this name should be defined in the DNS. Figure 7-11 shows this topology.
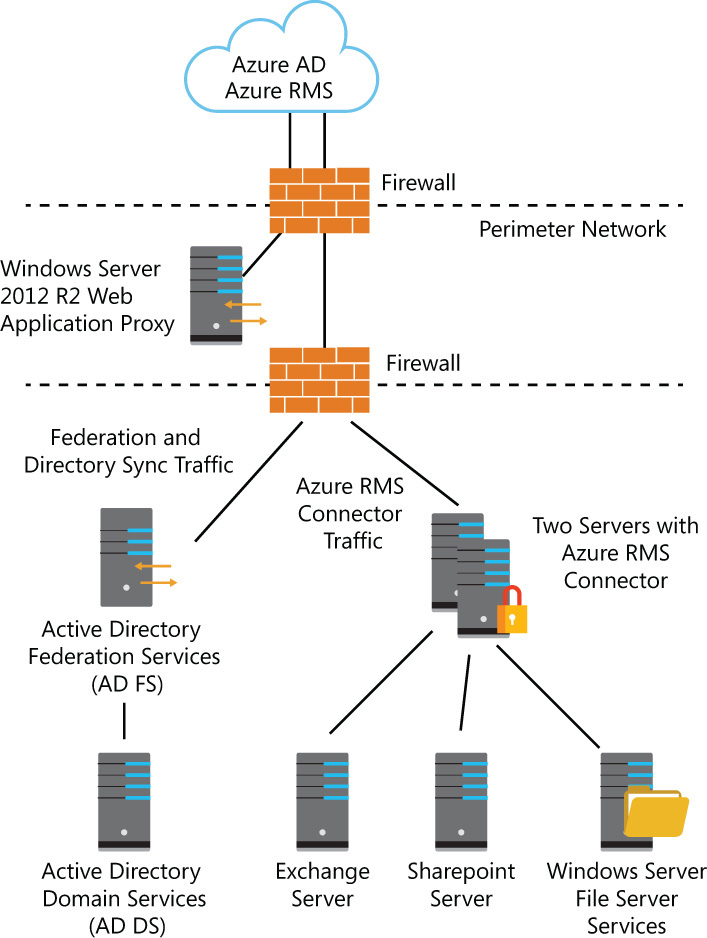
In the example shown in Figure 7-11, the Web Application Proxy has an HTTPS publishing rule for AD FS federation connectivity with Azure AD. The use of Web Application Proxy in this scenario is not a requirement as long as you have another solution to securely publish your on-premises applications. The diagram also shows two servers with Azure RMS connector for fault-tolerant and load-balancing purposes. It is important to mention that once you have both servers configured, you can use any IP-based load balancer to enable the Azure RMS connector clients (Exchange Server, SharePoint, and File Server) to see this Azure RMS connector as a single entity. If you choose to use the Network Load Balancing (NLB) feature available in Windows Server, you need to configure the Affinity to None and the Distribution Method to Equal.
Important
The RMS connector must be configured to use an account that has Microsoft RMS Tenant Global Administrator or Microsoft RMS Connector Administrator account privileges.
More Info
For more information about publishing AD FS via Web Application Proxy, read the TechNet article at http://technet.microsoft.com/en-us/library/dn528859.aspx. For more information on how to deploy Windows Network Load Balancing, read the TechNet article at http://technet.microsoft.com/library/cc754833(v=WS.10).aspx.
Monitoring access to resources
When dealing with data access and protection as a pillar for enterprise mobility adoption, it is important not only to keep control over the data, but also to understand how this data is being consumed by the users. Azure RMS enables IT administrators to monitor Azure RMS usage, which includes requests coming from users and Azure RMS-related tasks performed by IT administrators or users that were delegated to operate the Azure RMS service. By closely monitoring these aspects of the service, it will be easier to identify potential abuse of the protection service, track data access for forensics purposes, or just perform data analysis to understand patterns.
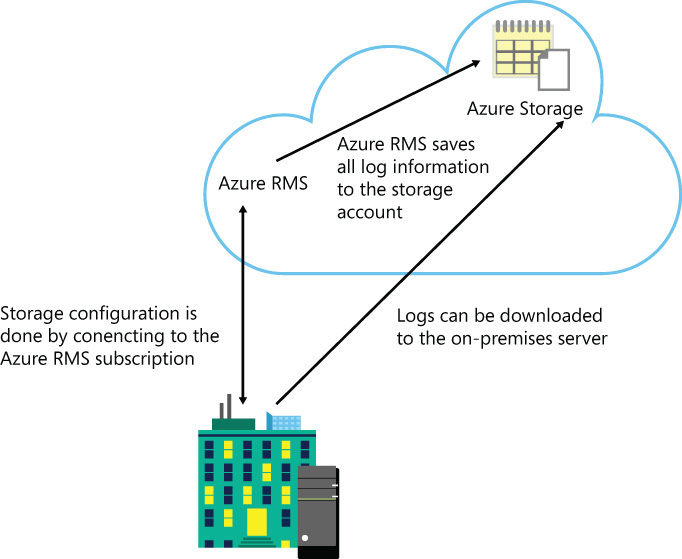
To use Azure RMS logging, you need to create an Azure Storage account using your Azure subscription and use Windows PowerShell for Azure RMS to configure this storage. (For information on installing Windows PowerShell for Azure RMS, go to http://technet.microsoft.com/en-us/library/jj585012.aspx.) Azure RMS will write the logs in this Azure Storage account that you created by using a series of blobs. Each blob will contain one or more log records that will be using W3C extended log format. You can use the Azure Administrative Portal to see these logs or you can download these logs using Windows PowerShell for your on-premises servers. Figure 7-12 shows a diagram of this distribution.
Tip
You can use the Get-AadrmUsageLog cmdlet to download Azure RMS logs to your computer. By using this cmdlet, you can download each blob as a file and save it in the location that you specify in the command.
Figure 7-13 shows an example of how this log format appears in the management portal.

If you decide to download the log files form Azure Storage to your on-premises server, ensure that the destination server is in a secure location, the storage that these logs will be saved is encrypted, and that only authorized users will have access to it. Logging can reveal many of the user’s behaviors and therefore should not be open to everyone in the organization. If necessary, you can delegate access to your RMS logs by sharing your storage account name and access key. There are many scenarios in which the IT administrator might want to share access to these logs with other administrative users or with a developer who is using this storage as part of his app development. Although it might sound risky to share your account name and access key, this is a safe procedure because this storage is dedicated to your RMS logs, which means that even though other users will have access to the key, they can’t use this key to access any other storage in the management portal.