
Chapter 9. Monitoring BYOD and company-owned devices
The next part of your strategy for a mobile workforce is to enable IT to stay in control while also enabling users to be productive. From the implementation perspective, you already learned how to do that, but now you need to keep the system working properly and, if necessary, be able to identify why it is not working.
In this chapter, you take on the role of the senior enterprise administrator for Blue Yonder Airlines IT to leverage EMS capabilities for monitoring resources and responding to security incidents.
Continuous monitoring and incident response
You need to ensure that IT can control your organization’s data both on-premises and on remote devices. You will need to implement continuous monitoring of users’ activities and understand how devices are being used to consume data. The IT department and the Security department should work together to identify any suspicious activities and react to them based on an established plan, which is part of the incident response plan.
Monitoring users and devices can also assist IT in identifying trends and proactively mitigating potential issues. For example, if an IT administrator repeatedly sees alerts regarding multiple failure attempts to log on from one user’s credential during a particular time of day, the administrator might suspect that someone other than the user is trying to log on with the user’s credentials. The administrator might investigate further to identify what is happening and why.
Before you start monitoring users and devices, you should formulate a monitoring plan. Begin by answering some important questions to help you develop the plan. Here are some sample questions that you can use to start your monitoring plan:
![]() What assets are you trying to protect?
What assets are you trying to protect?
![]() What are the threats against them?
What are the threats against them?
![]() What vulnerabilities might these assets have?
What vulnerabilities might these assets have?
![]() What’s the likelihood that those threats will materialize?
What’s the likelihood that those threats will materialize?
![]() What do you consider an authentication anomaly in your environment?
What do you consider an authentication anomaly in your environment?
These sample questions will assist you to build the foundation for your monitoring strategy and from there you can create more granular questions to target specific areas relevant to your organization. In conjunction with monitoring, you also need to understand how incident response takes place in the overall security strategy. Figure 9-1 shows three security phases—prevention, detection, and reaction—and how they fit into a monitoring plan.
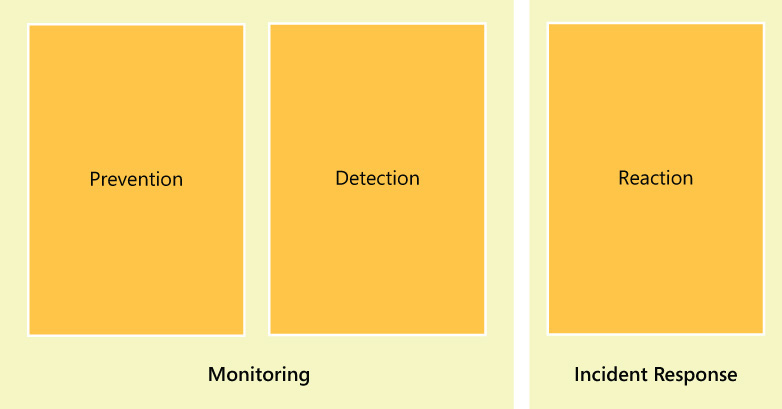
Figure 9-1 is an example of one way to fit the security phases into monitoring and incident response. Organizations with custom requirements might decide to break down these phases or expand on them. Large organizations might already have an incident response plan in place, in which case they need to identify how the plan will be affected when they are adopting enterprise mobility. The basic concept is that monitoring is a task that has direct impact in preventing and detecting security-related issues. Incident response is about how the organization will react to an incident when a security-related issue occurs.
Don’t overlook the learning process as a part of your incident response plan. Always ask what you learned from an incident and how can you prevent it from happening again. This learning will enable IT to enhance their monitoring scope to add attributes that were not previously considered because the company didn’t know about that potential threat. As you can see, this is an ongoing process and that’s why it is important to keep things aligned between proactive (monitoring) tasks and reactive (incident response) tasks.
Creating an incident response plan
This section addresses some of the key aspects of an incident response plan and what you need to consider to incorporate enterprise mobility into your plan. This is a huge topic and you can find long papers, such as Responding to IT Security Incidents1, that explain about all elements of an incident response plan.
1 You can read this paper at http://technet.microsoft.com/en-us/library/cc700825.aspx.
All employees of the organization must know how to react if they think a security breach might have occurred. If an employee is travelling and he believes his system is compromised, he needs to know whom he should contact first and what actions he must take. If a procedure is not well established or the employee is not aware of how to report an incident, he will try to troubleshoot it himself, which can be harmful in different levels. First, he might not have the technical expertise to resolve the issue; second, he might be removing evidence that could be used to identify the root cause of the problem.
A good incident response plan should, at a minimum, include procedures for the following items:
![]() Evaluate the current state of the system by verifying the:
Evaluate the current state of the system by verifying the:
![]() Extent of the infection
Extent of the infection
![]() Type of data at risk
Type of data at risk
![]() Source or target of the attack
Source or target of the attack
![]() Resources that were compromised
Resources that were compromised
![]() Resources that are suspected to be compromised
Resources that are suspected to be compromised
![]() Impact on infrastructure
Impact on infrastructure
![]() Cost of recovery
Cost of recovery
![]() Establish the first course of action in a detailed response plan
Establish the first course of action in a detailed response plan
![]() Isolate and contain the threat
Isolate and contain the threat
![]() Track and identify the attacker
Track and identify the attacker
![]() Analyze and respond to the incident
Analyze and respond to the incident
![]() Alert others according to the response strategy
Alert others according to the response strategy
![]() Begin system remediation and clean-up
Begin system remediation and clean-up
![]() Detail the de-escalation process
Detail the de-escalation process
![]() Detail the post-incident review process
Detail the post-incident review process
Several of these procedures might have ramifications. For example, the post-incident review process should include details on what needs to be documented, the lessons that were learned, and how to enhance the overall security to prevent this type of incident from happening again. If the incident isn’t preventable, at least add countermeasures that can reduce the likelihood that will happen again.
Leveraging EMS to monitor resources
Throughout this book you have seen how the three cloud services that are part of EMS can assist you in enabling users to be more productive with their devices while keeping IT in control of company data
Because EMS is composed of three cloud services, is very important for the IT administrator to understand the monitoring capabilities of each cloud service. With this knowledge, the IT administrator will understand which cloud service she needs to use to obtain specific types of information about the user or device. Figure 9-2 is a pictorial summary of this relationship.
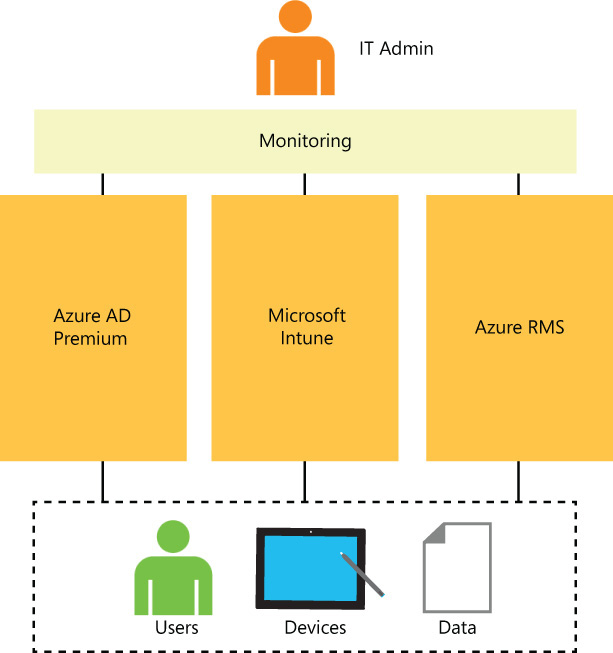
FIGURE 9-2 The IT admin should leverage the reporting and monitoring capabilities of all three cloud services to monitor users, devices, and data
Azure AD monitoring capabilities
As you learned in Chapter 3, you can use access and usage reports to gain visibility into the activity and security of your organization’s Azure AD environment. You can use the information from these reports to determine where possible security risks might exist and then plan how to mitigate those risks.
More Info
While all Azure AD reports are useful, the anomalous activity reports are the primary focus of this chapter. You can learn more about all of the available Azure AD access and usage reports on MSDN at http://msdn.microsoft.com/library/azure/dn283934.aspx.
As a tenant administrator, you should review all Azure AD reports on a regular basis to ensure that you are aware of any possible security threats. You will need to investigate and take action to mitigate any potential risks that you discover. After you implement EMS for your organization, you will have access to several Azure AD Premium reports (in addition to the standard reports) that are useful in detecting anomalous behaviors, including those shown in Figure 9-3.
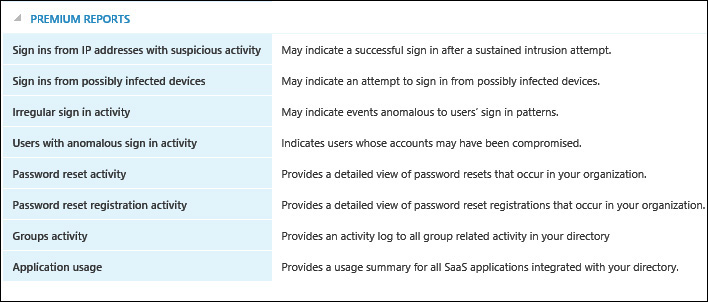
As shown in Figure 9-3, the premium reports are:
![]() Sign Ins From IP addresses With Suspicious Activity When multiple sign-in attempts fail over a short period of time or other suspicious activity occurs from the same IP address, it could indicate that someone other than the trusted user is trying to gain access to the account or company resources. You should review this report on a regular basis to discover all sign-in attempts originating from suspicious IP addresses.
Sign Ins From IP addresses With Suspicious Activity When multiple sign-in attempts fail over a short period of time or other suspicious activity occurs from the same IP address, it could indicate that someone other than the trusted user is trying to gain access to the account or company resources. You should review this report on a regular basis to discover all sign-in attempts originating from suspicious IP addresses.
![]() Sign Ins From Possibly Infected Devices This report should be reviewed to ensure that your users are not signing in on devices that might be compromised with malware. If a user’s device is assigned an IP address that was recently used to contact a malware server, the device and sign-in information will be available in this report.
Sign Ins From Possibly Infected Devices This report should be reviewed to ensure that your users are not signing in on devices that might be compromised with malware. If a user’s device is assigned an IP address that was recently used to contact a malware server, the device and sign-in information will be available in this report.
![]() Irregular Sign In Activity This is a powerful report, based on machine learning, which will alert you to abnormal sign-in activities. There are several ways that the service could determine that a sign-in is irregular, such as multiple sign-in locations in a very short period of time. The algorithm used to determine this behavior will classify the sign-in as either irregular or suspicious. If an event is marked as suspicious, you should definitely investigate the issue because it has a higher chance of being a security breach than an irregular event.
Irregular Sign In Activity This is a powerful report, based on machine learning, which will alert you to abnormal sign-in activities. There are several ways that the service could determine that a sign-in is irregular, such as multiple sign-in locations in a very short period of time. The algorithm used to determine this behavior will classify the sign-in as either irregular or suspicious. If an event is marked as suspicious, you should definitely investigate the issue because it has a higher chance of being a security breach than an irregular event.
If there are 10 or more irregular sign-in events in the past month, the Azure AD service sends an email to global administrators from [email protected].
![]() Users With Anomalous Sign In Activity This report gives you a single view of all user accounts for which anomalous sign-in activity has been identified through any anomalous reporting method. This report includes details about the user and other relevant information about the event.
Users With Anomalous Sign In Activity This report gives you a single view of all user accounts for which anomalous sign-in activity has been identified through any anomalous reporting method. This report includes details about the user and other relevant information about the event.
![]() Password Reset Activity This report provides you with an overview of the password reset activity that is occurring within your organization.
Password Reset Activity This report provides you with an overview of the password reset activity that is occurring within your organization.
![]() Password Reset Registration Activity This report provides you with an overview of the password reset registrations that are occurring within your organization.
Password Reset Registration Activity This report provides you with an overview of the password reset registrations that are occurring within your organization.
![]() Groups Activity This report provides you with information about the activities occurring within Azure AD groups. This includes changes to group memberships as well as other basic group activity.
Groups Activity This report provides you with information about the activities occurring within Azure AD groups. This includes changes to group memberships as well as other basic group activity.
![]() Application Usage This report provides you with an overview of how Software-as-a-Service (SaaS) applications that are integrated with your Azure AD directory are being used. It displays the application name, the number of unique users accessing that application, and how many total sign-ins have occurred during the time period you specify for the report (the last 30 days, the last 7 days, or the previous 24 hours).
Application Usage This report provides you with an overview of how Software-as-a-Service (SaaS) applications that are integrated with your Azure AD directory are being used. It displays the application name, the number of unique users accessing that application, and how many total sign-ins have occurred during the time period you specify for the report (the last 30 days, the last 7 days, or the previous 24 hours).
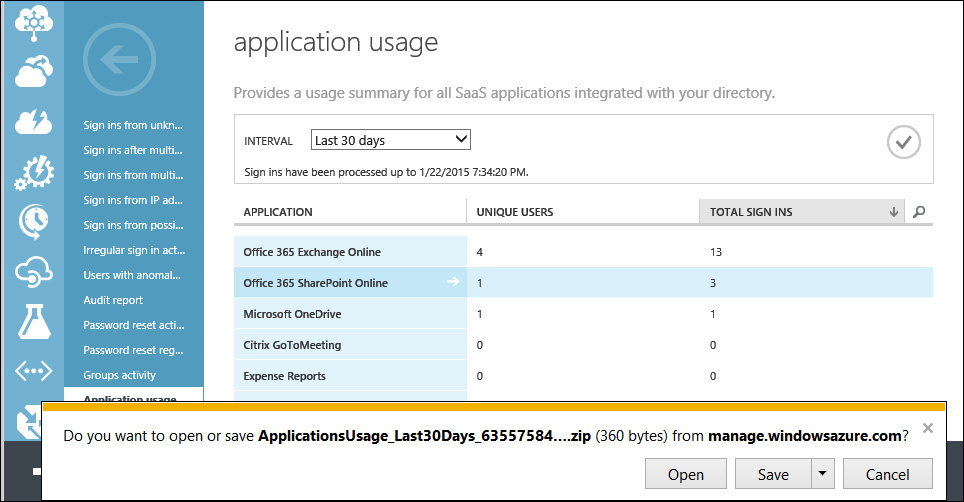
Besides simply viewing the data when a report is generated, you can sort the data by any of the resulting report columns or use the search box capabilities built into the report to search for specific data. If you need to save a copy of the report, you can use the Download option provided at the bottom of the report page to Open or Save a .zip file containing a copy of the report data in .csv format, as shown in Figure 9-4.
Microsoft Intune monitoring capabilities
Microsoft Intune provides alerts and reports that can be used to monitor the service to provide a high-level view of device health and inform you of issues that should be addressed. Just as you should review Azure AD reports on a regular basis, you should also respond to Microsoft Intune alerts in a timely manner and regularly review the reports available to you.
Microsoft Intune alerts
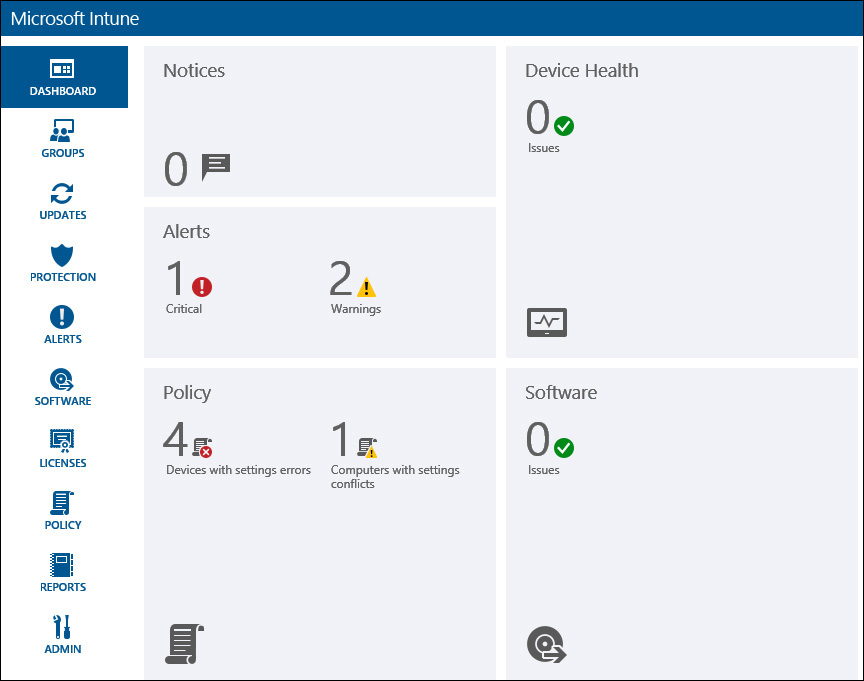
Microsoft Intune alert types can be thought of as pre-configured rules that generate an alert that is displayed in the main Admin Console dashboard, as shown in Figure 9-5.
You can configure alert types in the Admin Console by browsing to Admin, Alerts and Notifications, Alert Types. From there, you can change default alert settings and enable or disable alerts based on your preferences and needs. This is also where you define email notification recipients who will receive emails generated by the Microsoft Intune service when an alert is triggered. While there, you can also define when those emails are sent for the various alerts by customizing the notification rules to meet your notification requirements.
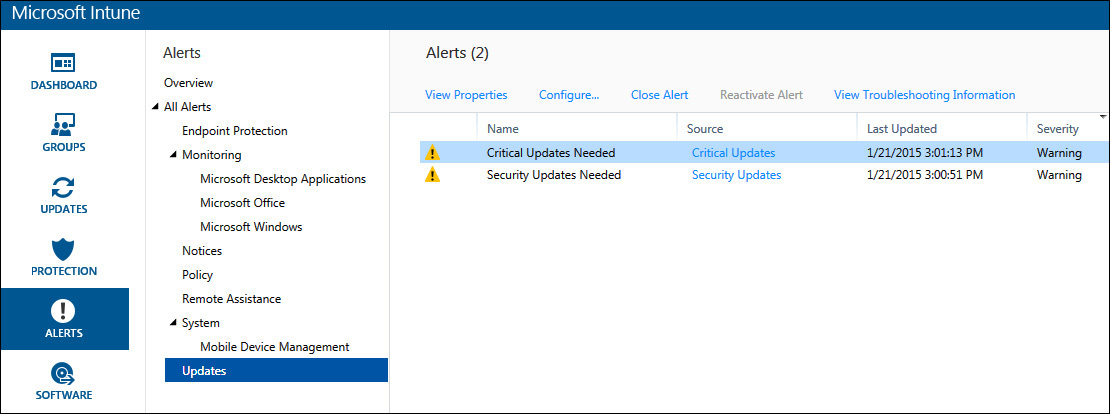
After you configure alert types, you can view detailed alert information for any alerts generated by the service in the Alerts workspace of the Admin Console. The Alerts Overview dashboard displays a summary of active alerts that you can review with a quick glance. You can display and sort active alerts by date, category (endpoint protection, monitoring, notices, policy, remote assistance, system, or updates), or severity (critical, warning, or informational) and also pick a sort option to choose to place either the newest or oldest alerts on top of the list. To dive deeper into a specific alert, click the alert notification itself or drill-down into the various alert categories for more information, as shown in Figure 9-6.
Microsoft Intune reports
The reporting capabilities provided by Microsoft Intune allow you to stay informed about activities occurring in your managed service and can be used to help you plan for future hardware or software purchases. The following built-in reports are available to provide information about inventoried hardware, software, and license usage in your Mobile Device Management (MDM) environment:
![]() Update Reports This report allows you to discover information about software updates that are pending, needed, installed, or failed on managed computers. You can also easily filter the report data to display only the information you need, such as the update classification, Microsoft Security Response Center (MSRC) rating, and whether or not you have defined the update as not applicable or should be installed.
Update Reports This report allows you to discover information about software updates that are pending, needed, installed, or failed on managed computers. You can also easily filter the report data to display only the information you need, such as the update classification, Microsoft Security Response Center (MSRC) rating, and whether or not you have defined the update as not applicable or should be installed.
![]() Detected Software Reports This report displays software that has been detected on computers managed by the Microsoft Intune service. This report allows you to further refine reported results by device group, software publisher, or software category.
Detected Software Reports This report displays software that has been detected on computers managed by the Microsoft Intune service. This report allows you to further refine reported results by device group, software publisher, or software category.
![]() Computer Inventory Reports This report displays hardware information that has been detected on computers managed by the Microsoft Intune service. Customizable criteria for this report include device group, manufacturers, chassis type, operating system, model, or even physical hardware information such as available disk space, physical memory, or CPU speed.
Computer Inventory Reports This report displays hardware information that has been detected on computers managed by the Microsoft Intune service. Customizable criteria for this report include device group, manufacturers, chassis type, operating system, model, or even physical hardware information such as available disk space, physical memory, or CPU speed.
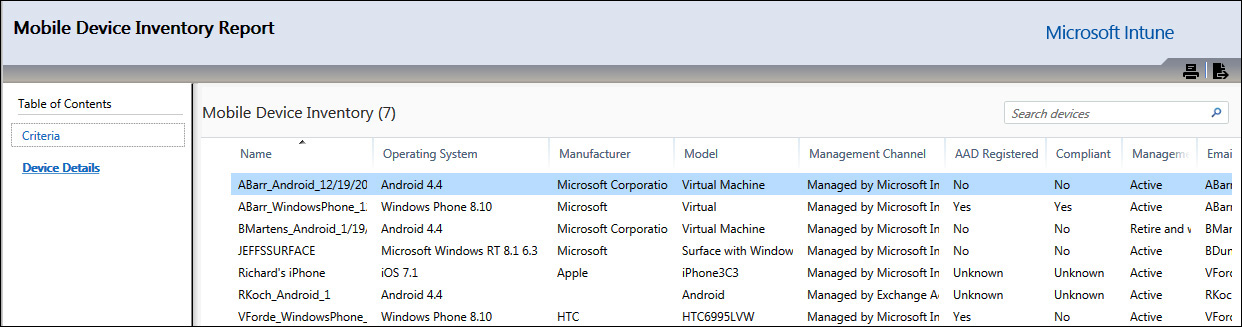
![]() Mobile Device Inventory Reports Similar to the computer inventory report, this report displays information collected about mobile devices being managed by your Microsoft Intune service instance. Results for this report can be scoped to a particular device group, operating system, and also whether the device has been jailbroken or rooted.
Mobile Device Inventory Reports Similar to the computer inventory report, this report displays information collected about mobile devices being managed by your Microsoft Intune service instance. Results for this report can be scoped to a particular device group, operating system, and also whether the device has been jailbroken or rooted.
![]() License Purchase Reports When you add license agreement information (either Microsoft Volume License Agreements or other license agreements) to your Microsoft Intune service from the Licenses workspace in the Admin Console, the agreement information is displayed in these reports.
License Purchase Reports When you add license agreement information (either Microsoft Volume License Agreements or other license agreements) to your Microsoft Intune service from the Licenses workspace in the Admin Console, the agreement information is displayed in these reports.
![]() License Installation Reports This report enables you to see at a glance how many software licenses you have purchased for licensed software and how many managed computers have that software installed. This report can be useful in ensuring that you are using software legally in your environment, but the service will not stop detected software from running or being installed if you run out of software licenses.
License Installation Reports This report enables you to see at a glance how many software licenses you have purchased for licensed software and how many managed computers have that software installed. This report can be useful in ensuring that you are using software legally in your environment, but the service will not stop detected software from running or being installed if you run out of software licenses.
![]() Terms And Conditions Reports Using this report, you can view which users have accepted your custom terms and conditions. In addition to the user name, you also see which version of the terms and conditions was agreed to and on what date the action occurred.
Terms And Conditions Reports Using this report, you can view which users have accepted your custom terms and conditions. In addition to the user name, you also see which version of the terms and conditions was agreed to and on what date the action occurred.
![]() Noncompliance Apps Reports If you have created and deployed configuration policies for Android or iOS devices, this report can be used to view app compliance status for users and their devices. You can filter this report to show app installations from either the compliant or noncompliant apps list that you have previously defined as part of the configuration policy.
Noncompliance Apps Reports If you have created and deployed configuration policies for Android or iOS devices, this report can be used to view app compliance status for users and their devices. You can filter this report to show app installations from either the compliant or noncompliant apps list that you have previously defined as part of the configuration policy.
![]() Certificate Compliance Reports This report displays information about certificates that have been issued to users and devices from the Network Device Enrollment Service (NDES). NDES is one of the role services of the Active Directory Certificate Services (AD CS) and it implements the Simple Certificate Enrollment Protocol (SCEP) to provide communication between network devices and a Registration Authority (RA)2.
Certificate Compliance Reports This report displays information about certificates that have been issued to users and devices from the Network Device Enrollment Service (NDES). NDES is one of the role services of the Active Directory Certificate Services (AD CS) and it implements the Simple Certificate Enrollment Protocol (SCEP) to provide communication between network devices and a Registration Authority (RA)2.
2 You can learn more about how SCEP is used for certificate enrollment at http://tools.ietf.org/html/draft-nourse-scep-18.
![]() Device History Reports Historical information about when a device is retired, wiped, or deleted is displayed in this report based on the date range that you specify. With this report, not only do you have a historical record of the action taken, but also information about the device name, owner, state, and who initiated the action.
Device History Reports Historical information about when a device is retired, wiped, or deleted is displayed in this report based on the date range that you specify. With this report, not only do you have a historical record of the action taken, but also information about the device name, owner, state, and who initiated the action.
When a Microsoft Intune report is generated based on the criteria that you have selected, you can easily view it in a new browser window. You can sort the data by any column and all of the report data is searchable via the search box in the top-right corner of the data display area, as shown in Figure 9-7.
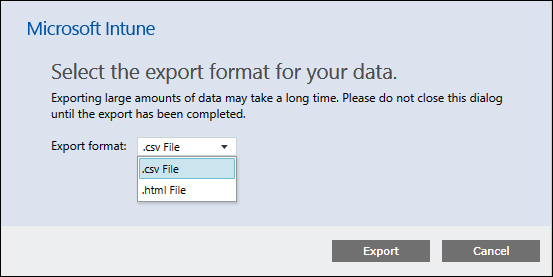
Additionally, in the top-right corner, each report provides you with options to print the data or export it as a .csv or .html file (see Figure 9-8).
While each of the built-in reports allows you to customize the data displayed by selecting the criteria most important to you, it can be time consuming to do this on a regular basis. Another option you have is to save a customized report so that you can quickly access the necessary information without needing to re-customize the built-in report every time. To do this, just customize the report so that it displays the information that you want to see and then use the Save As option in the top-right corner of the reports workspace to save the custom report. The list of built-in report names on the left side of the workspace will not change, but the next time you select the built-in report that you have customized, you will be able to quickly access the customized report from the Load drop-down menu on the right side, as shown in Figure 9-9.

Microsoft Azure RMS monitoring capabilities
As you learned in Chapter 7, Azure RMS enables IT Administrators to monitor Azure RMS usage, which includes requests coming from users and Azure RMS-related tasks performed by IT Administrators or users who were de legated to operate the Azure RMS service. The storage that has the Azure RMS log will show minimal information if you just look at the Dashboard, as shown in Figure 9-10.
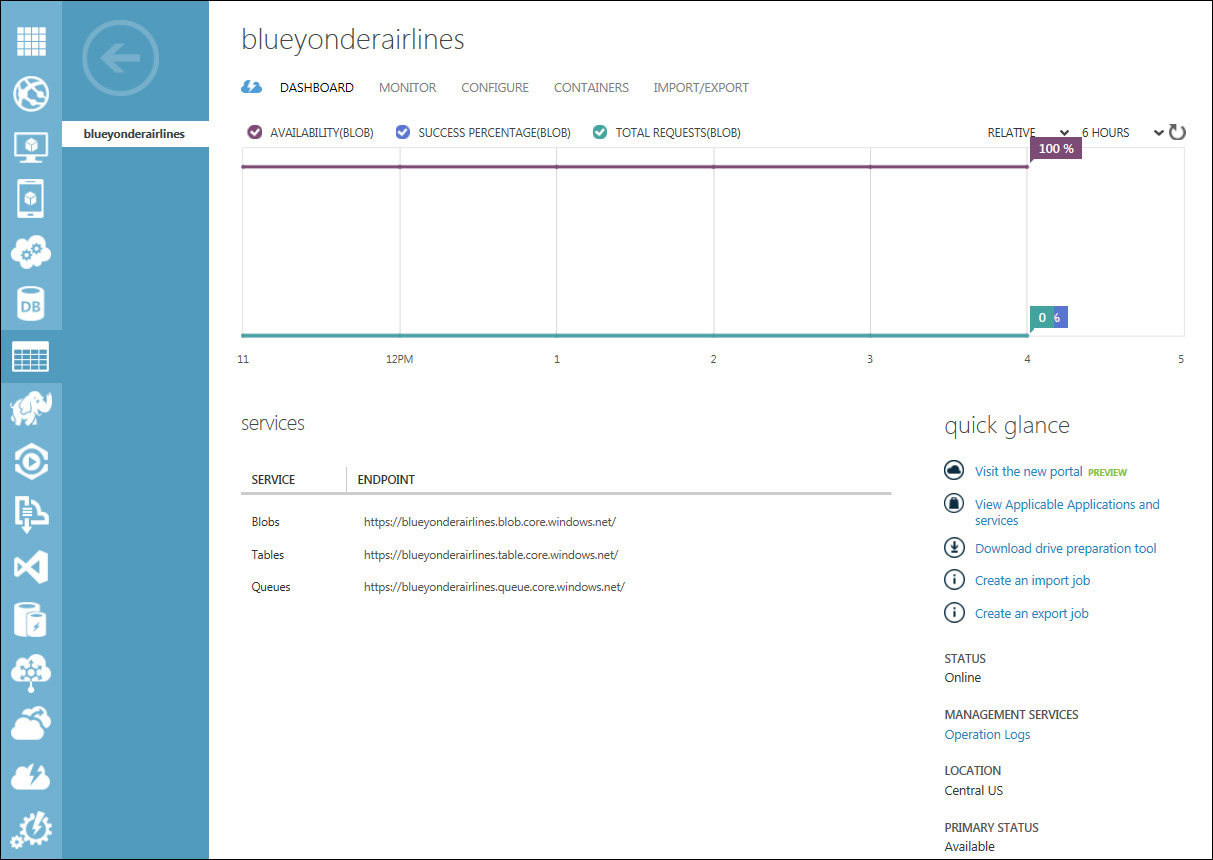
There is not much information to extract from the dashboard, but if you click Containers, you can access the logs and download them. When you download a log, it opens in a new tab in your browser and shows more details, as shown in Figure 9-11.

You can also use the Get-AadrmUsageLog cmdlet to download these logs. For more information about this cmdlet, visit http://msdn.microsoft.com/library/azure/dn629401.aspx.
In this log, you can identify activities such as a client requesting a license for a specific piece of content, a client requesting a certificate from a Windows-based computer, and request queries for the URLs to certify and acquire licenses. This log file contains the following fields:
![]() Date The date in which the request was made. This date is in UTC format.
Date The date in which the request was made. This date is in UTC format.
![]() Time The time in which the request was made. This time is in UTC 24 hour format.
Time The time in which the request was made. This time is in UTC 24 hour format.
![]() Row-id The unique GUID for the log.
Row-id The unique GUID for the log.
![]() Request-type The RMS API that was used in the request.
Request-type The RMS API that was used in the request.
![]() User-id The username that represents the user that started the request.
User-id The username that represents the user that started the request.
![]() Result The type of result, which shows if the request was done successfully or not.
Result The type of result, which shows if the request was done successfully or not.
![]() Correlation-id The common GUID used between RMS client and server.
Correlation-id The common GUID used between RMS client and server.
![]() Content-id The GUID for the protected content.
Content-id The GUID for the protected content.
![]() C-info The information regarding the client platform.
C-info The information regarding the client platform.
![]() C-ip The IP address of the client.
C-ip The IP address of the client.
With this information, you can identify the client that originated the request, and if you are working on an incident response case, this information can be useful for a compromised account.
Leveraging EMS to respond to a security incident
Now that you understand more about the monitoring and reporting capabilities available to you with EMS technologies, you can probably think of several ways to identify and mitigate security issues in your environment. Using the tools and reports available to you in a holistic way gives you greater control and ability to rapidly respond to any security issue that might arise as you work to keep control of the organization’s data while users are either on-premises or remote.
For the remainder of this chapter, you will again assume the role of the senior enterprise administrator for Blue Yonder Airlines and take the necessary steps to identify threats and take proactive actions to mitigate potential security issues using EMS technologies.
Scenario
As the senior enterprise administrator for Blue Yonder Airlines you are responsible for the overall monitoring and security strategy for the company. In addition to regular monitoring of the service and your users’ actions, the security strategy also outlines a clear incident response strategy built upon the capabilities provided by your EMS implementation for the airline.
Prevention
The first monitoring component of the security strategy you have developed for Blue Yonder Airlines is prevention. You have taken great effort during the planning and implementation phases of your EMS rollout to harden the security of your environment as much as possible while still providing the flexibility for your end users to easily use their own devices at work.
Beginning with on-premises Active Directory integration with Azure AD, you enabled hybrid identity and single source control of directory objects anywhere. In the Blue Yonder Airlines Azure AD, you have also required that all users register before accessing the Azure Access Panel applications and settings and you have also forced users to define multiple authentication methods for password resets and multi-factor authentication (MFA) applications. Requiring all users to enroll their devices in Microsoft Intune Mobile Device Management in order to access Microsoft Exchange email enables you to help protect access to company resources and control several aspects of the devices themselves without infringing on employee privacy. Finally, you have implemented Azure RMS as a final defense to protect company data. These proactive steps have set you up to both safeguard against security issues and to quickly respond to any security incidents.
Detection
Many security incidents go unnoticed in today’s enterprise environments. It is your job as the senior enterprise administrator for Blue Yonder Airlines to ensure that you and your IT management team are preforming due diligence and monitoring the services used by your users on a regular basis to identify any possible anomalies. To accomplish this task, you regularly review the Azure AD reports available to you as well as monitor the Microsoft Intune service alerts and reports.
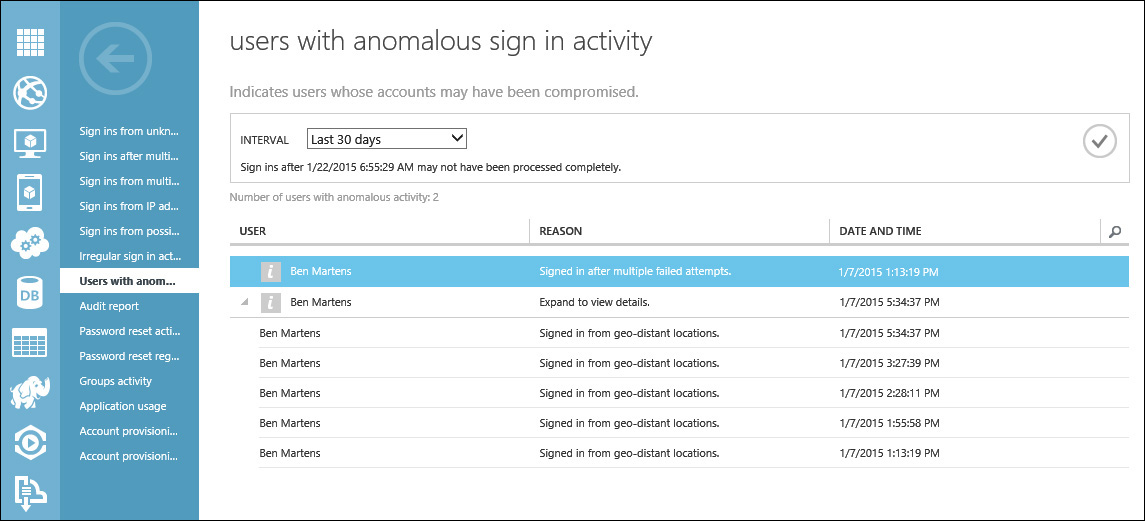
While reviewing Azure AD reports, you notice anomalous activity associated with one of Blue Yonder Airlines employees named Ben Martens. According to the Users With Anomalous Sign In Activity report shown in Figure 9-12, Ben Martens’ attempts to sign in failed multiple times before he finally successfully gained access to company resources. In addition to the several failed sign-in attempts, the report indicates that this account has been logged into from several geo-distant locations within a very short period of time. Each of these issues will need to be further investigated to determine what is going on with this account.
The first issue discovered is that the user, Ben Martens, has tried unsuccessfully to log in multiple times before finally gaining access to company resources at myapps.microsoft.com. This kind of behavior could indicate a brute force password attack using this user’s credentials. To investigate further, you review the Sign Ins After Multiple Failures report shown in Figure 9-13 and discover that this account had over 100 failed sign-in attempts before finally signing in successfully. By looking more closely at the report data, the date and time stamps of each failed log in attempt reveal they were all made in less than 15 minutes before a successful sign-in took place. These sign-in attempts also originated from an IP address that you do not recognize and from a city not associated with any Blue Yonder Airlines operations.
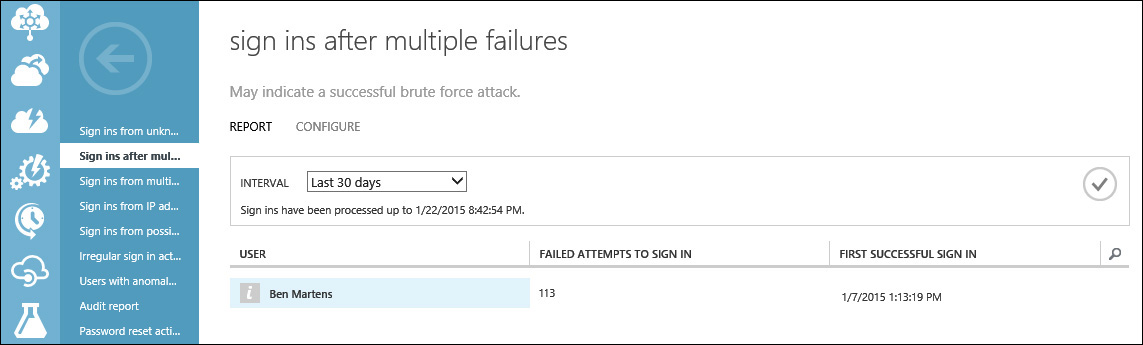
The Sign Ins After Multiple Failures Report is based on failed sign-in attempts from cloud-mastered user accounts only. In other words, this report displays only anomalous user activity detected by accounts created in Azure AD. To identify this behavior in on-premises domain users authenticating by AD FS, search for trends in failed logon attempts recorded as event ID 4768 in your on-premises domain controller event logs.
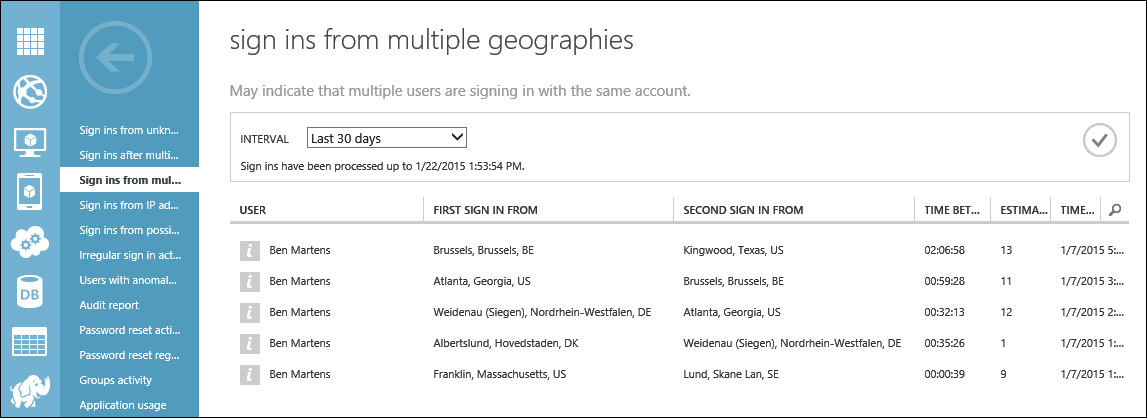
Continuing your investigation into this possible security breach, you review the Sign Ins From Multiple Geographies report and discover even more unsettling information about this possible security breach. This report shows that the user account was used to successfully authenticate into the Blue Yonder Airlines cloud services infrastructure several times on the same day from several different geographic locations from all over the world, as shown in Figure 9-14. Adding to your suspicions, according to the work info recorded in this user’s account properties, Ben Martens is located in Franklin, Massachusetts, and does not travel to Europe on a regular basis.
Reaction
After identifying this incident through monitoring, and evaluating it as a viable threat to company resources, the next step is to respond to the security breach and take action to isolate and contain the threat.
You immediately enable MFA on Ben Martens’ account in Azure AD, as shown in Figure 9-15, which will require him to provide both his password and a security code via text message or phone call before he can access company resources.

Next, you use Microsoft Intune to identify Ben Martens’ primary device and send a remote lock command to ensure that the device is locked from unauthorized access. You also try to call his office phone number, but he does not answer, so you leave a voice mail requesting him to call you as soon as possible with the warning that he will soon lose access to company resources if he does not contact you by the end of the business day. As an additional method of reaching out to him, you send an email outlying the same expected behavior.
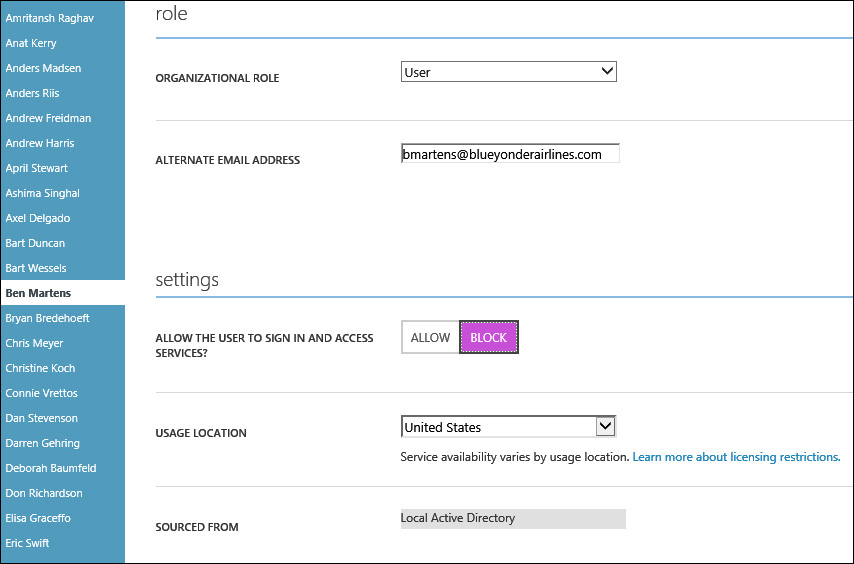
At the end of the day, you still have not heard from him, so you are forced to block his access to Blue Yonder Airlines cloud resources from his account properties in Azure AD, as shown in Figure 9-16. Then you notify your boss and the appropriate people in the security and legal departments about the possible security breach.
The next day, a helpdesk phone call is escalated to you. The call is from Ben Martens, who is complaining about having to verify his account by text messages and explaining that he is encountering errors when trying to sign in. He needs to access his work documents stored in his team’s SharePoint site and he needs to access his Exchange web mail from myapps.microsoft.com from his home. He is very upset and blaming you for his lost productivity and threatening to call your boss if you do not make his issue your top priority.
Thinking through your incident response procedures, you calmly reply to him that his issue is definitely your top priority. Because he can’t access his email, at least you now understand why he never responded to email; also, he’s been working from home, so that’s why he never returned your phone call yesterday. When you ask him why he’s using the Azure Access Panel instead of the Exchange profile and Microsoft OneDrive app on his Android tablet device he normally uses, he becomes silent for a moment and then sheepishly admits that his tablet was stolen recently, so he has been using his wife’s laptop to access company resources from home while he has been sick. He assures you that he was going to report the tablet stolen when he got back to the office. You probe further to determine whether his account password could have been compromised and he says there is no way it could have been compromised because, while the password that he had written on a note with his user name in his tablet case was a password that he had used in the past, it was one character different than his current password. There is no way anyone would ever figure that one out, right?
Suddenly, the entire situation becomes clear to you. What you now believe is that when Ben Martens’ tablet was stolen, his password was easily hacked by whoever found the note in the case. Judging by the number of failed sign-in attempts on his account, it must not have taken long for the attackers to gain access to the account and then share the account information with others all over the globe. You transfer Ben to someone in the security department who will take care of the post-incident and review process and then you continue the final remediation and clean up steps available to you.
Due to the lax security precautions with his password, you are confident that his tablet was secured by a weak PIN and you plan to wipe the device as soon as possible (rather than just reset the passcode) to prevent any further data leakage or unauthorized access. After reading the Terms And Conditions report to verify that Ben Martens accepted the latest terms and conditions for using his personal device at work, you return to his account properties in the Microsoft Intune Admin Console to use the Retire/Wipe option to force a factory reset on his Android tablet, as shown in Figure 9-17.

Tip
Before you wipe a user’s personal device, you should always review the Terms And Conditions report to ensure the user has accepted the terms and conditions for using his personal device at work and that these terms and conditions include the possibility of administrators wiping their device in situations such as this.
You immediately see a notification in the console that tells you the device is now in the process of retiring and, once the wipe process is complete, the device’s status will no longer appear in the Admin Console. You make a note to check the Device History report later in the day to ensure the remote wipe process completed successfully and, finally, you then take an early lunch after sending a meeting invite to your boss to discuss your next raise.