

Setting up an AWS Cloud Object Storage
Amazon Simple Storage Service (Amazon S3) is a cloud computing web service that is offered by Amazon Web Services (AWS), which manages data within an AWS cloud object storage. The basic storage units of Amazon S3 are objects that are organized into buckets that are owned by AWS accounts, which are identified within each bucket by a unique user-assigned key.
This chapter describes how to set up AWS S3 for the IBM TS7700C and includes the following topics:
8.1 TS7700 interaction with Amazon S3
A TS7700 that is enabled to use Cloud Storage Tier must connect to a previously installed cloud object storage. If Amazon S3 is used for this purpose, the user obtains the following elements to complete the TS7700 configuration:
•Authentication credentials: An account must be created in the AWS Web Services Cloud Platform, which owns storage resources to be used by the TS7700. To access such resources, the authentication method to be used by TS7700 is the Identity and Access Management (IAM) method, which requires the following credentials to be supplied instead of the traditional “user name” plus “password”:
– Access key ID
– Secret access key
•Name of the Amazon S3 bucket to be used by TS7700 to store virtual volumes as file objects into it. The bucket is then referred by the TS7700 as a cloud container. If cross region replication is used, two bucket names (one from each region) must be obtained.
|
Note: Unlike the case of IBM COS, the user does not need to provide a URL to connect to Amazon S3 because URLs for this public service are known in advance.
|
This chapter describes the following basic management procedures for the resources that are assigned in the Amazon S3 environment, which are related to TS7700 requirements:
•Generating IAM users and authentication credentials
•Creating an Amazon S3 bucket and configuring corresponding properties
•Configuring Cross Region Replication
|
Disclaimer: This chapter is provided only as a guide. Work with your AWS administrator to ensure that your AWS configurations are set up based on the requirements of your organization.
|
8.2 Generating an IAM user and credentials from a root account by using the AWS console
The TS7700 Cloud Storage Tier can use Amazon S3 buckets by associating them with its own TS7700 cloud containers. However, first we must be authenticated to the Amazon S3 services as an Identity and Access Management (IAM) user. AWS IAM is a web service that helps you securely control access to AWS resources and services.
IAM is used to control who is authenticated (signed in) and authorized (has permissions) to use resources. When you first create an AWS account, you begin with a single sign-in identity that has complete access to all AWS services and resources in the account. This identity is called the AWS account root user and is accessed by signing in with the email address and password that was used to create the account in the AWS portal. For more information, see this website.
AWS strongly recommends to not use the root user for your everyday tasks, even the administrative tasks. Instead, adhere to the best practice of using the root user to create only your first IAM user. Then, securely lock away the root user credentials and use them to perform only a few account and service management tasks.
|
Note: For more information about the IAM Console panels that are used to create users, see this web page.
|
Complete the following steps to create IAM users:
1. Sign in to the AWS Management Console and open the IAM console.
2. In the navigation pane, click Users and then, click Add user (as shown in Figure 8-1). For TS7700, a minimum of one IAM user available per grid is required. Depending on your management style of the account resources, you might want to set different users to segregate different workload types or locations.

Figure 8-1 AWS Management Console - IAM console Users panel
3. Enter a valid user name for the new user (see Figure 8-2). This sign-in name is for AWS. If you want to add other users, click Add another user for each user and enter their user names. You can add up to 10 users at a time.

Figure 8-2 Adding new users under a root account
4. Select the Programmatic access option (as shown in Figure 8-2) as the type of access for this set of users. This selection enables the IAM authentication mode, which is required for TS7700 cloud account definitions. Then, click Next: Permissions.
5. On the Set permissions page (as shown in Figure 8-3) we show how to set permissions by attaching existing policies to users directly. The following permission options are available:
– Add user to group
– Copy permissions from existing user
– Attach existing policies to user directly
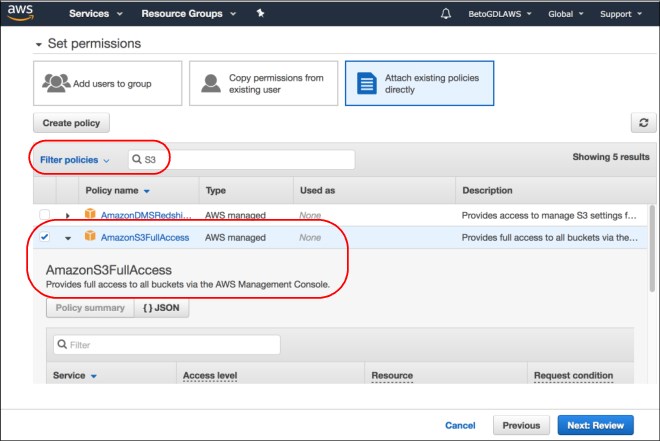
Figure 8-3 Setting permissions for new IAM users
Whatever method is chosen to attach permissions to the new users, the TS7700 cloud accounts require full access to the S3 buckets that they use for storage of virtual volumes.
TS7700 must read, write, and delete objects in those buckets whenever needed. You can create your own fully customized permission policies by clicking Create policies (that is, you might want to limit access for specific IAM users to use only specific buckets, as described here).
6. Click Next: Review to see all of your selections, as shown in Figure 8-4. Click Create users when you are ready to proceed.

Figure 8-4 Reviewing options for new users
7. After the users are created, a confirmation window opens. In this window, you can view the users’ access keys (access key IDs and secret access keys) by clicking Show next to each access key that you want to see. Save the access keys by clicking Download.csv and then, save the file to a safe location, as shown in Figure 8-5.

Figure 8-5 Credentials for new IAM users
8. After clicking Close in the confirmation window, the Users panel is displayed, in which you confirm that your new users are now included in the list of registered users, as shown in Figure 8-6.

Figure 8-6 New users shown in the Users panel under the root account
8.3 Amazon S3 buckets
Before the TS7700 can upload data to Amazon S3 by way of the cloud storage tier, at least one bucket in an AWS Region must be created in advance to store the virtual volumes. Buckets feature configuration properties, including their geographical region, that can access the objects in the bucket, whether they replicate to another region bucket or other metadata properties.
|
Note: For more information about creating S3 buckets, see this web page.
|
8.3.1 Creating an S3 bucket
Complete the following steps to create an S3 bucket:
1. Sign in to the AWS Management Console. Open the Amazon S3 console and click Create bucket, as shown in Figure 8-7.

Figure 8-7 Amazon S3 console
2. On the Name and region page, enter a name for your bucket and choose the AWS Region in which you want the bucket to be stored, as shown in Figure 8-8 on page 64. Complete the following fields on this page:
– For Bucket name, enter a unique name for your new bucket. Use the following naming guidelines for compatibility with TS7700 container naming conventions:
• The bucket name can be 3 - 63 characters long, and can contain only lowercase characters, numbers, and dashes.
• Each label in the bucket name must start with a lowercase letter or number.
• The bucket name cannot contain underscores or end with a dash.
• The bucket name cannot be formatted as an IP address (for example, 198.51.100.24).
• The name must be unique across all bucket names in Amazon S3 across all regions and all S3 users in the world.
• The name must not contain uppercase characters or periods (“.”).
• The name of the bucket cannot be changed after it is created.
– For Region, choose the AWS Region where you want the bucket to be stored. Select a Region close to the associated TS7700 to minimize latency and costs, or to address regulatory requirements.
Objects that are stored in a Region never leave that Region unless you specifically transfer them to another Region manually or through cross region replication. In addition, the Amazon S3 bucket must be created in an AWS Region that is supported by the TS7700 (see Table 8-1 on page 63).
Table 8-1 AWS regions supported by TS7700
|
Region Name
|
Region
|
|
US West (N. California)
|
us-west-1
|
|
US West (Oregon)
|
us-west-2
|
|
Asia Pacific (Mumbai)
|
ap-south-1
|
|
Asia Pacific (Seoul)
|
ap-northeast-2
|
|
Asia Pacific (Singapore)
|
ap-southeast-1
|
|
Asia Pacific (Sydney)
|
ap-southeast-2
|
|
Asia Pacific (Tokyo)
|
ap-northeast-1
|
|
EU (Frankfurt)
|
eu-central-1
|
|
EU (Ireland)
|
eu-west-1
|
|
South America (São Paulo)
|
sa-east-1
|
– (Optional) You can copy the attributes of an existing bucket when a bucket is created. This method can be helpful when multiple buckets must be created. To copy the attributes of an existing bucket when a bucket is created, choose Copy settings from an existing bucket and then, choose the bucket whose settings you want to copy and click Create. The bucket properties versioning, tags, and logging are copied.

Figure 8-8 Creating an S3 bucket: Adding name and selecting AWS region
3. If you did not copy settings from another bucket, click Next to show the Properties options page (as shown in Figure 8-9 on page 65) to configure the following fields (which can be modified after the bucket is created):
– Versioning: If you want to enable object versioning for the bucket Select the Keep all versions of an object in the same bucket. If you are using cross regional replication, versions must be enabled. Otherwise, versions are optional assuming you understand the following limitation.
• The TS7700 at 4.2 does not have a method to delete older versions retained within the AWS S3 object store. Therefore, a life cycle policy should be created by your AWS Admin to automatically delete older versions after some time period has passed.
– Server access logging: Select Log requests for access to your bucket to enable server access logging on the bucket, which enables the logging of detailed records for the requests that are made to your bucket. This option is not specific to TS7700 operations and is configured based on needs of the user.
– Tags: You can use cost allocation bucket tags to annotate billing for your use of a bucket. Each tag is a key-value pair that represents a label that you assign to a bucket. To add a tag, enter a Key and a Value. Choose Add another to add another tag. This option is not specific to TS7700 operations and is configured based on needs of the user.
– Object-level logging: Select this option if you want to record object-level API activity by using AWS CloudTrail for an extra cost. This option is not specific to TS7700 operations and should be configured based on needs of the user.
– Default encryption: AWS allows you to enable default encryption for a bucket so that all objects are encrypted when they are stored within it. However, the TS7700 has not yet implemented functions to manage client provided keys for the encryption process against S3. Therefore, enable default encryption only when encryption is required by your organization. Keep in mind that data in flight between the TS7700 and AWS S3 is always encrypted through the TLS HTTPS connection. Enabling encryption here ensures that data at rest within AWS S3 is encrypted as well.
– CloudWatch request metrics: Select this option if you want to monitor requests in your bucket (extra costs might apply). This option is not specific to TS7700 operations and is configured based on the needs of the user.

Figure 8-9 Setting bucket properties
4. Click Next to show the Set permissions page (as shown in Figure 8-10 on page 66) to manage the permissions that are set on the bucket that you are creating. The owning root account always includes full access permissions to created buckets, but it is a best practice to create IAM user accounts and provide access for a particular bucket to specific IAM users, (as described in “Generating an IAM user and credentials from a root account by using the AWS console” on page 56). For example, you might create an IAM user for each TS7700 grid, region, or cluster. This feature enables you to be more flexible about which TS7700s can access which buckets and easily provide a method to change access rules for one or more TS7700s.

Figure 8-10 Setting permissions for buckets
Click Add account to grant access to other AWS accounts (that is, if you want to have multiple TS7700 accounts belonging to different parent root accounts that share buckets), which must be identified by canonical ID. Canonical ID is a long string that is implemented by AWS primarily to be used for programmatic cross-account accesses (you can obtain the canonical ID of a root account by performing the procedures that are described at this web page.
|
Warning: Do not grant public read access to the bucket that you are creating. Granting public read access permissions means that anyone can access the objects that are in the bucket.
|
5. When you are done configuring permissions on the bucket, click Next to show the Review page (as shown in Figure 8-11) so you can verify the configured settings. If you want to change something, click Previous to return and change the wanted settings. If the current settings are correct, click Create bucket.

Figure 8-11 Review configured bucket setting
8.4 Cross-region replication
Amazon S3 offers Cross-region replication (CRR) as another service to enable the automatic asynchronous copying of objects across buckets in different AWS Regions. Buckets that are configured for cross-region replication can be owned by the same AWS account or by different accounts.
Cross-region replication is enabled at bucket-level granularity, which means that you must apply the replication rule to the source and target bucket. In a bidirectional configuration, each bucket within each region acts as a source and a destination. For a minimum configuration, you are required to have the following information:
•The destination bucket, where you want Amazon S3 to replicate objects.
•An AWS IAM role that Amazon S3 can assume to replicate objects on your behalf.
|
Note: For more information about adding a Cross-Region Replication (CCR) rule to an S3 bucket, see this web page.
|
8.4.1 Requirements for CRR
CRR includes the following requirements:
•Source and destination buckets include versioning that is enabled.
•The source and destination buckets are in different AWS Regions. Because the TS7700 does not support the ability to clean up previously deleted or overwritten versions of objects, a lifecycle policy must be configured on source and destination buckets within AWS to automatically cleanup older versions.
•Amazon S3 include permissions to replicate objects from the source bucket to the destination bucket on your behalf.
•If the owner of the source bucket does not own the objects in the bucket, the object owner grants the bucket owner READ and READ_ACP permissions with the object ACL.
•Any preexisting content within a bucket is not automatically replicated after CRR is enabled. Only objects that are created from that point forward are replicated.
8.4.2 Setting up S3 buckets for CRR
Complete the following steps:
1. Sign in to the AWS Management Console and open the Amazon S3 console at https://console.aws.amazon.com/s3. Click the entry that corresponds to the target “source” bucket (as shown in Figure 8-12) to open its bucket panel.

Figure 8-12 Selecting target source bucket for CRR
2. In the bucket panel, open the Management section. Click Replication to open the corresponding panel (see Figure 8-13).

Figure 8-13 Selecting the Replication configuration page

Figure 8-14 Adding CRR rule
Amazon S3 allows different settings for different use cases; however, for the TS7700 cloud Object Storage tier, you must select the Entire bucket option, as shown in Figure 8-15. Do not select the Replicate objects encrypted with AWS KMS option (TS7700 support for this option will be supported in a future release).

Figure 8-15 Creating a replication rule for CRR
4. Select the Destination bucket, as shown in Figure 8-16. Here, you must select a bucket that is in a region that is different from the Source bucket region. You select the Change object ownership to destination bucket owner option only if the candidate destination bucket corresponds to a different AWS account.
|
Note: You can select a bucket that belongs to the local AWS root account, or to a different AWS account, in which case you must supply the corresponding AWS account ID (12 characters, which can be obtained by following the steps at this web page) and the name of the candidate destination bucket.
|

Figure 8-16 Selecting a “Destination” bucket
5. Click Next to proceed to set up an AWS Identity and Access Management (IAM) role that Amazon S3 can assume to perform cross-region replication of objects on your behalf. The following options are available, as shown in Figure 8-17:
– It is highly recommended that you choose Create new role to have Amazon S3 create an IAM role for you. When you save the rule, a new policy is generated for the IAM role that matches the source and destination buckets that you choose. The name of the generated role is based on the bucket names and uses the following naming convention:
replication_role_for_source-bucket_to_destination-bucket
– You can choose to use an existing IAM role. If you do, you must choose a role that grants Amazon S3 the necessary permissions for replication. Replication fails if this role does not grant Amazon S3 sufficient permissions to follow your replication rule.

Figure 8-17 Determining IAM role and rule name
6. Click Next to display the configured options for your review, as shown in Figure 8-18. If the options are configured correctly, click Save to complete the process (click Previous to make any changes).

Figure 8-18 Reviewing CRR rule
Your new rule should be listed in the source bucket panel, as shown in Figure 8-19.

Figure 8-19 Available replication rules
8.5 Setting up TS7700Cs with Amazon S3 Cross Region Replication
If your cloud Object Storage is Amazon S3 and you have two clusters in different locations in the same Grid, you might want to set up Amazon Cross Region Replication for faster access to the cloud and multi-region-level redundancy.
|
Note: Each region can share an AWS IAM account or they can use unique AWS IAM accounts, depending on how the buckets and the cross region replication were configured.
|
When setting up Cross Region Replication, consider selecting the nearest regions to the TS7700C clusters that communicate most often with the AWS S3 bucket. For example, if a four-way configuration exists with two clusters nearest to AWS Region A and two DR clusters nearest to AWS Region B, a bucket in AWS Region A and in AWS Region B should be configured and setup for cross region replication bi-directionally.
|
Note: As of release 4.2, the TS7700 supports only AWS regions, as listed in Table 8-1 on page 63.
|
After the pair of S3 buckets that are linked by CRR are created, two TS7700 cloud containers must be created on TS7700C to connect to them (one container for each region). To create containers in the TS7700, follow the steps that are described in “Cloud tier settings” on page 80.
When the second container is created on TS7700, the warning message that is shown in Figure 8-20 is displayed. Because your two buckets are mirrored with AWS Cross-region replication, you can click OK to proceed.

Figure 8-20 Warning message on container creation
After the containers are created on the TS7700, two containers are listed in the Container MI panel, as shown in Figure 8-21.

Figure 8-21 Containers for a pair of Amazon S3 buckets (CRR)
|
Note: When you create containers for a pair of Amazon S3 buckets on TS7700, you might see “No Replication” in the Replication column that is in the Container panel. This message is a TS7700 reporting error and will be fixed in a future release.
|
Next, a Cloud URL must be created for each container. To create a Cloud URL, follow the steps that are described in “Cloud tier settings” on page 80.
After a Cloud URL is created for each container, open the Container panel on the Management Interface of the cluster you want to use the Cloud URL. Right-click the Cloud URL you want to assign to that cluster and select Create Cloud URL and Cluster association. Using the four way grid configuration example, you associate two clusters with one region container and the other two containers with the other region container.
You are now ready to start sending data to the TS7700 Cloud Storage Tier and both regions include access to the mirrored buckets and all content within them.
For more information about how to use corresponding data management policies, see “Directing virtual volumes to the cloud storage tier” on page 88.
..................Content has been hidden....................
You can't read the all page of ebook, please click here login for view all page.