

Configuration examples
This chapter shows some configuration examples of TS7700 with IBM Cloud Object Storage (ICOS) and Amazon S3. The examples show how to set up cloud pools, accounts, containers, and URLs for each configuration.
This chapter includes the following topics:
10.1 Stand-alone cluster
This section shows the simplest configurations that use a stand-alone cluster with ICOS or Amazon S3.
10.1.1 Stand-alone cluster with ICOS
In this section, we describe the process to configure a stand-alone cluster with ICOS. Before you start setting up the cloud storage tier on your TS7700, ensure that ICOS is set up in your environment. For more information about setting up your ICOS, see Chapter 8, “Setting up an AWS Cloud Object Storage” on page 55.
Figure 10-1 shows a stand-alone cluster that is connected to ICOS with three accessor nodes. The cloud storage tier is defined so that the TS7700 off loads volumes to the cloud pool MYPOOL. MYPOOL points to an ICOS vault MYVAULT, and TS7700 uses a cloud account MYACCT1 to access the vault.
Three IP addresses (https://192.168.100.10, https://192.168.100.20, and https://192.168.100.30) are available to access the vault. Although a load-balancer can be used between TS7700 and accessor nodes, we assume in this example that TS7700 directly connects to the three accessor nodes by using their unique IP address.

Figure 10-1 Stand-alone cluster with ICOS
The following process is used to set up such a configuration on the TS7700:
1. Create a cloud pool MYPOOL.
A cloud pool defines a group of common logical volumes that are collocated within the object store.
2. Create a cloud account MYACCT1.
This step is needed to configure the access credentials that are needed by the TS7700 to access the object store.
3. Create a container MYVAULT.
This step informs the TS7700 which vault it uses to off load a volume. A container must be assigned to a cloud pool. You also must select a cloud account to use to access the vault. In this example, MYVAULT is the target of volumes that are assigned to MYPOOL, and MYACCT1 is used to access MYVAULT. The container name must be the same name as the vault on ICOS. In this example, a container is named as MYVAULT.
4. Create three cloud URLs (https://192.168.100.10, https://192.168.100.20, and https://192.168.100.30).
This step informs the TS7700 which URLs can be used to access the vault.
5. Create a cloud URL and cluster association for each URL.
This step informs a specific cluster which URLs it uses from the previous step. Although only one cluster exists in this example, the cluster association must still be completed.
Each of these steps in this process is described next.
Creating a cloud pool
Complete the following steps:
1. Go to Settings → Cloud Tier Settings on the Management Interface (MI) and select Cloud Pools.
2. Click Create Cloud Pool.
3. Enter MYPOOL as the cloud pool’s nickname
4. Select Standard Format as Cloud Data Format
5. Click OK.
Creating a cloud account
Complete the following steps:
1. Go to Settings → Cloud Tier Settings on your MI and select Cloud Accounts.
2. Click Create Cloud Account.
3. Enter MYACCT1 as a cloud account’s nickname.
4. Select IBM COS S3 as the account type.
5. Select a health check method (Periodic is recommended).
6. Enter your Access Key ID and Secret Access Key of your cloud account (which is provided to you by your ICOS admin).
7. Click OK.
Creating a container
Complete the following steps:
1. Verify that a vault (for example, MYVAULT) is created in ICOS.
2. Go to Settings → Cloud Tier Settings on your MI and select Containers.
3. Click Create Container.
4. Enter MYVAULT as a container name.
5. Select MYPOOL as the cloud pool.
6. Select MYACCT1 as the cloud account.
7. Click OK.
Creating cloud URLs
1. Verify that an SSL certificate is uploaded to your TS7700.
For more information about uploading an SSL certificate, see Chapter 6, “SSL certificate” on page 29. If your cloud URL does not use the secure https protocol, you do not need to upload an SSL certificate.
2. Go to Settings → Cloud Tier Settings on your MI and select Containers.
3. Right-click the MYVAULT container and select Create Cloud URL.
4. Enter https://192.168.100.10 as a URL.
5. Select the SSL certificate alias that you uploaded.
6. Click OK.
7. If you use the non-secured http protocol, enter http://192.168.100.10 as a URL instead and leave the certificate alias blank.
8. After you create the first URL, right-click the MYVAULT container again and create a second and third cloud URL by using the same process for https://192.168.100.20 and https://192.168.100.30.
Creating cloud URL and cluster associations
Complete the following steps:
1. Go to Settings → Cloud Tier Settings on MI and select Containers.
2. Expand the container to show the Cloud URLs you created.
3. Right-click one of the Cloud URLs, and select Create Cloud URL and Cluster association.
4. Set 1 as a priority and click OK.
5. Create an association for each Cloud URL that you created so that each URL can be used by this cluster.
10.1.2 Stand-alone cluster with Amazon S3
In this section, the process that is used to configure a stand-alone TS7700C cluster with Amazon S3 is described. An Amazon Web Service (AWS) account must be created before a stand-alone cluster can be set up with Amazon S3. For more information about setting up an AWS account, see Chapter 8, “Setting up an AWS Cloud Object Storage” on page 55.
Figure 10-2 shows a stand-alone cluster that is connected to Amazon S3. The cloud storage tier is defined so that TS7700C off loads logical tape volumes to the cloud pool MYPOOL. MYPOOL points to AWS bucket MYBUCK1, and TS7700C uses a cloud account MYACCT1 to access the vault.

Figure 10-2 Stand-alone cluster with Amazon S3
The following process is used to set up such a configuration:
1. Create a cloud pool MYPOOL.
A cloud pool defines a group of common logical volumes that are collocated within the object store.
2. Create a cloud account MYACCT1.
In this step, the access credentials that are needed by the TS7700 to access the object store are configured.
3. Create a container MYBUCK1.
In this step, the TS7700 is informed of which AWS bucket it uses to off load logical tape volumes. A container must be assigned to a cloud pool. You must select a cloud account to use to access the AWS bucket. In this example, MYBUCK1 is the target of volumes that are assigned to MYPOOL. MYACCT1 is used to access MYBUCK1. The container name must be the same name as the AWS bucket in Amazon S3. In this example, a container is named MYBUCK1.
4. Create a cloud URL.
Often, the TS7700 is informed of which URL to use to access the bucket in this step. However, but you do not need to provide an Amazon S3 URL. Instead, the TS7700 automatically generates the URL by using the bucket name.
5. Create a cloud URL and cluster association for the previously created URL.
In this step, a specific cluster is informed that it can use the URL created in the previous step. Although only one cluster exists in this example, the cluster association must still be completed.
Each of these steps in this process is described next.
Creating a cloud pool
Complete the following steps:
1. Go to Settings → Cloud Tier Settings on the Management Interface (MI) and select Cloud Pools.
2. Click Create Cloud Pool.
3. Enter MYPOOL as the cloud pool’s nickname.
4. Select Standard Format as the Cloud Data Format.
5. Click OK.
Creating a cloud account
Complete the following steps:
1. Go to Settings → Cloud Tier Settings on MI and select Cloud Accounts.
2. Click Create Cloud Account.
3. Enter MYACCT1 as the cloud account’s nickname.
4. Select Amazon S3 as the account type.
5. Select a health check method (Periodic is recommended).
6. Enter your AWS S3 Access Key ID and Secret Access Key of your cloud account.
7. Click OK.
Creating a container
Complete the following steps:
1. Verify that a bucket MYBUCK1 is created in Amazon S3.
2. Go to Settings → Cloud Tier Settings on your MI and select Containers.
3. Click Create Container.
4. Enter MYBUCK1 as the container name.
5. Select MYPOOL as the cloud pool.
6. Select MYACCT1 as the cloud account.
7. Click OK.
Creating a cloud URL
Complete the following steps:
1. Go to Settings → Cloud Tier Settings on MI and select Containers.
2. Right-click the MYBUCK1 container and select Create Cloud URL.
3. Click OK on the Create Cloud URL window.
Creating a cloud URL and cluster association
Complete the following steps:
1. Go to Settings → Cloud Tier Settings on MI and select Containers.
2. Expand the container MYBUCK1 so that it displays the Cloud RUL you created.
3. Right-click the Cloud URL and select Create Cloud URL and Cluster association.
4. Set 1 as a priority.
5. Click OK.
10.2 Two-way grid with one cloud pool, account, and container with ICOS
This section describes a two-way Grid TS7700C cluster with one cloud pool/account/container that uses ICOS. Before setting up the cloud storage tier, ICOS must be set up in your environment. For more information about setting up your ICOS, see Chapter 8, “Setting up an AWS Cloud Object Storage” on page 55.
Figure 10-3 shows the two-way Grid with one cloud pool/account/container that uses ICOS. In this example, we assume that the ICOS configuration has three accessor nodes in each region and the contents that is in the single vault is made redundant through ICOS’s erasure coding. The cloud storage tier is defined so that the TS7700C off loads logical volumes to the cloud pool MYPOOL. MYPOOL points to an ICOS vault MYVAULT, and the two TS7700Cs in West and East use a cloud account MYACCT1 to access the vault.

Figure 10-3 Two-way TS7700C clusters with one cloud account/pool/container using ICOS
Because six total accessors are used, six unique cloud URLs are available to access the vault. Each of the six URLs must be assigned to the MYVAULT container.
Three IP addresses (https://192.168.100.10, https://192.168.100.20, and https://192.168.100.30) must be associated with TS7700C West. Three cloud URLs (https://192.168.200.10, https://192.168.200.20, https://192.168.200.30) must be associated with TS7700C East.
A load-balancer can be used between the TS7700 and accessor nodes. However, we assume in this example that the TS7700 directly connects to the three accessor nodes by using their unique IP addresses.
The following process is used to set up such a configuration. The first four steps must be completed only once per grid by using either of the clusters. Step five requires a unique step per cluster:
1. Create a cloud pool MYPOOL.
A cloud pool defines a group of common logical volumes that are collocated within the object store.
2. Create a cloud account MYACCT1.
In this step, the access credentials that are needed by the TS7700 to access the object store are configured.
3. Create a container MYVAULT.
In this step, TS7700C is informed which vault it uses to off load a volume. The container must be assigned to the cloud pool, and you must select a cloud account to use to access the vault. The container name must be in sync with a bucket in Amazon S3. In this example, a container must be named as MYVAULT, which is assigned to MYPOOL, and MYACCT1 is used to access MYVAULT.
4. Create six cloud URLs (https://192.168.100.10, https://192.168.100.20, https://192.168.100.30, https://192.168.200.10, https://192.168.200.20, and https://192.168.200.30).
In this step, the TS7700 is informed which URLs can be used to access the vault.
5. Create a cloud URL and cluster association for each URL.
In this step, a specific cluster is informed which URLs it uses from the previous step. Although all URLs are assigned to the same container, which cluster can use those URLs must be defined. This step must be completed on the cluster where the association is to be assigned. In this example, you need to assign three cloud URLs (https://192.168.100.10, https://192.168.100.20, and https://192.168.100.30) to TS7700 West and the other three cloud URLs (https://192.168.200.10, https://192.168.200.20, and https://192.168.200.30) to TS7700 East.
Each of these steps in this process is described next.
Creating a cloud pool
Complete the following steps:
1. In either cluster, go to Settings → Cloud Tier Settings on the Management Interface (MI) and select Cloud Pools.
2. Click Create Cloud Pool.
3. Enter MYPOOL as the cloud pools nickname.
4. Select Standard Format as the Cloud Data Format.
5. Click OK.
Creating a cloud account
Complete the following steps:
1. In either cluster, go to Settings → Cloud Tier Settings on your MI and select Cloud Accounts.
2. Click Create Cloud Account.
3. Enter MYACCT1 as the cloud account’s nickname.
4. Select IBM COS S3 as the account type.
5. Select a health check method (Periodic is recommended).
6. Enter your Access Key ID and Secret Access Key (provided by your ICOS Admin) of your vault’s cloud account.
7. Click OK.
Creating a container
Complete the following steps:
1. Verify that your vault (for example, MYVAULT) is created in ICOS.
2. In either cluster, go to Settings → Cloud Tier Settings on your MI and select Containers.
3. Click Create Container.
4. Enter MYVAULT as the container name.
5. Select MYPOOL as the cloud pool.
6. Select MYACCT1 as the cloud account.
7. Click OK.
Creating a cloud URL
Complete the following steps:
1. Verify that an SSL certificate is uploaded in your TS7700 grid.
For more information about uploading an SSL certificate, see Chapter 6, “SSL certificate” on page 29. If your cloud URL does not use the secure https protocol, you do not need to upload an SSL certificate.
2. In either cluster, go to Settings → Cloud Tier Settings on your MI and select Containers.
3. Right-click the MYVAULT container and select Create Cloud URL.
4. Enter https://192.168.100.10 as the URL.
5. Select the alias for the SSL certificate that you uploaded.
6. Click OK.
7. If you use the non-secure http protocol, enter http://192.168.100.10 as the URL instead and leave the certificate field blank.
8. After completed, right-click the MYVAULT container again and create cloud URLs for the remaining URLs (https://192.168.100.20, https://192.168.100.30, https://192.168.200.10, https://192.168.200.20, and https://192.168.200.30). Because all six URLs are associated with the same vault, all six can be created under the same container.
Creating a cloud URL and cluster association
Complete the following steps:
1. On the TS7700C West cluster, go to Settings → Cloud Tier Settings on its MI and select Containers.
2. Expand the Cloud URLs you created.
3. Right-click https://192.168.100.10, and select Create Cloud URL and Cluster association.
4. Set 1 as a priority and click OK.
The TS7700C West cluster is informed that it can use that URL to access the ICSO vault. Create an association for the other two URLs (https://192.168.100.20 and https://192.168.100.30) on TS7700C West so it has three URLs it can use to access the vault.
5. Log out of the TS7700C West MI and log in to the MI of the TS7700C East cluster and repeat the steps for its three URLs (https://192.168.200.10, https://192.168.200.20, and https://192.168.200.30).
After this process is completed, each cluster in each region now is aware of which of the six URLs it uses to access the ICOS vault.
10.3 Two-way grid with one cloud pool for an Amazon S3 Cross Region Replication set of buckets accessed by using different credentials
This section shows a two-way TS7700C cluster Grid with one cloud pool, two accounts (one for each AWS Region), and two containers (one for each region bucket) that use Amazon S3. Two Amazon Web Service accounts must be created before setting up the TS7700C clusters with Amazon S3. For more information about setting up the AWS accounts, see Chapter 8, “Setting up an AWS Cloud Object Storage” on page 55.
Figure 10-4 on page 101 shows a two-way TS7700C cluster Grid with one cloud pool, two accounts, and two containers that use Amazon S3. The two TS7700C clusters shares a cloud pool MYPOOL because all data is synchronized between regions. This configuration is achieved through AWS S3 Cross Region Replication, which requires each region to have a unique bucket name (for example, MYBUCK1 and MYBUCK2).
The contents in the buckets are synchronized by using Amazon Cross Region Replication. Because each bucket can have different access credentials, this example uses two cloud accounts (MYACCT1 and MYACCT2) to connect to each region’s unique bucket. Although they can use the same account, this example assumes that two different accounts are used.

Figure 10-4 Two-way TS7700C clusters with one cloud pool, two accounts, and two containers using Amazon S3
The following process is used to set up such a configuration. The first four steps must be completed only once per grid by using either cluster. Step five requires a unique step per cluster:
1. Create a cloud pool that is named MYPOOL.
In this example, a cloud pool represents a pair of containers where logical tape volumes are offloaded. The TS7700C West offloads to MYBUCK1, the TS7700C East cluster offloads to MYBUCK2.
The contents in MYBUCK1 and MYBUCK2 must be replicated bi-directionally by using Amazon Cross Region Replication so that anything that is put into either bucket is accessible from the other bucket as one cross-regional pool.
2. Create two accounts (MYACCT1 and MYACCT2).
This step is needed to configure the credentials that are needed by the TS7700 to access the object store.
3. Create two containers (MYBUCK1 and MYBUCK2).
In this step, both TS7700C clusters or informed which buckets are associated with MYPOOL. The containers (MYBUCK1 and MYBUCK2) must be assigned to the cloud pool (MYPOOL). You also must select the appropriate cloud account for each container (MYACCT1 for MYBUCK1 and MYACCT2 for MYBUCK2). Before containers are created on either TS7700C, you must set up Amazon Cross Region Replication bi-directionally between MYBUCK1 and MYBUCK2.
4. Create a cloud URL under each container.
Normally, the TS7700 is informed of which URL to use to access the buckets, but you do not need to provide an Amazon S3 URL. Instead, the TS7700 automatically generates the URL by using the bucket name under which you are creating the URL.
5. Create a cloud URL and cluster association for the previously created URLs.
In this step, each of the two clusters is informed of which URL that was created in the previous step is used to access a bucket. You must associate the TS7700 West cluster to the cloud URL that is assigned to MYBUCK1 and associate TS7700 East to the Cloud URL that is assigned to MYBUCK2.
Each of these steps in this process is described next.
Creating a cloud pool
Complete the following steps:
1. On either cluster, go to Settings → Cloud Tier Settings on the Management Interface (MI) and select Cloud Pools.
2. Click Create Cloud Pool.
3. Enter MYPOOL as the cloud pool’s nickname.
4. Select Standard Format as the Cloud Data Format.
5. Click OK.
Creating cloud accounts
Complete the following steps:
1. On either cluster, go to Settings → Cloud Tier Settings on your MI and select Cloud Accounts.
2. Click Create Cloud Account.
3. Enter MYACCT1 as the cloud account’s nickname.
4. Select Amazon S3 as the account type.
5. Select a health check method (Periodic is recommended).
6. Enter your AWS S3 Access Key ID and Secret Access Key (which is provided by your AWS S3 Admin) of your cloud account that is used to access MYBUCK1 in the West region.
7. Click OK.
8. On either cluster, create a second cloud account (MYACC2) by using the Access Key ID and Secret Access Key pair that is used to access MYBUCK2 in the East region.
Creating containers
Complete the following steps:
1. Ensure that buckets MYBUCK1 and MYBUCK2 are created in Amazon S3 in each region and cross regional replication is enabled bi-directionally.
2. In either cluster, click Settings → Cloud Tier Settings on the MI and select Containers.
3. Click Create Container.
4. Enter MYBUCK1 as the container name.
5. Select MYPOOL as the cloud pool
6. Select MYACCT1 as the cloud account
7. Click OK.
8. On either cluster, repeat this process and create a second container for MYBUCK2 and use MYACCT2 as the cloud account.
Creating a cloud URL
Complete the following steps:
1. On either cluster, click Settings → Cloud Tier Settings on the MI and select Containers.
2. Right-click the MYBUCK1 container and select Create Cloud URL.
3. In the Create Cloud URL window, click OK.
4. In the container window, create a cloud URL for MYBUCK2. This process can be completed on the same cluster.
Creating a cloud URL and cluster association
Complete the following steps:
1. On TS7700C West cluster, click Settings → Cloud Tier Settings on its MI and select Containers.
2. Expand the Cloud URL that you created for MYBUCK1.
3. Right-click the Cloud URL and select Create Cloud URL and Cluster association.
4. Set 1 as a priority.
5. Click OK.
The TS7700C West cluster is informed that it must use that URL to access MYBUCK1.
6. Log out of the TS7700C West cluster.
7. Log in to the TS7700C East cluster’s MI and create an association with the cloud URL that is assigned to MYBUCK2.
10.4 Four-way grid with one cloud pool, two accounts, and one container using ICOS
This section provides an example of a four-way two region TS7700C Grid with one cloud pool, two accounts (one per region), and one container using ICOS. Before setting up the cloud storage tier, your ICOS must be set up in your environment. For more information about setting up your ICOS, see Chapter 8, “Setting up an AWS Cloud Object Storage” on page 55.
Figure 10-5 on page 104 shows a four-way, two-region TS7700C Grid and all four clusters are connected to the same cloud pool MYPOOL. Two TS7700C clusters in the West region use one cloud account (MYACCT1) to access the cloud pool, and the other two TS7700C clusters in the East region use another cloud account (MYACCT2) to access the same cloud pool. MYVAULT is assigned to the cloud pool, and the following cloud URLs are available to be used to access the vault:
•https://192.168.100.10
•https://192.168.100.20
•https://192.168.100.30
•https://192.168.200.10
•https://192.168.200.20
•https://192.168.200.30)
Three URLs are used per region because each region includes three accessor nodes.

Figure 10-5 Four-way TS7700C clusters with one cloud pool/two accounts/one container using ICOS
Thee cloud URLs (https://192.168.100.10, https://192.168.100.20, and https://192.168.100.30) must be associated with the two TS7700Cs in the West region and other three cloud URLs (https://192.168.200.10, https://192.168.200.20, and https://192.168.200.30) must be associated with the two TS7700Cs in the East region.
The following process is used to set up such a configuration. The first four steps must be completed only once per grid by using any of the four clusters. Step five requires a unique step per cluster:
1. Create a cloud pool.
A cloud pool defines a container where logical tape volumes are offloaded. In this example, logical tape volumes are offloaded to MYVAULT from all the TS7700C clusters that are in the grid. The contents of MYVAULT must be synchronized between ICOS in West and East by using ICOS’s multi-sites erasure coding or 2-site replication.
2. Create two accounts MYACCT1 and MYACCT2.
This step is needed to configure the credentials that are needed by the TS7700 to access the object store.
3. Create two containers with the same name (MYVAULT) because each region must use its own account.
If both regions used the same account, only one container is needed. This step informs the TS7700C which vault and account it uses to offload logical volumes from either region. The containers must be assigned to the cloud pool, and you must select a cloud account to use to access each container.
Before creating containers on the TS7700C, a vault, such as MYVAULT on ICOS, must be created with the correct read/write access from accounts MYACCT1 and MYACCT2.
4. Create the following cloud URLs:
– https://192.168.100.10
– https://192.168.100.20
– https://192.168.100.30
– https://192.168.200.10
– https://192.168.200.20
– https://192.168.200.30)
This step informs the TS7700C which cloud URLs are available to access the vault.
5. Create cloud URL and cluster associations.
This step informs each unique cluster which cloud URLs that were created in the previous step it uses to access the vault. Three cloud URLs (https://192.168.100.10, https://192.168.100.20, and https://192.168.100.30) must be associated with TS7700Cs in the West region. The other three cloud URLs (https://192.168.200.10, https://192.168.200.20, and https://192.168.200.30) must be associated with the TS7700Cs in East region.
Each of these steps in this process is described next.
Creating a cloud pool
Complete the following steps:
1. On any of the four clusters, click Settings → Cloud Tier Settings on the Management Interface (MI) and select Cloud Pools.
2. Click Create Cloud Pool.
3. Enter MYPOOL as the cloud pool’s nickname.
4. Select Standard Format as the Cloud Data Format.
5. Click OK.
Creating cloud accounts
Complete the following steps:
1. On any of the four clusters, click Settings → Cloud Tier Settings on your MI and select Cloud Accounts.
2. Click Create Cloud Account.
3. Enter MYACCT1 as the cloud account’s nickname
4. Select IBM COS S3 as the account type.
5. Select a health check method (Periodic is recommended).
6. Enter the Access Key ID and Secret Access Key (provided by your ICOS Admin) of the cloud account that is used in the West region.
7. Click OK.
8. Create another cloud account (MYACCT2) by using the Access Key ID and Secret Access Key pair that is used in the East region.
Creating containers
Complete the following steps:
1. Ensure a vault (for example, MYVAULT) is created in your ICOS.
2. On any of the four clusters, click Settings → Cloud Tier Settings on your MI and select Containers.
3. Click Create Container.
4. Enter MYVAULT as the container name.
5. Select MYPOOL as the cloud pool.
6. Select MYACCT1 as the cloud account.
7. Click OK.
8. Create another container with the same name and select MYPOOL as the cloud pool and use MYACCT2 as the cloud account.
When this process is completed, two containers are available: one for region West and one for region East.
Creating cloud URLs
Complete the following steps:
1. Ensure that an SSL certificate is uploaded to your TS7700 Grid.
For more information about uploading an SSL certificate, see Chapter 6, “SSL certificate” on page 29. If your cloud URL does not use the secure https protocol, you do not need to upload an SSL certificate.
2. On any of the four clusters, click Settings → Cloud Tier Settings on the MI and select Containers.
3. Right-click the MYVAULT container that is associated with MYACCT1 and click Create Cloud URL.
4. Enter https://192.168.100.10 as a URL.
5. Select the SSL certificate alias for the certificate that you uploaded.
6. Click OK.
7. If you use the non-secure http protocol, enter http://192.168.100.10 as a URL instead and leave the certificate option blank.
8. Right-click the same container again and create a second cloud URL for https://192.168.100.20 and then, a third URL for https://192.168.100.30.
9. Right-click the MYVAULT container that is associated with MYACCT2 and create three cloud URLs for https://192.168.200.10, https://192.168.200.20, and https://192.168.200.30.
When this process is completed, three URLs are defined under each of the two containers: three for region West and three for region East.
Creating cloud URL and cluster associations
Complete the following steps:
1. On both TS7700C clusters in the West region, click Settings → Cloud Tier Settings on their MI windows (you must log in to each one individually) and select Containers.
2. Expand the Cloud URLs you created for the West region.
3. Right-click https://192.168.100.10 and select Create Cloud URL and Cluster association.
4. Set 1 as a priority and click OK.
5. Create an association for the other two West region URLs (https://192.168.100.20 and https://192.168.100.30).
6. Repeat these steps for the two clusters in the East region by associating them both with the three accessor URLs for that region.
7. Log in to each one individually and set up an association with https://192.168.200.10, https://192.168.200.20, and https://192.168.200.30.
When this process is completed, both clusters in the East are associated with three of the URLs. Also, both clusters in the West are associated with the other three URLs.
10.5 Four-way clusters (one TS7700C in each location) with one cloud pool, two accounts, and one container using ICOS
This section shows how to set up a four-way two region grid where only one cluster in each region connects to an ICOS object store. One cloud pool, two accounts, and one container are available for a single vault inside an ICOS. Before setting up the cloud storage tier, your ICOS must be set up in your environment. For more information about setting up your ICOS, see Chapter 8, “Setting up an AWS Cloud Object Storage” on page 55.
Figure 10-6 on page 107 shows a four-way two region grid with one TS7700C in each region. In this example, cloud configuration settings are used only on the two TS7700C clusters, but the other two peer clusters must still have their Storage Group values configured correctly to use the cloud storage tier.
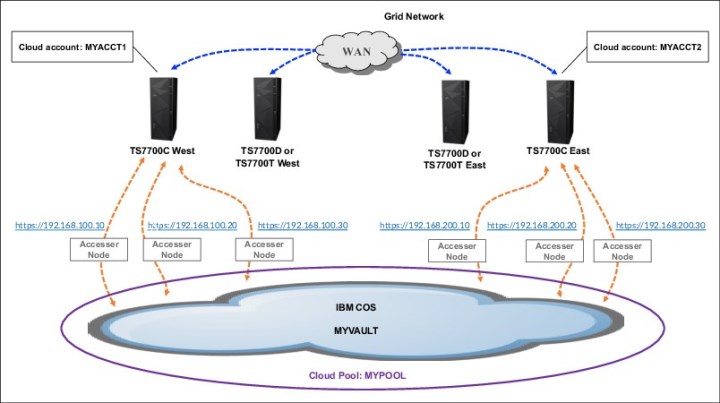
Figure 10-6 Four-way clusters
For example, you must create a Storage Group that also points to MYPOOL on non-TS7700C clusters and assign the Storage Group to logical tape volumes that ultimately end up in the cloud after replicating or remote mounting into a TS7700C cluster. If you do not create such a Storage Group on non-TS7700C clusters, any volume that is mounted by non-TS7700C clusters is not premigrated to MYPOOL on TS7700C clusters.
In Figure 10-6 on page 107, the two TS7700C clusters share a cloud pool (MYPOOL) to offload logical tape volumes to the cloud. The TS7700C cluster in the West region uses one cloud account (MYACCT1) to access the cloud pool, and the other TS7700C cluster in the East region uses another cloud account (MYACCT2) to access the same cloud pool.
MYVAULT is assigned to the cloud pool, and the following cloud URLs are used to access the vault (three URLs per region or one per available accessor):
•https://192.168.100.10
•https://192.168.100.20
•https://192.168.100.30
•https://192.168.200.10
•https://192.168.200.20
•https://192.168.200.30)
Thee cloud URLs (https://192.168.100.10, https://192.168.100.20, and https://192.168.100.30) must be associated with TS7700C in the West region. The other three cloud URLs (https://192.168.200.10, https://192.168.200.20, and https://192.168.200.30) must be associated with the TS7700C in the East region.
Each step of this process is described next. The first four steps must be completed once per grid by using either of the two TS7700C clusters. Step five requires a unique step per TS7760C cluster.
Creating a cloud pool
Complete the following steps:
1. On either TS7700C cluster, go to Settings → Cloud Tier Settings on the Management Interface (MI) and select Cloud Pools.
2. Click Create Cloud Pool.
3. Enter MYPOOL as the cloud pool’s nickname.
4. Select Standard Format as the Cloud Data Format.
5. Click OK.
Creating a cloud account
Complete the following steps:
1. On either TS7700C cluster, click Settings → Cloud Tier Settings on MI and select Cloud Accounts.
2. Click Create Cloud Account.
3. Enter MYACCT1 as the cloud account’s nickname.
4. Select IBM COS S3 as the account type.
5. Select a health check method (Periodic is recommended).
6. Enter the Access Key ID and Secret Access Key (provided by your ICOS Admin) of your cloud account that is used in the West region and click OK.
7. On either TS7700C cluster, create another cloud account (MYACCT2) using the Access Key ID and Secret Access Key pair that is used to access the vault from the East region.
Creating containers
Complete the following steps:
1. Ensure a vault (for example, MYVAULT) is created in your ICOS.
2. On either TS7700C cluster, click Settings → Cloud Tier Settings on the MI and select Containers.
3. Click Create Container.
4. Enter MYVAULT as the container name.
5. Select MYPOOL as the cloud pool.
6. Select MYACCT1 as the cloud account.
7. Click OK.
8. Create another container with the same name and select MYPOOL as the cloud pool and use MYACCT2 as the cloud account.
When this process is completed, two containers are available: one for region West and one for region East.
Creating cloud URLs
Complete the following steps:
1. Ensure that an SSL certificate is uploaded to your TS7700 grid.
For more information about uploading an SSL certificate, see Chapter 6, “SSL certificate” on page 29. If your cloud URL does not use the secure https protocol, you do not need to upload an SSL certificate.
2. On either TS7700C cluster, click Settings → Cloud Tier Settings on the MI and select Containers.
3. Right-click the MYVAULT container that is associated with MYACCT1 and select Create Cloud URL.
4. Enter https://192.168.100.10 as a URL.
5. Select an SSL certificate alias for the certificate that you uploaded.
6. Click OK.
7. If you use the non-secure http protocol, enter http://192.168.100.10 as a URL instead and leave the certificate alias blank.
8. Right-click the same container again and create the cloud URLs for https://192.168.100.20 and then, a third time for https://192.168.100.30.
9. On either TS7760C cluster, right-click the MYVAULT container that is associated with MYACCT2 and create cloud URLs for https://192.168.200.10, https://192.168.200.20, and https://192.168.200.30.
When this process is completed, three URLs are defined under each of the two containers: three for region West and three for region East.
Creating cloud URL and cluster associations
Complete the following steps:
1. On the TS7700C cluster in the West region, click Settings → Cloud Tier Settings in its MI window (you must log in to this specific TS7700C cluster) and select Containers.
2. Expand the Cloud URLs you for the West region.
3. Right-click https://192.168.100.10 and select Create Cloud URL and Cluster association.
4. Set 1 as a priority and click OK.
5. Create an association for the other two West region URLs (https://192.168.100.20 and https://192.168.100.30).
6. Repeat these steps on the TS7700C cluster in the East region by associating it with the three accessor URLs for that region.
7. Log in to the TS7700C West cluster and set up an association with https://192.168.200.10, https://192.168.200.20, and https://192.168.200.30.
When this process is complete, the TS7700C cluster West cluster is associated with the three URLs for the West region. The other three URLs are associated with the TS7700C East region.
..................Content has been hidden....................
You can't read the all page of ebook, please click here login for view all page.