APPENDIX C: ILLUSTRATIVE REFERENCES
In addition to the photographic references that elucidate the dynamics of a specific pose, having a general sense of the proportions of the body as well as an awareness of the underlying musculoskeletal elements that serve as landmarks can be helpful in effectively rendering a figure.
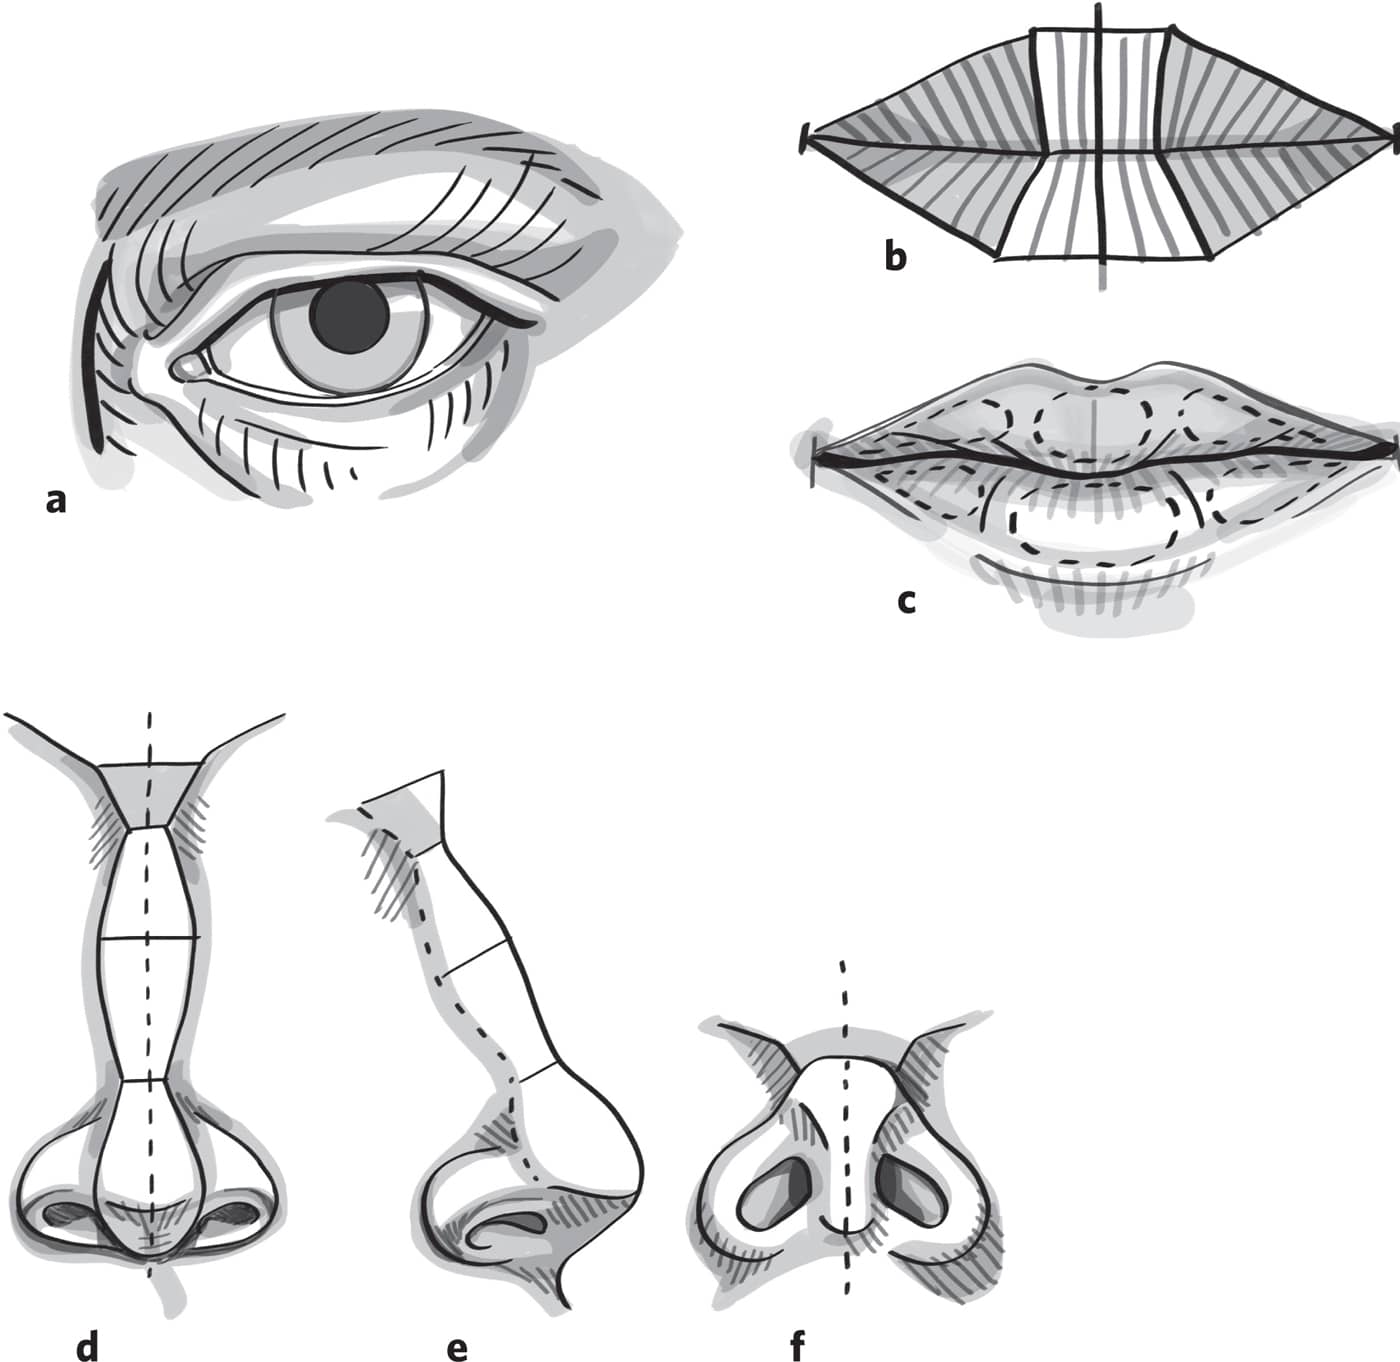
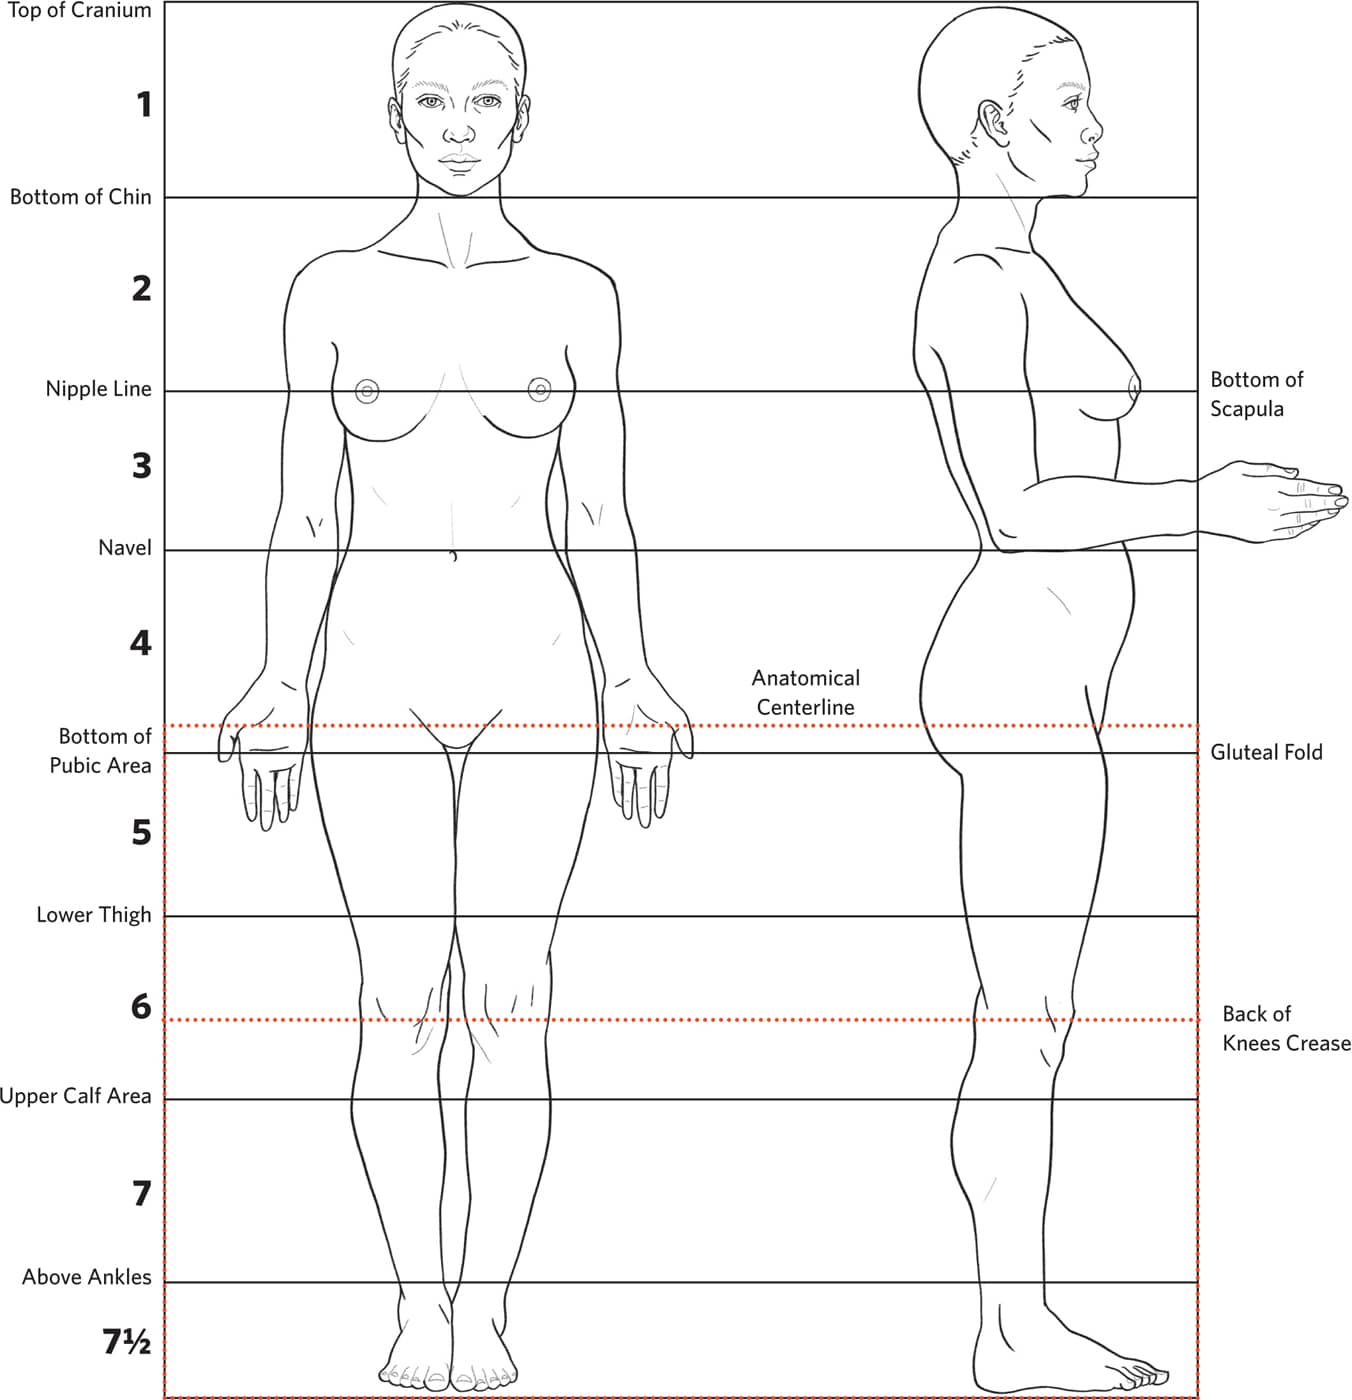
To ensure the anatomical forms remain in balance to each other at any scale, a generic system of measurements called a canon can be used to make sure the lengths and widths of the figurative components are proportional and properly positioned. Throughout history there have been varying preferences regarding these proportional systems, giving place to a rich variety in figurative styles across time and throughout cultures. Some of these systems achieved a great level of naturalism, as in the case of the ancient Greeks and Romans, while others gave forth more stylized figurative depictions that spoke to specific ideologies and shared values within a culture, as in the case of Egyptian or Byzantine art.
It was the ancient Greeks who first developed a mathematical system for rendering a figure based on taking one part of the body as a unit of measurement to establish idealized proportions throughout the rest of the body. Rediscovered by artists of the Renaissance, the canon of Polykleitos, a Greek sculptor who proposed one of the first set aesthetic principles to govern proportions, was most likely where the idea of dividing a figure into seven or seven and a half heads in height originated, favoring the creation of balanced, realistic figures. Another popular variation ascribed to Lysippus establishes the height of an average figure as measuring eight heads, creating a more elongated and stylized version of a figure. Together, these are the most prominent systems utilized to establish generic measurements throughout the body.
The importance of the use of a canon in my own practice lies in offering a system to quickly detect inconsistencies throughout a composition and facilitate insights as I am deciphering a three-dimensional gesture. It is particularly helpful when sculpting without a model or photographic references. Using a proportional guide also offers one more layer of support in neutralizing distortions from the camera lens that could manifest throughout the photographic references as well as checking one’s own distortion tendencies. As with any generic measurement system, it is important to note that these are always in the service of the unique variability present in human bodies as well as the stylistic dispositions of an artist. Nonetheless, this guide alongside scaled blueprints and photographic references are the next best thing to having a live model to sculpt from (see here).
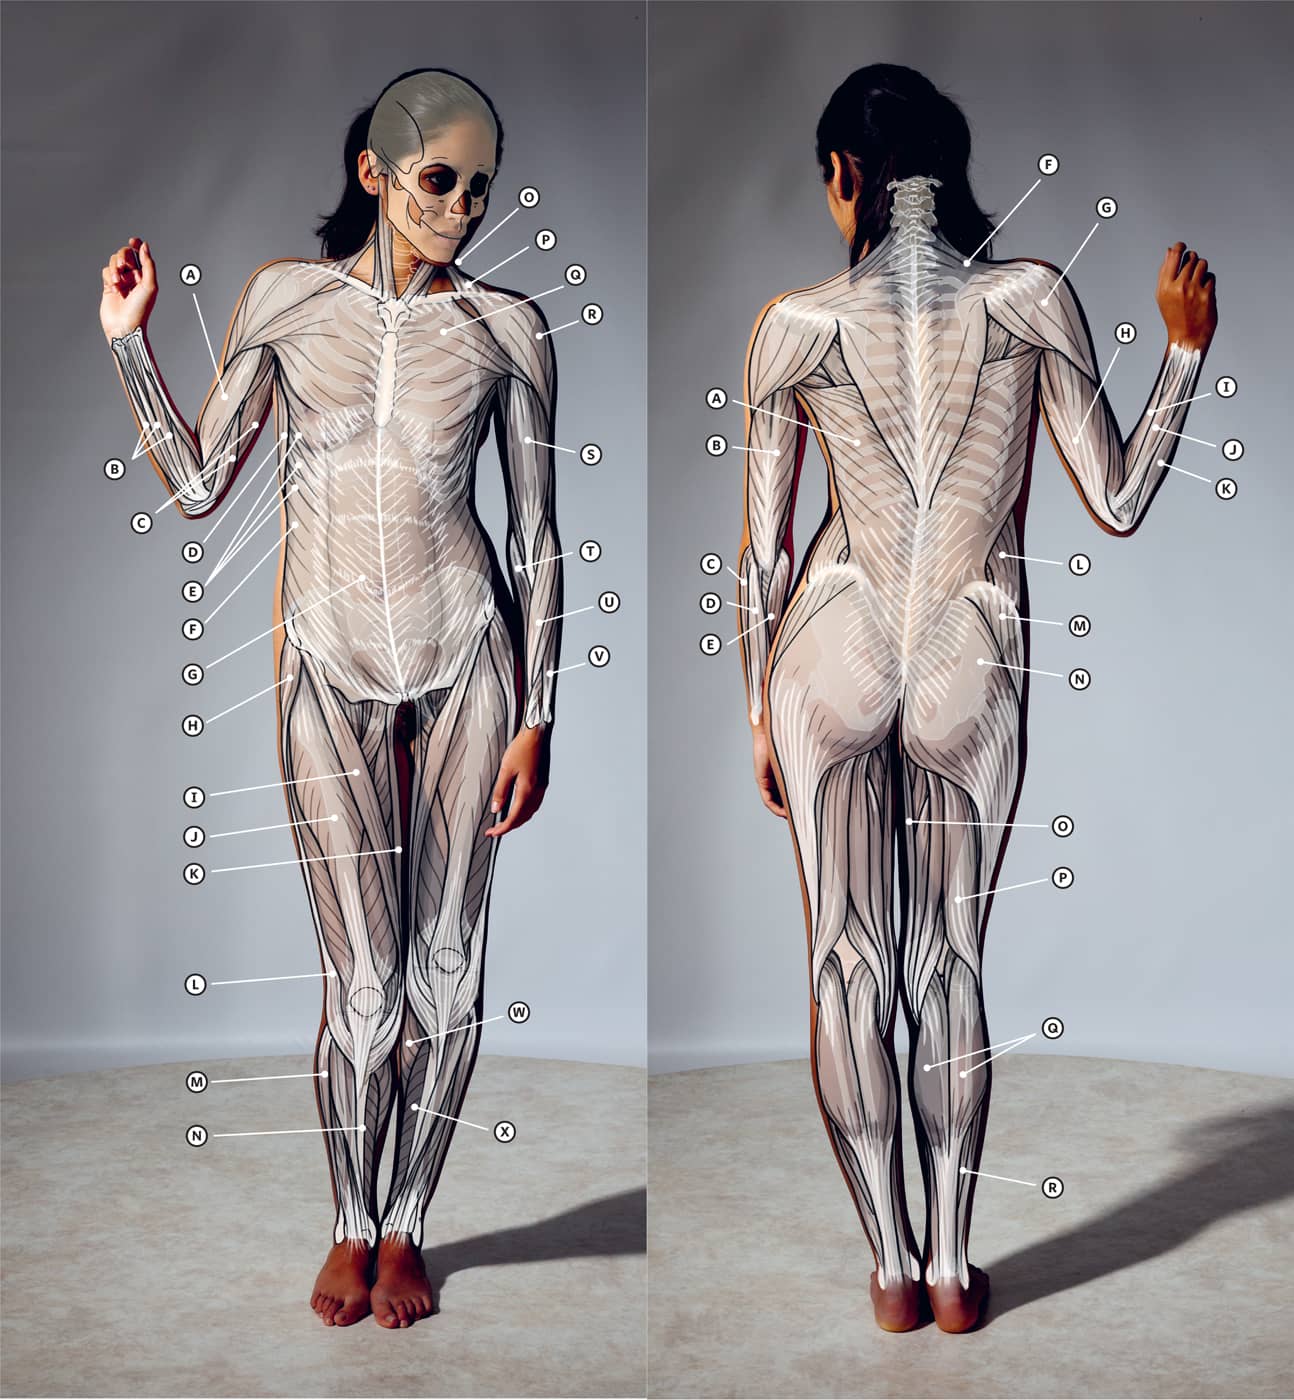
Further into the sculpting process, I utilize a series of bony and fleshy landmarks to help me understand a pose by breaking down the body’s information into smaller more digestible parts that interlock one with the other.
In the following images, the model’s front and back views have been overlaid with the skeletal system to give you a sense of the structural underpinning of the pose. I pay particular attention to the bones that are most prominent and evident through the skin. This, of course, may vary from pose to pose, but I can usually locate the following bones to ground my understanding of the pose and bring it into focus.
STARTING FROM THE TOP of the torso on the front, you find the clavicles, which have the shape of a handlebar and move laterally and back to connect with the acromion process of the scapula on either side, creating a visible notch that is evident in the tip of the shoulder through the skin. On the back, the seventh cervical vertebra is often visible between the trapezius muscles, marking an inward shift in the curve of the spine. I also locate the scapulae, defining their shape and checking their alignment with chest line (nipple line) at the front.
KEY TO THE MAJOR BONES OF THE FEMALE BODY
FRONT VIEW
![]() Mandible
Mandible
![]() Radius
Radius
![]() Ulna
Ulna
![]() ASIS (Anterior Superior Iliac Spine)
ASIS (Anterior Superior Iliac Spine)
![]() Clavicle
Clavicle
![]() Sternum
Sternum
![]() Humerus
Humerus
![]() Ulna
Ulna
![]() Radius
Radius
![]() Greater Trochanter
Greater Trochanter
![]() Femur
Femur
![]() Patella
Patella
![]() Tibia
Tibia
![]() Fibula
Fibula
BACK VIEW
![]() Clavicle
Clavicle
![]() Thoracic Spine
Thoracic Spine
![]() Ulna
Ulna
![]() Radius
Radius
![]() Pelvis
Pelvis
![]() Cervical Spine
Cervical Spine
![]() Scapula
Scapula
![]() Lumbar Spine (5)
Lumbar Spine (5)
![]() PSIS (Posterior Superior Iliac Spine)
PSIS (Posterior Superior Iliac Spine)
![]() Sacrum
Sacrum
![]() Coccyx
Coccyx
![]() Ischium
Ischium
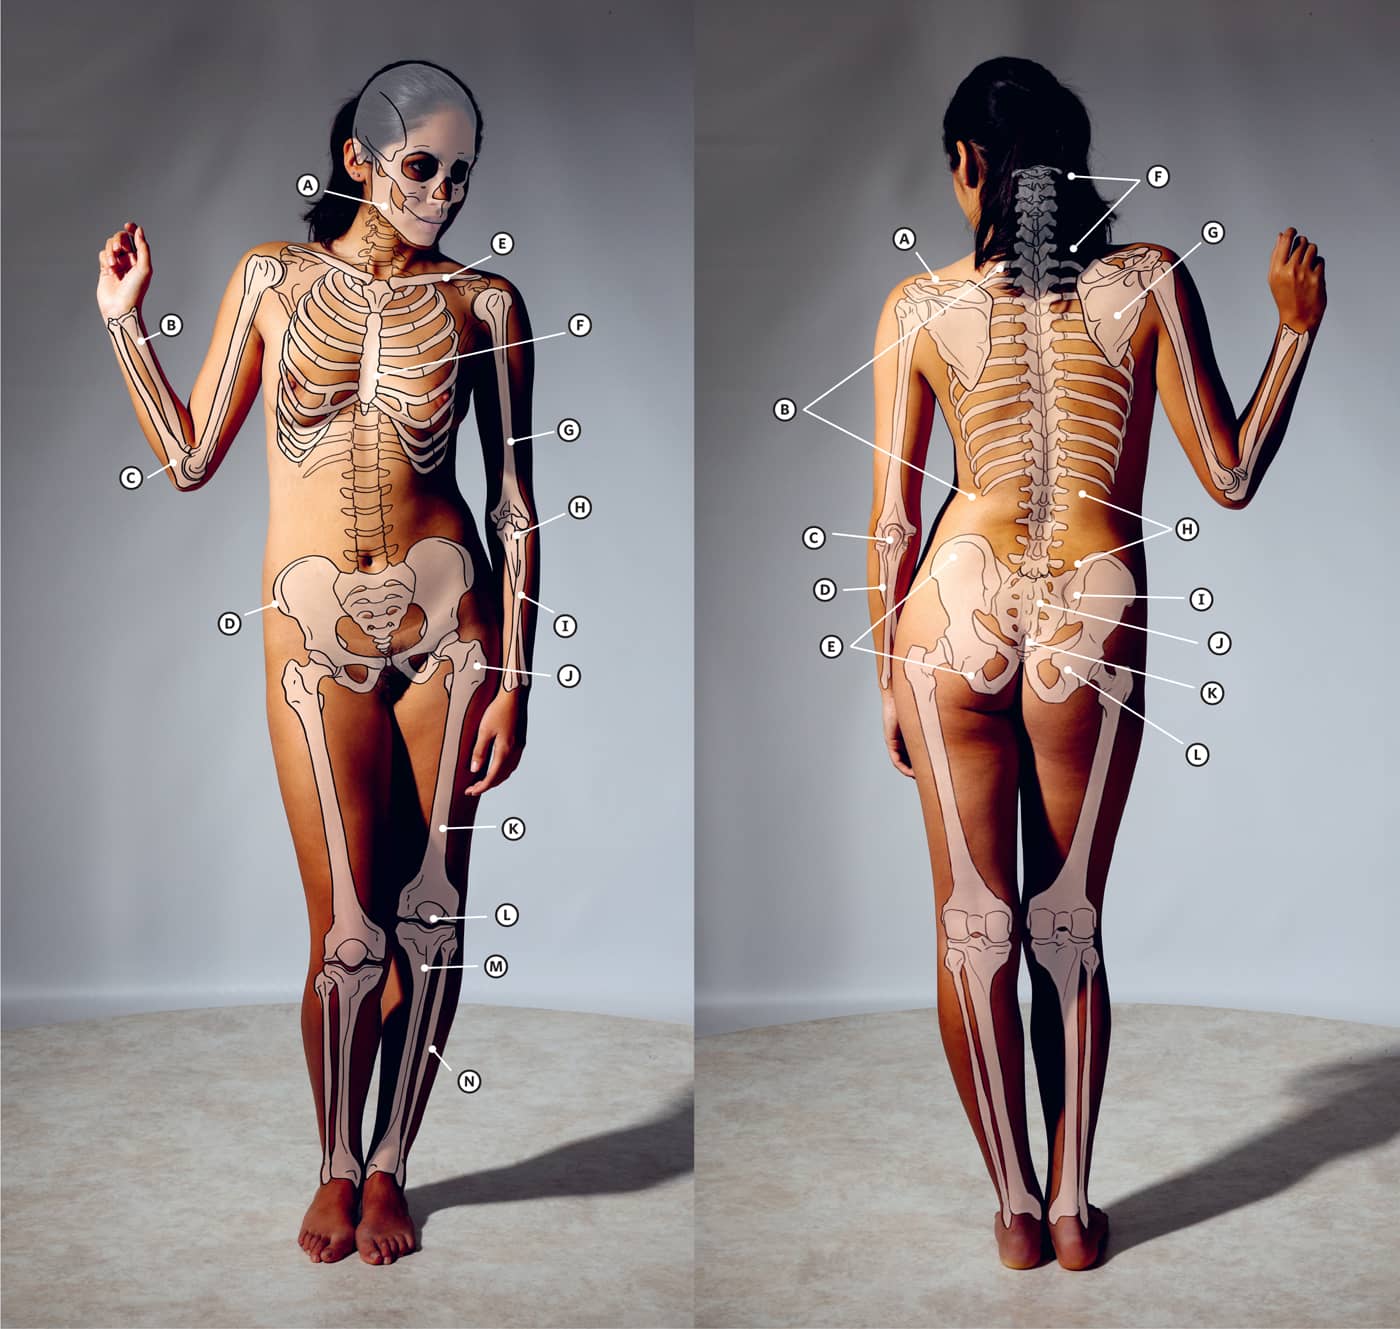
The pit of the neck, or suprasternal notch, also offers a stark landmark.
Moving down from there, I look for a triangular shape at the center of the upper chest, with its base starting right below the clavicles, created by the sternum.
Continuing down the torso, I note where the last rib ends and the lumbar spine begins, creating the cinch of the waistline.
Looking at the arms, the elbow, or olecranon process of the ulna, will align with the waistline. The head of the ulna will create that bony projection on the outer part of the wrist.
At the pelvic level, I look for the iliac spine. Toward the front of that ridge, one finds the ASIS or the anterior superior iliac spine, a part of the pelvic bone that creates a projection that is noticeable through the skin and is particularly helpful in establishing the top two points of the pelvic box. Toward the back of the iliac crest, the PSIS or posterior superior iliac spine also creates two subtle depressions that, when connected to the ASIS, can help trace the path of the iliac crest front to back. The PSIS at either side also mark the two top points that create the sacral triangle.
Continuing below, the widest part of the female body is created by the external head of the femur, referred to as the greater trochanter of the femur. This is also traditionally considered the center (top to bottom) of the body.
Moving to the legs, the bottom of the patella, or kneecap, from the front creates a very clear sense of where that center of the knee is.
The lower ends of the tibia on the inside of the leg and the fibula on the outside lead to the ankle bones, two distinct lateral projections that precede the feet.
NEXT, I CONSIDER the fleshy landmarks, or those comprised of muscles and connective tissues throughout the body articulated by adding bits of clay to slowly develop the myriad shapes over our core form.
Starting at the neck area, I locate the sternocleidomastoid muscles that connect the lower, back of the skull or mastoid process with the sternum and clavicles as well as the trapezius muscles, which from the front, appear as triangular shapes at either side of the neck in between the sternocleidomastoid muscles and the clavicles. From the back, the trapezius muscles create a distinct spear-like shape that points down and culminates around the center of the spine.
Moving laterally past the clavicle, I find the deltoid muscle, which is called such for the delta shape it creates as it nestles in between the bicep and the triceps.
I then look for the topography in the belly area developed by the obliques and the rectus abdominis punctuated by the belly button. There is a break in between the left and right abdominals as well as in between the rectus abdominis and the external obliques that can be drawn onto the surface of the sculpture to help organize the volumes in relation to a gesture, noting the asymmetrical shifts created by the movement of the pose.
Moving down, I locate the quads and the opposing hamstring muscles. From the side, I begin to note the S curves that form between the front of the leg muscles and the calf muscles (gastrocnemius) toward the back of the lower leg. I continue to find these S shapes in the legs from different angles, using them to detect and articulate the dynamics of the upper and lower leg muscles, side to side and front to back.
From the back, I note the gluteus medius and, below, the gluteus maximus aligning the bottom of the gluteal cleft with the bottom of the pubic area to the front in more grounded poses.
KEY TO THE MAJOR MUSCLES AND CONNECTIVE TISSUES IN THE FEMALE BODY
LEFT SIDE FRONT
![]() Biceps Brachii
Biceps Brachii
![]() Flexor Muscles
Flexor Muscles
![]() Triceps
Triceps
![]() Latissimus Dorsi
Latissimus Dorsi
![]() Serratus Anterior
Serratus Anterior
![]() External Oblique
External Oblique
![]() Rectus Sheath with Rectus Abdominus shown underneath
Rectus Sheath with Rectus Abdominus shown underneath
![]() Tenor Fasciae Latae
Tenor Fasciae Latae
![]() Sartorius
Sartorius
![]() Rectus femoris
Rectus femoris
![]() Gracilis
Gracilis
![]() Iliotibial Tract
Iliotibial Tract
![]() Fibularis Longus
Fibularis Longus
![]() Tibia (Bone)
Tibia (Bone)
LEFT SIDE BACK
![]() Lateral Dorsi
Lateral Dorsi
![]() Triceps
Triceps
![]() Extensor muscles
Extensor muscles
![]() Extensor digitorum
Extensor digitorum
![]() Flexor muscles
Flexor muscles
RIGHT SIDE FRONT
![]() Sternocleidomastoid
Sternocleidomastoid
![]() Trapezius
Trapezius
![]() Pectoralis major
Pectoralis major
![]() Deltoid
Deltoid
![]() Biceps brachii
Biceps brachii
![]() Flexor M.
Flexor M.
![]() Extensor Muscles
Extensor Muscles
![]() Extensor Digitorum
Extensor Digitorum
![]() Gastrocnemius
Gastrocnemius
![]() Soleus
Soleus
RIGHT SIDE BACK
![]() Trapezius
Trapezius
![]() Deltoid
Deltoid
![]() Triceps
Triceps
![]() Extensor muscles
Extensor muscles
![]() Extensor digitorum
Extensor digitorum
![]() Flexor muscles
Flexor muscles
![]() External oblique
External oblique
![]() Gluteus madius
Gluteus madius
![]() Gluteus maximus
Gluteus maximus
![]() Gracilis
Gracilis
![]() Biceps femoris
Biceps femoris
![]() Gastrocnemius
Gastrocnemius
![]() Soleus
Soleus