
SCULPTING IN CLAY is delightfully simple. It can be done without a specialized space or elaborate tools. All you truly need are clay, water, and some inspiration. That said, understanding how to prepare your workspace to both safeguard your health and optimize your creative output will help you nourish an effective studio practice. By familiarizing yourself with tools and equipment related to ceramic sculpture and then practicing your technique, you will learn to unlock the potential of this wonderful material.
To me, a studio is successful when it is safe, environmentally aware, and streamlined to fit your needs. In this chapter, I will explore what it means to cultivate a studio environment that frees you to create meaningful work.
STUDIO SETUP
After years of working on sculptural ceramics, I feel there are several key considerations that ensure the safest, most productive time in the studio. In this section, we will not only address the tools and equipment I use, but also important considerations like lighting, work surfaces, and safety.
SAFETY IN THE STUDIO
It is important to work in a space that has good air quality and proper ventilation, particularly with respect to kilns and glaze mixing. My kilns are on the covered porch that wraps around my studio, so fumes and gases are dispersed and do not enter the work area. If the kiln you will be using is located indoors, there are several downdraft and updraft kiln vent systems that you can purchase and hook up to your kiln to keep off-gassing chemical compounds out of your workspace—and lungs.
Although I do not mix my own clay, I routinely mix slip and glazes. When measuring and combining the dry materials that go into my glazes and slips, I work outdoors in my spray booth while wearing a respirator. I keep my respirator on until the glaze is hydrated and thoroughly integrated. The spray booth offers a contained space with good light and an exhaust system to move the particles away as I work.
Inside the studio, I do not have any special ventilation other than a gentle cross draft from open windows and doors during the warmer months. To keep dust down, I try to tidy the floor after each sculpting session with a wet rag and a dustpan. Cleaning scraps while they are still wet helps to contain the dust that ensues when clay dries and becomes pulverized.
Periodically I will do a deep cleaning. First, I move through the studio, picking up large scraps of clay with my wet rag. Next, I use a hose to pour water onto my concrete floor and then use a squeegee to push that water into a trap with a drain at the center of the workspace. If your workspace has no clay trap, you can achieve the same results with a wet/dry vacuum. Mopping takes more time but is also a good option.
Sweeping is best avoided as it is an easy way to make minute silica particles airborne and compromise your workspace. Unless I am using some sort of sweeping compound, which helps to capture the clay and dust particles, I do not sweep under any circumstances. Long-term exposure to clay dust can have cumulative, irreversible effects. I urge you to bring mindfulness into your studio routine by implementing simple cleaning strategies to keep yourself and everyone who enters your space healthy.
WORK SURFACES
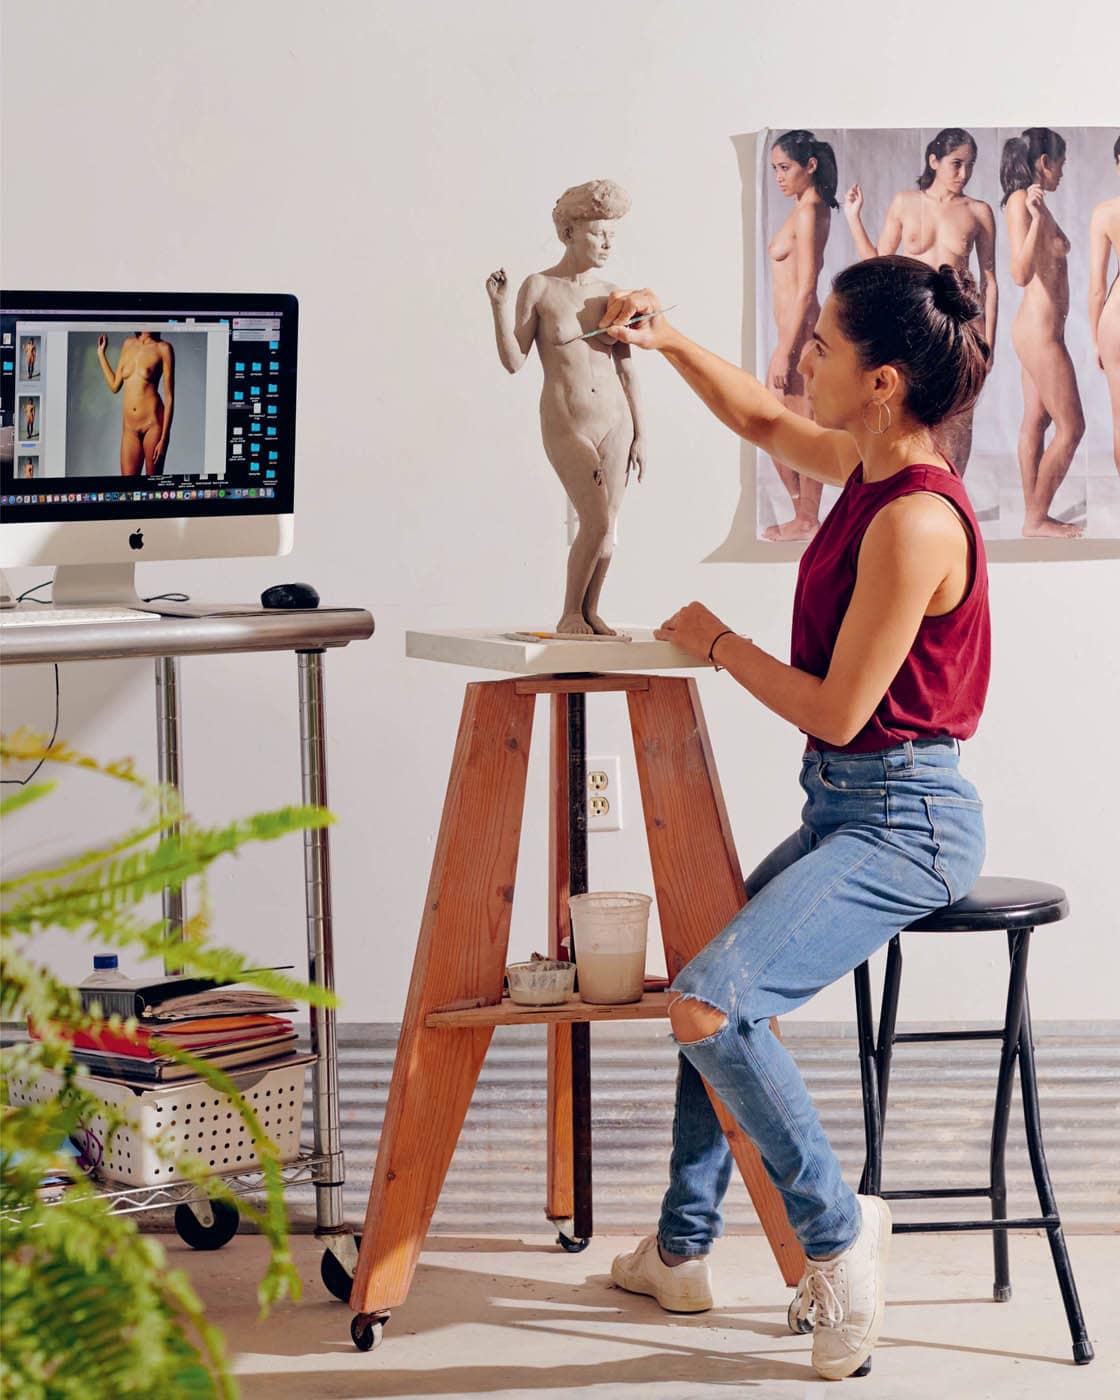
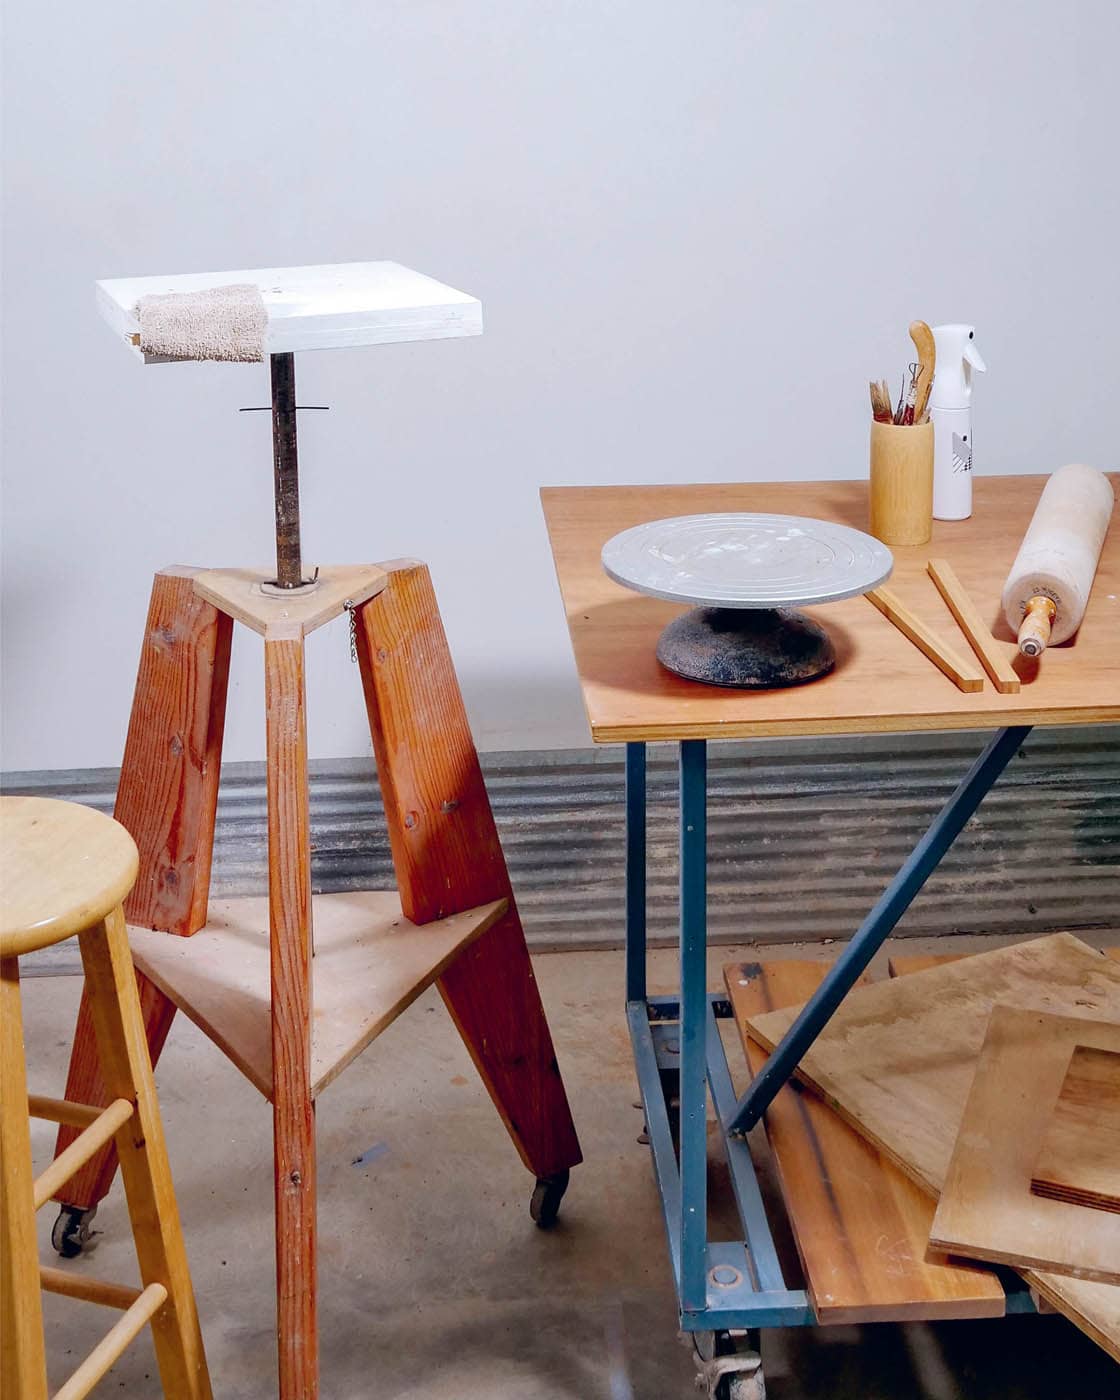
In my studio, I work on either a sculpture stand or one of several rolling tables with sealed plywood tops. All of my work surfaces are easy to clean and move around. I am 5 feet 4 inches [1.6 m], and my 36 inch (91 cm) tables come up to the level of my hips, which works well for me. When sculpting from photographic references that I have taped to my wall at the same height as my sculpture, I use a wooden sculpture stand with a rotating top. Built onto casters so that it can be easily moved into alignment with a particular reference image, my sculpture stand can also be adjusted to come up or down as needed. For larger pieces I use a steel turntable with a circular wooden base.
When looking to purchase a sculpture stand, you will find a wide variety available. These range from basic wooden stands that hold around 80 pounds (36 kg) to heavy-duty crank stands that can hold upwards of 700 pounds (317 kg). When making your selection, ensure that the stand you choose is rated to hold the weight range you will be sculpting in.
For the purposes of this book, I recommend you work on a rotating surface at the height of your photographic references. You want the top of your sculpting surface to line up with the bottom edge of the images. The idea is to be able to look through the sculpture and onto the references. I find that using an adjustable sculpture stand on casters near a wall offers the most effective way to easily move across your line of photo references, making adjustments and building accuracy as you go. I also like being able to move the piece to different parts of the studio to refresh my perception by viewing the work at a distance or in different light. As an alternative to a sculpture stand, you can place a turntable or banding wheel on top of a table that is located in front of the vertical surface where your photographic references are hung.
LIGHTING
A critical part of the sculptural process, lighting is what allows your eye to discern and articulate forms effectively. Make sure you work in a well-lit space to optimize your ability to understand and develop volumes. I am always blown away by the impact good lighting can make in both helping me understand the ins and outs of a composition and keeping my eyes and brain fresh throughout a long workday.
Diffused natural light is the best option, but adding in some artificial boosts can help create a bright environment that will enable you to sculpt with clarity and ease. I like to use clamp lights with 10 watt daylight LED bulbs to compensate for low or shifting natural lighting in my studio. Sometimes I put these lights on stands, and sometimes I clamp them to ceiling beams.
Note: I try to avoid harsh lights, particularly ones coming from side angles, as these can confuse the eye’s ability to decipher forms.
TOOLS
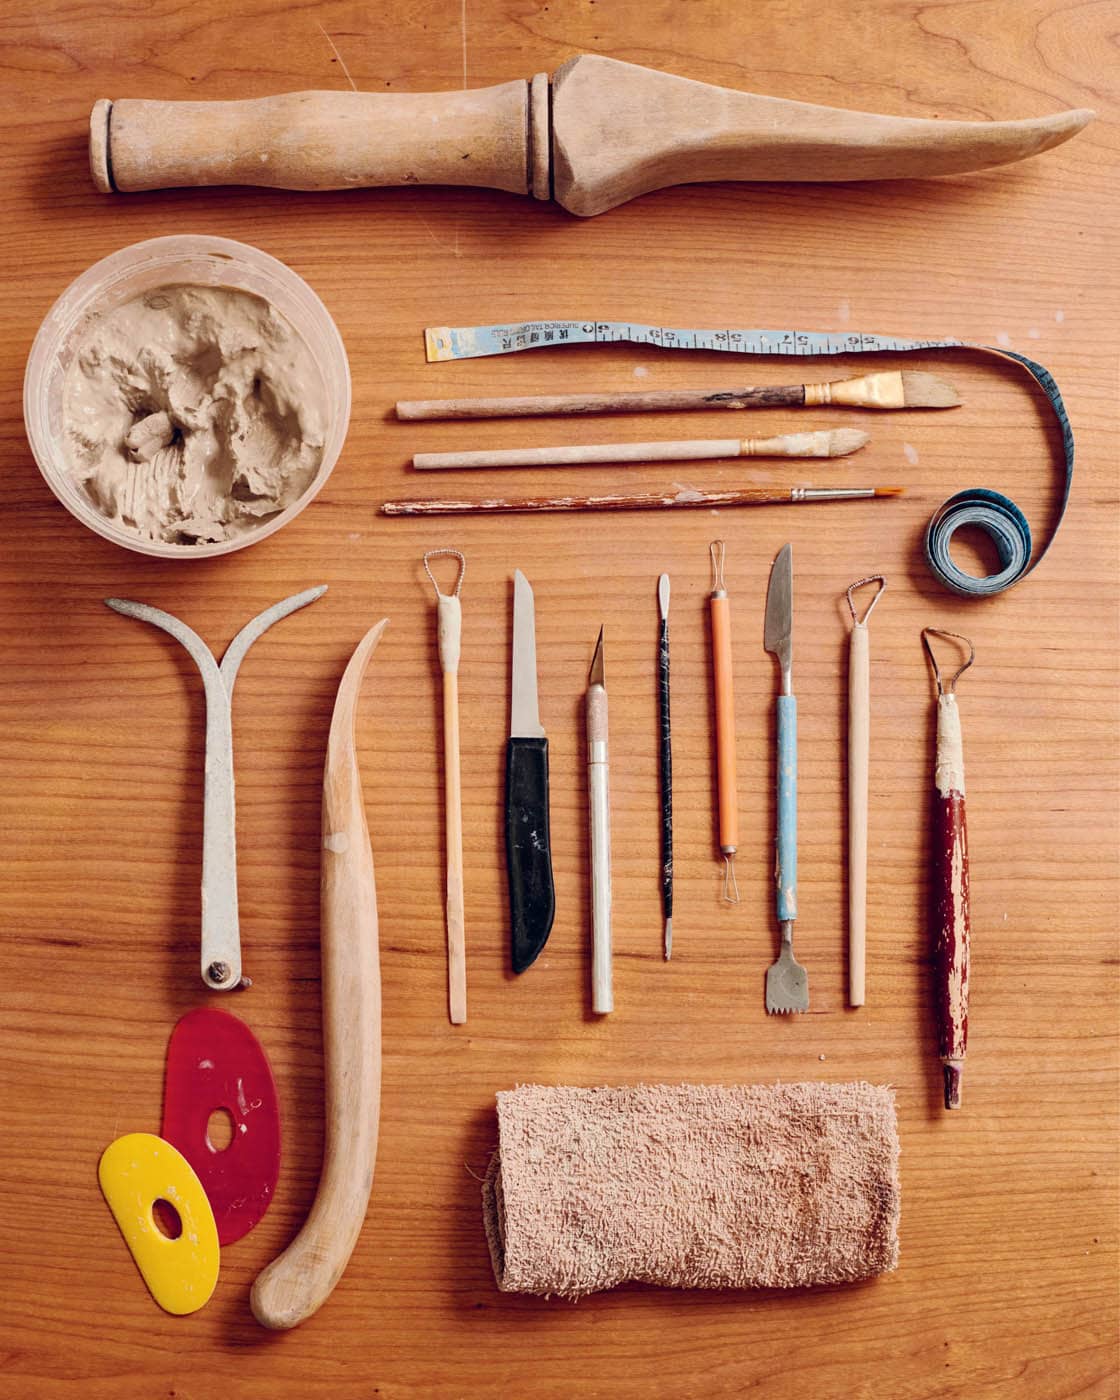
Wood and rods for armature: For the sake of stability, I often make my sculpture base thick, using two 14 × 14 inch (35.6 × 35.6 cm) pieces of plywood glued together. I am using ¼ inch (6 mm)–diameter metal rods to construct a simple armature and lend support to my sculpture during the construction process. By embedding threaded inserts within my wooden base, I make it easy to unscrew and remove the rods without damaging my piece before drying and firing.
Rolling pin: In generating slabs onto which I will trace my templates, I use rolling pins of varying sizes to compress my proto-slabs and roll them out to an even thickness, often with the help of thickness strips.
Thickness strips: Thickness strips are two long pieces of wood of even height. I use them as rails to guide either my wire tool or my rolling pin during the multi-step process of converting a block of fresh clay into slabs of uniform thickness. I have a 1 inch (2.5 cm) set of thickness strips that I place on either side of my block of fresh clay to guide me as I cut slices of clay off my block to send through my slab roller. When I don’t have a slab roller at my disposal, I use sets of ⅜ inch or ¼ inch (1 cm or 6 mm) thickness strips to create tracks over which my rolling pin will run as it compresses my proto-slab into a ⅜ inch or ¼ inch (1 cm or 6 mm) slab (my target slab thicknesses for the shapes used in this book and most of my work).

Mirror tile: Having a 12 x 12 inch (30 x 30 cm) mirror available in my studio not only lets me use my own face and body as an occasional figurative reference, but also enables me to observe my sculpture in its mirror image. Looking at my evolving figure through a mirror helps me perceive mistakes and inconsistencies that I do not catch as easily from the perspectives my brain has become accustomed to. The inverted image helps spark new insights around symmetry, rhythm, and balance in the composition as the brain is forced to reset and perceive outside its regular framework.
Clay: When choosing a clay body for figurative ceramics, select one with good sculptural capacities: plastic with a good amount of fine/medium grog. Although I use a number of clay bodies in my practice, my favorite for large-scale works and full figures of any size is Max’s White WC-953 Paper Clay from Laguna/ Axner. This versatile clay fires gray-stony white in reduction at cone 10, buff-white at cone 5 oxidation, and off-white at cone 04 to cone 2, my preferred firing temperatures. It contains a moderate amount of fine and medium mesh grog as well as paper pulp, which lets you build vertically quickly. It has lots of dry strength and has very little shrinkage (4% to cone 06 and 8% to cone 5). Not all clays will work with this hand building technique, so I recommend testing.
Tip: If you have a good sculpture body you know well you can wedge shredded nylon fibers or toilet paper sheets into part of the clay that will be used for the weight-bearing part of the sculpture to add dry strength and stability as you work up. You can also experiment with adding a small percentage of fine or medium grog to the clay that will be used to build the foundation of your piece.
Wire tool: Your wire cutter tool will enable you to break your block of fresh clay into sections that can be combined into slabs using a rolling pin or pressed on a slab roller to reach our target thickness. I also use it to trim parts of my sculpture that need to be reworked or reset.
Biodegradable plastic: Because I work in a waterbased medium, plastic is essential for keeping my pieces workable and controlling moisture throughout a composition. To reduce the environmental impact of plastic waste generated through my practice, I use biodegradable plastic and reuse each piece for as long as possible, washing them and hanging them out to dry on my back porch when they become coated in clay dust.
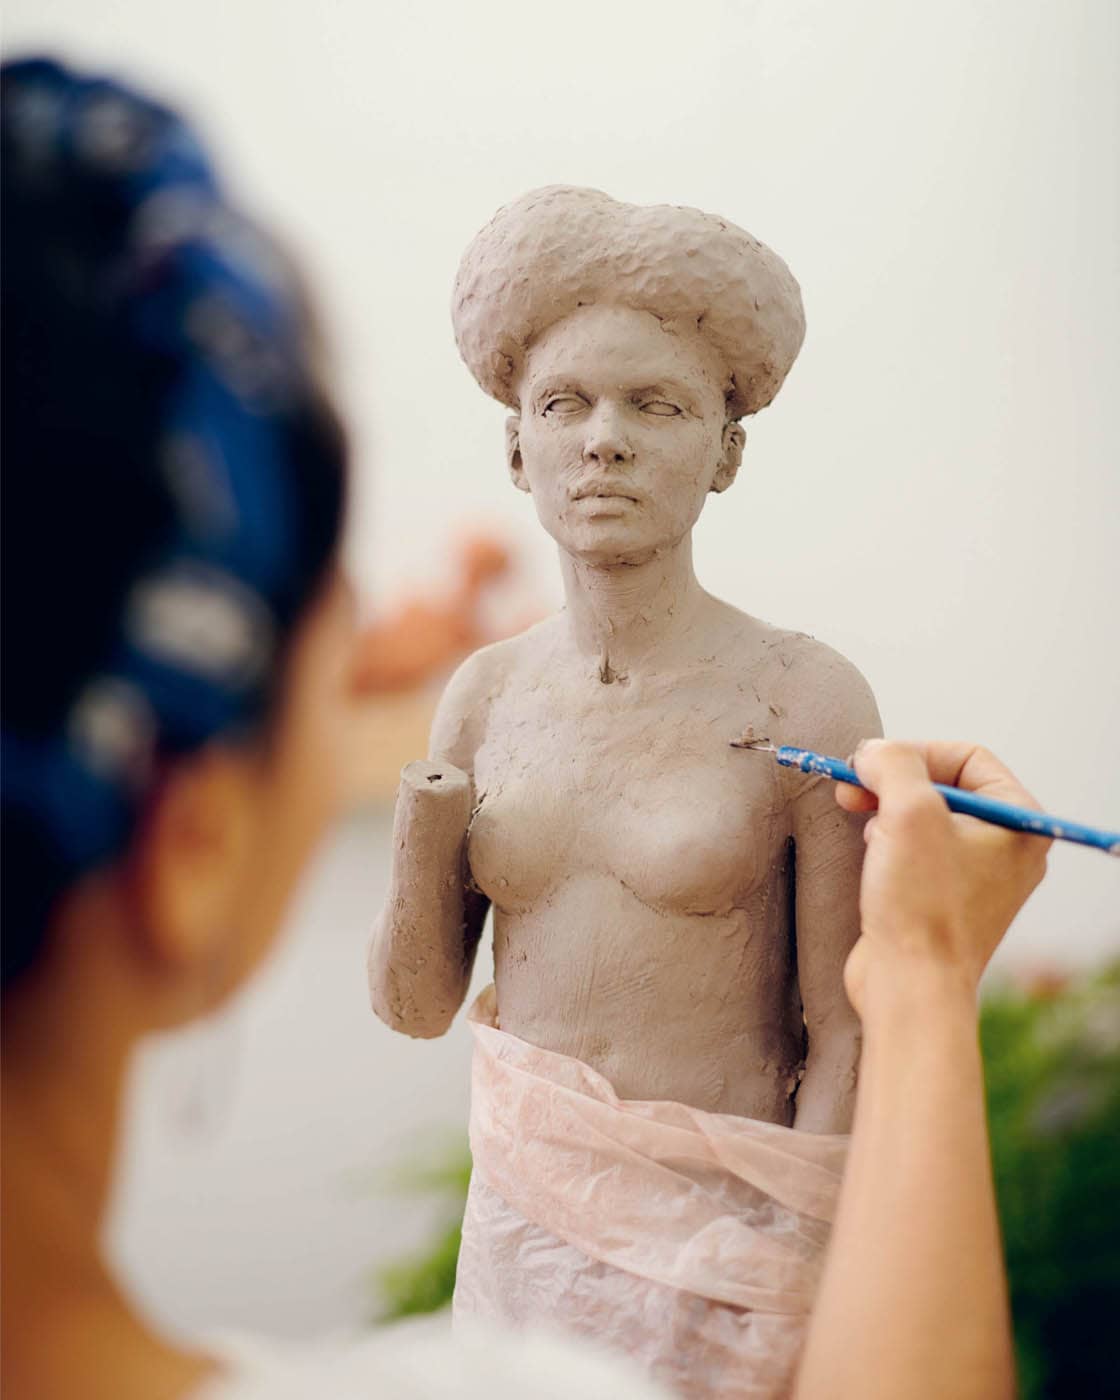
Shop towels: Thicker than regular paper towels, reusable shop towels are great for preserving the moisture of delicate areas on a sculpture. I run them under a faucet and squeeze them out until they are damp, then I lay them over areas of my sculptures that are prone to rapid drying, such as ears, hands, thin wrists, and other small extremities. I then cover these areas in plastic. I also use damp shop rags under plastic to protect seams of my sculpture that will need to receive new forms when I resume my work after a break. For example, once I have finished building the lower body, I will place moistened shop rags around the top perimeter of the pelvis form where I will later attach the torso.
Calipers (small and large): Calipers enable me to cross-reference the measurements of my sculpture against my reference images and vice versa. I use them to plot bony landmarks, features, and overall measurements onto a sculpture. They also come in handy when checking the width and height of various features, as well as the distance between designated points on my reference photos. When I use my calipers, I remember that I am moving from 2D photographs to a 3D sculpture, and I keep in mind that my reference photos do not account for z-axis displacement, or the measurement that describes depths and projections. It is also important to make sure that the wingnut at the bottom of the calipers is tight enough that the calipers will not slide out of position after having captured a measurement. For the purposes of this book, a simple pair of steel calipers will do, but for scaling up or down from life-size castings, you might consider investing in a pair of proportional calipers.
Seamstress tape: I routinely use seamstress tape to capture the circumference of various points on a human form. When working from a live model, I measure circumference at the top and bottom of each form. For example, for an upper arm, I measure the circumference at the armpit and just above the elbow. Then, when I go to lay out a trapezoid that will roll up into my upper arm cylinder, I know how wide to make the top and bottom of that trapezoid. I tend to make my measurements a little bit less than those that I capture on my model so that I have room to develop the forms with fresh clay once my core form has set. If I am not working at full scale, I can use a conversion ratio to adjust all the measurements that I capture with my seamstress tape and bring them into my target scale. For example, if my model is 5 feet 4 inches (64 inches or 1.6 m) and my target scale is 18 inches (46 cm), I will divide all the original measurements by 3.56, acquired by dividing 64 inches by 18 inches. Once I have rolled up each cylindrical component that will comprise my figurative sculpture, I check its circumference with seamstress tape before compressing my seam.
Sculpture rakes: A sculpture rake is a steel loop tool with a serrated edge that allows you to move clay around in a different way than a straight edge loop tool. This is one of the tools that I use the most to articulate the volumes throughout the figure. My rake helps me tie my forms together visually and create a sense of dynamic flow. Rakes tend to break after a lot of use, but if the wire head pops off your rake you can always use epoxy putty to re-adhere it to its shaft.
Clay modeling eye tool: I use a 7 inch (17.8 cm) plastic eye modeling tool by Philippe Faraut to help me define the eye without flattening the arching surface of the cornea. The concave surface of this tool lets me easily articulate a convex form.
Knife with small scoring tool attached: I love this tool. On one end, the large flat surface of its steel knife allows me to smooth areas on my sculpture or make drawn marks and cuts. The other end functions much like a wire brush—its small, serrated edge helps me score and stitch the ends of slabs as well as small areas of my sculpture that are hard to reach with a serrated rib.
Serrated rib: After cutting out my patterns from slabs of clay, I use scoring tools to score and slip the edges of my clay patterns where they will come together as seams when I assemble the slabs into three-dimensional forms. After I have thoroughly compressed all areas of a seam, I use my serrated rib in a cross-hatching motion over the new seam to integrate the clay from both sides of the new connection and to smooth down the small ridges and valleys created by my fingers during compression. I like using a fine edge serrated rib that has 18 teeth per inch. These toothy ribs are fantastic for unifying, scraping, and shaping clay. Made from high quality stainless steel, these scrapers are flexible.
Mudtools ribs (yellow and red for varying levels of hardness): I use ribs to groom my surface. I can hold my red rib in an arch and run it over a particular muscle to compress, unify, and smooth the surface in one fell swoop. The denser yellow rib is used for more aggressive passes where the clay form might need a bolder adjustment. I also use these when applying underglaze transfers to my surfaces.
Favorite stainless steel tools: These tools have both a straight edge and a curved edge. They help me articulate detail without flattening volumes. I use them to model and finesse facial features, nuances on hands and feet, creases where components meet, etc.
X-ACTO knife: I use a fresh X-ACTO knife over a cutting mat to prepare reference images that I will work from during my sculpting process. With the help of either a website called PosteRazor or Adobe Illustrator, I print my reference images over multiple pieces of printer paper and then use my X-ACTO blade to cut off the white margins of those 8.5 × 11 inch sheets, adhering them together with clear tape. X-ACTO knives with fresh blades also help me cut up underglaze transfers that I sometimes use to decorate my surfaces. Once my sculpture is in the hard stage where I am making refinements, I also use a dull X-ACTO knife to clarify the edges of the eyelids or define the lip partition.
Clay knife: When I overlay a paper template on top of my slab of clay, I use a paring knife to both mark my interior guidelines and cut around the perimeter of the pattern. When marking the inner marks, I use the back of my knife so as not to accidentally make a deep incision.
Small wire loop tools: These small wire loop tools are great for articulating and refining features. I use them in the corners of my sculptures’ eyes, around nostrils, or wherever there are tight areas that need to be finessed.
Goat hair brushes: Because their soft, absorbent quality allows me to load them up with material, goat hair mop brushes are my favorites for glazing and applying slip. In sculpting, I use them in the last steps when applying my finishing slip.
Small nylon brushes: I use these medium stiffness nylon brushes both to smooth and clean my surface and to move clay around in a sculptural way. I like having an assortment of these brushes of various shapes and sizes on hand. When used in a cross-hatching motion, these brushes can be great for smoothing out transitions between small-scale forms.
Wooden paddle: I use several paddles of different sizes and shapes to pound my sculptures from the outside into the forms I observe in my reference photos. Paddles are great for compressing seams and establishing planes that I will later flesh out with fresh clay.
Wood point head tool/finger tool: Rounded on one end, this tool is great for reaching into small forms and pushing out from the inside. Just as my paddles enable me to modify my forms from the outside, my wooden finger tool acts as an extension of my hand and lets me adjust my forms from the inside while I am gauging those changes from the outside.
Slip in lidded plastic container: I look for a sticky peanut butter consistency in my slip. If I initially add too much water, I leave my slip container with the lid off to let some of that moisture evaporate. I use slip as an adhesion aid any time I am joining a seam together. I like to score and then grab it with my scoring tool, like a small spoon, to lay it over the seam. I use slip liberally on my seams and clay surfaces that will be further developed, especially when my clay is already pretty firm. To finish my sculpture, I also use slip that is more hydrated and run it through an 80-mesh sieve. This creates a much smoother slip that will be used to finish the sculpture and impart a sense of skin onto the surface.
Rag/terry cloth: I use terry cloths in the later stages of my sculpting process to push back surface noise and slowly articulate my final layer of skin. Terry cloths work very nicely with Max’s White Paper Clay, which is strong enough to take a lot of scrubbing. When working at a large scale in Max’s mix, I move my damp rag over the surface of my sculpture in long, wide strokes from multiple directions to clean and unify my surface. Damp rags can also be used as alternatives to shop towels: I place them over areas of my sculptures that are vulnerable to drying when I am wrapping up my pieces.
Spray bottle: My favorite spray bottles are the fine-mist sprayers used by hair stylists. When my working sculpture is unwrapped from its plastic covering, I am spraying it regularly throughout my sculpting process—a light misting at least every ten minutes.
EQUIPMENT
Banding wheel: It is hard to overstate the importance of seeing your sculptural pieces in the round. Using a banding wheel is a simple way to make sure that you are considering your piece from all perspectives on a regular basis. A banding wheel on a table is a good alternative to a sculpture stand that has casters. I prefer heavy, sturdy banding wheels.
Wooden boards: I keep a series of large plywood boards in my studio for cutting and carrying slabs, keeping work contained, and keeping tables clean. I also have smaller boards to hold work in progress that I want to more easily move about the studio. My boards are cut from thick ¾ inch (2 cm) plywood so they will not warp when I wash them in my sink.
Sculpture stand: My sculpture stand can move up and down, and it rests on casters so it can be wheeled around the studio or in front of a particular reference image that is taped to the wall. Make sure that your sculpture stand is rated to support the weight of your sculpture.
80-mesh sieve: I use my 80-mesh sieve during my process of mixing glazes to ensure that no clumps of dry materials make it into my final glaze. After measuring out and thoroughly stirring my dry materials, while wearing a respirator and gloves, I hydrate the glaze, stir it again, and then use a spatula to push the glaze through my 80-mesh sieve at least one time. I also use an immersion blender to further integrate my glaze.
I also use my sieve to strain watered down joining slip to convert it into finishing slip at the end of my process
Slab roller: If you plan to do a lot of slab-based work in your studio, it may be worth investing in a slab roller to expedite this process and quickly generate slabs of uniform thickness. Much like a printing press, a slab roller consists of a metal roller positioned over a tabletop. You can use a crank to adjust the thickness of your slabs. It is important to sandwich your clay between two long pieces of canvas before sending it through the slab roller. The canvas protects your metal roller from becoming covered in clay.
Computer: I keep a desktop computer in one corner of my studio. On this computer I store all my reference images for each pose I am working on. While I print out my four cardinal views to the scale I am sculpting in, I generally do not print the transitional or “in between” views of my pose. When I get to the stage where I am looking at my transitional views, I move my sculpture stand close to my computer and observe the screen directly, cross-referencing what I see on my sculpture with what I see in the digital images. I also use my computer to scale and tile my photographic references before printing them. Finally, my computer comes in handy when I want to gain artistic inspiration from the work of other artists using either my Pinterest boards or the web.
Clamp lights or other lights to support sculpting: I use clamp lights with 10W daylight LED bulbs to compensate for low or shifting natural lighting in my studio. The flexibility of such lights lets you move them around with ease, clamping them to stands or other static features. Daylight bulbs have color temperatures that begin at 4600K (Kelvins) and range up to 6500K or higher. Emitting a bluish white light, they illuminate the workspace in a crisp, invigorating way that resembles midday light and provides optimal contrast among colors.
Kiln: I work with kilns of different sizes and shapes to support my practice. I fire most of my work at low- or mid-range temperatures, using ramping schedules that I have designed to suit the needs of my pieces. To prevent my pieces from cracking during the firing process, I use shrink slabs made from the same clay body as my sculptures. I also use a thin layer of sand—which acts like tiny ball bearings—beneath both my shrink slab and sculpture. Sand also protects my kiln shelves from potential glaze drippage during my glaze firings. When assembling and disassembling my kilns or loading and unloading pieces, I move slowly and treat my kilns gently to protect the fragile firebrick that they are made from.
Spray booth: Located on the porch of my studio, my spray booth is where I work with dry materials that may be harmful to my lungs (glaze components, dry slip, etc.). Once I turn it on, the spray booth continually sucks air from its chamber into a vent, moving particles away from me and into a filter. My spray booth is also where I spray my glazes. Its plastic walls catch the excess glaze that does not make it onto my sculpture, and these walls are easy to clean. I use caution and wear a respirator when mixing dry materials and spraying glazes.
Compressor: I turn on my air compressor when I am spraying glazes in my spray booth. If I have a piece of bisqueware that has been sitting around for a long time gathering dust, I may also shoot compressed air over its surface prior to glazing to move away any particulates that may cause crazing.
Heat gun: My heat gun comes in handy when I am pressed for time and am looking to speed up the drying process on a particular part of a sculpture. I prefer to let my pieces air dry, and I use my heat gun more frequently on less precious pieces of work, such as test tiles.
FINDING INSPIRATION
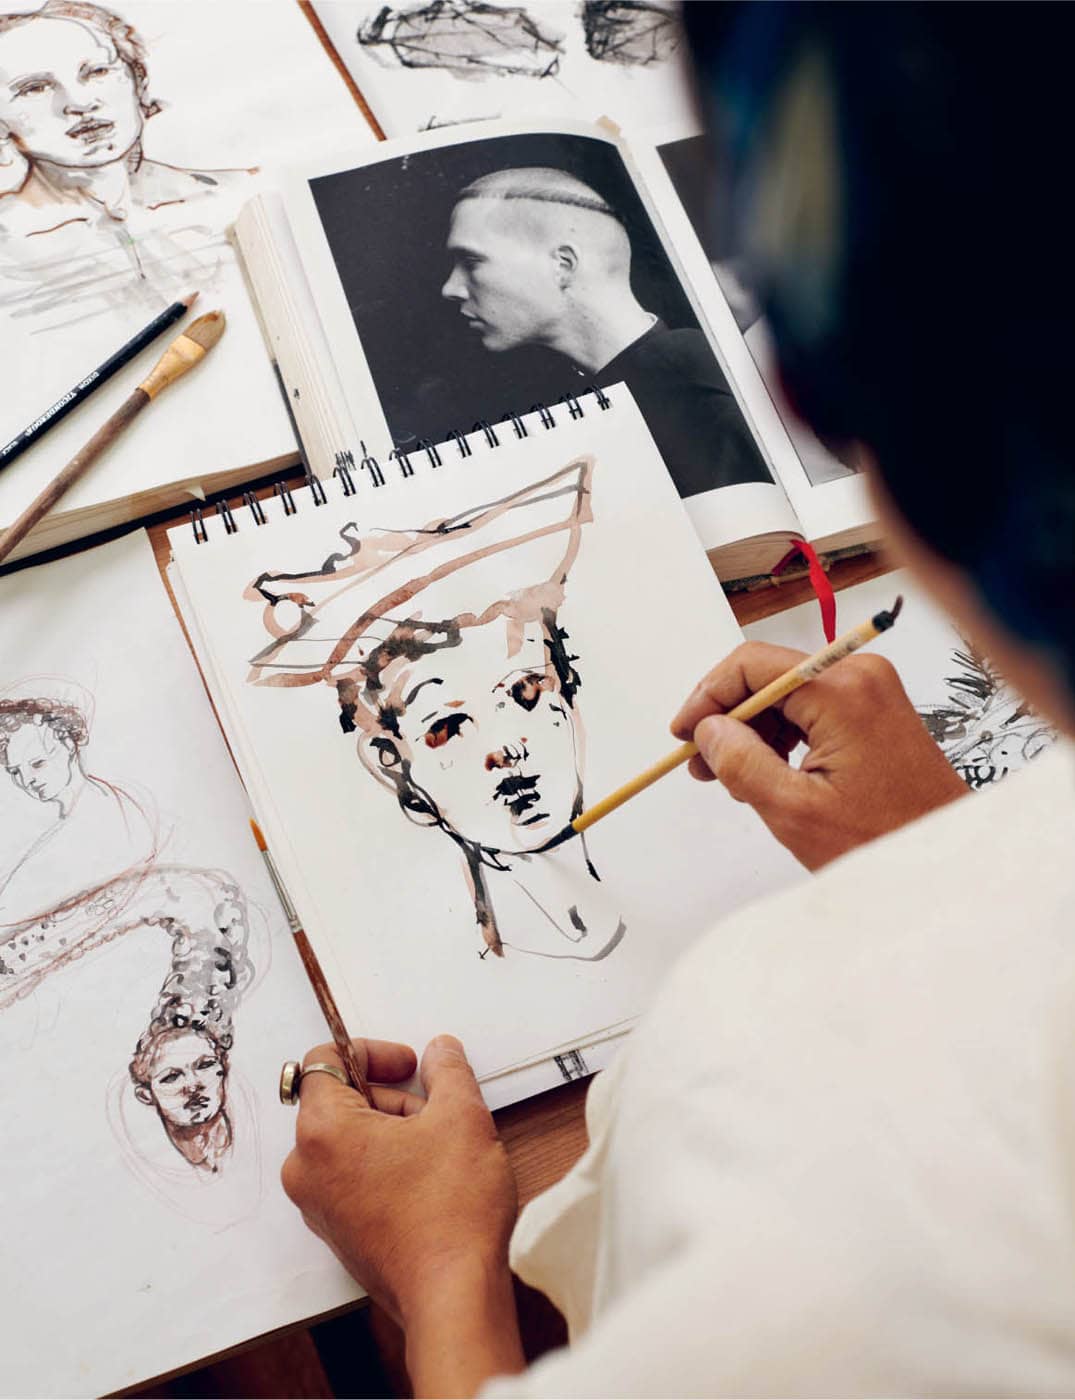
The process of exploring ideas and researching possibilities is a key part of any studio practice. Years into making, I realized that my most successful projects were preceded by a period of investigation where I clarified my ideas and translated them into formal possibilities through sketches, maquettes, and surface tests.
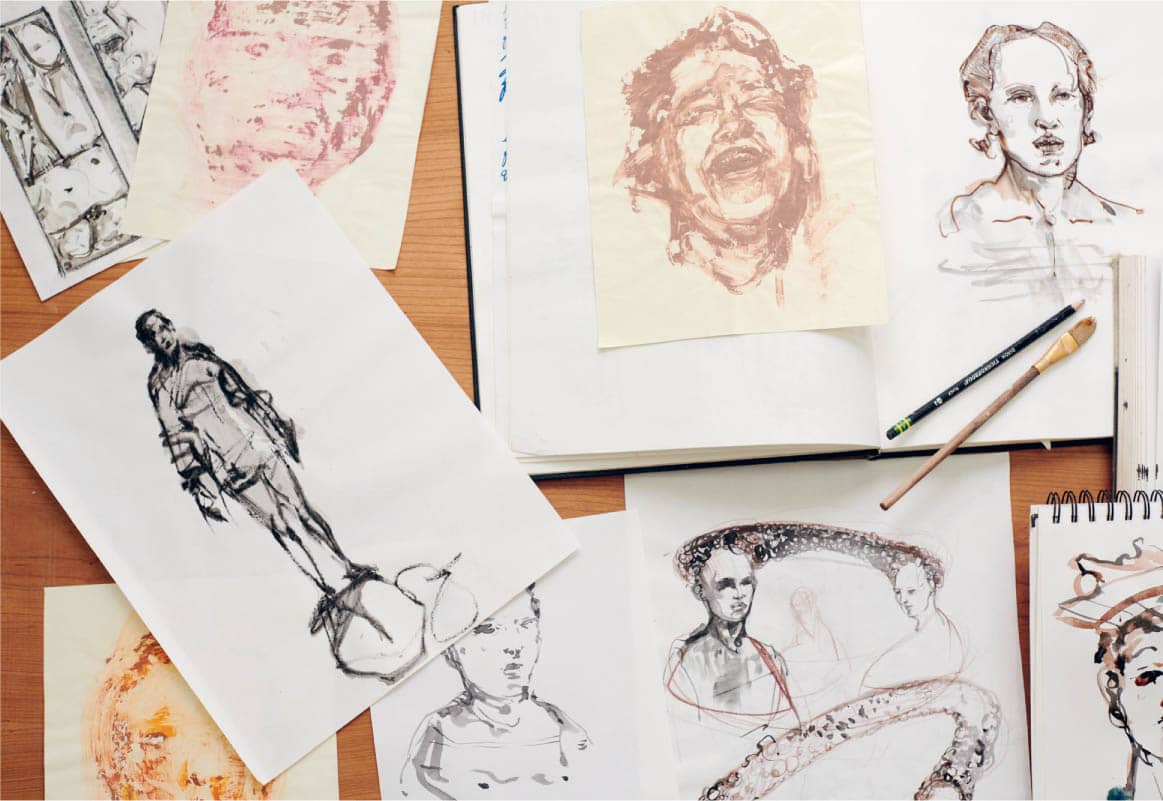
Depending on the scope of the work I am setting out to do, my approach to this preparatory stage varies in depth. At a minimum, I draw simple watercolor or charcoal renderings to understand where my creative energy wants to flow and experience my reaction to different scales and formats. I also take some time to look at books, old sketchbooks, and online images to facilitate this exploratory process. In the most comprehensive permutations of this preparatory stage, I move from sketches to clay models that I then photograph and print out to different scales to understand the potential of the idea as closely as possible before investing time and resources into executing it (see here). Working at this small scale unlocks a free-flowing exploration process, allowing me to be more playful as I develop an assortment of shapes and figurative ideas to pull from. As an artist, it is easy to fall into the safe, established grooves of the tried and true. Understanding how to activate your practice is an essential part of sustaining a meaningful and inspired connection to what you make.
Time consuming yet deeply grounding, this process allows you to discern what is most in alignment with your formal and conceptual inquiries at a given moment.
If you aim to be naturalistic in your figurative rendering, the next step involves finding or generating photographic references to support your sculpting.
For life-size pieces, I work with models who are close to me, like my daughter, Eva. The physical accessibility of my models opens a number of beneficial possibilities:
- I can do an exploratory photo session to investigate an assortment of poses and garments before selecting the final composition from which to generate my reference photos.
- I can take direct measurements of all the parts of the model to facilitate the construction process and help counteract lens distortion in my photo sets.
- The model can come into the studios to pose for me directly, infusing the work with a real interpersonal connection.
GATHERING AND PROCESSING REFERENCES FOR SCULPTING
SOURCING PHOTOGRAPHIC REFERENCES
When I am sculpting full-size figures, I prefer to take the images of the model in the studio on the same rotating base that I will use to sculpt. First, I cover the stand with a layer of sturdy plastic and place it in front of a clean white wall. I explore a variety of poses before settling on my final choice.
With a bright yet diffused light from above, I illuminate the model, minimizing shadows and hot spots as much as possible. I position my camera about 10 feet (3 m) away from the figure and set it on a tripod so that the camera’s height is lined up with the middle of the figure. This will minimize lens distortion. My current studio camera is a Canon Rebel with an 18-55 mm lens. When I feel ready to capture a position, I will have someone rotate the base in 15-degree increments as I take the images until I come back to my starting point, generating about 24 views.
Before releasing the pose, I trace my model’s feet onto the plastic covering the base. I take measurements from the model, such as the distances between bony landmarks and widths of arms, legs, neck, and torso, with my seamstress tape to create a blueprint that I will reconcile with the photographic references printed to scale, which helps me compensate for any distortion in the pictures.
Although I prefer photographing my model when rendering a life-size sculpture, the majority of my work is smaller-scale, so the ability to acquire pre-established photo sets has been invaluable. In the resources section of the book, I have included several of my favorite websites where you can browse through pose options and acquire references to inform your work.
PROCESSING AND PRINTING FILES TO SUPPORT SCULPTING
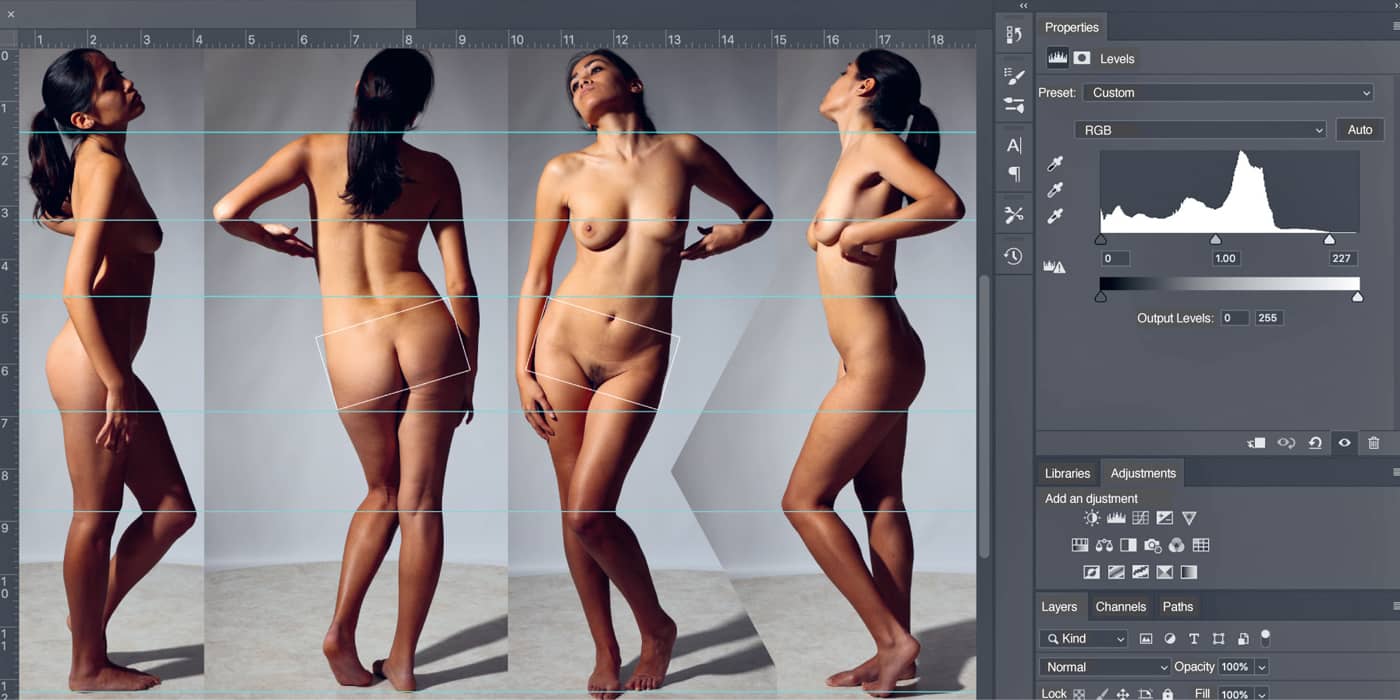
After selecting a pose and downloading a photo set (my own or purchased), which is generally comprised of 24 to 28 images in the round, I pick out the four cardinal views (direct front, back, and left- and right-side views) and then adjust them in Photoshop. As I seek to optimize my images for sculpting, I both color correct them and enhance the value range to better understand volumes and clarify external contours.
Next, I place my four cardinal views into one wide Photoshop document (see image on this page) and work to align them. Note that simply aligning the tops and bottoms of each photograph will likely not align the figures contained within each frame, as these photographs tend not to be taken at consistent distances from the model. It can be useful to drag guidelines down into your document, as these consistent horizontals will span across all four cardinal views. You can then select the visual landmarks on the figure that seem least affected by camera distortion and align them with your horizontal guides. If my gesture has a good measure of torque, making it harder to establish front and side alignments, I will determine the views based on the position of the pelvic box.
Next, I crop the images as close to the top of the head and the bottom of the feet as possible before putting them through a tiling software that will allow me to print out posters of any size using a standard home printer. (You can also send the original, untiled file to a print shop with large scale printing capabilities.) Printed to my target scale, these tiled images will serve as my blueprints as I construct my sculpture.
I use this same approach to process images of my small clay maquettes when I want to experience the impact they have at different scales (see here).
In addition to these four cardinal images, you can print out your additional “in-between” poses and hang them up on your vertical surface. Often, I reference these transitional photos directly off of my computer screen. I use them to inform the development of the gesture by providing additional insights into how the forms evolve in space.
As with any blueprint, interpretation is required to translate the two-dimensional information contained in these images into a three-dimensional rendering. Some aspects will be easier to resolve than others. Equipped not only with these scaled, printed images but also with additional photographic views, a generic proportions guide, knowledge of bony and fleshy landmarks, and additional tools for anatomical insight that can be sourced online or in books, you can confidently navigate any roadblocks you meet on this journey. Finally, your own intuition will be a constant companion, guiding you as you transform an image set into a form that speaks to your own experience and aesthetic values.
SIMPLE ARMATURE CONSTRUCTION
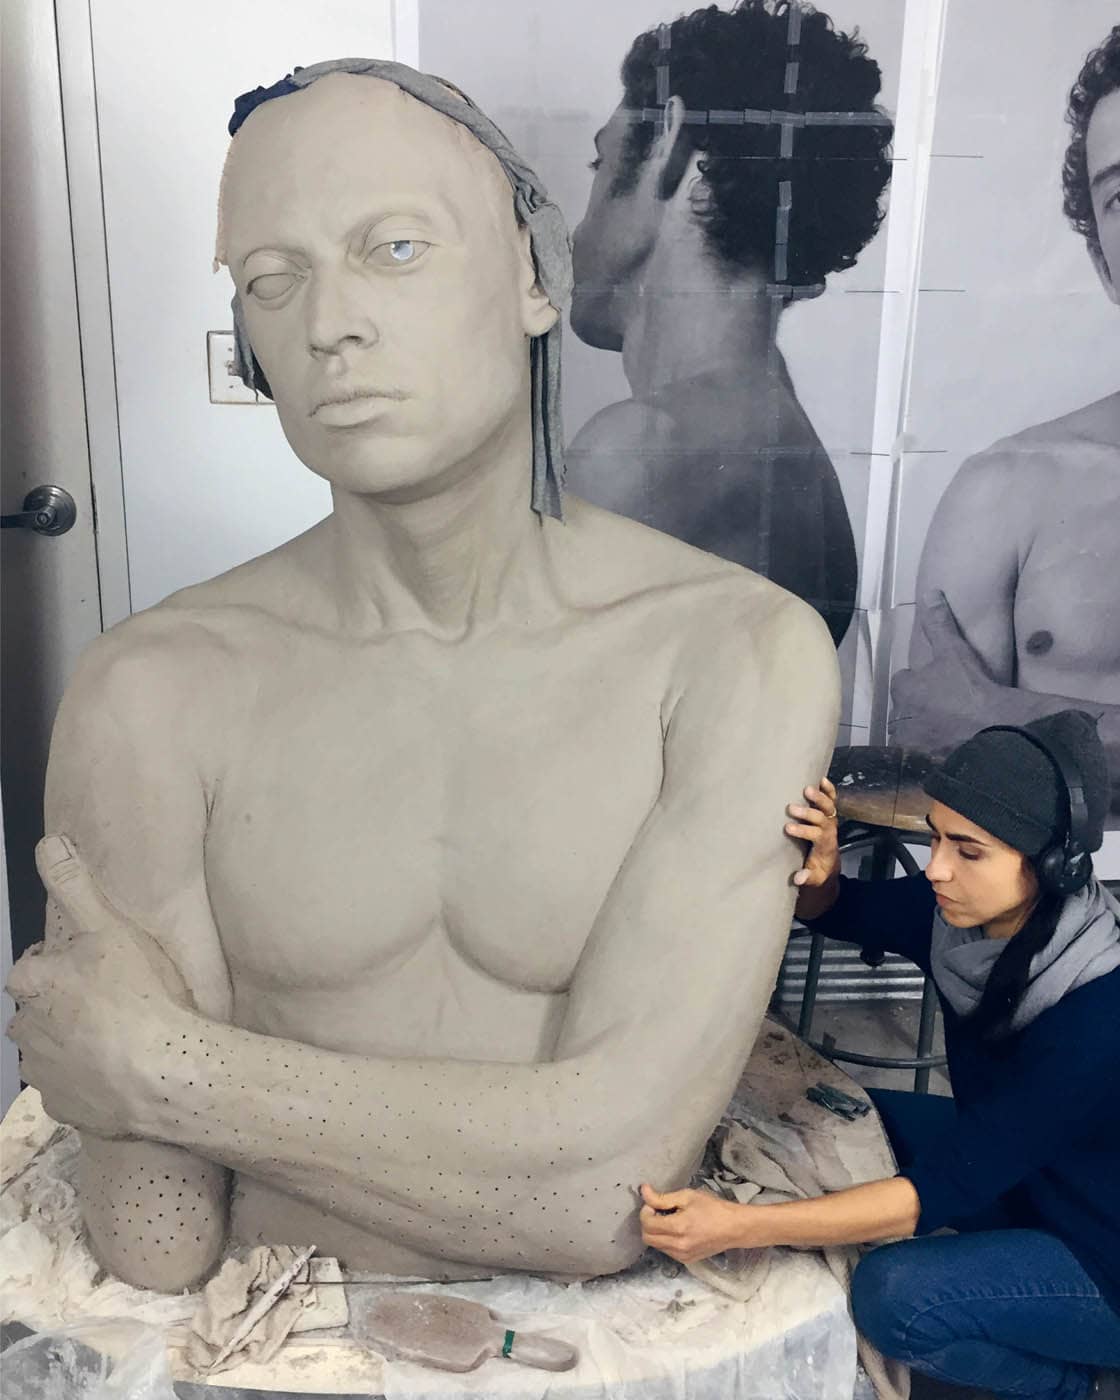
In the context of figurative sculpture, an armature is a structure that stabilizes the malleable material being formed into a figure. Depending on the technique being used, they can vary in complexity, ranging from carefully considered versions that provide measurements and gestural placement, comparable to a skeleton, to simple uprights in alignment with a pose that help stabilize the foundation of a figurative composition.
Because most of my work is built hollow, I use the latter, simplified approach to guide and stabilize the legs and pelvic area of a piece before stacking the upper body, which is sculpted without any internal support. In combination with the right clay body, this approach offers enough stability to achieve the results I am after without being overly complicated and makes it easy to dismantle when preparing the piece to dry fully before firing.
The first step is creating the right base, and the first thing I consider when deciding on the shape and size of my base is how big my piece will be. Larger pieces will need to be built over armatures that are secured to a heavier base to counteract the torque created by the height of the form. I build larger pieces on a rotating steel table with a wooden base cut round to make it more contained as the piece is rotated throughout the process.
For this piece, I am using a square 14 × 14 inch (35.6 × 35.6 cm) piece of wood, 1½ inch (3.8 cm) thick, and two ¼ inch (6 mm) threaded rods (with 20 threads per inch), one cut 13¾ inches (35 cm) long and the other cut 10¾ inches (27 cm).
MATERIALS
- ¾ inch (2 cm) plywood
- Two threaded inserts (¼ inch, size 20, sold by internal diameter) or 4 hex nuts (¼ inch-20)
- Two 18 inch (45.7 cm) lengths of steel threaded rod (¼ inch-20 size, and stainless or coated to inhibit rust)
- Printed full-size figure reference photos
- Hack saw (if steel rod is not pre-cut)
- Allen wrench ¼-inch
- Drill
- Two drill bits approx. 3/16 inch and 5/16 inch (5 and 8 mm)
- Ruler (14 inches [35.6 cm] or longer)
- Bevel gauge or protractor
- 3½ inch (8.9 cm) mil plastic to cover the top with clear tape to stabilize
INSTRUCTIONS
Cut two 14 inch (35.6 cm) squares of ¾ inch (2 cm) plywood. Spread wood glue on two faces of the plywood boards and either clamp them together or secure them with screws. Allow the glue to dry overnight.
Once the glue is dry, find the center of your square. An easy way is to draw two diagonals connecting opposing corners and the center will be the point where they intersect.
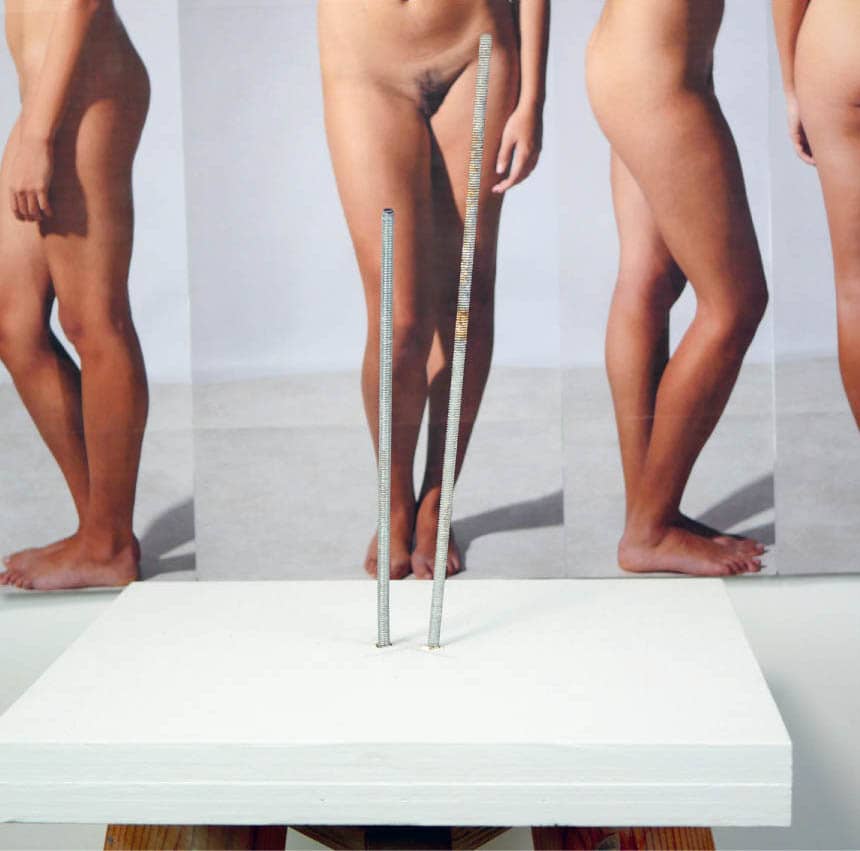
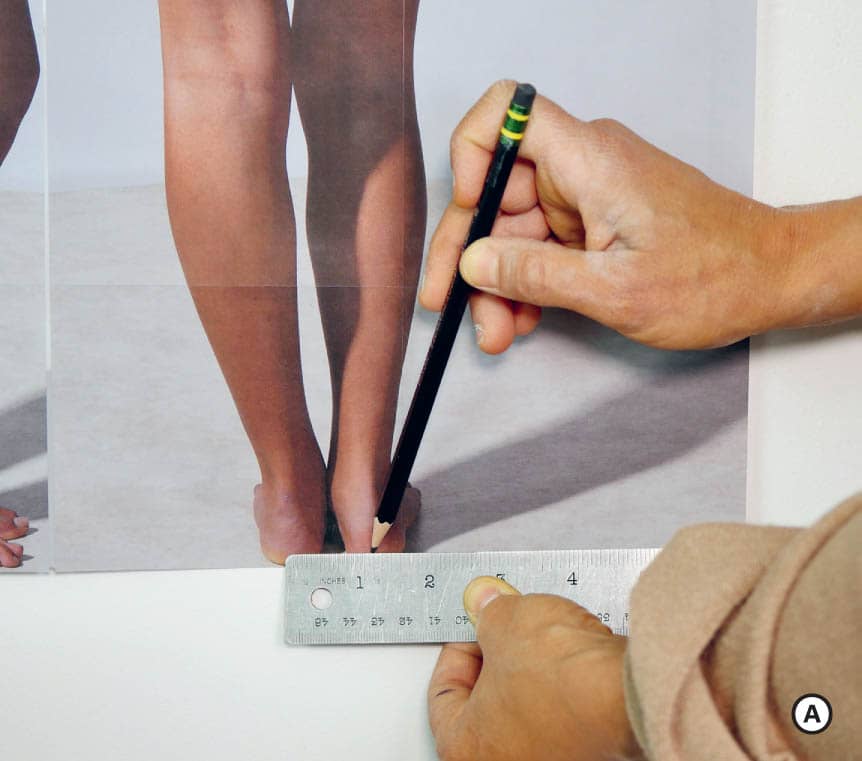
With the ruler, measure the distance between the center of the heels from the back view of your photographic references and mark that distance on your base, centered on the midpoint and parallel to an edge of the base. In this case, that distance is ⅛ inches (3 cm). These will be the marks for the rod placement. ![]()
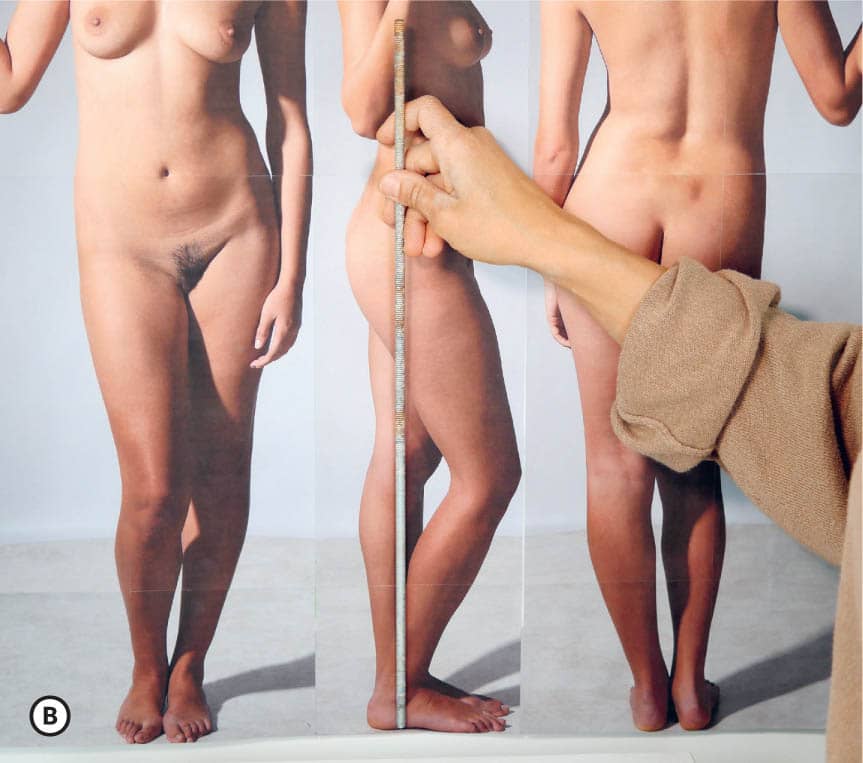
Now place your rods over your photographic references to understand the angle at which they will come out of the base. Make sure to check the alignment of the rods in relation to the photographic references from all views: front, back, and sides. In this pose, the model’s left leg is fairly straight, with a slight incline forward and to the right as the leg moves up. ![]()
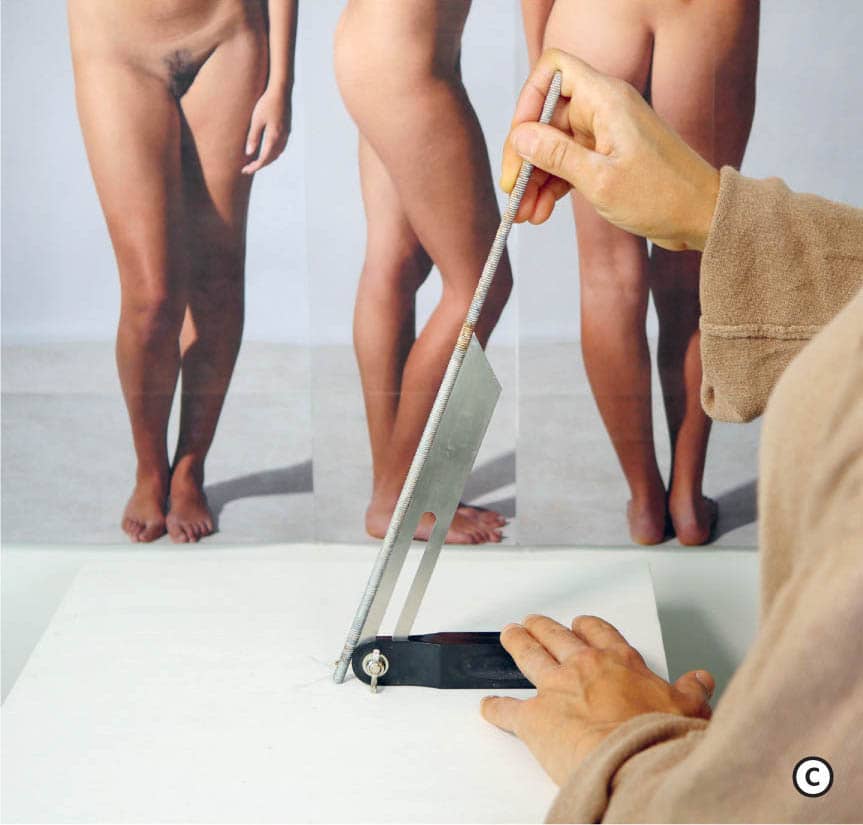
With the right leg, which rests at an angle, place the shorter rod over the left-side view of the photographic reference and use a bevel gauge to capture the angle. For more complicated leg placement, it can be helpful to use two bevel gauges to check front and side angles simultaneously. Bring the gauges to your base and align your drill with the angles from the side. ![]()
With a 3/16 inch (5 mm) drill bit in place, drill a straight hole slightly deeper than ¾ inches (2 cm, the length of the inserts) followed by drilling with a 5/16 inch (8 mm) drill bit. It is recommended that you make your way up to the final hole by starting with a smaller drill bit to ensure accuracy. ![]()
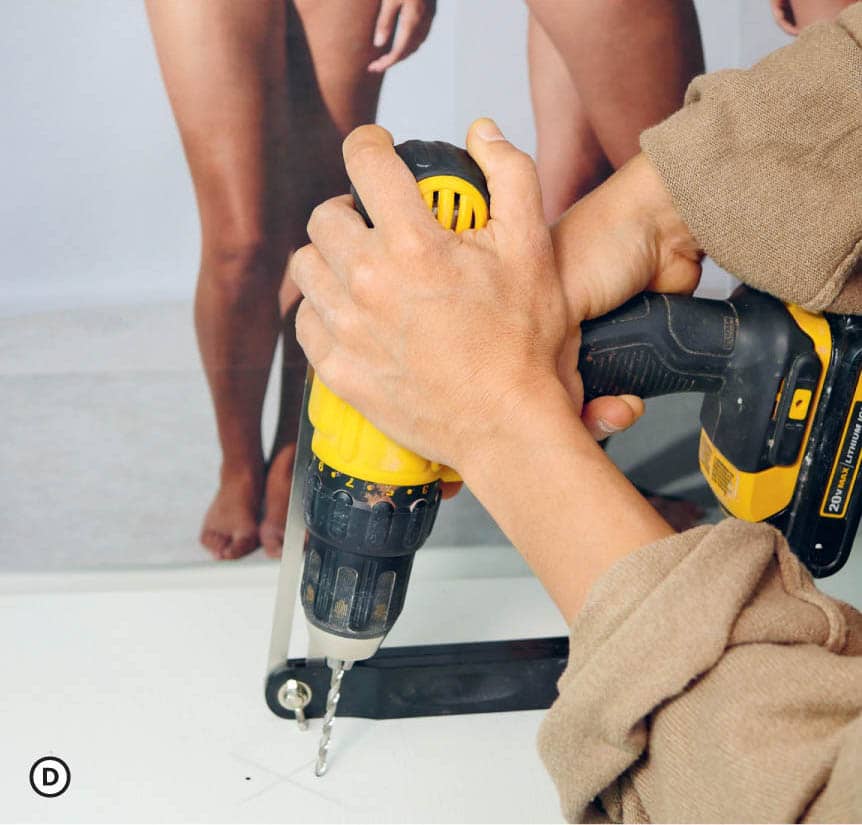
Tip: It can be helpful to have a second pair of eyes to ensure your drill remains straight from the front (not tipping left or right) as you go through the process of pre-drilling and drilling the second hole.
Once your holes are drilled, screw in your two 5/16 inch (external diameter) threaded inserts into the drilled holes with a ¼ inch (6 mm) Allen wrench until they are flush with the top of the base. Once you are done, screw the rods into the inserts, making sure they are all the way in, and check that the angles are consistent with your reference photos. If necessary, you can make minor adjustments by slightly bending the rods. Try to get the rods in as close to the reference as possible but keep in mind that this simple armature offers a margin of play. ![]()
![]()

VARIATION
An alternate route for more complicated positions, where the angles of the legs move more dramatically along both axes, involves following the same steps as above, but drilling 1 inch (2.5 cm)–diameter holes (as deep as the inserts) to receive the inserts. That extra space will be packed with epoxy paste (I use PC-7 or PC-11) to allow for more play in finding the right alignment of the rods from all angles. Once your holes are drilled, start by adding epoxy both within the 1 inch (2.5 cm) holes in your base and around the sides of your inserts, near their bottoms. You should have the rods already screwed into their inserts, and be mindful not to get epoxy into the threads on the rods.
You can then place the epoxied inserts, rods screwed in, into the epoxied holes in the boards. Using your angle bevel, match the angles of the rods to the angles of the legs in your front view reference photo, and then turn the board and adjust the angles of the rods to also match the side views. Once you have your rods positioned to match the angles of the legs from all views, prop them up with sturdy objects from your studio so they won’t move while the epoxy cures. Allow the epoxy to cure for 24 hours, or according to the package directions. Unscrew the rods to ensure that the epoxy has not stuck in the threads, then screw them back into the board as far as they will go. If the rods are stuck, you can grip the end with pliers or a vice grip to help you twist them free. Then screw them back into the board as far as they will go.
EXTERNAL SUPPORTS
Depending on the pose you will be developing, as well as the scale of the work, you might need to add some external support to your composition to secure the gesture. This is needed as more vertical weight is added and the figure runs a risk of distorting, or when adding appendages that may succumb to gravity before weight-bearing joints dry.
To do this, I take a pre-drilled piece of wood or custom fabricated steel support and run it from the base to the hip area of the figure at a diagonal, securing it with screws directly into the clay. It is important to note that paper clay has a wood-like quality that accepts this type of intervention without cracking. This might not be the case with other clay bodies, so I recommend doing tests to make sure this strategy is viable if you are not using the recommended clay.
Other options for external supports, depending on the scale, include metal rods or stiff wire, which I will use to support cantilevered arms or acutely angled heads by running them from the body part to the torso to take weight away from a soft joint and safeguard its position while it dries.
Eudald de Juana
Why do you work with clay?
I work with clay because it is a material that allows the whole process to be recorded. I like it because when you see a piece in clay, you can see the marks of tools, the fingerprints of the artist. I think this helps the viewer connect more with the piece because it feels more alive. If we use computers or molds, all these leave no trace of the process. They are mechanical processes that feel colder and, I think, keep the viewer at a distance, unable to engage as much. Clay is a material that captivates me and when it comes to working with it, I truly enjoy it. It does not make noise; it is a natural material you mostly work with your hands, then you just wash your hands with water. The truth is that it is a very generous material that allows you everything, from cutting and adding, and offers a lot of flexibility.
Your work appears and disappears simultaneously through a game between an exquisite figuration and a sensation of disintegration or erasure. How do you conceptually interpret these formal/stylistic decisions?
For me, it is a game. Representing reality as it is does not excite me. I want to contribute something more to the world I see around me, reinterpreting it in my own way. For me, this game of allowing forms to appear and disappear helps me connect more with the viewer because you leave things to be resolved. I don’t like it when things are obvious. When something is subtle, it is there but it gets the viewer more involved, inciting their imagination. When everything is very explicit and burdened with too much detail, it feels very chewed up, like you are saying things too many times, being too obvious. I think something is lost in these instances and the work becomes boring. I try to give just enough so that the viewer can make his own story, his film, and then erase anything that doesn’t add to that end.
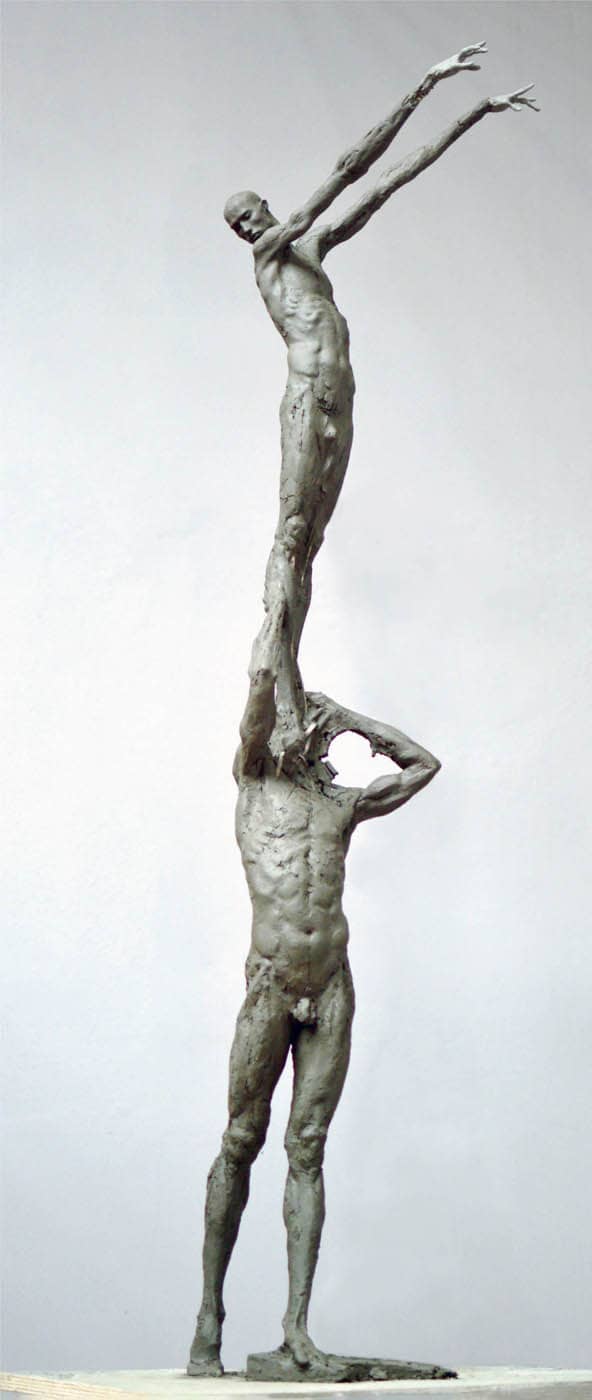
I also like to take a sculpture, which is something so physical and seemingly explicit, and play with the illusion of light, which is something painting does, to transform the planes and the surfaces. Through these modifications, when the light interacts with a piece, it can give you the sensation that there is an atmosphere, that there is a fog enveloping the form. It conceals and lets you see at the same time in a transformative way. It is a very interesting game between the form, which must be supported at a constructive and anatomical level, allowing everything to be in its place, and the simultaneous act of erasing the specificity of what is there, leaving parts unexpressed, latent. This subtle dance gives the sensation that the clay, which is such a solid conglomerate of particles, especially as it hardens, is something that can be perennially soft to the touch, or that it is ethereal as if it were fog. I feel this is very interesting for the viewer but also for me when creating. When I start a piece, I have a general idea, but during the process, as I start to evolve the form, deciding what to strengthen and what to subdue, one part takes you to another. And that is the beauty of this practice: When you let yourself be surprised and let yourself go.
Despite your youth, you have had a prolific career. How do you keep renewing your artistic vision and your purpose within this sculptural medium? And related, how do you prepare to start a new piece?
I have been doing quite a few commissions, several of them that have not yet come to light. Of course, I had always wanted commissions. For me, it was an explosion of joy every time I received a request, because I felt that I could live from doing what I love and this gave me a feeling of progress. But for the past years, because of the commissions, I haven’t had much time to do my personal work. Nonetheless, these commissions luckily have given me a lot of creative freedom, so I still feel the work is my own, not subdued by someone else’s vision. There is a second look, a second opinion from the client and an opportunity to modify. Each time you adjust a sculpture, there can be a thousand options, but it is interesting to use that other point of view from the client to help me leave my comfort zone.
I feel that if I had to do my personal work, everything would go in a predictable direction. When you get a commission, it is a new challenge. You are given some parameters. For example, make a sculpture of an angel for the Milan cemetery. Since this premise is an angel for the cemetery, from here on, how do I develop my own version that connects with this idea and feels harmonious with my body of work? Now I’m doing a head of a Spartan soldier for another company, a topic that, surely, I would never have done. But now I think, wow, super interesting, because it allows me to do things I wouldn’t have considered, opening my horizons.
Sometimes, the innumerable quantity of ideas can paralyze you, leaving you blank. A commission, or any thematic directive, can close the range a bit and facilitate that narrowing of focus, and from here, even more ideas can come out. So, I would say I have two primary ways of engaging with ideas. When working on commissions, I sit down with paper and more specifically think about the idea: what do I want to express, the aesthetics of characters, the composition, etc. Other times, I start in an organic way. I am attracted to a face or the shape of a body and from there the piece unfolds.