
This chapter discusses the procedures to install a new Operations Manager 2007 (OpsMgr) environment on the Windows 2003 operating system. The discussion will focus on prerequisites for installation and the installation steps required for each of the Operations Manager components discussed in Chapter 4, “Planning Your Operations Manager Deployment,” and Chapter 5, “Planning Complex Configurations.” We will also review two scenarios (single-server and multiple-server configurations) for an OpsMgr configuration and discuss potential troubleshooting areas. This chapter provides the information for a successful installation of each of the components of an OpsMgr configuration. We discuss more complex implementations, including multilocation deployments, connected management groups, multihomed deployments, and redundant configurations, in Chapter 10, “Complex Configurations.”
By this point in the book, you should be very familiar with the concepts of how to plan for your deployment of Operations Manager 2007 (if you still have questions, go back and read Chapters 4 and 5). As a reminder, the specific stages we introduced in Chapter 4 included Assessment, Design, Planning, Proof of Concept, Pilot, Implementation, and Maintenance. This installation chapter should be applicable both during the Proof of Concept and Pilot phases of your OpsMgr deployment.
Before actually running the setup program, you need to determine what your Operations Manager environment will look like. As part of the planning discussion in Chapters 4 and 5, you should have considered the following questions:
Prior to your installation, be sure you have completed the discovery in the planning chapters of this book. To assist as a quick reference, we have developed a pre-installation checklist for your use. The checklist includes the major components you will be installing and information you will need to have ready prior to beginning the installation.
The specific prerequisites for the installation of your OpsMgr environment depend on the component you will be installing. Microsoft designed Operations Manager 2007 to be simple to install, with most of the OpsMgr components installed through wizards launched from the System Center Operations Manager 2007 Setup (SetupOM.exe).
Table 6.1 includes the complete list of all the command-line parameters for OpsMgr 2007 components, including Audit Collection. You can use the syntax shown in Table 6.1 from the command line to install the various components, or with System Center Configuration Manager to automate deploying the OpsMgr components.
Table 6.1. OpsMgr Command Line Parameters for Installation
Component | Command |
|---|---|
Agent — MOMAgent.msi | msiexec.exe /I \pathDirectoryMOMAgent.msi /qn /l*v logsMOMAgent_install.log USE_SETTINGS_FROM_AD=0 MANAGEMENT_GROUP=<Management Group Name> MANAGEMENT_SERVER_DNS=<Management Server DNSName> ACTIONS_USE_COMPUTER_ACCOUNT=0 ACTIONSUSER=<Action Account> ACTIONSDOMAIN=<Domain> ACTIONSPASSWORD=<Password> |
Typical — MOM.msi msiexec.exe /i | msiexec.exe /I \pathDirectoryMOM.msi /qn /l*v logsMOMTypical_install.log ADDLOCAL=ALL USE_SETTINGS_ FROM_AD=0 MANAGEMENT_GROUP=<Management Group Name> MANAGEMENT_SERVER_DNS=<Management Server DNSName> SQLSVR_INSTANCE=<ServerNameInstance> ADMIN_ROLE_GROUP= “<Domain/Account>” ACTIONS_USE_COMPUTER_ACCOUNT=0 ACTIONSUSER=<Action Account> ACTIONSDOMAIN=<Domain> ACTIONSPASSWORD=<Password> SDK_USE_COMPUTER_ACCOUNT=0 SDK_ACCOUNT=<SDK Account> SDK_DOMAIN=<Domain> SDK_PASSWORD=<Password> |
Database — MOM.msi msiexec.exe /i | msiexec.exe /i \pathDirectoryMOM.msi /qn /l*vlogsMOMDB_install.log ADDLOCAL=MOMDB USE_SETTINGS_FROM_AD=0 MANAGEMENT_GROUP=<Management Group Name> SQLSVR_INSTANCE=<ServerNameInstance> DB_SIZE=500 ADMIN_ROLE_GROUP=<AD Security Group Name> DATA_DIR=<SQL data files folder> LOG_DIR=<SQL log files folder> |
Server — MOM.msi | msiexec.exe /i \pathDirectoryMOM.msi<file:///\pathDirectoryMOM.msi> /qn /l*v logsMOMServer_install.log ADDLOCAL=MOMServer USE_SETTINGS_FROM_AD=0 MANAGEMENT_GROUP=<Management Group Name> MOM_DB_SERVER=<ServerNameInstance> ACTIONS_USE_COMPUTER_ACCOUNT=0 ACTIONSUSER=<Action Account> ACTIONSDOMAIN=<Domain> ACTIONSPASSWORD=<Password> SDK_USE_COMPUTER_ACCOUNT=0 SDK_ACCOUNT=<SDK Account> SDK_DOMAIN=<Domain> SDK_PASSWORD=<Password> |
Console — MOM.msi | msiexec.exe /i \pathDirectoryMOM.msi /qn /l*v logsMOMUI_install.log ADDLOCAL=MOMUI USE_SETTINGS_FROM_AD=0 MANAGEMENT_GROUP=<Management Group Name> ROOT_MANAGEMENT_SERVER_DNS=<RMS DNSName> |
Web Console — MOM.msi | msiexec.exe /i \pathDirectoryMOM.msi /qn /l*v logsMOMUI_install.log ADDLOCAL=MOMWebConsole WEB_CONSOLE_AUTH_TYPE=0 ROOT_MANAGEMENT_SERVER_DNS=<RMS NetbiosName> |
(“0” is windows auth and “1” is Forms auth) | |
Data Warehouse — Reporting2007 | msiexec.exe /i \pathDirectoryReporting2007.msi /qn /l*v “D:LOGSREPORTING_INSTALL.LOG” ADDLOCAL=”MOMREPORTINGDB” SQLSVR_INSTANCE=”<ServerNameInstance>” MOMREPORTINGDBNAME=”SCOMDW” DB_SIZE=”1000” |
Reporting Server — Reporting2007.msi | msiexec.exe /i \pathDirectoryReporting2007.msi /qn /l*v “D:LOGSREPORTING_INSTALL.LOG” ADDLOCAL=”MOMREPORTING” SQLSVR_INSTANCE=”<ServerNameInstance>” MOMREPORTINGDBNAME=”<SCOMDW>” MGSERVER=<Management Server Name> PREREQ_COMPLETED=”1” REPORT_SERVER_FULL_HTTP_PATH=”http://%COMPUTERNAME%:80/ReportServer$Instance<http://%25computername%25/ReportServer$Instance>” DATAREADER_USER=<Data Reader Account> DATAREADER_PASSWORD=<Password> DATAREADER_DOMAIN=<Domain> DBWRITEACTIONSUSER=<DBWrite Action Account> DBWRITEACTIONSPASSWORD=<Password> DBWRITEACTIONSDOMAIN=<Domain> |
Gateway Server — MOMGateway.msi | msiexec /i \pathDirectoryMOMGateway.msi /qn /l*v D:GATEWAY_SERVER_INSTALL_1.LOG ADDLOCAL=MOMGateway,MOMNonRootServer SECURE_PORT=5723 MANAGEMENT_GROUP=<Management Group Name> MANAGEMENT_SERVER_DNS=<Management Server Name> IS_ROOT_HEALTH_SERVER=0 ROOT_MANAGEMENT_SERVER_AD=<RMS_Name> ROOT_MANAGEMENT_SERVER_DNS=<RMS_Name> ROOT_MANAGEMENT_SERVER_PORT=5723 ACTIONS_USE_COMPUTER_ACCOUNT=0 ACTIONSUSER=<Action Account> ACTIONSDOMAIN=<Domain> ACTIONSPASSWORD=<Password> |
Audit Collection Server — AdtSetup.exe | \pathDirectoryAdtSetup.exe /i /s /p:ACSInstallParameters.xml |
The ACSInstallParameters.xml file contains your settings. | |
Syntax for these commands is also available at http://blogs.technet.com/momteam/archive/2007/12/05/opsmgr-2007-command-line-parameter-complete-list.aspx. | |
One of the huge benefits to the installation approach implemented with OpsMgr is that it is very easy to identify and resolve any missing prerequisites for your installation. As shown in Figure 6.1, installation options include the following components:
Operations Manager 2007
Operations Manager 2007 Agent
Operations Manager 2007 Reporting
Audit Collection Server
MOM 2005 to OpsMgr 2007 Migration tool
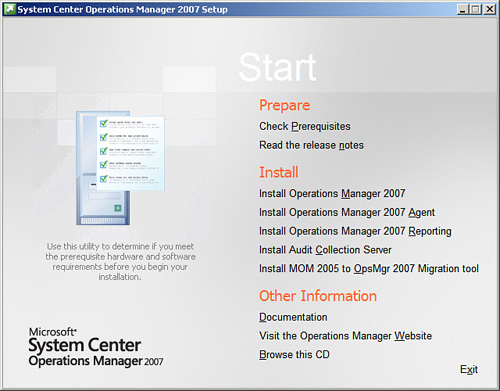
We will review each of these options (except for the OpsMgr 2007 Migration tool, which we discuss in Chapter 7, “Migrating to Operations Manager 2007”) discuss their prerequisites and the installation process itself.
There are a number of prerequisites either common to all OpsMgr components or that you should address prior to implementing OpsMgr. These prerequisites include server hardware, domain requirements, required Windows accounts, and the order for installing OpsMgr components.
You should have identified the hardware required for the Operations Manager components during the Design phase. We presented recommended hardware specifications in Chapter 4.
You must install Operations Manager 2007 in a Windows Server domain environment, but the servers it manages do not necessarily need to be in that (or any) domain. The Windows domain functional level must be Windows 2000 Native, Windows Server 2003 Interim, or Windows Server 2003; prior to installing OpsMgr, you need to raise the domain to at least one of these functional levels if it is not already. Although Operations Manager 2007 does not make any schema changes, it can create containers within Active Directory based on your agent deployment strategy. Microsoft does not recommend installing OpsMgr components on a domain controller; this generates a warning message when you check the OpsMgr prerequisites.
Prior to starting the installation process, you should also create the Windows security accounts required for installation. Table 6.2 lists the required security accounts as well as the account name used for each within this book.
Table 6.2. OpsMgr Required Security Accounts
Required Service Account | Name Used in This Book |
|---|---|
Management Server Action account | OM_MSAA |
Agent Action account | OM_AAA |
Gateway Action account | OM_GWAA |
Data Warehouse Write account | OM_DWWA |
Data Reader account | OM_DRA |
Software Development Kit and Configuration Service account | OM_SDK |
We discuss details on these accounts, including the required security permissions, in Chapter 11, “Securing Operations Manager 2007.”
Obtain all the software required to deploy Operations Manager prior to installing the components.
Tip: Installation Prerequisites
As a rule, go for “green” on your prerequisites for the OpsMgr components. To install OpsMgr, you have to fix the critical issues (red). OpsMgr will install if there are warnings (yellow). However, the installation will not be a recommended configuration and can result in a solution that may not perform optimally.
The prerequisite software varies depending on what component you installed, but the full list of software to have available during the installation includes the following:
Operations Manager 2007.
Windows Server 2003 Standard or Enterprise Edition.
Windows Server 2003 Service Pack 1 or 2.
Microsoft SQL 2005 Standard or Enterprise Edition.
Microsoft SQL 2005 Service Pack 1 or 2.
The X86 version is available for download at http://go.microsoft.com/fwlink/?LinkId=74965.
You can download the X64 version at http://go.microsoft.com/fwlink/?LinkId=74966.
Windows PowerShell (available for download at http://www.microsoft.com/windowsserver2003/technologies/management/powershell/download.mspx).
Tip: Service Packs Approach
In general, although service packs address bug fixes, they also tend to introduce new sets of features and issues. This is true for operating systems and monitored applications as well as OpsMgr itself. Always thoroughly test service packs before introducing them into a production environment.
Although the recommended order for installation depends on the components you are installing, there are certain components that you cannot install before others. As an example, the first management server installed is always the RMS, and you cannot install the RMS before installing the Operations database.
The following list is a recommended order for installation, which focuses on getting the core components installed first (including all components required to manage agents, such as the RMS, Management Server[s], Audit Collection Server[s], and Gateway Server[s]), followed by optional components and, finally, the deployment of OpsMgr agents. The components are as follows:
Operations Database Server
Root Management Server, Operations Console, and Web Console Server
Management Servers
Reporting Server and Data Warehouse Server
ACS Database Server and ACS Collector Server
Gateway Servers
Agentless Exception Monitoring
Operations Manager Agents
ACS Forwarder
You can install almost all the Operations Manager 2007 components on a single system. A single server (with sufficient hardware) can run the RMS, Operations Database, Operations Console, Web Console, Reporting Server, Data Warehouse Database, ACS Collector, and ACS Database Components—although this typically is not recommended, except for small environments or testing environments. If you are installing all the components on a single server, check to see whether you can use System Center Essentials, which may be a better fit for your needs. We discuss System Center Essentials and selection criteria in Chapter 4. (System Center Essentials also includes configuration management capabilities, such as software distribution and updates, and limited software and hardware inventory capacities for small environments.) There are three steps when performing the single-server installation:
The first step of the installation process involves running the Install Operations Manager 2007 option and choosing all the components available. This installs the Operations database, RMS, Operations console, and Web console.
The next step of the process is to run the Install Operations Manager 2007 Reporting option and then choose all the components available. This installs the Reporting Server and Data Warehouse Server Components.
The third step is to install the ACS-related components by using the Install Audit Collection Server option. This installs the ACS Collector and ACS Database Server Components.
These are also the steps performed when installing the OpsMgr components onto multiple servers. We discuss the details of how to install these components within the next sections of this chapter.
For our example, we will show the process for installing a multiple-server Operations Manager configuration. You can install each of these components (roles) individually, but we will gather them by function for our example. Table 6.3 lists the servers we are using in our fictitious organization (Odyssey) and their roles.
Table 6.3. OpsMgr Servers in and Roles
Server | Operations Manager Role |
|---|---|
Thunder | Operations Database Server |
Hydra | Root Management Server, Operations Console, Web Console Server |
Quicksilver | Reporting Server and Data Warehouse Server |
Hurricane | ACS Collector Server |
Fireball | ACS Database Server |
Ambassador | Gateway Server |
Hydra | Agentless Exception Monitoring, Client Monitoring |
Figure 6.2 displays the server configuration we are installing, for reference throughout this chapter.
You can install the majority of the OpsMgr components from the setup screen. These include the Operational Database, Management Server (and Root Management Server), Operations Console/PowerShell, Web Console, Reporting Server, and the Data Warehouse Server Components. The only components not installed from the setup screen are the Gateway Server (discussed in Chapter 10) and Client Monitoring functionality, which we introduce in Chapter 16, “Client Monitoring.”
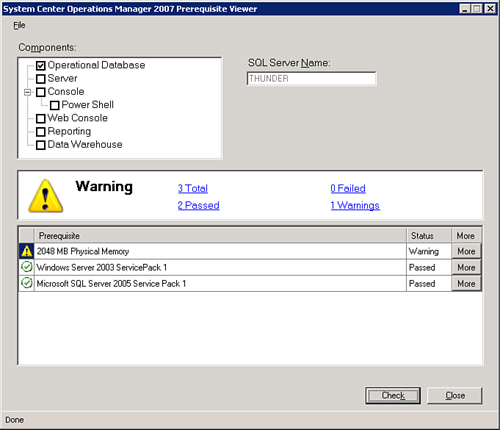
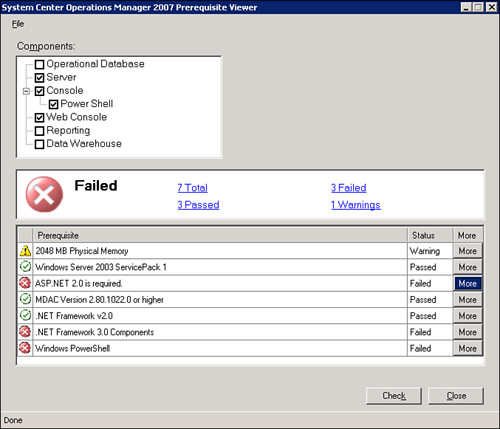
For production systems monitoring more than 100 servers, we recommend a dedicated server for the Operations database. Figure 6.3 shows the prerequisites for installing the Operations Database Component, which include the following items:
2048MB of memory. This is recommended but not required; the prerequisite checker warns if the hardware on which you are running the prerequisite checker has less than 2048MB of memory.
Windows Server 2003 Service Pack 1 or Service Pack 2.
SQL Server 2005 and then SQL Server 2005 Service Pack 1 (or Service Pack 2). When installing SQL Server 2005, check the option to install the Workstation components, Books Online, and development tools. Also, be sure to reboot your database server after completing the installation of any SQL Server 2005 Service Pack.
Operations Manager 2007 does not support using SQL Server 2000 to provide database functionality for any of the Operations Manager components (Operational Database, Data Warehouse, or ACS Database).
Tip: Identifying SQL Server Versions
KB article 321185 describes the process of identifying the installed SQL Server Service Pack version and edition of SQL Server. This is available at the Microsoft support website at http://support.microsoft.com/kb/321185.
Now we will walk through the installation itself. The following steps are performed on the computer that will be hosting the Operational database:
After addressing prerequisite requirements, the installation process goes through a standard System Center Operations Manager 2007 Setup Wizard. The first screen shown is a typical welcome to the wizard screen, which you move past by clicking Next.
The next screen displays the End-User License Agreement, which has to be accepted (check the I accept the terms in the license agreement option) and click Next to continue.
On the Product Registration screen, you need to enter the user name, organization, and 25-digit CD key, which is on the back of the CD case. (If your organization has a volume licensing agreement with Microsoft, this key is available on the Microsoft Volume License website.) Click Next to continue with the wizard.
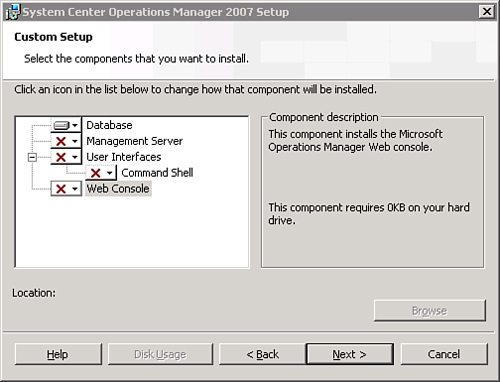
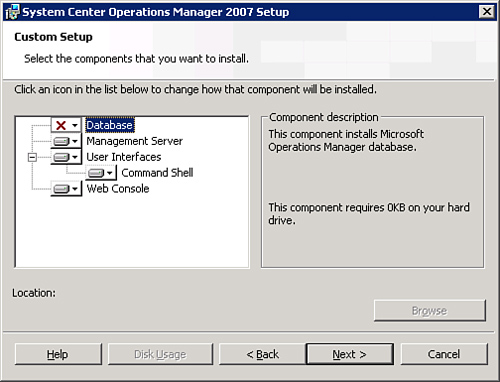
The next screen is where you identify what OpsMgr components you will be installing. When installing the Operations database on a separate database server, this screen is where you choose only the Database Component and uncheck all the other components. Figure 6.4 shows the configuration to have the Database Component installed but none of the other components (displayed with a red X on them).
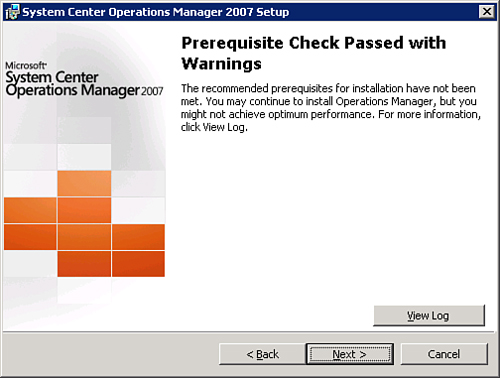
After you select the Database Component, the installation program automatically (re)runs the prerequisite checker to validate that the system has all required prerequisites installed. In our example, the checker passed with warnings due to the amount of memory available on the system selected for the Operations Database Server (shown in Figure 6.5). You can click on View Log to view information in the report.
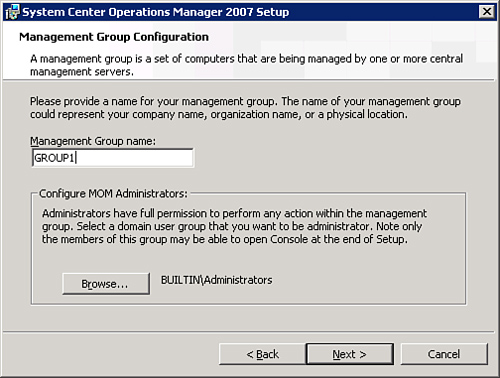
On the next screen of the wizard, you need to specify the management group name for your Operations Manager 2007 environment. This name is case-sensitive. The management group name should be unique (if you have existing Operations Manager 2007 or MOM 2005 environments) and easy to identify.
For our environment, we are using the management group name GROUP1, as shown in Figure 6.6. Note that once it’s specified, you cannot change the management group name without reinstalling the management group!
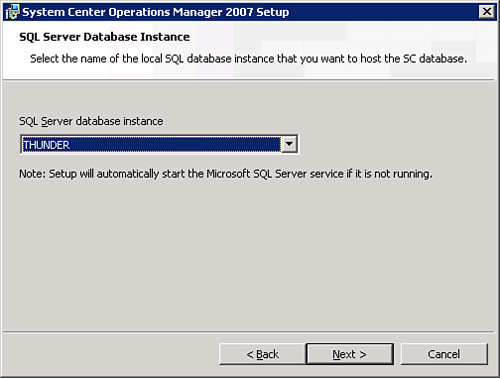
Next, identify the SQL Server database instance that the Operations database will run in. Because our environment is running SQL with a single (default) instance, the wizard defaults to the name of the server, as shown in Figure 6.7.
If you are installing to a SQL server instance, the syntax would be the servernameinstance. For example, for our Thunder server having a named instance of Instance2, the syntax would be ThunderInstance2.
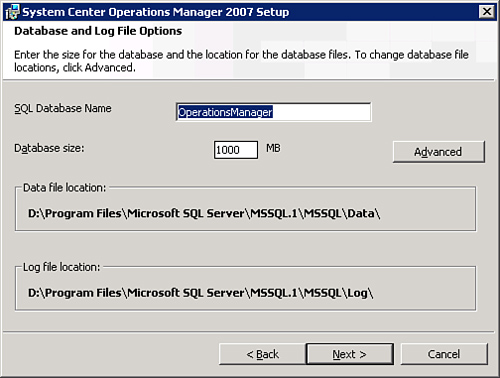
After we identify the instance into which the Operations database will install, the next configuration screen sets the database and log file options. As shown in Figure 6.8, this screen allows us to specify the name of the database, the database size, and the location of the data files (set on the Advanced tab).
Note: Database Size Estimates
Chapter 4 discusses approaches to providing estimated sizes for the Operations and Data Warehouse databases. Microsoft also has the System Center Capacity Planner 2007 tool, which will provide sizing information for OpsMgr and is available at no cost. Note that the version released in late 2007 does not yet provide sizing information or the capability to model the OpsMgr environment. Microsoft says OpsMgr support will be available in an “out of band” release.
Information on the current version of System Center Capacity Planner is available at http://www.microsoft.com/systemcenter/sccp/default.mspx.
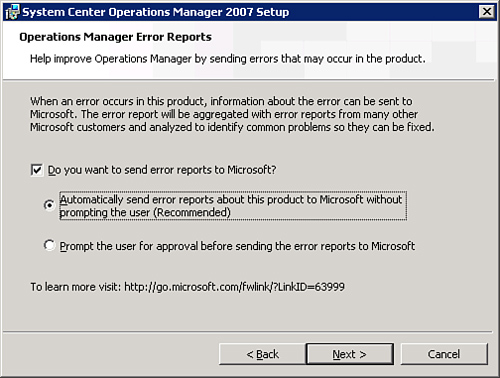
The next screen of the wizard asks whether you want to send error reports to Microsoft. The default configuration on this is not checked, but you can check it and select one of the suboptions:
We have chosen the option to send error reports to Microsoft automatically, as shown in Figure 6.9.
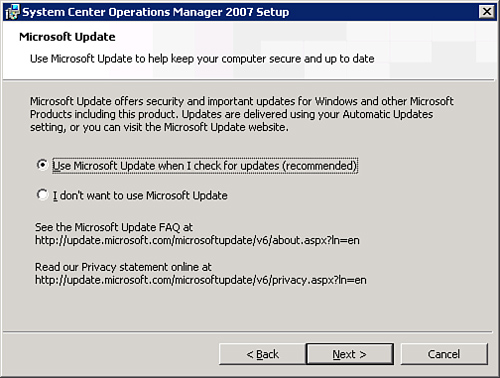
On the next screen, you specify if you want to use Microsoft Update to keep the system up to date with various security and other updates. If you do not currently have a method of providing patch management to the servers in your environment and you have configured your server to have access to the Internet, you should check the option to use Microsoft Update, as shown in Figure 6.10.
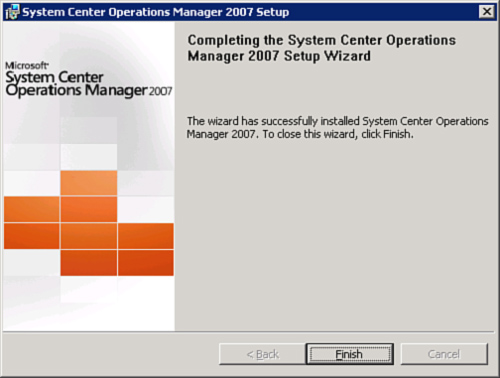
After the Microsoft Update screen, the next screen indicates that Operations Manager is ready to install. Click Install to continue with the installation process. Once the installation is completed, the wizard finishes and displays the Completing the System Center Operations Manager 2007 Setup Wizard screen (see Figure 6.11.)
Closing this screen completes the installation of the Operations Database Component. If you want to validate that the installation was successful, you can use the Microsoft SQL Server Management Studio to validate that the Operations database was created correctly.
Now that we have installed the Operations database, we can install the RMS. You can install the Root Management Server Component without either the Operations console or Web console. For most environments, we recommend installing multiple components on this server, including the RMS, Operations Console/PowerShell, and the Web Console components for consistency with the other management servers in your environment. Use the RMS for the Operations Web consoles only when consoles on other computers are unavailable, because the RMS functionality is very resource intensive. The prerequisites for these components include the following (which we display in Figure 6.12):
2048MB of memory.
Windows Server 2003 Service Pack 1 or 2.
ASP.NET 2.0.
Active Directory (AD) must be available; the installation process communicates with AD to verify service account information.
.NET Framework v2.0.
.NET Framework 3.0 components. If you did not download these components prior to this point of the installation process, you can click the More information button (highlighted in Figure 6.12), which provides the URL to download the framework components.
Windows PowerShell. We recommend installing PowerShell if you are installing the Operations console. If you did not download PowerShell prior to this point of the installation process, you can click the More information button, which provides the URL to download PowerShell.
If you will be editing management pack knowledge information in the Operations console, you must install Microsoft Office Word 2003 (or higher) with the .NET Programmability feature and Microsoft Visual Studio 2005 Tools for the Microsoft Office System. The Visual Studio 2005 Tools are available for download at http://go.microsoft.com/fwlink/?LinkId=74969.
After all prerequisites have been addressed, the process to install the RMS and Operations Console can begin. Installing these components is very similar to the steps performed when we installed the Operations database in the “Operations Database Server” section of this chapter. Perform these steps:
The OpsMgr Setup Wizard displays the startup screen; you will accept the license agreement and proceed to the product registration screen. After these screens, select the components you will install. These components are shown in Figure 6.13 and include all the components available (Management Server, User Interfaces, Command Shell, Web Console), except for the Database Component, which you have previously installed.
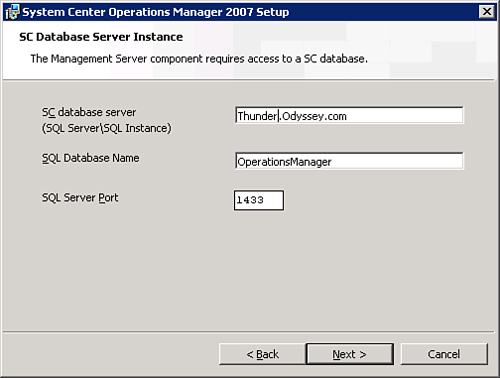
After you’ve chosen these components, the prerequisite checker runs. You then need to specify the database server, name, and port that contains the Operations database. For our environment, we are using the Thunder server with the OperationsManager database on port 1433. Enter the FQDN (Fully Qualified Domain Name) of the server to avoid any potential name resolution errors, as we show in Figure 6.14. OperationsManager is the default name for the Operational database.
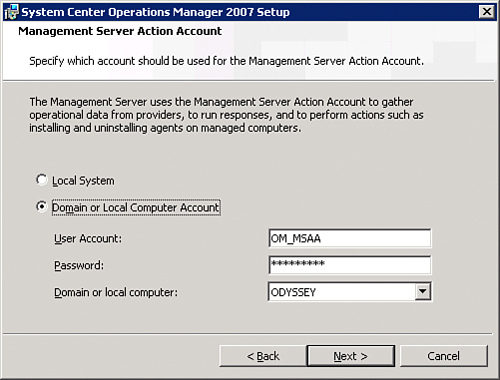
The next screen prompts you to identify a Management Server Action Account. As we discuss earlier in the “Security Accounts” section of this chapter, you should have already identified and configured each of these accounts prior to this step in the installation process. The account needs at least the following privileges:
Member of the Users group
Read access to the Windows Event logs
Member of the Performance Monitor Users group
Manage Auditing and Security Log permission
Allow Log on Locally permission
We are using the OM_MSAA account in the Odyssey domain, as displayed in Figure 6.15.
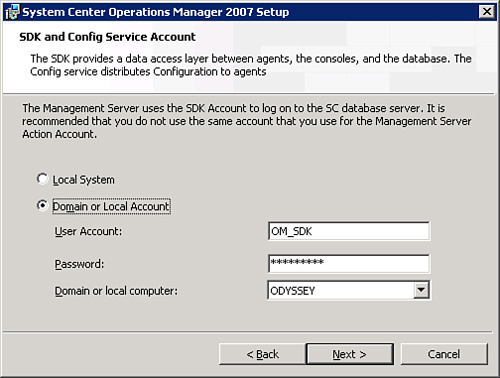
Next, we specify the SDK and Config Service Account, which we would also have previously identified. We are using the OM_SDK account, as shown in Figure 6.16. This account should have Local Administrator privileges. If your management group has the RMS and Operational database installed on the same server, you can also use Local System, although you may have issues during the Reporting Component setup.
Tip: Using a Domain Account for the SDK and Config Service Account
If you choose the Local System option on this screen, it will cause installation issues during installation of the reporting components. Using a domain account (as shown in Figure 6.16) will avoid the issue, which we discuss in the “Troubleshooting Tips” section of this chapter.
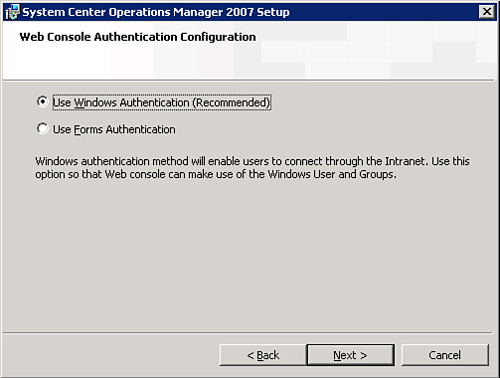
After the SDK account is configured, the next step is to specify the type of authentication to use for the Web console (shown in Figure 6.17). The options available are Windows Authentication and Forms Authentication.
Use Windows Authentication if the console will be accessed only via an intranet.
Choose Forms Authentication if the console will be accessed over the Internet.
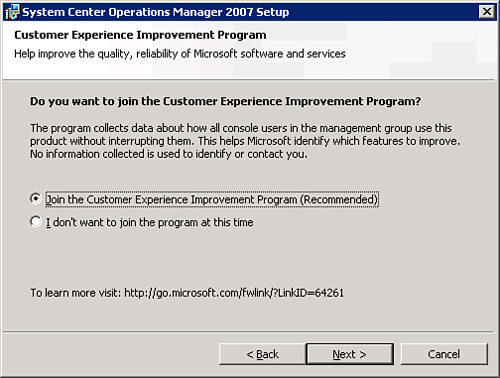
The next screen displayed is the option to join the Customer Experience Improvement Program, shown in Figure 6.18. If you choose to select this option, information about OpsMgr 2007 usage is collected and forwarded to Microsoft. If you do not choose the option, usage data is not sent to Microsoft.
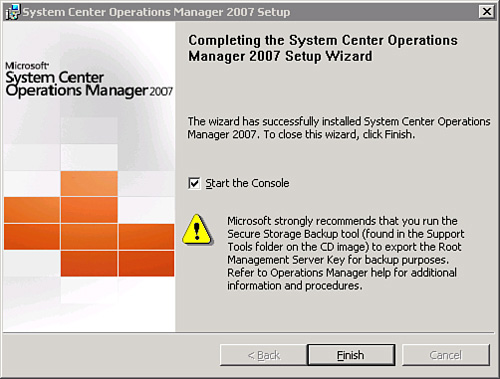
Next, the Microsoft Update option is configured (which we discussed in the “Operations Database Server” section of the chapter), and installation is ready to begin. After the installation is complete, there is a default action to start the console, shown in Figure 6.19. The wizard also strongly recommends that you run the Secure Storage Backup tool to export the RMS key. (In SP 1, this happens automatically.)
Refer to Chapter 12 for more information on how to use the Secure Storage Backup tool.
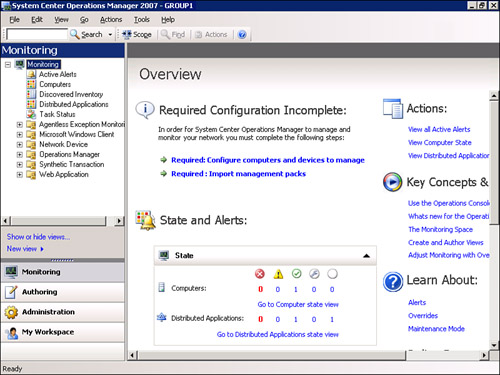
After the wizard completes, you now have a functional Operations Manager 2007 environment! After you launch the Operations console (shown in Figure 6.20), the next steps include configuring computers and devices to manage and importing management packs. We discuss these steps in detail in Chapter 8, “Configuring and Using Operations Manager 2007.”
Note: Backing Up the RMS Key
The release of OpsMgr 2007 Service Pack 1 adds a new backup wizard to the end of the RMS setup that walks through the process of backing up the RMS encryption key. Prior to of the service pack, the key was backed up only using a command-line tool, and many organizations did not realize how important this process was for disaster recovery situations. For further information on the RMS key and its importance, refer to Chapter 12.
If you want to validate the installation was successful, open the Operations console and verify that information displays within the console.
Now that we have installed the two core components for Operations Manager 2007, we will next discuss the steps required to install other OpsMgr components.
You can install additional management servers after installing the RMS. For redundancy and load-balancing purposes, we recommend deploying additional management servers and consoles. If your environment only requires installation of a management server without the consoles, the prerequisites are decreased to include only the following:
Windows Server 2003 Service Pack 1 or 2.
MDAC 2.80.1022.0 or higher.
Active Directory must be available; the installation process communicates with AD to verify service account information.
.NET Framework v2.0.
.NET Framework 3.0 components.
The installation process for just the management server (without the consoles) includes a subset of the steps required in the “Root Management Server and Consoles” section, earlier in this chapter.
To verify that a particular management server installation was successful, open the Operations console, navigate to Administration -> Device Management -> Management Servers, and validate that the new management server is in the list.
Tip: Installing the Consoles Later
You can always add the Operations console and Web console at a later point in time. If you re-run the OpsMgr installation program, it will display any previously installed components on that particular server as enabled. To install these new components, select the items to install but do not deselect any previously installed items; otherwise, those components will be removed from the server!
If you are running the original version of OpsMgr 2007 and install secondary management servers after installing reporting, by default the secondary management servers will not be able to write data warehouse data because the required profiles are not created by the setup process. The symptom will be alerts that say the second management server cannot write to the data warehouse using the Management Server Action account (although this may be the same Action account used on the RMS).
Service Pack 1 resolves this issue. If you are using the original release of OpsMgr 2007, perform the following steps to resolve the problem:
Log on as an OpsMgr administrator and open the Operations console.
Navigate to Administration -> Security -> Run As Profiles.
In the list of Run As Profiles, select the Data Warehouse account. Right-click and choose Properties; then select the Run As Accounts tab.
See if the new management server name is in the list. If it is not, click New.... In the Matching Computers list, click the name of the management server. Be sure the Run As Account specified is the Data Warehouse Action account.
This workaround was identified by Satya Vel, a Program Manager on the MOM team, and is written up at http://blogs.technet.com/momteam/archive/2007/08/29/if-you-install-opsmgr-2007-reporting-and-then-install-secondary-ms-then-it-will-not-be-able-to-write-dw-data-as-profiles-are-not-created.aspx
In our example, we will install both reporting components (the Data Warehouse and Reporting Server Components) on a single server. To check the prerequisites, we chose the Check Prerequisites option and selected both the Data Warehouse and Reporting Server options.
Tip: OpsMgr Reporting Server on a Domain Controller
The installation of the Reporting components on a domain controller was not initially supported when Operations Manager 2007 was released (per the Operations Manager help file). Microsoft has updated its support statement, which is available at http://support.microsoft.com/default.aspx/kb/942862.
The prerequisites to install the Reporting components include the following items:
Windows Server 2003 Service Pack 1 or 2.
SQL Server 2005 and then SQL Server 2005 Service Pack 1 (or 2). When installing SQL Server 2005, check the option to install the Reporting Services and the Workstation components, Books Online, and development tools. Also, be sure to reboot after the installation of any SQL Server 2005 Service Pack is completed.
The SQL Server service must be in automatic startup (except for clusters where it can be in manual startup, which we discuss in Chapter 10).
Microsoft SQL Server 2005 Reporting Services Service Pack 1 or 2.
Active Directory must be available; the installation process communicates with AD to verify service account information.
ASP.NET 2.0.
KB918222 for SQL 2005. A warning message will display if this hotfix is not already installed on the system.
You must turn off the Windows Firewall or configure it for the Reporting components. The Reporting Server Component needs to be able to communicate through the default TCP (Transmission Control Portocol) ports 80, OLEDB 1433, and 5724.
Tip: Windows Firewall and Group Policy
Just because there is a group policy installed to disable the firewall does not mean that the firewall is actually disabled. We’ve seen situations where the group policy was configured to disable the firewall. The firewall configuration was grayed out, and it did not look like it was running. However, the actual service was still running on the system! In this situation, we had to stop the service and disable it to install the OpsMgr component.
.NET Framework v2.0.
.NET Framework 3.0 components.
To install the Reporting components, perform the following steps.
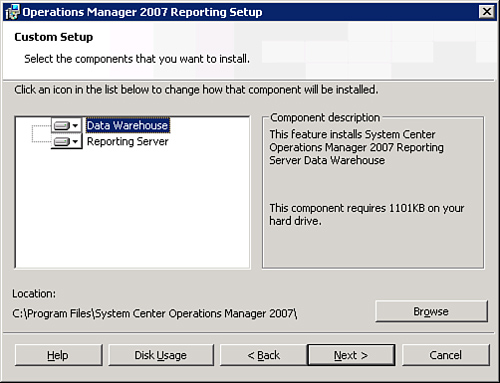
Choose the option to Install Operations Manager 2007 Reporting from the setup screen. The wizard displays the starting screen, the license agreement, product registration, and the custom setup screen. At Custom Setup, choose the Data Warehouse and Reporting Server Components, as displayed in Figure 6.21.
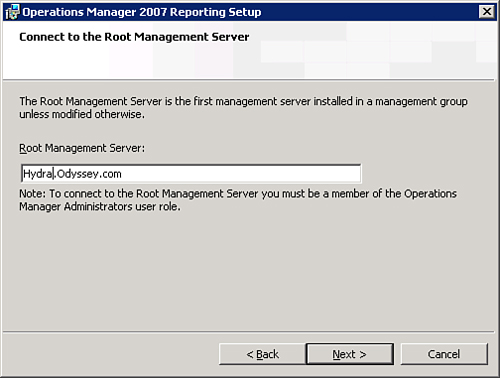
The prerequisites for the components are checked, and you must specify the name of the Root Management Server. In our example, the Root Management Server is named Hydra.Odyssey.com (shown in Figure 6.22), which we fully qualify as we do when we installed the RMS component.
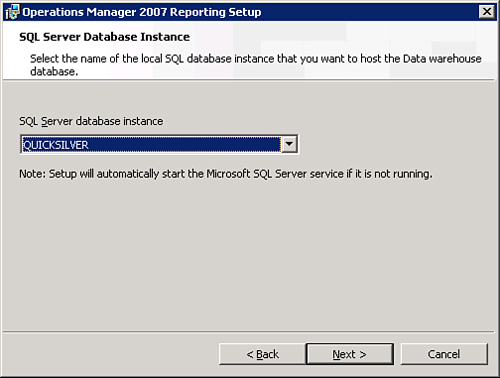
At the next screen, specify the SQL Server database instance to connect to. For our case, we are connecting to the default database instance of Quicksilver, as displayed in the dropdown box in Figure 6.23.
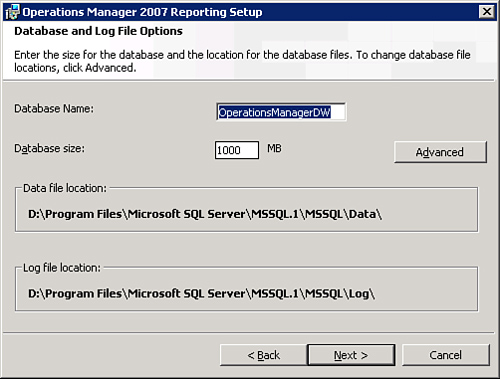
On the Database and Log File Options screen, we specify the name of the Reporting database, its size, and the locations for the data and log files (see Figure 6.24). The default name for the Data Warehouse database is OperationsManagerDW.
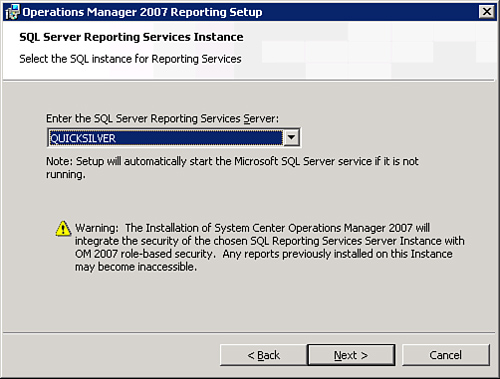
Now that we have determined which SQL Server Reporting Services Server to use and its configuration, we need to identify the instance to use, as shown in Figure 6.25. Note the warning in Figure 6.25 that Operations Manager role-based security will supersede (integrate) the security of the specified Reporting Services instance.
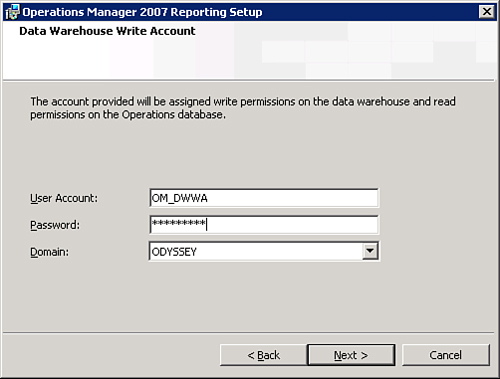
On the next screen, we specify the Data Warehouse Write Account. This account will write to the data warehouse, as shown in Figure 6.26. The account should be a domain user account.
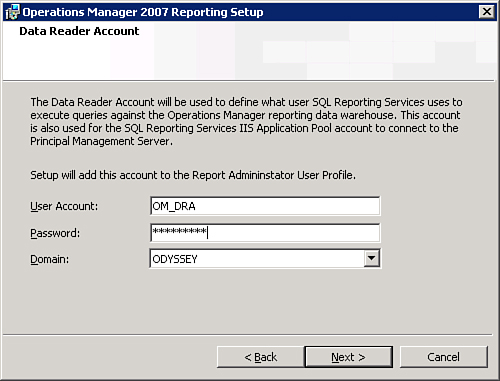
The last account we specify is the Data Reader Account, as seen in Figure 6.27. This can be a domain user account.
The final installation screens include the configuration for operational data reports, Microsoft Update (discussed in the “Operations Database Server” section), and then the installation is completed.
Tip: No Reports?
If you have opened Operations Console -> Reporting and there are no reports listed, the issue might be you have not installed the OpsMgr agent.
When installing reporting components on a separate server, reports will not appear until the OpsMgr agent is deployed to the Reporting server and/or Data Warehouse server.
To validate that the reports have installed correctly, open the Operations console and navigate to Reporting -> Microsoft ODR Report Library and double-click any of the reports available (Management Group, Management Packs, Most Common Alerts). If the report displays successfully, the reporting functionality within Operations Manager 2007 is working correctly.
The prerequisites for installing ACS include the following:
A functional OpsMgr 2007 environment, which as a minimum includes the RMS and the Operations database.
We recommend an additional management server to run the ACS collector. We will be using a new server named Hurricane.
SQL Server 2005 needs to be installed and configured on a system that will host the ACS database. Our SQL Server system for ACS is on Fireball.
To install Audit Collection Services, perform the following steps:
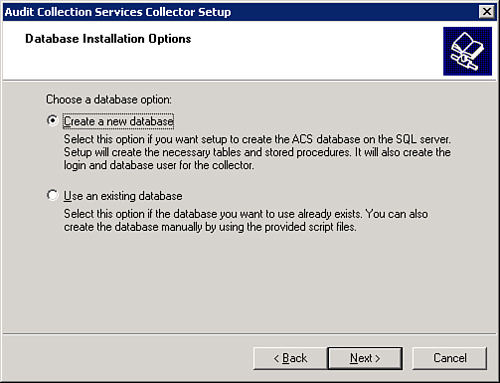
Install the ACS components by choosing the Install Audit Collection Server option from the setup screen. This installation needs to run on a management server, not on the server that will host the ACS database. When the installation process runs, the first screen is a Welcome to the Audit Collection Services Collector Setup Wizard screen. After the welcome screen, the license agreement screen displays, and then the database installation options start with the choice to either create a new database or use an existing database, as shown in Figure 6.28.
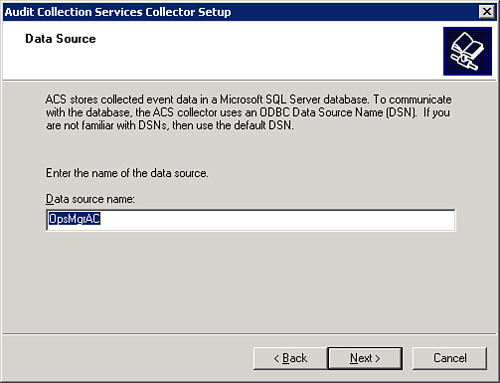
The next screen specifies the data source name (DSN) to use to communicate with the ACS database. The default is OpsMgrAC, as shown in Figure 6.29.
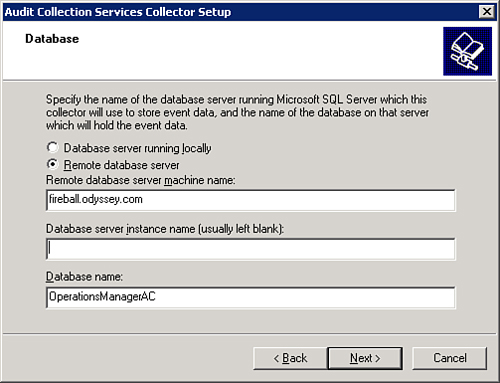
The Database screen provides you with two options regarding the location of the database server:
If the collector will be providing the ACS database functionality, you can connect to a database server running locally.
If the server is remote (as it is with our example), the remote option is chosen and the name of the remote server is required.
The instance and database name are also specified on this screen, with the defaults for these two fields set to blank for the instance and OperationsManagerAC for the database name, respectively. For our example, we are installing to a remote database server named Fireball (identified using its Fully Qualified Domain Name) and will take the defaults for the instance and database name, as shown in Figure 6.30.
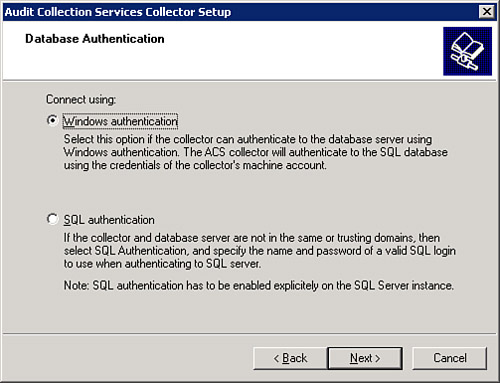
Next, we specify the type of database authentication to use. The two options available are Windows Authentication and SQL Authentication. We recommend using the Windows Authentication option unless the collector and database server are not in the same or trusting domains. Figure 6.31 shows the options available for authentication to the ACS database.
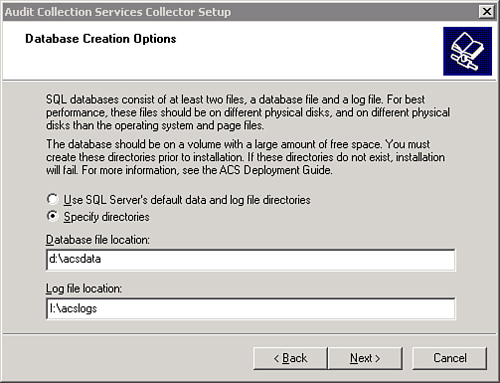
Next, specify where the ACS database and log file information will be stored on the SQL Server system. As a standard for increased database performance, the database and log files should be on different drives, and the drives should have sufficient space available. If the nondefault location is chosen (as we show in Figure 6.32), the directories need to be manually created.
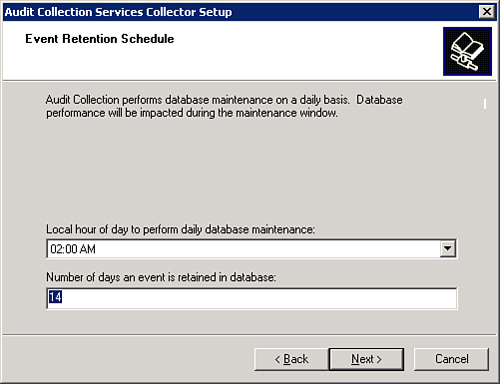
Now, we specify the event retention information, which defaults to performing daily maintenance at 2:00 a.m. and retaining data for 14 days, as we see in Figure 6.33.
Two options are available for how the timestamp information will be stored in the ACS database: Local and Universal Coordinated Time (UTC). The Local option is the default and is recommended, unless there are multiple ACS databases or you are very familiar with UTC. We have chosen to go with the default setting, Local, as shown in Figure 6.34.
The remaining screens show a summary of the configuration, connecting to the ACS database server to create the database, and displaying a screen to notify when the setup has finished. Start the Operations Manager Audit Collection service to verify that ACS is properly installed.

After installing ACS, you will need to add the ACS reports to Operations Manager 2007. Chapter 15, “Monitoring Audit Collection Services,” discusses details on this process.
The prerequisites for the installation of the Gateway Server Component include the following items:
Windows Server 2003 Service Pack 1 or 2.
Microsoft Core XML Services (MSXML) 6.0, also known as the MSXML 6.0 Parser, is required prior to installing the gateway server. The XML Services are installed as part of the OpsMgr agent installation (see Chapter 9) or can be separately downloaded and installed from http://go.microsoft.com/fwlink/?LinkId=76343.
Unlike the other Operations Manager components, you do not install the Gateway Server Component using the setup screen for OpsMgr. You will install this component by running the MOMGateway.msi file from the gateway<path> folder on the Operations Manager 2007 installation media (the path will be either i386 or amd64, depending on your hardware platform). Perform the following steps:
The first screen displayed is the Welcome to the System Center Operations Manager Gateway Setup Wizard screen. The next screen identifies where to install the gateway files, which defaults to the %ProgramFiles%System Center Operations Manager 2007 folder.
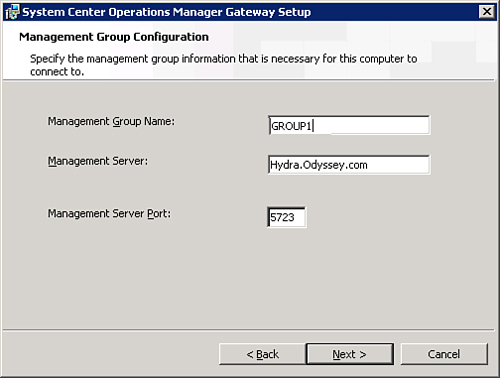
On the next screen, we specify the management group name, management server, and management server port number. We have configured these for our sample environment (GROUP1 as management group, Hydra.Odyssey.com as the management server, and 5723 as the default port), as shown in Figure 6.35.
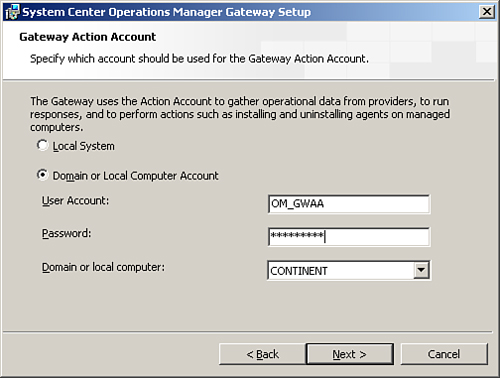
Next, we need to identify what account to use for the Gateway Action Account. The options available are Local System and a domain or local account. This account needs the permissions to be able to install and uninstall agents and to manage the computers. For our example, shown in Figure 6.36, we are using the OM_GWAA account within the domain that the gateway is a member of.
The remainder of the installation includes the Microsoft Update screen, a summary screen, and a wizard completion screen.
You must approve the Gateway Server Component after its installation. You will approve this component on the management server that the gateway was configured to communicate with. Follow these steps:
Copy the Microsoft.EnterpriseManagement.GatewayApprovalTool from the SupportTools folder on the Operations Manager 2007 installation media to the %ProgramFiles%System Center Operations Manager 2007 folder.
After copying the program, open a command prompt (cmd.exe) to that folder and run the program with the required options.
Chapter 10 discusses additional information on the approval process.
There is not really an actual installation process required to install a server to provide Agentless Exception Monitoring (AEM) functionality. However, there are prerequisites that need to be in place to activate this functionality, which include the following:
A functional RMS and/or management server
At least 2GB of available free space
No existing share named “AEM” on the specified system
To use AEM, you need to activate one of the management servers in the environment to provide the AEM capability. Active the server using the Operations console on the Administration tab under Device Management -> Management Servers. Right-click the management server and choose Configure Client Monitoring. This starts a wizard that enables the client monitoring functionality on this server. Here are the steps to follow:
The wizard starts with an introduction page, which introduces each of the steps that will occur, including CEIP (Client Experience Improvement Program) Forwarding, Error Collection, Error Forwarding, Create File Share, Task Status, and Client Settings.
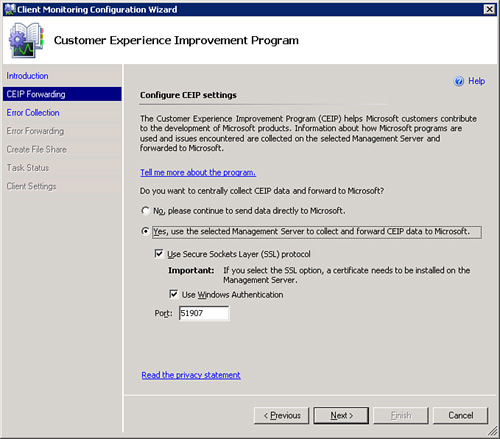
On the CEIP Forwarding screen of the wizard, we configure the Customer Experience Improvement Program. You can configure how CEIP collects data in several ways:
Continue to send data directly to Microsoft.
Use the selected Management Server to collect and forward the data to Microsoft.
If you select the second option, you can specify whether you want to use the Secure Sockets Layer (SSL) protocol, whether you use Windows Authentication, and the specific port number (which defaults to 51907), as shown in Figure 6.37.
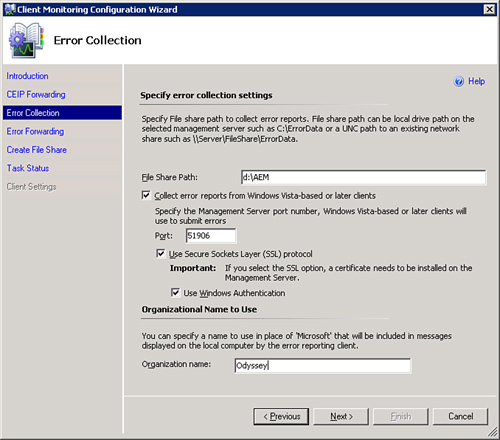
On the Error Collection settings screen, specify the following:
The location of the file share path (which needs to have at least 2GB of free disk space)
Whether error reports will be gathered for Windows Vista-based computers and, if so, what port to use (defaults to 51906)
Whether you will use SSL and Windows Authentication for the Vista clients
The organization name displayed in messages displayed on the local client
In our example, we have created a file share path of D:AEM and have enabled all the Windows Vista configurations for the organization name of Odyssey, as shown in Figure 6.38.
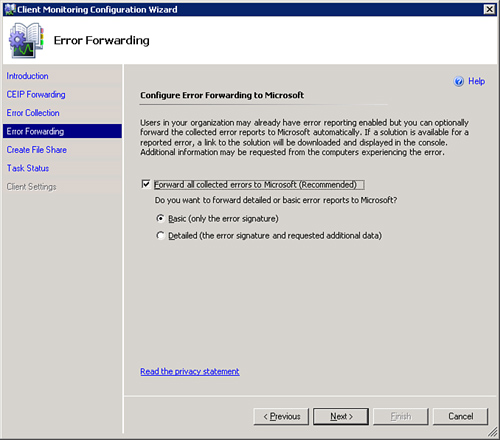
Figure 6.39 shows the next step of the wizard, where you configure forwarding to send either basic or detailed information to Microsoft.
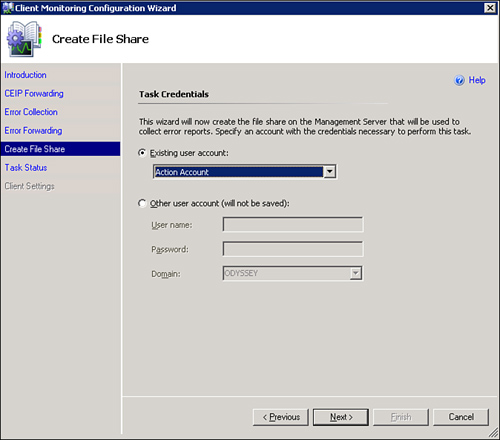
Finally, we need to specify which account will provide the credentials required to create the share on the system. The default configuration is to use the Action Account (see Figure 6.40), but another account can be specified.
Once each of these configurations is complete, the wizard configures the system and displays a tasks status screen indicating that the task completed successfully. Finally, the client settings screen indicates the location of the Administrative template (the .adm file used by Group Policy to set the configuration required on the clients to report errors to the new location).
If you need to remove Operations Manager from your environment, the recommended process is by reversing the order in which you installed the components. As a sample deployment, we have an RMS named Hydra, a operational database server named Thunder, and a reporting server named Quicksilver. These systems are monitoring systems in the environment that have locally deployed agents and agentless monitored systems. We installed these systems in the following order:
Operations database
RMS
Reporting server and Data Warehouse server
Agents and agentless monitoring
You would remove Operations Manager by reversing this process: agentless monitoring, agents, Reporting and Data Warehouse server, RMS, and then the Operations database.
To remove OpsMgr from this configuration, we would first uninstall the agentless monitored systems (Operations Console under Administration -> Device Management -> Agentless Managed) and then uninstall the agent monitored systems (Operations Console under Administration -> Device Management -> Agent Managed).
After successfully uninstalling the agents, we can uninstall the Reporting Server/Data Warehouse Server Components through Control Panel -> Add/Remove Programs. The RMS is uninstalled next with Add/Remove Programs. Finally, you can uninstall the Operations database through Add/Remove Programs. Use the SQL Server 2005 tools to archive or delete the databases from SQL Server, and use your regular Windows utilities to remove them from the file system.
Table 6.4. CleanMom Switches and Actions
Command-line Switch | Description |
|---|---|
| Removes all agent components from that computer |
| Removes all server components from that computer |
| Creates an .xml file listing the installed components |
| Selectively removes components listed in the .xml file previously created using the |
The prerequisite checker and the straightforward approach to installing Operations Manager 2007 will help to avoid many installation issues. However, you may encounter some common problems that which should be pointed out when installing Operations Manager.
Table 6.5 describes some of the potential errors that might occur when installing Operations Manager. You can use the Knowledge Base article number to get additional information in the Microsoft knowledge database at http://support.microsoft.com.
Table 6.5. Potential Installation Errors and Their Resolutions
Process Erroring | Error Message | Potential Cause | KB Article # |
|---|---|---|---|
2007 Install | When you try to install Microsoft System Center Operations Manager 2007 or you try to install Microsoft System Center Essentials 2007, the Setup Welcome page appears to be empty. | Configure Internet Options Security to allow Active Scripting on this website. | 932812 |
2007 Install | SDK service on the RMS may consume more than 2GB of memory. | The SDK service data source module does not limit the number of data items that are processed at one time. The module tries to read all pending data items from the database and process the items in a batch. The MonitoringHost.exe process may stop unexpectedly in response to an unhandled exception if too many data items have to be processed. | 943706 |
A hotfix is available: see KB 943706. Apply the hotfix to all management and gateway servers. | |||
This is fixed in Service Pack 1. | |||
2007 Install | Prerequisite checking fails, stating you must install Service Pack 1 for SQL Server 2005 although the Service Pack is already installed. | This can occur on a 64-bit Windows Server 2003 SP 1 computer if you have installed SQL Server 2005 (32 bit) SP 1. | 944346 |
Use the CreateDBWizard tool to create the database before starting the installation. Please note the requirements for running this tool in KB 938997. | |||
2007 ACS Install | Event ID: 4668 and the Audit Collection Services does not start. | Activate the Audit Collection Service. Clear the Read-only attribute on the AcsConfig.xml file and restart the service. | 932812 |
2007 ACS Install | The Audit Collection service does not start and SPN issues are occurring. | The NETWORK SERVICE account does not have permission to write the SPN (service principal name) information to Active Directory. Create a temporary domain admin account and give it permission to run as a service on the server where this service is failing. Change the Audit Collection service to run using this new account and start the service. Once the SPNs are written, the service can be changed back to NETWORK SERVICE and restarted. | 936579 |
2007 Reporting Install | Message during reporting installation “The wizard was interrupted before Operations Manager 2007 could be installed.” This also logs a return value 3 in the reporting installation log file MOMReporting(N).log. This log file is incremented for each installation attempt and is stored in the user’s %temp% folder. To verify that the error is due to query timeout, search for the following text: “SetPropertiesToManagement ServerActionAndSDKAccountCA error.” | This occurs if you attempt to use the Local System account to install reporting. The installation process queries Active Directory for the computer account associated with the RMS. In a large domain, the query may time out. This can be resolved through using a domain account for the OpsMgr SDK Service. After the installation is complete, you can configure the OpsMgr SDK Service to use the Local System account (documented in KB 936220). This is fixed in Service Pack 1. | 936219 |
2007 Reporting Install | OpsMgr 2007 Reporting fails because the SDK service does not have appropriate permissions. | You installed a domain environment with the Permissions compatible only with Windows 2000 or Windows Server 2003 operating systems option, and the SDK service account does not have read access to the | 938627 |
2007 Reporting Install | You cannot install the Reporting feature in a disjointed namespace environment. | The primary DNS suffix of the computer does not match the FQDN of the domain in which the computer resides. A hotfix is available (see http://support.microsoft.com/kb/936481 for additional information). This is fixed in Service Pack 1. | 936481 |
2007 Reporting Install | Reporting does not install, Error 26204, Error -2147217900: failed to execute SQL string, error detail: Incorrect syntax near the keyword ‘with’. ... previous statement must be terminated with a semicolon. | Reporting installation fails when the DB name contains special characters. This problem may occur when there is a “-” in the reporting database name (example: OPSMGR-Reporting). This is a special character. | 944347 |