
Chapter 5 JavaScript on the Server-Side
So far, you have taken an in-depth look into the JavaScript language. You have examined some of the functionality JavaScript has and some of its applications. The remaining chapters will discuss how to approach JavaScript as a programming language, and how to maximize your coding efforts by understanding the environments in which it is interpreted.
In addition to applying JavaScript on the client-side, there is also server-side usage. This feature, which is implemented in Netscape and iPlanet’s Enterprise line of servers and within Microsoft’s ASP environment in their Internet Information Server (IIS) servers, allows developers to build robust Web-based applications. The use of these Web-based programs can be limitless, but is most commonly used to maintain user sessions and interact with databases to build pages dynamically.
In this chapter, you will take a closer look at server-side JavaScript. You’ll see how it is different from client-side and learn how to deploy your applications. You will analyze the various uses of the technology and learn how to manage your programs. Overall, this chapter will be a primer for any server-side JavaScript you might be deploying on your site.
How Does Server-Side Differ from Client-Side?
Server-side JavaScript is not only different from client-side because of the environment in which it is interpreted, but it also has divergent concepts that are applied. These distinctions can be placed into two major categories, each of which will be further broken down in this chapter. The initial categories are
• Differences in the server-side environments
• Actual programming differences from client-side
As a developer, you should be aware of these items before you begin writing server-side applications. Server-side is conceptually different from client-side, even though much of the language semantics and syntax are shared.
Server-Side Environments
One of the first things you should understand about using JavaScript on the server-side is the fact that the implementations within the Enterprise and IIS servers are different. This difference is much greater than that on the client-side, where differences appear in object models and means of implementation.
On the Enterprise front, we find that the Netscape and iPlanet alliance has created objects, properties, and methods that conform to standard server-side functionality no matter what the platform. You will find language elements that allow you to access the file system, send mail, and retrieve data from databases. None of these items are specific to any platform and are generic enough to be used across all the platforms supported by the server.
Microsoft, on the other hand, has taken a very Windows-centric approach to implementing a server-side version of its JScript language. It has many objects and related elements pertaining to the Windows environment. And lately, it has extended support for the JScript language to be included as a major language within its .NET framework. We will touch on these areas in this chapter.
Programming Differences
The next items to analyze in server-side JavaScript are the programming differences that occur. Besides the functionality added on the server-side, JavaScript also has some key programming differences. These include, but are not limited to, the following:
• Within the Enterprise Server environment, scripts to be executed on the server-side are contained between beginning <server> and ending </server> tags.
• Within the Microsoft ASP environments, the JScript language must first be specified. By default, the VBScript language is the dialect of choice.
• Additional objects, methods, properties, and events are available on the server-side.
• None of the client-side–specific language elements are available on the server-side, however the elements core to the language are.
Unlike the client-side scripts, which are contained between beginning <script> and ending </script> tags, all scripts to be executed on the server-side within the Enterprise Server are contained between beginning <server> and ending </server> tags. This tells the Enterprise server to execute all the code between these tags. As a programmer, this allows you to have client-side code on the same page without it being interpreted by the server.
On the Microsoft side of the server-side implementation, several different languages are available to the developer for writing their applications. Because of this, it is necessary to specify JScript as the language used on your page. This is accomplished in two ways.
• Including the following line as the first line on your ASP page. It sets JScript as the default language for that page.
<%@LANGUAGE=“JScript”%>
• Using beginning and ending <script> tags with the runat ASP-specific attribute set to server and the language attribute set to JScript.
<script language=“JScript” runat=“server”>
// your code here
</script>
JavaScript on the server-side has objects for sending mail, opening connections to a database, managing a pool of connections, accessing the file system, and handling returned data. This syntax expansion on the server-side makes JavaScript a rich language for developing the robust applications on the server that you need.
A final difference is the fact that pure client-side language elements are not available on the server-side. This is nothing more than a reflection of the environment in which the scripts are interpreted, but it can be strange for the experienced JavaScript programmer who has not experienced the language on the server-side. For instance, there is no navigator or Form object. These are all specific to the client that is interpreting the script.
Netscape’s Server-Side JavaScript
Netscape was the first to implement JavaScript on the server-side, so it is no surprise that its implementation of the language builds upon the foundations developed within the browser. In this section, we will discuss what versions of their servers support JavaScript and how you run and manage applications developed in this language.
Server Support
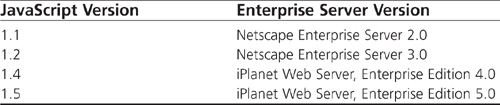
Before you start developing any server-side JavaScript application within the Enterprise Server environment, you should first make sure of the level of support you have access to. As you are beginning to see, things have changed a lot with JavaScript over the years, and you want to make sure that you have the resources necessary to perform the tasks you need to accomplish. Table 5.1 has a list of the various versions of JavaScript on the server-side within the Enterprise Server environment.
Table 5.1 Server-side JavaScript Support
Compiling Your Scripts
Unlike client-side JavaScript, the server-side implementation within the Enterprise Servers require you to compile your scripts into .web files. These files, which are stored in byte code, contain all the files necessary for your Web-based application. The .web files would include any .html files that contain your server-side code, as well as any external source JavaScript .js files that you might be using.
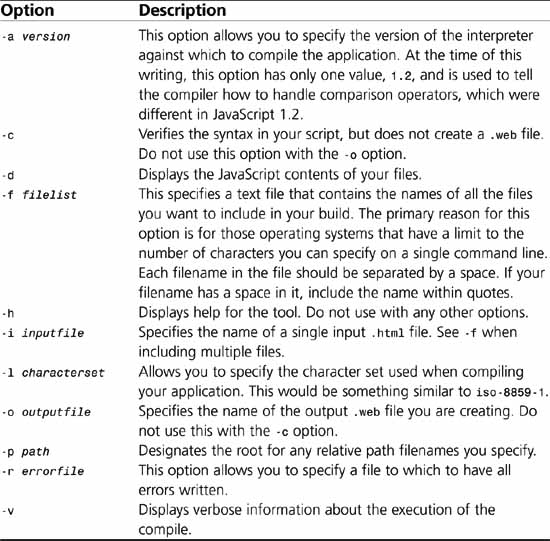
Netscape has provided a command-line tool, the JavaScript Application Compiler (jsac), which is located in the bin directory of your installation, to compile your applications. The minimum requirement for compiling the application is the .html file that contains your code. The tool itself takes a variety of parameters, defined in Table 5.2, to build your .web file.
Table 5.2 Command-Line Parameters Available to jsac
Using these options, a typical build of an application might look something similar to the following.
jsac -o myApp.web -v index.html results.html jsbeans.js
It specifies to display the build process verbose, defines the output file as myApp.web, and gives the filenames of the files to include.
Here is another example that specifies a full path to the input file as well as sets an error file to log any errors during the compilation process.
jsac -o myApp.web -v -i /js/myapps/index.html -r /js/logs/myapperror.log
As many programmers know, it is very important to know your command-line options. Knowing how to troubleshoot by compiling a project can often be just as challenging as creating one.
The Server Side JavaScript Application Manager
The Server Side JavaScript Application Manager, shown in Figure 5.1, is the program used to manage server-side applications within the Enterprise Server environment. From within this common interface, you can start, stop, restart, run, debug, modify, and remove applications created for a Web site. It is a dashboard to all the server-side JavaScript applications installed.
Figure 5.1 Enterprise Server’s Server Side JavaScript Application Manager.
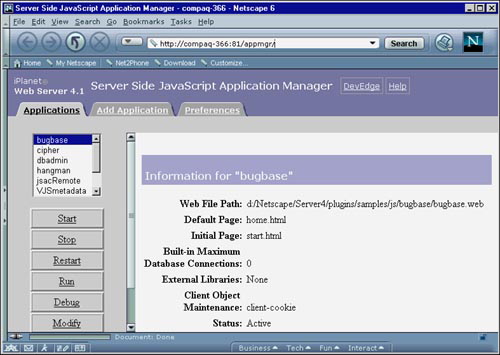
This manager is much more than a start and stop location for applications. In fact, it is most useful for verifying current status and information, debugging, and setting configuration options. After an application has been compiled and added to the Server Side JavaScript Application Manager, this interface is used to maintain all aspects of the program—not including the actual coding, of course. However, before you can use the JavaScript Application Manager, you must do a few things.
Configuration
Before the Server Side JavaScript Application Manager is available for use, it must be enabled within an instance of Enterprise Server. This can be done easily from the Server Manger.
Once logged in to the Administration Server, simply select the option that represents the instance of the Web server on which you want to enable server-side JavaScript. When you have accessed the Server Manager for this instance, click the Programs button in the menu bar. Next, click the link to Server Side JavaScript in the navigation bar to the left of the page. This takes you to the main screen, shown in Figure 5.2.
When you have access to this page, there are three options:
• Activate the server-side JavaScript environment
• Require a password for access to the JavaScript Application Manager
• Select a JavaScript Thread Pool option
Figure 5.2 Enabling server-side JavaScript through the Server Manager.
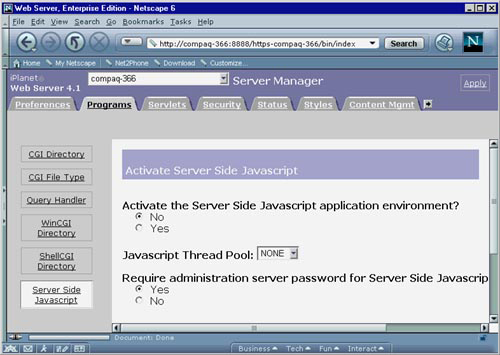
The first thing you need to select in this screen is to activate the server-side JavaScript environment. Next, consider using the Administration password to access the JavaScript Application Manager. This is highly recommended because it is a major security risk to unprotect applications. Without the password, a person could stop, or even worse, modify the settings for applications. And finally, if you plan on using server-side JavaScript to connect to databases, you can specify a thread pool. For more information on thread pooling, click the Help button on this screen.
When server-side JavaScript is enabled and you have made a decision on whether to password protect the application manager, click the OK button. This will take you to the Save And Apply Changes page, where you should click Save And Apply to activate these options. An alert box will be displayed, confirming a successful or unsuccessful change.
• Are any NSAPI (Netscape Server Application Programming Interface) plug-ins running that might conflict with server-side JavaScript?
• Is any kind of third-party software being used to dynamically build the Web pages for this site that might have conflicting or overlapping settings?
• Has someone hand modified the obj.conf file recently?
For the first two, think specifically about those applications or NSAPI plug-ins that parse pages. Consider turning off Parsed HTML if it is enabled. This can be done within the Web server instance’s administration by clicking the Content Management menu item and then clicking the Parse HTML link in the navigation.
Finally, if there are still troubles or if the third bullet point came into play, consider loading a previous version of the obj.conf file. This can be done by clicking the Server Preferences menu item, and then selecting the Restore Configuration link in the navigation. Check under the obj.conf column and roll it back one version at a time until it works. Note that you are undoing any prior changes of the configuration file. Doing so might break another process while trying to fix the JavaScript ApplicationManager.
When a successful saving of the configuration file (obj.conf) and restarting of the Web server has been accomplished, you will be returned to the Active Server Side JavaScript page. At the top of the page, there will now be a link to the Server Side JavaScript Application Manager. This link will be in the following form, where machinename is replaced with the name of your machine and domain if applicable.
http://machinename/appmgr
Now that everything is configured to run the application manager, click the link. This will launch another page and load the Server Side JavaScript Application Manager. When on this page, click the Preferences tab. This will display a page to set up some defaults when adding new applications and set a couple of preferences.
Table 5.3 defines the options available when setting the default values for new applications.
Table 5.3 Default Application Settings That Can Be Set for the JavaScript Application Manager
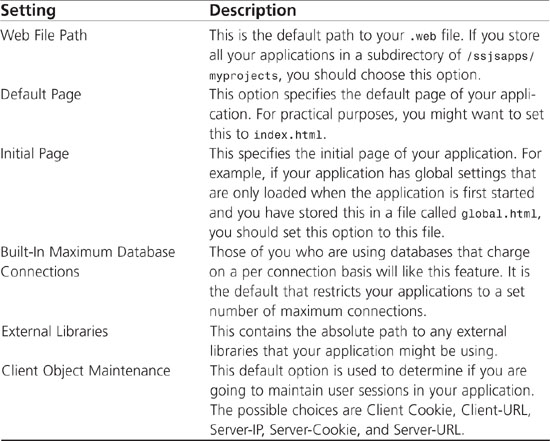
After specifying the options for the Default Values When Adding Applications section, specify your preferences. Within the Preferences section, there are two items to set:
• Confirm On— This option determines if a confirmation dialog box is to pop up before you perform a task. The list of tasks this can be enabled for are Remove, Start, Stop, and/or Restart an application.
• Debug Output— This option allows you to choose if you want to do your debugging in the Same Window or Other Window of the application.
After these settings are completed, click the OK button. This will finish the configuration of the Server Side JavaScript Application Manager. Additional help or documentation can be accessed by clicking the links within the user interface.
Script Management
Managing scripts might be one of the most overlooked aspects of deploying a Web-based application. The mentality seems to be, “It was written to never break.” This, as we all know, simply never holds up in the real world. Even applications that worked perfectly for years will eventually hit a bump. It might be after an upgrade to a new server, or maybe a new browser has come out that implements some client-side JavaScript differently than expected. Either way, it will happen, so expect it.
The Server Side JavaScript Application Manager provides a common location to manage applications as well as perform maintenance on them. You can access the online documentation at DevEdge and launch the help window with documentation before clicking any of the available tabs.
When the Applications tab is selected, you will see the list of applications currently installed. These are located in a scrolling text area at the top of the section. After an application is selected, any of the options defined in Table 5.4 can be used.
Table 5.4 Application Options in the Controls Section
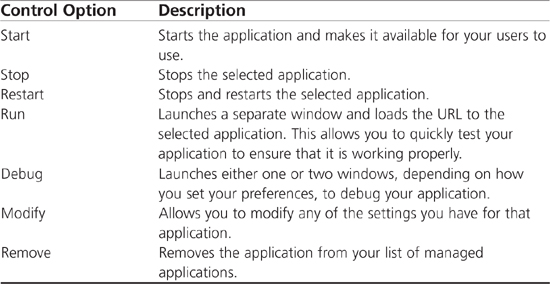
This section discusses the ability to manage applications. When an application is selected, its information is displayed as well as its current status. Now take a look at using the Debug feature, which is a valuable tool for any server-side JavaScript developer.
To launch the Debugging window, select the application to debug, and then click the Debug button. Depending on how the preferences are set, you will see one or two main windows. If there is only one window, it will be split into two frames.
One of these elements is the Debugging window, seen as a single window in Figure 5.3. As a program runs, the contents of this window will change as JavaScript code is processed within the application. This tool provides a look at the information being passed back and forth. It is possible to see variables being set, as well as objects created and their various states.
Figure 5.3 The Debugging window is used to display various bits of information about the application being debugged.
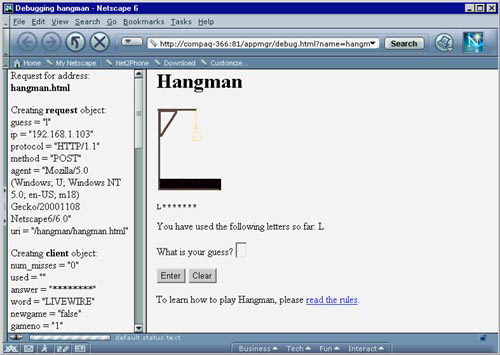
As a programmer, you often will want to know the value of variables you create and return values of methods. Server-side JavaScript makes this possible by using the debug() method in scripts to write information to the Trace Information window during runtime. This method is similar to the write() server-side method, where a string or variable is passed, and the interpreter writes the data passed to the window. A typical use of this method might look similar to the following:
debug("myFunction entered and was passed: " + myVar);
In addition to knowing how to debug applications, it is important to understand the error messages you might run across. There are two main types of errors. One type of error, which is common for syntax mistakes, is a standard server-side JavaScript error. This error will return the object in which the error occurred, the error message, the filename of the application, and the line number.
The second types of errors are those generated by databases. These errors can have several different types of information returned, but usually contain the following:
• Database/Function— This error alerts the programmer that a database error occurred, and it lists the function in which it occurred.
• LiveWire Services Error— This error, generated by the LiveWire database connection service, states that an error occurred and lists a message as to why.
• Vendor Error— This error is also returned by the LiveWire service, but it reports an error specific to the database to which you are connecting. You will need to know your database error codes to decipher this error.
• Standard Server-Side JavaScript Error— This error is the same as the first type, except that it is specific to your use of a database connection.
In addition to the Debugging window, there is a main window, or frame. When debugging an application, this window contains the application itself. The combination of this window and the Debugging window allows a developer to step through, as a user would, and see what is going on in the background. With the Debug feature of the Server-Side JavaScript Application Manager, a developer can correct and work through almost any problem he might encounter.
Microsoft’s ASP Environment
Like Netscape, Microsoft soon saw the value in implementing JScript on the server-side and within its .NET framework. The ability to give developers a single language for both client-side and server-side was too compelling. So, with the release of IIS 3.0, ASP 1.0 was made available, and within that release, JScript was at the disposal of developers. Since that time we have seen the release of IIS 4.0 and 5.0, along with ASP 2.0, 3.0, and ASP+ (now referred to as ASP.NET).
Server Support
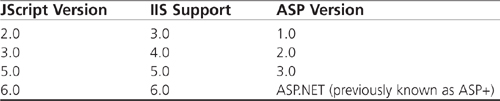
Before you start developing any server-side JScript application within the ASP environment, you should first make sure of the level of support you have access to. Table 5.5 has a list of the various versions of JScript on the server-side within IIS.
Table 5.5 Server-side JScript Support
Using the JScript Language
Before we go any further, there is one interesting thing to note about Microsoft’s implementation of JScript. Unlike, at least currently, other browsers and environments that support an ECMAScript-based scripting language, the JScript engine within Microsoft’s applications can be upgraded. This means that you might only be currently running IIS 4.0, but it is possible to download and install the JScript 5.6 engine.
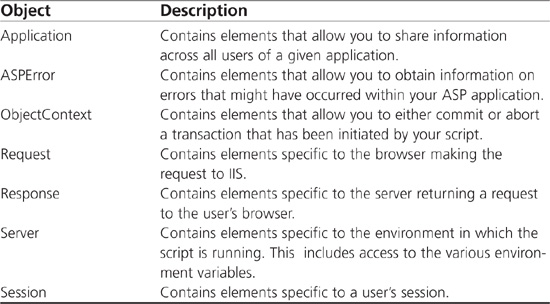
Actually using the JScript language is fairly easy. As we touched on in Chapter 1, “What Is JavaScript to a Programmer?” there are a few extra objects, listed in Table 5.6, that you need to be aware of. Other than these, you can use the normal objects, properties, and methods you are accustomed to using.
Table 5.6 Server-side JScript Objects
NOTE
See Chapter 9 for more information on these objects and their properties, methods, events, and collections.
Checking Your Environment
Before you start trying to build ASP applications using JScript, there are a few items that you should be aware of. These items might differ slightly across the various versions of IIS, but conceptually they are consistent.
• Make sure that your installation of IIS is configured to load and execute .asp files with the asp.dll.
• Make sure that your Home Directory permissions allow for Script or Execute permissions.
• Make sure that you have either explicitly set JScript as the language on your pages, or that you have set it as the default language within the properties of your instance of IIS.
Although these items seem minor, failure to have these set can prevent your scripts from running. By default, everything, with the exception of the default language being JScript, should be set up correctly. To test, you can use the code in Listing 5.1. If you are able to serve the page through IIS to a browser and see "It Worked!", you will be able to proceed with the ASP examples later in this chapter.
Listing 5.1 Sample Code to Test if ASP Is Properly Functioning Within Your Instance of IIS
<html>
<head>
<title>JScript within ASP Test</title>
</head>
<body>
<script language=“JScript” runat=“server”>
// Write "It Worked!" to the users page.
Response.Write("It Worked!");
</script>
</body>
</html>
Uses of Server-Side JavaScript
Now that you have seen some of the differences of server-side and client-side JavaScript and how to create your applications within the appropriate environments, take a look at some of Server-Side JavaScript’s uses. This section does not try to outline all the uses you might encounter, but rather discusses some of the more common aspects of using server-side JavaScript. We have included examples for both environments specific to the server-side implementation, so this should give you a good taste of what you can do with this powerful language.
Within Enterprise Server
Because both the Enterprise and IIS environments differ as do their implementation of the JavaScript language, we will first take a look at examples specific to Enterprise Server. In this section, we will explore the following:
• Database connectivity
• Working with Files
Database Connectivity
One of the major features of server-side JavaScript is its capability to connect to databases. As you know, Netscape has paved the way for the use of standardized technology, and you can expect nothing less when connecting to databases. It provides native-support, industry-leading databases such as DB2, Informix, Oracle, and Sybase databases, as well as access through ODBC for other databases, such as Microsoft’s SQL Server.
The functionality server-side JavaScript provides for connecting to databases is done through its LiveWire service, which no longer has to be installed as a separate component. This service provides JavaScript objects that can be used to connect to various databases. Once connected, you are able to run the SQL statements necessary to perform the operations you want.
Connections to a database are maintained in a pool. Before you open a connection to a database and have the ability to run queries against it, you must create an instance of the DbPool object. When the instance is created, you can obtain connections from the pool as needed. The pool object itself takes all the parameters necessary to make the connection. It is possible to create a pool without specifying any parameters. However, you must pass the parameters when the first connection is attempted.
The following code is the syntax for creating a DbPool object. Each parameter is defined in the bulleted list following the example.
var myPool = new DbPool (DBType, DBInstance, UID, PWD, DBName, MaxConn, CommitFlag);
• DBType—The type of database it is. Possible values are ORACLE, SYBASE, INFORMIX, DB2, or ODBC.
• DBInstance—This is the instance name of the database. For ODBC it is the DSN entry name.
• UID—The username or ID you want the connections to connect as.
• PWD—The password for the user you are connecting as.
• DBName— The name of the database into which you want to log. For Oracle, DB2, and ODBC connections, this should be a blank, "", string. In Oracle, the name of the database for these connections is set up in the tnsnames.ora file and is defined by the DSN for ODBC connections. DB2 does not have a database name and is referenced only by the DBInstance.
• MaxConn— The maximum number of connections to the pool. This is effectively the number of connections the pool will open to the database.
• CommitFlag— This flag determines if a pending transaction is committed when the connection is released. If it is set to false, the transaction is rolled back. If it is set to true, it is committed.
Because it is possible to create an instance of this object by passing a limited set of these parameters, as well as passing none, you should reference the DbPool entry in Chapter 9 before using this object.
After you have created a pool, you can use the connections within that pool as needed. To pull a connection, use the connection() method on your pool. This will return an available connection to use for processing. The syntax and a description of the parameters are as follows:
var myConn =myPool.connection(name, timeout);
• name— This is a name you can give your connection. Because you actually store the connection in a variable, this name’s primary function becomes one for debugging purposes.
• timeout— A numeric value for the number of seconds you give the instance to connect.
After the connection has been made, you are able to perform the necessary processing you require for your application. For more information on the methods available, check entries for the Connection, Cursor, and database objects in Chapter 9.
You should know how database queries are handled. You should understand how the information is returned from your specific database and how to process the information.
You should also know how to appropriately manage user connections to your application. It is possible your application will have to manage many connections from many users at the same time. If your sessions and connections get crossed, you might send the wrong information to the wrong user.
Maintaining and managing your user sessions and database connections can be a very important factor and you should take great care when working with them.
Another feature that can be exploited and implemented within server-side JavaScript applications is the ability to send mail. The properties and methods needed to perform these tasks are contained in the SendMail object.
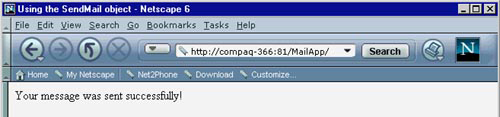
Using the SendMail object is very straightforward. Simply set the same properties contained in the everyday e-mail you send and invoke the send() method. If an error is encountered, it can be analyzed by using the error methods supplied. Listing 5.2 shows an example use of this object to create a page for users to send e-mail. Figure 5.4 shows what is displayed to the user when she encounters this page, and Figure 5.5 shows the results of submitting a successful e-mail.
Listing 5.2 Example of Using the SendMail Object
<html>
<head>
<title> Using the SendMail object</title>
</head>
<body>
<server>
// See if they have submitted or just need the form.
if(request.method == “POST”){
// Create an instance of the SendMail object.
var myMail = new SendMail();
// Assign the properties their values.
myMail.To = request.toAddress;
myMail.From = request.fromAddress;
myMail.Subject = request.subject;
myMail.Body = request.body;
myMail.Smtpserver = "mail.purejavascript.com";
myMail.Errorsto = "[email protected]"
// Try to send the mail.
if(!myMail.send()){ <html>
<head>
<title> Using the SendMail object</title>
</head>
<body>
<server>
// See if they have submitted or just need the form.
if(request.method == “POST”){
// Create an instance of the SendMail object.
var myMail = new SendMail();
// Assign the properties their values.
myMail.To = request.toAddress;
myMail.From = request.fromAddress;
myMail.Subject = request.subject;
myMail.Body = request.body;
myMail.Smtpserver = "mail.purejavascript.com";
myMail.Errorsto = "[email protected]"
// Try to send the mail.
if(!myMail.send()){
// If there was an error, give the user the e-mail address of who they
// should contact about the error, as well as the error code and
// message.
write("Error sending your message. Please send e-mail to ");
write(myMail.Errorsto + " with the following error message");
write("Error " + myMail.errorCode() + ": " + myMail.errorMessage());
}else{
// If there was not an error, tell the user they were successful.
write("Your message was sent successfully!");
}
}else{
// If this page was called and a form was not submitted, write the
// email form to the page for the user to use.
write('<form name=“myForm” method=“post”>'),
write('<table border=“1”><tr><td>'),
write('<table border=“0”>'),
write('<tr align=“left” valign=“top”>'),
write('<td><b>To:</b></td>'),
write('<td><input type=“text” name=“toAddress” size=“30”></td>'),
write('</tr>'),
write('<tr align=“left” valign=“top”>'),
write('<td><b>From:</b></td>'),
write('<td><input type=“text” name=“fromAddress” size=“30”></td>'),
write('</tr>'),
write('<tr align=“left” valign=“top”>'),
write('<td><b>Subject:</b></td>'),
write('<td><input type=“text” name=“subject” size=“30”></td>'),
write('</tr>'),
write('<tr align=“left” valign=“top”>'),
write('<td><b>Body:</b></td>'),
write('<td><textarea name=“body”'),
write(' cols=“60” rows=“10” wrap=“soft”></textarea>'),
write('</td>'),
write('</tr>'),
write('<tr align=“left” valign=“top”>'),
write('<TD colspan=2 align=“right”><input type=“submit”'),
write(' value="Send Mail">'),
write('</td>'),
write('</tr>'),
write('</table>'),
write('</td></tr></table>'),
write('</form>'),
}
</server>
</body>
</html>
Figure 5.4 Building an e-mail page for your applications.
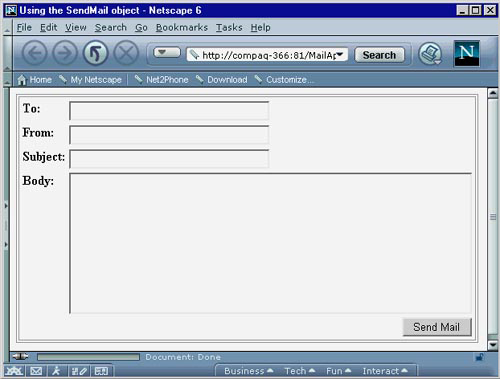
Figure 5.5 The results of submitting an e-mail successfully.
As the example demonstrates, the SendMail object makes it easy to create a page through which users can send mail. In a true, fully developed, Web-based application, a programmer should add code to check for errors in the submission. This would be an appropriate time to use client-side JavaScript to ensure that basic requirements, such as syntactically correct e-mail addresses, are entered.
Working with Files
The File object allows you to perform various system tasks, such as reading and writing to a file on your disk. The File object itself has many methods and a prototype property that allows a programmer to create new properties and methods of the object.
Similar to the SendMail object, the use of the File object is straightforward. The methods provided allow you to perform the various tasks needed on the files in your file system.
Part of the functionality of working with these files allows a programmer to specify how he wants to open the file. A file can be opened to read, write, append, or open in binary mode. These options are specified in the open() method in the following form.
myFile.open("option");
In your applications, you might want to display the contents of a file. This program could be an administration application that reads a file and displays its contents on a page. Listing 5.3 contains an application that displays the contents of a selected log file on the file system.
Listing 5.3 Using the File Object to Display the Contents of a File
<html>
<head>
<title> Using the File object</title>
</head>
<body>
<server>
// See if they have submitted or just need the form.
if(request.method == “POST”){
// Create an instance of the File object and pass it the file
// the user specified they wanted to view.
var myLog = new File(request.file);
// Try to open the file.
if(!myLog.open(“r”)){
// If there was an error, tell the user.
write("There was an error opening the file: " + request.file);
}else{
// If there was not an error, then open the file and display it.
write('<h3>The contents of ' + request.file + ' are as follows:</h3>);
while(!myLog.eof()){
write(myLog.readln());
}
}
}else{
// If this page was called then write the select box to the page for
// the user to use select which log they want to see.
write('<form name=“myForm” method=“post”>'),
write('<select name=“file”>'),
write('<option value="/logs/admin.log">Admin Log</option>'),
write('<option value="/logs/user.log">User Log</option>'),
write('<option value="/logs/error.log">Error Log</option>'),
write('</select>'),
write('<input type=“submit” value="View Log">'),
write('</form>'),
}
</server>
</body>
</html>
In this example, a user has the ability to select a file for viewing. After submitting the request, the example tries to open the file for reading. If it is unsuccessful, an error with the filename is returned to the user. If the file opens, the contents are displayed in the document.
Within IIS
On the IIS side of the fence, it is important to show how the language syntax differs from Enterprise Server’s implementation, but remains true to the JavaScript language. Within this section we will explore examples in the follow areas:
• Form submissions
• Session handling
Form Submissions
One of the nice things about JavaScript on the server-side within both the Enterprise and IIS environments is the ease with which you can process form data. Within IIS this is accomplished through the use of the Request object and its associated properties, methods, and collections, which are detailed in Chapter 9.
To use this object, we must create a form that will pass some information. For simplicity’s sake, we will prompt the user for his first and last name. Listing 5.4 contains the HTML for this page.
Listing 5.4 HTML for Our Form
<html>
<head>
<title>ASP Form Example</title>
</head>
<body>
<form action="process.asp" method=“post”>
First Name:<input name=“first” width=“10”><br>
Last Name:<input name=“last” width=“10”><br>
<input type=“submit” value=“Submit”>
</form>
</body>
</html>
Now that the form has been created, we must create the process.asp file to handle its submission. Within this file, we will use the Write() method of the Response object to output the values of the passed information. As we mentioned before, JScript has several objects specific to their IIS implementation for processing data. The Response object, which is detailed in Chapter 9.
We will use the Request.Form collection, which takes the name of the form element you are trying to access. In our example, this will be for first and last. Listing 5.5 shows the code we can use to complete this task.
Listing 5.5 ASP Code Using JScript to Process Our Form
<html>
<head>
<title>ASP Form Example: Results</title>
</head>
<body>
<script language=“JScript” runat=“server”>
// write the first and last name entered in the form
Response.Write("You entered (last, first format): ");
Response.Write(Request.Form(“last”) + ", " + Request.Form(“first”));
</script>
</body>
</html>
Server Variables
Another use of ASP is to access and use various server variables. For instance, on many occasions a Web developer might need to determine the browser making the request. He might want to direct the user agent to a specific site, or possibly post a warning message.
In Listing 5.6 we use the Request.ServerVariables collection to access the HTTP_USER_AGENT variable. After loading into a variable, we use the indexOf() method to see if it is Internet Explorer. We then print out a message stating if it is Internet Explorer or not followed by the entire user-agent string.
Listing 5.6 Using the Request.ServerVariables Collection
<html>
<head>
<title>ASP Form Example: Results</title>
</head>
<body>
<script language=“JScript” runat=“server”>
// store user agent string in variable
var ua = new String(Request.ServerVariables("HTTP_USER_AGENT"));
// Check to see if its Internet Explorer.
if(ua.indexOf(“MSIE”) != -1){
Response.Write("Welcome!<br />");
Response.Write("User-agent: ");
Response.Write(Request.ServerVariables("HTTP_USER_AGENT"));
// Browser is not IE, so do something different.
}else{
Response.Write("You are not using an Internet Explorer browser<br />");
Response.Write("User-agent: " +
Request.ServerVariables("HTTP_USER_AGENT"));
}
</script>
</body>
</html>
Moving On
Up until this point, we have covered the use of JavaScript on both the client and server-side. For many of you, this represents the borders of what can be accomplished with JavaScript. However, Chapter 6, “Windows Scripting,” will map out yet another environment where JavaScript (or JScript rather) has taken hold—the Windows Script Host environment.