In this chapter, you’ll explore all the cell phone functionality that iPhone has to offer. The topics include the following:
![]() Getting information about your cell account
Getting information about your cell account
1 Making, Receiving, and Managing Calls
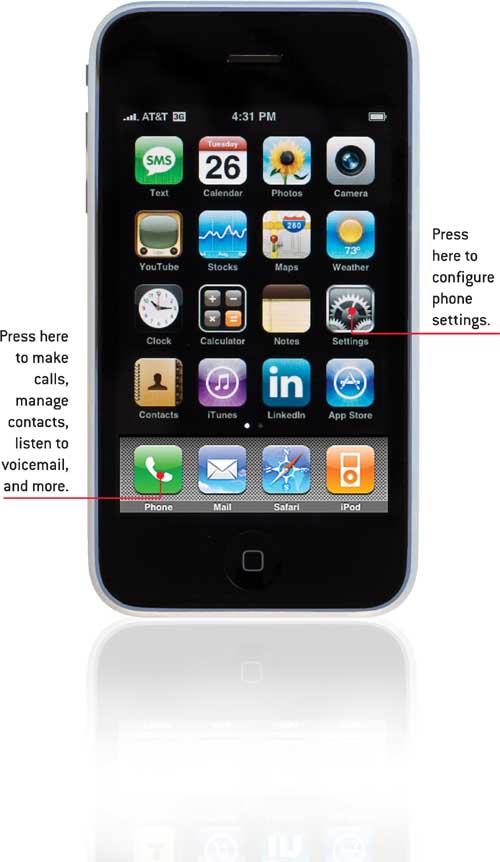
Although it’s also a lot of other great things, such as an iPod, web browser, email tool, and so on, there’s a reason the word phone is in iPhone’s name. It’s a feature-rich cell phone that includes one of iPhone’s best features, which is visual voicemail. Other useful features include a speaker phone, conference calling, and easy-to-use onscreen controls. Plus, iPhone’s phone functions are integrated with its other features. For example, when using the Maps application, you might find a location, such as a business, that you’re interested in contacting. You can call that location just by pressing the number you want to call directly from the Maps screen. No need to fumble around switching to phone mode and dialing the number manually. iPhone makes your mobile phone use quicker, easier, and smarter in so many ways, as you’ll see in the pages that follow.
Configuring Phone Settings
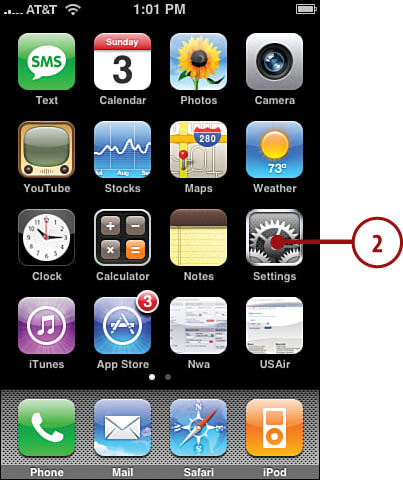
Before jumping into iPhone calling, take a few minutes to configure iPhone’s phone functions to work the way you want them to. To start, move to iPhone’s Home screen by pressing the Home button at the bottom of iPhone. On the Home screen, press Settings. The Settings screen appears.
>>>step-by-step
Creating Your Own Ringtones
Of course, one of the most fun phone settings are the ringtones you hear when you receive calls. iPhone includes quite a collection of ringtones from which you can choose. To make your ringtones more custom, you can create them from selected songs you can purchase in the iTunes Store. There are two steps to this. In the first, you create the ringtone. In the second, you move the ringtone onto iPhone so you can select it.
iTunes Store Info
You can find out how to access the iTunes Store to buy and download music in Chapter 3, “Listening to Audio and Watching Video.”
Creating a Ringtone in iTunes
To use a song as a ringtone, you must purchase it from the iTunes Store. (If you’ve imported a ringtone-enabled song from another source, such as a CD, you won’t be able to create a ringtone from it; you have to buy it from the iTunes Store.) Songs that are ringtone-enabled are marked with the ringtone icon, which is a bell. After you’ve purchased a ringtone-enabled song and downloaded it, you can convert it into a ringtone; note there is an additional charge of $.99 to do this. Here’s how to create a ringtone for a ringtone-enabled song in your library.
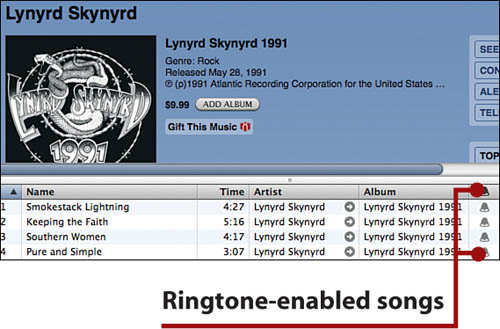
1. In iTunes, select a song that you want to use as a ringtone by searching or browsing your library. Ringtone-enabled songs are marked with the same icon that they are in the iTunes Store. You can easily find all your ringtone-enabled music by selecting Music on the iTunes Source list and ensuring All is selected in each column of the Browser. Then sort the list by the Ringtone-enabled column.
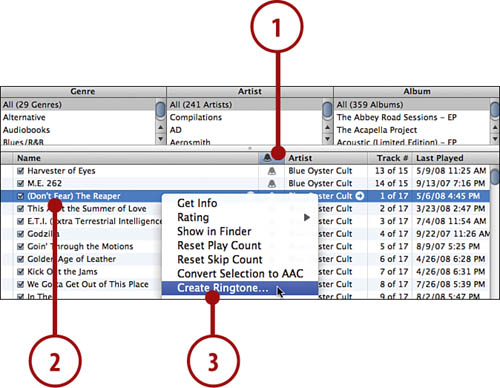
2. Right-click (or Control+click) the song you want to use as a ringtone.
3. Select Create Ringtone. The Ringtone tool appears at the bottom of the iTunes window, and the song you selected is added to it. By default, the first 15 seconds of the song is selected; the part that is the ringtone is highlighted in a blue select box. You can create a ringtone of up to any 30 seconds of the song.
4. Click Play. The selected ringtone plays and loops as you work on it.
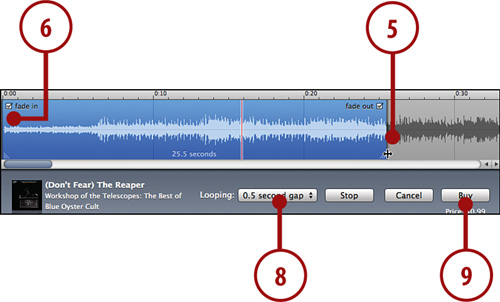
5. Drag the right edge of the selection box until it is at the end of the ringtone.
6. Drag the left edge of the selection box until it is at the start of the ringtone. The length of the ringtone is shown at the bottom of the selection box. The ringtone plays and repeats as you make changes.
7. Repeat steps 5 and 6 until the selection box contains exactly what you want to use as a ringtone.
8. Use the Looping pop-up menu to determine the amount of gap between the loops of the ringtone when it rings. The default is .5 seconds, but you can increase this if you want more of a pause between repetitions.
9. When the ringtone is right, click Buy. If you aren’t logged into your iTunes Store account, you are prompted to do so. The ringtone you created is saved to the Ringtones area within your library.
>>>step-by-step
Moving Ringtones onto iPhone
After you’ve created a ringtone using iTunes, you can move it onto iPhone.
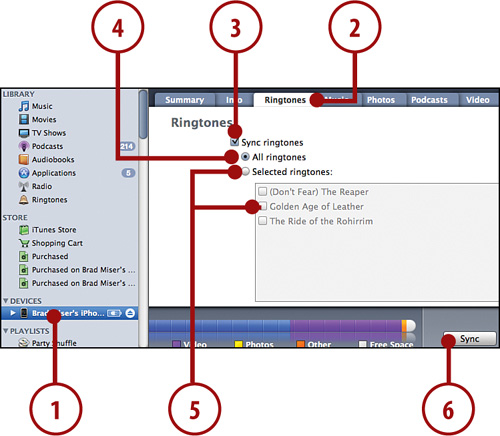
1. Connect iPhone to your computer and select it on the iTunes Source list.
2. Click the Ringtones tab. The ringtones you’ve created are shown in the box below Selected Ringtones.
3. Check the Sync ringtones check box.
4. To move all of your ringtones onto iPhone, click All ringtones.
5. To move only selected ringtones onto iPhone, click Selected ringtones and then check the check box next to each ringtone you want to move onto iPhone.
6. Click Sync or Apply. A sync is performed, and the ringtones are moved onto iPhone where you can use them.
Setting Phone Sounds
You can set iPhone to play specific sounds for various events, such as a ringtone, receiving a voicemail message, and so on.
1. Press the Home button to move to the Home screen.
2. Press Settings.
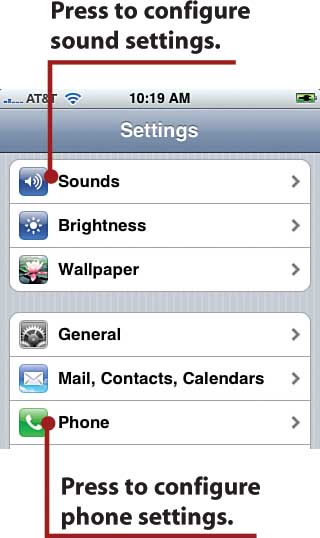
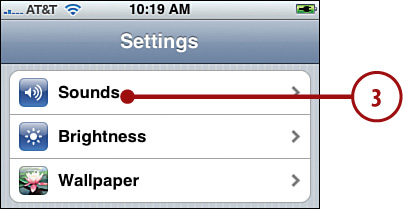
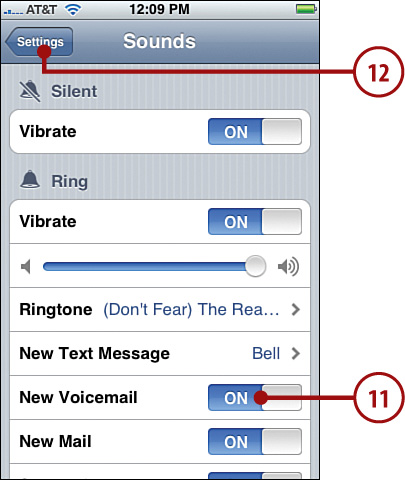
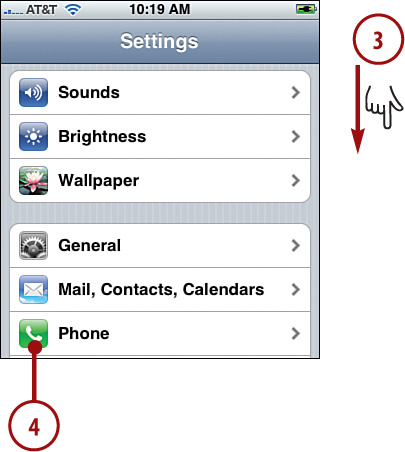
3. On the Settings screen, press Sounds. The Sounds screen appears.
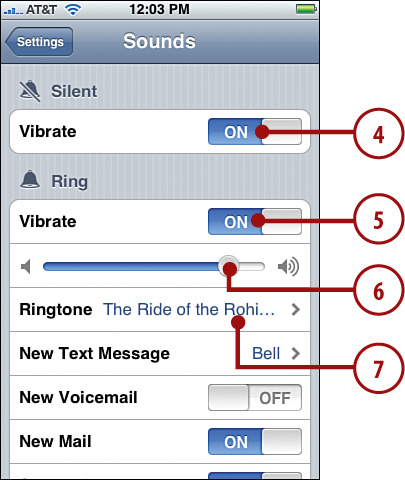
4. To prevent iPhone from vibrating when you’ve silenced the ringer, press the Vibrate ON button. The status becomes OFF, and iPhone won’t vibrate when you have silenced it using the Mute switch. Press OFF to re-enable vibration.
5. To prevent iPhone from vibrating when the ringer is active, press the Vibrate ON button. The status becomes OFF, and iPhone won’t vibrate when the ringer sounds to indicate you’re receiving a call or when some other action for which sound is enabled occurs.
6. To increase the volume level of ringer sounds, drag the slider to the right; drag it to the left to lower the volume of ringer sounds.
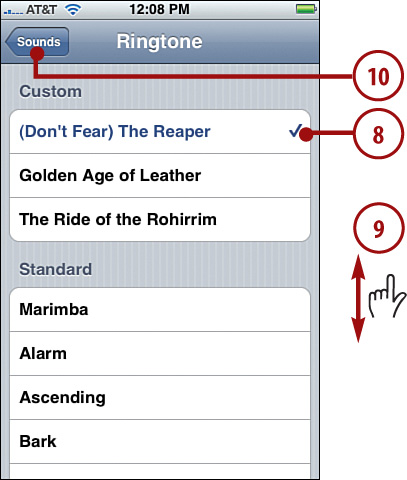
7. Press Ringtone or press the name of the current ringtone. The Ringtone screen appears. In the Custom section, you see ringtones you’ve created. In the Standard section, you see iPhone’s default ringtones.
8. Listen to a ringtone by pressing its name. The ringtone is marked with a check mark to show you that it is the active ringtone, and it plays.
9. Browse the screen and keep trying sounds until you find the one you want to use as the ringtone.
10. Press Sounds. You move back to the Sounds screen, and the Ringtone area shows the sound you selected.
11. If you don’t want to hear a sound when you receive a new voicemail, press New Voicemail ON. Its status becomes OFF, and you won’t hear a sound when you receive voicemail.
12. Press Settings. You move back to the Settings screen.
Hearing Things
If you want to hear any of the action sounds, such as New Voicemail, Press ON to turn that sound off and then press OFF to turn it back on. When you do, you hear the sound that plays when the related event occurs.
Configuring Phone Settings
There are a number of settings you can use to configure the way the phone functions work.
1. Press the Home button to move to the Home screen.
2. Press Settings.
3. Drag down the Settings screen until you see Phone.
4. Press Phone. The Phone screen appears.
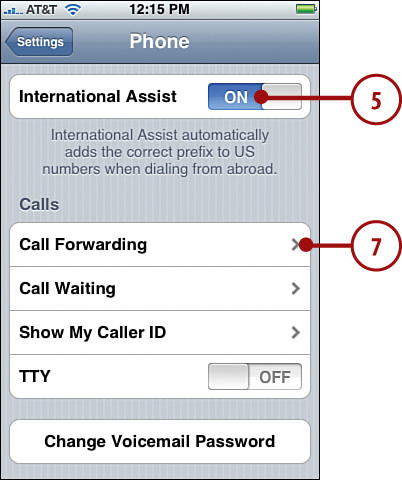
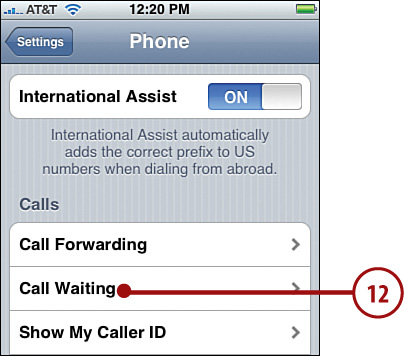
5. If you don’t want the correct prefixes added to U.S. phone numbers when you dial them from outside the United States, press ON. It becomes OFF to show you that you have to add any prefixes manually when dialing a U.S. number from outside the United States.
6. To forward your calls to another number, perform steps 7 through 11; if you don’t want to forward calls, skip to step 12.
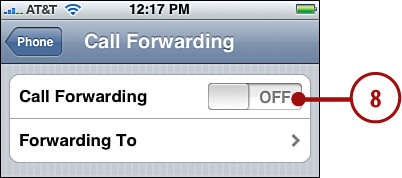
7. Press Call Forwarding. The Call Forwarding screen appears.
8. To forward calls, press OFF. It becomes ON to show you that call forwarding is active. The Forwarding To screen appears.
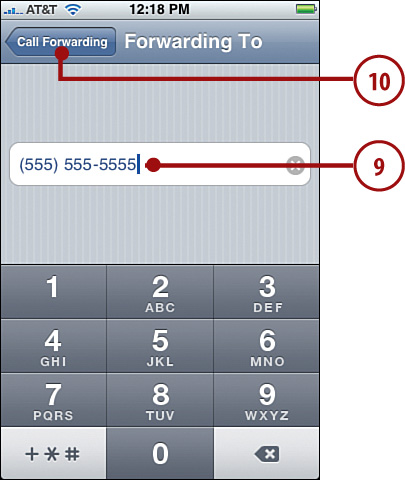
9. Enter the number to which you want to forward calls. Include the number’s area code. You can use the special symbols located in the lower-left corner of the keypad to enter pauses and such.
10. Press Call Forwarding. iPhone saves the number, and you return to the Call Forwarding screen. The number to which iPhone will forward calls shows next to the Forwarding To text.
11. Press Phone. You move back to the Phone settings screen.

12. To disable call waiting, press Call Waiting, and the Call Waiting screen appears; to leave Call Waiting active, skip to step 15.
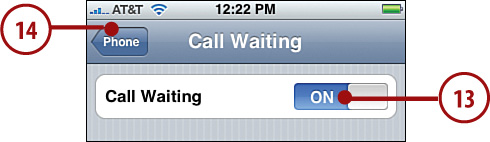
13. To disable call waiting, press ON. Its status becomes OFF. When call waiting is turned off and you receive a second call while you’re already on another call, the second call immediately goes to voicemail.
14. Press Phone.
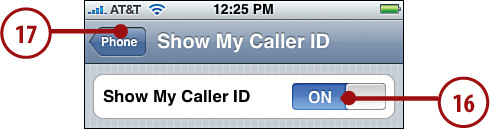
15. To hide your information when you make calls, press Show My Caller ID; to leave it showing, skip the rest of these steps.

16. Press ON. The status becomes OFF to show you that your information won’t be transmitted when you make a call.
17. Press Phone. You return to the Phone screen and are ready to use iPhone to make and receive calls.
Other Phone Settings
TTY devices enable hearing-impaired people to use a telephone. To use TTY with iPhone, you need an adapter to connect iPhone to a TTY device. You also need to turn TTY support on by pressing the TTY OFF button, which becomes ON to show you that TTY support is active.
The Change Voicemail Password command enables you to reset your voicemail password; this is covered at the end of the chapter.
The SIM PIN setting enables you to associate a personal ID number, or PIN, with the SIM (subscriber identity module) card in iPhone. You can remove this card from iPhone and install it in other phones that support these cards to be able to use your account with a different phone. If you set a PIN, that PIN is required to be able to use the card in a different phone.
The AT&T Services option (US markets) enables you to get information about your account. This is covered at the end of this chapter.
Which Network?
Although iPhone currently supports only the default network for the country in which you purchased it, when you are in different countries, you might see something other than that network next to the strength bars. The specific network you see doesn’t really matter; what counts is the strength of the signal you receive. That is, the network you use doesn’t matter except for roaming charges, which can be significant depending on where you use iPhone and what your default network is. Before you travel outside of your default network’s coverage, check with that network to determine the roaming rates that apply to where you are going. Also see if there is a discounted roaming plan for that location. If you don’t do this before you leave, you might get a nasty surprise when the bill comes in and you see substantial roaming charges.
Making Calls
There are a number of ways to make calls with iPhone, but after a call is in progress, you can manage it in the same way no matter how you started.
>>>step-by-step
Dialing with the Keypad
The most obvious way to make a call is to dial the number.
1. On the Home screen, press Phone. You move to the Phone screen.
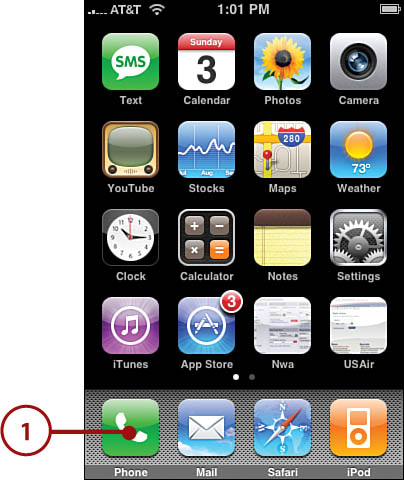
2. If you haven’t made a call from your current location before, check the signal strength to make sure that you can reach the network. As long as you see at least one bar, you should be able to make and receive calls.
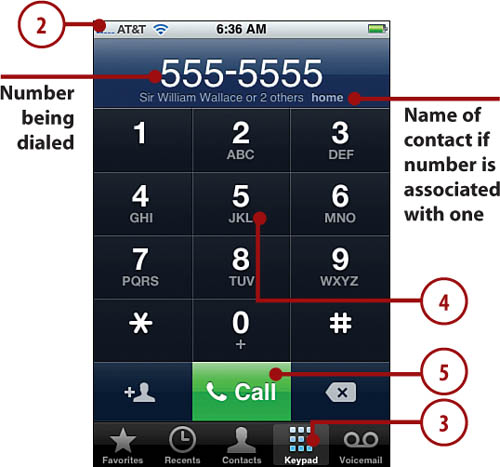
3. Press the Keypad button. The keypad appears if iPhone isn’t already displaying it.
4. Press numbers on the keypad to dial the number you want to call. If you dial a number associated with one or more contacts, you see the contact’s name just under the number.
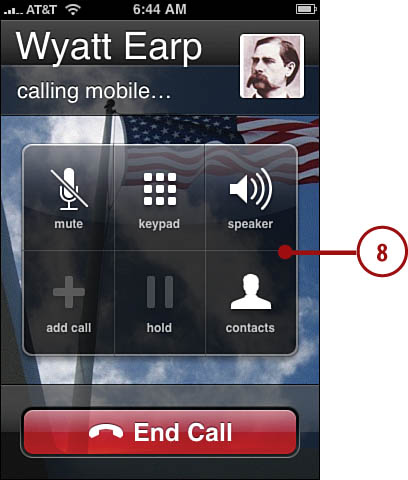
5. Press Call. iPhone dials the number, and the Call screen appears.
6. Use the Call screen to manage the call; see Managing In-Process Calls later in this section for the details.
Dialing with Contacts
iPhone has a complete contact manager so that you can store phone numbers for people and organizations. (You’ll learn how to configure your contacts in Chapter 2, “Managing Contacts.”) To make a call using a contact, follow these steps.
1. On the Home screen, press Phone. You move to the Phone screen.
2. If you haven’t made a call from your current location before, check the signal strength to make sure that you can reach the network. As long as you see at least one bar, you should be able to make and receive calls.
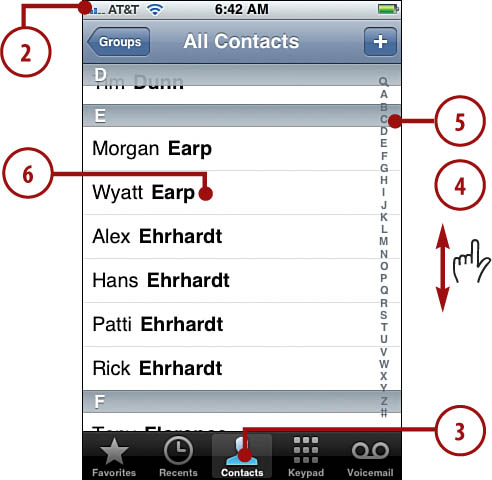
3. Press the Contacts button. The All Contacts screen appears.
4. Drag your finger up and down to browse the list. The faster you drag up or down, the faster you scroll.
5. To jump to a specific section of the list, click a letter on the index.
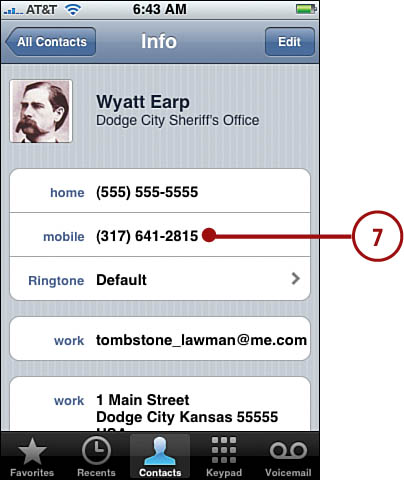
6. When you see the contact you want to call, press it. The contact’s Info screen appears.
7. Press the number you want to dial. iPhone dials the number, and the Call screen appears.
8. Use the Call screen to manage the call; see Managing In-Process Calls later in this section for the details.
Dialing with Favorites
You can save contacts and phone numbers as favorites to make dialing them even simpler. (You learn how to save favorites in various locations later in this chapter and in Chapter 2.)
1. On the Home screen, press Phone. You move to the Phone screen.
2. If you haven’t made a call from your current location before, check the signal strength to make sure that you can reach the network. As long as you see at least one bar, you should be able to make and receive calls.
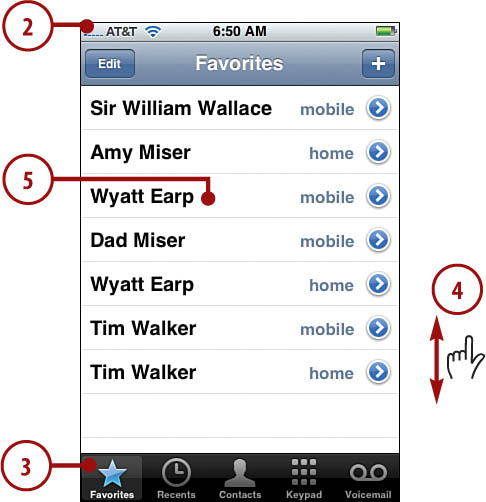
3. Press the Favorites button. The Favorites screen appears.
4. Drag up or down the list until you see the favorite you want to call.
5. Press the favorite you want to call. iPhone dials the number, and the Call screen appears.
6. Use the Call screen to manage the call; see Managing In-Process Calls later in this section for the details.
Dialing with Recents
As you make, receive, or miss calls, iPhone keeps track of all the numbers for you. You can use the recent list to make calls.
1. On the Home screen, press Phone. You move to the Phone screen.
2. As long as you see at least one bar, you should be able to make and receive calls.
3. Press the Recents button. The Recents screen appears.
4. Press All to see all calls.
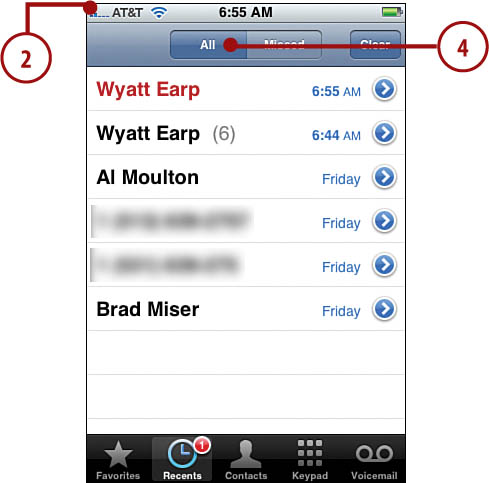
5. Press Missed to see only calls you missed.
6. If necessary, drag your finger up or down the screen to browse the list of calls.
7. To call the number associated with a recent call, press the title of the call, such as a person’s name. iPhone dials the number, and the Call screen appears. Skip to step 11.
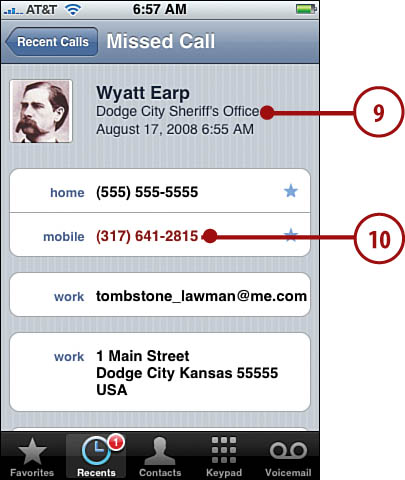
8. To get more information about a recent call, press its Info button.
9. Read the information about the call. For example, if the call is related to someone in your Contacts list, you see detailed information for that contact. The number associated with the call is highlighted in red.
10. Press a number on the Info screen. iPhone dials the number, and the Call screen appears.
11. Use the Call screen to manage the call; see Managing In-Process Calls later in this section for the details.

Going Back
To return to the Recents screen without making a call, press Recent Calls.
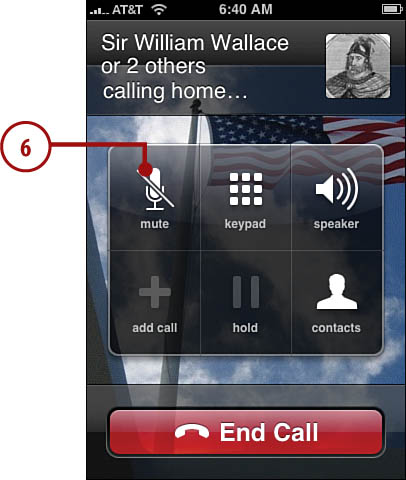
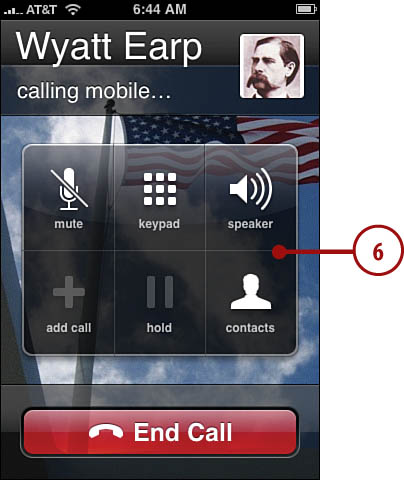
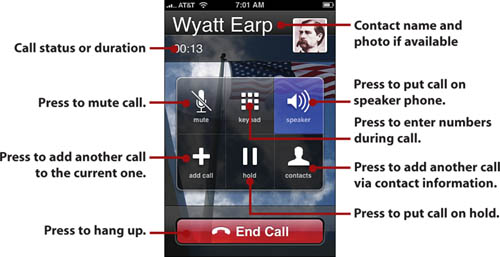
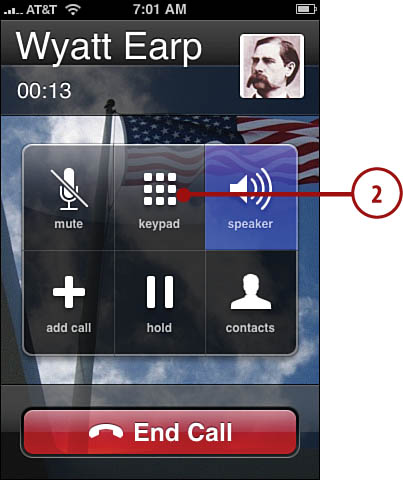
Managing In-Process Calls
When you place a call, there are several ways to manage it. The most obvious is to place iPhone next to your ear and use iPhone like any other phone you’ve ever used. As you place iPhone next to your head, its screen becomes disabled so that you don’t accidentally press onscreen buttons. When you take iPhone away from your ear, the Call screen appears again, and iPhone enables its controls.
If iPhone can’t complete the call for some reason, such as not having a strong enough signal, the Call Failed screen appears. Press Call Back to try again or press Done to give up. When you press Done, you return to the screen from which you came.
Some of the other things you can do while on a call might not be so obvious, as you’ll learn in the next few tasks.
>>>step-by-step
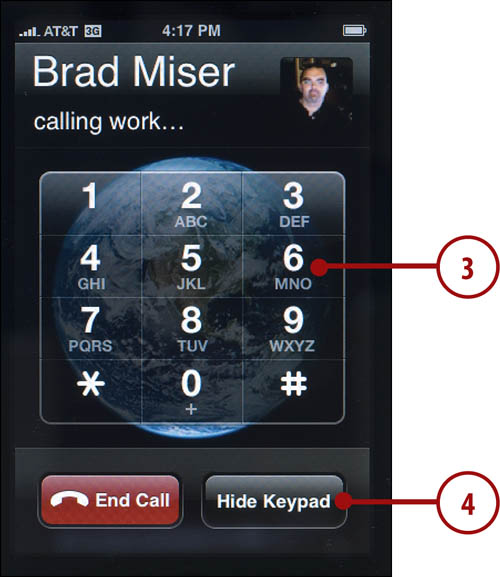
Entering Numbers During a Call
You often need to enter numbers during a call, such as to log in to a voice mail system, access an account, and so on.
1. Place a call using any of the methods you’ve learned so far. The Call screen appears.
2. Press the Keypad button. The keypad appears on the screen.
3. Press the numbers.
4. When you’re done, press Hide Keypad. You return to the Call screen.
Making Conference Calls
iPhone makes it easy to talk to multiple people at the same time. You can have two separate calls going on at any point in time. You can have more calls going on by merging them together.
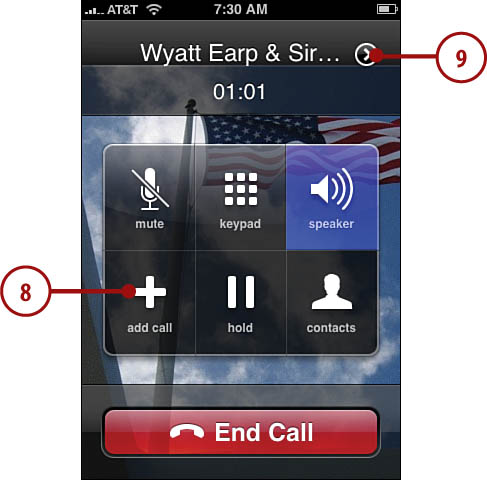
1. Place a call using any of the methods you’ve learned so far. The Call screen appears.
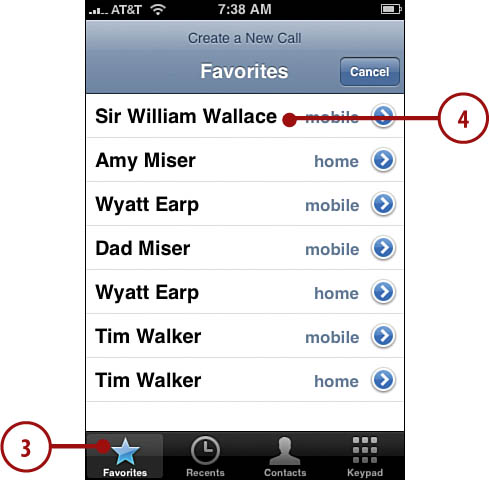
2. Press add call. The Create a New Call screen appears.

Similar but Different
If you press contacts instead of add call, you move directly into the Contacts screen. This might save you one screen press if the person you want to add to the call is in your contacts list.
3. Press the button you want to use to place the next call. Press Favorites to call a favorite, press Recents to use the Recents list, press Contacts to place the call via contacts, or press Keypad to dial the number. These work just as they do when you start a new call.
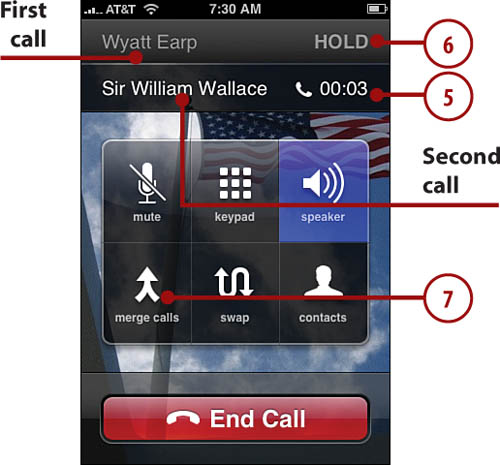
4. Place the call using the option you selected in step 3. Doing so places the first call on hold and moves you back to the Call screen while iPhone makes the second call. The first call’s information appears at the top of the screen, including the word HOLD so that you know the call is on hold. iPhone displays the second call just below that, and it is currently the active call.
5. Talk to the second person you called; the first remains on hold.
6. To switch to the first call, press it on the list. This places the second call on hold and moves it to the top of the call list, while the first call becomes active again.
7. To join the calls so that all parties can hear each other, press merge calls. iPhone combines the two calls, and you see a single entry at the top of the screen to reflect this.
Merging Calls
As you merge calls, iPhone attempts to display the names of the callers at the top of the Call screen. As the text increases, iPhone scrolls it so that you can read it. Eventually, iPhone gives up and replaces the names with the word Conference.
8. To add another call, repeat steps 2 though 4. Each time you merge calls, the second line becomes free so that you can add more calls.
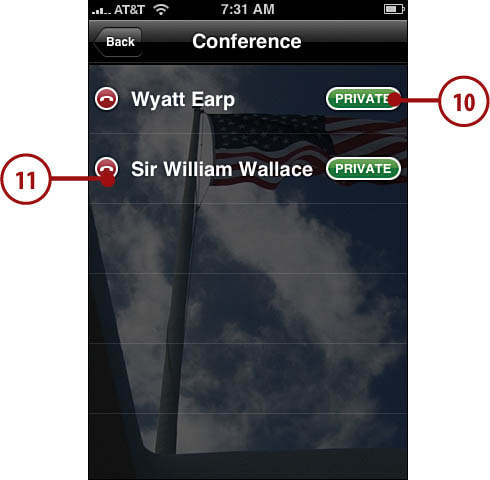
9. To manage a conference call, press Conference or the names shown at the top of the screen. The Conference screen appears.
10. To speak with one of the callers privately, press Private. Doing so places the call on hold and returns you to the Call screen showing information about the active call. You can merge the calls again by pressing merge calls.
11. To remove a call from the conference, press the unlock button. The END CALL button appears.
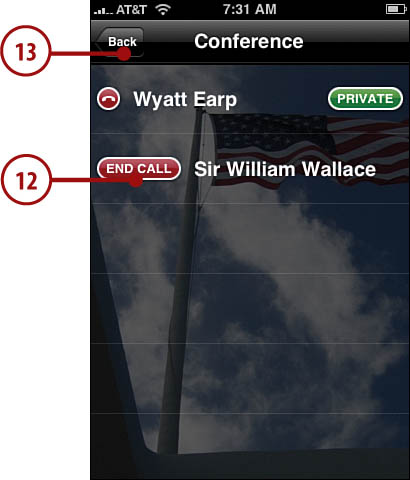
12. To remove a caller from the call, press END CALL. iPhone disconnects the caller from the conference call. You return to the Call screen and see information about the active call.
13. To move back to the Call screen, press Back. You move to the Call screen and can continue working with the call, such as adding more people to it.
Swap’Em Out
You can also swap calls by pressing the Swap button.
14. To end the call for all callers, press End Call.
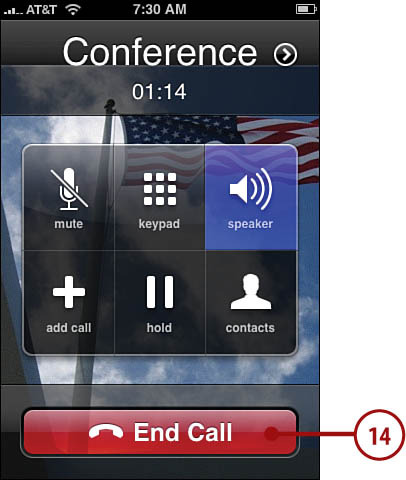
Time Multiplier
When you have multiple calls combined into one, the minutes for each call continue to count individually. So if you’ve joined three people into one call, each minute of the call counts as three minutes against your calling plan.
Receiving Calls
Receiving calls on iPhone enables you to access the same great tools you can use when you make calls, plus a few more for good measure.
Answering Calls
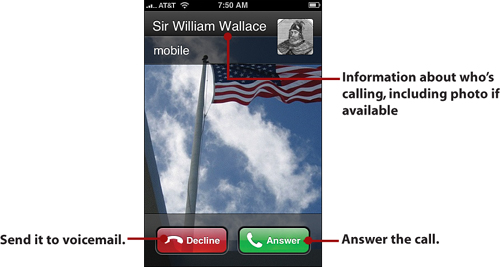
When iPhone rings, it’s time to answer the call—or not. If you configured the ringer to ring, you hear the general ringtone or one associated with the caller when a call comes in. If vibrate is turned on, iPhone vibrates whether the ringer is on or not. And if those two ways aren’t enough, a message appears on iPhone’s screen to show you information about the incoming call.
If iPhone is locked when a call comes in, drag the slider to the right to answer it.

When you receive a call, you have the following options:
• Answer Press Answer to take the call. You move to the Call screen and can work with the call like one you placed from iPhone. For example, you can add a call, merge calls, place the call on hold, end the call, and so on.
• Decline If you press Decline, iPhone immediately routes the call to voicemail. You can also decline a call by pressing the Sleep/Wake button twice quickly on iPhone’s top.
• Silence a call To silence the ringer without sending the call to voicemail, press the Sleep/Wake button on iPhone’s top once or press either the upper or lower part of the Volume button on iPhone’s left side. The call continues to come in, and you can answer it even though you shut the ringer off for the call.
Silencio!
To turn iPhone’s ringer off temporarily, slide the Ringer switch located above the Volume switch on iPhone’s left side toward the back so that the red dot appears. The no-ringer icon (a bell with a slash through it) appears on the screen to let you know that you turned the ringer off. To turn it back on again, slide the switch toward iPhone’s front. The bell icon appears on the screen to show you that the ringer is active again. To set the ringer’s volume, use the Volume switch on iPhone’s left side when you aren’t in a call and aren’t listening to music or video via its iPod functions.
Answering Calls When You’re Already on a Call
As you saw earlier, iPhone can manage multiple calls at the same time. If you are on a call and another call comes in, you have a number of ways to respond.
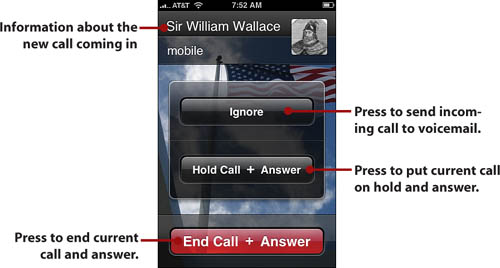
• Decline Press Ignore to send the incoming call directly to voicemail.
• Place the first call on hold and answer the second Press Hold Call + Answer to place the current call on hold and answer the second one. After you do this, you can manage the two calls just as when you called two numbers from iPhone. For example, you can place the second call on hold and move back to the first one, merge the calls, add more calls, and so on.
• End the first call and answer the second Press End Call + Answer to terminate the active call and answer the incoming call.
Auto-Mute
If you are listening to music or video, the iPod function automatically pauses when a call comes in. When the call ends, the music or video picks up right where it left off.
Managing Calls
You’ve already learned most of what you need to know to use iPhone’s cell phone functions. In the following sections, you learn the rest.
>>>step-by-step
Working with Missed and Recent Calls
You can use iPhone’s Recents list to get information about the calls you’ve made with iPhone, well…recently. This includes both calls that were completed and calls that were missed.
1. On the Home screen, press Phone. You move to the Phone page. At the bottom of the screen, on the Recents button, you see an indicator if you missed any calls since you last looked at the list, along with the number that you missed.
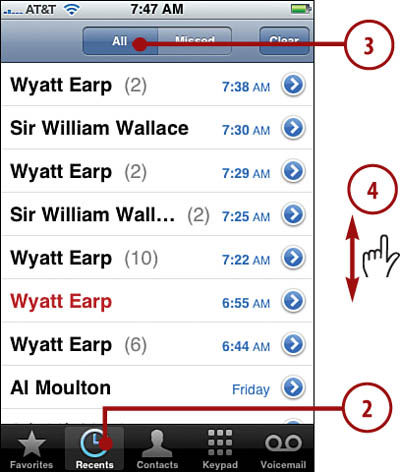
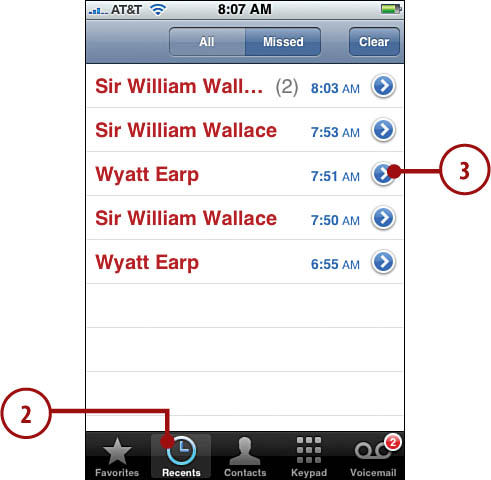
2. Press Recents. The Recents list appears.
3. Press All to see all recent calls, including those you’ve made, those you’ve answered, and those you’ve missed. iPhone highlights calls you missed in red. For each call, you see who made it and the time at which the caller made it.
4. Drag your finger up and down the list to scroll it.
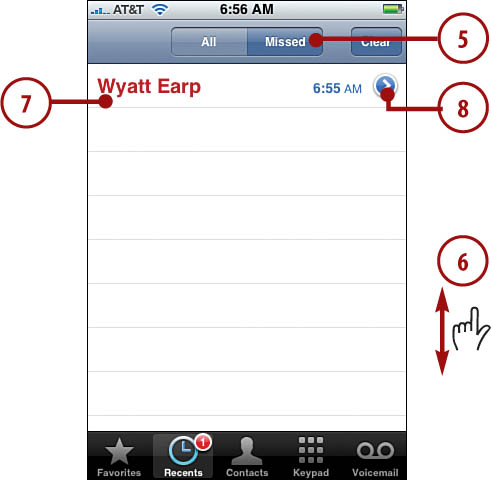
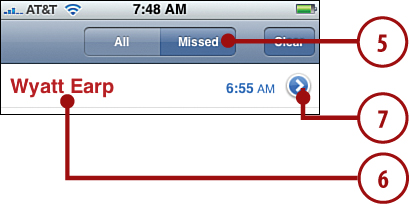
5. To see only missed calls, press Missed. The list reduces to show only missed calls.
6. To return a call, press the contact associated with the call.
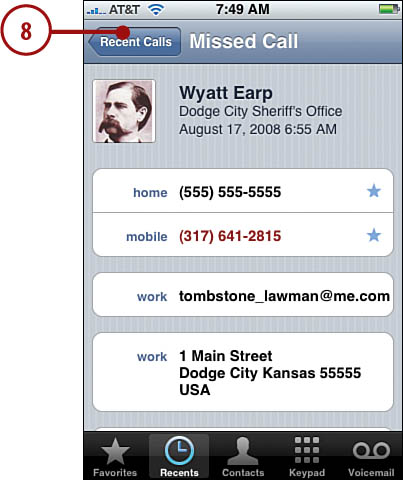
7. To get more information about a missed call, press its Info button (if you press the number you’ll call it instead). The Info screen appears. Here you see a variety of information about the call, such as who made it, the time at which the caller placed the call, and contact information for the person making the call if that information resides on your contacts list. The number from which the call came shows in blue. You can dial any number shown by pressing it.
8. To return to the Recents list, press Recent Calls.
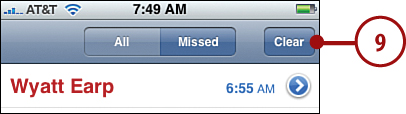
9. To clear the list, press Clear.
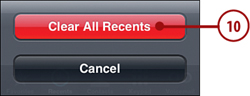
10. Press Clear All Recents. The Recents list is reset.
Adding Caller Information to Favorites
Earlier you learned how simple it is to place calls to someone on your favorites list. There are a number of ways to add people to this list, including adding someone who has called you.
1. On the Home screen, press Phone.
2. Press Recents. The Recents list appears.
3. Press the Info button for the person you want to add to your favorites list. The Info screen appears. If the number is associated with a contact, you see that contact’s information.
4. Press Add to Favorites (you may have to scroll down the screen to see this button). If the person has multiple numbers associated with his contact information, you see each available number. Numbers that are already set as favorites are marked with a blue star.
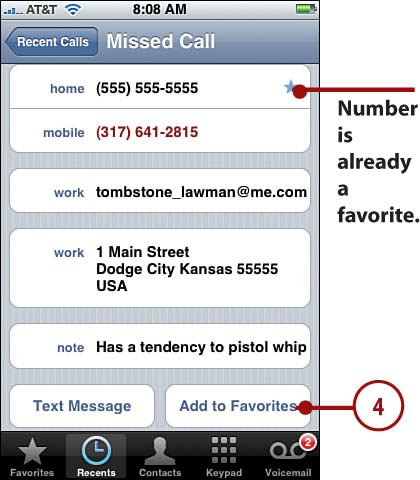
5. Press the number you want to add as a favorite. You return to the Info screen, and the number is marked with a blue star to show that it is on your favorites list.
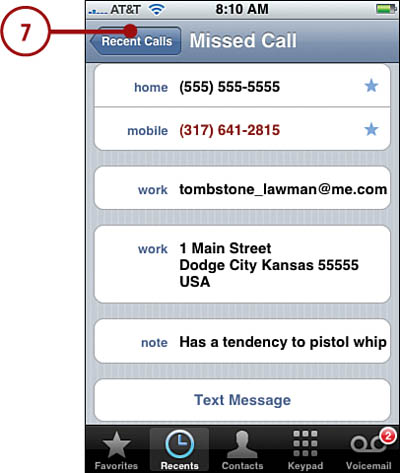
6. Repeat step 5 to add the contact’s other numbers to the favorites list if you want to. If all the numbers are assigned as favorites, the Add to Favorites button disappears.
7. Press Recent Calls. You can call the favorite by pressing the Favorites button and pressing that favorite on the list.
Using iPhone’s Headset for Calls
iPhone includes a set of earbud headphones with a microphone on one of its cords. The mic includes a button that you can use to do the following:
• Answer Press the mic button once to answer a call.
• End a call Press the mic button while you are on a call to end it.
• Decline a call Press and hold the mic button for about two seconds. Two beeps sound when you release the button to let you know that iPhone sent the call to voicemail.
• Put a current call on hold and switch to an incoming call Press once and then press again.
• End a current call on hold and switch to an incoming call Press once and hold for about two seconds. Release the button and you hear two beeps to let you know that you ended the first call. The incoming call is ready for you.
Ringing
When you have headphones plugged into iPhone and you receive a call, the ringtone plays on both the iPhone’s speaker and the headphones.
Using Visual Voicemail
Visual voicemail just might be the best of iPhone’s many great features. No more wading through long, uninteresting voicemails to get to one in which you are interested. You simply jump to the message you want to hear. And because voicemails are stored on iPhone, you don’t need to log in to hear them. If that isn’t enough for you, you can also jump to any point within a voicemail to hear just that part.
>>>step-by-step
Recording a Greeting
The first time you access voicemail, you are prompted to record a voicemail greeting. Follow the onscreen instructions to do so. You can also record a new greeting at any time.
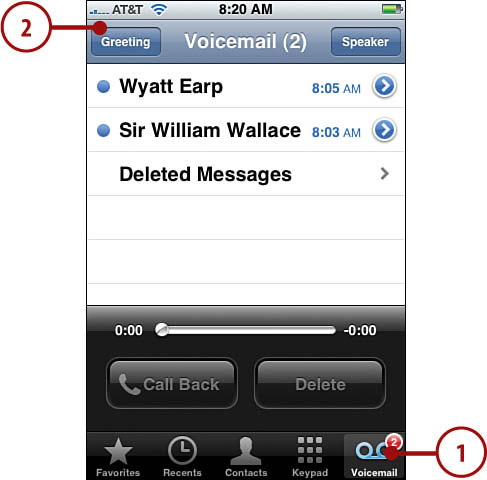
1. Move to the Phone screen and press Voicemail. The Voicemail screen appears.
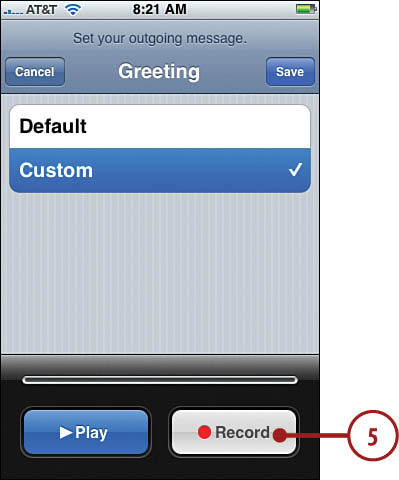
2. Press Greeting. The Greeting screen appears.
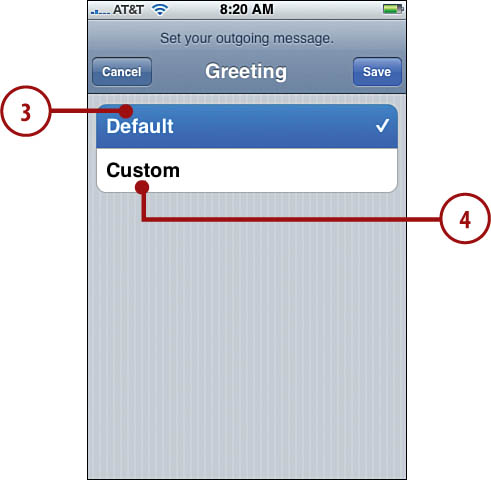
3. To use a default greeting that provides only the iPhone’s phone number, press default.
4. To record a custom greeting, press Custom. The Record tool appears.
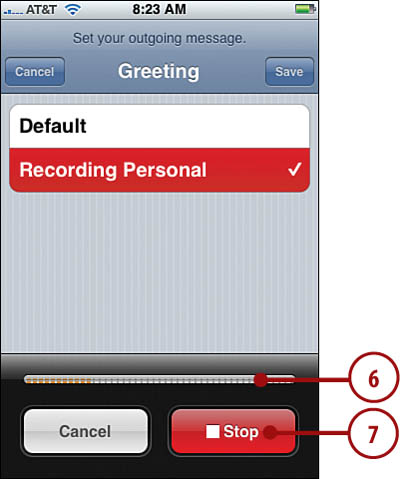
5. Press Record. The Recording Personal message appears, and recording begins.
6. Speak your greeting. As you record your message, monitor the sound level using the gauge at the bottom of the screen. You should attempt to keep the volume level of your greeting at the midpoint of the gauge.
Missing Password
If something happens to the password stored on iPhone for your voicemail, such as if you restore iPhone, you are prompted to enter your password before you can access your voicemail. Do so at the prompt and press OK. iPhone logs you in to voicemail, and you won’t have to enter your password for a second time unless something happens to it again.
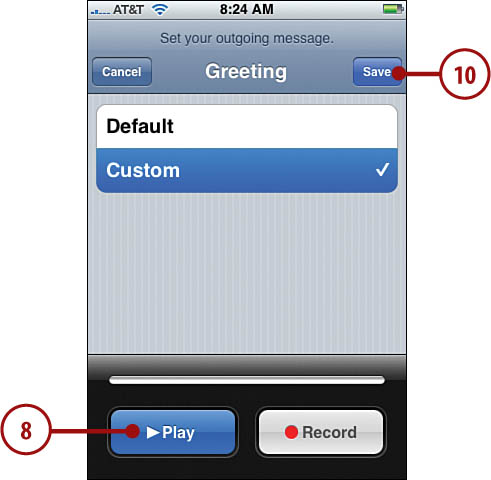
7. When you’re done, press Stop. The Play button becomes active.
8. Press Play to hear your greeting.
9. If you aren’t satisfied, repeat steps 5 through 8 to record a new message. You can only replace a recorded greeting; you can’t change it.
10. When you are happy with your greeting, press Save. iPhone saves the greeting and returns you to the Voicemail screen.
Listening to and Managing Voicemails
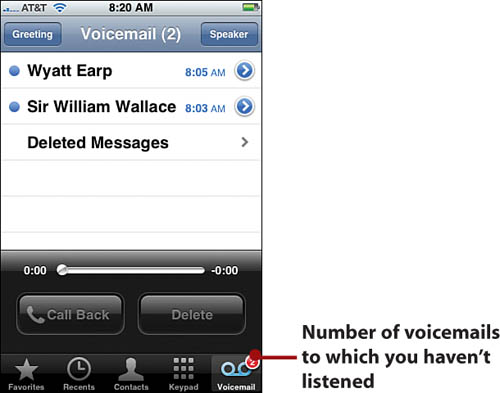
Unless you turned off the voicemail sound, you hear a tone each time a caller leaves a voicemail for you. In the Voicemail button on the Phone screen, you also see the number of new voicemails you have. (New is defined as those voicemails to which you haven’t listened.)
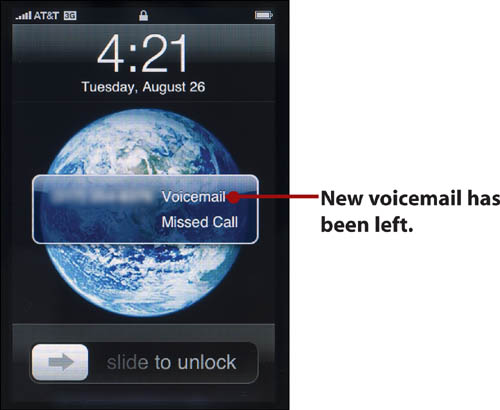
If you receive a voicemail while iPhone is locked, you see a message on the screen alerting you that iPhone received a voicemail. Drag the slider to the right to jump to the Voicemail screen so that you can work with the message.
>>>step-by-step
Finding and Listening to Voicemails
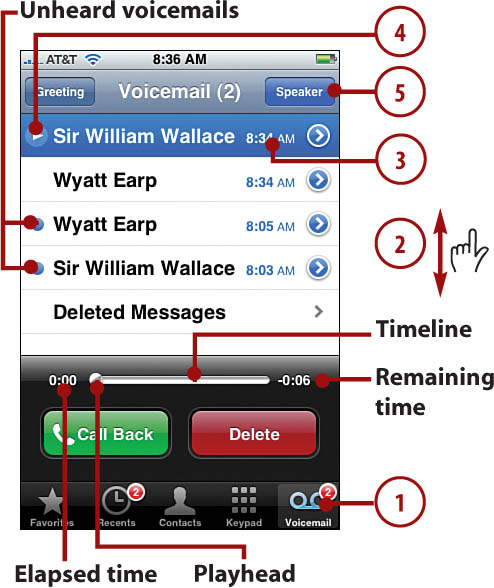
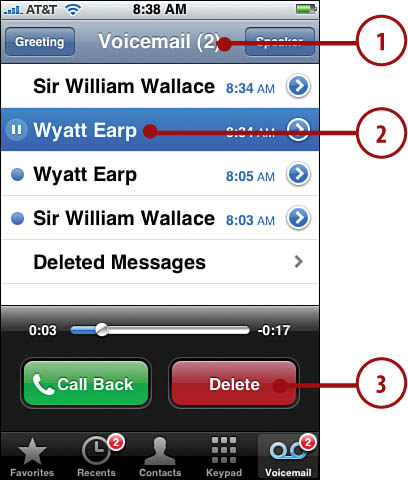
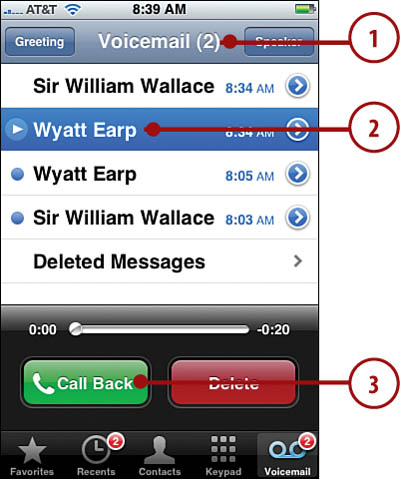
1. Move to the Phone screen and press Voicemail. You see the Voicemail screen. The list contains each voicemail you’ve received. If iPhone recognizes the person who left the message because the number is on your contacts list, it shows the caller’s name. If the number isn’t recognized, you see the number itself. You also see the time at which the caller left the message. Messages to which you haven’t yet listened are marked with a blue dot.
2. Browse the list of voicemails.
3. To listen to a voicemail, press it. It becomes highlighted to let you know that it is the active voicemail message.
4. Press the message for a message you haven’t listened to before or press the Play button for messages you have heard previously. It begins to play. As it does so, the Playhead moves along the Timeline so that you can see where you are in the message.
5. To hear the message on iPhone’s speaker, press Speaker.
6. To pause a message, press its Pause button.
7. To move to a specific point in a message, drag the Playhead to the point at which you want to listen.
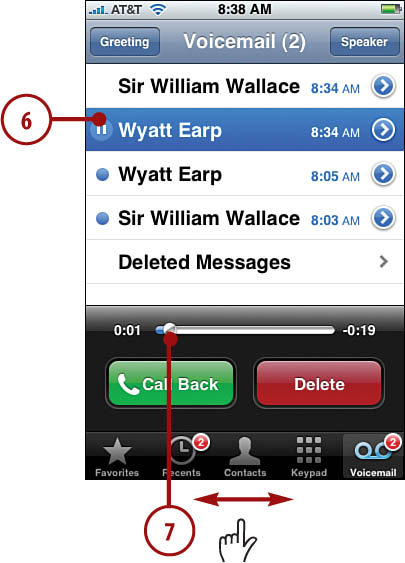
You can also drag the Playhead while a message is playing to rewind or fast-forward it. This is also helpful when you want to listen to specific information without hearing the whole message again.
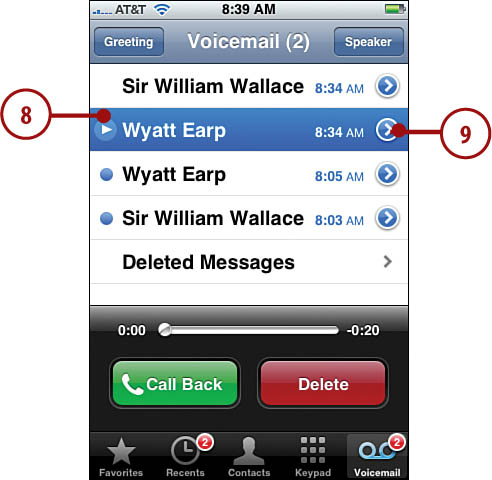
8. Press the Play button next to the voicemail you want to hear. The message plays from the Playhead’s location.
9. To get more information about a message, press its Info button. The Info screen appears. If the person who left the message is on your contacts list, you see her contact information.
10. To return to the Voicemail screen, press Voicemail.
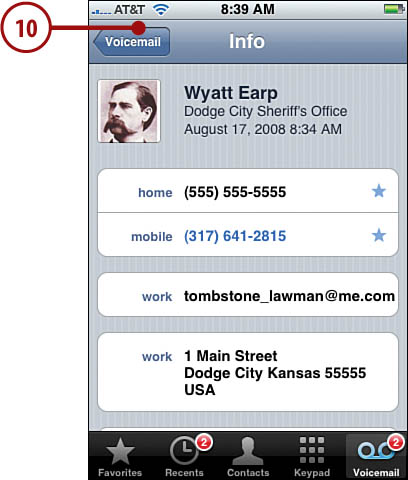
More than Information Only
Much of the information on the Info screen is active, meaning that you can press it to do something. For example, to call a listed number, press it. To send an email, press an email address. To visit a website, press its URL.
If you deal with lots of voicemails, iPhone solves two annoyances for you. (Well, they’re annoyances to me anyway.) The first annoyance involves people who speak too quickly or unclearly when they leave information you need, such as a phone number. With regular voicemail, you have to play the whole message just to hear the information you need. With iPhone, you can drag the Playhead to the point in the message containing the information of interest to hear it as many times as you need.
The other annoyance is dealing with long voicemails. Because iPhone shows you how long each message is, you can decide to listen to a message based on how long it is. And, of course, you see who each message is from, so you can prioritize messages to listen to as you see fit.
>>>step-by-step
Deleting Voicemails
1. Move to the Voicemail screen.
2. Press the message you want to delete to select it.
3. Press Delete. iPhone deletes the message, the Deleted Messages option appears (the first time you delete a message), and the next message on the list plays.
Listening to and Managing Deleted Voicemails
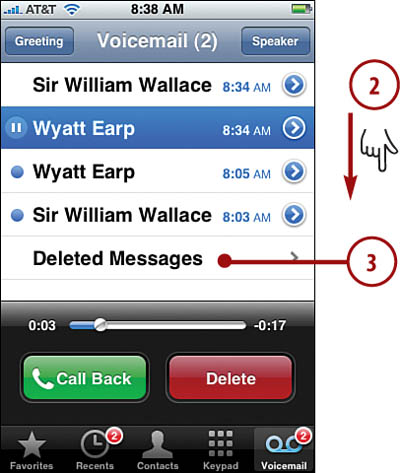
1. Move to the Voicemail screen.
2. Scroll down the screen until you see the Deleted Message options.
3. Press Deleted Messages. The Deleted screen appears.
4. Listen to any deleted messages just as you do on the Voicemail screen.
5. To move a message back to the Voicemail screen, select it.
6. Press Undelete. iPhone restores the message to the Voicemail screen.
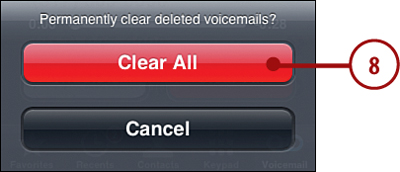
7. To remove all deleted messages permanently, press Clear All.
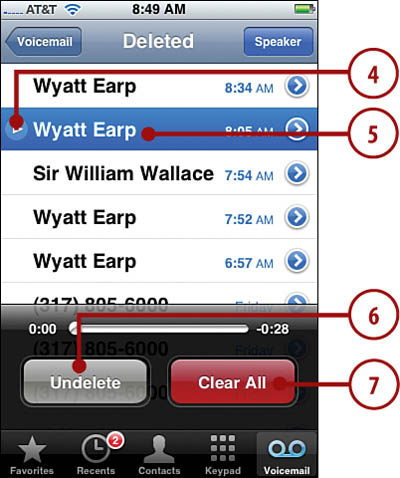
8. Press Clear All at the prompt. iPhone erases the deleted messages and returns you to the Deleted screen.
9. To return to the Voicemail screen, press Voicemail.
What’s Missed
In case you’re wondering, iPhone considers any call you didn’t answer as a missed call. So if someone calls and leaves a message, that call is included in the counts of both missed calls and new voicemails.
Returning Calls
1. Move to the Voicemail screen.
2. Press the message for which you want to return a call.
3. Press Call Back. The number associated with the message is called.
Changing Your Voicemail Password
1. Move to the Settings screen.
2. Press Phone. The Phone screen appears.
3. Press Change Voicemail Password. The Password screen appears.

4. Enter your current password.
5. Press Done.

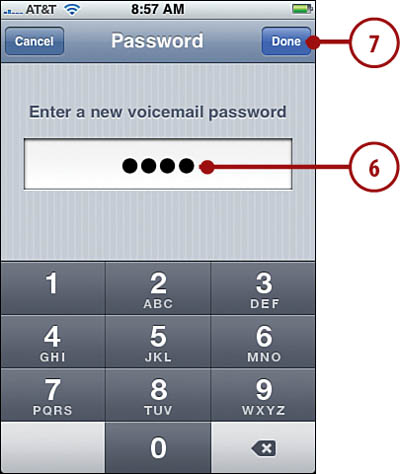
6. Enter the new password.
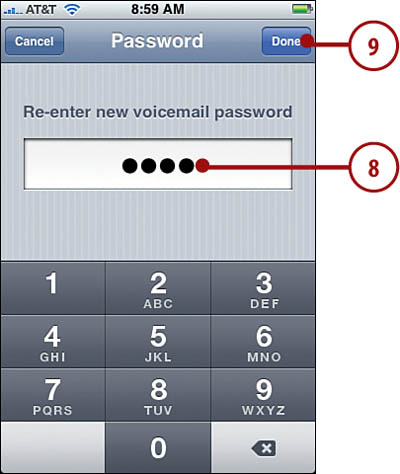
7. Press Done. The screen refreshes and prompts you to re-enter the new password.
9. Press Done. iPhone saves the new password and returns you to the Phone screen.
Getting Information About Your Cell Account
One area in which iPhone is like other cell phones is that you have an account with a service provider—in the United States, this is AT&T. You can use iPhone to get information about your account and to log in to it via the Web.
>>>step-by-step
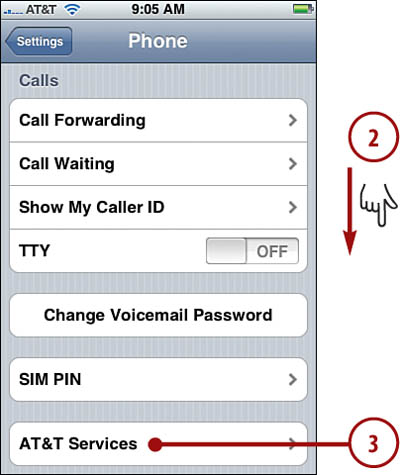
1. Move to the Phone settings screen.
2. Scroll down until you see AT&T Services.
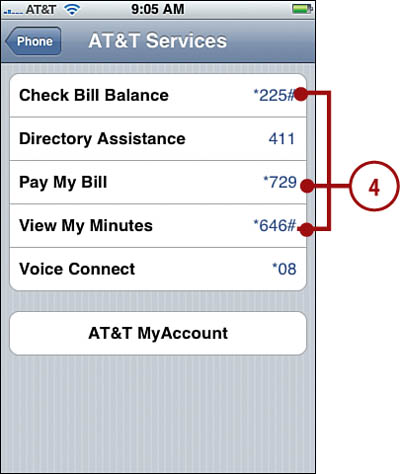
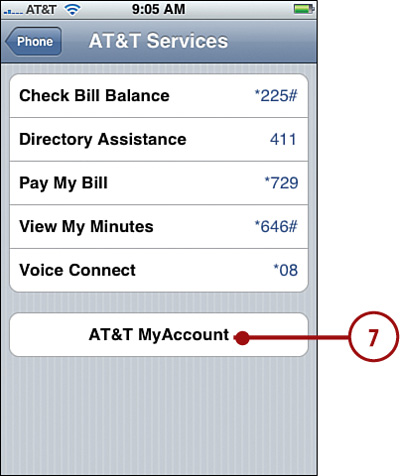
3. Press AT&T Services. The AT&T Services screen appears.
4. Press the action you want to perform, selecting one the following:
• Check Bill Balance
• Directory Assistance
• Pay My Bill
• View My Minutes
• Voice Connect
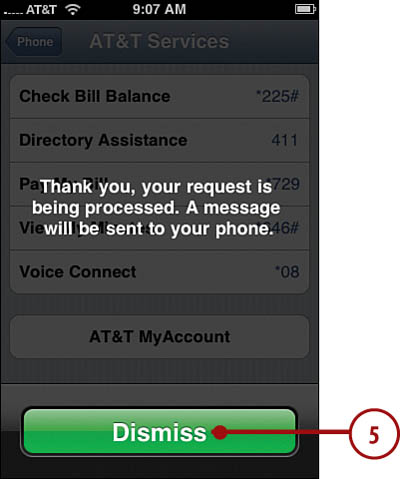
5. Respond to the message that appears on the screen. The particular result depends on the action you select. For example, if you select View My Minutes, you see a note explaining that a message will be sent to your phone. Press Dismiss to clear the message.
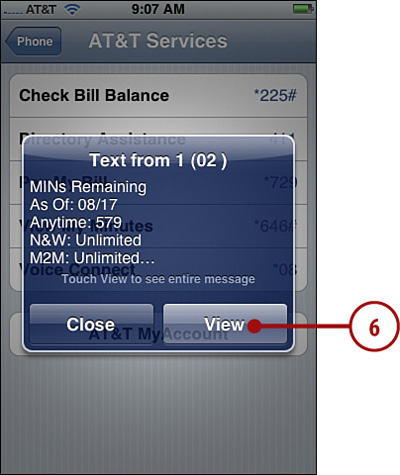
6. Read any messages you receive as the result of the action you selected by pressing them when they appear on the screen.
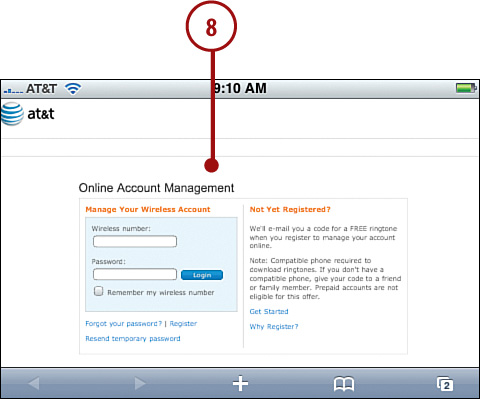
7. Back on the AT&T Services screen, press AT&T MyAccount. You move to Safari, and then AT&T’s website opens.
8. Use the website to access your account information. Chapter 6, “Surfing the Web,” covers using Safari on iPhone.