
6 Hardcopy: Using a Paper Planner
In this chapter
![]() Learn how to choose a planner that is right for you
Learn how to choose a planner that is right for you
![]() Understand how to use your paper planner effectively
Understand how to use your paper planner effectively
![]() Learn how to coordinate your handheld with your planner
Learn how to coordinate your handheld with your planner
Electronic planning tools are not for everyone; if you like the look and feel of paper, then a paper planner/time management tool might be best for you. Some individuals like to use their trusty paper planners along with a handheld device. Thankfully, there are options for everyone.
The key to success with any time-management tool is consistency. If you determine to track your meetings and appointments in your paper planner and your contacts electronically, then remember to enter that information consistently in those locations. You’ll run into problems if you record information about appointments, contacts, and action items in multiple places with no consistent plan for coordinating it. When this data becomes scattered and fragmented, tracking, organizing, and planning your day become difficult.
This chapter discusses how to use a paper planner effectively. To help you choose from among the many paper planner styles and designs, we discuss which format and size might be best for your needs. Because you can use your planner for much more than a calendar, we’ll also look at all the other day-to-day information you can track in it. Many individuals cannot seem to function without their planners and would like to integrate them with a handheld or a contact management (CM) or personal information management (PIM) device. In this chapter, we discuss the best way to approach integrating electronic and paper planners.
To do list

![]() Determine the best size planner for you.
Determine the best size planner for you.
![]() Choose a calendar page format for your planner.
Choose a calendar page format for your planner.
![]() Choose and set up note pages and sections in your planner.
Choose and set up note pages and sections in your planner.
Paper planners are available both online and in office supply stores, and they come in a number of sizes, styles, and formats. Most planners are designed in a loose-leaf binder format, which makes customizing the planner to best suit your needs easy—an advantage not found in prebound planners. Paper planner pages are available in a wide variety of formats and layouts, so you can choose how you want to view your work week, daily appointments, contact information, and so on. The size of your planner also is important, and you can choose from among a large assortment here, as well. The size, color, materials, and page layout of your planner will determine how well it works for you and how likely you are to use it consistently. Before you purchase any planner, binder, or filler, ask yourself these questions:
• What kinds of information do I want to track in the planner, and is this format appropriate for that purpose?
• Does it have enough space and room to write the data I would like to capture?
• Will I use this kind of planner?
• Will I carry the planner with me?
• Is the planner’s design appropriate to take to business meetings and appointments?
As I said, you have plenty of paper planners to choose from, so be sure you find one for which can answer “yes” to all these questions. The following sections talk about some of the variations you’ll find in planner size and page layout to help you begin to narrow your choices.
In choosing a planner, the first consideration is size. For time management tools to be effective, it is best if you carry your planner with you to meetings, to appointments, and out of the office. Therefore, it is important to have a size and weight that fits conveniently in your briefcase or bag. If your planner is too large, you might be reluctant to carry it with you, and therefore you won’t use it effectively. If the planner is too small, you will find it hard to write—and read—the information you record in it. One of the main reasons individuals end up not using the paper planner they’ve purchased is because the planner wasn’t the right size, so take care to choose a size that works best for you.
Although you can find planners in a variety of sizes, these three sizes are standard for paper planners:
• Desktop—The larger size, or desktop, paper planner is about 8″ × 11″, or the size of a standard piece of paper. This size is good for individuals who take a lot of daily notes and like to write on full sheets of paper. The larger size has enough space to write ample notes about calendar items, to-dos, and other events throughout the day. Because this is a standard paper size, you easily can add correspondence, memos, and other loose papers to your planner simply by using a three-hole punch on the documents. This is especially convenient for securing separate papers you need with you at meetings, at appointments, for projects, and so on. Because this size planner is larger and usually heavier to carry, I only recommend it for individuals who need to track a lot of information and are not in their offices or near a computer regularly. If you do purchase a desktop planner, you might consider getting a binder case that has a handle on it so you can carry it separately.
• Classic—The medium, or classic, size paper planner is usually about 5″ × 7″ and is similar to a small writing tablet. This size planner fits easily into a briefcase or bag, yet it’s still large enough to give you room to write a good amount of daily notes. You can carry standard-sized paper in the planner by folding sheets in half and inserting them between regular planner pages. If you want to secure loose documents in the binder, you’ll need to purchase a separate custom hole punch that matches the binder’s size and ring configuration. This size planner is best for individuals who will be tracking all their day-to-day information in their planners and don’t use an electronic CM or PIM software. It is also good for individuals who really want to track daily notes or phone calls on a calendar page.
• Pocket—The small, or pocket, size planner is about 3″ × 5″ and can fit into a small purse, bag, or suit pocket easily. This size is good if you want something light and easy to carry and don’t need to record lots of appointment details or notes. This size isn’t a good choice if your day is made up of a series of brief, back-to-back appointments; if you like to keep notes alongside your appointments; or if you want to carry a lot of loose papers and documents in your planner. This size is recommended only if you need a very basic calendar, task list, and address book.
With most paper planners, you can customize pages and inserts to fit your work needs. Most loose-leaf planners include inserts for calendar pages, address book and contact information pages, and notes pages. Most planner fillers also come bundled with other inserts, including reference information such as time zones, maps, dialing codes, and so on.
tip
Pocket-size planners are also good for individuals who have handhelds and want a basic calendar and note pages to carry with their handheld. It is much easier to view a monthly calendar in the pocket-size planner than on the handheld itself. It is also handy to track a few handwritten notes you might not want to enter into your handheld.

Many times, people buy planner inserts that they hope will be useful organizational tools, only to find that they just don’t use them. Before you purchase additional pages and inserts, make sure you have a need for the types of space and information they offer. For example, if you track your contacts in a desktop flip-through card filer or handheld device, you might not need address book pages in your paper planner. If you determine that you would rather have your contacts in your planner, however, you might want to purchase address book pages and then transfer contact information into your paper planner.
How about your handwriting? If you write in large letters and like to have a lot of space to record information and notes, consider purchasing pages with ample blank space and note space. If you don’t write many daily notes and have smaller handwriting, you will probably be fine with a limited notes area.
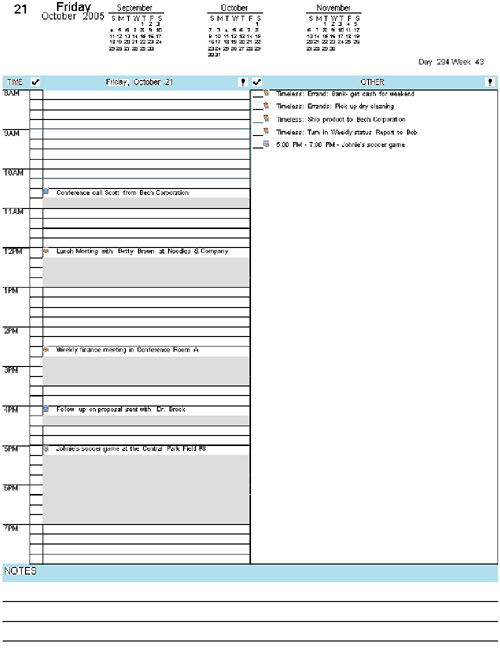
Most planners have either a one- or two-page format for daily, weekly, and monthly calendar pages. Individuals who have many daily appointments and like to write daily notes tend to purchase the daily page format. The daily two-page view is convenient for capturing all the information for that day in one place. You can use the right side page for appointments and action items; the left side page is usually blank so you can write phone messages, meeting notes, and all the other information received that day. The two-column page per day also provides a notes area, as shown in Figure 6.1. Having this page format can eliminate the need to track information in spiral tablets, note pads, sticky notes, or other small pieces of paper.
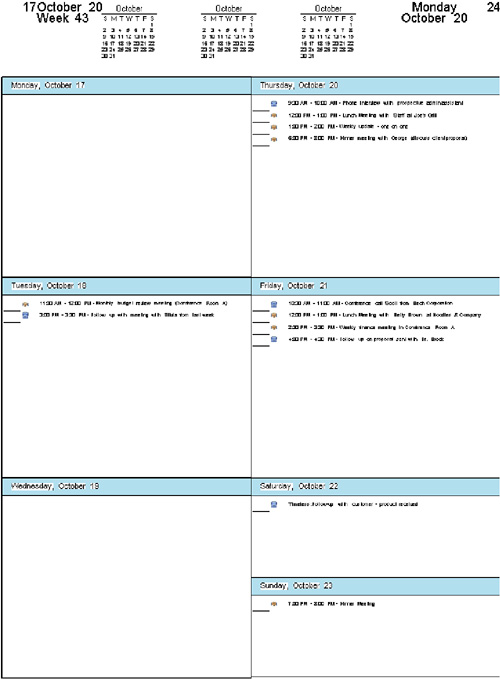
If you don’t have a lot of weekly meetings and appointments (maybe only one or two per day) and like to view a week at a glance, you probably should get weekly view pages. I suggest purchasing the two-page format to give you enough room to write appointments and tasks without the pages looking too cluttered, as shown in Figure 6.2.
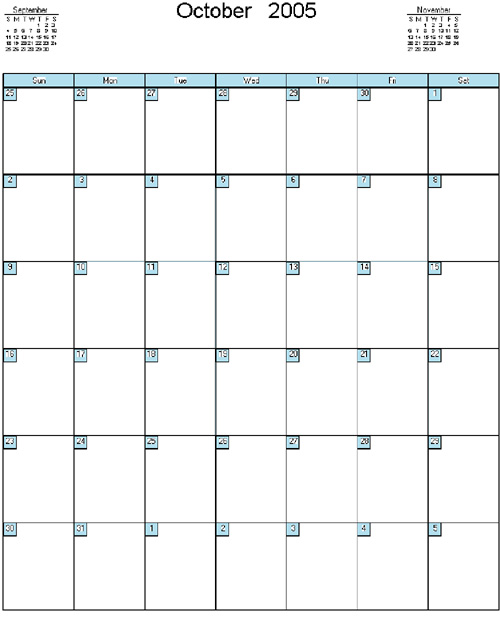
Monthly view pages, as shown in Figure 6.3, are nice to use in conjunction with daily or weekly pages. If you don’t have many appointments, you might only need a monthly two-page view format. If you do choose to use the monthly format only, I suggest purchasing one that is at least 5″ × 7″ or bigger in size. This size gives you room to record appointments and take limited notes. If all you really need is a paper-based monthly calendar, then the smaller size will do fine.
If you want your paper planner to be your primary address book, purchase address pages that allow 2″ per contact to capture all the data for that person. I also suggest purchasing plastic business card holding pages and placing one plastic sheet between each alphabetical tab. That way, as you receive business cards, you can merely insert them into your address book. If you use a standard desktop business/address card filer as your primary system for your contacts and business cards, you might only need basic address pages in your planner to write down the frequent contacts you call.
All sorts of note pages are available. Note pages can be plain or lined; other note pages are designed to track specific information such as meeting notes, projects, birthdays, task lists, phone calls/messages, and goals. You can use the preprinted pages to track this type of information or create your own lists using blank paper.
Most notes sections include tabbed dividers, which you can use to categorize and organize your notes. Creating notes sections helps you record and find information easily. Here are some of the sections you might use in your planner:
• Projects—Create a section for each major project that you have. You can keep important reference information, such as a project calendar or timeline, in this section. You can also track and store project meeting notes.
• Meetings—Create a section for each type of regular meeting you attend. Insert blank lined pages, and use them to track and keep meeting notes.
tip
Be sure to date the top of each page of notes you keep in any of the notes sections of your planner. This way, when the next meeting or associated event occurs, you easily can find the notes from the previous meeting or event. Some individuals use their paper planners solely as a meeting notebook.
• Clients—Create a section for each of your clients. Then, all the phone communications, tasks, and meetings you have with each client are tracked and inserted into their designated sections. Creating client sections provides a notes and history section to track the status of each client’s account and correspondence. If you have multiple clients, you can separate sections into broader categories such as by region or in an alphabetical range.
• Departments and Colleagues—If you participate in projects or other ongoing activities with a number of departments or colleagues, you can create sections for each of them and use those sections to track your progress and activities. Track the action items that each person or department has committed to, the meeting notes, and updates. When you need to follow up with that person or department, you have all the historical information in one section to review.
• Reference—Create sections for different types of reference that would be useful to have with you, such as schedules, phone lists, group calendars, maps, travel information, websites, and so on.

When you need to insert documents into this section, take the time to use your hole punch and insert them securely in your planner. This makes the information easily accessible and also ensures that the loose paper does not fall out of your planner. A little bit of time spent securing documents in the planner will save you a lot of time down the road when you don’t have to search or backtrack for missing information.
Paper Planner Recommendations

The following is a list of recommended paper planner manufacturers. You can order and learn more information about each product online:

• AT-A-GLANCE (www.at-a-glance.com)—The company began making desk calendars back in 1924. It has a broad range of calendars and day planners available at most office supply stores.
• ClickBook (www.bluesquirrel.com/clickbook)—ClickBook is a software that allows you to design and customize your own paper planner using various layout designs.
• Day Runner (www.dayrunner.com)—You can order Day Runner products on its website or through your local office supply store. Its planner products are in a loose-leaf format and fit in ring binder notebooks.
• Day-Timer (www.daytimer.com)—One of the leading manufacturers of day planners, it offers a variety of pages, formats, and sizes. Day-Timer also has a nice online wizard that helps you create your own customized planner.
• Digital Women (www.digital-women.com/daily planner)—The Digital Women website provides free downloadable daily planner pages. These pages specifically track a wide range of information for the office and home.
• FranklinCovey (www.franklincovey.com)—FranklinCovey is one of the pioneers in time management systems and products. Its products are available online or through its retail stores.
• Planner Pads Company (www.plannerpads.com)—The Planner Pad is a prebound, one-page weekly view day planner. The planner has designated areas for a task list, projects, and daily appointments. This planner is standalone and cannot be customized with additional pages.
![]() Create a standard location for your paper planner on your desk.
Create a standard location for your paper planner on your desk.
![]() Carry your planner with you to meetings and appointments.
Carry your planner with you to meetings and appointments.
![]() Create and follow a consistent method for tracking information.
Create and follow a consistent method for tracking information.
![]() Use codes and standard naming methods for appointments and tasks.
Use codes and standard naming methods for appointments and tasks.
![]() Designate a specific location for loose paper in your planner.
Designate a specific location for loose paper in your planner.
Ideally, your day planner should always be located at your fingertips. If not, the information you need to track will be kept in your head or scribbled on pieces of paper; some of it will be unavailable when you need it, and some information will be lost entirely. You’ll save time and effort by making a habit of always having your planner with you and avoiding the problems of finding and tracking information you gathered while away from your planner. Utilize your planner effectively by writing down information instantly when you receive it. After you write it down, you can forget it—no need to reenter it and no need to remember it. Your data is now safely in the appropriate area for you to retrieve and access it when you need it.
Like any organizing tool, a paper planner is only as good as the system for using it. If you determine that a paper planner is better for you than an electronic option, I recommend that you use it consistently.
Here are a few guidelines to help you get the most benefit from keeping and using your day planner:
• Create a standard place for your planner on your desk, such as beside your desk phone or computer, so you can quickly find and access that information.
• Make a rule that no paper or other articles get on top of your planner. That way, the planner is never out of sight or inaccessible when you need to record information. When your planner is conveniently located and visible, you’re less likely to resort to writing appointments or phone numbers on sticky notes and floating pieces of paper.
• Take your planner with you to meetings and on business trips, but when you return to your office each day or after a meeting, be sure you always put your planner in the same location on your desk.
Not only can your planner save you time and effort, it can make you work better. In today’s multitasking and information world, it is difficult to rely on memory. More than that, just like the computer, you are using up valuable short-term memory with your brain. The best time managers are those who don’t rely on memory. They track information in a designated location to access when needed. Using your time management tool to track information gives you the power to forget. Then you have the full capacity of your thought and attention on the task, or conversation, at hand.
Things You’ll Need![]()
![]() Pen/pencil
Pen/pencil
![]() Your paper planner
Your paper planner
![]() Color-coding markers or flags
Color-coding markers or flags
![]() Clear vinyl sleeves for holding bills, directions, and other loose papers
Clear vinyl sleeves for holding bills, directions, and other loose papers
![]() Group/shared calendar
Group/shared calendar
You’ll enter all scheduled appointments and meetings on your planner’s calendar pages. Ideally it is best to have one calendar on which you track both personal and business-related appointments and meetings. Keeping one calendar is simpler than using multiple calendars, and it leaves less room for errors and oversights. When you have more than one personal calendar, you have to be careful of recording the same information in multiple places. And, inevitably, you forget to track the data in both locations and then scheduling conflicts can occur. Rectifying scheduling conflicts takes time and can be difficult. If you feel you must keep separate business and personal calendars, make sure both are located in your paper planner and easily accessible.
tip
Add in cushions of time in your day. If you regularly schedule back-to-back appointments, consider planning in 10–15 minute increments so you have time to check voice mail, return phone calls, and track information in your handheld or planner. This helps you stay organized and current with routine tasks. Leaving time between appointments also can help prevent one late-running meeting from bumping your schedule out for the rest of the day.
If you have electronic group or shared calendars, you can print them and put them in your planner. You might want to create a separate section for each type of calendar. Or you can merely insert the calendars under the appropriate month or week tab.
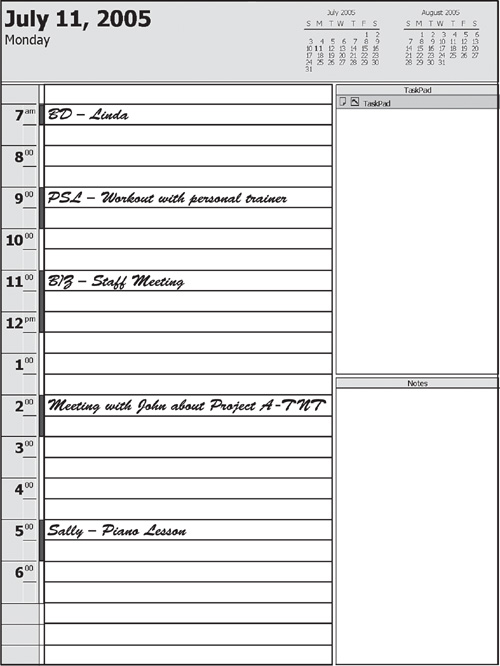
Create a standard naming format for calendar entries in your planner for easy viewing. Determine which types of meetings and appointments you want to be most immediately visible on your calendar; then determine a code, symbol, color, or standard subject name that will make those entries stand out. You can use colored pens or highlighters to color-code appointments. You also can use any of a number of coding options to identify specific types of appointments. If you have a busy schedule and record all business and personal appointments and events on a single calendar, coding is a fast and simple method for noting (and recalling) important information about each of those items. Here are a few examples of appointment/event codes, some of which are shown in Figure 6.4:
• Personal versus business—To quickly view personal versus business appointments, you can use a code or color to distinguish between them. For example, put the letters PSL before the appointment entry to signify a personal appointment, and possibly the letters BIZ for business appointments.
• Tentative meetings—If you have a tentative meeting, use the letters TNT behind the entry to signify that it is not confirmed and tentative. After it’s confirmed, you could cross out the TNT and write CFD to symbolize it has been confirmed.
• Reoccurring appointments—I suggest that you take the time to write these in your calendar a few months (or weeks) in advance so you don’t forget them. By marking them with a code, such as with the letter R, you give yourself a visual reminder to reschedule that appointment for the next occurrence.
• Annual events—For annual holidays, events, and birthdays, it is best to track these appointments in a monthly view as well as in your daily or weekly view. Consider highlighting these events to distinguish them from regular meetings. With birthdays, you could use the code BD and write the person’s name behind it—for example, BD-Linda.
tip
If you created a separate birthday list, write in your planner on the first day of the month to check the birthday list for that month. Do the same for holidays and events. This way you can preplan gifts, cards, arrangements, or phone calls that you need to take action on.
• Family members—If you need to track appointments for other members of your family, you can place that family member’s name within the recorded item. For example, Sally-Piano Lesson reminds you of both the event and the family member who’ll participate in it.
There will always be separate or loose paper that you will want to carry with you in your planner. Here are some suggestions of possible locations for common paper items:
• Action items—Insert paper action items inside your planner next to the day, week, or month you intend to take the action. If you would rather not carry the additional paper, write down that action item on the day or week you want to accomplish the task; also mark where you have stored the corresponding paper. You can also designate a section in your planner solely for paper action items. (You learn more about tracking action items in the next sections of this chapter.)
• Email—If many of your appointments and meetings are determined and confirmed via email, the email messages might contain important details about those events. You can copy the information from the email into your paper planner, or you can print the email and insert it in your paper planner. If the latter option results in printing, carrying, and organizing too much paper, keep the email messages in your electronic inbox and mark the date of the message and the sender’s name or initials next to the appropriate calendar items. That way, on that day of the meeting, you can quickly locate the email and review the details or print it for that day’s meeting.
• Bills—If you want to keep bills in your planner to remind you to pay them, create a specific area to keep them, such as in the front or back pocket of the planner. Or purchase a separate plastic sleeve, insert it in the appropriate section of your planner, and keep pending bills within it.
• Coupons—Create one designated area to keep coupons in your planner. Usually a separate plastic sleeve that opens from the top or side is best. If you have a tendency to forget that you have coupons in your planner, carry coupons in your wallet instead.
• Directions—If you have an area to track notes on your calendar page, write the directions directly on the notes page. If not, use a sticky note to write down the directions and then place the sticky note on that day or week page. If you have the directions in an email, print the email and insert it in your planner. Or, write the date of the email and the sender’s name next to the appointment and print the email directions when that day arrives.
• Invitations—It is best to insert the invitation in the day or week that the event is scheduled. Either paper clip the invitation to the page or hole punch and insert it directly into the planner.
Action items are tasks or to-do’s that you must accomplish. With most calendar pages, there is a sidebar or area to track action items. You can also track tasks on separate note pages located within your planner. Remember to assign due dates to all tasks. Write tasks on the calendar page of the date you want to take action. If you track your action items separately on note pages, be sure to write a due date next to the task.
You can use your planner’s calendar to track action items in a number of ways, depending on your preferences and your calendar’s page layout.
Most daily page view calendars have a designated to do column for tracking action items. Enter your action items on the day you want to take action and then check off the items after you complete them. The action items you do not complete need to be moved forward to the day of your choosing; code these listings (refer to “Entering Appointments and Events,” earlier in this chapter), so you know they have been moved forward, rather than completed or overlooked. Use a capital M to signify moved, or use another code or symbol of your choosing. Instead of moving tasks forward daily, you can wait and move them forward weekly, if you prefer.
caution
Avoid tracking tasks on sticky notes. Sticky notes lose their stickiness and become lost, or they get piled on top of one another or stuck between other papers, where they become useless as visible reminders. If you can’t break the habit of using sticky notes to record task reminders, insert the sticky note in your planner on the day or week you intend to do the task. Then, the tasks will be consolidated in your planner and also be assigned a due date. If you track only immediate doable tasks on sticky notes, be sure to recycle the sticky note directly after completing the task.
On most weekly view pages, there is a to do column or area located on the left side or at the bottom of the page. When you track action items in a weekly view, you typically don’t assign a specific due date but are simply listing the tasks you must complete within that week. For some, a weekly action list is ample and daily due dates simply aren’t necessary. If you would like to distinguish dates for each task, write the date or day abbreviation next to the action item. In any case, listing tasks in order of their priority can help you determine which tasks to tackle first.
If you do not have a designated to-do area in your week view planner, you can create one. One option is to track all weekly action items on a large sticky note and place it on the side of the page. Another option is to track action items in an unused time interval of each day’s listing in your weekly view. You might want to use the 6:00 a.m. to 8:00 a.m. slot, for example, or 8:00 p.m. to 10:00 p.m. area to track your action items. Creating and using a daily action list in your weekly view can be useful.
Most monthly view pages don’t have a designated to-do column or area. It is best to have a separate page as your action list if you have a monthly view planner. When creating action lists on separate paper from your calendar, remember to track deadline dates and priorities with each task. This helps determine which task items to perform first. Keep your action list in front of your monthly calendar so you can see it easily.
If you find paper planners and electronic software are too complicated for your needs, consider keeping your schedule in a plain, empty spiral notebook. For a few dollars, you can have a simple paper planner to track your day-to-day information. The empty notebook can become your daily log of notes, including action items, meeting notes, phone log, and reference. Any information you write down will be tracked chronologically in this notebook. I suggest dating the top of each page so you have a way to easily refer to items. I also suggest coding or highlighting action items, so you can spot them easily on the page. For some, this method is easier than having different views, pages, and locations for day-to-day information. If you find that you like this method, consider upgrading to a hardback empty notebook. If you use this method to track your schedule, you might want to keep your calendar electronically and print it as needed or have a separate monthly calendar that fits inside the notebook.

Today most individuals prefer to use some combination of electronic and paper-based time management tools. The benefit of using an integrated electronic and paper planning system is that it enables you to track data in the format that is most useful and comfortable for you. Some individuals prefer to record certain kinds of information by hand but like having other data in electronic form. You might, for example, decide to maintain your calendar and daily notes in a paper planner while using a PDA to handle tasks and contact/address information. If you have considered moving to an electronic time management tool but don’t feel quite ready to toss your paper planner completely, you might want to use a combination system while you’re transitioning to the new planner style.
The keys to using both systems are to clearly delineate which kind of information is tracked in which tool and to have and consistently use a plan for coordinating the two parts of the system. This approach becomes complicated when you fall into the habit of tracking the same information in both locations. For example, one day you write an appointment in your planner, but the next day you write appointments in your handheld. Inconsistency creates confusion and makes it difficult to plan and organize your day. Keep in mind, too, that you’ll need to maintain two systems—electronic and paper—which can take more energy and effort than what’s required to maintain a single system.
Here are some common handheld and paper planner combinations that might work for you:
• Handheld: Address book
Paper planner: Calendar, meeting and daily notes, action list
Good for: Individuals who are just beginning to use a handheld. Start with tracking your address book first and use your paper planner for everything else. Then, slowly you can add more functions electronically as you feel more comfortable using your handheld.
• Handheld: Calendar and address book
Paper planner: Action list, meeting and daily notes
Good for: Individuals who have a handheld and need to track their calendars electronically for other colleagues to see, but still like to handwrite information and aren’t completely comfortable writing a lot of notes into a handheld.
• Handheld: Calendar, address book, and task list
Paper planner: Meeting and daily notes
Good for: Individuals who are using their CM and PIM software tool completely and would like to have that information available to them when they’re away from their desks or offices; many people prefer to handwrite meeting and daily notes.
• Handheld: Business calendar, address book, task list
Paper planner: Personal calendar, address book, task list
Good for: Individuals who have a lot of information to track on a personal/family and business level and would like to track the data on separate time management systems. Tracking personal information in a paper-based format can be more convenient for those individuals with families and children on the go.
![]() Printer
Printer
![]() Paper-based planner
Paper-based planner
![]() PDA or other electronic time-management tool
PDA or other electronic time-management tool
![]() CM or PIM software, such as Outlook, ACT!, GroupWise, Palm, or Lotus Notes
CM or PIM software, such as Outlook, ACT!, GroupWise, Palm, or Lotus Notes
Determine which location (electronic or planner) will be the primary tracking location for your appointments, contact information, tasks, and daily notes. For instance, if you determine that you’ll track calendar items electronically, be sure to enter all calendar items into your electronic time-management tool. If you handwrite additional appointments on the calendar pages of your paper-based planner, always make sure that by the end of each day you have entered all such appointments electronically. The same rule applies to all items and information you keep in your time-management tools. Designate which information belongs in which tool, and follow that designation consistently. Consider checking both tools weekly to make sure you have transferred and entered data correctly.
tip
Some planner cases have specific areas to hold your handheld. Test your handheld in that designated area, to make sure you can access the buttons, keys, and stylus easily. Because you will need to sync your handheld regularly, be sure to check that your handheld slides easily in and out of the designated slot.
Most CMs and PIMs allow you to print your calendar, address book, and task list in standard paper planner formats with multiple print options. This approach lets you view your information electronically and on paper; it also enables you to quickly and easily transfer large amounts of information from your electronic planner to your paper-based planner. You can simply print the elements, prepare them with your hole punch, and then clip them in your planner binder.
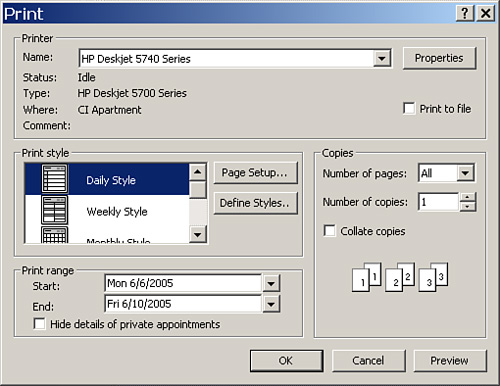
Print options are usually found under the Print menu of your CM or PIM software. In Microsoft Outlook, under the Print menu, you can print your calendar in daily, weekly, or monthly views. Click in the Calendar folder and select File, Print. Once in the Print window, select your preferred calendar format under the Print Style options, as shown in Figure 6.5. In the Start and End text boxes of the Print Range area, choose the date range you want to print. Click Page Setup to open a separate window with further print options.
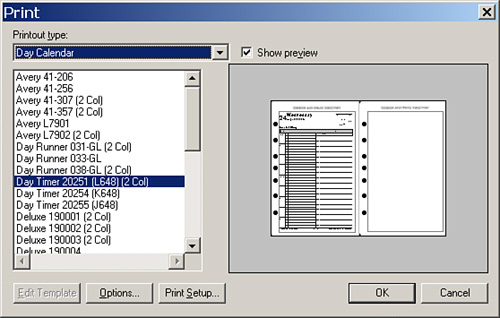
You also can print calendar pages in ACT!, as shown in Figure 6.6. In the Print menu, select File, Print. Once in the Print window, select what you want to print from the Printout Type option drop-down list. Then, highlight the type of day planner and view style you prefer. If you click Options, a separate window opens with further print options, including date range. Click OK to finish.
Again, if you handwrite additional information on the printed calendar, address book, or task lists, be diligent about updating your CM and PIM with that information. Using this combination tracking system is helpful only if you remember to update both parts of the system regularly.
tip
Display your name and contact information clearly in the front of the planner, in case it’s lost or stolen and later recovered. And don’t let any portable device—paper or electronic—be the sole keeper of important and irreplaceable data. Periodically photocopy important information, such as your address book, and store it in a safe location. Syncing your handheld device with a desktop computer is a good way to maintain an ongoing backup of your electronic data.
In this chapter, you have learned how to choose and use your paper planner more effectively to track your day-to-day information. Paper planners are useful tools to track daily information, either in conjunction with your CM or PIM software or as standalone devices. The key with any time-management tool is to maintain consistency in tracking and using it.
Here are some of the important recommendations you should remember from this chapter:
• Determine which size planner and pages you need based on the daily information you track.
• Regularly carry your planner with you.
• Begin to code your appointments and action items, as needed.
• Consider using a handheld in conjunction with your paper planner.
• Be consistent with tracking information in the designated area in your planner.
In the next chapter, “Improving Your Relationship with Email,” you learn how and why to back up your key electronic data, and how doing so can help you get the most from your work day. We also discuss which backup options are available and which options will work best for you.