
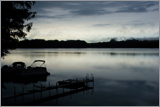
If you want to create decent photos, it’s essential to make sure your main subject is in focus. However, that isn’t as easy as it sounds. For example, if you’re shooting landscapes, you want everything (or almost everything) in the frame to be in sharp focus (see Figure 14.1). However, for portraits, you want to blur out the background (see Figure 14.2).

![]() With a simple digital point-and-shoot camera that offers only limited options, you might be able to accomplish the first objective by increasing the ISO setting so the camera uses a smaller aperture (which increases the depth of field), and the second objective by selecting Portrait mode, which forces the camera to use a wide aperture (which reduces the depth of field).
With a simple digital point-and-shoot camera that offers only limited options, you might be able to accomplish the first objective by increasing the ISO setting so the camera uses a smaller aperture (which increases the depth of field), and the second objective by selecting Portrait mode, which forces the camera to use a wide aperture (which reduces the depth of field).
![]() However, if your camera offers the capability to select the aperture manually, adjust the ISO manually, or use manual focus, you have full control over what’s in focus. By controlling focus, you help viewers see what part of the photo is most important. This chapter shows you how.
However, if your camera offers the capability to select the aperture manually, adjust the ISO manually, or use manual focus, you have full control over what’s in focus. By controlling focus, you help viewers see what part of the photo is most important. This chapter shows you how.
What is depth of field? I could quote you technical explanations galore, but here’s a simple one: Depth of field refers to how much in front of and behind the point of sharpest focus is also in acceptably sharp focus.
Three factors affect depth of field:
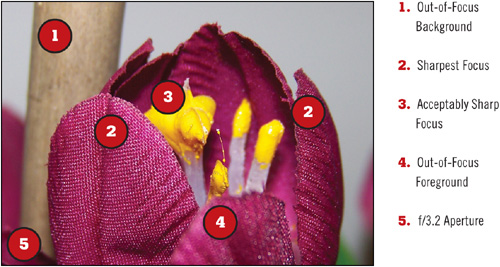
The aperture (f-stop) in use—. The wider the aperture, the shallower the depth of field (see Figure 14.3).
The distance to the point of sharpest focus—. The closer you are to the point of sharpest focus, the shallower the depth of field. This is why you will often see parts of a macro (ultra close-up) photo out of focus (see Figure 14.4).
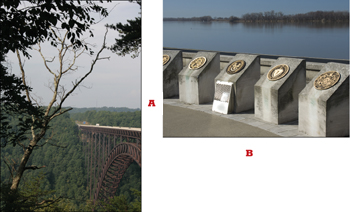
The focal length (zoom setting) of the lens—. The shorter the focal length (smaller zoom setting), the greater the depth of field. As the focal length increases, the depth of field decreases (see Figure 14.5).
Most digital cameras focus on the center of the viewfinder or LCD display; however, quite often the subject of the photo is not in the center. Fortunately, virtually every digital camera supports a feature called Focus Lock. Focus Lock (which also locks the exposure on most cameras) enables you to shoot an off-center subject and get a sharp and clear photo.
Use Focus Lock when you want to focus on a subject that’s off center, or to prevent the camera from focusing on a distant background.
Focus Lock works the same way as Exposure Lock (see Chapter 8, “Recipes for Better Event Pictures”):
Aim the camera toward what you want to be in focus; make sure the intended subject is in the center of the viewfinder or LCD display.
Press the shutter button down halfway and hold it.
Frame your picture the way you want it.
Press the shutter button down the rest of the way to take the picture.
If you move closer or farther away from the subject, or zoom your lens to recompose, repeat steps 1 through 4.
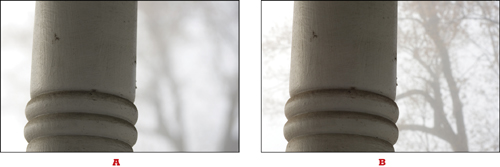
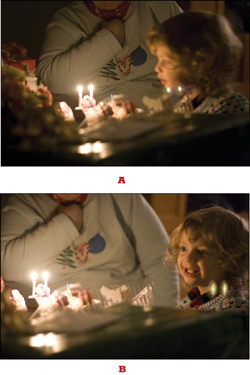
Figure 14.6 illustrates the difference between not using Focus Lock and using Focus Lock.
Most digital cameras offer more than one way to use autofocus. Select the right method to help you get sharp pictures in different situations.
Face detection is a feature found in many recent digital cameras. It’s designed to find faces turned toward the camera and focus on them, even if they’re well away from the center of the picture. As you can see from Figure 14.7, face detection works automatically; just press the shutter button partway, and take the picture as soon as the face-detect frame highlights the face(s) you want in focus.
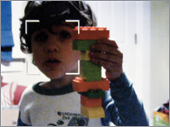
Use face detection when you are shooting photos of individual people or groups of people, especially in a casual environment such as a party or reunion.
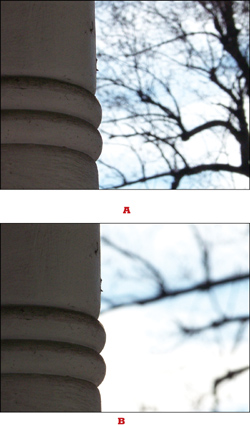
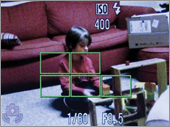
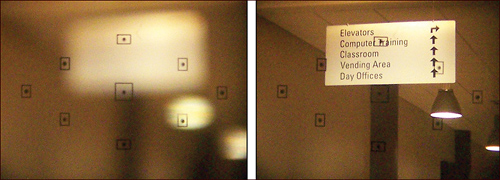
Most newer digital cameras can select more than one area for focusing, as shown in Figure 14.8. When the focus frame changes color after you press the shutter button partway, the area inside the frame is in sharp focus. If the intended subject is not in the focus area, release the shutter button, re-aim the camera slightly, and press the shutter button partway down again.
If you are not satisfied with the results using multiple focusing zones, consider switching your focus method to the center or to a single area. The focus method setting is usually found in the shooting menu on most digital cameras; some DSLR cameras use a button to select automatic (multiple) or manual focus point selection (see Figure 14.9). Using manual focus points, as in Figure 14.9, enables the user to select a focus point that matches the position of the subject, making it easier to focus on an off-center subject without needing to recompose the picture after using Focus Lock.

By default, most digital cameras use an autofocus mode that sets the focus when you press the shutter button partway. This is often referred to as One Shot or Single AF autofocus. This works well for subjects that are standing still or are moving across your field of view. However, if the subject is moving toward you or away from you, this focusing method can cause out-of-focus shots.
To keep moving subjects in focus, select autofocus modes that continuously focus on the subject in the middle of the viewfinder. These methods have names such as Servo AF or Continuous AF. When you use these modes, the normal focusing frames or dots in the display are shut off and the camera focuses on the middle of the frame. Remember to switch back to Single AF if you want to use focus lock or shoot off-center subjects. Some cameras offer a third mode that switches between single and continuous autofocus as needed.
Using wide apertures (f/5.6 and smaller numbers) enables you to use a technique called selective focus. Instead of most or all of the picture being in focus, only the area you select will be in focus.
On the other hand, using narrow apertures (f/11 and larger numbers) enables you to take pictures with a much deeper depth of field (more of the photo in focus). If you use apertures of f/16 and smaller, you can achieve an effect sometimes called “deep focus,” in which all the photo is in sharp focus. Figures 14.10 and 14.11 compare the same scene shot with an f/2.8 and f/22 aperture.
Use wide apertures to blur out the background or to draw the eye to the main subject by blurring other parts of the photo. You can use wide apertures for portraits, nature photography, and macro photography, among other subjects.
Use narrow apertures when the entire photo is the subject, such as with landscapes or building shots, or when you are shooting a group of people at many different distances from the camera.
Keep in mind that the narrower the aperture, the less light the lens uses. As a consequence, you must use a slower shutter speed to get a good exposure. You might need to use a tripod or other steady surface for your camera.
![]() Use the aperture priority (A or Av) or Manual (M) settings on your camera and select the aperture (f-stop) you want to use (see Chapter 7, “Recipes for Better Daytime Pictures,” for details). With most zoom lenses, the widest aperture changes as you zoom, so you might want to zoom first, and then select the aperture you want.
Use the aperture priority (A or Av) or Manual (M) settings on your camera and select the aperture (f-stop) you want to use (see Chapter 7, “Recipes for Better Daytime Pictures,” for details). With most zoom lenses, the widest aperture changes as you zoom, so you might want to zoom first, and then select the aperture you want.
If you have a camera that uses scenes, select Portrait mode if you want to shoot with a wide aperture. To shoot with narrow apertures, see your camera manual for suggestions.
Figure 14.12 illustrates how using wide apertures can help isolate the main subject.
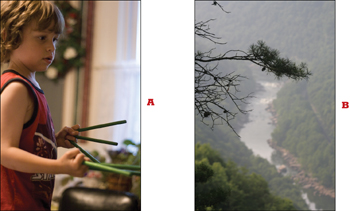
Figure 14.13 illustrates how using smaller apertures are useful for making both foreground and background important parts of the photo.
Some DSLR cameras include a feature called depth-of-field preview. This feature enables you to see how the depth of field changes when a smaller aperture is used for shooting, either by you (in Aperture Priority or Manual modes) or by the camera (in Shutter Priority, Program, or Auto modes), compared to the normal widest-aperture view used to compose your photo.
Depth-of-field preview is most useful when you are shooting with narrow apertures (f/11 or higher f-numbers), because much more of the photo is in focus than is apparent when you are composing your picture.
If your DSLR camera has a depth-of-field preview button (usually located near the interchangeable lens mount), select the shooting aperture, look through the viewfinder, frame the picture as desired, and press the preview button. The viewfinder gets darker, but objects closer to and farther away from what you focused on will appear sharper as well. Figure 14.14 simulates what you might see if you focus on a nearby object, select a small aperture, and use depth-of-field preview.
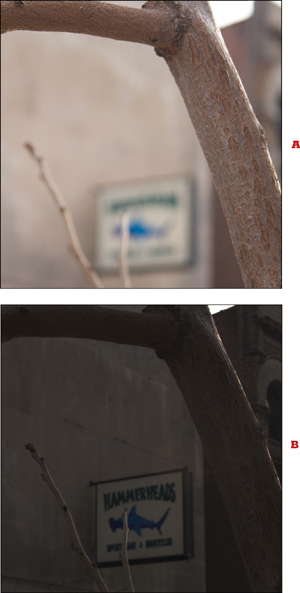
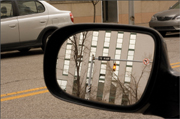
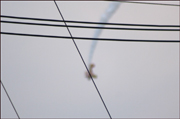
Autofocus doesn’t always work, especially if there are objects such as wires, window glass, screens, or other obstructions in front of your intended subject (see Figure 14.15). DSLR cameras and a few point-and-shoot digital cameras include manual focus options.
Use manual focus when you have difficulty using autofocus because of obstructions, low light, or low contrast. If your camera “hunts” (changes focus frequently) when you are pointing the camera at a nonmoving subject, consider using manual focus if you can.
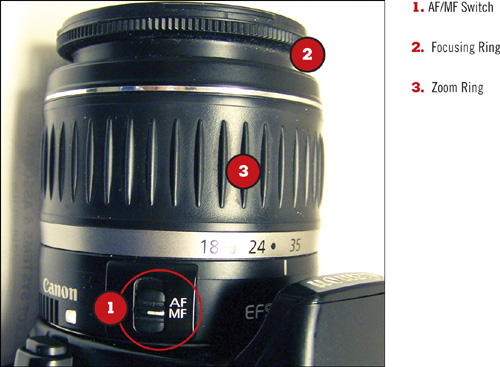
To use manual focus on a DSLR, find the autofocus/manual focus switch on the lens and move it to the MF (manual focus) setting (see Figure 14.16). After selecting manual focus, locate the focusing ring on the lens and turn it while looking through the viewfinder until the subject is in sharp focus (see Figure 14.17).
If you want to use narrow apertures, especially in dim light or with ISO settings under 400, you need to use a tripod or place your camera on a steady surface. Although image stabilization/vibration reduction lenses or cameras (see Chapter 15, “Using Zoom and Interchangeable Lenses”) can help you shoot with slower shutter speeds than with regular lenses, they cannot completely prevent camera shake, especially at shutter speeds of 1/8-second or slower.
Use a tripod or other mounting device, such as a beanbag or clamp, when you will be using shutter speeds of 1/30 second or longer with up to 4x zooms; for other lenses, see Chapter 10, “Improving Exposure,” for recommendations.
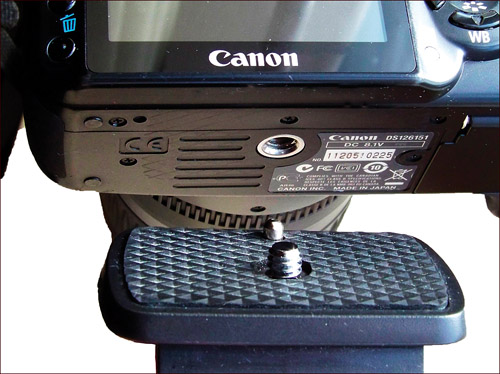
Attach a tripod or removable tripod mounting shoe to the threaded tripod socket hole at the bottom of the camera (see Figure 14.18). The shoe has a knob or tab that is turned to attach the tripod screw to the camera’s tripod socket. If you are using a heavy lens that has its own tripod socket, use the lens’s tripod socket instead of the camera’s tripod socket.
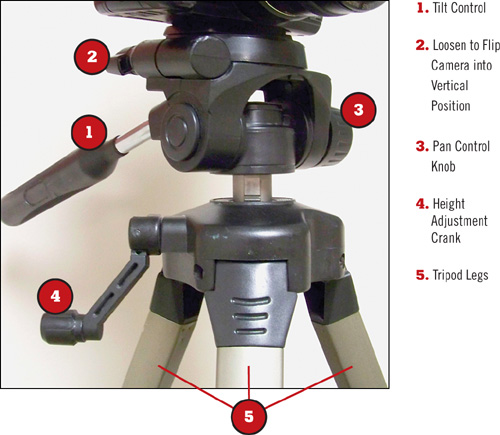
Spread the legs of the tripod out as far as they will go. Adjust the legs to provide the height needed, and adjust the center shaft with the height adjustment knob or crank to fine-tune the height (see Figure 14.19).
![]() If you don’t need to capture split-second action, use a self timer to help you get even steadier shots. A self timer generally provides a delay of up to 10 seconds between the time you press the shutter button and the moment the picture is taken. The self-timer function is indicated by a stopwatch-style icon on most digital cameras. You can also use a self-timer to provide time to get into the photo.
If you don’t need to capture split-second action, use a self timer to help you get even steadier shots. A self timer generally provides a delay of up to 10 seconds between the time you press the shutter button and the moment the picture is taken. The self-timer function is indicated by a stopwatch-style icon on most digital cameras. You can also use a self-timer to provide time to get into the photo.