

Change Backgrounds
</objective> <objective>Create and Apply Theme Fonts
</objective> <objective>Format Text
</objective> <objective>Create Slide Layouts
</objective> <objective>Add Theme Colors
</objective> <objective>Include Add-on Elements
</objective> <objective>Add Scary Music
</objective> </feature>ON THE CD:
The sample presentation and all other files with which you need to work can be found on the CD in the Makeover 05 folder.
This Halloween theme presentation is accompanied by some scary music. The Halloween party organizers will play it for partygoers just before they announce the awards for the best costumes.
This was so much fun to work with. The original presentation contained several slides with pictures, but it did not use the new Slide Layouts option to create several picture layout slides.
In addition, this was intended to be a scrapbook-style presentation, but there were no add-on elements, such as buttons or ornaments, to provide that scrapbook “look,” so we used an assortment of coordinated, add-on picture elements to make the presentation look more like an electronic scrapbook.
Check out the before and after sample, and then follow us as we lead you through this eerie world of ghosts, goblins, bats, and pumpkins!
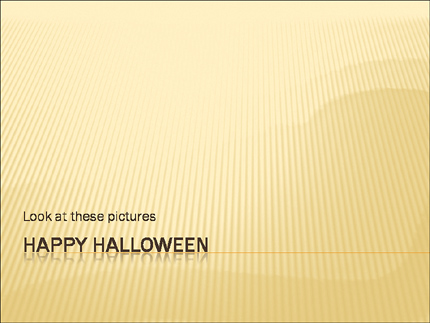
Figure 6.1 shows you the “before” slides. These were created in PowerPoint 2007 using one of PowerPoint’s built-in themes. The theme used in this presentation was a slightly modified version of Trek, which is one of the better themes bundled with PowerPoint. However, as you can see, the theme presents an almost joyful atmosphere to the slides, which is quite unlike a typical Halloween theme that can be identified by a scary, dark look.
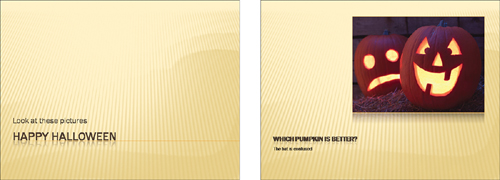
Figure 6.2 shows our “after” slides. These slides have the same text and the same pictures; it’s just that a new theme makes them look eerie and more Halloween-like in appearance. Just wait until you hear the scary music we added!
The first step in this makeover process is to insert a picture onto the slide background. Do note the distinction—you’ll insert a picture on the slide master, not format the slide background, because we want to use the Recolor Picture option in PowerPoint that works only with inserted pictures.
You’ll want to use a background picture that lends itself to PowerPoint’s recoloring options. Most of the time, you’ll want to use a grayscale image that is neither uniformly gray nor presented with too much contrast. In other words, it should contain subtle shadows and highlighted areas to look great. See Figure 6.3 to get an idea of the type of picture that makes a good background for this purpose.

You will find the background picture we have used, halloween_back.jpg, on the CD in the Makeover 05Pictures folder (see Figure 6.3).
Open the halloween_00.pptx presentation from the Makeover 05Steps folder on the CD.
Follow these steps to change the background picture in the Slide Master:
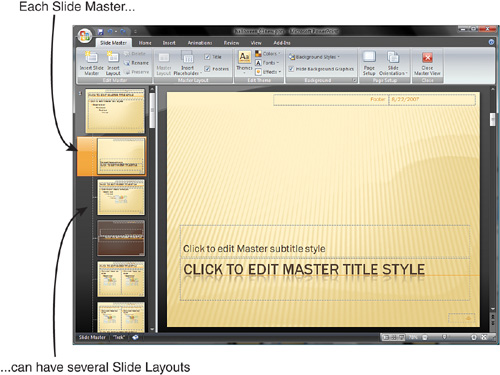
Select the View tab on the Ribbon, and then click the Slide Master button to open Slide Master view (see Figure 6.4).
Select the Slide Master on the left pane; the Slide Master is the larger thumbnail on the left, whereas all the smaller thumbnails below the Slide Master are for the Slide Layouts.
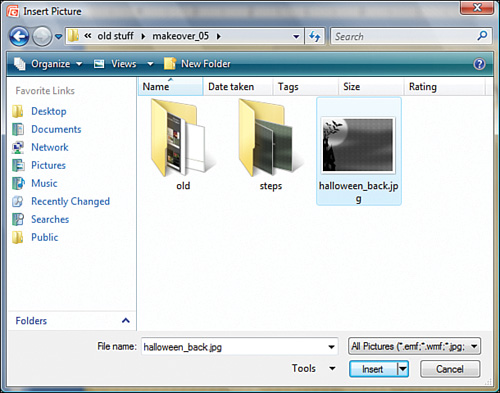
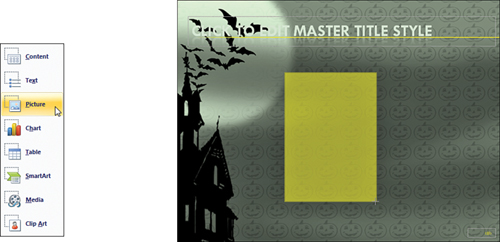
While still in Slide Master view, click the Insert tab on the Ribbon, and then click Picture. This brings up the Insert Picture dialog box that you can see in Figure 6.5.
Select the
Halloween_back.jpgpicture from theMakeover 05Picturesfolder on the CD with this book, and then click Insert. You’ll see the picture inserted within the Master.If the inserted picture does not fill the entire slide area, select the picture and drag any of the selection handles on the picture to resize it to fit the slide area. Right-click the picture, and choose Send to Back.
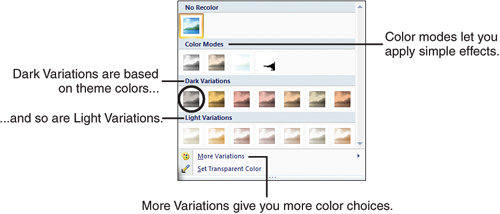
With the picture still selected, you should see the Picture Tools Format tab on the Ribbon. Click this tab, and click the Recolor button to view the Recolor gallery shown in Figure 6.6.
Choose the first recolor variation (the ToolTip shows Text color 2 Dark when you hover over it with your mouse) within the Dark Variations section.
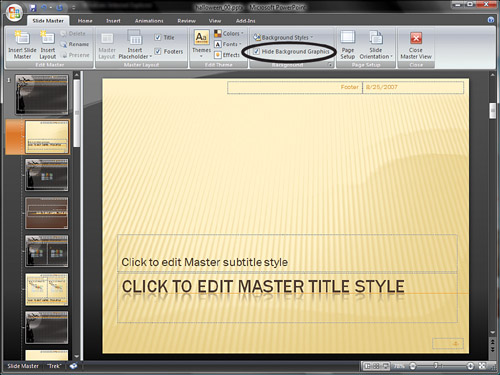
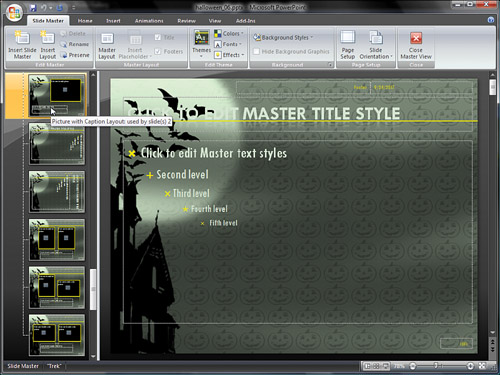
Click the Slide Master tab on the Ribbon, and explore all the Slide Layouts visible under the active Slide Master, as shown in Figure 6.7. You’ll see that some of them don’t show your inserted Halloween picture at all!
Select the offending Slide Layout thumbnail, and uncheck the Hide Background Graphics check box in the Slide Master tab of the Ribbon (refer to Figure 6.7). Repeat the same process for all Slide Layouts so that they now sport Halloween backgrounds.
Click the Slide Master tab of the Ribbon, and then click the Close Master View button at the end of the Ribbon. Save your presentation.
The next step is to create a new Theme Font set for this presentation. Fortunately, it’s quite easy to create a Theme Font set in PowerPoint, but first let me tell you what a Theme Font set is.
Microsoft created this new PowerPoint 2007 feature so that you can give a presentation a set of consistent font styles to apply to various slide objects (titles, body text, and so on) that all work well together rather than having a mishmash of different font types that scream unprofessional.
If you are following the makeover step by step, continue using your saved presentation. If you just stepped in, you can use the halloween_01.pptx presentation from the Makeover 05Steps folder on the CD.
To create your own Theme Font set, follow these steps:
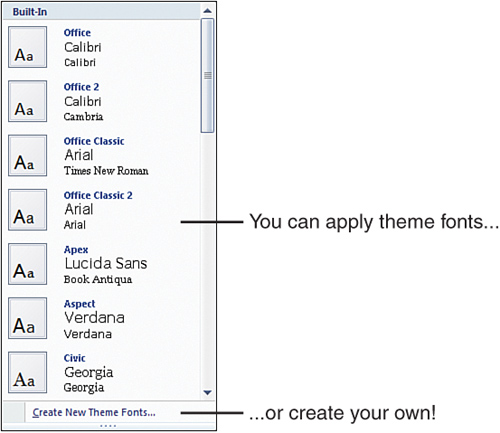
Click the Design tab on the Ribbon, and click the Fonts button to view the Fonts gallery (see Figure 6.8).
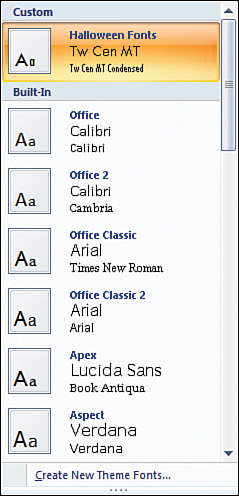
All the existing options in this gallery are Theme Font sets that you can apply to the open presentation with one click. For now, ignore these existing Theme Font sets and choose the last option in the gallery, Create New Theme Fonts.
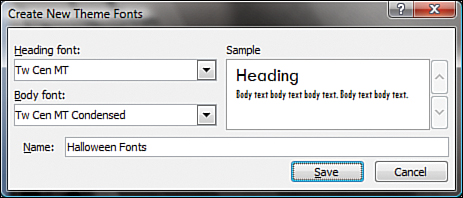
This brings up the dialog box of the same name, as you can see in Figure 6.9.
Select the Heading font; for this example, I chose Tw Cen MT as the heading font within the Heading font drop-down list.
Select the Body font; for this example, I chose Tw Cen MT Condensed as the body font within the Body font drop-down list.
If you don’t have these fonts on your system, you can use any other font that you think matches the mood of the presentation.
Give a name to your new Theme Font set. I called mine
Halloween Fonts, but you can choose any other name.Click the Save button on the QAT (or press Ctrl + S) to save your presentation.
After you create your own Theme Font set in PowerPoint, you can apply it to your open presentation. If you followed the previous step, PowerPoint might have actually applied the Theme Font set you created to the presentation. Even if it did that (or not), go ahead with this section of the makeover because you’ll learn how you can apply an existing Theme Fonts set.
If you are following the makeover step by step, continue using your saved presentation. If you just stepped in, you can use the halloween_02.pptx presentation from the Makeover 05Steps folder on the CD.
To apply a Theme Font set, follow these steps:
Click the Design tab on the Ribbon, and click the Fonts button to view the Fonts gallery that you can see in Figure 6.10.
Click a Theme Font set within this gallery; if you created your own Theme Font sets, these should be visible here as well.
If you are not happy with the choice, you can opt to apply another Theme Font set, or you can press Ctrl+Z to undo the new font choice.
Although Theme Fonts are a great feature that let you create coordinated font sets, they don’t let you set other font attributes, such as bold or underline.
Tip
Do you want to make the text stay all caps? If so, select your text and head to the Home tab of the Ribbon, click the dialog launcher in the Font group to bring up the Font dialog box, and choose All Caps.
If you are following the makeover step by step, continue using your saved presentation. If you just stepped in, you can use the halloween_03.pptx presentation from the Makeover 05Steps folder on the CD.
For now, you’ll see that some of the slide titles are bold, while others are not. To remedy that, follow these steps:
Click the View tab on the Ribbon, and click Slide Master to get to the Master Editing view (refer to Figure 6.4 earlier in this chapter).
Within the Slide Master, click the active Master thumbnail (the larger thumbnail) in the Slides pane.
Select the Slide Title placeholder.
Click the Home tab on the Ribbon, and within the Font group, click the Bold option.
View all the Slide Layouts within this Slide Master to make sure that all slide titles are bold. Don’t worry about the color of the slide titles for now; we’ll look at colors in the next step of this makeover.
Click the Slide Master tab of the Ribbon, and click the Close Master View button.
Save your presentation.
The next step in our makeover is to create a Halloween-inspired set of theme colors. PowerPoint includes several Theme Color sets that you can use, but it is more satisfying to choose the colors on your own.
As you create this custom set, you will learn the underlying structure of a Theme Color set in PowerPoint and what role each individual color plays in the larger picture.
There’s a limit of just one custom Theme Color set that gets saved inside your presentation, so if you create many custom Theme Color sets, make sure you create newer presentations for them all unless you want to overwrite your other custom Theme Color sets.
If you are following the makeover step by step, continue using your saved presentation. If you just stepped in, you can use the halloween_04.pptx presentation from the Makeover 05Steps folder on the CD.
Follow these steps to create your own set of theme colors:
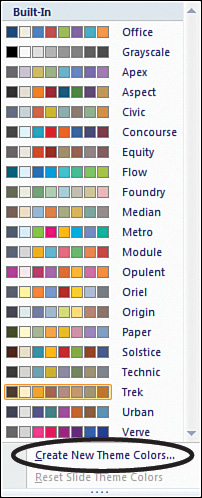
Click the Design tab on the Ribbon, and click the Colors button to view the Theme Colors gallery (see Figure 6.11).
Choose the Create New Theme Colors option to bring up a dialog box of the same name, as shown in Figure 6.12.
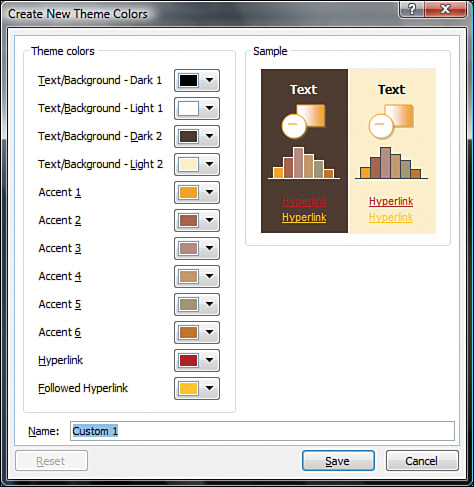
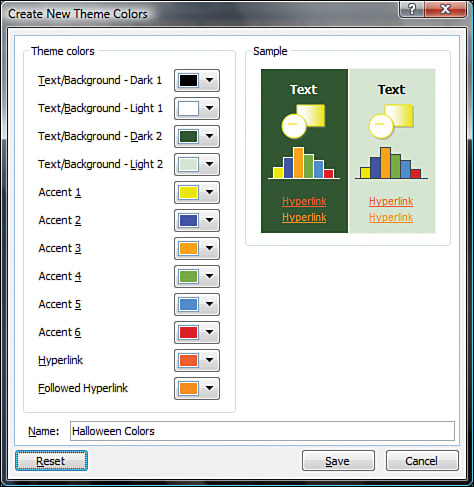
Under the list of theme colors, you’ll see 12 color swatches. These swatches represent the 12 colors that comprise a Theme Color set. In the remaining steps, I’ll show you how you can change the colors within these swatches to create your own Theme Color set.
Toward the left of each swatch is an explanation of what that color signifies within a PowerPoint presentation; to learn more about these, refer to “The Twelve Theme Colors” section later in this chapter.
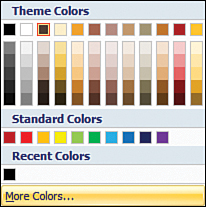
Click the down arrow next to each individual swatch, and you’ll see a small color palette, as shown in Figure 6.13.
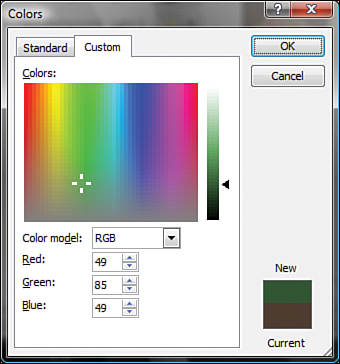
Click the More Colors option to bring up the standard Windows color picker dialog box, which you can see in Figure 6.14.
Click the Custom tab in the dialog box, and enter the RGB values for each of the 12 swatches, as shown in Table 6.1. You won’t have to change the Text/Background – Dark 1 and Text/Background – Light 1 colors, because they’re the same as the original swatches.
Table 6.1. RGB Values for Custom Color Swatches
Swatch
RGB Value
Text/Background – Dark 1
R: 0 G: 0 B: 0
Text/Background – Light 1
R: 255 G: 255 B: 255
Text/Background – Dark 2
R: 49 G: 85 B: 49
Text/Background – Light 2
R: 213 G: 229 B: 209
Accent 1
R: 235 G: 230 B: 0
Accent 2
R: 37 G: 32 B: 249
Accent 3
R: 255 G: 162 B: 0
Accent 4
R: 118 G: 170 B: 36
Accent 5
R: 47 G: 149 B: 252
Accent 6
R: 219 G: 15 B: 23
Hyperlink
R: 237 G: 96 B: 46
Followed Hyperlink
R: 250 G: 142 B: 26
Click OK after you type in your color values for each individual swatch.
Name your Theme Color set in the Name text box (refer to Figure 6.12). Call it
Halloween Colorsor something similar, and then click the Save button to get back to your slide.The new Theme Color set now is saved within your presentation. It also is applied to the presentation.
The makeover is taking shape, but you probably can’t help wondering when I am going to make the background and text colors look a little more appealing. Well, now is a good time to do that, so let me show you how you can change the backgrounds and text in a slide without changing the theme.
Each theme includes four background and text colors, as you learned in the preceding section. Figuring out which of these four colors work best is a trial-and-error process.
If you are following the makeover step by step, continue using your saved presentation. If you just stepped in, you can use the halloween_05.pptx presentation from the Makeover 05Steps folder on the CD.
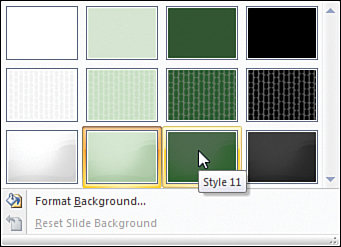
Click the Design tab on the Ribbon, and click the Background Styles button to view the gallery shown in Figure 6.15.
As you hover your cursor over the 12 background options in this gallery, you will see some changes preview in the active slide.
Each background style has a name that you can see as a ToolTip when you hover your cursor over its thumbnail in the Backgrounds gallery (refer to Figure 6.15). Choose the style named Style 11, and your text suddenly will be much more readable.
Save your presentation.
The ability to create Slide Layouts is a powerful new feature in PowerPoint 2007. PowerPoint comes with many types of Slide Layouts, including Title Slide Layouts, Title and Content Layouts, Section Header Layouts, and so on. You can even create your own layouts and name them anything you want!
Although our makeover presentation has several Picture Slide Layouts, it does not use them optimally. This step in the makeover shows you how to boost the visual interest of the presentation by improving the Picture Slide Layouts. You can apply these same techniques to create any type of Slide Layout.
Tip
This section shows you how you can create picture Slide Layouts, but what might be less obvious is that all Slide Layouts can be created the same way!
If you are following the makeover step by step, continue using your saved presentation. If you just stepped in, you can use the halloween_06.pptx presentation from the Makeover 05Steps folder on the CD.
Follow these steps to create and edit your own picture Slide Layouts:
Click the View tab on the Ribbon, and click the Slide Master button to view the presentation in Slide Master view (refer to Figure 6.4 earlier in this chapter).
In the Slides pane on the left side of the screen, you’ll find a set of slides identified by one large thumbnail (the Slide Master) and several smaller thumbnails (the Slide Layouts). If your presentation includes more than one Slide Master, you’ll find several such Master and Layout sets.
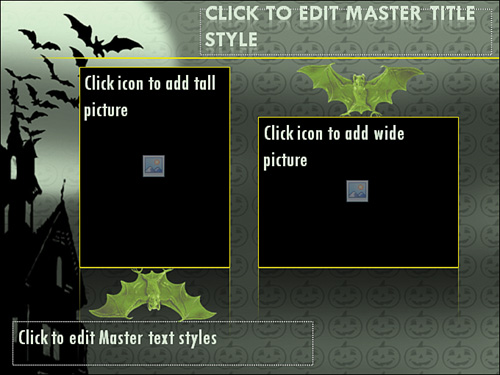
Scroll down the Slides pane to see all the layouts. You’ll find four picture Slide Layouts, which can be identified by the large, empty boxes that currently are empty picture placeholders. As you hover your cursor over any of them, you’ll see that the ToolTip provides a name for the layout (see Figure 6.16).
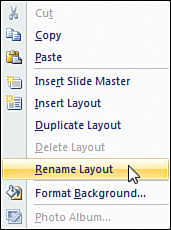
It is helpful to give the layouts more descriptive names. To do that, right-click on the Slide Layout that you want to rename, and choose Rename Layout, as shown in Figure 6.17.
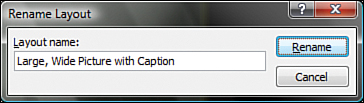
This brings up the Rename Layout dialog box, as shown in Figure 6.18. Change the default name to a nice, descriptive name. I chose Large, Wide Picture with Caption, but you could choose anything else.
Rename all the picture Slide Layouts (or even all the Slide Layouts) the same way.
Tip
You might wonder why you should bother with renaming a Slide Layout. You can actually opt not to rename a layout if you are creating a presentation that you never will use again. However, if you want to share this presentation with other users who will make changes to the presentation, or even if you might want to edit the same presentation after a few weeks or months, renaming a layout will help you understand the purpose you had for creating the new Slide Layout in the first place. In addition, maybe you’ll end up becoming so good at designing Slide Layouts that you will make a business out of creating them!
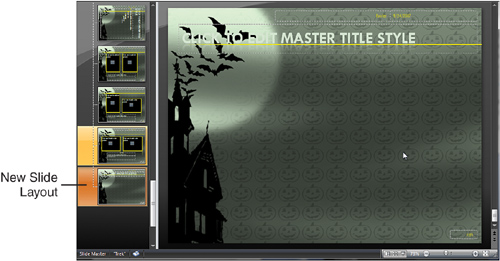
Now it’s time to create a new Slide Layout. Select the active Slide Master thumbnail in the Slides pane, and click the Insert Layout button on the Slide Master tab of the Ribbon.
You’ll find a new Slide Layout thumbnail in the tree within the selected Slide Master, as you can see in Figure 6.19.
Right-click this layout and choose Rename Layout (refer to Figure 6.18).
Give a name to the layout. For example, I just called it
My New Picture Layout 01, but you could call it anything you want.
Now you have a blank Slide Layout with a Title placeholder (and possibly a placeholder for the date and the footer). Delete the date and footer placeholders for now; you can do this by selecting the dashed placeholder outline and pressing the Delete key on your keyboard.
Now you are ready to insert new placeholders. To begin, follow these steps:
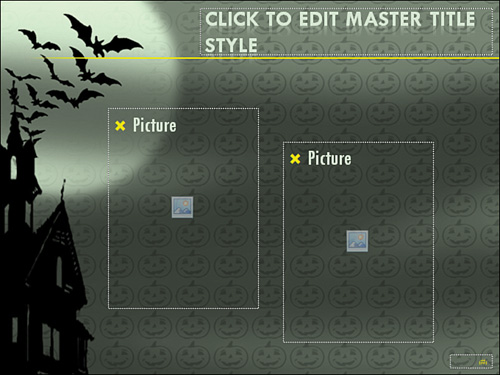
Insert one picture placeholder by clicking the Insert Placeholder button on the Slide Master tab of the Ribbon to open the Placeholder gallery that you can see in Figure 6.20. Choose the Picture option, and you’ll be returned to your Slide Layout. Your mouse cursor will look like a crosshair.
Drag the cursor to create a picture placeholder, as shown in Figure 6.20.
Now you need to resize the picture placeholder. For most situations, you’ll want to resize it to use one of these proportions:
Height: 3 and Width: 4 for landscape-oriented pictures
Height: 4 and Width: 3 for portrait-oriented pictures
Note
The reason to use these proportions is not difficult to discover; almost all digital cameras out there shoot using these proportions, and unless you have a good reason to use another proportion (perhaps your camera uses the conventional film proportion of 3:2, you have a new camera that has wide-angle shots of 16:9, or you just must have square shots!), you’ll want to stick with these values.
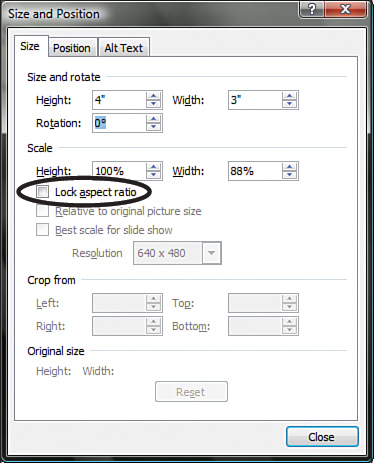
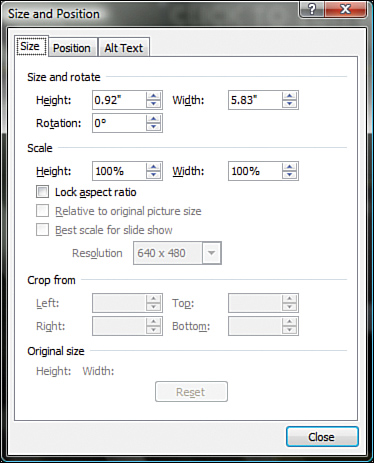
To resize the picture placeholder, right-click it and choose the Size and Position option to bring up a dialog box of the same name, as shown in Figure 6.21.
Within the Size tab of this dialog box, first make sure that the Lock Aspect Ratio check box is unchecked. Then, type in the size values in the Height and Width boxes.
For a landscape-oriented picture, you could type
3inches (height) by4inches (width). If you want to place just one larger picture in the Slide Layout, you could type4.5inches (height) and6inches (width), or you could type these in centimeters if your version of PowerPoint shows centimeters rather than inches. These are all 4 (width) × 3 (height) aspect ratios.For a portrait-oriented picture, you could type
4inches (height) by3inches (width). If you want to place just one larger picture, you could type6inches (height) and4.5inches (width), or you could type these in centimeters if your version of PowerPoint shows centimeters rather than inches. These are all 3 (width) × 4 (height) aspect ratios.After you have resized the placeholder, check the Lock Aspect Ratio check box to enable this option, and click Close.
If desired, add another picture placeholder in the same way, even on the same slide. Remember that you can add any combination of placeholders in the following list to build your picture Slide Layout:
Two landscape pictures
Two portrait pictures
One portrait picture and one landscape picture
One larger landscape picture
One larger portrait picture
Add a text placeholder on the slide if you want to use a caption for the pictures (remember that you already have a title placeholder). Including both a title and a text placeholder is completely optional. You’ll have to make this decision based on your presentation’s requirements. Inserting a text placeholder is easy; just use the instructions given for adding a picture placeholder and choose Text from the Placeholder gallery shown in Figure 6.20.
Rearrange the position of the placeholders as needed. You can move the title below the pictures or drag the title a little to the right (see Figure 6.22). You can place picture placeholders close to each other or apart; you also can place the picture placeholders next to each other, but place one at a higher level than the other to create an interesting layout (again, see Figure 6.22). In addition, don’t forget that you can slightly rotate your picture placeholders!
Tip
To rotate your placeholders, just select them; the placeholders then will be crowned with a green handle. Drag this handle to the left or right to rotate as required.
Click the Close Master View button on the Slide Master tab on the Ribbon to get back to your presentation. Save your presentation.
Picture placeholders don’t have to be plain. In addition, if you don’t want to go overboard with the effects, you still can apply some subtle changes to the placeholders so that the pictures you’ll insert within the placeholders will look more elegant.
If you are following the makeover step by step, continue using your saved presentation. If you just stepped in, you can use the halloween_07.pptx presentation from the Makeover 05Steps folder on the CD.
Follow these steps to fine-tune the placeholder settings:
Click the View tab on the Ribbon, and choose the Slide Master option. In the Slides pane, select the new Slide Layout that we created in the preceding section.
If you did not follow the preceding section and instead opened the
halloween_07.pptxpresentation from the CD, the Slide Layout you want is the one at the bottom of the other layouts.Select one or more picture placeholders on the Slide Layout. If you have more than one picture placeholder, you can select the first placeholder, then hold the Shift key and select the other placeholder, and repeat the steps for any more picture placeholders.
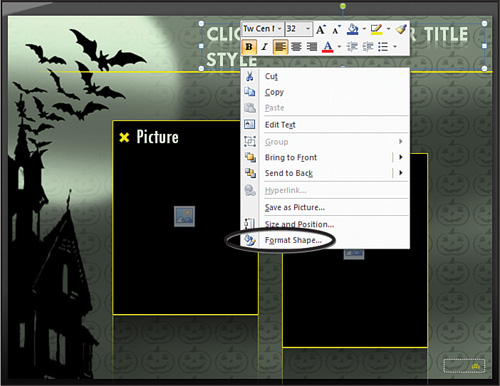
Right-click the selected picture placeholders and choose Format Shape (or Format Object) to bring up the Format Shape dialog box (see Figure 6.23).
Click Fill on the left, and opt for a Solid fill. Click the Color button to view the Theme Colors, and select the black swatch at the top left.
Next, click Line Color on the left, and choose the Solid line color. Click the Color button to view the theme colors, and select the Accent 1 color (yellow in this theme). See Figure 6.24.
Click the Close button to get back to your slide layout.
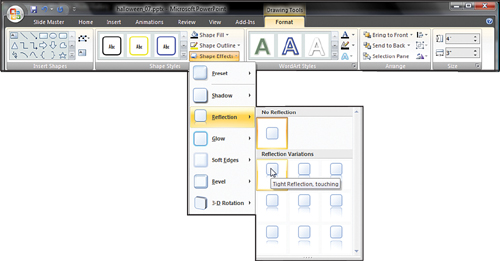
Next, let’s add some reflection to the picture placeholders. To do that, select one or more of the picture placeholders. Then, click the Drawing Tools Format tab on the Ribbon. Click the Shape Effects option to view the Effects gallery shown in Figure 6.25.
Tip
If you can’t see the Drawing Tools Format tab, or any of the other context-sensitive tabs on the Ribbon, you might not have selected a slide object.
Many of these tabs are activated only if you select a corresponding object. Thus, if you select a shape on the slide, you should be seeing the Drawing Tools Format tab on the Ribbon.
Choose the Reflection option to view the Reflection subgallery (refer to Figure 6.25). Within the Reflection subgallery, explore the options in the Reflection Variations section. I chose the top-left option to provide a very subtle reflection effect.
Click the Slide Master tab on the Ribbon, and click the Close Master View option to get back to the default PowerPoint interface. Save your presentation.


After you create and fine-tune the picture Slide Layouts as explained in the preceding sections, you need to apply those layouts to the picture slides.
If you are following the makeover step by step, continue using your saved presentation. If you just stepped in, you can use the halloween_08.pptx presentation from the Makeover 05Steps folder on the CD.
Follow these steps to apply the picture Slide Layout to slides in your presentation:
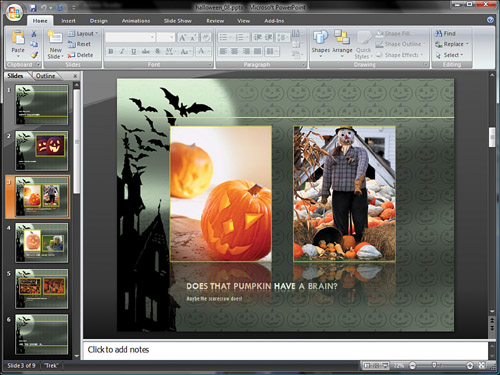
Make sure that the visible slide in Normal view is the one for which you want to change the Slide Layout. For now, I am choosing slide 3 (see Figure 6.26) because it has two tall pictures like the new Slide Layout we created in the preceding steps.
Tip
When you apply a new Slide Layout from the Layout gallery (refer to Figure 6.27), it is applied by default to the active slide. That should be fine in this case, but if you want to apply the same Slide Layout to multiple slides, you need to select all the slides that you want to change within Slide Sorter view. Then follow the rest of the steps in this step sequence.
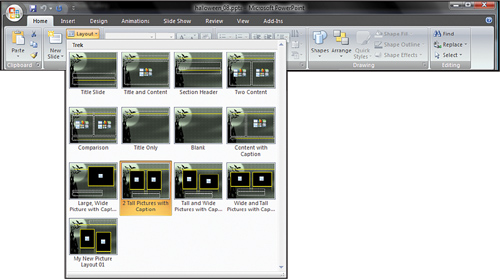
Click the Home tab on the Ribbon, and then click the Layout option to open the Layout Gallery shown in Figure 6.27. Note that the new picture Slide Layout that you created now shows up within this drop-down gallery (see the last layout in Figure 6.27).
Click the picture Slide Layout in the Layout gallery that you want to apply to the selected slide (or slides). If you don’t like the layout you chose, or if you clicked the wrong layout, press Ctrl+Z to undo the last step.
Sometimes, applying a Slide Layout alters the orientation of pictures already inserted in the slides. For example, a landscape-oriented picture might show up in your portrait-oriented picture placeholder. To correct this, simply resize the placeholders, or change the pictures within the placeholders to ones that fit the placeholder on the slide itself.
Tip
You can change the picture in a placeholder by using the Change Picture option in the Picture Tools Format tab on the Ribbon. This tab normally is not visible—it shows up only when you select the picture or picture placeholder on the slide. Or you can always just right-click the picture or picture placeholder and choose Change Picture.
Continue following steps 1–4 until you have finished applying new Slide Layouts to all the slides you want to update. Tweak the placeholders if the picture orientations change, as explained in step 4.
Remember to save your PowerPoint presentation often as you continue to make changes!
Although adding a new Slide Layout is easy, editing existing layouts is simpler than creating them again from scratch.
We did create a new picture Slide Layout, but our makeover presentation already contains several other picture Slide Layouts, as you might remember from our short renaming spree earlier in this chapter. While most of these Slide Layouts look similar to the new Slide Layout we created, you’ll find that the placement of slide titles is not consistent on all the layouts. In addition, the font size of the titles in some of these is different.
If you are following the makeover step by step, continue using your saved presentation. If you just stepped in, you can use the halloween_09.pptx presentation from the Makeover 05Steps folder on the CD.
Follow these steps to create consistent-looking slide titles:
View the Slide Master of the presentation by clicking the View tab on the Ribbon and clicking the Slide Master button.
Select any one of the picture Slide Layouts in the Slides pane. Most of the time, you will have trouble selecting the objects on the Slide Layout itself, including some title placeholders, because the reflection effects added to the picture placeholders earlier in this makeover might be placed over the titles as well. This isn’t always noticeable because most of the reflections are quite transparent.
To rectify this, select each of the picture placeholders, right-click, and click the Send to Back option in the resulting context menu. Do this on all Slide Layouts that contain picture placeholders.
Next, select the new picture Slide Layout that you created earlier in this makeover. Click the Title placeholder. Select all the text within the title and right-click to access the mini toolbar shown in Figure 6.28. As you can see in the figure, the font size is 32.
Select the title placeholders in all the other picture Slide Layouts, and change their font sizes to 32 as well. Don’t worry if some of the title placeholders look out of place; we’ll fix that soon.
Remove the footer, slide number, and date placeholders from all the picture Slide Layouts, if you want. It’s not necessary to remove these unless you like to have them out of the way. To do this, make sure that the Slide Master tab on the Ribbon is active, and uncheck the Footers option.
Resize and reposition all the title placeholders as required. You might want to give them a larger area for the increased font size. Whatever you do, make sure that all the title placeholders are sized and positioned consistently across all the Slide Layouts. That’s easy to do if you note the size and position values found on the Size tab of the Size and Position dialog box. Access this box by selecting the placeholder, right-clicking, and choosing the Size and Position option (see Figure 6.29).
After you clean up the title placeholders, you might want to reposition other elements as well. For example, you might want to reposition the text boxes for subtitles or captions, change their font sizes, and add reflections to text. Why would you want to add reflections to text? Because it looks trés cool!
Remember that you can add the effect to all titles or placeholders in a presentation by formatting the appropriate placeholder in the Slide Master.
As soon as you select the title placeholder, a new tab called Drawing Tools Format is visible on the Ribbon. Click this tab.
In the WordArt Styles group, click the down arrow next to the Text Effects button to open a gallery. Select the Reflection option to open a subgallery (as shown in Figure 6.30).
You can choose from any of the reflection options. For the purposes of our makeover, choose the top-middle option called Half Reflection, Touching.
If you are in Slide Master view, click the View tab on the Ribbon, and click Normal. Remember to save your presentation.

I also chose to change the font sizes for the subtitles for our makeover presentation. Open the halloween_10.pptx (the next file in this makeover sequence) presentation from the Makeover 05Steps folder on the CD to see the result.
In the same way that you might put some embellishments on a paper scrapbook, you can add graphic elements in PowerPoint.
There are many ways you can do this:
Draw a shape or a line. Add effects and color fills to shapes or lines and place them over the pictures, or just slightly overlap the edges of the pictures.
Create your own simple graphics using another program, such as Windows Paint. You also can use a more advanced program such as Adobe Photoshop to create graphics for your layout and save them as PNGs with transparent backdrops. Place those PNGs on the slide wherever required. Duplicate the same PNG several times, and then add variation to the duplicated PNGs by resizing and rotating them differently.
Insert small graphics. Choose small pictures with transparent backgrounds from PowerPoint’s Clip Art task pane.
Add small text notes. Add text such as “Wow,” “Awesome,” “Happiness,” and so on, and then format them with WordArt styles.
Whatever you do, make sure that the end results are more subtle than dramatic. In addition, remember that you can add these graphic elements to individual layouts in the Slide Master as well.
Gradient Lines
Look at the lines you can see in Figure 6.31. These thick lines are colored with more than one color. New for PowerPoint 2007, these gradient lines can blend many, many colors to create a unique statement. However, be careful with the colors—just because you can create a line that contains six colors is no reason to use them all!
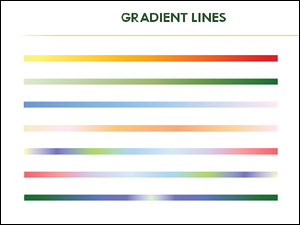
Try creating gradient lines that use monochromatic colors, such as six shades of the blue-gray family starting from a vivid turquoise to the palest gray.
To apply a gradient to a line, remember that you need a somewhat-thick line to show off all the colors. A one-point line hardly will benefit from six colors. As a rule of thumb, a 15-point line is a good starting point, although sometimes you can go as low as 10 points.
To apply a gradient to a line, follow these steps:
Draw a line, or select an existing line. The line does not even have to be a conventional, straight line; it also can be the outline of a selected rectangle or another shape. Either way, the important part is that it should be selected.
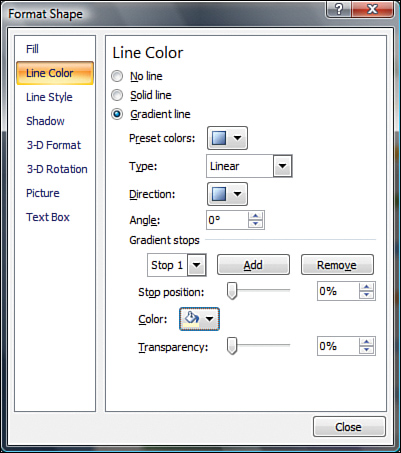
Right-click the selected line or shape to access the context menu. Choose the Format Shape option to bring up a dialog box of the same name.
Click Line Color on the left of this dialog box, as shown in Figure 6.32, and then click the Gradient Lines option to alter the options available.
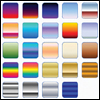
Choose a preset gradient option, or play with the gradient settings. Choosing a preset option does free you from creating your own gradient, but a little time spent in working with the other options will go a long way in helping you create more coordinated gradients. Figure 6.33 shows you a selection of preset gradient styles that are available.
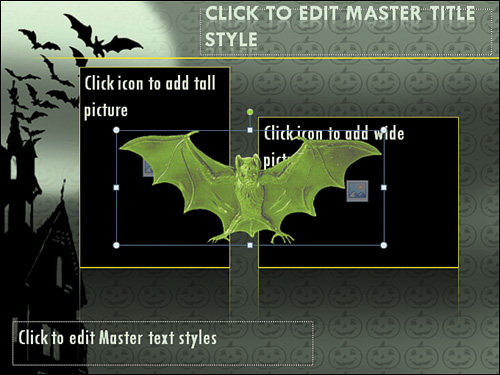
Now let’s add some ornamental elements to make your pictures stand out even more. Because this is a Halloween presentation, I selected the bat, as shown in Figure 6.34, to add some creepiness to the slides!

You’ll find this bat picture (bat3.png) in the Makeover 05Steps folder on the CD. If you are following the makeover step by step, continue using your saved presentation. If you just stepped in, you can use the halloween_10.pptx presentation from the Makeover 05Steps folder on the CD.
Follow these steps to bring in the bats:
View the Slide Master of the presentation by clicking the View tab on the Ribbon and clicking the Slide Master button.
Select any of the picture Slide Layouts, and then click the Insert tab on the Ribbon. Click the Picture button to bring up the Insert Picture dialog box. Navigate to wherever you saved the bat image (or go straight to the
Makeover 05Picturesfolder on the CD), and select thebat3.pngfile. Click the Insert button to get back to your Slide Layout.As you can see in Figure 6.35, the bat seems to be enjoying the attention it can get by sitting over the two picture placeholders. Cut him down to size by clicking and dragging one of the corner handles on the bounding box toward the center of the box. Now you can click and drag the bat and place him anywhere you fancy. If you want two bats, just duplicate the existing one by right-clicking it and choosing Copy, and then right-clicking again and choosing Paste. Click and drag it to place it elsewhere on the slide. The second slide in Figure 6.35 shows how interesting this can look.
Using steps 2 and 3, add more bats to the other Slide Layouts in the presentation. In some of the Slide Layouts, you can rotate the bats as you like. After the bat is selected, drag the top green handle as required to rotate it.
Click the Slide Master tab on the Ribbon, and click the Close Master View button to get back to your slides. Save your presentation.
There’s one last flourish you can add to the presentation to really add to the Halloween atmosphere: a scary music track.
If you are following the makeover step by step, continue using your saved presentation. If you just stepped in, you can use the halloween_11.pptx presentation from the Makeover 05 folder on the CD.
Here’s how you can add some scary music:
Because we are going to insert a sound clip from Microsoft’s Office Online collection, we need to be sure that the sound inserted is embedded within the presentation file itself, just in case you need to copy the presentation to another computer and discover that the sound no longer plays.
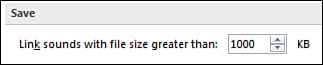
To do that, choose Office Button, PowerPoint Options to bring up a dialog box of the same name. Click Advanced on the left, and scroll down a little on the right side under Save so that you can set the Link Sounds Larger Than parameter. Change that to 1000 kb, as shown in Figure 6.36. Click OK to get back to your presentation.
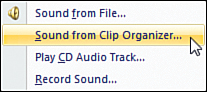
Make sure you are on the first slide of the presentation. Now click the Insert tab on the Ribbon, and click the small arrow below the Sound button to bring up the short list that you can see in Figure 6.37.
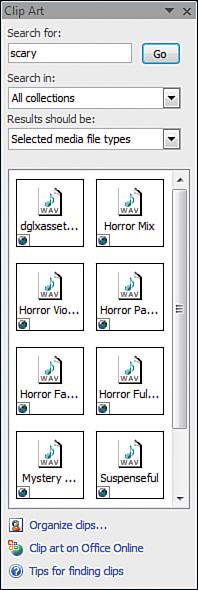
Choose the Sound from Clip Organizer option to activate the Clip Art task pane that you see in Figure 6.38. At this point, if PowerPoint asks you for permission to search Microsoft’s online media collection, say yes.
Type
scaryin the Search For text box, and click the Go button. Assuming you are connected online, PowerPoint will search Microsoft’s media servers for scary sounds and show you the results within the pane (refer to Figure 6.38).Tip
If you choose to insert sound by clicking the Clip Art button on the Insert tab of the Ribbon, you will need to click the Results Should Be option in the Clip Art pane and choose Sound to filter the search to just sound files. This is one reason it’s easier just to choose the Sound button on the Insert tab of the Ribbon.
You can preview any of the sounds by right-clicking the sound icon in the pane and choosing the Preview/Properties dialog box, as shown in Figure 6.39.
To insert the sound, right-click the sound icon in the pane, and choose Insert. We chose a clip called Horror Full Mix. PowerPoint will show you a dialog box that lets you decide whether you want the sound to start automatically or when clicked. Choose the Automatically option.
You’ll see a sound icon right in the middle of your slide. In addition, the Ribbon will show you the Sound Tools Options tab, as shown in Figure 6.390. In the Play Sound drop-down list, choose the Play Across Slides option, and check the Loop Until Stopped check box.
You now can drag that sound icon off the slide area to get it out of view.
Save your presentation.

You can view (and hear) the finished presentation, halloween_12.pptx from the Makeover 05Steps folder on the CD.