
This chapter helps you to prepare for the exam by covering the following Microsoft-specified objectives for the Installing and Upgrading Windows Vista section of Exam 70-620, TS: Microsoft Windows Vista, Configuring:
Configure and troubleshoot User Account Control.
<objective>User Account Control improves on security by enabling users to run without administrative privileges and provides a prompt when a user performs an action such as installing an application that requires administrative privileges. Microsoft expects you to know how to configure several policies related to User Account Control and troubleshoot problems that can arise.
</objective>Configure Windows Defender.
<objective>Windows Defender helps keep your computer secure by preventing installation of spyware, adware, and other unwanted software that unscrupulous websites can attempt to install. Support staff and administrators must ensure that users’ computers remain secure from these types of threats.
</objective>Configure Dynamic Security for Internet Explorer 7.
<objective>Users who access Web resources through Internet Explorer can inadvertently expose their computer to security problems. Ranging from hackers to malware, the exposure on the Internet can cause serious problems to a computer. Not only does an administrator need to protect the computer, but also the privacy of the user’s personal information.
</objective>Configure security settings in Windows Firewall.
<objective>You can configure the types of communication that are allowed to pass in either direction across Windows Firewall. In the 70-620 exam, Microsoft tests your ability to limit communications to only those that are desired, as well as troubleshoot communication problems that can occur across the firewall.
</objective> </feature>Outline
Whether a computer is used as a standalone, a portable laptop, a member of a workgroup, or a member of a domain, it can be subject to security breaches. All it takes is a person who can physically or remotely access the computer and gain rights to view or change its files. The risk can range from theft of proprietary information, to a breach of personal privacy, to malicious attacks on the computer’s operating system.
The following is a brief summary of popular attack methods used by hackers and crackers in recent years (for additional information, see any recent book dedicated to computer security, including those listed in the “Suggested Readings and Resources” section of this chapter):
Denial of service (DoS)—. This includes any type of attack that disrupts access to services and resources that a user should be able to reach. In its usual form, a computer is so overwhelmed by such a large number of data packets that it is unable to perform normal activities. A distributed denial of service (DDoS) attack is similar except that the attacker uses a series of computers to attack and overwhelm the target.
Spoofing—. This attack impersonates a legitimate user or website to make you believe that data being sent is genuine. Phishing, or the attempt to deceive you into sending confidential information such as bank account or credit card numbers to attackers, is a type of spoofing.
Man-in-the-middle—. An attacker intercepts traffic by entering the mid-point of a legitimate communication and attempts to deceive the parties at both ends into believing that they are communicating with each other, when they are actually communicating with the attacker. TCP/IP hijacking is a type of this attack, in which the attacker uses source-routed IP packets to take over a TCP session between two legitimate computers.
Password guessing—. Programs exist that attempt to sniff passwords being transmitted across a network, either by searching dictionaries for commonly used passwords or utilizing a brute force method to try all possible combinations of letters, numerals, and special characters until a password is found.
Social engineering—. An attacker can take advantage of the kind nature of individuals by masquerading as a user such as a manager who has forgotten her password or other authentication information.
Malicious software—. A malicious or compromised website or email message can distribute software programs that are intended to cause harm to any user accessing the website or message. Viruses, worms, and Trojan horses were the earliest types of malicious software (malware) employed by attackers. In recent years, more insidious forms of malware have arisen, including back doors, keystroke loggers, logic bombs, adware, spyware, and rootkits.
Windows Vista incorporates a number of security technologies to protect it from these and other types of attacks. First introduced in Windows XP SP2, the Windows Security Center shown in Figure 5.1 enables you to configure many of these features.
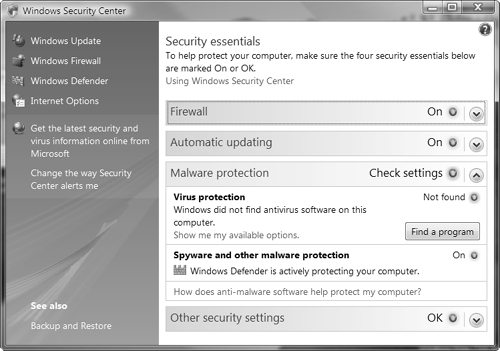
This chapter looks at how you configure and troubleshoot User Account Control, Windows Defender, Internet Explorer security options, and Windows Firewall.
Although Microsoft did not include configuration of user and group accounts in its Exam 70-620 objectives, an introductory knowledge of how these accounts operate is important in understanding security configuration and how features such as User Account Control operate. For this reason, this section includes an introduction to this topic.
Note: Principle of Least Privilege
In developing Windows Vista, Microsoft stressed the Principle of Least Privilege, which in its simplest form states that programs and services should run in a user account that is granted the minimum privileges required to run properly. Microsoft has simplified the processes behind running a computer with a standard user account by granting such accounts the privileges to do tasks such as modifying time and power settings while limiting actions that malicious software can perform. Internet Explorer 7 runs in Protected mode by default, and Windows services operate under a profile that enables only the minimum privileges required to run properly. Furthermore, most drivers run in user mode, which grants them fewer privileges than they formerly received by running in kernel mode. For more information on the Principle of Least Privileges, refer to Applying the Principle of Least Privilege to Windows Vista in the “Suggested Readings and Resources” section at the end of this chapter.
Every person who logs on to Windows Vista must do so with a user account. If the user account has been granted greater rights and permissions, the user can access resources on that computer that otherwise would be inaccessible. Problems arise in productivity when users are not able to access the resources that they need to conduct their jobs. One alternative is to allow users to have unrestricted rights to the computers and resources. However, this can result in an even greater loss of productivity because a user could unintentionally render the computer inoperable in any number of ways. The trick to effective management is to create a balance between rights granted to users and those denied.
One of the top concerns regarding user rights is file and folder access, especially the rights configured for shared folders or on computers that are shared by multiple users. Because multiple people potentially can access a file at any time on shared folders and shared computers, a misapplied right can compromise a file containing private data.
Best practices dictate that users should never be granted rights individually. Instead, you should create a group to be granted that permission even if only one user needs the access to the resource. This practice makes it easier to duplicate the types of rights and permissions that users require to perform certain functions. For example, if you are managing a workgroup for a tax accounting business, you can expect that seasonally the work will increase. With extra work, additional tax preparers will require the same access as a current tax preparer. To make certain that all the additional tax preparers have the same rights to the shared folders, you can add them to the group (or combination of groups) that includes the current tax preparers. This method certainly beats trying to re-create the same rights for each file, folder, and other resources that a user account was granted individually.
Any person who owns an object can grant or deny permissions to other users or groups. If permission is not specifically and explicitly granted to a user or the groups to which the user belongs, then the permission is implicitly denied. For example, if you create a group called SALES that has Read privileges to the Sales Literature folder and Full Control privileges to the Sales Database folder and its contents, a user who is not a member of the SALES group (and has not been granted any other rights explicitly or through other group membership) is not allowed to read the files in the Sales Literature folder or access the Sales Database folder contents.
Caution: Denial wins out
When permission is explicitly denied to a user or group, even if the user is a member of another group where the same permission is explicitly granted, the Deny permission overrides all others, and the user will not be allowed access.
Permissions are stored as access control entries (ACE) in a discretionary access control list (DACL). (ACEs can be placed in the object’s system access control list [SACL], which determines what will trigger an audit event.) Whenever a user requests authorization to use a prohibited object or resource, the user sees an Access Is Denied message.
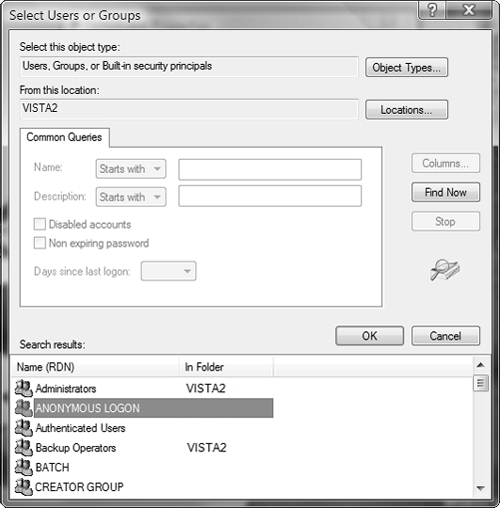
When a local user account attempts to use a domain-based network resource, the user is disallowed unless the resource has been configured to allow Anonymous access. To enable anonymous access, you can select ANONYMOUS LOGON, which is a built-in special group, from the Select Users or Groups dialog box, which is displayed in Figure 5.2.
You can use User Accounts and Family Safety in Control Panel to create new local user accounts. Chapter 4 demonstrates the use of this feature.
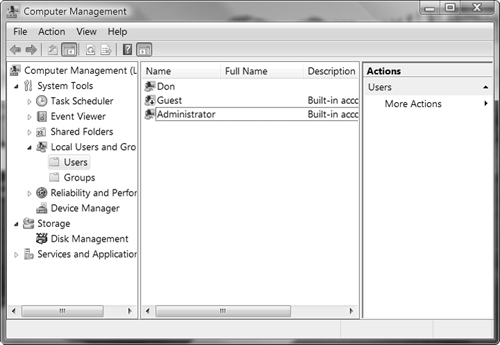
To create and configure both user and group accounts, you should use the Computer Management console, shown in Figure 5.3, which you can open by clicking Start, right-clicking Computer, and selecting Manage from the shortcut menu. You will need to provide administrative permission to use this feature.
Note: Password never expires
When you create or edit a user account, you are provided with an option to configure for Password Never Expires. This setting overrides any password settings in Group Policy or Local Security Policy. You should use this option only for user accounts that are used for applications that must interact as a user with the operating system.
Local users receive their rights to access resources by being explicitly granted permissions or by being members of local groups that have been granted permissions. You cannot add local users to domain global groups—you can add domain users only to global groups in a domain. However, you can always add a domain global group as a member of a local group if Windows Vista Business, Enterprise, or Ultimate is a member of the domain.
Tip: Using whoami to troubleshoot user rights
You can troubleshoot user rights using whoami, a command-line utility that is installed by default in Windows Vista. To see the rights that the current user has, type whoami at the command prompt. You can see everything in verbose mode by typing whoami /all. This utility displays all groups, even the built-in groups that do not appear under Member Of property sheets, which you can use to track down a misconfigured right.
Managing Local Group Accounts
Windows Vista provides a number of default local groups. Table 5.1 lists the more commonly accessed default local groups. The Authenticated Users and Interactive groups are special built-in groups described later in Table 5.2. Their inclusion in the Users group allows any user who has submitted correct credentials to be considered a member of the Users group. Removing the Authenticated Users and Interactive groups from the Users group will cause problems and potentially prevent access to the computer from applications such as Remote Assistance.
Table 5.1. Default Local Groups in Windows Vista
Local Group | Default Access | Default Members Locally |
|---|---|---|
Administrators | Unrestricted access to the computer | Administrator |
Backup Operators | Access to run Windows Backup and sufficient access rights that override other rights when performing a backup | N/A |
Guests | Limited only to explicitly granted rights and restricted usage of computer | Guest |
Network Configuration Operators | Access to manage the network configuration of the computer, such as TCP/IP properties | N/A |
Power Users | Not used directly with Vista; included only for backwards compatibility with previous Windows versions | N/A |
Remote Desktop Users | Limited to accessing the computer via a remote desktop connection plus any explicitly granted rights and restricted usage of computer | N/A |
Users | Limited to use of the computer, personal files and folders, and explicitly granted rights | All newly created users. NT AuthorityAuthenticated Users special built-in group NT Authority Interactive special built-in group |
Table 5.2. Built-in Special Groups in Windows Vista
Built-in Group | Default Access | Default Members Locally |
|---|---|---|
Anonymous Logon | Not provided any default access rights | User accounts that Windows Vista cannot authenticate locally |
Authenticated Users | Not given any default access rights | All users with valid local user accounts on this computer |
Creator Owner | Designated full control over resources created or taken over by a member of the Administrators group | Administrators group |
Dialup | No specific rights; this group is not shown on systems without configured modems and dial-up connections | All users who have connected to the computer with a dial-up connection |
Everyone | Full control is the default permission granted for all files and folders on NTFS volumes; you must remove this permission to implicitly deny access | All users who access the computer |
Interactive | No specific rights | All users who have logged on locally to the computer |
Network | No specific rights | All users who have established a connection to this computer’s shared resource from a remote network computer |
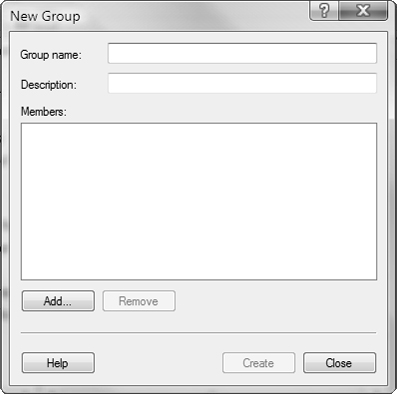
Best practices state that you should never change the default rights and members of a default local group or built-in group. Instead, you should create your own specific groups, provide them with explanatory names and descriptions, and then grant or deny those groups the necessary rights. To create a group, open the Local Users and Groups console (by accessing it in Computer Management, or typing lusrmgr.msc in the Run dialog box and pressing Enter, or adding the Local Users and Groups snap-in in the Microsoft Management Console [MMC]). Right-click Groups and select New Group from the shortcut menu. The New Group dialog box opens, as shown in Figure 5.4.
When you name the group, you will be restricted from using special characters ( / “ [ ] : | < > + = ; , ? * @), the same as you would when creating a new user. To add new members to the group after it is created, you can right-click the group and select Add to Group from the shortcut menu. When you delete a local group, you delete the group and its permissions but not any users who are members of the group.
You are not allowed to modify the built-in system groups directly in the Local Users and Groups console because their membership is not based on who the user is, but on how the user was able to access the computer. A user is dynamically included in these groups after satisfying the authentication required by the group. You are able to add or deny rights and permissions to built-in special groups. To prevent severe problems when granting rights, never deny nor increase rights to these groups—create your own special group and deny or grant the rights to that group and then add the users to whom these rights should be given. Table 5.2 discusses several of the more common built-in special groups.
As outlined in Chapter 1, “Introducing Windows Vista,” you can join computers running the Business, Enterprise, or Ultimate editions of Windows Vista to an Active Directory domain hosted on domain controllers running Windows 2000 Server, Windows Server 2003, or Windows Server 2008. To do so, ensure that you are connected to the network hosting the domain controllers. Then follow Step by Step 5.1.
Joining a Windows Server domain
Access the System Properties dialog box and click Change Settings in the Computer Name, Domain, and Workgroup Settings section of this dialog box.
Click Continue on the User Account Control prompt that appears.
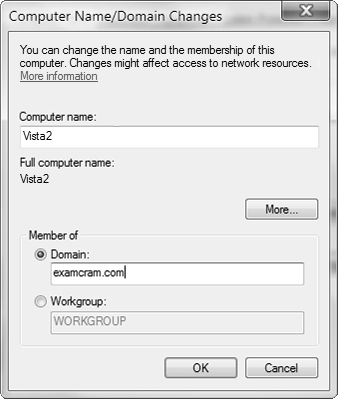
In the System Properties dialog box, click Change to access the Computer Name/Domain Changes dialog box.
Under Member of, select Domain and type the name of the domain to be joined and then click OK, as shown in Figure 5.5.
When requested, supply the credentials of an account with Domain Administrator privileges in the selected domain.
You will have to restart the computer to complete this action.
After you have joined the domain, you should use only domain user accounts to log on to your computer, as already mentioned. In addition, you can use domain-based user and group accounts to configure security on your Windows Vista computer. This enables you to utilize domain groups with the following group scopes:
Global—. You can use these groups to contain users, computers, and other global groups from the same domain. They are generally employed to organize users who have similar functions and therefore similar needs on the network. For example, you might include all help desk staff in one global group, all accounting staff in another global group, and so on.
Domain local—. You can use these groups to contain users, computers, and groups from any domain in the Active Directory forest. Note that a forest is a group of domains that share a common trust relationship, schema, and configuration. They are most often used for granting permissions for resources and as such may be employed to grant access to any resource in the domain in which they are created. Therefore, it is logical for a domain local group to include global groups that contain all users who have a common need for a given resource.
Universal—. Similar to the way you use domain local groups, you can employ these groups to grant permissions to resources. However, this group scope enables you to grant access to any resource in the Active Directory forest, rather than just a single domain. A universal group can include users, computers, and global groups from any domain.
You can add any of these domain groups directly to local groups on your Windows Vista computer to grant access to files and folders on your computer. In addition, the following default domain groups are automatically added to local groups when you join your computer to a domain:
The Domain Admins global group is added to the Administrators local group.
The Domain Guests global group is added to the Guests local group.
The Domain Users global group is added to the Users local group.
All domain user accounts in the computer’s domain or any trusted domain are added to the Authenticated Users special built-in group.
For more information on Active Directory domains, user accounts, and group accounts, refer to MCSE Exam 70-294 Exam Prep: Planning, Implementing, and Maintaining a Microsoft Windows Server 2003 Active Directory Infrastructure in the “Suggested Readings and Resources” section.
Objective: Configure and troubleshoot User Account Control.
In previous versions of Windows, many users became frustrated with the inability to perform many common tasks and therefore ran their computers with an administrative user account, often the default Administrator account created when Windows was installed. These users received total system privileges as required for installing and configuring applications, modifying system configuration, running background system tasks, installing device drivers, and performing other system configuration actions. Such a practice left the computers open to many types of attack by malware programs such as those mentioned at the start of this chapter.
Administrators and technical support personnel in a corporate environment were often left in a dilemma. They could grant users administrative privileges, which can result in users changing settings, either accidentally or deliberately, that disrupted computer or network performance or compromised security. Or they could limit user privileges, which often limited productivity because users were unable to perform basic tasks such as connecting to a wireless network or installing a printer driver.
Windows Vista addresses this problem by introducing a new feature called User Account Control (UAC). Simply put, UAC requires users performing high-level tasks to confirm that they actually initiated the task. Members of the Administrators group are logged on with only normal user privileges and must approve administrative actions before such actions will run. Non-administrative users must provide an administrative password. Providing administrative approval to run such tasks places the computer into Admin Approval mode.
UAC requests approval before running administrative tasks on the computer. UAC redefines what a standard user is permitted to do: Such a user can perform many basic functions that pose no security risk but previously required administrative privileges. In addition, it facilitates the act of providing administrative credentials when users needed to perform a higher-level task such as installing an application or configuring system settings. Furthermore, UAC makes administrative accounts safer by limiting tasks that can be performed without providing additional consent and requesting such consent for performing tasks such as system tasks that require higher privileges.
Under UAC, all users (administrative or not) can perform tasks such as the following without supplying administrative credentials:
Viewing the system clock and calendar and configuring the time zone (but not changing the system time)
Modifying power management settings
Installing printers and hardware devices that an administrator has allowed using Group Policy
Using Wired Equivalent Privacy (WEP) to connect to an approved wireless network
Creating and configuring an approved virtual private network (VPN) connection
Installing ActiveX controls from sites that an administrator has approved
Installing critical updates from Windows Update
Exam Alert: The Power Users group
The tasks summarized here are similar to those granted to members of the Power Users group in previous Windows versions. Vista includes the Power Users group solely for backwards compatibility purposes. You do not need to add users to this group to perform these functions. Only add users to this group if required for running non-certified or legacy applications. To grant this group all the privileges provided in Windows XP, you must apply a default security template that modifies default permissions on system folders and the Registry. An exam choice that suggests adding a user to the Power Users group in Vista is most likely incorrect in all instances.
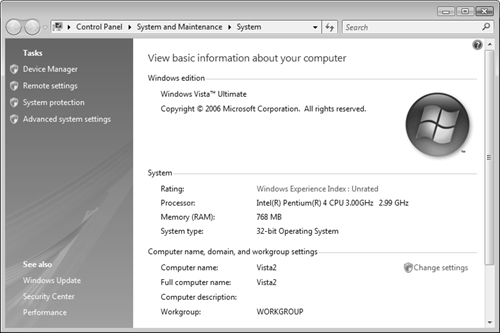
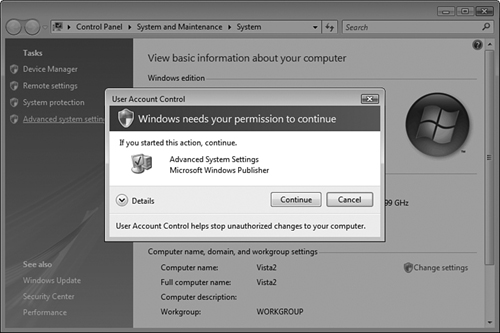
When authenticating a member of the Administrators group, Vista issues two access tokens: a full administrator token and a standard user token. The standard token is used for all actions that do not require administrative privileges, while the administrator token is used only when administrative privileges are required. Windows Vista informs you when a task requires elevated (administrative) privileges by displaying a shield icon such as those that appear in the Tasks column of the System applet shown in Figure 5.6. When you select one of these tasks, the screen dims and you receive a UAC prompt (also known as an elevation prompt), as shown in Figure 5.7. When you click Continue, the administrative access token grants you elevated privileges, enabling you to perform the task you have selected.
The dimmed screen indicates that the UAC prompt is running in secure desktop mode (such as when the Ctrl+Alt+Delete prompt appears when logging on to a domain-based computer). This means that you must either approve or cancel the UAC prompt before you can continue performing any other task on the computer.
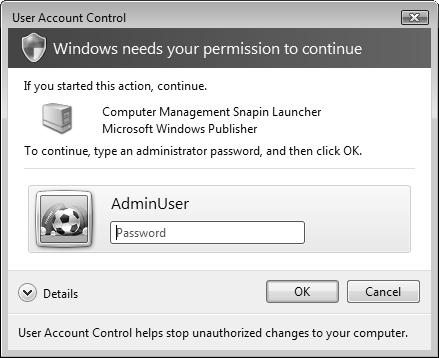
A user who is not a member of the Administrators group receives only the standard user token when her access is authenticated. Such a user receives the UAC prompt shown in Figure 5.8, which requires that a password for an Administrator user account be entered.
Caution: Protecting your computer
Always ensure that the action that launches a UAC prompt is the one you want to perform. This is especially true if a UAC prompt appears unexpectedly, which could indicate a malware program is attempting to run. Should this happen, click Cancel, and the program cannot run. You should then scan your computer with one or more malware detection programs.
If a background application that is minimized to the taskbar requires elevated privileges, the UAC prompt appears on the taskbar and blinks to draw attention. An example of where this would happen is in the downloading of an application from the Internet. When the download completes and approval for installation is required, the user can click the prompt and approve it. This enables the user to continue performing other tasks such as reading email without being interrupted by the UAC prompt.
Note: UAC and Parental Controls
In a family setting, UAC supplements the functions that a parent can control with the Parental Controls feature introduced in Chapter 4. Parents can give each child a user account with ordinary privileges. When a child needs to perform a task such as installing a program, the child receives a UAC dialog box asking for administrative approval and can ask a parent to enter administrative credentials. This enables the parent to approve programs a child wants to use as required.
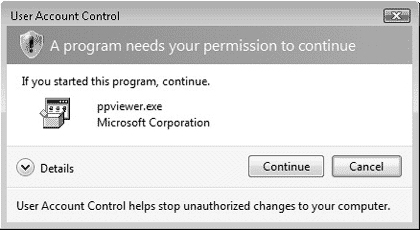
UAC causes some third-party applications to display prompts when you attempt to run them. This helps to secure your computer because the prompt informs you of the program that is attempting to run so that you can verify that this is a program you really want to run. Click Continue to run the program or Cancel to exit. When running with an administrative account, a program with a legitimate digital signature that includes its name and publisher will display the prompt appearing in Figure 5.9.
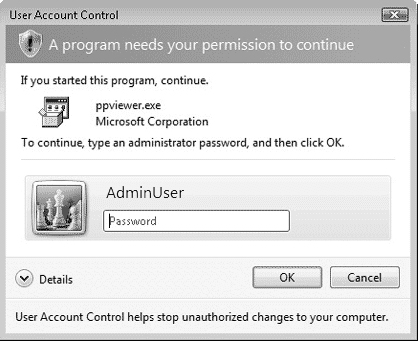
A non-administrative user running a similar program will receive the prompt appearing in Figure 5.10.
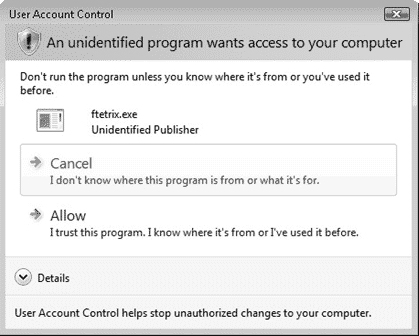
If the third-party program does not have a digital signature that includes its name and publisher, the prompt that appears is stronger. It uses a yellow title bar and yellow shield, as shown in Figure 5.11. If a prompt with a strange program name appears, click Cancel to prevent it from running.
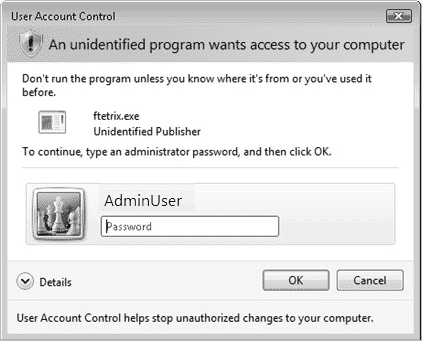
When a non-administrative user runs a program without a digital signature, UAC asks for an administrative user password, as shown in Figure 5.12.
Microsoft has provided several means of configuring applications and tasks to run with elevated privileges. Follow Step by Step 5.2 to perform a task with elevated privileges.
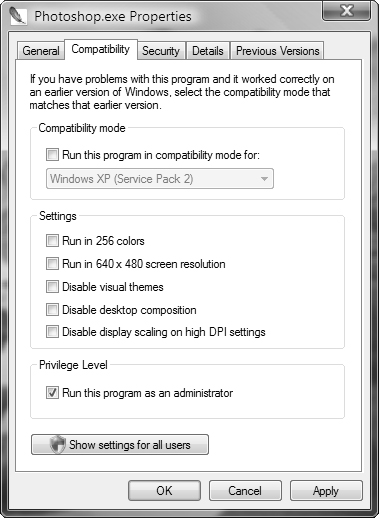
You can also mark an application to always run with elevated privileges. This situation may occur if the application developer has coded the program to access protected folders such as the %ProgramFiles% or %Systemroot% folders, or requires access to the Registry. Follow Step by Step 5.3 to mark an application to always run with elevated privileges.
Configuring an Application to Always Run with Elevated Privileges
Ensure that you are logged on to the computer as a member of the local Administrators group.
Right-click the desired application and choose Properties.
On the Compatibility tab of the application’s Properties dialog box, select Run This Program as an Administrator, as shown in Figure 5.13. Then click OK.
Caution: Default Administrator account
If you are logged on using the default Administrator account created when you install Windows Vista, you do not receive any UAC prompts. Do not use this account except under emergency conditions. Best practices recommend that this account be disabled.
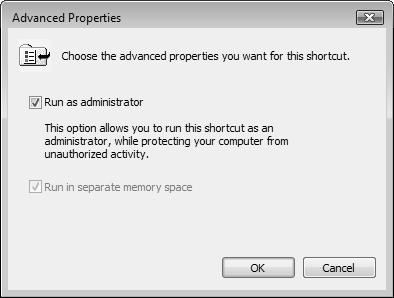
You can also configure a program to request administrative privileges from its shortcut properties. When you do this, the program always displays a UAC prompt when started from its shortcut. Follow Step by Step 5.4 to do so.
Configuring an Application to Request Elevated Privileges
Ensure that you are logged on to the computer as a member of the local Administrators group.
If necessary, drag a shortcut to the desktop.
Right-click the shortcut and choose Properties.
On the Shortcut tab, click the Advanced button.
On the Advanced Properties dialog box shown in Figure 5.14, select the Run as Administrator check box, and then click OK.
Click OK to close the shortcut Properties dialog box.
Note: Windows programs and shortcuts
You cannot configure Windows components to always run in elevated privileges. For these programs, the options on the Compatibility tab shown previously in Figure 5.13 are unavailable (dimmed). For these components, you must perform the procedure outlined in Step by Step 5.3 so that the program displays a UAC prompt when started from the shortcut.
Also note that if you start the program that you have configured in Step by Step 5.3 from the Start, All Programs menu, it does not display a UAC prompt and runs in normal mode.
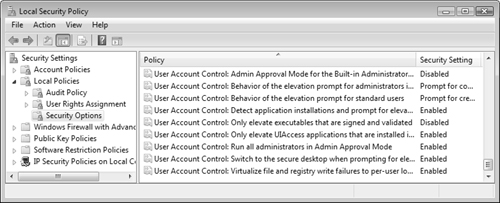
Microsoft has provided a series of policies in Vista Group Policy that govern the behavior of UAC. These policies are available from the Group Policy Object Editor snap-in (available by typing gpedit.msc from the Run dialog box) or from the Local Security Policy snap-in. Follow Step by Step 5.5 to configure UAC policies.
Using Local Security Policy to Configure UAC
Click Start, Control Panel, System and Maintenance, Administrative Tools, Local Security Policy. You can also click Start, Run, type
gpedit.msc, and then press Enter.Click Continue on the UAC prompt that appears.
On the Local Security Policy console, navigate to the Security SettingsLocal PoliciesSecurity Options node.
Scroll to the bottom of the policy list to view and configure the available policies, as shown in Figure 5.15.
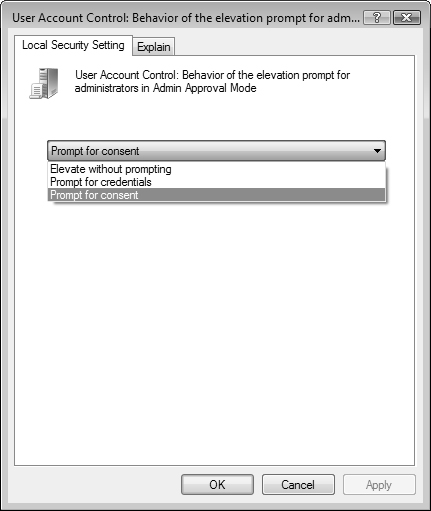
To configure a policy, right-click it and choose Properties. Choose Enabled or Disabled as required, and click OK. Two of the policies offer options from a drop-down list, as shown in Figure 5.16. You can also click the Explain tab for further information on each policy.
When finished, click OK.
Group Policy makes the following UAC policies available:
Admin Approval Mode for the Built-in Administrator—. Governs the behavior of the built-in Administrator account. When enabled, this account displays the UAC prompt for all actions requiring elevated privileges. When disabled, this account runs all actions with full administrative privileges. Disabled by default.
Behavior of the Elevation Prompt for Administrators in Admin Approval Mode—. Determines the behavior of the UAC prompt for administrative users. This policy has the following options:
Prompt for Consent—. Enables an administrator to select either Permit or Deny when an action runs that requires elevated privileges. Select Permit to run the action with the highest possible privileges. This is the default.
Prompt for Credentials—. Prompts for an administrative username and password when an action requires administrative privileges. When selected, administrative users receive the prompt previously shown in Figure 5.8 for non-administrative users.
Elevate without Prompting—. Enables the administrator to perform the action without consent or credentials. In other words, the administrator receives Admin Approval mode automatically. This setting is not recommended for normal environments.
Behavior of the Elevation Prompt for Standard Users—. Determines the behavior of the UAC prompt for non-administrative users. This policy has the following options:
Prompt for Credentials—. Displays a prompt to enter an administrative username and password when a standard user attempts to run an action that requires elevated privileges. This is the default.
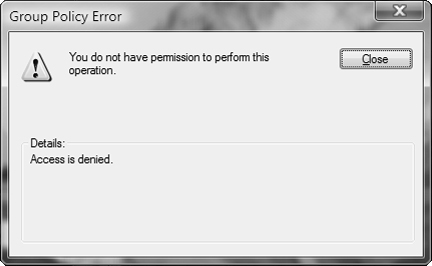
Automatically Deny Elevation Requests—. Displays an Access is Denied message similar to that shown in Figure 5.17 when a standard user attempts to run an action that requires elevated privileges.
Detect Application Installations and Prompt for Elevation—. When enabled, displays a UAC prompt when a user installs an application package that requires elevated privileges. When disabled, domain-based Group Policy or other enterprise-level technologies govern application installation behavior. Enabled by default in an enterprise setting and disabled by default in a home setting.
Only Elevate Executables that are Signed and Validated—. When enabled, performs public key infrastructure (PKI) signature checks on executable programs that require elevated privileges before they are permitted to run. When disabled, no PKI checks are performed. Disabled by default.
Only Elevate UIAccess Applications that are Installed in Secure Locations—. When enabled, runs applications only with UIAccess integrity if situated in a secure location within the file system such as
%ProgramFiles%or%Windir%. When disabled, the application will run with UIAccess integrity regardless of its location in the file system. Note that UI (User Interface) Access-application programs and accessibility tools used by developers to push input to higher desktop windows require theuiAccessflag to be equal to true; that is,uiAccess=true. Also the application program that wishes to receive the uiAccess privilege must reside on the hard drive in a trusted location and be digitally signed. Disabled by default.Run All Administrators in Admin Approval Mode—. When enabled, enforces Admin Approval mode and other UAC policies. When disabled, all UAC policies are disabled, and no UAC prompts will be displayed. In addition, the Windows Security Center will notify the user when disabled and offer the option to enable UAC. Enabled by default.
Switch to the Secure Desktop When Prompting for Elevation—. When enabled, displays the secure desktop when a UAC prompt appears. When disabled, the UAC prompt remains on the interactive user’s desktop. Enabled by default.
Virtualize File and Registry Write Failures to Per User Locations—. When enabled, redirects application write failures for pre-Vista applications to defined locations in the Registry and the file system, such as
%ProgramFiles%,%Windir%, or%Systemroot%. When disabled, applications that write to protected locations fail as was the case in previous Windows versions. Enabled by default.
Caution: Don’t disable UAC completely
If you disable the Run All Administrators in Admin Approval mode policy setting, you disable UAC completely, and no prompts will appear for actions requiring elevated privileges. This leaves your computer wide open for attack by malicious software. Do not disable this setting at any time!
Note that the Windows Security Center will display a message from the notification area if you have disabled this setting.
Configuring Windows Defender
Objective: Configure Windows Defender.
First available in Windows XP as Windows AntiSpyware beta, Windows Defender is a program that protects your computer against the damaging effects of spyware. Spyware is malicious software that hides on your computer and performs nefarious activities such as the following:
Logging your Internet browsing habits and sending pop-up advertisements that reflect these habits
Modifying your default Internet Explorer start page and search engine
Adding unwanted, difficult to remove toolbars to Internet Explorer and Windows Explorer
Logging keystrokes that capture confidential information such as passwords
Sending personal data such as credit card or Social Security numbers to unauthorized parties
Taking control of your computer for purposes such as storing pirated data or sending spam
Causing a general slowdown of computer performance with more frequent program or system crashes
Although you might think that Windows Firewall would block spyware downloads or UAC would display prompts when spyware attempts to install or run, most spyware programs piggyback onto otherwise legitimate programs that users download from the Internet. These problems are great enough that Microsoft decided to integrate Windows Defender into Vista as an important component of the operating system. Windows Defender provides an additional layer of protection against these types of malware.
Windows Defender monitors your computer for telltale signs of spyware activity. When it finds problems, it attempts to block the actions of spyware and remove it from your computer. It displays alerts in the event that a serious problem requiring your immediate action should occur. In addition, it collects and sends information about the spyware infection to a Microsoft online community called SpyNet, which assists other users in detecting and combating spyware attacks.
Tip: Using third-party anti-spyware programs
Windows Defender can cooperate with third-party anti-spyware programs to provide an enhanced level of protection from malware. Other programs may have spyware definitions or scan techniques not yet built into Windows Defender. Spyware is pervasive and uses a large number of methods to infect computers, so it is always worthwhile to have more than one anti-spyware program running at the same time.
Windows Defender automatically and continuously monitors your computer for signs of unwanted applications, concentrating on often-abused locations such as Registry keys and the Startup folder. By default, it also performs a quick scan of the most vulnerable locations of your computer daily at 2:00 AM. An application attempting to perform a modification in such a location will cause Windows Defender to display a prompt, asking the user either to allow or reject the modification.
Follow Step by Step 5.5 to perform scans using Windows Defender.
Performing Windows Defender Scans
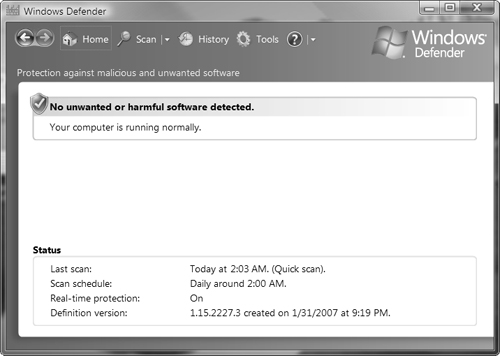
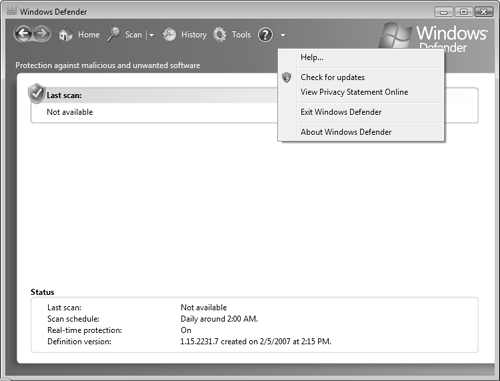
Start the Windows Defender configuration screen, which is shown in Figure 5.18, using one of the following procedures:
Click Start and type
defenderin the Search box. Then click Windows Defender in the program list.Click Start, Control Panel, Security, Windows Defender.
Click Start, All Programs, Windows Defender.
To perform an immediate quick scan, click Scan. Windows Defender scans the most vulnerable locations of your computer and displays the results.
To perform a full or custom scan, click the triangle next to Scan. This displays a pop-up menu from which you can choose a full scan (scans all computer locations) or a custom scan (enables you to select the drives and folders to be scanned).
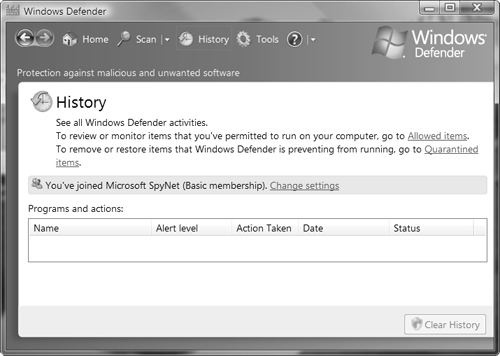
To display a history of recent Windows Defender activities, click History. The History panel shown in Figure 5.19 displays recent actions and provides links to items that are either permitted or restricted from executing.
When you are finished, close Windows Defender. It continues to monitor your computer in the background.
If Windows Defender finds software that it thinks is spyware on your computer, it displays an alert and offers you the following options:
Quarantine—. Places the software in a restricted location on your computer from which it cannot run. You can choose later to delete the software or move it back to a location from which it can run. Use this option if you are unsure whether the program is spyware.
Remove—. Deletes the software permanently from your computer.
Ignore—. Ignores the threat this time only. Windows Defender will detect the threat again the next time it runs.
Always Allow—. Enables the software to run and adds it to the Windows Defender allowed list.
Windows Defender comes with a complete set of configurable actions that govern how it monitors your computer. Follow Step by Step 5.6 to configure actions performed by Windows Defender.
Configuring How Windows Defender Works
Start the Windows Defender configuration screen using one of the methods described in Step by Step 5.5.
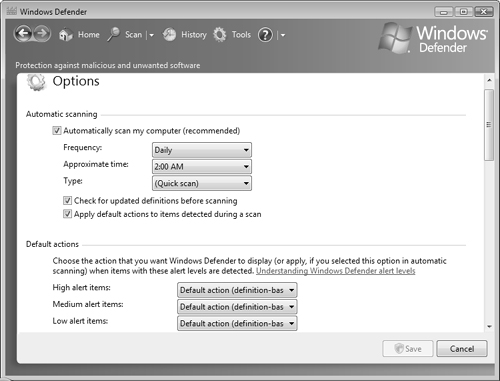
Click Tools, and then click Options to display the Options screen shown in Figure 5.20.
From this screen, configure the following items as required:
Automatically Scan My Computer (recommended)—. Enables you to configure the frequency, time, and type of scan (quick scan or full system scan)
Check for Updated Definitions Before Scanning—. Ensures that Windows Defender always has the most recent spyware definitions from Microsoft. This check box is selected by default.
Apply Default Actions to Items Detected During a Scan—. Automatically removes spyware or other types of malware at the conclusion of a scan. This check box is selected by default.
Default Actions—. Enables you to select the type of action to be applied when items of high, medium, or low alert value are detected.
Real-Time Protection Options—. Enables you to select from a list of security agents to be run. These options are all selected by default. See Table 5.3 for a description of the available security agents.
Table 5.3. Available Security Agents in Windows Defender
Agent
What each agent monitors
Auto Start
Applications that execute automatically on Vista startup, either from the Registry hives or the various Startup folders. Spyware can add itself to these locations to execute without the user’s knowledge.
System Configuration (Settings)
Security-related Windows settings. Spyware can modify these settings to allow it to run undetected.
Internet Explorer Add-ons
Add-ons that run automatically from Internet Explorer. Spyware can masquerade as these add-ons. See Chapter 4 for more information.
Internet Explorer Configuration (Settings)
Browser security settings. Spyware can modify these settings without your knowledge.
Internet Explorer Downloads
Downloaded applications that provide functionality to Internet Explorer, such as ActiveX controls and software installation programs. Spyware is often included with these downloads.
Services and Drivers
Services and drivers interacting with applications and the Windows operating system itself. Spyware can masquerade as services or drivers to perform its actions.
Application Execution
Programs as they start up and execute on the computer. Spyware can attach itself to these programs and run in the background.
Application Registration
Files and other locations in the operating system in which applications including spyware can be inserted to execute.
Windows Add-ons
Software utilities integrated with Windows. Such utilities can collect information about the user and transmit it to unauthorized parties.
Advanced Options—. Enables you to scan archived files and folders, use heuristics to detect potentially harmful or undesired behavior, or create a restore point before applying actions to detected items. These three actions are all selected by default. You can also use the Add button to specify files or locations that Windows Defender should not scan or the Remove button to reenable files and locations for scanning.
Administrator Options—. Enables you to choose whether to use Windows Defender at all (you should never deselect this option) and to allow all non-administrative users to use Windows Defender.
After you have configured these options, click Save and then click Continue in the UAC prompt to apply the configured actions. This returns you to the Tools display, where you can select additional options.
To manage the list of quarantined items, click Quarantined Items from the Tools display. If you have inadvertently quarantined an item that should be allowed, select it, click Remove, and click Continue in the UAC prompt that appears.
To manage the list of allowed items, click Allowed Items from the Tools display. If you have inadvertently allowed an item that should be prevented from running, select it, click Remove from List, and click Continue in the UAC prompt that appears.
Microsoft publishes updates to spyware definition signatures on a regular basis. You might be informed of an available update by receiving a message Windows Defender Definitions haven't been updated on starting Windows Defender. Follow Step by Step 5.6 to check for updates to Windows Defender.
Checking for Updates to Windows Defender
Start the Windows Defender configuration screen using one of the methods described in Step by Step 5.5.
Click the triangle next to the Help (blue question mark) icon. From the pop-up menu that appears (see Figure 5.21), select Check for Updates and then click Continue on the UAC prompt that appears.
You receive a message in the notification area as Windows Defender checks for and installs any available updates. In a few minutes, you receive a message that either the updates were installed successfully or that no updates were available.
If you receive this message but are informed that no updates are available after following Step by Step 5.6, your computer may not be up-to-date from Windows Update. You might also need to uninstall the most recent definition file. For more information, refer to How to troubleshoot definition update issues for Windows Defender in the “Suggested Readings and Resources” section of this chapter.
Using Software Explorer
Windows Defender also includes a program called Software Explorer, which enables you to view information about software programs and system state on your computer. It includes categories for startup programs, currently running programs, network connected programs, and Winsock service providers. Software Explorer provides the following information:
Auto Start—. Specifies programs that are configured to start automatically on Windows startup.
Startup Type—. Specifies the location where automatically starting programs are registered; for example, a user’s or All Users Startup folder or various Registry hives.
Ships with Operating System—. Indicates programs that were installed as Windows components.
Classification—. Specifies whether the program has been tested for risks to computer security or personal privacy.
Digitally Signed By—. Specifies whether the program has been signed and the name of the publisher that signed it. You should locate additional details about unsigned software before deciding whether you trust such programs.
Using Software Explorer you can perform actions such as either temporarily or permanently disabling a program from running at startup. Follow Step by Step 5.7 to run Software Explorer.
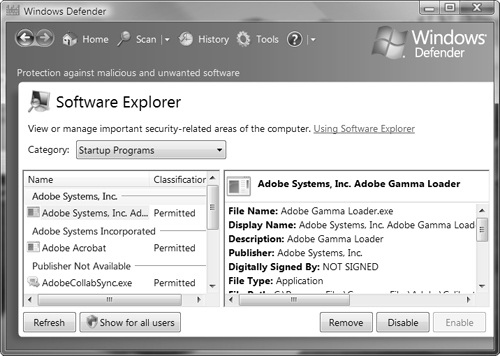
Using Software Explorer
Start the Windows Defender configuration screen using one of the methods described in Step by Step 5.5.
Click Tools and then click Software Explorer. Software Explorer opens to the Startup Programs category as shown in Figure 5.22.
The list on the left side displays programs configured to start from various locations, including the User Profile, All Users, and the Current User and Local Machine hives of the Registry. To view information on a startup program, select it from the list. Information appears on the right side of Software Explorer.
To prevent a program from starting once only, select it and click Disable. Click Yes on the prompt that asks you whether you are sure you want to disable this program.
To remove it permanently from the Startup folder, click Remove and then click Yes on the confirmation prompt.
To view a list of programs currently running on the computer, select Currently Running Programs from the Category drop-down list. To shut a program down, select it and click End Process. To open Task Manager, which offers additional options for managing applications running on the computer, click Task Manager. Chapter 8, “Maintaining and Optimizing Systems That Run Windows Vista,” discusses Task Manager in more detail.
To view programs running from a network location, select Network Connected Programs from the Category drop-down list. You receive the same options available for other programs.
To view Winsock service providers, select it from the Category drop-down list. These are programs that perform fundamental networking and communication services for Windows and its running programs. This option does not have any configurable controls.
Objective: Configure Dynamic Security for Internet Explorer.
In Chapter 4 you learned about the new features of Internet Explorer 7 and how to perform basic configurations, including tabbed browsing, pop-up windows, interface customizations, add-ons, and Really Simple Syndication (RSS) feeds. Here, the discussion of Internet Explorer continues by showing you how to configure and troubleshoot Internet Explorer’s security settings. The term “dynamic security” refers to the multiple, interrelated security features that defend your computer against multiple attacks, including those introduced at the start of this chapter. Also included are technologies that protect users against malicious websites that attempt to steal users’ personal data using tactics such as phishing.
You can configure your Internet Explorer’s security settings from the Internet Properties dialog box, which you can access by any of the following methods:
Click Start, right-click Internet Explorer, and then select Internet Properties.
Click Start, Control Panel, Security, and then select Internet Options.
Open the Security Center and select Internet Options from the list on the left side.
In Internet Explorer, select Tools, Internet Options.
The Security tab of the Internet Properties dialog box displays a list of website types called Internet zones, as shown in Figure 5.23.
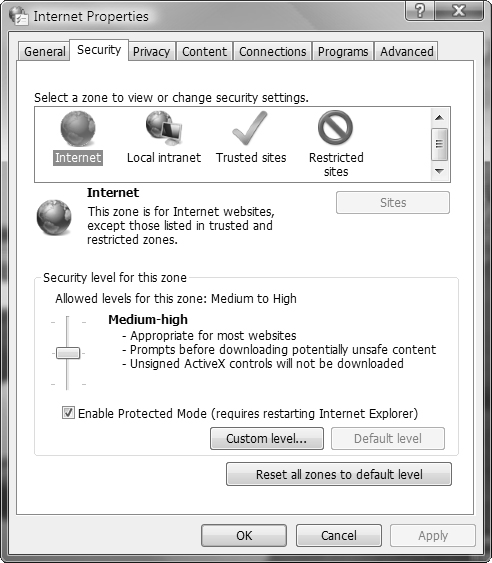
By default, all websites are included in the Internet zone. To move a website to another zone, select the desired zone and click Sites. On the dialog box that appears, type or copy the URL to the text box provided, click Add, and then click Close. You can return a site to the Internet zone by selecting it and clicking Remove. You can also limit the Local intranet and Trusted sites zones to secured sites whose URL starts with https: by selecting the check box labeled Require Server Verification (https:) for All Sites in This Zone.
Caution: Trusted Sites zone
The default security for the Trusted Sites zone is considerably lower than that for any of the other zones. Be absolutely certain that you trust a website implicitly before adding the site to this zone. If you are uncertain, you should leave the site in the Internet zone until you have investigated it thoroughly.
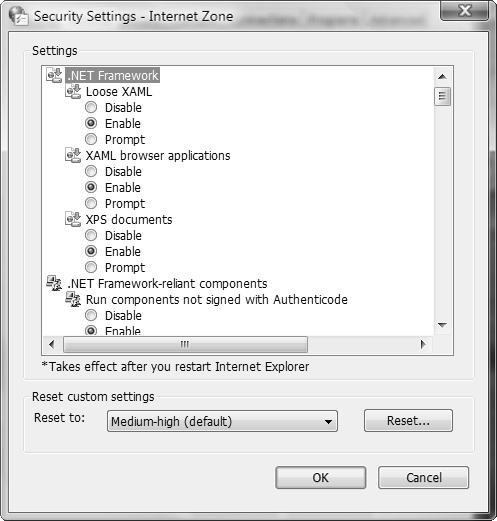
To configure the security settings for an Internet zone, click the zone to select it and then click the Custom Level button. The Security Settings dialog box opens, as shown in Figure 5.24, where you can select each individual security setting or set an Internet zone to a predefined group of security settings including Low, Medium-Low, Medium, Medium-High, and High. Unlike previous versions of Internet Explorer, the default Internet zone does not include the Low and Medium-Low options. The default security setting for this zone is Medium-High.
To establish the privacy settings, click the Privacy tab. Here you can select a preset level for handling cookies. If you click the Sites button, you can block or allow privacy information to be exchanged with specific websites. To establish a different method for handling cookies in the Internet zone, click the Advanced button and select your preferred settings.
For security settings that govern specific behaviors in Internet Explorer, click the Advanced tab and scroll down the window to the Security category. Here, you can set options such as reducing problems caused by software downloaded and run from the Internet (do this by clearing the Allow Software to Run or Install Even if the Signature Is Invalid check box).
One of the ways that you can secure Internet Explorer is to ensure that it is updated with the latest patches and service packs available. Microsoft is constantly providing new security updates. To look for these updates, open Internet Explorer, click the Tools menu and select Windows Update. This will take you to windowsupdate.microsoft.com, where you can download and install all types of updates for Windows Vista.
Internet Explorer 7 in Windows Vista introduces the concept of Protected mode, which provides enhanced levels of security and protection from malware. Protected mode prevents websites from modifying user or system files and settings unless you provide your consent. It displays a prompt similar to those discussed with UAC, asking you to confirm any action that attempts to download something to your computer or launch a program. The user can ensure that these actions are desired and prevent any action that would perform an activity such as installing undesired software. You can stop any such type of action and confirm the trustworthiness of the website before proceeding. Protected mode also prevents Internet Explorer from writing data to any location except the Temporary Internet Files folder unless you provide consent (such as during a desired download).
Protected mode is enabled by default on all Internet zones except the Trusted Sites zone, and Internet Explorer confirms this fact by displaying a message Protected Mode: On in the status bar. If this message does not appear, you can turn Protected mode on by selecting the check box labeled Enable Protected Mode on the Security tab shown previously in Figure 5.23 and then restarting Internet Explorer. Internet Explorer might also display an information bar informing you that Protected mode is turned off in this instance.
Exam Alert: Internet Explorer Protected Mode
Protected mode prevents hackers from hijacking your browser for nefarious purposes such as installing malicious software, modifying startup routines, or redirecting your home page. Internet Explorer runs in Protected mode by default and informs you of this fact with a message in the status bar at the bottom of the browser window (see the figures referenced in the previous section). You should not turn this mode off; if it is turned off by mistake, you can reenable it by resetting Internet Explorer to default settings. An exam question might include a situation in which you must check the Protected mode setting.
Content Advisor enables you to control the Internet content that users can view on the computer. You can specify ratings that filter websites according to their content as established by various rating boards. By default, Internet Explorer 7 uses rules formulated by the Recreational Software Advisory Council (RSAC). You can also add content rules set out by other Internet content ratings bureaus that utilize rules formatted according the World Wide Web Platform for Internet Content Selection (PICS). Follow Step by Step 5.8 to enable and configure Content Advisor ratings.
Enabling and Configuring Content Advisor
Access the Content tab of the Internet Properties dialog box using any of the methods described earlier in this section.
Under Content Advisor, click Enable, and then click Continue on the UAC prompt. The Content Advisor dialog box opens, as shown in Figure 5.25.
To configure ratings levels, select a category from the list provided. You can select from the following categories:
Content that creates fear, intimidation, etc.—. Provides three levels for limiting this content from no content to unlimited: None, which prevents any content of this type from appearing; Limited, which limits this content to situations of artistic, medical, educational, sports, or news; or Unrestricted, which removes all limits of this nature.
Content that sets a bad example for young children—. Limits the extent of content that would encourage young children to perform harmful acts or dangerous behavior.
Depiction of alcohol use, depiction of drug use, depiction of gambling, depiction of tobacco use, depiction of weapon use, and incitement/depiction of discrimination or harm—. Provides three levels for each of these categories similar to the fear and intimidation category.
Language—. Limits the extent of vulgar language, profanity, and swearing.
Nudity—. Limits the extent of nudity.
Sexual material—. Limits the extent of sexual acts, including obscured or implied acts, kissing, and so on.
User-generated Content—. Limits the appearance of content from sources such as chat rooms and message boards, including moderated locations.
Violence—. Limits various types of violent acts.
To configure any of these ratings, drag the slider to the desired position.
To specify websites that are always or never approved for viewing, select the Approved Sites tab. Type or copy the URL into the Allow This Web Site text box and then select Always or Never as required.
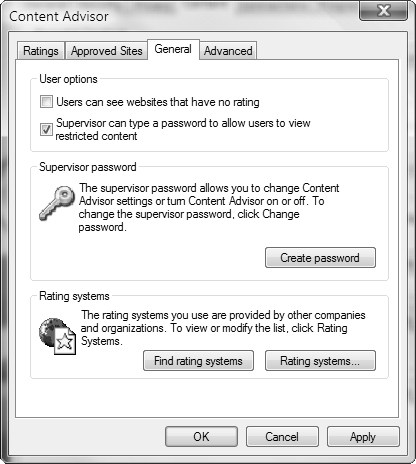
To configure user options, click the General tab and select the following check boxes as required (see Figure 5.26):
Users Can See Websites That Have No Rating—. Enables users to access any Web pages that are not rated. Otherwise, users cannot access these pages.
Supervisor Can Type a Password to Allow Users to View Restricted Content—. Enables users to view restricted content after you type the supervisor password for the Content Advisor. Click Create Password to provide a password that protects unauthorized users from modifying these settings or enables users to view restricted content.
To view or modify systems used to rate Web pages, click Rating Systems to display the Rating Systems dialog box. Select from the listed rating systems, and then click OK.
To add a rating system, click Find Rating Systems to connect to a Web page containing links to additional rating systems. Then download the desired rating system to your computer and add it from the Rating Systems dialog box by clicking the Add button on this dialog box.
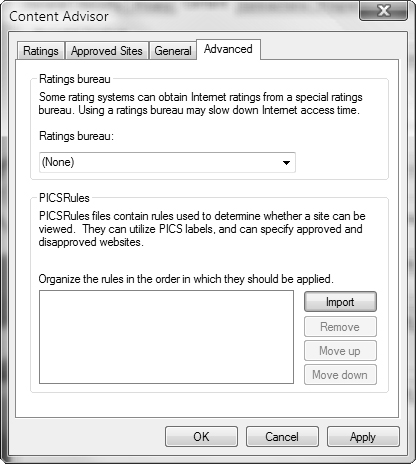
To add rules set out by PICS, click the Advanced tab. Type the name of the ratings bureau offering these rules, and then click Import under the PICS Rules section (see Figure 5.27).
When you are finished configuring content rules, click OK. If you haven’t entered a password from the General tab, the Create Supervisor Password dialog box appears. Type and confirm a password, and then provide an optional hint. This hint should help you remember the password without providing a clue to others who use the computer.

After you have configured Content Advisor for the first time, the Enable button changes to Disable. If you need to modify the settings in Content Advisor, follow Step by Step 5.9.
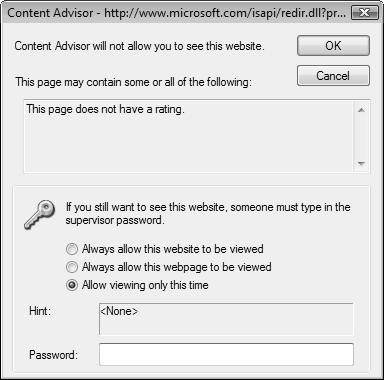
After you have enabled Content Advisor, any Web page that does not conform to the rules you have configured will display a message box similar to that shown in Figure 5.28, informing you of the rule or rules that were violated. To view the website, select one of the options shown, type the supervisor password you configured when you first enabled Content Advisor, and then click OK. You might want to use Step by Step 5.9 to modify content rules.
The practice of phishing refers to the creation of a fake website that closely mimics a real website and contains a similar looking URL, intending to scam users into sending confidential personal information such as credit card or bank account numbers, dates of birth, Social Security numbers, and so on. The attacker sends email messages that appear to originate from the company whose website was spoofed, so that users connect to the fake website and provide this type of information. The attacker can use this information for identity theft and other nefarious purposes.
Microsoft built the phishing filter into Internet Explorer 7 to check websites for phishing activity using the following methods:
Comparing website addresses visited by users with lists of reported legitimate sites saved on your computer
Analyzing website addresses against characteristics (such as misspelled words) used by phishing sites.
Comparing website addresses with those in an online service that Microsoft operates for immediate checking against a list of reported phishing sites. This list is updated several times each hour using material gathered by Microsoft or other industries or reported by users. Other global databases of known phishing sites are also used.
If the phishing filter detects a known phishing site, Internet Explorer displays the address bar in red and replaces the website with a message informing you of the risks. You receive options to close the website or continue to it. If the site is not a known phishing site but behaves in a similar manner to a phishing site, the address bar appears in yellow and a warning message appears. The user can report the site to the Microsoft Phishing Filter list or gather further information to report a false positive if the site turns out to be legitimate.
If you suspect that a website you are visiting is a phishing site (whether the address bar has turned yellow or not), you can check the following items:
The URL appearing in the address bar—. A spoofed domain name will appear similar to the authentic one but contain misspelled or additional words.
URLs associated with page links—. Although some of these might point to the authentic site, others might point to the phisher’s site. Check the address that appears in the lower-left corner of the status bar when you hover your mouse over the link.
Advertisements or other content not associated with the legitimate site—. Many phishers use free Web hosting services that might add advertising or other content to the fake site.
Failure to use a secure (https) connection—. Legitimate sites use secure connections for transmitting all sensitive data. Internet Explorer displays a lock icon in the status bar for all https connections. If this icon does not appear, you are most likely dealing with a phishing site.
Addresses used for submitting forms—. In general, the phisher site will contain a form that you are asked to fill out with your personal information and click a button that says Submit or something similar. To check this address, select View, Source, and locate the value of the
<form>tag’sActionattribute. If this is a non-legitimate address, you know you are on a phishing site.
To configure the phishing filter, follow Step by Step 5.10.
Configuring the Phishing Filter
Open Internet Explorer to a website that you suspect might be a phishing site.
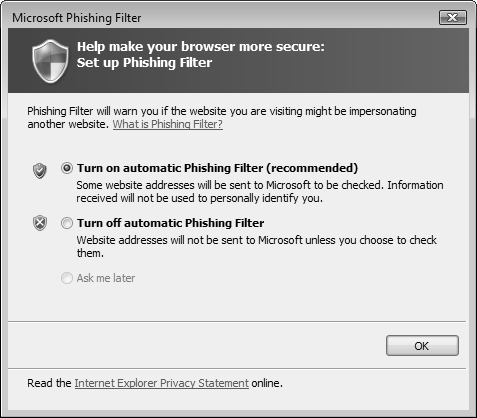
On the Tools menu, select Phishing Filter, and then select one of the following options:
Turn On Automatic Website Checking—. Displays the dialog box shown in Figure 5.29, which enables you to turn the filter on or off as desired. This menu item appears as Turn Off Automatic Website Checking when the filter is already on.
Check This Website—. Checks the current website. Click OK in the Phishing Filter message box that appears and you will receive a message informing you of the result.
Report This Website—. Enables you to report a phishing website or remove an authentic site that has been flagged as a phishing one.
Phishing Filter Settings—. Accesses the Advanced tab of the Internet Properties dialog box and enables you to turn automatic website checking on or off or disable the phishing filter entirely.
The Internet Properties dialog box enables you to configure additional options that affect the security of Internet Explorer. The following sections describe several of the more important options that you should be familiar with:
The Privacy tab of the Internet Properties dialog box, shown in Figure 5.30, enables you to configure cookie handling and the pop-up blocker.
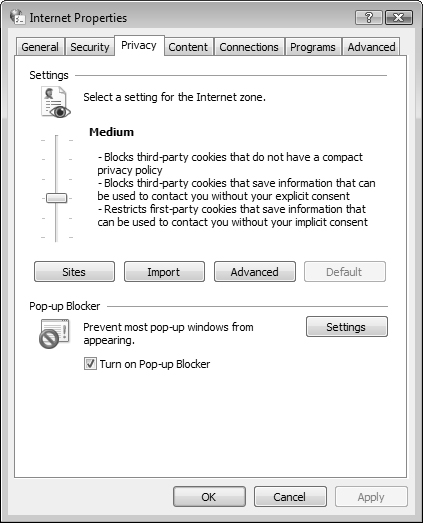
Cookies are small files that websites place on your computer to facilitate improved browsing or advertisement display on future visits to the same website. You can choose from the following options:
Block All Cookies—. Prevents all websites from storing cookies on your computer and from reading existing cookies.
High—. Prevents websites that do not have a compact privacy policy from storing cookies on your computer. This is a condensed computer-readable privacy statement. Web sites are also prevented from storing cookies that use personally identifiable information without your consent.
Medium High—. Prevents websites that do not have a compact privacy policy from storing cookies on your computer. Also blocks third-party cookies that use personally identifiable information without your explicit consent or first-party cookies that use personally identifiable information without implicit consent.
Medium—. Prevents websites that do not have a compact privacy policy from storing cookies on your computer. Limits websites that place first-party cookies that save information but use identifiable information without your implicit consent.
Low—. Allows websites to place cookies on your computer, including those that do not have a compact privacy policy or that use personally identifiable information without your explicit consent.
Accept All Cookies—. Allows all websites to place cookies on your computer and allows websites that create cookies to read them.
The Content tab, which is described in the next section, also enables you to specify which websites are allowed or prevented from using cookies regardless of their privacy policy. Click Sites to access the Per Site Privacy Actions dialog box to specify these websites. You can also choose the manner in which first- or third-party cookies are handled in the Internet zone. Click Advanced to specify whether these cookies are accepted or blocked or whether you receive a prompt for these cookies.
Pop-ups are additional windows that appear while browsing the Internet. Advertisers often use these to display ads to Internet users. Some pop-ups even deploy malware and are displayed in such a way that the only possible way to close the pop-up without installing the malware is to use the Task Manager to force the window to close. Users who do not know how to do this often end up with huge amounts of pop-up traffic, viruses, spy software, and other problems. Internet Explorer 7 includes a pop-up blocker that blocks any website from spawning another Internet Explorer window without your explicit permission. To toggle this feature on and off, in Internet Explorer click the Tools menu and select Pop-up Blocker and then either select Turn Pop-up Blocker On or Turn Pop-up Blocker Off. You learned about the settings available for the pop-up blocker in Chapter 4.
Besides the Content Advisor already discussed earlier in this section, the Content tab includes several other security-related options, as follows:
Parental Controls—. Links to the Parental Controls feature described in Chapter 4.
Certificates—. Controls the behavior of certificates used for encrypted connections and identification. Click the Certificates button to view certificates issued to yourself or others on the computer. You can also view certificates issued by trusted root certification authorities (CAs) or intermediate CAs, import new certificates and configure certificate purposes. Click Publishers to view information on trusted and untrusted publishers.
Auto Complete—. Stores information from previously visited Web pages and tries to complete entries you make on Web addresses, forms, usernames, passwords, and so on. Click Settings to specify the types of entries that Auto Complete is used for. You can delete Auto Complete history from the General tab of the Internet Properties dialog box.
Feeds—. Enables you to configure settings for Really Simple Syndicated (RSS) feeds, which you learned about in Chapter 4.
The Advanced tab of the Internet Properties dialog box contains a large range of settings that you can configure in the subjects of accessibility, browsing, HTTP 1.1, international, multimedia, printing, searching, and security. Figure 5.31 shows most of the security settings available from this tab.
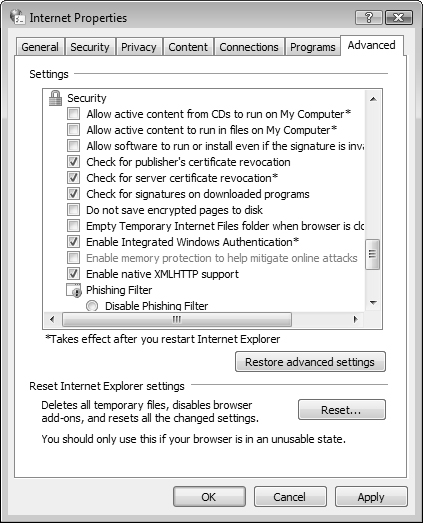
From this tab you can click Restore Advanced Settings to reset all settings to their defaults or click Reset to reset all Internet Explorer settings to their defaults.
Objective: Configure security settings in Windows Firewall.
The Internet Connection Firewall (ICF) in Windows XP before SP2 is now called the Windows Firewall. Windows Firewall is a personal firewall, stopping undesirable traffic from being accepted by the computer. Using a firewall can avoid security breaches as well as viruses that utilize port-based TCP or UDP traffic to enter the computer’s operating system. For computers that use broadband Internet connections with dedicated IP addresses, the Windows Firewall can help avoid attacks aimed at disrupting a home computer. Even people with dial-up Internet connections can benefit from added protection. As in Windows XP SP2, the Windows Firewall is enabled by default when you install Vista.
Windows Vista has upgraded the Windows Firewall even further. The Vista firewall adds outbound traffic protection. This is important because some malicious programs such as Trojan horses attempt to send personal information to unauthorized destinations. The outbound firewall prevents this from occurring.
In addition, Microsoft has added the following new features to Windows Firewall:
Support for the IP Security (IPSec) protocol
Support for environments using only IP version 6 (IPv6)
Configurable exceptions for both incoming and outgoing firewall
Application of exceptions to many components, including both local and remote ports; specific interface types including local area networks (LANs), remote access, and wireless networks; additional protocols beyond TCP and UDP; specific computers and users; and Vista services
Support for command-line configuration
As in XP SP2, you can accomplish basic configuration activities from a Control Panel applet; however, the Vista firewall adds advanced configuration features available from a MMC snap-in. This section looks at each set of features in turn.
You can enable or disable the Windows Firewall separately for each connection. In doing so, you are able to use Windows Firewall to protect a computer connected to the Internet via one adapter and not use Windows Firewall for the adapter connected to the private network.
Follow Step by Step 5.11 to perform basic firewall configuration.
Basic Windows Firewall Configuration
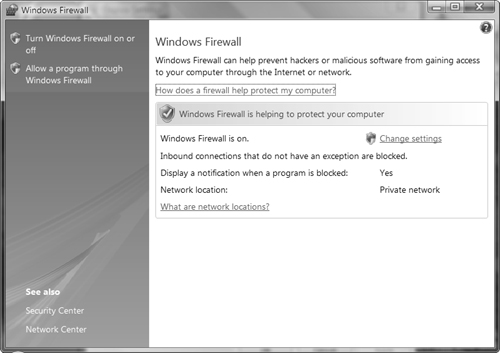
Open the Windows Firewall applet shown in Figure 5.32 by using any of the following methods:
Click Start, Control Panel, Security, Windows Firewall.
Click Start, Control Panel, Network and Internet, Windows Firewall.
Click Start, right-click Network, and then click Properties. Select Windows Firewall from the lower-left corner of the Network and Sharing Center.
From the Windows Security Center, select Windows Firewall in the left pane.
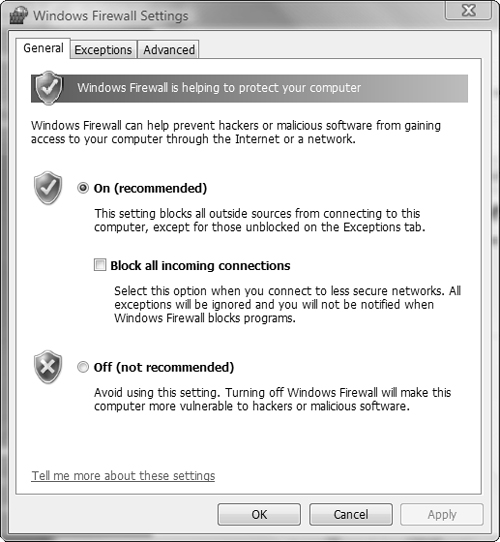
From the left pane, select Turn Windows Firewall On or Off, and then click Continue in the UAC prompt that appears. This displays the General tab of the Windows Firewall Settings dialog box, shown in Figure 5.33.
If you are connected to a corporate network with a comprehensive hardware firewall, select Off. If you are connected to an insecure network such as an airport or restaurant Wi-Fi hot spot, select the Block All Incoming Connections option. This option disables all exceptions you’ve configured on the Exceptions tab.
Caution: Don’t disable the firewall unless absolutely necessary
Never select the Off option in Figure 5.33 unless you’re absolutely certain that your network is well protected with a good firewall. The only exception should be temporarily to troubleshoot a connectivity problem; when you’ve solved the problem, be sure to reenable the firewall immediately.
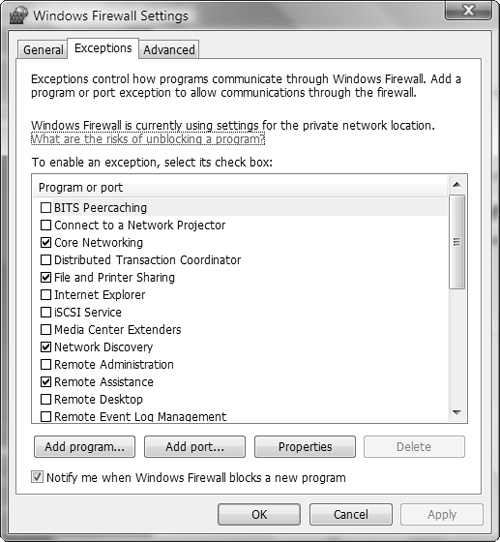
To configure program or port exceptions, select the Exceptions tab.
From the list shown in Figure 5.34, select the programs or ports you want to have access to your computer. Table 5.4 describes the more important items in this list. Clear the check boxes next to any programs or ports to be denied access or select the check boxes next to programs or ports to be granted access.
Table 5.4. Windows Firewall Configurable Exceptions
Program or Port
Description
Enabled by Default?
Core Networking and Network Discovery
Work together to enable your computer to connect to other network computers or the Internet
Yes
Distributed Transaction Coordinator
Coordinates the update of transaction-protected resources such as databases, message queues, and file systems
No
File and Printer Sharing
Enables your computer to share resources such as files and printers with other computers on your network
Yes
Allows management of remote computers by means of utilities that utilize remote procedure call (RPC)
No
Remote Assistance
Enables an expert user to connect to the desktop of a user requiring assistance in a Windows Feature
Yes
Remote Desktop
Enables a user to connect with and work on a remote computer
No
Remote Management
Enables an administrator to manage items on a remote computer, including event logs, scheduled tasks, services, and disk volumes
No for all these tasks
Routing and Remote Access (RRAS)
Enables remote users to connect to a server to access the corporate network (used on RRAS server computers only)
No
Windows Easy Transfer
Enables a user to copy files, folders, and settings from an old computer running Windows 2000 or later to a new Vista computer
Yes
Windows Meeting Space
Enables users to collaborate with others by setting up computer-based meetings
No
Windows Remote Management
Enables you to manage a remote Windows computer
No
To add a program not shown in the list, click Add Program. From the Add a Program dialog box that appears, select the program to be added, and then click OK. If necessary, click Browse to locate the desired program.
To add a port, click Add Port. On the Add a Port dialog box, type the name and number of the desired port. Select the appropriate protocol (TCP or UDP), and then click OK. To modify the scope of a given port, select Change Scope and select an option from the Change Scope dialog box.
To view properties of any program or port on the list, select it and click Properties.
To delete a program or port from the list, select it and click Delete. You can do this only for programs or ports you have added using steps 6 or 7.
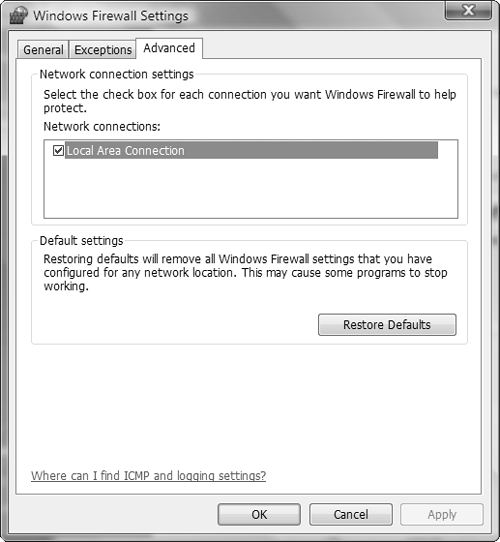
Click the Advanced tab to display the settings shown in Figure 5.35. If you have more than one network connection, they will be displayed here, and you can select the connections you want to protect.
If you need to restore default settings, click Restore Defaults. Then confirm your intention in the Restore Defaults Confirmation dialog box that appears.
When you are finished, click OK. To apply settings and continue making changes, click Apply.
Tip: Configuring public and private connections
If you click the Advanced tab, you should select the boxes next to any connections that link to the Internet and clear the boxes next to any connections to a private network.
You can also access the Exceptions tab directly by selecting the Allow a Program Through Windows Firewall option from the Windows Firewall applet.
Exam Alert: The Block All Incoming Connections option
You should select the Block All Incoming Connections option, found on the General tab of the Windows Firewall Settings dialog box, when you must block all unsolicited attempts to connect to your computer (for example when you are in an insecure location such as a public Wi-Fi hotspot). This option ignores all exceptions you have configured but still enables you to send and receive email and instant messages and view Web pages. An exam question might present a scenario in which you are required to select this option to block access or clear this option to obtain access to resources such as Web pages stored on the computer. For further information, refer to Windows Vista Help and Support.
Microsoft has provided a powerful new snap-in called Windows Firewall with Advanced Security, which enables you to perform a comprehensive set of configuration actions. To access the snap-in, click Start, Run, type wf.msc, and then press Enter. You can also type firewall in the Search field of the Start menu and then select Windows Firewall with Advanced Security from the Programs tab. After accepting the UAC prompt, you receive the snap-in shown in Figure 5.36.
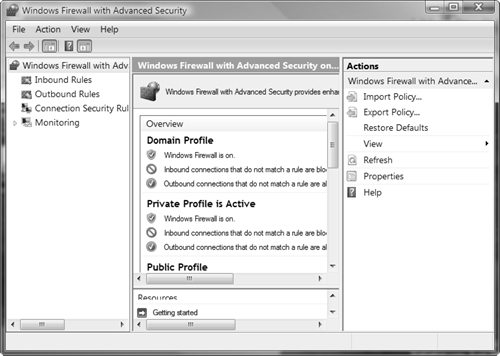
When the snap-in first opens, it displays a summary of configured firewall settings. From the scope pane, you can configure any of the following types of properties:
Inbound rules—. Displays a series of defined inbound rules. Enabled rules are shown with a green check mark icon. If the icon is dark in appearance, the rule is not enabled. To enable a rule, right-click it and select Enable Rule. To disable an enabled rule, right-click it and select Disable Rule. You can also create a new rule by right-clicking Inbound Rules and selecting New Rule. Follow the instructions in the New Inbound Rule Wizard that starts.
Outbound rules—. Displays a series of defined outbound rules, also with a green check mark icon for enabled rules. You can enable or disable rules and create new rules in the same manner as with inbound rules.
Connection security rules—. Does not contain any rules by default. Right-click it and choose New Rule to create rules that are used to determine limits applied to connections with remote computers.
Monitoring—. Displays a summary of enabled firewall settings and provides links to active rules and security associations. This includes a domain profile for computers that are members of an Active Directory domain. The following three links are available from the bottom of the details pane:
View Active Firewall Rules—. Displays enabled inbound and outbound rules
View Active Connection Security Rules—. Displays enabled connection security rules that you have created
View Security Associations—. Displays IPSec main mode and quick mode associations
The Windows Firewall with Advanced Security snap-in enables you to define different firewall behavior for each of the following three profiles:
Domain Profile—. Specifies firewall settings for use when connected directly to an Active Directory domain. If the network is protected from unauthorized external access, you can specify additional exceptions that facilitate communication across the LAN to network servers and client computers.
Private Profile—. Specifies firewall settings for use when connected to a private network location, such as a home or small office. You can open up connections to network computers and lock down external communications as required.
Public Profiles—. Specifies firewall settings for use when connected to an insecure public network such as a Wi-Fi access point at a hotel, restaurant, airport, or other location where unknown individuals might attempt to connect to your computer. By default, network discovery and file and printer sharing are turned off, inbound connections are blocked, and outbound connections are allowed.
To configure settings for these profiles from the Windows Firewall with Advanced Security snap-in, right-click Windows Firewall with Advanced Security at the top of the scope pane and choose Properties. This opens the dialog box shown in Figure 5.37.
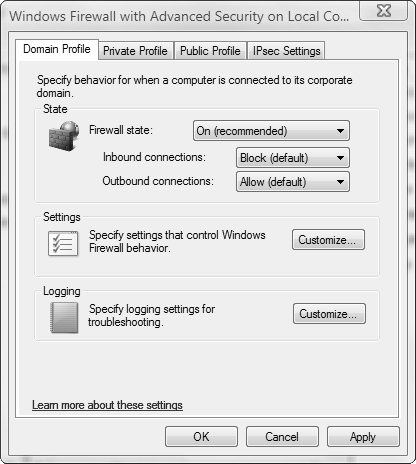
You can configure the following properties for each of the three profiles individually from this dialog box:
State—. Enables you to turn the firewall on or off for the selected profile and block or allow inbound and outbound connections. For inbound connections, you can either block connections with the configured exceptions or block all connections.
Settings—. Enables you to customize firewall settings for the selected profile. Click Customize to specify whether to display notifications to users when programs are blocked from receiving inbound connections or allow unicast responses. You can also view but not modify how rules created by local administrators are merged with Group Policy-based rules.
Logging—. Enables you to configure logging settings. Click Customize to specify the location and size of the log file and whether dropped packets or successful connections are logged (see Figure 5.38).
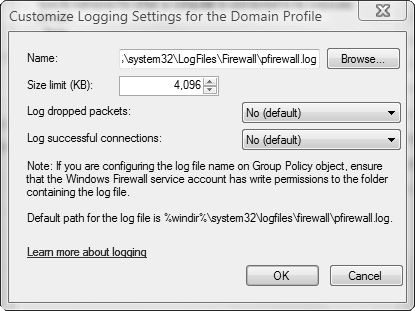
Tip: Secure public network communication
By default, the public profile blocks inbound connections but allows your configured exceptions. You should set the Inbound Connections option on this profile to Block All Connections, which is the same as selecting the Block All Incoming Connections option in Figure 5.33 shown previously.
You can configure IPSec settings from the IPSec Settings tab, including defaults and exemptions. IPSec authentication rules enable you to configure bypass rules for specific computers that enable these computers to bypass other Windows Firewall rules. Doing so enables you to block certain types of traffic while enabling authenticated computers to receive these types of traffic. Configuring IPSec settings is beyond the scope of the 70-620 exam and will not be further discussed here.
For additional information on all aspects of using the Windows Firewall with Advanced Security snap-in, refer to The New Windows Firewall in Windows Vista and Windows Server 2008 and Getting Started with Windows Firewall with Advanced Security in the “Suggested Readings and Resources” section.
Group Policy in Windows Firewall enables you to configure similar policies to those configured with the Windows Firewall with Advanced Security snap-in. Follow Step by Step 5.12 to configure Group Policy for Windows Firewall.
Configuring Group Policy for Windows Firewall
Click Start, Run, type
gpedit.msc, and then press Enter. Then click Continue on the UAC prompt that appears.Navigate to the Computer ConfigurationWindows SettingsSecurity SettingsWindows Firewall with Advanced SecurityWindows Firewall with Advanced Security—Local Group Policy Object node. The details pane displays the Windows Firewall with Advanced Security settings, as shown in Figure 5.39.
Scroll the details pane to select links for inbound rules, outbound rules, and connection security rules. These links open subnodes in the console tree.
Unlike the Group Policy with Windows Firewall snap-in, no default rules are present. To add rules, right-click in the details pane and select New Rule. Follow the instructions in the New Rule Wizard to add rules.
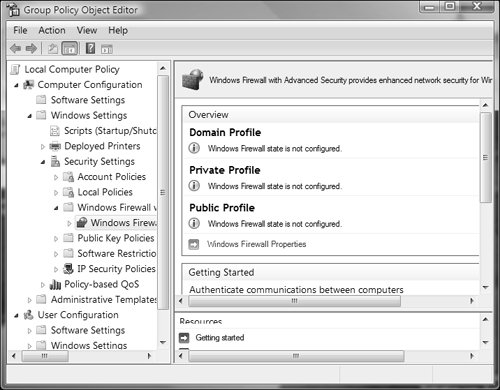
After you have added firewall rules in Group Policy, you can filter the view according to profile (domain, private, or public) or by state (enabled or disabled).
Exam Alert: Group Policy and multiple users
A new Group Policy feature in Windows Vista enables you to configure common policy settings for all user accounts on a computer used by more than one user. This includes Windows Firewall as discussed here, as well as UAC and all other policy settings. In addition, you can configure separate policies for administrators or non-administrators. If necessary, you can even configure local group policies on a per-user basis in Windows Vista. An exam question might contain answer options that refer to this feature.
Every Windows Vista computer contains its own user database that holds local user accounts and groups, including a series of default groups with Microsoft-defined rights and privileges. You can create your own local users and groups and add users or groups to the default groups. In a domain environment, you can also add domain users and groups to the locally defined groups.
Microsoft created UAC to enable all users, even administrators, to run with only non-administrative privileges enabled. When an administrator needs to perform an administrative task, he receives a UAC prompt that asks him to confirm that he wants to perform this task. A non-administrative user receives a UAC prompt asking for the credentials of an administrator to perform the task. You can configure a series of policies in Group Policy that govern UAC behavior.
Windows Defender monitors the computer against spyware and offers default remedies when it recognizes a spyware infection. You can configure the behavior of Windows Defender including the ability to check for updated spyware definitions and the security agents used for performing scans. Software Explorer enables you to view information about software programs and system state on your computer.
Internet Explorer organizes its security settings in the Internet Properties dialog box. You can create different security settings for the various Internet zones. The Content tab enables you to configure Content Advisor, which places limits on the types of viewable Internet content. The Phishing filter enables you to receive alerts if a malicious website is attempting to hijack your personal information. The Advanced tab contains additional security settings.
Windows Firewall stops undesirable traffic from being accepted by the computer. It also stops certain types of outbound traffic from being sent out. You can configure the firewall with policies that protect the computer on domain-based, private, and public networks; specify exceptions; and block all incoming traffic as necessary.
Windows Vista introduces several new security-related features and enhances the features that were included in previous Windows versions such as Windows XP and Windows Server 2003. The 70-620 exam expects you to be familiar with the configuration and application of these security features. The exercises in this section are designed to improve upon your understanding of how these features operate.
Note that you must be logged on with an administrative account to perform these exercises.
Estimated Time: 10 minutes, plus the wait time before Windows Defender next performs a scheduled scan. Group Policy provides a series of settings that govern the behavior of Windows Defender. None of these settings are configured by default in Windows Vista. In this exercise you examine these settings and configure Windows Defender to check for new signatures before performing an automatic scan.
|
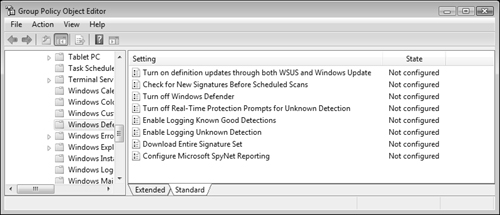
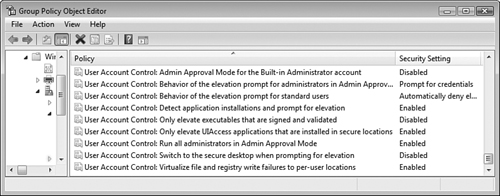
E. In Windows Vista, all users are automatically members of the Users group, which is entitled to perform these tasks by default; therefore, you do not need to add the users to any other group. Adding the accounts of these users to the Administrators group or the Remote Desktop Users group would grant the users excess privileges, so answers A and D are incorrect. The Power Users group is not used in Windows Vista and appears only to enable backwards compatibility with applications requiring its usage, so answer B is incorrect. The Interactive group is a special group to which local users of a computer are added automatically. You cannot add user accounts to this group, so answer C is incorrect. For more information, see the section, “Managing User Accounts.” | |
B. You should configure the User Account Control: Behavior of the Elevation Prompt for Standard Users policy to prompt for credentials. The figure shows that this policy is set to automatically deny elevation requests, which results in users receiving a denial of access if they attempt to perform an action that displays a UAC prompt. By setting this policy to prompt for credentials, Charles will receive a UAC prompt that asks for an administrator to enter a password to enable him to perform this action. If you add Charles to the Administrators group, he receives more privileges than required, so answer A is incorrect. If you enable the Only Elevate Executables that are Signed and Validated policy, public key infrastructure (PKI) signature checks on executable programs that require elevated privileges are performed before they are permitted to run. This does not alleviate the problem at hand, so answer C is incorrect. If you enable the Switch to the Secure Desktop when Prompting for Elevation policy, the secure desktop appears whenever a UAC prompt is displayed. While you should enable this policy for a secure environment, it does not solve this problem, so answer D is incorrect. If you disable the Admin Approval mode for the Built-in Administrator account, you turn UAC off. Administrators can run any actions that normally display UAC prompts without receiving a prompt, while non-administrators are denied access; therefore, answer E is incorrect. For more information, see the section, “User Account Control Policies.” | |
A. Jennifer should select the Shortcut tab of the Command Prompt Properties dialog box, click Advanced, and then select the Run as Administrator option. This action marks the command prompt to always run with elevated privileges and ensures that the help desk analyst will receive the UAC prompt. She cannot select the Run as Administrator option from the compatibility tab of the Command Prompt Properties dialog box because these options are not available on this tab; therefore, answer B is incorrect. She should not grant the help desk analyst the Full Control permission on the Security tab. This would enable the help desk analyst to modify the properties of the shortcut but would not provide him with the UAC prompt automatically, so answer C is incorrect. Adding the help desk analyst’s user account to the Administrators group would provide him with more privileges than required, so answer D is incorrect. For more information, see the section, “Configuring User Account Control.” | |
C. You should select the Ignore option. This option downloads the software to a location from which you can run it for testing purposes so that you can decide whether you want the software on your computer and others on the network. If you choose Quarantine, software is placed in a restricted location on your computer from which it cannot run. You would need to move it to another location to test it, so answer A is incorrect. If you choose Remove, the software is deleted permanently, and you cannot examine it later, so answer B is incorrect. If you choose Always Allow, the software is enabled to run and is added to the Windows Defender allowed list. You would need to edit the allowed list if you decide that the software is unwanted, so answer D is incorrect. For more information, see the section, “Scanning for Malicious Software.” | |
D and E. Ryan should select the check box labeled Apply Default Actions to Items Detected During a Scan, found under the Automatic Scanning section of the Options page. He should also select the Remove option under the High Alert Items drop-down list in the Default Actions section of the same page. This option automatically removes spyware or other types of malware at the conclusion of a scan according to the default actions configured from the same page. The application execution option checks programs as they start up and execute on the computer. He should keep this option selected, so answer A is incorrect. The Check for Updated Definitions before Scanning ensures that Windows Defender has the most recent signature files before performing a scan. Ryan should ensure that this option is selected before performing a scan, so answer B is incorrect. The custom scan option in Windows Defender enables him to customize which drives and folders are scanned by Windows Defender. The spyware program may have installed to a different folder, so answer C is incorrect. For more information, see the section, “Scanning for Malicious Software.” | |
C. You should add the vendor’s website address into the Trusted Sites zone in the Internet Properties Security Settings. If necessary, you can adjust the settings for the Trusted Sites zone. Answer A is incorrect because local security policies are applied before all other Group Policy settings and cannot override the subsequent settings. Answer B is incorrect because changing Windows Firewall settings will not accomplish your objective; furthermore, violating security policy is an unacceptable condition. Answer D is incorrect because copying the website brings with it problems such as applying updates and potential security breaches. For more information, see the section, “Configuring Internet Explorer Zones.” | |
B. You should access the Tools menu in Internet Explorer and ensure that the phishing filter is enabled. This option checks for malicious websites that attempt to trick you into providing personal data such as credit card or bank account numbers for fraudulent purposes. It sends the addresses of these sites to Microsoft, which maintains an up-to-date list of websites that have been identified as phishing sites. This filter is enabled by default. The pop-up blocker prevents websites from displaying additional Internet Explorer windows but also does not check for phishing sites, so answer A is incorrect. Protected mode prevents websites from modifying user or system files and settings unless you provide your consent. It also does not check for phishing sites, so answer C is incorrect. Setting the security level for the Internet zone to High disables less secure features of the browser and ensures that the highest security level is maintained; however it does not check for phishing sites, so answer D is incorrect. For more information, see the section, “Configuring the Phishing Filter.” | |
D. You should ensure that Protected mode is enabled for the Internet zone. You can do this by accessing the Security tab of the Internet Properties dialog box. Protected mode prevents websites from modifying user or system files and settings unless you provide your consent and is enabled by default on all zones except the Trusted Sites zone. The phishing filter checks websites against lists of known and suspected phishing sites, but is not relevant to this situation, so answer A is incorrect. The Block All Cookies option prevents websites from placing cookies on your computer, but does not prevent websites from installing software, so answer B is incorrect. The pop-up blocker prevents websites from displaying additional Internet Explorer windows but also does not prevent them from installing software, so answer C is incorrect. For more information, see the section, “Configuring Protected Mode in Internet Explorer.” | |
A and D. In Internet Explorer 7 on Vista, the default setting is to run in Protected mode. So if you reset Internet Explorer to default settings, it will be running in Protected mode. In addition, it will display the message Protected Mode: On in the status bar. If this message is not visible, you should reset the default settings. Protected mode attempts to prevent hackers from hijacking your browser and installing malicious software. Deleting the browser history, disabling add-ons, or disabling RSS feeds will not reset Internet Explorer to Protected mode, so answers B, C, and E are incorrect. For more information, see the section, “Configuring Protected Mode in Windows Internet Explorer.” | |
C and E. Sarah should clear the Block All Incoming Connections option on the General tab of the Windows Firewall Settings dialog box. She should also open TCP port 80 in Windows Firewall on her computer. In this scenario, it appears that the Block All Incoming Connections option has been enabled on her computer, preventing any type of network communication, including use of the | |
A. You should select the Block option in the Inbound Connections section on the Private Profile tab of the Windows Firewall with Advanced Security on Local Computer Properties dialog box. This enables client employees to access shared information on your computer according to the Windows Firewall exceptions you have configured. You should also select the Block All Connections option in the Inbound Connections section on the Public Profile tab of the Windows Firewall with Advanced Security on Local Computer Properties dialog box. This prevents any unauthorized connections to your computer when you are in an insecure location, while still allowing Internet access. Answer B is incorrect because this option would prevent client employees from accessing required information and would leave your computer open to unauthorized access when in insecure locations. Answers C, D, E, and F are all incorrect because you do not need to configure outbound connections and one of the required inbound configurations is missing. For more information, see the section, “Configuring Multiple Firewall Profiles.” |
The following are some recommended readings on the subject of Windows Vista security features:
Course
Microsoft Official Curriculum course 5115, Installing and Configuring the Windows Vista Operating System. Module 4, Sharing Files by Using Windows Vista; Module 6, Configuring User Account Security; Module 7, Configuring Network Security; and Module 8, Configuring Internet Explorer 7.0. Information available at http://www.microsoft.com/learning/syllabi/en-us/5115aprelim.mspx
Books
Poulton, Don. MCSE Exam 70-294 Exam Prep: Planning, Implementing, and Maintaining a Microsoft Windows Server 2003 Active Directory Infrastructure. Indianapolis, IN: Que Publishing. 2006.
Hausman, Kirk, Diane Barrett, and Martin Weiss. Security+Exam Cram 2. Indianapolis, IN: Que Publishing. 2003.
Bradley, Tony and Harlan Carvey, Essential Computer Security. Rockland, MA: Syngress, 2006.
Websites
Microsoft TechNet. Windows Vista Security Guide. http://www.microsoft.com/technet/windowsvista/security/guide.mspx.
Microsoft TechNet. User Account Control Overview. http://technet.microsoft.com/en-us/windowsvista/aa906021.aspx.
Microsoft TechNet. Windows Vista User Account Control Step by Step Guide. http://technet2.microsoft.com/WindowsVista/en/library/0d75f774-8514-4c9e-ac08-4c21f5c6c2d91033.mspx?mfr=true.
Microsoft TechNet. Understanding and Configuring User Account Control in Windows Vista. http://technet2.microsoft.com/WindowsVista/en/library/00d04415-2b2f-422c-b70e-b18ff918c2811033.mspx?mfr=true.
Microsoft. Microsoft’s Spyware Strategy. http://www.microsoft.com/athome/security/spyware/software/msft/strategy.mspx.
Heaton, Alex. Applying the Principle of Least Privilege to Windows Vista. http://www.microsoft.com/technet/community/columns/secmgmt/sm1006.mspx.
Microsoft. How to troubleshoot definition update issues for Windows Defender. http://support.microsoft.com/kb/918355.
Microsoft TechNet. Content Advisor. http://www.microsoft.com/technet/prodtechnol/ie/reskit/6/part2/c05ie6rk.mspx?mfr=true.
Walker, Mark. Internet Explorer 7: Security gets an upgrade. http://www.microsoft.com/windows/ie/community/columns/securityupgrade.mspx.
Microsoft TechNet. Using Windows Vista: Controlling Communication with the Internet. http://technet2.microsoft.com/WindowsVista/en/library/7ea6ee84-b696-4e75-9c1c-c2b99c8af54b1033.mspx?mfr=true.
Microsoft TechNet. Introduction to Windows Firewall with Advanced Security. http://technet.microsoft.com/en-us/windowsvista/aa905080.aspx.
Davies, Joseph. The New Windows Firewall in Windows Vista and Windows Server2008. http://www.microsoft.com/technet/community/columns/cableguy/cg0106.mspx.
Microsoft TechNet. Getting Started with Windows Firewall with Advanced Security. http://technet2.microsoft.com/WindowsVista/en/library/19b429b3-c32b-4cbd-ae2a-8e77f2ced35c1033.mspx?mfr=true.
Riley, Steve. Exploring the Windows Firewall. http://www.microsoft.com/technet/technetmag/issues/2007/06/VistaFirewall/default.aspx