Use DEVONthink To Go
If you have an iPhone, iPad, or iPod touch, you can take your DEVONthink data with you and work with it when you’re away from your Mac. For that matter, you can use the majority of DEVONthink’s features on the go even if you don’t have a Mac at all! To do this, you’ll need an iOS app called DEVONthink To Go, which costs $14.99. (An optional in-app purchase for $7.99 adds Pro features, including metadata-only syncing; support for viewing email messages, sheets, and .csv or .tsv documents; and annotating PDFs.)
Although even DEVONthink To Go (at version 2.7.3 as of publication time) doesn’t have all the features that the desktop versions of DEVONthink do, it does have a surprisingly rich range of capabilities for viewing, creating, capturing, and managing information directly on your iOS device.
If you have no iOS or iPadOS device, or if you’re not interested in taking your DEVONthink data with you, there’s nothing to see here—move on to the next chapter, Get Information Out of DEVONthink. Otherwise, keep reading to learn about using this extremely handy tool.
Get to Know DEVONthink To Go
Just as DEVONthink for Mac is a complex product, DEVONthink To Go is quite deep, with a huge number of features that may not be obvious at first glance. Detailing all those features would require its own book, and I can offer only an overview in this chapter. I do, however, suggest you download the user handbook for DEVONthink To Go, which is available in PDF, EPUB, and Mobipocket formats.
So, what can DEVONthink To Go do? It appears to have, at a rough estimate, about 75 percent of the capabilities of the desktop versions of DEVONthink. For example, here’s a partial list of what you can do in DEVONthink To Go:
Sync data from DEVONthink for Mac (or DEVONthink To Go running on other iOS/iPadOS devices) via Dropbox, iCloud, CloudMe, WebDAV, or a Bonjour connection over Wi-Fi
View any document type supported by iOS/iPadOS
Capture data from other apps (such as bookmarks, PDFs, text, and images) to a specific database or your global Inbox
Create new databases, groups, and tags
Create and edit documents in plain text, rich text, Markdown, and formatted note formats; rotate and apply filters to graphics; annotate PDFs; and convert (most) documents to other formats
Move, duplicate, replicate, group, tag, or delete items
Use complex search criteria to find your documents
Share documents using the activity view (or Share sheet, as it was known prior to iOS 13/iPadOS 13)
However, you should also be aware of some limitations compared to the desktop versions of DEVONthink. Among the features DEVONthink To Go does not include are the following:
Indexing documents stored elsewhere on your iOS/iPadOS device
Creating new smart groups, or using smart groups created on your Mac (but you can tap Edit on the home screen to use any of 18 built-in smart groups)
Editing RTFD documents (RTF with graphics)
Performing OCR on photos or scanned documents
Splitting or merging documents
The Concordance feature
In short, DEVONthink To Go lets you view and manage your DEVONthink databases effectively with an iOS/iPadOS device, and can also function as a standalone tool for gathering and organizing information—but if you’re a power user, you’ll most likely find that it can’t replace the desktop versions of DEVONthink.
Configure and Sync DEVONthink To Go
Assuming you want to use DEVONthink To Go mainly to store copies of documents from your desktop version of DEVONthink, you should configure syncing, and perform your first sync, before doing anything else.
As in the desktop versions of DEVONthink (see Sync DEVONthink Databases), sync configuration involves three elements—first add a location, then select databases, and finally (or whenever you prefer) set syncing options.
Add a Location and Select Databases
To add a location and select databases to sync in that location:
If you’re not already on the home screen (where the global Inbox, smart groups, and databases live), tap the arrow in the upper-left corner of the screen until you get there.
Tap the Settings
 icon.
icon.In the Sync section, next to Locations, tap Edit Locations.
Tap the green plus
 icon next to the location type you want to add. (If you already have a location specified, tap Edit to see the list of locations.) For Dropbox accounts, follow the prompts to authenticate; for direct connections, enter the password when prompted.
For indirect connections (such as Dropbox, iCloud, and WebDAV), enter the requested information, including the sync store name and password; and, if applicable and desired, turn on Verify Uploaded Items. If you already set up a sync store on another device, use its name and encryption key. (Refer back to Add an Indirect Connection for details on these options.)
If you’ve enabled the Pro features of DEVONthink To Go, tap Always to download full copies of every document, or On Demand to sync only metadata (with full documents available at a tap).
Select whether you want to sync “Labels and Colors” and/or “Database Properties” (both on by default; again, see Add an Indirect Connection).
Tap Save.
At this point, your location has been created, and you need only select which databases to sync in that location:
Tap the location name.
Turn on the switch for each database in this location that you want to sync.
DEVONthink To Go starts syncing your data. While that’s happening, you can tap outside the location window to perform other activities in DEVONthink To Go.
Set Sync Options
Either before or after you set up locations and select databases, you can configure sync options, which are similar to those in the desktop versions of DEVONthink:
If you’re not already in the Settings window, go to the home screen of DEVONthink and then tap the Settings
icon.Set the following options as you prefer:
Conflicts: Tap an option to choose what happens if a document changes both locally and remotely between syncs. If you select Newest, the more recently changed document overwrites the older one. If you select Duplicate, both copies sync in both directions—preventing data loss, but forcing you to manually sort out, later on, which version of each document you want.
Schedule: Tap Automatic (the default) to make DEVONthink watch for changes and upload or download new or changed documents automatically. Or tap Manually to sync only when you tap the Cloud
 icon or swipe downward to initiate a sync.
Keep: This slider is applicable only if you have enabled Pro features; and even then, only in cases where you’ve selected On-Demand Syncing. If it’s set all the way to the right (“Keep all”), DEVONthink To Go keeps local copies of all downloaded files. If you want DEVONthink To Go to purge the contents of less-recently-used files (keeping only the metadata, so you can re-download the files as needed), move the slider to the left (to “Keep 100 items,” “Keep 250 items,” “Keep 500 items,” or “Keep 1000 items”). DEVONthink purges the contents of any older files over that number.
Tap the X
 icon to close the Settings window.
Your new sync options apply immediately.
Find Your Way Around
Like most iOS apps, DEVONthink To Go has a predictable, hierarchical interface, which reconfigures itself depending on the size and orientation of your device’s screen. You should be able to navigate it without much difficulty. However, I would like to bring a few less-than-obvious things to your attention.
The Home Screen
The home screen (the top level of DEVONthink To Go) is special—that’s where you find your global Inbox, smart groups, and databases; and it’s also the only place where you see the Settings icon. If that’s where you want to be, tap whatever text is in the upper-left corner of the screen until you get there.
On the home screen, tap Edit in the upper-right corner to display additional smart groups, reorder smart groups, or delete databases.
List Views
In other list views (that is, the top level of a database, or the contents of any group), tap the View Options ![]() icon to display options for sorting the list (by name, kind, date [tap repeatedly to cycle among Added, Created, Modified, and Visited], or size—ascending or descending), filtering it (displaying only flagged and/or labeled items), and toggling the display of details and hidden items.
icon to display options for sorting the list (by name, kind, date [tap repeatedly to cycle among Added, Created, Modified, and Visited], or size—ascending or descending), filtering it (displaying only flagged and/or labeled items), and toggling the display of details and hidden items.
Tap Edit to reveal controls you can use to select one or more items. Having selected them, you can click the Organize  icon to move, replicate, duplicate, group/ungroup, or delete them; or, if a single item is selected, tap the Share
  icon to display the activity view (or Share sheet). (Note that the item must be downloaded to your device before you can share it, duplicate it, or move it to another database.)
Searching
To search for a document in DEVONthink To Go, look for the search field at the top, and if you don’t see it, swipe downward on the list to reveal it (just as in Mail for iOS). Enter the text you’re searching for. If you’re anywhere other than the home screen, you can tap “All databases,” “This database,” or “This group” to narrow your search to that location.
You can also search within the text of an open PDF document (sorry, other formats aren’t supported) by tapping the Search ![]() icon.
icon.
Add Items to DEVONthink To Go
In addition to items you’ve synced from your Mac or a different iOS device, you can add items of many kinds to DEVONthink To Go right on your iOS device. The two most common approaches are creating a new document (or group, or other item) within DEVONthink To Go (discussed next) and adding content from other apps using the Clip to DEVONthink extension (see Use Clip to DEVONthink).
Create and Edit Content
To create a new document or other item in DEVONthink To Go, navigate to the location where you want the document to be stored and tap the plus  icon. A panel appears, which may show just a list of item types (on smaller screens) or item types plus an editing area (on larger screens). Select an item type from the list of choices, and then use the editing view to fill in the details. Your choices are:
Text: Create a document in plain text, rich text, Markdown, or formatted note formats. Fill in the title and body of the document, and optionally apply metadata (see Apply Metadata, ahead, for details). Then click the tiny right arrow
 in the upper-right corner of the editing view, tap the name of the format you want to use, and tap Done.
Media: Tap New Photo (to take a photo), Existing Photo (to add a photo already in your Photos library), Photo from Clipboard (only if there already is a graphic on your clipboard), Last Photo Taken, Video Note (to record a new video), or Voice Note (to record audio).
Bookmark: Enter a name and URL for the bookmark, and optionally apply metadata.
Sheet: Assuming you’ve made the in-app purchase of the Pro features, you can add and edit sheets. After tapping Sheet, tap the Add Heading
icon and type a name. Press Return and repeat as needed. Then click the tiny right arrow in the upper-right corner of the editing view, enter a name for the sheet, and tap Done. DEVONthink To Go creates a new, empty sheet in that location; tap it to open it. To edit a table, tap Edit. You can then double-tap a cell to change its contents, or use the controls on the floating toolbar to select, add, and delete columns and rows, among other actions.Tag: Type a tag name. (Normally, you create tags in the process of applying them to existing items, but if for some reason you need to create a standalone tag, this is how you do it.)
Group: Type a group name and optionally apply metadata.
Database: Type a database name. To protect the database data during syncing with a password, turn on Protect with Password, tap Proceed after reading the warning, enter a username, and enter and confirm a password. This does not encrypt or lock the database; it only encrypts data in transit during syncs.
After filling in the required information, tap Done.
You can also edit plain text, rich text, formatted note, and Markdown files, plus (to a limited extent) graphics—whether or not you created them in DEVONthink To Go. To do so, select the document and either tap in the document body or tap Edit at the top of the screen. When you’re finished making changes, tap Done. (Note that, for graphics, your only options are to rotate the image and apply filters using the icons at the bottom of the screen.)
Use Clip to DEVONthink
In iOS and iPadOS, Clip to DEVONthink is a system-wide extension that can add an icon to the activity view (or Share sheet) in nearly any app. By tapping that icon, you can capture information from elsewhere on your device and add it to DEVONthink.
Before you use Clip to DEVONthink, you should make it more easily accessible—this step is mandatory in iOS 12 and optional (but a good idea) in iOS 13/iPadOS 13:
Open a document or webpage in any app that supports activity views or Share sheets (such as Safari).
Tap the Share
icon, swipe the row of app icons (that is, the top row of icons in iOS 12) toward the left, and tap More.Enable the extension:
In iOS 13/iPadOS 13, tap Edit. Then scroll down until you find DEVONthink. Make sure its switch is turned on, and tap the plus
icon to add it to the Favorites list at the top.In iOS 12, find Clip to DEVONthink in the list and turn it on.
Use the handle on the right to drag it closer to the top (which means it will appear closer to the left in the list of icons in the future).
Tap Done.
Once you’ve done this, you can use almost the same procedure to capture information:
While viewing content you want to capture in to DEVONthink To Go, tap the Share
icon.Tap the DEVONthink (or Clip to DEVONthink) icon. (In iOS 13/iPadOS 13, if you did not add DEVONthink to your Favorites list, you can instead swipe to the left, tap More, scroll in the list until you find DEVONthink, and tap it.)
In the panel that appears, you can optionally edit the document’s name and metadata. The Database line indicates which database the item will be stored in; to pick a different one, tap the database name and then select a different database or Global Inbox.
Tap the right arrow
icon.Tap the format in which you want to capture the document—Bookmark, Web Archive, Web Archive (clutter-free), Markdown, or Markdown (clutter-free)—and tap Done.
The extension puts the document in the inbox of the selected database (or in your global Inbox).
Manage Documents
Once you have documents in DEVONthink To Go—whether you synced them from your Mac or added them manually on your iOS device—you can do quite a few things with them. Here are some of the most useful examples.
Organize Files and Groups
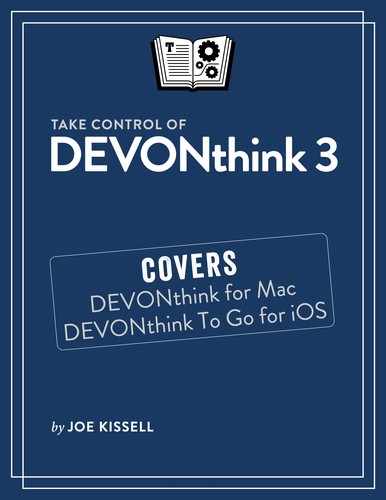
With a single document or group open—or with one or more items selected in a list view in Edit mode—tap the Organize icon to display a popover (Figure 82) with the organizational options available. (Not all options apply to every item.)
Your potential choices are:
Move: Navigate to the location where you want to move the item and tap Move.
Replicate: Navigate to the location where you want to create the replicant and tap Replicate.
Duplicate: Navigate to the location where you want to copy the item and tap Duplicate.
Convert: Tap Convert followed by the format you want to use. (The options are Formatted Note, Markdown, Plain Text, or Rich Text—but not all formats apply to every source document.) DEVONthink To Go makes a copy of the document in the same location, but with the new format. (If you were editing the document, the original version remains open.)
Share: This option appears only on small-screen devices, where the regular Share
icon doesn’t fit on the screen; it opens the activity view or Share sheet.Download: For documents in groups, databases, or locations configured to use on-demand downloads, tap this to download the document.
Move to Trash: Move the item to the Trash.
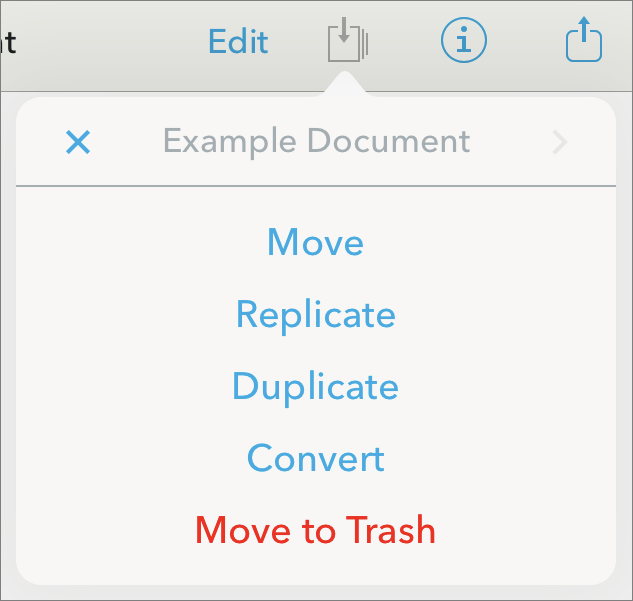
Apply Metadata
Any document or group in DEVONthink To Go can have various kinds of metadata, just as in the desktop versions of DEVONthink. To apply this metadata to the currently open group or document, tap the Info  icon to open the Info popover (Figure 83).
You can then specify or edit the following:
Name: Tap to edit the document or group name.
URL: If the item is a URL, this field holds the bookmark’s location. For all other item types, you can optionally fill in any URL that’s relevant to it. Tap in the URL field to type or paste the URL. To open the URL in Safari, tap the Safari
 icon.
icon.Tags: Tap the Tags
 icon, then type one or more tags. (After you type at least three characters, suggestions for matching tags may appear.) After typing a tag, tap Return; this turns it into a token
  .
.Label: Tap the Label
 icon and then use the selector that appears to apply a predefined label (such as To Do, Done, or Important). The Label icon then assumes the color of the corresponding label:
  .
.Flag: Tap the Flag
 icon to flag the item. The icon then turns orange:
  . Tap it again to remove the flag.
Unread: Tap the Read
 icon to mark the item as unread. The indicator then turns blue
  to show that it’s unread; tap it again to mark it as read.
Lock: To make the item read-only, tap the Lock
 icon, which then turns magenta:
  . Tap it again to unlock the item, making it editable.
Comments: To add a comment, type in the Comments field.
Annotate PDFs in DEVONthink To Go
The Pro package adds PDF annotation features to DEVONthink To Go. (If you haven’t already purchased the Pro package, you can do so by navigating to the home screen of DEVONthink To Go, tapping the Settings icon, and then tapping Manage next to Premium Features.)
With a PDF open in DEVONthink To Go, tap Edit. A narrow vertical toolbar appears at the left with icons for various types of annotation actions (much like those in the desktop versions of DEVONthink):
Text Highlights: Touch and hold Highlight
 and then tap an icon to select a tool with which you can add a background color, underline, wavy underline, or strikethrough to text that you drag over with your finger.
Annotations: Touch and hold Text
 and then tap an icon to select a tool with which you can add a text annotation, callout, or signature.
Note: Tap the Note
 icon and then tap in the document to add a note.
Pen: Tap the Pen
 icon to draw with a pen on the PDF.
Highlighter: Tap the Highlighter
 icon to draw with a highlighter on the PDF.
Shapes: Tap and hold Shapes
 and then tap an icon to select a tool with which you can draw arrows, lines, squares, circles, and other shapes.
Photo: Tap Photo
 and then tap either Camera or Photo Library to insert a graphic on top of the PDF. Or, tap and hold Photo and then tap an icon for media, stamp (like “Approved” or “Sign Here”), clipboard, link, or audio recording.
Erase: Tap Erase
 to activate the eraser tool, with which you can wipe away annotations you made with the pen or highlighter.
Select: Tap Select
 to draw a selection rectangle, which selects any existing annotations.
In addition to all these tools, you can select text in a PDF to display the standard iOS pop-up toolbar with additional options.
Configure DEVONthink To Go Settings
You can adjust the behavior of numerous DEVONthink To Go features. To do this, navigate to the home screen of DEVONthink To Go and tap the Settings icon. There, you can change the following:
Premium Features: If you haven’t already purchased the Pro package, tap Manage to do so.
Security: Optionally require a passcode (possibly along with FaceID or Touch ID) to access your DEVONthink To Go data, and configure how long the app should wait before requiring it.
Sync: See Set Sync Options, earlier, for a description of these settings.
Groups: Turn on “Keep on top when sorting” to put all groups higher on lists than individual documents.
Documents: The following options are available:
Plain Text Size: Drag the slider to set the font size for plain text documents.
PDF scrolling: Tap an icon for left-right or up-down scrolling while in PDFs.
Continuous: Turn this on to scroll PDFs continuously; turn it off to scroll a full page at a time.
PDF pages: Tap Automatic to let DEVONthink To Go display two PDF pages side-by-side if space permits; tap Single to view only a single page at a time.
Editing: Turn on or off the following text editing features:
Automatic Caps: Capitalize the first letter typed after a period and a space.
Spelling Correction: Use the iOS spelling correction feature as you type.
Data Detectors: Look for, and highlight, text that might be dates, phone numbers, addresses, and so on (for ease of adding the information to Contacts, Calendar, and the like).
TextExpander: If you have TextExpander touch installed, tap Update to make any recently added snippets available in DEVONthink To Go.
Backup data to iCloud: Enable this to make a backup of your database that’s accessible to the Files app.
In addition, there are a few system-level settings you can adjust in Settings > DEVONthink; there may be more or fewer options here depending on your device and how you’ve used DEVONthink To Go so far:
Location: To enable DEVONthink To Go to record the location where a document was created, make sure this is set to While Using the App. To keep DEVONthink To Go from knowing your location, set it to Never.
Photos: Turn this on to give DEVONthink To Go access to your photos.
Siri & Search: Use these switches to specify in what ways, if any, Siri and the iOS/iPadOS system-wide search tools can interact with DEVONthink To Go and its data.
Notifications: Configure the ways in which you would like DEVONthink To Go to be able to get your attention.
Background App Refresh: Turn this on to enable DEVONthink To Go to perform certain tasks (such as syncing and indexing) even when the app isn’t open. This capability is entirely controlled by iOS/iPadOS, however—it’s not under DEVONthink’s control.
Cellular Data: For iPhones and iPads with cellular radios, turn this off if you want to prevent DEVONthink To Go from syncing over a cellular connection.
Language: Choose DEVONthink To Go’s default language here. Unless you specify otherwise, it uses the language you set for your device in Settings > General > Language & Region > Device Language.