
Document Everything, Assume Nothing
Federal Rule of Civil Procedure 26
Federal Rule 26 states the General Provisions Governing Discovery and Duty of Disclosure. Section (a) states Required Disclosures and Methods to Discover Additional Matter.
As an investigator, the better you understand a case, the better you’ll be able to sense each logical step in the investigation process. An experienced investigator knows that the success of a forensic investigation relies not only on the ability to uncover evidence but also on following sound methodology while collecting and handling evidence, so it can be used in court. Under Federal Rule of Civil Procedure 26, section (a)(2)(B), parties involved in legal cases are required to disclose the identities of their forensic experts or risk not being able to call those experts to testify at trial. This rule states that testimony must be accompanied by a written, signed report. The report must contain:
- A complete statement of all opinions and the basis and reasons for such
- Any data or other information relied upon in forming the opinions
- Any exhibits to be used in support of or summary for the opinions
- The qualifications of the witness, including a list of all publications authored by the witness within the last ten years
- Amount of compensation to be paid for the study and testimony
- A list of any other cases in which the witness has testified as an expert at trial or by deposition within the last four years.
Attorneys may ask the forensic investigator write and sign an affidavit attesting to these items instead of preparing a full report. On December 1, 2010, Rule 26 was amended and a new section, Rule 26(a)(2)(C), added. Under this rule, witnesses who do not normally testify, or who were not hired for the purpose of providing expert testimony, are only required to provide a summary of the subject matter, facts, and opinions about which they’ll testify.
Under Rule 30(b)(6), an organization’s designated agent needs to testify to matters known by or reasonably available to the organization. This could include providing additional items of more specific information, such as:
- Quantity and locations of computers in use
- Operating systems and application software installed and dates of use
- File-naming conventions and which directories data is saved to
- Backup disk or tape inventories and schedules
- Computer use policies
- Identities of current and former employees responsible for systems operations
- E-mail with dates, times, and attachments
- Word documents, tables, graphs, and database files
- Internet bookmarks, cookies, and history logs
You begin the documentation process long before you start dealing with any data used as evidence in a case. Prior to seizing equipment or data, make sure you have the necessary paperwork filed and have proper permission to seize the computer or equipment in question. Remember that the Fourth Amendment limits the ability of government agents to search for evidence without a warrant, but consent remains the most relevant exception to this Amendment. When a proper computer use policy is in place, it can cover an employee’s consent to search their system. If you don’t know whether a warrant is needed, the manual Searching and Seizing Computers and Obtaining Electronic Evidence in Criminal Investigations on the Computer Crime and Intellectual Property Section of the United States Department of Justice Web site at http://www.cybercrime.gov/ssmanual/ can provide guidance. Of course, don’t overlook the obvious—always consult an attorney when in doubt about whether a warrant is required.

Although the excitement of working in the computer forensic field comes while performing the investigation and “catching the bad guy,” the “real work” is achieved when the investigator “kills a few trees” and completes the paperwork. As a computer forensic investigator, you must remember that your job is not complete until your report is filed.
Document everything carefully, consistently, and neatly. As discussed in Chapter 3, “Computer Evidence,” you need to record the who, what, when, where, why, and how of the case. You’ll also want to pay special attention to procedural details. You may want to start with a bound paper notebook, making notes in pen with dates and initials. This type of documentation can provide a good point of reference for jogging the memories of the forensic investigators when the case is lengthy. Chapter 3 provides a brief explanation of documentation and a sample log sheet. The National Institute of Justice offers a document titled Forensic Examination of Digital Evidence: A Guide for Law Enforcement. Appendix C in that document has a wide variety of sample forms that you can tailor for your needs. The document, with sample forms, is located online at http://www.ojp.usdoj.gov/nij/pubs-sum/199408.htm.
A large percentage of your time will be spent writing reports and completing logs. All the documentation you create might be used at a later time by the courts. When you write the report, remember that it may take years for the case to reach the courts. The more details you include in the report you write now, the easier it will be for you to recall facts about the case when you have to testify in the future.
Interviews and Diagrams
If you interview anyone, create a list of who you interviewed, including their names, e-mail addresses, what they saw, and when, where, and how they saw it. In cases such as the release of malware or denial of service (DoS) attacks, you can sometimes obtain more information than you expect just by asking. You might even end up with a confession.
Using diagrams is another method to document a case. Remember that jurors might not know about the workings of computers and networks, so you may want to use pictures or drawings to get your point across. For example, if you are asked to prove that the data presented has not been altered, you must present documentation proving that you made the image of the original evidence correctly. Let’s say that you used MD5 verification to ensure that the procedure did not corrupt the data. In your report, you would explain that when using MD5, even a change to one bit of information on a large drive packed with data results in a new message digest. By comparing the original disks and the copy, you can ensure that an image is an exact replica of the original. By using a drawing like the following one, you can help the jury better understand how this procedure works.
Figure 9-1: How MD5 verification works

Tales from the Trenches: Reports
The ability to write clear and concise reports will greatly benefit the computer forensic investigator.
When I was testifying in a deposition a few years ago, an extremely well-prepared attorney for the opposing side questioned me for hours about the minutest details of the case. I had been called to analyze a hard drive belonging to a publishing company. The drive in question had been used by an editor and was suspected to contain highly inappropriate material prohibited by the company’s acceptable use policy. I located many evidence items on the drive and documented each and every one, as well as the procedures I used to process the case.
When it was time to testify, the opposing attorney was very well briefed on the details of the case and on forensic procedures. If I had not properly prepared my report during that investigation, I would have performed poorly while I was being “grilled.” I was properly prepared to testify because I reviewed my report before the deposition and because I wrote an extremely detailed report at the time of the investigation. This particular investigation occurred three years and many investigations before I testified, but I was able to easily recall the necessary facts just by reviewing the report.
Keep in mind that the work you do today to prepare a report may very well more than pay for itself many years down the road.
Videotapes and Photographs
If at all possible, videotape the entry of all persons into the crime scene. By taping the actual entrance of a forensic team into the area, you can help refute claims that evidence was planted at the scene. You might also want to take photographs of the actual evidence and take notes at the scene. For example, in the case of an intrusion, you may want to take a photograph of the monitor. However, time is usually of the essence. Consideration should be given to the possibility of destructive processes running in the background or a time-delayed password-protected screen saver.
Pictures of the computer should be taken from all angles to document the system hardware components and how they are connected. Be careful to label each wire so that the original computer configuration can be restored. Remove the case cover of the PC or server, and carefully photograph the interior. Note the serial number, internal drives, and peripheral components. Documentation should include a physical description and detailed notation of any identifying markings or numbers. Make sure you document the configuration of the cables and connection types as well. Next, label the evidence and then once again photograph the evidence after the labels have been attached.
Most forensic investigators use digital cameras instead of 35mm film cameras to take their photographs. However, using digital images is not without risk because they’re easy to manipulate and tamper with. Be prepared to defend the authenticity of any digital images gathered as a part of an investigation. Documentation should include the following information:
- The type of digital camera used
- Who took the digital photographs
- Any special training or expertise of the investigator taking the digital photographs
- Documentation showing all procedures used when inputting or outputting the digital images
- Information regarding any software used in retrieving or reproducing the digital image.
Ideally, one person documents while another person handles the evidence. Document everything that goes on. The designated custodian for the chain of custody should initial each item after double-checking the list you have created. It is important to do this at the scene to eliminate the possibility of evidence tainting at a later date. You want to be able to prove that you did not alter any of the evidence after the computer came into your possession. Such proof will refute allegations that you changed or altered the original evidence.
Transporting the Evidence
electrostatic discharge (ESD)
Buildup of electrical charge on a surface that is suddenly transferred to another surface when it is touched.
electromagnetic fields
Produced by the local buildup of electric charges in the atmosphere. They can damage computer components. They are present everywhere in our environment but are invisible to the human eye.
The computer most likely will be moved to a secure location where a proper chain of custody can be maintained and the processing of evidence can begin. Therefore, the next step in the documentation process is to document the transporting of the evidence to the lab. Photograph or videotape and document the handling of evidence leaving the scene to the transport vehicle. Be careful to guard against electrostatic discharge (ESD). Although ESD won’t hurt you, it can certainly kill your computer components. Integrated circuits (such as processors, memory, and expansion cards) are especially sensitive to ESD. During transportation, electromagnetic fields created by magnets and radio transmitters can alter or destroy data as well. To ensure the integrity of the data stored on the media, avoid exposing the computer or media to conditions such as moisture, high humidity, and extreme heat or cold. At the examination facility, videotape or photograph and document the handling of evidence from the transportation vehicle to the lab.
Leave original evidence untouched unless extenuating circumstances occur. Do not leave a computer unattended unless it is locked in a secure location. You don’t want to risk the destruction of any crucial evidence.
Documenting Gathered Evidence
When gathering and preparing evidence, keep in mind that normal computer operations can destroy evidence in memory, in the file slack, or in the swap file. When documenting physical evidence such as hard disks or portable media, put the original evidence in a bag and seal it with tape that can’t be unsealed without leaving a mark. Clearly mark the sealed evidence bags with the case information. Tamper-proof evidence bags can be purchased from companies such as SecurityBag.com (the e-commerce division of Packaging Horizons Corporation) at http://evidencebags.info/. Be sure to keep extra plastic bags with ties for storing evidence along with numerous blanks for all incident-handling forms.
The U.S. Department of Justice, Office of Justice Programs at the National Institute of Justice has established a guide for forensic computer and digital evidence examinations. This guide includes lists of the types of items to be documented. It is published as Forensic Examination of Digital Evidence: A Guide for Law Enforcement and you can find it at http://www.ncjrs.gov/pdffiles1/nij/199408.pdf. Document all standard procedures and processes used in the examination of the evidence and note in detail any deviations from standard procedures. All recovered data should be properly marked.
Complementary Metal Oxide Semiconductor (CMOS) chip
On-board semiconductor chip used to store system information and configuration settings when the computer is either off or on.
Timelines for computer usage and file accesses offer valuable sources of computer evidence. Computer investigators rely on evidence stored as data and the timeline of dates and times that files were created, modified, or last accessed by a computer user. If the system clock is one hour different from the actual time because of Daylight Saving Time, then file time stamps will also reflect the wrong time. To adjust for such inaccuracies, documenting the system date and time settings at the time the computer is taken into evidence is crucial. The accuracy of the time and date stamps on files depends on the accuracy of the time and date stored in the CMOS chip of the computer. It is important to document the accuracy of these settings on the seized computer in order to validate the accuracy of the times and dates associated with any relevant computer files. Compare the current time and date with the date and time stored in the computer. The current time can be obtained from official time sites such as http://www.greenwichmeantime.com or www.worldtimeserver.com. Normally, the date and time are checked by simply booting into the BIOS and then checking the time and date in the BIOS settings.
File dates and times are important when documenting backdating of computer files. Sometimes criminals purposely change the date and time on their computers. They do this for several reasons; one of the most common is to defeat valid software licensing. Another reason the computer date and time may not be current is because the CMOS battery is dead. When a CMOS battery dies, the computer no longer keeps correct time, causing the computer date and time to be inaccurate. When settings on the computer are inaccurate, times and dates associated with relevant files can sometimes be established by a computer forensic specialist through the painstaking collection of information about time discrepancies on the system, date of occurrence, and so forth. Be prepared to review and confirm date and time information on any files where reported time and actual, correct time differ. Be prepared to respond to challenges to your findings from the opposing side. AFind is one program that is available from Foundstone’s Web site (www.foundstone.com, search for AFind). AFind lists the last access time for files without tampering with their data.
Always remember to make a bit stream backup of the hard drive before running the computer or checking the time and date. It’s important!
Activity timelines can be especially helpful when multiple computers and individuals are involved in the commission of a crime. A computer forensic investigator should consider timelines of computer usage in all computer-related investigations. The same is true in computer security reviews concerning potential access to sensitive and/or trade secret information stored in the form of computer files. The time and date that files were created can be important in cases involving computer evidence. Forensic software, such as Guidance Software’s EnCase, allows you to build a timeline in your casework (Figure 9-2).
Figure 9-2: EnCase timeline options
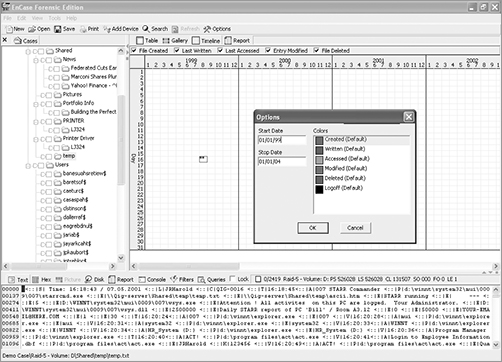
Using forensic software, you can create a case and then enter details such as case description, examiner name, organization, and comments. The next section discusses these in finer detail. When working in a case file, you have the option of logging all your actions, including exact dates and times and screenshots of dialog boxes.
Documenting the process from entering the scene to gathering the evidence is important. You aren’t done yet, though. Forensic investigators may need to gather a couple of additional pieces of documentation before the report is actually written.
Additional Documentation
If someone intends to prosecute for damages caused to an organization, all losses the organization suffered as a result of the incident should be documented. Ask the organization for such data as:
- Estimated number of hours spent in response and recovery
- Cost of damaged equipment
- Value of data lost
- Amount of credit given to customers because of the inconvenience
- Loss of revenue
- Value of any trade secret information lost or stolen
Document and Validate Evidence
A basic rule of evidence is that it must be the best available, which means evidence that is primary or first-hand. Computer forensic involves the use of tools and procedures to guarantee accurate preservation of evidence. Most computer forensic specialists use multiple software tools, created by separate and independent developers, to help them preserve evidence accurately. By using different, independently developed tools to validate results, you can avoid inaccuracies owing to software design flaws or bugs. By validating evidence with software tools and procedures, you help eliminate the likelihood of a successful challenge to the integrity of results based on the accuracy of software tools used. By documenting everything, you should be able to refute claims that evidence was mishandled or that the tools used in your investigation were unacceptable.
Hacker Acquitted
Aaron Caffrey, 19, was acquitted after a jury unanimously decided he was not guilty of unauthorized computer access related to an attack on the Port of Houston’s web-based systems in September 2001. Caffrey claimed that the evidence against him was planted on his computer by attackers who used an unspecified Trojan horse program to gain control of his PC and launch the assault. A forensic examination of Caffrey’s PC found attack tools but no trace of a Trojan infection. The case depended on whether the jury accepted the argument that a Trojan could remove itself or accepted expert testimony from the prosecution that no such technology existed.
As a forensic investigator, it’s important to document your findings, validate the evidence gathered, and be prepared to present that evidence to a court so that the jury understands the facts and your conclusions regarding those facts. The final outcome of the case may depend on how well you document, gather, and present the evidence. That’s why it’s so important to be competent, convincing, and—above all else—clear.
Now that you are familiar with all the information you should document, it’s time to decide how to put all this information into a report format that a judge and jury can understand easily.