1
Getting Started with NHibernate 3
My first experiences programming data-driven computer systems required registering COM objects with the regsrv32.exe, invoking the Server.CreateObject method to create an ADODB.Connection and ADODB.Recordset, and then using the MoveFirst(), MoveLast(), MoveNext(), and MovePrevious() methods that navigate, forward only, through the result set. At the time, the practice was groundbreaking technology. The ADO data access technique laid the foundation for the next advancement, which Microsoft released in late 2005, ADO.NET. In late 2005, Microsoft released the .NET Framework version 2.0. Programmers said goodbye to regsrv32.exe, COM, and a whole lot of other unwanted features of a nonmanaged code way of life.
ADO.NET provided programmers with an object-oriented, or component-oriented, approach to creating data-driven computer systems. Programmers were able to isolate the SQL queries from the database connection, and the business logic from the data implementation logic. This multi-layered capability greatly reduced the complexity and the unwanted side effects caused by changes, while increasing the speed with which new or enhanced features are introduced.
However, despite the many new features and advancements provided by ADO.NET, programmers still faced difficulties developing data-driven software applications, including the following:
- Using multiple database management systems (DB2, Oracle, SQL Server, etc.)
- Easily responding and adapting to changes in data structures
- Managing the connection between computer system and database
- SQL injection
- Database concurrency
- Performing complex SQL operations without specialized technical skills
The next generation of data-driven software solutions is upon us. This next generation is called object-relational mapping, or ORM. Programmers can now say goodbye to the data access layer and numerous SQL queries, to the methods returning data reader objects, and the writing of complex SQL queries. For programmers with many years of experience with large enterprise systems, moving from ADO to ORM is the equivalent of moving from COM to ADO.
NHibernate is a C# .NET port of the very popular Hibernate project for Java, which came into existence in 2001. For a number of years, both NHibernate and Hibernate were supported and managed by the same company, JBoss, Inc. (now part of Red Hat); however, as of 2006, NHibernate is totally managed by the user community.
Numerous ORMs are available. However, NHibernate is one of the most, if not the most, mature .NET open-source libraries available. It has a very active user community that drives new feature development and allows newcomers a place to ask technical or best practice questions.
The following sections cover how this new approach to data access resolves many of the challenges programmers and IT organizations face today. After a short introduction to ORM, you will learn:
- How to configure NHibernate
- The benefits of lazy loading
- How to configure log4net
- How to serialize NHibernate's startup
- Many other features and tips about NHibernate
WHAT IS AN ORM?
Object-relational mapping (ORM) is one of many techniques used to retrieve and modify data stored in a database. An ORM approach to a data solution requires that you view your data more as a group of objects than as a relationship between data tables. Take, for example, the SQL query shown in Listing 1-1, which joins two tables to get a Guitar type and model.
LISTING 1-1: A basic relational SQL query
SELECT
      g.TYPE, i.MODEL
FROM
      GUITAR g, INVENTORY i
WHERE
      g.ID = i.TYPEID
ORDEY BY
      g.TYPE;
This returns a list of Guitar types and their models to a result set that could then be displayed in a GUI. It's assumed that the two tables have a foreign key relationship between the ID on the GUITAR table and the TYPEID on the Inventory table. This is a standard relational database configuration.
If you wanted to implement a similar query using the IQuery (HQL) interface of NHibernate, it would look something like what is shown in the following code snippet:
Select g.Type, g.Inventory.Model from Guitar g order by g.Type
Notice how HQL enables programmers to state their queries in terms of objects in the same way SQL enables them to state queries in terms of relational data.
Again, the preceding query returns a list of Guitar types and their models to a result set that could then be displayed in a GUI. An assumption that the two tables have a relationship defined on the database may or may not be correct. However, it is certain that the relationship has been defined in the program and that the Guitar class contains an instance of the Inventory class.
As the preceding query shows, an ORM like NHibernate provides the capability to navigate a data structure using dot notation instead of complicated join or embedded SQL clauses. Once the object relational model has been designed and built, or the mapping of an existing relational database to objects completed, you can say farewell to SQL. As a result of using an ORM, a C# programmer no longer needs to write SQL and can focus on writing reusable and maintainable code.
It is a mistake to believe that by implementing an ORM solution you no longer need qualified database administrators. It could result, however, in needing fewer of them or less of their time. This reduction of technical resources is a direct result of adding an additional layer of abstraction, NHibernate, between a skilled programmer and the database. NHibernate enables developers to work in the area of system development for which they are most skilled, while delegating the details of query construction to the ORM, rather than co-opting developers into writing complex queries in SQL for which they aren't adequately trained and skilled. By reducing the technical skill set required to create a program, an additional reduction in the amount of time required to build, modify, and maintain it is realized.
CREATING A SAMPLE PROJECT: THE GUITARSTORE
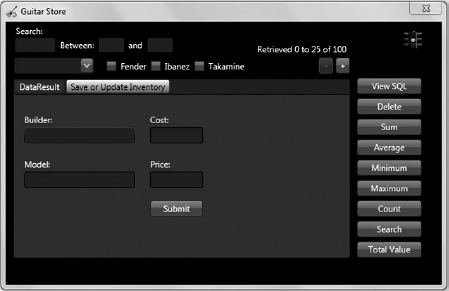
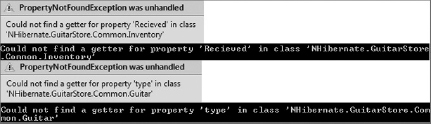
A good way to learn a new technology is to create something with it. This chapter walks through the creation of a small program based on Windows Presentation Foundation (WPF). This program enables the user to insert, update, select, search, and delete guitar inventory. Figure 1-1 and Figure 1-2 show the final GuitarStore WPF windows.

Project Requirements
In our example scenario, imagine you have been contacted by a small music store that specializes in selling guitars. The owner has requested that you create a system that enables them to track their guitar inventory. The requirements for the database include the following:
- Retrieve a list of all guitars ordered by the builder.
- Retrieve the total value of merchandise by guitar type.
- Search for guitar models.
- Retrieve 25 records per query and allow paging.
- Store an audit of inventory deletions.
- View details of each guitar in inventory.
- Insert new guitars into the database.
These requirements are used throughout this book to show many of NHibernate's capabilities.
Creating the GuitarStore Solution
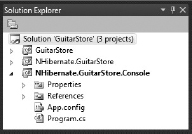
The example Visual Studio solution will contain three C# projects:
- A WPF project that presents the data to the user
- A class library that uses NHibernate to interact with the database
- A console application for testing
Creating the GuitarStore WPF Project and Solution
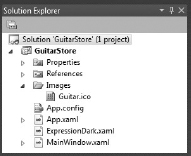
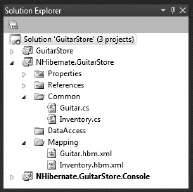
Using Visual C# 2010 Express, create and save a new project called GuitarStore. Add an app.config file, which is used to store NHibernate and log4net configurations. Figure 1-3, shows the GuitarStore solution.
 NOTE This WPF program uses the ExpressionDark.xaml theme. It can be downloaded from SourceForge at this address: http://wpf.codeplex.com/wikipage?title=WPF Themes.
Creating the NHibernate.GuitarStore Class Library
Add a class library to project to the solution by following these steps:
- Right-click on the GuitarStore solution and add a new class library project called NHibernate.GuitarStore.
- Delete the auto-generated Class1.cs file, as it is not used.
- Add three directories to the class library project named Common, Mapping, and DataAccess.
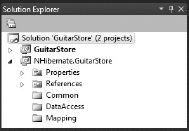
These directories are used to group the class, mapping, and data access files together, respectively. The grouping of like files into directories simplifies and sustains the ongoing development and support of a program. As the program grows in size and complexity, having a logical structure that team members can quickly understand and use is a necessity. Figure 1-4 shows the modified GuitarStore solution.
Note the following main points:
- The Common directory contains all the class files used to store the data retrieved from the database.
- The DataAccess directory contains all the methods that interact with the NHibernate methods and your classes.
- The Mapping directory contains the NHibernate XML mapping files.
Creating the Console Application
The console application provides a quick and easy way to test the NHibernate interface methods contained within the NHibernate.GuitarStore class library. Right-clicking on the GuitarStore solution and adding a new console application project named NHibernate.GuitarStore.Console results in the solution shown in Figure 1-5, which shows the three projects contained within GuitarStore.
Add an app.config file to the console project to store NHibernate and log4net configurations. More details are provided in the sections titled “Using an app/web.config File” and “Creating a Console Application for Testing” later in this chapter.
Creating the Database
A database is used to store the guitar inventory used by the program created in this book. In this section, you will perform two actions:
- Create the SQL Server 2008 database.
- Create the Guitar and Inventory tables.
Creating a SQL Server 2008 Database
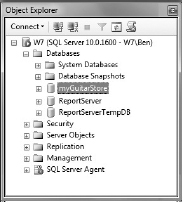
Open and connect to SQL Server Management Studio. Right-click the Database folder, select New Database …, and create a database named myGuitarStore. Figure 1-6 shows the newly created database.
Creating the Guitar and Inventory Tables
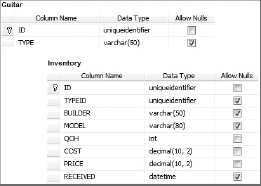
Expand the myGuitarStore database, right-click the Tables directory, select New Table…, and create the Guitar and Inventory tables, as shown in Figure 1-7.
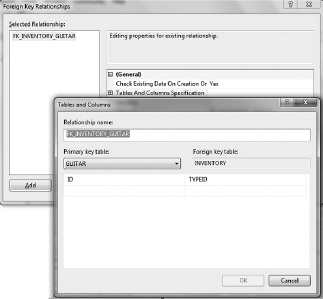
While in design mode of the Inventory table, add the foreign key relationship between the Guitar and Inventory tables by selecting Table Designer menu item ![]() Relationships. Figure 1-8 shows the windows required to add the foreign key.
Relationships. Figure 1-8 shows the windows required to add the foreign key.
Understanding the Guitar and Inventory Tables
NHibernate makes it unnecessary for developers to create a data access layer (DAL) containing large numbers of SQL queries. Nor must developers write database SQL queries. From this point on, data can be retrieved from the Guitar and Inventory tables, shown in Figure 1-9, after implementing one of the many NHibernate interfaces.
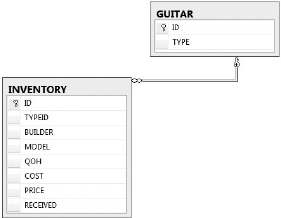
Table 1-1 describes the Guitar and Inventory tables that exist in the myGuitarStore database, and Table 1-2 provides the definition.
| TABLE NAME | DESCRIPTION |
| GUITAR | The type of guitar (electric, acoustic, etc.) |
| INVENTORY | Quantity of each guitar type in stock, plus other details |
TABLE 1-2:Guitar Table Definition

Guids are used as the primary keys for the tables; and as previously mentioned, the foreign key relationship is between the Guitar.ID and the Inventory.TYPEID. You can use almost any database to create these tables. You need only to confirm that NHibernate contains the driver for it. You can do this by looking within the NHibernate.Driver namespace source code. All the standard DMBSs are supported, including Oracle, SQL Server, MySQL, DB2, ODP.NET, SQLite, and so on. Even ODBC and OLEDB connections are supported.
Table 1-3 describes the column data types, and indicates whether a null value is allowed.
TABLE 1-3 Inventory Table Definition
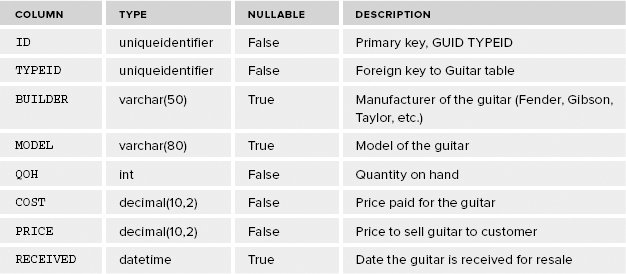
 WARNING There is some debate about using GUIDs as the primary keys on tables. The argument is related to two main issues. The first is the size of the GUID and the space it occupies on the hard drive, which is 36 bytes, or 32 digits with 4 dashes. Therefore, a table with 100,000 rows requires 3.6MB of space just for the primary key. The second issue is index fragmentation. However, NHibernate provides a sequential GUID (guid.comb) id generator that prevents this fragmentation.
CONFIGURING NHIBERNATE
Configuring NHibernate requires a number of actions:
- Download and install NHibernate.
- Create the class files.
- Create the mapping files.
- Create an NHibernateBase class, to centralize data access. (This is recommended but not required.)
- Configure the SessionFactory.
Downloading and Installing NHibernate
Start by downloading the current version of NHibernate. The GuitarStore program uses version NHibernate-3.X.X.GA-bin, which is downloadable from http://nhforge.org.
Figure 1-10 shows the extracted list of the NHibernate binary files from the downloaded zip file. The files are copied into a single directory on a development computer. If you are part of a development team or the lead developer, it is a good idea to place the NHibernate files your team references in a specific location. Everyone should use the same group of files. Instead of hosting the entire NHibernate download, supply only the binaries you or the team needs to successfully utilize the NHibernate interface.

You need to add the preceding NHibernate binaries to all three projects in the GuitarStore solution by right-clicking the References folder and selecting Add Reference. Then select the Browse tab, navigate to where the binary files are stored, select them, and press OK.
Creating the Class Files
Now that the database and the GuitarStore solution are created, it's time to create the classes that store the data. The first step in the process is to create a class file (.cs) for each table in the domain.
NOTE There are tools that can automate the mapping of your database entities. In this example, you perform the mapping manually, but if your database has a large number of tables and relationships, you should consider using an automated approach. Fluent NHibernate is one such tool, which is found here: http://fluentnhibernate.org.
Building the Common/class.cs Files
The first class you need to create is the Inventory.cs class. Within the NHibernate.GuitarStore project, right-click the Common directory, then select Add ![]() Class …, enter Inventory.cs
Class …, enter Inventory.cs ![]() Add.
Add.
Listing 1-2 shows the code for the Inventory class. Notice that all properties are preceded by a virtual declaration. This is required in order to use the lazy loading feature of NHibernate. As you can see, NHibernate does not require inheritance from a base class or implementation of any interfaces to utilize its features. Instead, NHibernate creates a proxy of the class. In this context, an NHibernate proxy is an inherited type of the Inventory class (sometimes referred to as an entity). The Inventory class is considered the base class to NHibernate's proxies. At application startup, NHibernate inherits and overrides the class, adding the required logic to support lazy loading. Lazy loading is covered in more detail later in this chapter.
LISTING 1-2: Inventory.cs
namespace NHibernate.GuitarStore.Common
{
    public class Inventory
    {
        public Inventory() { }

        public virtual Guid Id { get; set; }
        public virtual Guid TypeId { get; set; }
        public virtual string Builder { get; set; }
        public virtual string Model { get; set; }
        public virtual int? QOH { get; set; }
        public virtual decimal? Cost { get; set; }
        public virtual decimal? Price { get; set; }
        public virtual DateTime? Received { get; set; }
    }
}
Notice that a nullable DateTime? value is used to define the Received property. This is because in .NET, the System.DateTime is a value type and therefore cannot be null. However, a DateTime value within a database table can be null. If Received is not defined as nullable, attempting to load a null into that property results in a PropertyValueException, which needs to be handled appropriately.
The differences between value types and reference types are not covered here, but this aspect of NHibernate makes it important that a programmer understand them.
All value types should be implemented as nullable or you need to ensure that the values on the database do not allow nulls. Table 1-4 lists the common .NET value types to which you should pay attention.
TABLE 1-4:Nullable .NET Value Types
| TYPE | DECLARATION |
| System.DateTime | DateTime? |
| System.Int32 | int? |
| System.Double | double? |
| System.Boolean | bool? |
| System.Char | char? |
| System.Decimal | decimal? |
Note the use of the auto-implemented property declaration, which was new in C# 3.0. This isn't required for NHibernate, but it is a good coding practice. Using the { get; set; } format makes the code more legible. This is important because these classes and mapping files (mapping files will be created in the next section) do not change often, nor do developers need to access them very often. After the mapping has been completed, accessing them again is unlikely—only if the data structure changes or a new persistent object is required, as in the Guitar class covered next. Hence, making them compact and clear ensures they are quickly and clearly understood when a modification needs to be made later.
WARNING When using NHibernate's property-level accessor mappings, using the underlying private field value (instead of going through the {get; set;} property) will circumvent lazy loading and produce unexpected results. Consider this another reason to use auto-implemented or automatic properties.
At this point, create the Guitar.cs class in the same way the Inventory.cs class was created. Name the new class Guitar.cs. The Guitar class, shown in Listing 1-3, contains an enumerable list of the Inventory class called Inventory. Access to this list returns the inventory data for the specific Guitar type. It is important to set lazy loading to true; otherwise, when loading the data into the Guitar class, the Inventory is loaded, too, even if it is not needed.
LISTING 1-3: Guitar.cs
namespace NHibernate.GuitarStore.Common
{
    public class Guitar
    {
        public virtual Guid Id { get; set; }
        public virtual string Type { get; set; }

        IList<Inventory> Inventory { get; set; }
    }
}
Creating the Mapping Files
So far, the database has been created, you have built a solution with three projects, and you have programmed your class files. Now it is time to create the mapping files.
Mapping files (*.hbm.xml) are used by NHibernate to correlate the classes and properties in the persistent objects with the tables and fields in the relational database. This information is then used by NHibernate to generate the SQL needed to perform Select, Insert, Update, and Delete operations for the computer program.
Installing the NHibernate XML Schema Templates
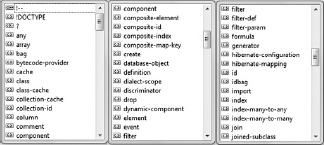
The release of NHibernate 3.0 includes two XML schema files. These files enable you to use IntelliSense during the creation of the mapping files, which allows the Visual Studio XML editor to display syntax errors as you work in the mapping files. These files, in combination with IntelliSense, provide a list of allowable NHibernate mapping elements and attributes, as shown in Figure 1-11, which you may find extremely useful.
Installing the NHibernate XML schema templates requires Visual Studio Professional or higher. The Schemas menu item is found within the XML menu. Selecting Schemas opens the XML Schemas window shown in Figure 1-12.
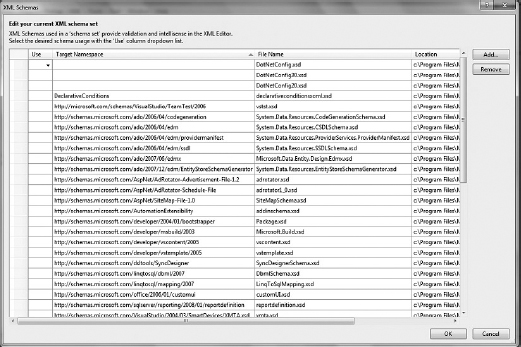
Selecting the Add button opens a browse window that you can use to navigate to the two NHibernate XML schema templates (.xsd) shown in Figure 1-13. Select the templates and then click OK.
![]()
Building the Mapping/class.hbm.xml Files
NHibernate uses the mapping files to gather the required information to create a SQL query. The mapping file contains the class and assembly where the data is stored once retrieved from the database.
To create a mapping file, right-click on the Common directory within the NHibernate.GuitarStore project ![]() Add
Add ![]() New Item. Scroll down to the bottom of the window and select XML File, enter Inventory.hbm.xml
New Item. Scroll down to the bottom of the window and select XML File, enter Inventory.hbm.xml ![]() Add. Lastly, add the mapping configuration, as shown in Listing 1-4.
Add. Lastly, add the mapping configuration, as shown in Listing 1-4.
LISTING 1-4: Inventory.hbm.xml
<?xml version=“1.0” encoding=“utf-8” ?>
<hibernate-mapping xmlns=“urn:nhibernate-mapping-2.2”
                   assembly=“NHibernate.GuitarStore”>
  <class name=“NHibernate.GuitarStore.Common.Inventory,
                                               NHibernate.GuitarStore”
         table=“INVENTORY”>
    <id       name=“Id”       column=“ID”       type=“System.Guid” />
    <property name=“TypeId”   column=“TYPEID”   type=“System.Guid” />
    <property name=“Builder”  column=“BUILDER”  type=“System.String” />
    <property name=“Model”    column=“MODEL”    type=“System.String” />
    <property name=“QOH”      column=“QOH”      type=“System.Int32” />
    <property name=“Cost”     column=“COST”     type=“System.Decimal” />
    <property name=“Price”    column=“PRICE”    type=“System.Decimal” />
    <property name=“Received” column=“RECEIVED” type=“System.DateTime” />
  </class>
</hibernate-mapping>
The assembly is defined within the hibernate-mapping element using the assembly attribute. Within the class element, you need to provide the fully-namespaced type-name for the class (optionally, include its containing assembly name) and the database table from which the data is persisted. The id element contains the primary key of the table that is identified by the table attribute of the class element.
NOTE If you provide an assembly attribute value for the <hibernate-mapping> element, you only need to provide the namespace in the <class> element and not its assembly.
Both the id and property elements contain a name, column, and type attribute. When using the default mapping strategy, as is being done in the GuitarStore example, the value provided for the name attribute must match the property name defined within your class, as shown in Listing 1-5.
LISTING 1-5: Matching C# code with the XML mapping
   <property name="Received" column="RECEIVED" type="System.DateTime" />
public virtual DateTime? Received { get; set; }
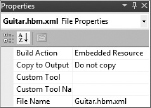
The name attribute is case-sensitive. If you try to run your program with misspelled or wrongly cased properties in your mapping file, you will receive an exception. The most common of these is PropertyNotFoundException, shown in Figure 1-14. If you receive this exception, check your spelling.
![]()
The column attribute defines the name of the database column to which this property is associated. This valuable feature enables you to have a property name in your code that is different from the name of the column. For example, perhaps in some situations you need to reference the BUILDER database column as Manufacturer, as shown in Listing 1-6. In this case, you can achieve that by simply setting the name attribute to Manufacturer and the column attribute to BUILDER. Then, when the class is populated with data, the BUILDER database column value can be referenced via a property named Manufacturer.
LISTING 1-6: Matching column and name properties in the mapping XML file
<property name=“Manufacturer”  column=“BUILDER”  type=“System.String” />

list.Add(item.Manufacturer);
Note that by default the mapping files assume that the table name is the same as the class name and the fields are the same name as their properties. You only need to provide the optional values for table or column if the names are something other than what exists in the database.
The last attribute discussed here is the type attribute. NHibernate provides an interface to create custom types, such as the currency type, which is covered in Chapter 5, “Managing State and Saving Data.” The type attribute is not required because NHibernate uses reflection, which enables the reading of metadata at runtime, to determine the type into which it needs to convert the database data value. However, it is a good practice to use it. The more information you provide, the better; and if you need to implement a custom type, then it easily falls into place with your other mapped properties.
Now that the Inventory mapping is complete, the Guitar mapping file, shown in Listing 1-7, must be created by the programmer. Perform the same actions you took to create the Inventory.hbm.xml file. The Guitar table is referenced and uses the Guitar.cs file to store the retrieved data. Recall within the Guitar class definition where an IList<Inventory> collection was added to store the Inventory per Guitar type. A <bag> element is used to store the Inventory collection.
LISTING 1-7: Guitar.hbm.xml
<?xml version=“1.0” encoding=“utf-8” ?>
<hibernate-mapping xmlns=“urn:nhibernate-mapping-2.2”
assembly=“NHibernate.GuitarStore”>
  <class name=“NHibernate.GuitarStore.Common.Guitar, NHibernate.GuitarStore”
              table=“GUITAR”>
    <id name=“Id”         column=“ID”       type=“System.Guid” />
    <property name=“Type”       column=“TYPE”     type=“System.String” />
    <bag name=“Inventory”  table=“INVENTORY” lazy=“true”>
      <key column=“TYPEID” />
      <one-to-many class=“NHibernate.GuitarStore.Common.Inventory” />
    </bag>
  </class>
</hibernate-mapping>
Several different methods for storing a collection using NHibernate are available, as described in Table 1-5.
TABLE 1-5:NHibernate Collection Options
The NHibernate.GuitarStore class library should now contain two classes and two mapping files. The project should now resemble what is shown in Figure 1-15.
Deploying the Mapping Files
There are two ways to deploy the XML files:
- As an embedded resource
- As separate XML files
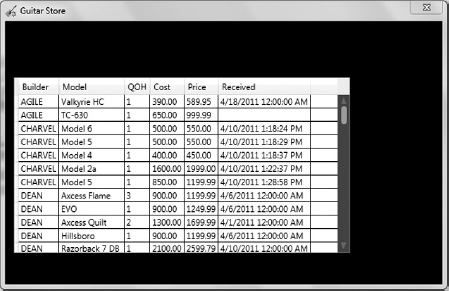
Deploying the mapping files as embedded resources requires setting the Build Action file property to Embedded Resource, as shown in Figure 1-16. By doing this, the mapping files are packaged with the assembly, which prevents programmers and system administrators from tampering with them. It also reduces the complexity of deployment because you have fewer files to install.
It is also possible to deploy the mapping files as separate files alongside the assembly. This method facilitates being able to adjust your mapping as needed after the program has been compiled. Both approaches are common as they serve different use cases. For simplicity, the GuitarStore program uses the embedded approach to deploying the mapping files.
Mapping by Code
With the release of NHibernate 3.2 comes the concept of mapping by code. The concept relies on the ClassMapping class found within the NHibernate.Mapping.ByCode.Conformist namespace. If you choose to map your database using this method, you do not need to manually create hbm.xml files. As well, you have the flexibility to decide for yourself how to organize the mappings — for example within the same class file (class-by-class).
To map the Inventory class using the class-by-class approach, open the Inventory.cs file found within the Common directory of the NHibernate.GuitarStore project and modify it, as shown in Listing 1-8.
LISTING 1-8: Mapping the inventory class by code
using NHibernate.Mapping.ByCode.Conformist;

namespace NHibernate.GuitarStore.Common
{
  public class Inventory
  {
    public Inventory() { }

    public virtual Guid Id { get; set; }
    public virtual Guid TypeId { get; set; }
    public virtual string Builder { get; set; }
    public virtual string Model { get; set; }
    public virtual int? QOH { get; set; }
    public virtual decimal? Cost { get; set; }
    public virtual decimal? Price { get; set; }
    public virtual DateTime? Received { get; set; }
  }

  public class InventoryMap : ClassMapping<Inventory>
  {
    public InventoryMap()
    {
      Id<Guid>(x => x.Id, map =>
      {
        map.Column(“ID”);
      });
      Property<Guid>(x => x.TypeId, map => map.Column(“TYPEID”));
      Property<string>(x => x.Builder, map => map.Column(“BUILDER”));
      Property<string>(x => x.Model, map => map.Column(“MODEL”));
      Property<int?>(x => x.QOH, map => map.Column(“QOH”));
      Property<decimal?>(x => x.Cost, map => map.Column(“COST”));
      Property<decimal?>(x => x.Price, map => map.Column(“PRICE”));
      Property<DateTime?>(x => x.Received, map => map.Column(“RECEIVED”));
    }
  }
}
The implementation of this method is covered in the “Using a Strongly Typed Configuration” section.
Understanding the property-ref Attribute
The property-ref attribute, shown in Listing 1-9, is worth a mention. In some legacy databases, relationships have been built between tables without using a foreign key. That means the connection between the tables is not built on a primary-key-based relationship. Recall the creation of the bag element in the Guitar.hbm.xml file, as shown previously in Listing 1-7.
The Inventory.TYPEID is the foreign key link to the ID on the Guitar table. This relationship is defined via the column attribute value within the key element. However, if you were required to connect your tables using a column value that is not the primary one, your mapping bag element may resemble something like what is shown in Listing 1-9.
LISTING 1-9: Mapping a property-ref attribute
    <bag name=“Inventory”  table=“INVENTORY” lazy=“true”>
      <key column=“ID”       property-ref=“OID” />
      <one-to-many class=”GuitarStore.Common.Inventory” />
    </bag>
This configuration represents an ID on the Inventory table as the pseudo-foreign key with the OID on the Guitar table. The OID is not the primary key on the Guitar table. Nonetheless, when the bag is persisted, the Inventory.ID value is used as the foreign key link to the Guitar.OID column.
Configuration Techniques
One of NHibernate's best characteristics is the many different types of database management systems (DBMSs) it can support. DBMSs such as Oracle, Microsoft SQL Server, Sybase, MySQL, and so on, are quickly up and running by simply using the correct NHibernate dialect and driver. If your program interacts with different database management systems, then it is good practice to configure your installation in an app.config or web.config file. Conversely, if your program employs a single database management system, then you will be interested in a cool new feature in version 3 of NHibernate: support for a strongly typed configuration, which uses a number of hard-coded values.
In addition to an overview of the Configuration and SessionFactory classes, this section describes two types of NHibernate configuration techniques: one approach that is easily changed, and another hard-coded approach that uses the strongly typed dialect and driver within the code base.
TIP Because it is possible to mix and match both code-based configuration and configuration files, you can add configuration values that change to the configuration file, and the values that will not change can be hard-coded.
Understanding Configuration and the SessionFactory
The NHibernate.Cfg.Configuration class is an initialize-time object that is used to store properties and map documents for use by the NHibernate.ISessionFactory interface. The minimum properties required to build a SessionFactory are defined in Table 1-6. In most cases, a program creates a single Configuration, builds a single SessionFactory, and then instantiates Sessions that manage the client requests.
TABLE 1-6:SessionFactory Required Properties
| NAME | EXAMPLE VALUE |
| Dialect | NHibernate.Dialect.MsSql2008Dialect |
| DriverClass | NHibernate.Driver.SqlClientDriver |
| ConnectionString | Database-specific connection information |
| ConnectionProvider | NHibernate.Connection.DriverConnectionProvider |
| ProxyFactory | NHibernate.ByteCode.Castle.ProxyFactoryFactory |
NOTE With the release of NHibernate 3.2, the ProxyFactory is no longer a required property, as there is now a default proxy. However, versions prior to 3.2 require this property.
Within the NHibernate.Cfg.Environment.cs file you can find all the properties that can be set via the Configuration class. The following list defines and explains each of these required properties:
- Dialect — Each DBMS has its own dialect, which means that although the majority of the language is the same across databases, it contains some unique terms. For example, Oracle has a keyword rownum, but there is no direct equivalent in Microsoft SQL Server, even though the latter DBMS also provides a way to achieve the same effect using a different method. There are also differences between versions of the same DBMS. Choosing the correct dialect for the driver helps to manage these differences within the specific DBMS only.
- DriverClass — This specifies the driver that is used to connect and interact with a specific database. These classes are responsible for interacting on behalf of NHibernate with each of the ADO.NET drivers that are often provided by the individual database vendors — for example, SqlClientDriver for SQL Server or OracleDataClientDriver for ODP.NET.
- ConnectionString — This defines the data source. It generally includes the server name; the initial catalog, which is the name of the database on the server; and the user id and password. Examples for Oracle and SQL Server are shown in Table 1-7.
- ConnectionProvider — The DriverConnectionProvider is an interface that manages the opening and closing of database connections. If the requirements state that connections to the database must be audited, it is possible to implement an application-specific ConnectionProvider and override the methods within the interface to perform the logic. This is similar to Interceptors, which are discussed later in this chapter.
- ProxyFactory — This is the proxy class used for lazy loading. In the GuitarStore program, the Castel proxy is implemented. Three different proxies are provided and required only with NHibernate 3.1 and earlier:
- NHibernate.ByteCode.Castle.ProxyFactory
- NHibernate.ByteCode.LinFu.ProxyFactory
- NHibernate.ByteCode.Spring.ProxyFactory
TABLE 1-7:ConnectionString Examples
| DBMS | CONNECTION STRING |
| MS SQL Server 2008 | “Data Source=PC-W7;Initial Catalog=myGuitarStore;Integrated Security=True” |
| Oracle 11g | “user id=*****;password=*****;data source=(DESCRIPTION=(ADDRESS=(PROTOCOL=tcp)(HOST=192.168.1.1)(PORT=1521))(CONNECT_DATA=(SERVICE_NAME=ora11g)))” |
Since the release of NHibernate 3.2, the proxy components are no longer distributed nor required. Instead, a DefaultProxyFactory class is utilized, which is found in the NHibernate.Proxy namespace.
Creating an NHibernate Base Class
Add a new class file to the DataAccess directory within the NHibernate.GuitarStore project named NHibernateBase.cs. The NHibernateBase class contains the logic to initialize the Configuration, SessionFactory, and Session classes.
This base class also provides a nice “library-like” code base, similar to that of a pre-ORM data access repository. This means that you can consolidate all your querying logic in whatever manner you like — for example, by business function or domain.
Now add the following code in Listing 1-10:
LISTING 1-10: NHibernateBase class
using NHibernate;
using NHibernate.Cfg;

namespace NHibernate.GuitarStore.DataAccess
{
  public class NHibernateBase
  {
    private static Configuration Configuration { get; set; }
    protected static ISessionFactory SessionFactory { get; set; }
    private static ISession session = null;
    private static IStatelessSession statelessSession = null;

    public static Configuration ConfigureNHibernate(string assembly)
    {
       Configuration = new Configuration();
       Configuration.AddAssembly(assembly);

       return Configuration;
    }

    public void Initialize(string assembly)
    {
      Configuration = ConfigureNHibernate(assembly);
      SessionFactory = Configuration.BuildSessionFactory();
    }

    public static ISession Session
    {
      get
      {
         if (session == null)
         {
             session = SessionFactory.OpenSession();
         }
         return session;
      }
    }

    public static IStatelessSession StatelessSession
    {
      get
      {
        if (statelessSession == null)
        {
           statelessSession = SessionFactory.OpenStatelessSession();
        }
        return statelessSession;
      }
    }
  }
}
The Initialize() method is the entry point for the GuitarStore NHibernate configuration. This method is called once when the program begins. The Initialize() method first calls the ConfigureNHibernate() method, which uses the NHibernate.Cfg.Configuration class's AddAssembly() method to add all of the assembly's mapped resources whose name ends with.hbm.xml. The NHibernate.Cfg.Configuration object loads and validates the configured driver class, proxy, dialect, mappings, and so on.
Once the assembly and properties have been added and the configuration object instantiated, the BuildSessionFactory() method of the NHibernate.Cfg.Cofiguration class is used to instantiate a new NHibernate.SessionFactory object. The SessionFactory property of the NHibernateBase class is used to store the object returned from the BuildSessionFactory() method. The SessionFactory property is also used to call the OpenSession() method, which returns a Session object for executing queries via the NHibernate library.
The NHibernate Session gives you access to a rich collection of querying APIs needed to save, update, and delete data from your database, plus a whole lot more. ICriteria, IQuery (HQL), IMultiQuery, IMultiCritiera, and IQueryOver are all accessible from the Session object. The Session is the main entry point to your application's interaction with NHibernate, and its implementation is a very important design decision.
The decision regarding how to manage the Session lifetime/lifecycle in a program is a complicated one. It depends very much on the requirements of the specific program. For the GuitarStore WPF program created in this book, the session-per-presenter implementation is utilized. The session-per-presenter has the following benefits:
- Retains access to all benefits NHibernate offers, such as lazy loading and flushing.
- Easy implementation within a program-specific context. For example, you can create a single Session per form and dispose of it when the form is closed, making the Session eligible for garbage collection.
- Optimally manages the opening and closing of the database connection.
- Better system recovery from a StaleObjectException because more than a single Session exists.
TIP Take a look at the NHibernate.ISession.cs file for a great description of the Session and the role it plays. The source code is well documented and you can learn a lot from it. The comments were written by experts and you can find some real gems in there.
Lastly, create an additional method within the NHibernatBase class called ExecuteICriteria<T>(). Notice that this method uses generics. By using generics, the Guitar class, the Inventory class, or any class created in the future can use this method and get the expected results. Add the code in Listing 1-11 to the NHibernatBase class.
LISTING 1-11: The ExecuteICriteria<T>() method
public IList<T> ExecuteICriteria<T>()
{
  using (ITransaction transaction = Session.BeginTransaction())
  {
    try
    {
      IList<T> result = Session.CreateCriteria(typeof(T)).List<T>();
      transaction.Commit();
      return result;
    }
    catch (Exception ex)
    {
      transaction.Rollback();
      throw;
    }
  }
}
The preceding code shows an example of a typical C# NHibernate transaction implementation that uses an explicit transaction. As you learn more about NHibernate, the importance of the transaction becomes clearer. Each time you do something on the database, at minimum a Session is required. That Session is used to begin a transaction. The specific query and transaction commit should be performed between the beginning and the end of the transaction.
It's a good practice to place the code within a try … catch block, rolling back the transaction if one of the steps fails. This is done by calling the Rollback() method of the NHibernate.ITransaction interface.
WARNING NHibernate's second-level cache is updated only after a transaction commit is performed. If changes to the database are made, of any kind, without committing, the integrity of the data stored in the cache is compromised.
Now that it is clear which properties are required to create the Configuration class so a SessionFactory can be successfully built, and how to initialize them, the following sections describe implementation of the two different configuration techniques.
Using an app/web.config file
This configuration method is best for programs that use a single database but could be deployed to different users who want different database management systems. For example, suppose your company offers a software package for which the licensed customers have the option to use a different database management system. Having an NHibernate configuration that supports a simple conversion between databases can increase your customer reach and reduce the technical development and implementation costs.
Listing 1-12 is an example of how NHibernate is implemented into the app.config file of a WPF or console application. To use another database management system, you only need to change three values: Dialect, Driver_Class, and ConnectionString.
LISTING 1-12: app.config NHibernate Configuration
<?xml version=“1.0”?>
<configuration>
  <configSections>
    <section name=“hibernate-configuration”
             type=“NHibernate.Cfg.ConfigurationSectionHandler, NHibernate”/>
  </configSections>
  <hibernate-configuration xmlns=“urn:nhibernate-configuration-2.2”>
    <session-factory>
      <property name=“dialect”>NHibernate.Dialect.MsSql2008Dialect</property>
      <property name=“connection.driver_class”>
      NHibernate.Driver.SqlClientDriver</property>
      <property name=“connection.connection_string_name”>GuitarStore
      </property>
      <property name=“connection.provider”>
      NHibernate.Connection.DriverConnectionProvider</property>
    </session-factory>
  </hibernate-configuration>
  <connectionStrings>
    <add name=“GuitarStore”
         connectionString=“Data Source=PERKINS-W7;Initial
     Catalog=myGuitarStore;Integrated Security=True”/>
   </connectionStrings>
</configuration>
NOTE The <configSections> element, where the name=”hibernate-configuration” attribute is defined, must be placed directly after the initial <configuration> element.
Add Listing 1-12 to the app.config file located within the NHibernate.GuitarStore.Console project and then open the Program.cs file. To test that the class files, mapping files, and app.config settings are correctly configured, add Listing 1-13 to the Main() method of the Program class.
LISTING 1-13: Console code for configuration testing
using NHibernate.Cfg;
using NHibernate.GuitarStore.DataAccess;

try
{
   NHibernateBase NHB = new NHibernateBase();
   NHB.Initialize(“NHibernate.GuitarStore”);
   System.Console.WriteLine(“NHibernate.GuitarStore assembly initialized.”);

   System.Console.ReadLine();
}
catch (Exception ex)
{
   string Message = ex.Message;
   if (ex.InnerException != null)
   {
     Message += “ - InnerExcepetion: ” + ex.InnerException.Message;
   }
     System.Console.WriteLine();
     System.Console.WriteLine(“***** ERROR *****”);
     System.Console.WriteLine(Message);
     System.Console.WriteLine();
     System.Console.ReadLine();
}
Run the NHibernate.GuitarStore.Console application by pressing the F5 button. When the message in the console window states that the assembly has been initialized, the app.config-based configuration is successful. For more details about creating the console application, see the section “Creating a Console Application for Testing” later in this chapter.
Using a Strongly Typed Configuration
This configuration method is useful with an internal program that uses a single database management system and is unlikely to change, such as the GuitarStore program or a system that has implemented DBMS-specific technology.
I like this method because a strongly typed implementation provides very good IntelliSense and access to all the methods and properties, unlike using the app.config file to create the configuration, whereby the programmer has to know which elements, attributes, and properties are required. In addition, the strongly typed implementation clearly indicates your options; simply place the . (dot) after the object to see them displayed using IntelliSense.
As shown in Listing 1-14, a strongly typed configuration uses many of the NHibernate classes. These classes enable you to choose the dialect, connection driver, and so on needed for your program.
LISTING 1-14: Additional directives for a strongly typed configuration
using System.Data;
using NHibernate.ByteCode.Castle; //For NHibernate 3.1 and before
using NHibernate.Cfg.Loquacious;
using NHibernate.Connection;
using NHibernate.Dialect;
using NHibernate.Driver;
Implementing or migrating to a strongly typed configuration is not difficult. No configuration values are needed in the app.config file; however, the connection string, such as in the GuitarStore example, continues to be configured and retrieved from it. This is because, for example, if the password for the database is changed, only the app.config file needs to be changed. However, if the connection string is hard-coded in the program, a new executable needs to be distributed. The code shown in Listing 1-15 can replace the current ConfigureNHibernate() method that exists in the NHibernateBase.cs class file.
LISTING 1-15: Strongly typed NHibernate configuration
public static Configuration ConfigureNHibernate(string assembly)
{
    Configuration = new Configuration();

    Configuration.DataBaseIntegration(dbi =>
    {
       dbi.Dialect<MsSql2008Dialect>();
       dbi.Driver<SqlClientDriver>();
       dbi.ConnectionProvider<DriverConnectionProvider>();
       dbi.IsolationLevel = IsolationLevel.ReadCommitted;
       dbi.Timeout = 15;
    });

    Configuration.AddAssembly(assembly);

    return Configuration;
}
Once the preceding code has replaced the existing method in the NHibernateBase class, press F5 to run the console application and confirm that the initialization was successful.
The most important point to understand here is that the type of configuration is determined based on the program's requirements. The crux of this determination is whether the configuration settings change often. If they are unlikely to change, then the strongly typed configuration is a good alternative, regardless of the fact that some configurations are hard-coded.
If you have chosen to implement the class-by-class mapping by code concept, additional code needs to be added to the ConfigureNHibernate() method shown previously in Listing 1-15. When mapping by code and using the ConfigureNHibernate() method, you are required to add the mapping to the Configuration prior to adding the assembly, as shown in Listing 1-16.
LISTING 1-16: Implementing mapping by code
using NHibernate.Mapping.ByCode;
using NHibernate.Cfg.MappingSchema;
using NHibernate.GuitarStore.Common;

public static Configuration ConfigureNHibernate(string assembly)
{
  Configuration = new Configuration();

  Configuration.DataBaseIntegration(dbi =>
  {
    dbi.Dialect<MsSql2008Dialect>();
    dbi.Driver<SqlClientDriver>();
    dbi.ConnectionProvider<DriverConnectionProvider>();
    dbi.IsolationLevel = IsolationLevel.ReadUncommitted;
    dbi.Timeout = 15;
  });
  ModelMapper mapper = new ModelMapper();
  mapper.AddMapping<InventoryMap>();
  HbmMapping mapping = mapper.CompileMappingFor(new[] { typeof(Inventory) });
  Configuration.AddDeserializedMapping(mapping, “GuitarStore”);

  Configuration.AddAssembly(assembly);

  return Configuration;
}
Creating a Console Application for Testing
The initial mapping of a database can take significant time and effort if done manually. A single spelling, typo, or case mistake can sometimes take an hour or more to sort out and resolve. An example of a case typo and a spelling mistake is shown in Listing 1-17.
LISTING 1-17: Invalid class and mapping example
public virtual string Type { get; set; }
  <property name=“type” column=“TYPE” type=“System.String” />

public virtual DateTime? Received { get; set; }
  <property name=“Received” column=“RECEIVED” type=“System.DateTime” />
When the AddAssembly(“NHibernate.GuitarStore”) method of the Configuration class is called from the NHibernateBase class, the mapping documents (.hbm.xml) are validated. If there are spelling, type, or case errors, you will likely get the error shown in Figure 1-17.
If you try to make the changes to the class library, and implement and then test them directly in the GuitarStore WPF program, troubleshooting becomes more complex. This is because the programmer must test not only the configuration, but also the implementation in the WPF program. It is complicated to determine whether a failure is a configuration problem or an implementation problem. Having a simple tool to confirm the configuration before implementation greatly helps in the development process.
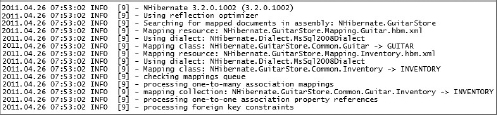
TIP You can write the NHibernate-generated SQL to the console by adding the show_sql property to the NHibernate configuration file:
<property name=“show_sql”>true</property>
To begin, add some general ICriteria, IQuery (HQL), or LINQ to NHibernate queries, as shown in Listing 1-18, to the code previously created in Listing 1-13. The following code is used to confirm that each of the classes and mapping files return expected results:
LISTING 1-18: Console testing examples
using NHibernate.GuitarStore.Common;
using NHibernate.Linq;

IList<Inventory> list1 =
NHibernateBase.StatelessSession.CreateQuery(“from Inventory”).List<Inventory>();

IList<Inventory> list2 =
NHibernateBase.Session.CreateCriteria(typeof(Inventory)).List<Inventory>();

IQueryable<Inventory> linq =
  (from l in NHibernateBase.Session.Query<Inventory>() select l);
Executing the console application results in something like what is shown in Figure 1-18.
![]()
Creating a console application to test your class library configuration and modifications saves a lot of time and prevents a lot of headaches. If the queries and assembly validation succeed, then you can be very confident that they function the same way when used in your more complex applications.
TIP Add your testing code within a try … catch block and write the error message to the screen. Be sure to include the InnerException.Message because it often contains valuable information.
CONFIGURING THE GUITARSTORE WPF PROGRAM
Now that the projects, the database, the classes, and the mapping files are created, and NHibernate has been configured, the creation of the GuitarStore WPF program can begin. You will perform the following actions in this section:
- Initialize the NHibernate SessionFactory.
- Add and populate the DataGrid ordered by Builder.
- Add and populate a ComboBox.
- Filter the DataGrid based on ComboBox selection.
Initializing NHibernate
To initialize NHibernate within the GuitarStore WPF program, you need to first open the MainWindow.xaml.cs file. From the MainWindow() constructor, call the Initialize() method found within the NHibernateBase class, as shown in Listing 1-19.
LISTING 1-19: Initializing NHibernate in the WPF program
using NHibernate.GuitarStore.DataAccess;
namespace GuitarStore
{
    public partial class MainWindow : Window
    {
        public MainWindow()
        {
            InitializeComponent();
            NHibernateBase nhb = new NHibernateBase();
            nhb.Initialize(“NHibernate.GuitarStore”);
        }
    }
}
Adding and Populating the DataGrid Control
To add and populate the DataGrid, the following actions will be taken:
- Add the DataGrid control to the MainWindow.
- Populate the DataGrid.
- Create a new NHibernateInventory class.
- Add an orderBy method to the NHibernateInventory class.
Add a DataGrid control to the GuitarStore WPF MainWindow.xaml window by dragging and dropping the control from the Toolbox. Then add a Loaded element to the MainWindow.xaml window with a value of Window_Loaded() method. The MainWindow.xaml code should resemble what is shown in Listing 1-20.
LISTING 1-20: MainWindow.xaml with Loaded element
<Window x:Class=“GuitarStore.MainWindow”
        xmlns=“http://schemas.microsoft.com/winfx/2006/xaml/presentation”
        xmlns:x=“http://schemas.microsoft.com/winfx/2006/xaml”
        Title=“Guitar Store” Height=“400” Width=“625”
        WindowStartupLocation=“CenterScreen” BorderBrush=“Black”
        Background=“Black” Icon=“Images/Guitar.ico”
        ResizeMode=“NoResize” Loaded=“Window_Loaded”>
    <Grid>
        <DataGrid AutoGenerateColumns=“True” HorizontalAlignment=“Stretch”
                  Margin=“12,59,110,52” Name=“dataGridInventory”
                  VerticalAlignment=“Stretch” />
    </Grid>
</Window>
Next, open again the MainWindow.xaml.cs file and add the following code in Listing 1-21, which populates the DataGrid.
LISTING 1-21: Populating the GuitarStore inventory DataGrid
using NHibernate.GuitarStore.Common;

namespace GuitarStore
{
    public partial class MainWindow : Window
    {
        private void Window_Loaded(object sender, RoutedEventArgs e)
        {
            NHibernateBase nhb = new NHibernateBase();
            List<Inventory> list =
                  (List<Inventory>)nhb.ExecuteICriteria<Inventory>();
            dataGridInventory.ItemsSource = list;

            if (list != null)
            {
                dataGridInventory.Columns[0].Visibility =
                                   System.Windows.Visibility.Hidden;
                dataGridInventory.Columns[1].Visibility =
                                   System.Windows.Visibility.Hidden;
                dataGridInventory.Columns[8].Visibility =
                                   System.Windows.Visibility.Hidden;
            }
        }
    }
}
Change the GuitarStore project to the startup project by right-clicking it and selecting Set as Startup Project from the context menu. Press F5 to run the GuitarStore WPF program. The inventory is retrieved and loaded into the DataGrid.
The ExecuteICriteria<T>() method in the NHibernateBase class does not order the result set by Builder, as the requirements dictate. Therefore, create a new class called NHibernateInventory that inherits from NHibernateBase and resembles the code shown in Listing 1-22. The new class should be added into the DataAccess folder of the NHibernate.GuitarStore class library.
LISTING 1-22: NHibernateInventory class with OrderBy method
using NHibernate.Criterion;
using NHibernate.GuitarStore.Common;

namespace NHibernate.GuitarStore.DataAccess
{
  public class NHibernateInventory : NHibernateBase
  {
    public IList<Inventory> ExecuteICriteriaOrderBy(string orderBy)
    {
      using (ITransaction transaction = Session.BeginTransaction())
      {
        try
        {
          IList<Inventory> result = Session.CreateCriteria(typeof(Inventory))
                                           .AddOrder(Order.Asc(orderBy))
                                           .List<Inventory>();
          transaction.Commit();
          return result;
        }
        catch (Exception ex)
        {
          transaction.Rollback();
          throw;
        }
      }
    }
  }
}
The method shown here uses ICriteria and its AddOrder method to retrieve the data from the database. The projection methods of ICriteria are found in the NHibernate.Criterion namespace and therefore require the addition of the NHibernate.Criterion directive.
Lastly, update the Window_Loaded() method to call the ExecuteICriteriaOrderBy() method, passing it “Builder”, as shown in Listing 1-23. Note that the NHibernateInventory class is instantiated, unlike the NHibernateBase class.
LISTING 1-23: Implementing the OrderBy ICritera method
NHibernateInventory nhi = new NHibernateInventory();
List<Inventory> list = (List<Inventory>)nhi.ExecuteICriteriaOrderBy(“Builder”);
Press F5 to see the results shown in Figure 1-19. This window provides the current Inventory list.
Adding and Populating a ComboBox
Drag and drop a ComboBox control from the Toolbox and add it to the MainWindow.xaml window. In the MainWindow.xaml.cs file, add a new method called PopulateComboBox(), adding the code shown in Listing 1-24.
LISTING 1-24: PopulateComboBox() method
private void PopulateComboBox()
{
  NHibernateBase nhb = new NHibernateBase();
  IList<Guitar> GuitarTypes = nhb.ExecuteICriteria<Guitar>();
  foreach (var item in GuitarTypes)
  {
    Guitar guitar = new Guitar(item.Id, item.Type);
    comboBoxGuitarTypes.DisplayMemberPath = “Type”;
    comboBoxGuitarTypes.SelectedValuePath = “Id”;
    comboBoxGuitarTypes.Items.Add(guitar);
  }
}
Lastly, call the PopulateComboBox() method from the Window_Loaded() method so that the ComboBox is populated with the GuitarTypes result set.
Filtering the DataGrid Based on the ComboBox Selection
To add filtering capabilities to the GuitarStore WPF program, you need to take the following actions:
- Add a SelectionChanged event and method.
- Create a method that returns a result set based on Guitar type.
- Modify the SelectionChanged() method to capture the selection and repopulate the DataGrid.
In the MainWindow.xaml file, add a SelectionChanged event within the ComboBox control, as shown in Listing 1-25.
LISTING 1-25: ComboBoxGuitarTypes ComboBox
<ComboBox Height=“23” SelectionChanged=“comboBoxGuitarTypes_SelectionChanged”
          HorizontalAlignment=“Left” Margin=“12,50,0,0” Name=“comboBoxGuitarTypes”
          VerticalAlignment=“Top” Width=“195” />
Next, create a method within the NHibernateInventory class that accepts a Guid as parameter and returns the matching Inventory data, as shown in Listing 1-26.
LISTING 1-26: Guitar type filter method
public IList<Inventory> ExecuteICriteria(Guid Id)
{
  using (ITransaction transaction = Session.BeginTransaction())
  {
    try
    {
      IList<Inventory> result = Session.CreateCriteria(typeof(Inventory))
                                       .Add(Restrictions.Eq(“TypeId", Id))
                                       .List<Inventory>();
      transaction.Commit();
      return result;
    }
    catch (Exception ex)
    {
      transaction.Rollback();
      throw;
    }
  }
}
The last step is to add the code that clears the existing data in the DataGrid, capture the selected value from the ComboBox, and call the method created in Listing 1-26. The SelectionChanged() method is shown in Listing 1-27.
LISTING 1-27: SelectionChanged() method
private void comboBoxGuitarTypes_SelectionChanged(object sender,
                                              SelectionChangedEventArgs e)
{
  try
  {
     dataGridInventory.ItemsSource = null;
     Guitar guitar = (Guitar)comboBoxGuitarTypes.SelectedItem;
     Guid guitarType = new Guid(guitar.Id.ToString());

     NHibernateInventory nhi = new NHibernateInventory();
     List<Inventory> list = (List<Inventory>)nhi.ExecuteICriteria(guitarType);
     dataGridInventory.ItemsSource = list;

     if (list != null)
     {
       dataGridInventory.Columns[0].Visibility = System.Windows.Visibility.Hidden;
       dataGridInventory.Columns[1].Visibility = System.Windows.Visibility.Hidden;
       dataGridInventory.Columns[8].Visibility = System.Windows.Visibility.Hidden;
     }
     PopulateComboBox();
  }
  catch (Exception ex)
  {
    labelMessage.Content = ex.Message;
  }
}
Notice that a label has been added to display an error and a message, if one is thrown.
Within this section some basic functionality has been implemented using NHibernate's ICriteria interface. Both the Restrictions and the AddOrder ICriteria methods were used to restrict and format the data. The remaining sections in this chapter discuss other NHibernate capabilities that are important to understand. Further implementation of functionality into the GuitarStore WPF program occurs in the following chapters.
UNDERSTANDING LAZY LOADING
One of NHibernate's strongest features is lazy loading, which means that data is not retrieved from the database until it is specifically requested. For example, the mapping shown in Listing 1-28 specifies that when the Guitar class is populated with data from the database using any of the NHibernate querying mechanisms, it is not automatically retrieved. If the Inventory bag is not specifically accessed by the application, the property is not populated.
LISTING 1-28: Mapping lazy loading configuration
    <bag name=“Inventory” table=“INVENTORY” lazy=“true”>
      <key column=“TYPEID” />
      <one-to-many class=“NHibernate.GuitarStore.Common.Inventory” />
    </bag>
This makes a lot of sense. Why retrieve data that the user will not use? The code in Listing 1-29 shows an example of retrieving all the Guitar types from the Guitar table and then, at a later point, within the same method, retrieving the Inventory for a single type of Guitar. The first line performs a simple ICriteria select of all Guitar types. The program could then do some processing of the different Guitar types and load the specific Inventory details as required, and only if required.
LISTING 1-29: Lazy loading the inventory for a specific guitar type
IList<Guitar> GuitarTypes = session.CreateCriteria(typeof(Guitar))
                                    .List<Guitar>();

//Do something else within the session context logic here

Inventory inventory = GuitarTypes[0].Inventory[0];
If lazy loading were set to false, all the guitars and the Inventory are loaded with one large SQL statement. Although this isn't an issue using the current example, imagine a system that has hundreds of thousands of rows. System performance would be severely affected in that case. The recommendation is to leave lazy loading set to true.
Not only is it possible to lazy load a bag, it is also possible to lazy load a specific property. For example, suppose user manuals or images are stored in the database for each guitar in inventory. Clearly, it isn't a good idea to retrieve the user manuals or images when a user only wanted to check the price or quantity of a specific guitar. Images and documents are large and cause unnecessary load on the system if they are unnecessarily retrieved. By turning lazy loading on or off at the property level, as shown in the following code snippet, images, manuals, or large data types are not retrieved unless specifically referenced from the program.
<property name=“Image” column=“IMAGE” lazy=“true” />
Specifically setting the Image property to lazy load means NHibernate retrieves the image only if it is included in the NHibernate query.
NOTE Using the fetch attribute aff ects lazy loading. Select, which is the default value, lazy loads the data. If the value is changed to join, as shown in Listing 1-30, the data is eagerly loaded, meaning all data is loaded at once. Be aware of this and implement the fetch attribute only if dictated by the program's requirements.
LISTING 1-30: Using fetch with your collection
<bag name=“Inventory” table=“INVENTORY” fetch=“join”>
  <key column=“TYPEID” />
  <one-to-many class=“NHibernate.GuitarStore.Common.Inventory”  />
</bag>
CONFIGURING LOGGING USING LOG4NET
The log4net.dll is found in the Test directory contained within the NHibernate download. It is tightly integrated with NHibernate and is used to log NHibernate activities. It can also be used for customized logging within a program.
TIP Confirm that your C# project is configured to use a full version of the .NET Framework. If your project is configured to use a Client Profile version of the .NET Framework, you will not be able to add the log4net directive to your solution without error, and therefore will not obtain access to any of its methods.
Return to the NHibernateBase class and add a constructor and the code shown in Listing 1-31.
LISTING 1-31: Enabling the log4net configurator
using log4net;

public NHibernateBase()
{
    log4net.Config.XmlConfigurator.Configure();
}
To configure log4net, you need to make some modifications to the app.config file. The configuration example shown in Listing 1-32 specifies where the log should be placed (console or file), the format of the log, and much more. This listing shows a default configuration for logging to a file.
LISTING 1-32: App.config log4net configuration example
<?xml 1=“version.0” encoding=“utf-8” ?>
<configuration>
 <configSections>
   <section name=“log4net”
            type=“log4net.Config.Log4NetConfigurationSectionHandler, log4net”/>
 </configSections>
 <log4net>
   <appender name=“NHLog” type=“log4net.Appender.RollingFileAppender, log4net” >
     <param name=“File” value=“NHLog.txt” />
     <param name=“AppendToFile” value=“true” />
     <param name=“maximumFileSize” value=“200KB” />
     <param name=“maxSizeRollBackups” value=“1” />
     <layout type=“log4net.Layout.PatternLayout, log4net”>
      <conversionPattern
       value=“%date{yyyy.MM.dd hh:mm:ss} %-5level [%thread] - %message%newline” />
     </layout>
   </appender>
   <!-- levels: ALL, DEBUG, INFO, WARN, ERROR, FATAL, OFF -->
   <root>
     <level value=“INFO” />
     <appender-ref ref=“NHLog” />
   </root>
   <logger name=“NHBase.SQL”>
     <level value=“ALL” />
     <appender-ref ref=“NHLog” />
   </logger>
 </log4net>
</configuration>
The log4net configuration has two parts, the appender and the logger.
The Appender
The appender is used to provide log4net with the information it needs to store or present the generated logs. The preceding configuration in Listing 1-32 instructs log4net to store the log in a text file named NHLog.txt. This is done using the param tag with the name of File and the value of NHLog.txt. The value attribute that contains NHLog.txt can contain an absolute path; if it isn't set, then the log file is stored in the relative working directory.
Some other parameters are AppendToFile and maximumFileSize. AppendToFile simply specifies whether you want to create a new log file each time the NHibernate-based program begins. If it is set to true, then each time the program is started it adds log information to the same NHLog.txt file. If it is set to false, then the file is deleted each time a new Session is created. The size of the log file can affect your system's performance, so you should set the maximum size to which the log file can grow. Note that when the maximum file size is exceeded, the log file is automatically deleted and a new one created.
If you want the old one to be backed up before the new one is created, use the maxSizeRollBackups parameter, setting the value for the number of files you want before they are removed. I have seen many performance and availability issues caused by large log files and/or the reduction of disk space. Therefore, carefully consider your logging strategy and configuration.
A very nice feature in log4net is the capability to confi gure the layout of your log. The example confi guration results in a row in the text file, as shown in Figure 1-20.
The Logger
The logger is where the source of the logs is determined. The seven values that can be provided to the logger are described in Table 1-8.
TABLE 1-8:Log4net Logging Levels

If you look at the log values hierarchically, you can see, for example, that if level 4 is chosen, configured events with a level lower than or equal to level 4 are logged.
It is possible to configure and use more than one appender within your solution. Each appender is uniquely identified by the name attribute. This name is referenced within the logger, using the ref attribute within the appender-ref tag. If you want to capture different levels of events in different areas of your system, you can configure multiple appenders and configure your loggers to use them. The example shown in Listing 1-33 uses an appender named NHErrorLog and logs only ERROR or FATAL events.
LISTING 1-33: Addition To log4net App.config configuration
<logger name=“NHSQL”>
  <level value=“ERROR”>
    <appender-ref ref=“NHErrorLog” />
  </level>
</logger>
The NHErrorLog can also be configured, perhaps to log the error to a different file in a different location.
Configuring Your Program To Use log4net
If you decide to use and configure log4net to log NHibernate events, you should know that you can use the same configuration to log events within your own system. This is an alternative to using the .NET capabilities or another third-party tool. It is done by adding just a few simple lines of code.
Within the class you want to log, add the log4net directive and the following code snippet:
private static ILog log = LogManager.GetLogger(“NHBase.SQL”);
The value passed to the GetLogger method must match a logger name within the log4net configuration section in the app.config file. You can see an example toward the bottom of Listing 1-33 and in the previous section. Lastly, you need to tell the LogManager when and what level of log you want to record. This is done by using the private static log instance you created within the class and selecting the needed level, as shown in Listing 1-34.
LISTING 1-34: Writing custom messages to the log4net log file
log.Debug(“Add a message to write to the log file”);
log.Info(“Add a message to write to the log file”);
This logs all events at the DEBUG level and below to the logger named NHBase.SQL, which has been configured to use the NHLog appender.
All error values are accessible from the LogManager, excluding ALL. You can, however, use DEBUG for this.
TIP You may need to manually copy the log4net.dll into the /bin/Debug or/ bin/release directories. Alternately, you can set the Copy Local property of the log4net.dll to true.
SERIALIZING STARTUP
Before a query can be executed via NHibernate, it must validate all the .hbm.xml files that exist within the assembly. As mentioned, the example in this book has only two HBM files, so validation is quick. However, if a mapped database has hundreds of tables, and therefore hundreds of .hbm.xml files, validation can take some time — often too much time.
The validation happens one time during the life of your program. The performance hit is apparent during the initial query or when the assembly is loaded into the configuration object. All queries after the initial validation are generated using the validated .hbm.xml files and therefore run as fast as the normal query would. When the program is stopped and restarted for any reason, the .hbm.xml files are revalidated.
NOTE The placement of your NHibernate configuration is important. If the configuration is performed at program startup, then the startup may be perceived as slow. If the configuration is performed prior to the first query, then the first query may be perceived as slow. Consider using a background worker thread to validate the hbm.xml files(s) during startup.
For users, this performance issue may not be so bad, meaning a few seconds or more, one or two times per day, is acceptable. Conversely, a programmer who needs to stop and start the program numerous times a day in the process of coding, debugging, and testing the program may find the constant validation unacceptable.
NOTE An alternate solution that can be implemented to reduce startup time is to consolidate all your mapping files into a single .hbm.xml file. This has been proven to reduce startup times as well.
Recognizing that other options to improve the validation process exist, the method discussed in detail here is serialization of the NHibernate configuration. Serialization is simply the conversion of an object to a stream of bytes, which is then written to a data stream. In this context, the NHibernate configuration instance is the object. When the assembly is loaded into the configuration object, it validates all the .hbm.xml files, which are configured as an embedded resource against the schema. It is then possible to take the NHibernate configuration instance, serialize it, and persist it to disk. If you view the NHibernate.Cfg.Configuration implementation, you see that it implements the ISerializable interface, so serialization can be utilized.
The activities required to serialize, deserialize, and use the serialized configuration are as follows:
- Serialize the configuration.
- Check whether the serialized configuration is the most current.
- Load the configuration from the serialized file.
- Modify the NHibernateBase.ConfigureNHibernate() method to use the serialized configuration.
Add the code in Listing 1-35 to the NHibernateBase class of the NHibernate.GuitarStore class library. Note that you must add the System.Configuration assembly as a reference and the directive before the C# code in Listing 1-35 works.
LISTING 1-35: Declaring a serialized filename
using System.Configuration;

private static string SerializedConfiguration =
                   ConfigurationManager.AppSettings[“SerializedFilename”];

Add to both  app.config files contained in the solution:
  <appSettings>
    <add key=“SerializedFilename”
         value=“nhibernate.guitarstore.serialized.cfg”/>
  </appSettings>
The SerializedConfiguration property stores the name of the serialized NHibernate configuration. It is good practice to store values in a place where changes to them do not require a recompilation and redeployment of your program. Therefore, the value is captured from the appSetting section of the app.config file using the ConfigurationManager, also shown in Listing 1-35.
Serializing the Configuration
The NHibernate configuration can be serialized regardless of configuration method — app.config, strongly typed, or mixed configuration — used. The first step is to modify the existing ConfigureNHibernate() found within the NHibernate.GuitarStore class library. Listing 1-36 shows the modified method.
LISTING 1-36: Serializing an NHibernate configuration
using System.IO;
using System.Runtime.Serialization;
using System.Runtime.Serialization.Formatters.Binary;

public static NHibernate.Cfg.Configuration ConfigureNHibernate(string assembly)
{
  if (Configuration == null)
  {
     Configuration = new NHibernate.Cfg.Configuration();
     Configuration.AddAssembly(assembly);
     FileStream file = File.Open(SerializedConfiguration, FileMode.Create);
     IFormatter bf = new BinaryFormatter();
     bf.Serialize(file, Configuration);
     file.Close();
  }
  return Configuration;
}
Notice that after the NHibernate configuration object is created, the assembly is added and then passed to the Serialize() method of the BinaryFormatter class. The method then writes the serialized file to the file identified in Listing 1-35.
Validating a Serialized Configuration
Reflection is used to validate that the serialized configuration contains the most current NHibernate configuration, as shown in Listing 1-37.
LISTING 1-37: The IsConfigurationFileValid property
using System.Reflection;

private static bool IsConfigurationFileValid
{
  get
  {
    try
    {
       Assembly assembly = Assembly.Load(“Nhibernate.GuitarStore”);
       FileInfo configInfo = new FileInfo(SerializedConfiguration);
       FileInfo asmInfo = new FileInfo(assembly.Location);

       return configInfo.LastWriteTime >= asmInfo.LastWriteTime;
    }
    catch (Exception ex)
    {
       return false;
    }
  }
}
This code compares the modification dates of the assembly against the serialized configuration file. I use the Assembly class of System.Reflection to get the correct reference to the NHibernate.GuitarStore.dll binary file. I use the FileInfo class of System.IO to provide the specifics about the file. In this example, the code only confirms that the binary file's LastWriteTime is less than the LastWriteTime of the serialized configuration. If the binary file's modified date is greater than the serialized configuration, then the program will need to reserialize the configuration.
NOTE If the binary file changes and the serialized configuration file is not updated, then modifications in the new configuration are not available within the program that implements the changes.
The logic in Listing 1-37 only checks for a change in the binary file. If a programmer decides to store the dialect, database driver, proxy, and connection string in the app.config file, for example, the preceding logic does not recognize the change and does not create a new serialized configuration. Therefore, if the database instance is changed within the app.config file, for example, the user needs to either delete the serialized configuration file so that a new configuration is created using the newest modifications or create a method to perform the check and take appropriate action.
NOTE This configuration uses the relative path to store, access, and validate the serialized configuration. It is possible to include an absolute path if you want to store the serialized configuration file in a location other than the working directory.
Loading the Current Serialized Configuration
The next code segment implemented in the serialization of the NHibernate configuration is the method that deserializes an existing configuration. Use the Deserialize() method of the BinaryFormatter class to perform this. This is done by adding the method in Listing 1-38 to the NHibernateBase class.
LISTING 1-38: The LoadConfigurationFromFile() method
private static NHibernate.Cfg.Configuration LoadConfigurationFromFile()
{
    if (!IsConfigurationFileValid) return null;

    try
    {
        using (FileStream file =
               File.Open(SerializedConfiguration, FileMode.Open))
        {
               BinaryFormatter bf = new BinaryFormatter();
               return (NHibernate.Cfg.Configuration)bf.Deserialize(file);
        }
    }
    catch (Exception)
    {
        return null;
    }
}
Recall that earlier the concept of serialization was described as converting a stream of bytes into a data stream. It makes sense, therefore, that the serialized configuration is loaded into a class named FileStream. This file stream is then used as the parameter for the Deserialize() method within the BinaryFormatter class which is used to return the deserialized file to the ConfigureNHibernate() method.
NOTE Serialization and deserialization of the configuration does incur some performance overhead. However, it is much less than the overhead from NHibernate's validation of all .hbm.xml files each time the program begins.
Using a Serialized Configuration
In the ConfigureNHibernate() method, the serialized configuration needs to be loaded into the NHibernate.Cfg.Configuration object or a new configuration must be created and then serialized. This is achieved by adding the single line of code shown in the following code snippet to the existing ConfigureNHibernate() method:
Configuration = LoadConfigurationFromFile();
This method attempts to get the configuration from the LoadConfigurationFromFile() method. If the returned Configuration is null, then a new configuration is created; otherwise, the existing serialized configuration is used.
Here the relative path is used to create the serialized configuration in the working directory; and instead of the Deserialize() method, the Serialize() method of the BinaryFormatter class is used.
How much this improves performance depends on the number of .hbm.xml mapping files that need to be validated during program startup. A typical real- world example might be reducing the validation of ~20 .hbm.xml files from ~8 seconds to ~3 seconds.
Prior to serialization of the console application program, the validation took 4.65 seconds. After implementing the serialization, startup took 2.52 seconds. That's almost a 50% improvement. Results from the console test application are shown in Figure 1-21.
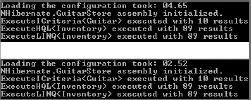
Timing the Startup
The configuration time was captured using the Stopwatch class in the System.Diagonistics namespace, as shown in Listing 1-39.
LISTING 1-39: Stopwatch timing of configuration serialization
using System.Diagnostics;

Stopwatch stopwatchConfiguration = new Stopwatch();
TimeSpan timespanConfiguration;
stopwatchConfiguration.Start();

NHIC.Initialize(“NHibernate.GuitarStore”);

stopwatchConfiguration.Stop();
timespanConfiguration = stopwatchConfiguration.Elapsed;
The specifications of the machine that that validates and serializes the configuration plays a significant role in startup time performance.
NOTE Each time the configuration is serialized, there is a performance hit. This hit results from validation of the .hbm.xml files, not from the serialization process. Any changes to the .hbm.xml file results in reserialization and validation.
INTERCEPTORS AND EVENTS
NHibernate Interceptors and Events provide an interface for executing custom logic before a transaction begins, before a transaction completes, or after a transaction completes. With few, if any, exceptions, Interceptors and Events function the same way within NHibernate. In both cases, an interface with one or more method(s) are provided for implementation or override. The primary differences between them are their implementation and the different capabilities they contain. Some users believe that NHibernate Events are the new way and Interceptors are the old way. However, I recommend you use the one that best meets the requirements of the program.
Interceptors
To utilize an Interceptor in NHibernate you need to implement the IInterceptor interface. The IInterceptor interface contains methods such as OnLoad(), OnSave(), OnDelete(), and OnPrepareStatement(). Each method can be included and overridden in your class that implements the interface. I recommend that the class used to implement an Interceptor should also inherit from Nhibernate.EmptyInterceptor.cs. This way, you won't need to implement every method found in the interface; instead, you only need to override the methods specifically needed.
Using an Interceptor, you can create a very useful tool for troubleshooting, programming, or tuning NHibernate. For example, you might want the capability to quickly view the SQL generated from statements (e.g., IQuery (HQL), ICriteria, etc). It is possible to use log4net as previously discussed in the section “Configuring Logging Using log4net,” but that requires navigating to a directory and opening a log file each time you want to see the SQL. Nor is the format of the query as user friendly.
Capturing NHibernate-Generated SQL in Real time
Capturing the NHibernate-generated SQL in real time requires the following actions:
- Create a new class to store and format the SQL.
- Add the Interceptor code to the NHibernateBase class.
- Activate the Interceptor.
First, in the NHibernate.GuitarStore class library, add a new class, Utils.cs, to the DataAccess directory. Add the code in Listing 1-40 to the class.
LISTING 1-40: The Utils class
using NHibernate.AdoNet.Util;

namespace NHibernate.GuitarStore.DataAccess
{
    public class Utils
    {
        public static string NHibernateGeneratedSQL { get; set; }
        public static int QueryCounter { get; set; }

        public static string FormatSQL()
        {
            BasicFormatter formatter = new BasicFormatter();
            return formatter.Format(NHibernateGeneratedSQL.ToUpper());
        }

    }
}
Next, open the NHibernateBase class and create an Interceptor, as shown in Listing 1-41.
LISTING 1-41: Capturing an NHibernate-generated SQL query
using NHibernate.SqlCommand;

public class SQLInterceptor : EmptyInterceptor, IInterceptor
{
  SqlString IInterceptor.OnPrepareStatement(NHibernate.SqlCommand.SqlString sql)
  {
     Utils.NHibernateGeneratedSQL = sql.ToString();
     Utils.QueryCounter++;
     return sql;
  }
}
The QueryCounter created previously in Listing 1-40 and then implemented here in Listing 1-41, counts the number of times NHibernate generates a SQL query. This property is useful in later chapters when MultiQuery, MultiCriteria, and the Future() method are implemented using IQuery, ICriteria, and LINQ. It demonstrates that batching the queries together is truly working.
TIP Use the OnPrepareStatement() of the IInterceptor interface, along with the NHibernate.AdoNet.Util.BasicFormatter.Format() method, to format the SQL generated by NHibernate. By default, the SQL is not formatted and therefore not easy to read. The formatter improves the readability of the NHibernate-generated SQL.
Lastly, add the Interceptor to the ConfigureNHibernate() method of the NHibernateBase class. The following line of code adds the Interceptor to the configuration:
Configuration.SetInterceptor(new SQLInterceptor());
An Interceptor can be applied to either a Session or a Configuration. If the Interceptor is implemented using the SetInterceptor() method of the configuration, the Interceptor is applied to all Sessions opened from the SessionFactory. Think of this as the global implementation.
Conversely, passing the Interceptor as a parameter to the OpenSession() method of the SessionFactory applies the Interceptor to that specific Session only.
The Interceptor class provides some methods that do not exist in the Event context. Some interesting ones are OnPrepareStatement(), mentioned previously; AfterTransactionBegin(); BeforeTransactionCompletion(); and AfterTransactionCompletion(). That being said, if you need to perform an action before a transaction, before the end of a transaction, or after a transaction, use an Interceptor, because Events do not have this capability.
Events
NHibernate also contains many event interfaces, found in the NHibernate.Event namespace. The event interfaces such as IPreDeleteEventListener.cs, IPostDeleteEventListener.cs, and IPreInsertEventListener.cs typically implement a single method, such as OnPreDelete(), OnPostDelete(), or OnPreInsert(), respectively, which can be modified and enhanced in a custom class.
Creating an Event to Log Deletions
The code required to log an event when a delete occurs is shown in Listing 1-42. Add the code to the NHibernateBase class found in the NHibernate.GuitarStore class library.
LISTING 1-42: Creating a PostDeleteEvent
using NHibernate.Event;

public class AuditDeleteEvent : IPostDeleteEventListener
{
   public void OnPostDelete(PostDeleteEvent @event)
   {
       log.Info(@event.Id.ToString() + “ has been deleted.”);
   }
}
The OpenSession() method of the SessionFactory does not provide a method that accepts Events. Therefore, Events must be registered via the NHibernate.Cfg.Configuration class, which provides a private EventListeners class that allows the inclusion of Events into the configuration object. Listing 1-43 shows the line of code that adds an Event to the configuration.
LISTING 1-43: Adding an Event to the configuration
using NHibernate.Event;

Configuration.EventListeners.PostDeleteEventListeners =
      new IPostDeleteEventListener[] { new AuditDeleteEvent() };
Implementing the Interceptor and Event Classes
Now that the Interceptor and Event classes have been created, the next step is to implement them into the GuitarStore WPF program. In this section, you will perform the following tasks:
- Add a View SQL button to the GuitarStore to display the most recently executed SQL query.
- Add a traffic-light image to display database round-trips.
- Add a Delete Button control to remove an item from inventory, then log the Event to a log file.
Viewing NHibernate-Generated SQL in Real Time
Add a button to the GuitarStore WPF program by dragging and dropping a Button control onto the MainWindow.xaml window. Modify the Content to “View SQL” and add a Click event. The code behind the Click event should resemble what is shown in Listing 1-44.
LISTING 1-44: Showing the NHibernate-generated SQL
private void buttonViewSQL_Click(object sender, RoutedEventArgs e)
{
  MessageBox.Show(Utils.FormatSQL(), “Most recent NHibernate generated SQL",
                MessageBoxButton.OK, MessageBoxImage.Information);
}
Running the GuitarStore WPF program and clicking the View SQL button results in the window shown in Figure 1-22.
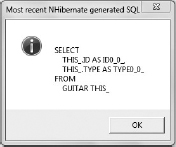
Currently, the last query run on the database is the one that populates the ComboBox with the Guitar types on the Guitar table.
Implementing the Database Round-Trip Counter
The round-trip database counter is a cool tool that counts the number of times a unit of work goes back and forth between the program and the database server.
The first action is to add the three traffic-light images (red, yellow, green) to the GuitarStore WPF project. Right-click on the Images directory ![]() Add
Add ![]() Existing Item. Next, drag and drop an Image control onto the MainWindow.xaml window, add a Source element that points to /Images/green.jpg, and name the Image control ImageDatabaseCounter.
Existing Item. Next, drag and drop an Image control onto the MainWindow.xaml window, add a Source element that points to /Images/green.jpg, and name the Image control ImageDatabaseCounter.
Next, in the MainWindow.xaml window, add the code shown in Listing 1-45 directly after the Window element.
LISTING 1-45: Round-trip counter image settings
<Window.Resources>
    <ResourceDictionary>
        <ImageSource x:Key=“ImageDatabaseCounterGreen”>
                                               Images/green.jpg</ImageSource>
        <ImageSource x:Key=“ImageDatabaseCounterYellow”>
                                               Images/yellow.jpg</ImageSource>
        <ImageSource x:Key=“ImageDatabaseCounterRed”>
                                               Images/red.jpg</ImageSource>
    </ResourceDictionary>
</Window.Resources>
Next, add Listing 1-46 to MainWindow.xaml.cs. The SetDatabaseRoundTripImage() method checks the number of times a round-trip to the database has occurred and sets the Image control to the proper image.
LISTING 1-46: Setting the image based on the number of database round-trips
public void SetDatabaseRoundTripImage()
{
  if (Utils.QueryCounter < 0)
  {
    ImageDatabaseCounter.Source =
                   (ImageSource)FindResource(“ImageDatabaseCounterRed”);
    ImageDatabaseCounter.ToolTip = “Error”;
  }
  else if (Utils.QueryCounter == 0)
  {
    //Image is reset when, for example, the Configuration is changed
    ImageDatabaseCounter.Source =
                   (ImageSource)FindResource(“ImageDatabaseCounterGreen”);
    ImageDatabaseCounter.ToolTip = “”;
  }
  else if (Utils.QueryCounter == 1)
  {
    ImageDatabaseCounter.Source =
                   (ImageSource)FindResource(“ImageDatabaseCounterGreen”);
    ImageDatabaseCounter.ToolTip = “1 round trip to database”;
  }
  else if (Utils.QueryCounter == 2)
  {
    ImageDatabaseCounter.Source =
                   (ImageSource)FindResource(“ImageDatabaseCounterYellow”);
    ImageDatabaseCounter.ToolTip = “2 round trip to database”;
  }
  else if (Utils.QueryCounter > 2)
  {
    ImageDatabaseCounter.Source =
                   (ImageSource)FindResource(“ImageDatabaseCounterRed”);
    ImageDatabaseCounter.ToolTip =
                   Utils.QueryCounter.ToString() + “ round trip to database”;
  }
  //reset the value each time this method is called.
  Utils.QueryCounter = 0;
}
Calling the preceding method at the end of the Window_Loaded() method results in a yellow image, as two database round-trips were performed. The first query populates the DataGrid and the second populates the ComboBox.
Using the Event to Write to a Log
One of the requirements listed for the GuitarStore WPF program is to log when an Inventory item is deleted from the database. An NHibernate Event is used to write to a log.
The first action to take is to write the query to delete the Inventory item. Open the NHibernateInventory.cs file and add the IQuery method shown in Listing 1-47.
LISTING 1-47: Deleting an Inventory item using HQL
public bool DeleteInventoryItem(Guid Id)
{
  using (ITransaction transaction = Session.BeginTransaction())
  {
    try
    {
      IQuery query = Session.CreateQuery(“from Inventory where Id = :Id”)
                            .SetGuid(“Id”, Id);
      Inventory inventory = query.List<Inventory>()[0];
      Session.Delete(inventory);
      transaction.Commit();
      return true;
    }
    catch (Exception ex)
    {
      transaction.Rollback();
      return false;
    }
  }
}
Now add a button to the GuitarStore WPF program by again dragging and dropping a Button control onto the MainWindow.xaml window. Rename the button content to Delete. Add a Click event, which calls the preceding listing. The following code in Listing 1-48 shows the contents of the Click event found in the MainWindow.xaml.cs file:
LISTING 1-48: Deleting an inventory item from the GuitarStore WPF program
private void buttonDelete_Click(object sender, RoutedEventArgs e)
{
  Inventory inventoryItem = (Inventory)dataGridInventory.SelectedItem;
  Guid item = new Guid(inventoryItem.Id.ToString());

  NHibernateInventory nhi = new NHibernateInventory();
  if (nhi.DeleteInventoryItem(item))
  {
    dataGridInventory.ItemsSource = null;
    PopulateDataGrid();
    labelMessage.Content = “Item deleted.”;
  }
  else
  {
    labelMessage.Content = “Item deletion failed.”;
  }
}
When a row from the Inventory is selected and the Delete button is clicked, the row is deleted from the database and a log is written to the file. Writing to the log file takes place in the AuditDeleteEvent() method using the previously configured log4net feature. The entry in the log file resembles what is shown in Figure 1-23.
![]()
SUMMARY
A lot has been covered in this chapter, from the creation of the Visual Studio solution to the implementation of some of NHibernate's sophisticated features, such as Interceptors, serialization, and lazy loading. You learned that using serialization significantly reduces the time required to build the SessionFactory because the mapping files are validated and serialized once, and then future startups do not require validation again. Additionally, you learned that with the release of NHibernate 3.2 there now exists a default proxy, which means its manual configuration is no longer required and that instead of using .hbm.xml files to map your entities, you can map your entities by code. In the following chapters, detailed instruction and implementation of the different data manipulation interfaces that NHibernate exposes, such as IQuery, LINQ, ICriteria, and QueryOver, are discussed.