5
Managing State and Saving Data
In the previous chapter, the LINQ to NHibernate API was discussed. Like the IQuery, ICriteria, and QueryOver APIs, LINQ to NHibernate provides functionality that enables the retrieval of data from a database in an object-oriented manner. Up to now, only the retrieval of data has been covered. This chapter, however, covers data insertion and entity state management. This is where many of NHibernate's strengths lie. It is also a more complicated aspect of NHibernate, however, and therefore more diffi cult to comprehend and implement. This chapter clarifi es the following topics:
- An overview of concurrency
- Using NHibernate versioning
- Implementing a custom data type using IUserType
- Inserting data into a database
- Using the first- and second-level caches
- Understanding the Evict(), Merge(), and Persist() methods
- Implementing batch processing
INTRODUCTION
Of course, a discussion about NHibernate isn't complete without covering the management and manipulation of data. It is relatively difficult to find good examples of inserting data using NHibernate, probably because there are so many options and implementation possibilities. The task, or program requirement, at hand determines which technique is the best in a given situation.
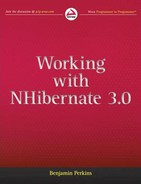
Before using NHibernate's methods, such as Save(), SaveOrUpdate(), Update(), and so on, which add or modify data on the database, it is important to understand the three different instance states an object can have: transient, persistent, or detached. Figure 5-1 displays which NHibernate methods can be used to change the state of an object or entity.
A transient object is an object that has never been associated with an NHibernate Session and therefore does not exist in the ISession's Identity Map, meaning it is not change-tracked. Creating an instance of a mapped class, such as Guitar guitar = new Guitar(), within a program results in the creation of a transient instance of an object. Associating values to the properties does not cause NHibernate to track the object. Only after the instance of the class has been associated with a Session is the object capable of changing to a persistent state, and then possibly later to a detached object.
There are two primary differences between objects in the persistent and detached states. First, a persistent object is currently associated with an NHibernate Session, whereas a detached object is not, but has been at some point in the past. The second difference is related to whether or not NHibernate can guarantee that the object stored in memory is equal to the data stored in the database, or which will be stored in the database. A persistent object has this guarantee, whereas a detached object does not.
A detached object could be represented by a List<T> bound to a DataGrid. At one point, the objects within the list were associated with a Session; however, once bound, the association or Session is no longer needed and is closed. Converting a detached object to a persistent object is achieved by using the Update(), SaveOrUpdate(), Persist(), or Merge() methods. For example, you can convert a transient object to a persistent object by using, for example, the Save(), SaveOrUpdate(), or Flush() methods.
UNDERSTANDING CONCURRENCY
A program that is used by more than one person and allows simultaneous updates or deletes needs to implement a concurrency strategy. A concurrency solution requires a lot of thought in regard to the following concurrency strategy components:
- Choosing the isolation level
- Choosing optimistic or pessimistic concurrency
- Deciding how to resolve concurrency conflicts
- Deciding how to recover from a concurrency violation
The isolation level that is implemented can have a significant impact on the system due to its effect on performance and data integrity. Table 5-1 provides a brief description of each isolation level, from safest to fastest.
| ISOLATION LEVEL | DESCRIPTION |
| Serializable | A range lock is placed on the dataset until the transaction is complete, which prevents other users from updating or inserting rows into the dataset. |
| Snapshot | Stores a version of the data used by one program to read while another is modifying the same data. One transaction cannot see changes made by another transaction. |
| RepeatableRead | Locks are placed on all data used in a query, preventing other users from updating the data. Phantom rows are still possible, but non-repeatable reads are prevented. |
| ReadCommitted | Shared locks are applied while the data is being read, avoiding dirty reads; however, data can be changed before the end of the transaction, which can result in non-repeatable reads or phantom data. |
| ReadUncommitted | No shared locks are issued and no exclusive locks are honored, meaning dirty reads are possible. |
 TIP These descriptions can be found in the System.Data.IsolationLevel metadata.
The default isolation level for NHibernate is ReadCommitted and is configurable at either the transaction and/or program level. Recall from Chapter 1, Listing 1-15, where the strongly typed configuration and app.config configuration in Listing 1-12 represent how and where the configuration is set up. You can use these two listings to better understand where to place the isolation configuration based on the chosen configuration method. If you need to change the isolation level from the default, a change to either of those configuration methods will be needed. Adding the isolation level at the program level requires setting an additional property, as shown in Listing 5-1.
LISTING 5-1: Setting the isolation level value
Strongly Typed Configuration:

dbi.IsolationLevel = IsolationLevel.ReadUncommitted;

app.config Configuration:

<property name="connection.isolation">ReadUncommitted</property>
You can set the isolation level for a specific transaction by passing the isolation level as a parameter to the BeginTransaction() method. Listing 5-2 provides an example of this.
LISTING 5-2: Setting the isolation level for a transaction
using (ISession session = SessionFactory.OpenSession())
{
  using (ITransaction transaction =
                    session.BeginTransaction(IsolationLevel.ReadUncommitted))
  {
     // Todo: ...
  }
}
Setting the isolation level is one part of a data concurrency strategy. When the correct settings have been found per program or per transaction, the program will perform optimally. However, there is another significant aspect of data concurrency and data integrity: concurrency control. Concurrency control refers to the two main approaches to managing database modifications: optimistic or pessimistic. Pessimistic control is not an option for high-concurrency programs because it blocks a transaction if it violates the current isolation level rules. This blocking will have serious implications on performance because it will wait in a queue until the transaction can complete. The best solution for enterprise or web solutions is optimistic concurrency control with versioning. If it violates the current isolation level, implementing optimistic concurrency results in the transaction failing and returning an exception. This exception can be handled in a way specific to the program, for example retrying the transaction or notifying the user of the program to please try again at a later time.
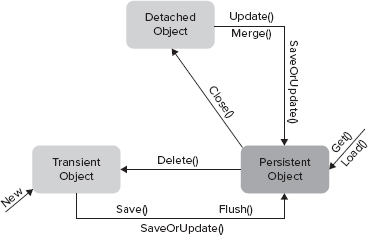
Concurrency control is important in programs in which a user can update stale data, or a single business transaction spans several database transactions. When data is selected from the database and stored in a local disconnected dataset that allows updates, what happens if user 1 has updated the data after user 2 has retrieved it, and then user 2 attempts to update that same data? This is commonly referred to as the lost update problem, whereby a second transaction overwrites a first transaction. In this case, the modification made by user 1 will be lost. Figure 5-2 provides a graphical representation of this problem.
In this case, two instances of the GuitarStore WPF program are running at the same time. Each one has a local copy of the inventory data. Transaction 1 updates a guitar price by 25 percent, which results in an update statement being generated and executed on the database. The current amount stored on the database for the guitar is now €1250. However, transaction 2 still has the original value of €1000 in the GuitarStore WPF program. If user 2 updates that same guitar price by 15 percent, then the amount saved to the database would be €1150. That's a problem.
Managing this type of issue is primarily the responsibility of the application tier and not solely the DBMS. However, NHibernate provides a solution for this: versioning. Some of the source that supports this capability can be found in the NHibernate.Engine.Versioning class.
The following actions are required to implement versioning in NHibernate for our GuitarStore application:
- Add a column to the INVENTORY data table for which versioning will be implemented to store the row version.
- Add and configure the version element to the Inventory.hbm.xml file.
- Add the version property to the Inventory.cs file.
- Add an additional catch block for the StaleObjectException where the exception can occur.
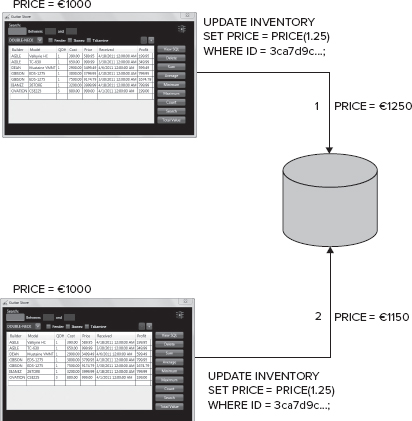
First, add a column named VERSION to the INVENTORY table with type timestamp and which allows nulls. The new INVENTORY table will resemble Figure 5-3.
Add the element shown in Listing 5-3 directly below the existing id element, to the Inventory.hbm.xml mapping file located in the Mapping directory of the NHibernate.GuitarStore project. The value for the name attribute is the database column name used for the versioning of this entity.
NOTE The <version …> element must immediately follow the <id…> element in the mapping file; otherwise, you will receive a MappingException when you attempt to run the program.
LISTING 5-3: Adding the versioning element to the .hbm.xml mapping file
<version name=“VERSION” generated=“always” type=“BinaryBlob” />
Next, add the property to the Inventory.cs file located in the Common directory of the NHibernate.GuitarStore project, as shown in Listing 5-4.
LISTING 5-4: Adding the versioning property to the class
public virtual Byte[] VERSION { get; set; }
After versioning has been implemented, each time a row on the database is updated, the value in the VERSION column will be changed. NHibernate adds the VERSION column as part of the WHERE clause in the generated SQL query, as shown in Listing 5-5.
LISTING 5-5: NHibernate-generated versioned SQL
UPDATE INVENTORY SET MODEL = @p0
WHERE ID = @p1 AND VERSION = @p2;
@p0 =  ‘1956 Jazzmaster’ [Type: String (4000)],
@p1 = d9055045-f347-424f-995a-1db6a7a61e65 [Type: Guid (0),
@p2 = 0x00000000000007FC [Type: Binary (2147483647)]
If the query cannot update due to versioning, a StaleObjectException is thrown with the text “Row was updated or deleted by another transaction (or unsaved-value mapping was incorrect).” Therefore, it is a good idea to add the logic shown in Listing 5-6 to specifically catch this exception. Adding this catch block enables the application to recover from this exception in a manner that best suits the needs of the program's requirements.
LISTING 5-6: Catching a StaleObjectException
catch (StaleObjectStateException soe)
{
   // Recovery logic : ...
}
TIP If a StaleObjectException occurs, one of many possible solutions is to select the most current data from the database and present it to the user along with the attempted update values and highlight the diff erence. Then enable the user to decide how to proceed.
CREATING AN IUSERTYPE
Although the .NET Framework supports most of the data types required for building quality programs, you may occasionally require a custom data type — for example, a monetary value whose type needs a decimal value combined with a currency type, or a name that is a combination of the first, middle, and last names. NHibernate provides the IUserType interface, which is found in the NHibernate.UserTypes namespace, to implement a custom data type.
The following tasks can be used to implement an IUserType into a program:
- Create an abstract base class that implements IUserType.
- Create a class that implements the base class to override the method needed.
- Create a class that represents the custom data type.
- Modify the NHibernate mapping and class files.
- Use the custom data type in a program.
To implement the preceding steps in the GuitarStore WPF program, the following example assumes that the guitar store using this program is located in Europe, and has recently been purchased by an American company. The program needs to begin tracking the currency type used within the program. An agreement has been made that when the costs and prices are saved, local currency will be used; however, prior to storing these values in the database, the value will be converted to USD ($). This means all values in the database have a currency type of USD ($).
The IUserType interface implements 11 methods. Add an abstract class named BaseUserType to the DataAccess directory of the NHibernate.GuitarStore project. Listing 5-7 shows an example of the BaseUserType abstract class.
LISTING 5-7: Implementing the IUserType in a base class
using NHibernate.SqlTypes;
using NHibernate.UserTypes;
using System.Data;

namespace NHibernate.GuitarStore.DataAccess
{
  public abstract class BaseUserType<T> : IUserType
  {
      public abstract SqlType[] SqlTypes { get; }

      public System.Type ReturnedType { get { return typeof(T); } }

      public new bool Equals(object x, object y)
      {
          if (object.ReferenceEquals(x, y)) return true;
          if (x == null || y == null) return false;
          return x.Equals(y);
      }

      public int GetHashCode(object x) { return x.GetHashCode(); }

      public abstract object NullSafeGet(IDataReader dr, string[] names,
                                         object owner);

      public abstract void NullSafeSet(IDbCommand cmd, object value, int index);

      public object DeepCopy(object value) { return value; }

      public bool IsMutable { get { return false; } }

      public object Replace(object original, object target, object owner)
        { return original; }

      public object Assemble(object cached, object owner)
        { return DeepCopy(cached); }

      public object Disassemble(object value) { return DeepCopy(value); }
  }
}
Implementing the IUserType interface into a base abstract class enables you to avoid applying (copying and pasting) all the methods to more than one custom data type class. Instead, you can inherit from the base class and override only the methods required for the specific implementation. Listing 5-8 inherits from the base class; uses the class CurrencyAmount, which will be created next in Listing 5-9; and overrides two methods: NullSafeGet() and NullSafeSet(). Add the CurrencyUserType calls to the DataAccess directory of the NHibernate.GuitarStore project.
LISTING 5-8: CurrencyUserType class inherited from the base class
using NHibernate;
using NHibernate.SqlTypes;
using System.Data;

namespace NHibernate.GuitarStore.DataAccess
{
  public class CurrencyUserType : BaseUserType<CurrencyAmount>
  {
    public override object NullSafeGet(IDataReader dr, string[] names,
                                       object owner)
    {
      var currentAmount = ((decimal?)NHibernateUtil.Decimal
                                    .NullSafeGet(dr, names[0]));

      if (currentAmount.HasValue)
      {
        return new CurrencyAmount(currentAmount.Value, “USD”);
      }
      else
      {
        return CurrencyAmount.SetToZero;
      }
    }

    public override void NullSafeSet(IDbCommand cmd, object value, int index)
    {
      var currencyAmount = (CurrencyAmount)value;
      object theValue;

      if (currencyAmount != null)
      {
        CurrencyAmount.Convert(currencyAmount, “USD”);
        theValue = currencyAmount.Amount;
      }
      else
      {
        theValue = DBNull.Value;
      }
      NHibernateUtil.Decimal.NullSafeSet(cmd, theValue, index);
    }

    public override SqlType[] SqlTypes
    {
      get { return new[] { SqlTypeFactory.Decimal }; }
    }
  }
}
The NullSafeGet() method is called during retrieval of the data and sets the retrieved currency type to USD ($). The NullSafeSet() method is called during a save and is overridden to convert the currency amount from local currency into USD ($). The conversion is performed by calling the Convert() method of the CurrencyAmount class, as shown in Listing 5-9. Add the CurrencyAmount class to the DataAccess directory of the NHibernate.GuitarStore project.
LISTING 5-9: CurrencyAmount class example
namespace NHibernate.GuitarStore.DataAccess
{
  public class CurrencyAmount
  {
     public CurrencyAmount(decimal amount, string symbol)
     {
         Amount = amount;
         Symbol = symbol;
     }

     public decimal? Amount { get; set; }
     public string Symbol { get; set; }

     public static CurrencyAmount SetToZero
     {
         get { return new CurrencyAmount(0, null); }
     }

     public static CurrencyAmount Convert(CurrencyAmount ca,
                                       string targetCurrency)
     {
       if (targetCurrency == “USD” && ca.Symbol == “EUR”)
       {
           ca.Amount = ca.Amount * 1.37;
       }
       else if (targetCurrency == “USD” && ca.Symbol == “JPY”)
       {
           ca.Amount = ca.Amount * .24;
       }
       else if (targetCurrency == “USD” && ca.Symbol == “GBP”)
       {
           ca.Amount = ca.Amount * 1.64;
       }
       return ca;
     }
  }
}
Now that the IUserType interface, the custom data type class, and the CurrencyAmount class have been implemented, the next step is to modify the .hbm.xml mapping file and class file. Listing 5-10 shows the modified Cost and Price properties contained within the Inventory.hbm.xml and Inventory.cs files, both of which are located in the NHibernate.GuitarStore project.
LISTING 5-10: Changing the Cost and Price properties to custom data types
<property name=“Cost”
          column=“COST”
          type=“NHibernate.GuitarStore.DataAccess.CurrencyUserType,
                      NHibernate.GuitarStore” />
<property name=“Price”
          column=“PRICE”
          type=“NHibernate.GuitarStore.DataAccess.CurrencyUserType,
                NHibernate.GuitarStore” />

public virtual CurrencyAmount Cost { get; set; }
public virtual CurrencyAmount Price { get; set; }
Note that the mapped type is now of type CurrencyUserType, which is a derived class from BaseUserType that implements the IUserType interface. In addition, Cost and Price are no longer type decimal? — they are type CurrencyAmount, which contains both an amount and a currency type.
When the preceding is compiled, errors will be generated because Cost and Price are no longer decimal. Therefore, two additional modifications are required within the NHibernateInventory class found within the DataAccess directory of the NHibernate.GuitarStore project. You need to change Cost and Price to Cost.Amount and Price.Amount, respectively.
NOTE Converting Cost and Price to the CurrencyAmount data type is easy if you use the NHibernate.GuitarStore console application. This is because throughout this book all the GuitarStore methods have been added to the NHibernate.GuitarStore.Console application, and, by running the application, errors are generated where modifications need to take place to support this transition from the decimal? data type to the CurrencyAmount data type.
The final step is to implement the CurrencyAmount class into the GuitarStore WPF Program. There are two places where modifications are needed. The first is within the method that saves a new Inventory class. Instead of setting the Cost and Price to a decimal value, they are set to new instances of the CurrencyAmount class, as shown in Listing 5-11.
LISTING 5-11: Instantiating an Inventory class with a custom user type
Inventory inventory = new Inventory
{
   Builder = textBoxBuilder.Text,
   Model = textBoxModel.Text,
   QOH = 1,
   Cost = new CurrencyAmount(Convert.ToDecimal(textBoxCost.Text), “EUR”),
   Price = new CurrencyAmount(Convert.ToDecimal(textBoxPrice.Text), “EUR”),
   Received = DateTime.Now,
   TypeId = guitar.Id,
   Guitar = guitar
};
As mentioned earlier, the Cost and Price are inserted as local currency, in this case EUR (€) and then converted to USD ($) from the CurrencyAmount.Convert() method via the overridden CurrencyUserType.NullSafeSet() method.
The second change is a bit more complex and requires a number of code changes. That's because in order to access the Cost.Amount and Price.Amount values so that they are shown in the DataGrid correctly, a strongly typed result set is used. Modify the PopulateDataGrid() method found within the MainWindow.xaml.cs file of the GuitarStore WPF project so that it resembles Listing 5-12.
LISTING 5-12: Implementing the custom user type into the GuitarStore WPF
private void PopulateDataGrid()
{
  NHibernateInventory nhi = new NHibernateInventory();
  int inventoryCount;
  IList<Inventory> GuitarInventory = nhi.GetLINQInventory(MaxResult,
                                     FirstResult, out inventoryCount);
  DataTable dt = new DataTable();
  dt.Columns.Add(“Builder”, typeof(string));
  dt.Columns.Add(“Model”, typeof(string));
  dt.Columns.Add(“Price”, typeof(string));
  dt.Columns.Add(“Id”, typeof(string));

  foreach (Inventory item in GuitarInventory)
  {
    dt.Rows.Add(item.Builder, item.Model, item.Price.Amount.ToString() +
                “ ” + item.Price.Symbol, item.Id);
  }

  dataGridInventory.ItemsSource = dt.DefaultView;
  totalCount = inventoryCount;
  labelPaging.Content = “Retrieved ” + FirstResult.ToString() +
                       “ to ” + (FirstResult + GuitarInventory.Count).ToString() +
                       “ of ” + inventoryCount.ToString();
  SetDatabaseRoundTripImage();
}
Notice two things specific to the preceding implementation. First the list returned from the GetLINQInventory() method is, as expected, strongly typed. The reason this is significant and required is because later in the code segment where the result set is added to the DataTable within the foreach loop, instead of accessing the Price property directly, as in previous examples, the Price.Amount and Price.Symbol values are captured and added to the DataGridRow. It is not possible to directly access the Price.Amount and Price.Symbol values using a dynamic result set without further modifications.
INSERTING DATA
This section provides two examples of inserting data that demonstrate the following:
- Creating insert capabilities in the GuitarStore WPF program
- Inserting a single row into a database
- Creating a custom id generator
- Inserting a parent/child into a database
Before an insertion can take place, the insertion capability needs to be built into the GuitarStore WPF window. Modify the MainWindow.xaml file so that it results in a window resembling Figure 5-4.
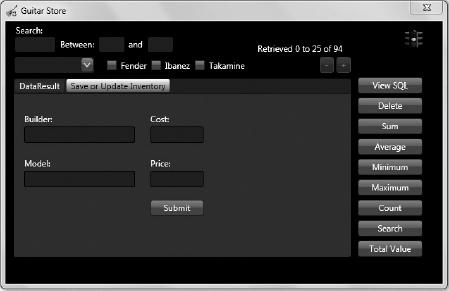
This is achieved by dragging and dropping a TabControl, some TextBox controls, a Button control, and some Label controls onto the WPF MainWindow. The XAML code is provided in Listing 5-13.
LISTING 5-13: GuitarStore Save or Update TabControl XAML code
<TabControl Height=“253” HorizontalAlignment=“Left”
            Margin=“11,81,0,0” Name=“tabControlGuitarStore”
            VerticalAlignment=“Top” Width=“478”>
 <TabItem Header=“DataResult” Name=“tabItemDataResult”>
  <Grid>
   <DataGrid AutoGenerateColumns=“True” HorizontalAlignment=“Stretch”
             Margin=“6,0,6,6” Name=“dataGridInventory”
             VerticalAlignment=“Stretch” />
  </Grid>
 </TabItem>
 <TabItem Header=“Save or Update Inventory” Name=“tabItemInsertInventory”>
  <Grid>
   <TextBox Height=“23” HorizontalAlignment=“Left”
            Margin=“15,46,0,0” Name=“textBoxBuilder”
            VerticalAlignment=“Top” Width=“157” />
   <TextBox Height=“23” HorizontalAlignment=“Left”
            Margin=“15,109,0,0” Name=“textBoxModel”
            VerticalAlignment=“Top” Width=“157” />
   <TextBox Height=“23” HorizontalAlignment=“Left”
            Margin=“194,46,0,0” Name=“textBoxCost”
            VerticalAlignment=“Top” Width=“75” />
   <TextBox Height=“23” HorizontalAlignment=“Left”
            Margin=“194,109,0,0” Name=“textBoxPrice”
            VerticalAlignment=“Top” Width=“75” />
   <Label Content=“Builder:” Height=“28”
          HorizontalAlignment=“Left” Margin=“15,27,0,0”
          Name=“labelBuilder” VerticalAlignment=“Top” />
   <Label Content=“Model:” Height=“28”
          HorizontalAlignment=“Left” Margin=“15,90,0,0”
          Name=“labelModel” VerticalAlignment=“Top” />
   <Label Content=“Cost:” Height=“28”
          HorizontalAlignment=“Left” Margin=“194,27,0,0”
          Name=“labelCost” VerticalAlignment=“Top” />
   <Label Content=“Price:” Height=“28”
          HorizontalAlignment=“Left” Margin=“194,90,0,0”
          Name=“labelPrice” VerticalAlignment=“Top” />
   <Button Content=“Submit” Height=“23” HorizontalAlignment=“Left”
           Margin=“194,150,0,0” Name=“buttonSubmit”
           VerticalAlignment=“Top” Width=“75”
           Click=“buttonSubmit_Click”/>
  </Grid>
 </TabItem>
</TabControl>
Inserting a single row is relatively straightforward. Using the methods found within the IQuery, ICriteria, QueryOver, or LINQ classes is not required to insert. All you need to do is call the Save() method from the Session and pass the entity as a parameter.
Create the SaveInventory() method within the NHibernateInventory class, as shown in Listing 5-14.
LISTING 5-14: Saving a guitar to the INVENTORY table
public bool SaveInventory(Inventory inventory)
{
  try
  {
    using (ITransaction transaction = Session.BeginTransaction())
    {
      Session.Save(inventory);
      transaction.Commit();
    }
    return true;
  }
  catch (Exception ex)
  {
    return false;
  }
}
Next, open the MainWindow.xaml.cs file of the GuitarStore WPF project and add the following code shown in Listing 5-15 to the buttonSubmit_Click() method.
LISTING 5-15: Saving a Guitar to Inventory from GuitarStore WPF
private void buttonSubmit_Click(object sender, RoutedEventArgs e)
{

  Guitar guitar = (Guitar)comboBoxGuitarTypes.SelectedItem;

  Inventory inventory = new Inventory();
  inventory.Id = Guid.NewGuid();
  inventory.Builder = textBoxBuilder.Text;
  inventory.Model = textBoxModel.Text;
  inventory.QOH = 1;
  inventory.Cost = Convert.ToDecimal(textBoxCost.Text);
  inventory.Price = Convert.ToDecimal(textBoxPrice.Text);
  inventory.Received = DateTime.Now;
  inventory.Guitar = guitar;

  NHibernateInventory nhi = new NHibernateInventory();

  if (nhi.SaveInventory(inventory))
  {
    labelMessage.Content = “Save was successful.”;
  }
  else
  {
    labelMessage.Content = “Save failed.”;
  }
}
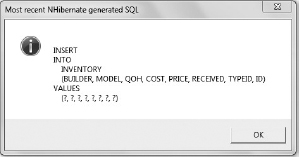
The preceding Save() method results in the NHibernate-generated SQL query shown in Figure 5-5. It is a result of clicking the View SQL button directly after the saving a guitar to inventory.
One of the more complex decisions to make when inserting data is which type of id generator to use. The type of id generator is configured in the hbm.xml file for each class. Until now, this element has been left out of the mapping files because it wasn't needed. Listing 5-16 shows a standard configuration of an id generator using a guid.comb.
LISTING 5-16: Id generator mapping configuration
<id name=“Id” column=“ID” type=“System.Guid”>
  <generator class=“guid.comb” />
</id>
If no value is provided, Assigned (the default) is used. This means NHibernate expects to be provided with the Id from the implementation and before the Save() method is used. Some of the more popular generators are described in Table 5-2.
TABLE 5-2:Commonly Used NHibernate id Generators
| GENERATOR | DESCRIPTION |
| Assigned | The program itself provides the id before the Save() method is used. This is the default setting if no element is provided. |
| Foreign | Uses the id of another related object. |
| Guid | Uses a GUID as the key. |
| guid.comb | Uses a GUID sequence, which reduces table fragmentation |
| Hilo | Generates a HI and a LOW value as the id; see.NHibernate.ID.TableHiLoGenerator.Generate() for the source code. |
| Identity | Provides support for IDENTITY database columns. |
| Native | Uses either IDENTITY, SEQUENCE, or HILO, depending on the utilized database. |
| Seqhillo | Uses a named database SEQUENCE to generate HI/LOW ids. |
| Sequence | Provides support for the SEQUENCE database method. |
If none of the preceding id generators meets the current requirements, it is possible to create a custom id generator. This is done, for example, by inheriting from the class TableGenerator or TableHiLoGenerator found in the NHibernate.Id namespace and overriding the Generate() method. The code within the Generate() method can be modified to return a value specific to the requirements. An overridden Generate() method is show in Listing 5-17. It returns a Guid in this example, but the method can be programmed to return any unique identifier. Notice that the return type is an object. Add the CustomIdGenerator class to the DataAccess folder of the NHibernate.GuitarStore project.
LISTING 5-17: Custom id generator example
using NHibernate.Id;
using NHibernate.Engine;

public class CustomIdGenerator : TableGenerator
{
  public override object Generate(ISessionImplementor session, object obj)
  {
     Guid guid = Guid.NewGuid();
     return guid;

     //return base.Generate(session, obj);
  }
}
The preceding code listing is only an example. NHibernate already has its own GUID generator; therefore, you would not implement the code in Listing 5-17. You can add your own algorithm to create an id in a way that meets the needs of the current project.
Then, within the mapping file of the class that uses the CustomIdGenerator, associate the namespace.class to be used to generate the id, as shown in Listing 5-18.
LISTING 5-18: Mapping a customer id generator
<id name=“Id” column=“ID” type=“System.Guid”>
  <generator class=“NHibernate.GuitarStore.DataAccess.CustomIdGenerator,
                    NHibernate.GuitarStore” />
</id>
Inserting a Parent/Child into a Database
Inserting a parent and then its children into the database is a common action in many programs. This section demonstrates one way to insert data using the many-to-one and one-to-many relationships. Listing 5-19 shows how the mappings should be configured to support inserting. Add a bag element to the Guitar.hbm.xml file and a many-to-one element to the Inventory.hbm.xml file, both of which are located in the Mapping directory of the NHibernate.GuitarStore project.
LISTING 5-19: Parent/child insert mapping configuration
PARENT - Guitar

<bag      name=“Inventory”  table=“INVENTORY” cascade=“all”>
  <key    column=“TYPEID” />
  <one-to-many class=“NHibernate.GuitarStore.Common.Inventory”  />
</bag>

CHILD - Inventory

<property name=“TypeId”   column=“TYPEID”   type=“System.Guid” insert=“false”/>
<many-to-one  name=“Guitar” column=“TYPEID” />
TIP By adding the insert=“false” attribute to the child mapping file, the “Invalid Index for this SqlParameterCollection with count=” error is avoided. This error is caused by the declaration of the TYPEID as a property and a foreign key in the many-to-one element. It should only be declared once for inserts and updates.
Next, add the initialization of the List<Inventory>() to the constructor of the Guitar class located in the Common directory of the NHibernate.GuitarStore project, as shown in Listing 5-20.
LISTING 5-20: Instantiating the Inventory list in the Guitar constructor
public Guitar()
{
    Inventory = new List<Inventory>();
}
The basic approach for inserting a parent and child is to create an instance of the parent, create the children, add the children to the parent, and then perform a Save(). Listing 5-21 shows an example. This approach works fine, but performing a save in this manner results in two INSERT statements and an additional but unnecessary UPDATE statement.
LISTING 5-21: Standard NHibernate Save() example
public bool InsertParentChild(Guitar guitar, Inventory inventory)
{
  try
  {
    using (ITransaction transaction = Session.BeginTransaction())
    {
      guitar.Inventory.Add(inventory);
      Session.Save(guitar);
      transaction.Commit();
    }
    return true;
  }
  catch (Exception ex)
  {
    return false;
  }
}

Generated SQL:

INSERT INTO GUITAR (TYPE, ID) VALUES (@p0, @p1);
@p0 =  ‘ELECTRIC - ACOUSTIC’ [Type: String (4000)],
@p1 = 945e108f-536a-4a93-8953-e7856e33f77f [Type: Guid (0)]

INSERT INTO INVENTORY (BUILDER, MODEL, QOH, COST, PRICE, RECEIVED, TYPEID,
   ID) VALUES (@p0, @p1, @p2, @p3, @p4, @p5, @p6, @p7);
@p0 =  ‘CHARVEL’ [Type: String (4000)],
@p1 =  ‘Model 5’ [Type: String (4000)],
@p2 = 1 [Type: Int32 (0)],
@p3 = 600 [Type: Decimal (0)],
@p4 = 899 [Type: Decimal (0)],
@p5 = 4/10/2011 10:40:05 AM [Type: DateTime (0)],
@p6 = NULL [Type: Guid (0)],
@p7 = 32f45e7e-861c-4c7b-afa8-9ec100afce25 [Type: Guid (0)]

UPDATE INVENTORY SET TYPEID = @p0 WHERE ID = @p1;
@p0 = 945e108f-536a-4a93-8953-e7856e33f77f [Type: Guid (0)],
@p1 = 32f45e7e-861c-4c7b-afa8-9ec100afce25 [Type: Guid (0)]
The initial insertion of the child sets the foreign key to NULL and then the child is updated with the foreign key after the INSERT. You can avoid the additional UPDATE by adding the INVERSE attribute to the parent's mapping file, as shown in Listing 5-22.
LISTING 5-22: Adding an INVERSE attribute to mapping for insert optimization
<bag      name=“Inventory”  table=“INVENTORY” inverse=“true” cascade=“all”>
  <key    column=“TYPEID” />
  <one-to-many class=“NHibernate.GuitarStore.Common.Inventory”  />
</bag>

INSERT INTO GUITAR (TYPE, ID) VALUES (@p0, @p1);
@p0 = ‘;ELECTRIC - ACOUSTIC’ [Type: String (4000)],
@p1 = eb6d6ef2-ce25-4817-957e-062ee75f7e2c [Type: Guid (0)]

INSERT INTO INVENTORY (BUILDER, MODEL, QOH, COST, PRICE, RECEIVED, TYPEID,
   ID) VALUES (@p0, @p1, @p2, @p3, @p4, @p5, @p6, @p7);
@p0 = ‘CHARVEL’ [Type: String (4000)],
@p1 = ‘Model 5’ [Type: String (4000)],
@p2 = 1 [Type: Int32 (0)],
@p3 = 600 [Type: Decimal (0)],
@p4 = 899 [Type: Decimal (0)],
@p5 = 4/10/2011 10:49:39 AM [Type: DateTime (0)],
@p6 = eb6d6ef2-ce25-4817-957e-062ee75f7e2c [Type: Guid (0)],
@p7 = 91392dcb-bab3-4c04-b5dc-9ec100b26f09 [Type: Guid (0)]
After updating the mapping files with an Id generator type, properly configuring the attributes, and calling the Save() method from methods within the NHibernateInventory class, the capability to insert new Inventory and new Guitar items is complete and usable from within the GuitarStore WPF program.
UNDERSTANDING NHIBERNATE CACHING
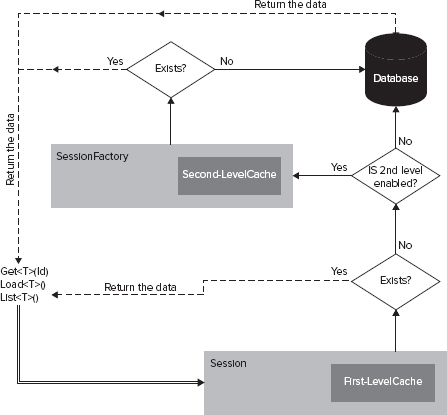
Caching is a mechanism that stores data transparently, enabling requests to execute faster when the stored data is again requested. NHibernate provides two methods of caching, first-level and second-level. These caching methods help improve a program's performance by reducing or eliminating the generation and execution of database queries. Figure 5-6 visually describes the life spans of first- and second-level caches in combination with the data retrieval process of the Get(), Load(), and List() methods.
Using the First-Level Cache
The first-level cache, which is enabled by default in NHibernate, has a life span equal to that of the current NHibernate Session. When an entity is loaded into the identity map, whose primary responsibility is to confirm that only a single instance of a database record exists in a Session, all future requests for that entity will be loaded from the first-level cache. You can consider the identity map and the first-level cache as the same thing.
NOTE You must employ the stateful Session, as the stateless Session does not update the cache.
NHibernate provides two methods for loading an entity into the identity map: Get() and Load(). They are exposed via the NHibernate Session.
Using Get() and Load()
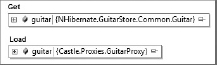
After an initial save, it may be necessary to add more children to the parent. This requires retrieval of the parent so that the newly created children can be associated and saved. As shown in Figure 5-7, using the Get() method creates an instance of the class, while the Load() method creates a proxy.
When the Get() method is used as shown in Listing 5-23, NHibernate performs a SELECT statement to retrieve the persisted data of the parent only if the entity does not already exist in the identity map. If the entity is not present in the identity map, then it is loaded into it and all future requests for that entity within the context of the Session are retrieved from memory.
LISTING 5-23: Using the Get() method
Guitar guitar = session.Get<Guitar>(Id);

SELECT guitar0_.ID as ID0_0_,
       guitar0_.TYPE as TYPE0_0_
FROM GUITAR guitar0_
WHERE guitar0_.ID=@p0;
@p0 = e6f2a2ab-ca6d-4874-8874-6bb9baccffcb [Type: Guid (0)]
If a fully populated entity is not required, and you are certain that the entity exists on the database, then you can use the Load() method. For example, if the Id is known, you can simply use the code in Listing 5-24 to create a proxy class for the child to use, then set the foreign key and perform the Save(). A SELECT is executed only if the code specifically accesses a property of the parent class.
LISTING 5-24: Using the Load() method and creating a child
Guitar guitar = session.Load<Guitar>(Id);

Inventory inventory = new Inventory
{
   Builder = textBoxBuilder.Text,
   Model = textBoxModel.Text,
   QOH = 1,
   Cost = Convert.ToDecimal(textBoxCost.Text),
   Price = Convert.ToDecimal(textBoxPrice.Text),
   Received = DateTime.Now,
   TypeId = guitar.Id,
   Guitar = guitar
};
Implementing the Second-Level Cache
The second-level cache has a life span equal to that of the SessionFactory and is not enabled by default. Using the second-level cache requires the following configurations:
- Identify which type of caching to use.
- Configure NHibernate to use the second-level cache.
In this example, the NHibernate.Cache.HashtableCacheProvider cache provider is used. This is not a recommended provider for a production environment. For real production usage, use one of the many cache providers that are part of the NHibernate contribution project. Before selecting a provider, be sure to do sufficient research to determine which one is best suited for your program requirements.
NOTE You must commit transactions; otherwise, caching does not work.
Table 5-3 describes the most common cache providers.
| NAME | DESCRIPTION |
| Velocity | Uses Microsoft Velocity, now called AppFabric, a highly scalable in-memory cache |
| SharedCache | Supports the distribution and replication of in-memory object caching |
| SysCache | Relies on the ASP.NET System.Web.Caching.Cache class as the cache provider |
| SysCache2 | Can configure certain cache regions to expire automatically when certain data in the database changes |
| Prevalence | Based on Bamboo.Prevalence and provides persistent caching in client applications |
| MemCache | In simple terms, a distributed hash table that is primarily used for speeding up web applications |
The first action to take when configuring the second-level cache is to set the cache.provider_class and the (cache.use_second_level_cache) properties. This can be done within the app.config file or by using the strongly typed configuration method. Listing 5-25 shows what the app.config file should look like after adding the two properties.
LISTING 5-25: Second-level cache app.config configuration
<?xml version=“1.0”?>
<configuration>
 <configSections>
  <section name=“hibernate-configuration”
           type=“NHibernate.Cfg.ConfigurationSectionHandler, NHibernate”/>
  </configSections>
  <hibernate-configuration xmlns=“urn:nhibernate-configuration-2.2”>
    <session-factory>
      <property name=“connection.isolation”>ReadCommitted</property>
      <property name=“dialect”>NHibernate.Dialect.MsSql2008Dialect</property>
      <property name=“connection.driver_class”>
                               NHibernate.Driver.SqlClientDriver</property>
      <property name=“connection.connection_string_name”>GuitarStore</property>
      <property name=“connection.provider”>
                      NHibernate.Connection.DriverConnectionProvider</property>
      <property name=“cache.provider_class”>
                      NHibernate.Cache.HashtableCacheProvider</property>
      <property name=“cache.use_second_level_cache”>true</property>
      <property name=“show_sql“>true</property>
    </session-factory>
  </hibernate-configuration>
  <connectionStrings>
    <add name=“GuitarStore”
         connectionString=“Data Source=W7;Initial Catalog=myGuitarStore;/>
    <add name=“GuitarStoreOracle”
         connectionString=“user id=*****;password=*****;
                           datasource=(DESCRIPTION=(ADDRESS=(PROTOCOL=tcp)
                           (HOST=192.168.1.1)(PORT=1521))
                           (CONNECT_DATA=(SERVICE_NAME=ora11g)))”/>
  </connectionStrings>
  <appSettings>
    <add key=“SerializedFilename” value=“nhibernate.guitarstore.serialized.cfg”/>
  </appSettings>
</configuration>
You can also configure second-level caching using the strongly typed configuration. To do so, open the NHibernateBase.cs file in the DataAccess directory of the NHibernate.GuitarStore project. Change the ConfigureNHibernate() method so that it resembles Listing 5-26.
LISTING 5-26: Second-level cache strongly typed configuration
using NHibernate.Cfg.Loquacious;

public static Configuration ConfigureNHibernate(string assembly)
{
  Configuration = new NHibernate.Cfg.Configuration();

  Configuration.DataBaseIntegration(dbi =>
  {
    dbi.Dialect<MsSql2008Dialect>();
    dbi.Driver<SqlClientDriver>();
    dbi.ConnectionProvider<DriverConnectionProvider>();
    dbi.IsolationLevel = IsolationLevel.ReadCommitted;
    dbi.Timeout = 15;
  });

  Configuration.Cache(ca =>
  {
    ca.Provider<NHibernate.Cache.HashtableCacheProvider>();
  });

  Configuration.AddAssembly(assembly);

  return Configuration;
}
NOTE When configuring the second-level cache via the app.config file, the cache.use_second_level_cache attribute is false. If you use the strongly typed configuration, the default is true. However, in both configuration methods, if cache.use_second_level_cache is added to the app.config file and set to false, it will turn off the second-level cache.
Next, add the cache element to the mapping file of the Inventory entity. Open the Inventory.hbm.xml file located in the Mapping directory of the NHibernate.GuitarStore project. Listing 5-27 shows an updated Inventory mapping file containing the cache element.
LISTING 5-27: Enabling the second-level cache for the Inventory entity
<?xml version=“1.0” encoding=“utf-8” ?>
<hibernate-mapping xmlns=“urn:nhibernate-mapping-2.2”
                   assembly=“NHibernate.GuitarStore”>
  <class name=“NHibernate.GuitarStore.Common.Inventory, NHibernate.GuitarStore”
         table=“INVENTORY”>
   <cache usage=“read-write”/>
   <id       name=“Id”         column=“ID”       type=“System.Guid”>
     <generator class=“guid.comb” />
   </id>
   <version name=“VERSION” generated=“always” type=“BinaryBlob” />
   <property name=“TypeId”   column=“TYPEID”   type=“System.Guid” insert=“false”/>
   <property name=“Builder”  column=“BUILDER”  type=“System.String” />
   <property name=“Model”    column=“MODEL”    type=“System.String” />
   <property name=“QOH”      column=“QOH”      type=“System.Int32” />
   <property name=“Cost”     column=“COST”     type=“System.Decimal” />
   <property name=“Price”    column=“PRICE”    type=“System.Decimal” />
   <property name=“Received” column=“RECEIVED” type=“System.DateTime” />
   <many-to-one  name=“Guitar” column=“TYPEID” />
 </class>
</hibernate-mapping>
In this example, the read-write caching strategy has been implemented. Table 5-4 describes the caching strategy types. As mentioned earlier, the caching strategy should be implemented based on your current program requirements.
To confirm that the second-level cache is working, set the cache.use_second_level_cache attribute to false and add the code shown in Listing 5-28 to the Main() method within the Program.cs file of the NHibernate.GuitarStore.Console application.
LISTING 5-28: Testing second-level caching from the console application
Guid guitar59 = new Guid(“c8cb8762-a498-47f7-8e72-013ca20b84d6”);

using (ISession session = sessionFactory.OpenSession())
{
  Inventory inventory59 = session.Get<Inventory>(guitar59);
}

using (ISession session = sessionFactory.OpenSession())
{
  Inventory inventory60 = session.Get<Inventory>(guitar59);
}
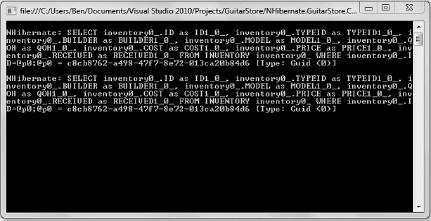
Notice in Figure 5-8 that two SELECT statements are generated and executed on the database.
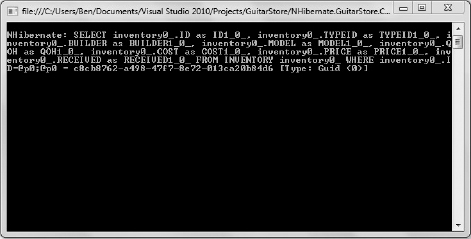
Now set the cache.use_second_level_cache attribute to true and rerun NHibernate.GuitarStore.Console application. As shown in Figure 5-9, only a single SELECT statement is generated and executed on the database. The first Get<T>(Id) method retrieves the data and loads it into the second-level cache. The second call to the Get<T>(Id) retrieves the data from the second-level cache. The data for this entity is retrieved from the cache for the life span of the associated SessionFactory.
UNDERSTANDING EVICT(), MERGE(), AND PERSIST()
Before you begin reading the section, I recommend that you download the NHibernate source code and view the ISession.cs file, which contains very good descriptions for the Evict(), Merge(), and Persist() methods, along with summaries of many other NHibernate features. These three methods, in particular, can be used to help manage the state (transient, detached, and persistent) of the object being used in a specific business transaction within the scope of the Session.
Using Evict()
The Evict() method stops the synchronization of an entity to the database and removes it from the first-level cache. This means that if modifications are made to an Inventory object and the Evict() method is called before a Flush(), Save(), or SaveOrUpdate(), then the modification will not be persisted to the database. At the same time, the object will be removed from the first-level cache. If later a Get(), Load(), or List() method is used to retrieve inventory data, the modifications made prior to the Evict() method call will not be realized. A possible usage for the Evict() method is when loading or processing a large number of objects whereby some objects need to be skipped, removed, or specifically marked for saving based on a program requirement data value. Listing 5-29 provides an example implementation.
LISTING 5-29: Using the Evict() method
using (ITransaction transaction = Session.BeginTransaction())
{
  IQueryable<Inventory> inventory62 = (from inv in Session.Query<Inventory>()
                                       orderby inv.Id
                                       select inv);
  IList<Inventory> inventoryList62 = inventory62.ToList();

  foreach (Inventory item in inventoryList62)
  {
    item.Price = item.Price * 1.15M;
    if (item.Price > 5000)
    {
      Session.Evict(item);  //Don't save it
    }
    Session.Flush();
  }
}
If the Price is more than €5,000, then evict the object from the update and remove it from the first-level cache.
NOTE The code shown in Listing 5-29 exists only to demonstrate the behavior of the Evict() method. This method, while powerful, exists to address some unique cases that many typical programs don't experience. The implementation pattern is sub-optimal and should not be replicated.
Using Merge()
The Merge() method provides the capability to move a transient or detached object into a persistent state. If an entity with the same identifier has already been persisted, then the transient entity will be merged with the current entity stored in the first-level cache. Conversely, if the transient entity does not exist in the first-level cache, then it will be loaded from the database and stored into memory. Take, for example, the loading of Inventory into the DataGrid in the GuitarStore WPF program using a stateful Session. This results in persisted Inventory entities.
Before getting deeper into the Merge() method, add a MouseDoubleClick that captures the values in the columns and populates the TextBox controls on the Save Or Update TabControl. The first action to take is to open the MainWindow.xaml file found in the GuitarStore WPF project. The DataGrid XAML should resemble the code in Listing 5-30.
LISTING 5-30: DataGrid MouseDoubleClick XAML code
<DataGrid AutoGenerateColumns=“True” HorizontalAlignment=“Stretch”
          Margin=“6,0,6,6” Name=“dataGridInventory”
          VerticalAlignment=“Stretch”
          MouseDoubleClick=“dataGridInventory_MouseDoubleClick” />
Next, open the MainWindow.xaml.cs file found in the GuitarStore WPF project and add the following code to the dataGridInventory_MouseDoubleClick() method, as shown in Listing 5-31.
LISTING 5-31: DataGrid double-click event
private void dataGridInventory_MouseDoubleClick(object sender,
                                                MouseButtonEventArgs e)
{
  Inventory inventory = dataGridInventory.SelectedItem as Inventory;
  tabItemInsertInventory.Focus();

  textBoxBuilder.Text = inventory.Builder;
  textBoxModel.Text = inventory.Model;
  textBoxCost.Text = inventory.Cost.ToString();
  textBoxPrice.Text = inventory.Price.ToString();
}
This code segment captures the double-clicked row, sets the focus to the Save or Update Inventory TabControl, and sets the modifiable property values to the corresponding TextBox value.
Next, open the NHibernateInventory.cs file located in the DataAccess folder of the NHibernate.GuitarStore project and modify the SaveInventory() method, as shown in Listing 5-32.
LISTING 5-32: SaveInventory() method
public bool SaveInventory(Inventory inventory)
{
  try
  {
    using (ITransaction transaction = Session.BeginTransaction())
    {
      Inventory inventoryDetached = new Inventory();
      inventoryDetached.Id = inventory.Id;
      inventoryDetached.Builder = inventory.Builder;
      inventoryDetached.Model = inventory.Model;
      inventoryDetached.Cost = inventory.Cost;
      inventoryDetached.Price = inventory.Price;

      Session.SaveOrUpdate(inventory);
      transaction.Commit();
    }
    return true;
  }
  catch (Exception ex)
  {
    return false;
  }
}
Finally, modify the buttonSubmit_Click() method found within the MainWindow.xaml.cs file of the GuitarStore WPF project so that it calls the previously created SaveInventory() method, passing it an Inventory class as a parameter. Listing 5-33 provides an example.
LISTING 5-33: Using the SaveInventory() method from the GuitarStore WPF program
private void buttonSubmit_Click(object sender, RoutedEventArgs e)
{
  Inventory inventory = new Inventory();
  inventory.Id = dgId;
  inventory.Builder = textBoxBuilder.Text;
  inventory.Model = textBoxModel.Text;
  inventory.Cost = Convert.ToDecimal(textBoxCost.Text);
  inventory.Price = Convert.ToDecimal(textBoxPrice.Text);
  inventory.QOH = 1;

  NHibernateInventory nhi = new NHibernateInventory();
  if (nhi.SaveInventory(inventory))
  {
    labelMessage.Content = “Save was successful.”;
  }
  else
  {
    labelMessage.Content = “Save failed.”;
  }
}
When the GuitarStore WPF program is executed and a save is attempted, the save will fail. This is because Listing 5-33 created a transient Inventory class, populated it with data from an identical already persisted Inventory class, and attempted to save the transient entity. The result is an NHibernate.NonUniqueObjectException. To resolve this issue, simply use the Merge() method instead of the SaveOrUpdate() method, as shown in Listing 5-34.
LISTING 5-34: Using the Merge() method to avoid a NonUniqueObjectException
public bool SaveInventory(Inventory inventory)
{
  try
  {
    using (ITransaction transaction = Session.BeginTransaction())
    {
      Inventory inventoryDetached = new Inventory();
      inventoryDetached.Id = inventory.Id;
      inventoryDetached.Builder = inventory.Builder;
      inventoryDetached.Model = inventory.Model;
      inventoryDetached.Cost = inventory.Cost;
      inventoryDetached.Price = inventory.Price;

      Session.Merge(inventory);
      transaction.Commit();
    }
    return true;
  }
  catch (Exception ex)
  {
    return false;
  }
}
Using Persist()
The Persist() method enables you to attach a transient object to a Session. At the same time, the object is not saved or updated to the database, nor is it granted an identifier until Session.Flush() is called. This may be useful in situations when you want to persist an object at the beginning of a business transaction but not save it until the end. This specific business transaction may take a large number of other actions, which, in turn, could change the original values of the unsaved persisted object. You therefore avoid an initial INSERT and then UPDATE of the object when the transaction is completed. Listing 5-35 shows how to use the Persist() method.
LISTING 5-35: Use the Persist() method with long-running transactions
using (ITransaction transaction = Session.BeginTransaction())
{
  Guitar transientGuitar = new Guitar();
  transientGuitar.Type = “ACOUSTIC ELECTRIC”;
  Session.Persist(transientGuitar);
  //Do some other required activies for this specific transaction
}
  //Do some other transactions that modify persisted transient object
Session.Flush();
NOTE The code shown in Listing 5-35 exists only to demonstrate the behavior of the Persist() method. This method, while powerful, exists to address some unique cases that many typical programs don't experience.
EXECUTING BATCH PROCESSES
Many activities require the insertion, updating, or deletion of a group of data. Using a for or foreach loop, as shown in Listing 5-36, is considered an anti-pattern. Additionally, when the Session is used to perform the batch update, insert, or delete of a large set of data, the entities are loaded into the identity map and second-level cache, if enabled. The code in Listing 5-36 can be added within the Main() method of the Program.cs file found in the NHibernate.GuitarStore.Console project.
LISTING 5-36: Batch update method using a stateful Session
Guid guitarType61 = new Guid(“471c5b3f-19da-4fcb-8e9f-48dd17a00a3d”);
using (ITransaction transaction = Session.BeginTransaction())
{
  //Performs an UPDATE per CHILD record
  IQuery queryUpdate = .Session
                       .CreateQuery(“from Inventory where TypeId = :TypeId”)
                       .SetGuid(“TypeId”, guitarType61);
  IList<Inventory> invUpdateList = queryUpdate.List<Inventory>();

  foreach (var item in invUpdateList)
  {
    item.Cost = (decimal)item.Cost * (decimal)1.15;
  }
  transaction.Commit();
}
The preceding method is considered an anti-pattern because it results in one UPDATE statement per item. The foreach loop could potentially attempt to process hundreds of thousands of updates. This method results is more memory utilization and slightly worse performance compared to, for example, using the IStatelessSession. To use the IStatelessSession, simply replace the Session with the OpenStatelessSession() method. Listing 5-37 demonstrates this approach. Note that even when using the IStatelessSession, an UPDATE per row is generated and executed on the database.
LISTING 5-37: A batched stateless update process
Guid guitarType61 = new Guid(“471c5b3f-19da-4fcb-8e9f-48dd17a00a3d”);

using (ITransaction transaction = StatelessSession.BeginTransaction())
{
  //Performs an UPDATE per CHILD record
  IQuery queryUpdate = StatelessSession
                       .CreateQuery(“from Inventory where TypeId = :TypeId”)
                       .SetGuid(“TypeId”, guitarType61);
  IList<Inventory> invUpdateList = queryUpdate.List<Inventory>();

  foreach (var item in invUpdateList)
  {
    item.Cost = (decimal)item.Cost * (decimal).85;
    StatelessSession.Update(item);
  }
  transaction.Commit();
}
NOTE When saving data, use the Insert() method in conjunction with the StatelessSession. The IStatelessSession interface does not have a method named Save() that is used with the ISession.
Another approach you can use to perform stateful batch insertions, updates, or deletions is to use the adonet.batch_size attribute. This attribute, as the name states, batches a configurable number of INSERT, UPDATE, or DELETE statements together for execution. By batching these statements together, fewer database round-trips are made for the batch process, therefore making it somewhat faster. There are several ways to implement this, including the following:
- Within the app.config file
- Strongly typed within the configuration
- Directly on the Session
To implement batching via the app.config file, add the code in Listing 5-38 to the program's app.config file within the session-factory element.
LISTING 5-38: Setting the batch size from the app.config file
<hibernate-configuration xmlns=“urn:nhibernate-configuration-2.2”>
 <session-factory
  <property name=“adonet.batch_size">10</property>
 </session-factory>
</hibernate-configuration>
Then, simply execute the stateful batch process and record the performance improvement of the program.
To set the batch size from a strongly typed configuration, modify the ConfigureNHibernate() method found within the NHibernateBase.cs file of the NHibernate.GuitarStore project so that it resembles Listing 5-39.
LISTING 5-39: Setting the batch size from a strongly typed configuration
using NHibernate.Cfg.Loquacious;

public static Configuration ConfigureNHibernate(string assembly)
{
  Configuration = new Configuration();

  Configuration.DataBaseIntegration(dbi =>
  {
    dbi.Dialect<MsSql2008Dialect>();
    dbi.Driver<SqlClientDriver>();
    dbi.ConnectionProvider<DriverConnectionProvider>();
    dbi.IsolationLevel = IsolationLevel.ReadUncommitted;
    dbi.Timeout = 15;
    dbi.BatchSize = 10;
  });

  Configuration.AddAssembly(assembly);
  return Configuration;
}
Note that the batch configuration methods in Listing 5-38 and Listing 5-39 have a scope of the SessionFactory. The batch size setting is applied to all batches for all Sessions. If this is not what is needed, it is possible to set the batch size for a specific Session. Listing 5-40 shows how to set the batch size for a specific NHibernate Session.
LISTING 5-40: Setting batch size for a specific Session
Guid guitarType61 = new Guid(“471c5b3f-19da-4fcb-8e9f-48dd17a00a3d”);

using (ITransaction transaction = Session.BeginTransaction())
{
  //Performs an UPDATE per CHILD record
  IQuery queryUpdate = Session
                 .CreateQuery(“from Inventory where TypeId = :TypeId”)
                 .SetGuid(“TypeId”, guitarType61);
  IList<Inventory> invUpdateList = queryUpdate.List<Inventory>();

  Session.SetBatchSize(10);
  foreach (var item in invUpdateList)
  {
    item.Cost = (decimal)item.Cost * (decimal)1.15;
  }

  transaction.Commit();

}
Another alternative is to use the ExecuteUpdate() method. There are a number of classes within the NHibernate source where the ExecuteUpdate() method is implemented. For our purposes, the classes of special interest are SqlQueryImpl, QueryImpl, and SessionImpl, found within the NHibernate.Impl namespace. Listing 5-41 shows an example of using the ExecuteUpdate() method with the QueryImpl class.
LISTING 5-41: ExecuteUpdate() method example
using (ITransaction transaction = Session.BeginTransaction())
{
  //Performs a single UPDATE
  string hqlQuery =
         “update Inventory set Price = Price*1.15 where TypeId = :TypeId”;

  IQuery queryUpdate = Session.CreateQuery(hqlQuery)
                              .SetGuid(“TypeId”, guitarType61);
  int UpdatedCount = queryUpdate.ExecuteUpdate();

  transaction.Commit();
}
As shown in the preceding example, this method results in the generation of a single update statement. This is much better than creating and executing an update statement per row. However, two very important topics need to be discussed in regard to using either the IStatelessSession interface or the ExecuteUpdate() method: versioning and their effect on a cached entity.
The method shown in Listing 5-41 will not update the VERSION column that was added to the INVENTORY table column. This means if a user is working with some detached data and the preceding batch update is executed via another process, the user will not receive a StaleObjectException and the data will be overwritten by the user (i.e., that data is being modified from two different sources). Modifying the HQL query as shown in Listing 5-42 will update the version number. Note the addition of the HQL keyword, versioned, before the Inventory reference in the HQL statement.
LISTING 5-42: HQL query to enforce versioning
string hqlQuery =
       “update versioned Inventory set Price = Price*1.15 where TypeId = :TypeId”;
The issue regarding the effect of using either the IStatelessSession or the ExecuteUpdate() method on a cached entity is a little more complex. One of the reasons a programmer would want to implement the solution shown in Listing 5-36 is because by doing so, the data stored in memory — that is, the first- (identity map) or second-level cache — remains consistent with that stored on the database. This means that the object remains persistent. This is not the case when using the IStatelessSession and the ExecuteUpdate() methods, whereby neither the identity map nor the second-level cache, if implemented, are updated, and this can cause some data integrity issues.
You can handle this by confirming that objects being modified or used for reference are persistent. Using either the Merge(), Get(), or Persist() method will ensure that the objects remain in a valid state.
NOTE If a program loads a large amount of persistent data into memory and uses it for the lifetime of the program, be aware that the data can become stale if another process performs an update of that data from another transaction.
SUMMARY
This chapter covered many topics regarding the management and insertion of data. By gaining insight into the differences among persistent, transient, and detached states, and the impact these states have on the data's integrity, you are better able to implement superior technical solutions. Furthermore, it should be clear that the integrity and performance of the database are enriched with the implementation of concurrency rules and versioning, both of which have strong functional representation within NHibernate. With a broad understanding of NHibernate terminology and its capabilities, programmers can build, and architects can design, better data-driven solutions.