
9
Working with Audio and Video
WHAT YOU WILL LEARN IN THIS CHAPTER:
- Introduction to the Open Source Media Framework
- Creating media resources and elements
- Accessing media traits
- Handling media trait events
- Using Media Player classes to play media
- Utilizing the Video Player component to play video
This chapter introduces you to aspects of the Open Source Media Framework (OSMF, www.osmf.org) and explores the core classes found in the framework that are used to work with audio and video.
You'll also build a media player example demonstrating the capabilities of OSMF, and using the Flex <s:VideoPlayer> component to examine how you can use video within your mobile applications.
INTRODUCING THE OPEN SOURCE MEDIA FRAMEWORK
The Open Source Media Framework is an open source development framework for Flash-based media players, aimed at simplifying the build of media based applications, in particular utilizing audio and video.
Figure 9-1 shows the OSMF logo.

The open nature of OSMF and its pluggable architecture facilitates a collaborative development effort in the Flash community, with Adobe and many third parties developing plug-ins that can swap in and out of media players. In addition, the core OSMF source code is updated at periodic intervals.
However, you should note that at the time of writing the release version of OSMF is version 1.5, while the latest working version is sprint 1.6.
You will need to download a copy of the OSMF source code to include as part of your mobile projects. Download the release version from the Source Forge website at http://sourceforge.net/projects/osmf.adobe/files/.
Over the next few sections you take a look at the fundamentals of OSMF, including:
- Using media resources
- Working with media elements
- Handling media traits
- Utilizing the media player
Many of the OSMF core concepts are explained purely from an AS3 perspective. Using the Flex framework, you find that the features are wrapped in a single video component <s:VideoPlayer>, which is covered later.
Creating a URLResource Object
In OSMF media resources are essentially used to reference the physical path of a media object. They are used by media elements to process the media.
The URLResource class is one type of media resource that holds a reference to a URL property. To create a URLResource object you first need to import the class, which is found in the org.osmf.media package:
import org.osmf.media.URLResource;
In the following snippet you see the creation of a new URLResource object:
var urlResource:URLResource;
urlResource = new URLResource("http://localhost/wrox/ch9/sound.mp3");
Here the URL path to the .mp3 file sound.mp3 is supplied as an argument to the constructor of the URLResource class, generating a resource that can be utilized by the framework.
In addition to URLResource, a number of different types of media resources can be created, including:
- DynamicStreamingResource: To create a media resource that references multiple representations of a single item, allowing a media player to dynamically switch from one representation to another, for instance different bit rates
- MulticastResource: To create a media resource that is able of carrying multicast streaming information
- StreamingURLResource: To create a media resource that can be streamed
After creating a media resource, it needs to be assigned to a media element; the next section takes a look at creating media elements and the generic MediaElement class.
Creating a MediaElement Object
OSMF includes a number of media element types, each representing a specific type of media object to be interpreted by the framework:
- AudioElement: This is used for streaming and progressive audio playback of MP3 and AAC files. It also supports audio-only streams from Flash Media Server.
- DurationElement: This is used for wrapping a media object to give it temporal (time-based) capabilities.
- F4MElement: This is used for loading media from XML documents that adhere to the Flash Media Manifest format via F4M files.
- ImageElement: This is used for loading and presenting any PNG, GIF, or JPG image.
- LightWeightVideoElement: This is used for simple RTMP streaming and progressive video playback.
- ParallelElement: This is used for concurrently presenting a number of media elements in a single media composition.
- ProxyElement: This is used for controlling access to a wrapped media element.
- SerialElement: This is used for sequentially presenting a number of media elements in a single media composition.
- VideoElement: This is used for streaming and progressive video playback of Flash Video (FLV) and MP4 files, and it also supports streaming from Flash Media Server.
These media elements represent a particular media implementation. The ParallelElement and SerialElement objects both represent media compositions, while the AudioElement and VideoElement are representations of elements of specific media types.
Each implementation is derived from the generic MediaElement class, a generic media element that can represent any particular type of simplified or complex media entity.
To create a MediaElement object, you need to import the class, which is found in the org.osmf.media package:
import org.osmf.media.MediaElement;
You then assign a resource to the resource property on the MediaElement object:
var mediaElement:MediaElement = new MediaElement();
mediaElement.resource = urlResource;
The following sections take a look at the creation of AudioElement and VideoElement objects.
Creating an AudioElement Object
An AudioElement is a media element specifically created for audio playback, supporting streaming and progressive formats.
When using OSMF to play audio, you will need to import the AudioElement class found in the org.osmf.elements package:
import org.osmf.elements.AudioElement;
To create an AudioElement, you first need to create a new URLResource object that references an audio file or stream, and then assign that URLResource object to the resource property in the AudioElement object, as shown in the following snippet:
var urlResource:URLResource;
urlResource = new URLResource("http://localhost/wrox/ch9/sound.mp3");

var audioElement:AudioElement = new AudioElement();
audioElement.resource = urlResource;
Creating a VideoElement Object
The VideoElement is another media element type; this is specifically used for video playback, supporting all streaming and progressive formats.
When using OSMF to play video, you need to import the VideoElement class, found in the org.osmf.elements package:
import org.osmf.elements.VideoElement;
You then create a URLResource object to a video and assign it to the resource property on the VideoElement object:
var urlResource:URLResource;
urlResource = new URLResource("http://localhost/wrox/ch9/video.mp4");

var videoElement:VideoElement = new VideoElement();
videoElement.resource = urlResource;
To actually play audio using an AudioElement or video using the VideoElement, it needs to be assigned to a MediaPlayer object; this will be covered shortly.
The next section covers another concept in OSMF that all media elements can expose, media traits.
Media Traits
Media traits essentially define a media element's characteristics and are dynamic in nature, so depending on the resource assigned to a media element the framework will effectively generate a trait for the media element, if it is possible to do so.
Consider an audio file, a video file, and a still image resource, and when they are loaded into an application. You would probably expect to be able play the audio and video files, but not the still image, because an image is not playable. You would also expect to be able to alter the volume of the audio and video files, but again not the image, because, of course, an image doesn't have a sound track.
In OSMF, audible and playable characteristics, like the ones described, are two of a number of characteristics that provide features and define how you can interact with different media types. These characteristics are known as traits.
A trait is a particular characteristic that defines a capability exhibited by a media element type.
In some scenarios you will need to access the traits of media elements to determine whether certain tasks can be carried out on the media. For instance, does a VideoElement have a playable characteristic so that it can be played?
OSMF has a number of traits, some of which are listed here:
- AudioTrait: A trait that exposes properties that indicate the left-to-right panning of sound, whether sound is muted, and also the volume level of the sound
- TimeTrait: A trait that exposes properties that indicate the duration and current time properties of a media type in seconds
- PlayTrait: A trait that exposes properties that indicate whether media playback can be stopped and started
- SeekTrait: A trait that exposes properties that indicate whether the media is currently seeking, and exposes the canSeekTo() and seek() methods
One of the tricks to using traits is learning what properties and features you want or need to use in your applications, then refer to each of the trait classes to see which ones are appropriate. Another useful class is the MediaTraitType class, which is used primarily to identify traits.
Using the MediaTraitType Class to Identify Traits
Up to now you've learned how you create media resource objects and assign them to media elements. During the playback of those media elements you may want to be able to seek a position of an audio file, or simply display the full duration of a video.
Furthermore, in the previous section you saw how each trait type had particular properties, but how do you know whether a media element has a particular trait? You can determine whether a media element type has a particular trait by using the MediaTraitType class found in the org.osmf.traits package.
This class has a number of static properties that define particular traits, including:
- MediaTraitType.AUDIO: To identify and reference AudioTrait instances
- MediaTraitType.BUFFER: To identify and reference BufferTrait instances
- MediaTraitType.DISPLAY_OBJECT: To identify and reference DisplayObjectTrait instances
- MediaTraitType.LOAD: To identify and reference LoadTrait instances
- MediaTraitType.PLAY: To identify and reference PlayTrait instances
- MediaTraitType.SEEK: To identify and reference SeekTrait instances
- MediaTraitType.TIME: To identify and reference TimeTrait instances
To determine whether a MediaElement object has a particular trait, you can use the hasTrait() method, supplying the name of the trait via one of the static constants on the MediaTraitType class.
The following snippet shows how to determine whether a MediaElement object has the AudioTrait, using the MediaTraitType.AUDIO constant as the argument for hasTrait():
var mediaElement:MediaElement = new MediaElement();

if(mediaElement.hasTrait(MediaTraitType.AUDIO))
{
      // Media has the audio trait
}
Retrieving a trait allows you to access the properties and invoke the methods on MediaElement objects.
To actually retrieve and use a trait, again you use the MediaTraitType class, this time supplying one of the static constants to the getTrait() property on the MediaElement object:
var mediaElement:MediaElement = new MediaElement();

if(mediaElement.hasTrait(MediaTraitType.AUDIO))
{
      var audioTrait:AudioTrait;
      audioTrait = mediaElement.getTrait(MediaTraitType.AUDIO);
}
In the following example you see that once the AudioTrait object has been retrieved, you can use it to set the volume property to 5 on the MediaElement object:
var mediaElement:MediaElement = new MediaElement();

if(mediaElement.hasTrait(MediaTraitType.AUDIO))
{
      var audioTrait:AudioTrait;
      audioTrait = mediaElement.getTrait(MediaTraitType.AUDIO);
      audioTrait.volume = 5;
}
This is just one example of how to utilize media traits in the framework.
Using the MediaPlayer to Play Media Elements
The MediaPlayer class is essentially a controller that can be used to play any of the media element types that are supported in OSMF.
So, for example, if you supply a MediaPlayer object an ImageElement, it can generate an image, and if you pass a MediaPlayer object a VideoElement, it can render a video.
The following lists each of the public properties exposed by a MediaPlayer object:
- audioPan: A number representing the pan property of the media
- autoDynamicStreamSwitch: A Boolean indicating whether the media will automatically switch between dynamic streams
- autoPlay: A Boolean defining whether the media starts playing as soon as its load operation has successfully completed
- autoRewind: A Boolean defining whether the media is returned to the beginning of playback after playback of the media completes
- buffering: A Boolean indicating whether the media is currently buffering
- bufferLength: A number returning the length, measured in seconds, of the content currently in the media's buffer
- bufferTime: A number that indicates the desired length of the media's buffer, in seconds
- bytesLoaded: A number that returns the bytes of the media that have been loaded
- bytesLoadedUpdateInterval: A number representing the interval between the dispatch of change events for the bytesLoaded property
- bytesTotal: A number representing the total number of bytes of the media that will be loaded
- canBuffer: A Boolean to indicate whether the media can buffer
- canLoad: A Boolean to indicate whether the media can be loaded
- canPause: A Boolean to indicate whether the media can be paused
- canPlay: A Boolean to indicate whether the media can be played
- canSeek: A Boolean to indicate whether the media is seekable
- currentDynamicStreamIndex: An integer representing the index of the dynamic stream currently rendering
- currentTime: A number returning the current time of the playhead in seconds
- currentTimeUpdateInterval: A number to define the interval between the dispatch of change events for the current time in milliseconds
- displayObject: The DisplayObject for the media
- drmEndDate: A date representing the end date for the playback window
- drmPeriod: A number returning the length of the playback window, in seconds
- drmStartDate: A date representing the start date for the playback window
- drmState: A string indicating the current state of the DRM for this media
- duration: A number representing the duration of the media's playback, in seconds
- dynamicStreamSwitching: A Boolean to indicate whether a dynamic stream switch is currently in progress
- hasAudio: A Boolean to indicate whether the media has audio
- hasDRM: A Boolean to indicate whether the media element has the DRMTrait
- isDVRRecording: A Boolean to indicate whether the media is DVR-enabled and currently recording
- isDynamicStream: A Boolean to indicate whether the media consists of a dynamic stream
- loop: A Boolean to indicate whether the media should play again after playback
- has completed
- maxAllowedDynamicStreamIndex: An integer representing the maximum allowed dynamic stream index
- media: A MediaElement defining the source media element being controlled by the
- media player
- mediaHeight: A number defining the height of the media, in pixels
- mediaWidth: A number defining the width of the media, in pixels
- muted: A Boolean to indicate whether the media is currently muted
- numDynamicStreams: An integer representing the total number of dynamic stream indices
- paused: A Boolean to indicate whether the media is currently paused
- playing: A Boolean to indicate whether the media is currently playing
- seeking: A Boolean to indicate whether the media is currently seeking
- state: A string representing the current state of the media
- temporal: A Boolean to indicate whether the media is temporal
- volume: A number representing the volume of the media
The MediaPlayer class also provides many convenient functions to control media, including:
- authenticate(username:String = null, password:String = null): To authenticate the media
- authenticateWithToken(token:Object): To authenticate the media using an object that serves as a token
- canSeekTo(seconds:Number): To determine whether the media is capable of seeking to the specified time, measured in seconds
- getBitrateForDynamicStreamIndex(index:int): To retrieve the bit rate in kilobytes for a specified dynamic stream index
- pause(): To pause the media, if it is not already paused
- play(): To play the media, if it is not already playing
- seek(time:Number): To jump to the specified time in the media file
- stop(): To stop playback and return to the beginning of the media file
- switchDynamicStreamIndex(index:int): To switch to a specific dynamic stream index
For your OSMF project you will need to import the MediaPlayer class; this can be found in the org.osmf.media package:
import org.osmf.media.MediaPlayer;
To utilize an AudioElement object, you need to create a MediaPlayer object, and then assign the AudioElement object to the MediaPlayer object's media property:
var urlResource:URLResource;
urlResource = new URLResource("http://localhost/wrox/ch9/sound.mp3");

var audioElement:AudioElement = new AudioElement();
audioElement.resource = urlResource;

var mediaPlayer:MediaPlayer = new MediaPlayer();
mediaPlayer.media = audioElement;
To play audio, you simply call the MediaPlayer object's play() method:
var mediaPlayer:MediaPlayer = new MediaPlayer();
mediaPlayer.media = audioElement;
mediaPlayer.play();
Using the MediaPlayerSprite Class to Play Media Resources
The MediaPlayerSprite class allows you to assign a resource object to the resource property on a MediaPlayerSprite object. The MediaPlayerSprite extends MediaPlayer, but also contains instances of the MediaContainer and MediaFactory classes, which allow you to set the scale mode of the media and automatically generate the appropriate MediaElement object, which will be passed to the MediaPlayer.
To use the MediaPlayerSprite class in your projects, you need to use the following import statement:
import org.osmf.media.MediaPlayerSprite;
The following snippet demonstrates how to use a MediaPlayerSprite object and play an audio file:
var urlResource:URLResource;
urlResource = new URLResource("http://localhost/wrox/ch9/sound.mp3");

var mediaPlayerSprite:MediaPlayerSprite = new MediaPlayerSprite();

addChild(mediaPlayerSprite);

mediaPlayerSprite.resource = urlResource;
Alternatively, you could assign a media element type to the media property on the MediaPlayerSprite object. For example, in the following snippet an AudioElement object is created from a path to the sound.mp3 file. This is then assigned to a MediaPlayerSprite object's media property. Here's how you would assign an AudioElement:
var urlResource:URLResource;
urlResource = new URLResource("http://localhost/wrox/ch9/sound.mp3");

var audioElement:AudioElement = new AudioElement();
audioElement.resource = urlResource;

var mediaPlayerSprite:MediaPlayerSprite = new MediaPlayerSprite();

addChild(mediaPlayerSprite);
mediaPlayerSprite.media = audioElement;
Handling Trait Events
Let's say you wanted to display a visual message to the user in your application when a video needs to “buffer” content, or when a sound clip has been “paused” rather than “stopped.” There are trait events that are intrinsic to OSMF, which help to present a particular response for media elements, like the ones just highlighted.
The TraitEventDispatcher class, which we'll cover shortly, is able to monitor a media element to check when a trait has been added, and is subsequently able to handle dispatched trait events. But before you look at how to use the dispatcher, you'll need to know a little more about the events you want to handle.
In this section you'll take a brief look at the AudioEvent, PlayEvent, and TimeEvent objects.
Using an AudioEvent Object
An AudioEvent object is dispatched when the properties of an audio trait have changed for a media element; hence, a derived MediaElement object needs to have an AudioTrait object.
The AudioEvent class can be found in the org.osmf.events package:
import org.osmf.events.AudioEvent;
The class itself has three static event-type properties:
- AudioEvent.MUTED_CHANGE: A string “mutedChange”, dispatched when the muted property of the media has changed
- AudioEvent.PAN_CHANGE: A string “panChange”, dispatched when the pan property of the media has changed
- AudioEvent.VOLUME_CHANGE: A string “volumeChange”, dispatched when the volume property of the media has changed
Three read-only public properties for the AudioEvent object also can be accessed via an event handler for each of the event types:
- muted: A Boolean indicating whether the audio for the media element is muted
- pan: A number representing the pan
- volume: A number representing the volume level of the audio for the media element
The audio of a MediaElement object that has an AudioTrait can be changed through a volume property, which should trigger an AudioEvent.VOLUME_CHANGE event to be dispatched.
Using the PlayEvent and PlayState Objects
A PlayEvent object is an OSMF event that is dispatched when the properties of a play trait have changed for a media element. A derived MediaElement object needs to have a PlayTrait object in order for PlayEvent objects to be dispatched.
When a PlayEvent is triggered, you can detect changes to the play state of a media element, or detect whether a media element can be paused.
You have to import the PlayEvent, which can be found in the org.osmf.events package:
import org.osmf.events.PlayEvent;
This class has two static event-type properties:
- PlayEvent.CAN_PAUSE_CHANGE: A string “canPauseChange”, dispatched when the canPause property has changed
- PlayEvent.PLAY_STATE_CHANGE: A string “playStateChange”, dispatched when the playing or paused property of the media has changed
A PlayEvent object also exposes two public properties:
- canPause: A Boolean indicating whether the PlayTrait can be paused
- playState: A string defining the current PlayState of the media element
The playState property returned on the PlayEvent object is actually tied to a static constant held by the org.osmf.traits.PlayState class. This has three static constants:
- PlayState.PAUSED: A string defining the play state as paused
- PlayState.PLAYING: A string defining the play state as playing
- PlayState.STOPPED: A string defining the play state as stopped
Using a TimeEvent Object
A TimeEvent object is dispatched when there is a change in the properties of a media element object that has a time/temporal trait:
import org.osmf.events.TimeEvent;
The class itself has three static event types:
- TimeEvent.COMPLETE: A string “complete”, dispatched when the media has completed playback
- TimeEvent.CURRENT_TIME_CHANGE: A string “currentTimeChange”, dispatched when the time property of the media has changed
- TimeEvent.DURATION_CHANGE: A string “durationChange”, dispatched when the duration property of the media has changed
A TimeEvent object exposes a public time property, which holds the value represented by the change in the media's TimeTrait.
Using the TraitEventDispatcher Class
A TraitEventDispatcher object allows you to receive trait events from a MediaElement object, and thus utilize updates and changes to media properties. In addition to dispatching the trait events of a MediaElement object, the TraitEventDispatcher has an added bonus with its ability to monitor a MediaElement object to tell when traits have been added or removed.
To utilize this functionality, you need to import the TraitEventDispatcher class found in the org.osmf.traits package:
import org.osmf.traits.TraitEventDispatcher;
The TraitEventDispatcher object is one way in which you can listen for OSMF events. First you need to create a TraitEventDispatcher object, and then assign each of the events you want to listen to via the addEventListener() method to the TraitEventDispatcher object. You then need to assign a media element to the media property on the TraitEventDispatcher object.
The following snippet shows how an AudioElement object is added to a TraitEventDispatcher object called traitDispatcher, where the AudioEvent.VOLUME_CHANGE and TimeEvent.COMPLETE events are listened for and handled by the onVolumeChange(), onPlayStateChange(), and onComplete() event handlers, respectively:
var traitDispatcher:TraitEventDispatcher = new TraitEventDispatcher();
traitDispatcher.media = audioElement;

traitDispatcher.addEventListener(AudioEvent.VOLUME_CHANGE, onVolumeChange);
traitDispatcher.addEventListener(TimeEvent.COMPLETE, onComplete);
Another way in which you can listen for OSMF events is by using a MediaPlayer object, as shown in the following snippet, which shows how the TimeEvent.COMPLETE event type is registered with a MediaPlayer object:
mediaPlayer.addEventListener(TimeEvent.COMPLETE, onComplete);
USING THE FLEX OSMF WRAPPER
In addition to the OSMF classes that can be utilized to render video, two components can be used to accomplish video playback, the <s:VideoDisplay> and <s:VideoPlayer> components. Both are Flex wrappers for OSMF-based AS3 classes.
The <s:VideoDisplay> component is a basic renderer for video playback, without media controls to interact with the video. Here you'll explore how to use the <s:VideoPlayer> component, allowing you to render videos in your mobile applications and control playback.
Using the VideoPlayer Component
This section takes you through some of the properties and methods of the <s:VideoPlayer> component, a skinnable component that also exposes some familiar properties of OSMF, covered earlier.
In total, 14 public properties are exposed with the <s:VideoPlayer> component:
- autoDisplayFirstFrame: A Boolean used to define whether to display the first frame of a video
- autoPlay: A Boolean used to define whether a video automatically plays when it first loads
- autoRewind: A Boolean to define whether a video automatically rewinds when it reaches its end
- bytesLoaded: A number representing the bytes of data that have been loaded
- bytesTotal: A number representing the total bytes of data that will be loaded
- currentTime: A number indicating the current position of the video
- duration: A number representing the full running time of the video
- loop: A Boolean to define whether a video restarts once it has ended
- mediaPlayerState: A static string indicating the current state of the video player; the values include UNINITIALIZED, READY, PLAYING, PAUSED, BUFFERING, and PLAYBACK_ERROR
- muted: A Boolean indicating whether the video player's volume is set to zero
- pauseWhenHidden: A Boolean to pause the video when it is hidden
- playing: A Boolean indicating whether the video is currently playing
- scaleMode: A string defining how to size the video content; the values “none,” “stretched,” “letterbox,” or “zoom” can be assigned
- source: A string that defines the path to the video content
In addition to these properties are four public methods that are associated with the <s:VideoPlayer> component:
- pause(): To pause a video
- play(): To play a video
- seek(seconds:Number): To seek to a specified time in a video
- stop(): To stop a video
These methods are exactly the same ones exposed by the MediaPlayer and MediaPlayerSprite classes, covered earlier.
Creating a MediaPlayer Example
You will now need to set up a new Flex Mobile Project in Flash Builder.
Defining the Flex Mobile Project Settings
The following lists a few of the familiar settings you will need to ensure are defined for the project:
- Name: Set the Name for the project as MediaPlayerApp.
- Application ID: Set the Application ID as com.wrox.ch9.MediaPlayerApp.
- Application Template: Set the Application Template to a View-Based Application, setting the initial view title to MediaPlayerAppHome.
Targeting Mobile Devices on Different Platforms
This example project can run on each of the mobile platforms supporting AIR, including Apple iOS, Google Android, and BlackBerry Tablet OS. No permissions need to be specified for any of the target platforms.
Creating Run and Debug Configurations
You can elect to run this project on the desktop or directly on your mobile device. This chapter focuses on running the app on the desktop; however, both approaches can be employed.
Building the Media Player App
The following steps will take you through the build of a media player app targeted for mobile using a combination of Flex and ActionScript classes:
- In the MediaPlayerApp project, create a new ActionScript class named MediaItemVO in a new package called model.vo.
- In MediaItemVO, add four public variables of string type: title, description, url, and duration (Listing 9-1).
- Create a new MXML item renderer called MediaItemRenderer.
- In MediaItemRenderer add a <s:VerticalLayout> declaration to the <s:layout>, setting the gap property to 5, the paddingLeft property to 10, the paddingTop property to 20, and paddingBottom property to 5. Next update the text property on the item renderer's default <s:Label> component. The value supplied to this property should be the data.title and data.duration properties. Also set the fontSize property to 18. Add another <s:Label> component that sets the data.description property on the text property, and also the fontSize to 16 (Listing 9-2).

LISTING 9.2: Assigning the layout and data object properties in MediaItemRenderer.mxml
<?xml version="1.0" encoding="utf-8"?>
<s:ItemRenderer xmlns:fx="http://ns.adobe.com/mxml/2009"
                xmlns:s="library://ns.adobe.com/flex/spark"
                autoDrawBackground="true">

      <s:layout>
            <s:VerticalLayout gap=“5”
                              paddingLeft=“10”
                              paddingTop=“20”
                              paddingBottom=“5”/>
      </s:layout>

      <s:Label text=“{data.title} ({data.duration})”
               fontSize=“18”/>

      <s:Label text=“{data.description}”
               fontSize=“16”/>

</s:ItemRenderer>
- In MediaPlayerAppHome.mxml add the namespace declaration xmlns:vo to the view, specifying the model.vo.* package. Also set the title property for the view to Media Player App. Ensure that the <fx:Declarations> and <fx:Script> tags are present (Listing 9-3).
LISTING 9.3: Setting the title and xmlns:vo namespace properties in MediaPlayerAppHome.mxml
<?xml version="1.0" encoding="utf-8"?> <s:View xmlns:fx="http://ns.adobe.com/mxml/2009" xmlns:s="library://ns.adobe.com/flex/spark" xmlns:vo=“model.vo.*” title=“Media Player App”> <fx:Script> <![CDATA[ ]]> </fx:Script> <fx:Declarations> </fx:Declarations> </s:View> - Within the <fx:Script> block, define a new bindable string called basePath to hold a reference to a local server path, in which the videos will be stored (Listing 9-4).
LISTING 9.4: Setting the basePath for the videos in MediaPlayerAppHome.mxml
<fx:Script>
      <![CDATA[

            [Bindable]
            private var basePath:String = “http://localhost/video/”;
      ]]>
</fx:Script>
Setting the basePath to “http://localhost/video/” presumes you have a web server running on you machine with the video folder at the root. The content used in the example can be found in the bin-debug folder for the project. So, when you run this example, you can also set the basePath to “”, removing the reference to the local web server.
- In the <fx:Declarations> tag, define a new <s:ArrayList> called arrList. Define three <vo:MediaItemVO> objects. On the first MediaItemVO object, set the id property to mediaItem1, then set the title property to Sintel, the description property to The search for a baby dragon., the url property to sintel_trailer.flv, and the duration property to 0:52. For the second MediaItemVO object, set the id to mediaItem2, set the title to Big Buck Bunny, and the description to Meet three bullying rodents.. Set the url to big_buck_bunny_trailer.flv and the duration to 0:33. Then for the third MediaItemVO object, set the id to mediaItem3, set the title to Elephants Dream, and the description to Emo is introduced to the machine. Then set the url to elephants_dream_trailer.flv and the duration to 1:15 (Listing 9-5).
LISTING 9.5: Declaring an <s:ArrayList> of MediaItemVO objects in MediaPlayerAppHome.mxml
<fx:Declarations> <s:ArrayList id=“arrList”> <vo:MediaItemVO id=“mediaItem1” title=“Sintel” description=“The search for a baby dragon.” url=“sintel_trailer.flv” duration=“0:52”/> <vo:MediaItemVO id=“mediaItem2” title=“Big Buck Bunny” description=“Meet three bullying rodents.” url=“big_buck_bunny_trailer.flv” duration=“0:33”/> <vo:MediaItemVO id=“mediaItem3” title=“Elephants Dream” description=“Emo is introduced to the machine.”You can package the video files used in this example project for testing on a mobile device. First you need to ensure that the videos are included in the packaging. Select File
 Properties Flex Build Packaging, and then enable your target platform. Then select the files you want to include. You will need to set the basePath to “”, and this will then allow you to reference each of the videos relative to the installation folder.
 - Next define two states, portrait and landscape (Listing 9-6).
LISTING 9.6: Declaring the portrait and landscape states in MediaPlayerAppHome.mxml
<fx:Declarations> <s:State name=“portrait”/> <s:State name=“landscape”/> <s:ArrayList id="arrList"> <vo:MediaItemVO id="mediaItem1" title="Sintel" description="The search for a baby dragon." url="sintel_trailer.flv" duration="0:52"/> <vo:MediaItemVO id="mediaItem2" title="Big Buck Bunny" description="Meet three bullying rodents." url="big_buck_bunny_trailer.flv" duration="0:33"/> <vo:MediaItemVO id="mediaItem3" title="Elephants Dream" description="Emo is introduced to the machine." url="elephants_dream.flv" duration="1:15"/> </s:ArrayList> </fx:Declarations> - Under the closing <fx:Declarations> tag, add a <s:Group> container, setting its width property to 100%. For the container, add two <s:layout> definitions, <s:layout.portrait> and <s:layout.landscape>, adding the <s:VerticalLayout> declaration to the portrait state and a <s:HorizontalLayout> declaration for the landscape layout. Set the gap, paddingBottom, paddingLeft, paddingRight, and paddingTop properties to 0 for both states (Listing 9-7).
LISTING 9.7: Defining the layout properties for the <s:Group> container for portrait and landscape states in MediaPlayerAppHome.mxml
</fx:Declarations>

<s:Group width=“100%”>

      <s:layout.portrait>
            <s:VerticalLayout gap=“0”
                              paddingBottom=“0”
                              paddingLeft=“0”
                              paddingRight=“0”
                              paddingTop=“0”/>
      </s:layout.portrait>

      <s:layout.landscape>
            <s:HorizontalLayout gap=“0”
                                paddingBottom=“0”
                                paddingLeft=“0”
                                paddingRight=“0”
                                paddingTop=“0”/>
      </s:layout.landscape>

</s:Group>
- Next add a <s:VideoPlayer> component to the <s:Group> container. Set the id property on the component to mediaPlayer. Then set the autoPlay property to false and the autoDisplayFirstFrame and autoRewind properties to true. Also set the fontSize to 16 and fontWeight to normal. Set the scaleMode property to letterbox and the interactionMode to touch. Lastly set the source property of the video to use the basePath property and the first video in arrList, via the mediaItem1.url property (Listing 9-8).
LISTING 9.8: Adding the <s:VideoPlayer> to the <s:Group> container in MediaPlayerAppHome.mxml
</fx:Declarations>

<s:Group width="100%">

      <s:layout.portrait>
            <s:VerticalLayout gap="0"
                              paddingBottom="0"
                              paddingLeft="0"
                              paddingRight="0"
                              paddingTop="0"/>
      </s:layout.portrait>

      <s:layout.landscape>
            <s:HorizontalLayout gap="0"
                                paddingBottom="0"
paddingLeft="0" paddingRight="0" paddingTop="0"/> </s:layout.landscape> <s:VideoPlayer id=“mediaPlayer” autoDisplayFirstFrame=“true” autoPlay=“false” autoRewind=“true” fontSize=“16” fontWeight=“normal” interactionMode=“touch” scaleMode=“letterbox” source=“{basePath}{mediaItem1.url}” volume=“5”/> </s:Group>
- After the <s:VideoPlayer> component, add a <s:List> component, setting the id property to mediaPlaylist. Assign the MediaItemRenderer to the itemRenderer property. Then set the dataProvider property to the ArrayList object, arrList. Set both the width and height properties to 100%. Then finally, set the click property on the <s:List> component to a new event handler called onClick(). You'll take a look at that function shortly (Listing 9-9).
LISTING 9.9: Adding the <s:List> to the <s:Group> container in MediaPlayerAppHome.mxml
<s:VideoPlayer id="mediaPlayer" autoDisplayFirstFrame="true" autoPlay="false" autoRewind="true" fontSize="16" fontWeight="normal" interactionMode="touch" scaleMode="letterbox" source="{basePath}{mediaItem1.url}" volume="5"/> <s:List id=“mediaPlaylist” itemRenderer=“views.renderers.MediaItemRenderer” width=“100%” height.landscape=“100%” dataProvider=“{arrList}” click=“onClick(event)”/> - In the <fx:Script> block, add a protected function called onClick() with a single parameter e, an Event object. In the function, use the selectedIndex property on the <s:List> component mediaPlaylist to retrieve a MediaItemVO object. Use the url property on the MediaItemVO object to build a full path to a video, combined with the basePath. Assign this to the mediaPlayer.source (Listing 9-10).
LISTING 9.10: Defining the onClick() method in MediaPlayerAppHome.mxml
[Bindable]
private var basePath:String = "http://localhost/video/";

protected function onClick(e:Event):void
{
      var mediaItem:MediaItemVO;
      mediaItem = arrList.source[mediaPlaylist.selectedIndex];

      mediaPlayer.source = basePath + mediaItem.url;
}
- Above the onClick() method, add a protected function called onComplete() with a single parameter e, a TimeEvent object, which should be imported above the private basePath variable. In onComplete(), use the selected index on the <s:List> component to determine which item to play once the current item has completed (Listing 9-11).
LISTING 9.11: Defining the onComplete() method in MediaPlayerAppHome.mxml
import org.osmf.events.TimeEvent;

[Bindable]
private var basePath:String = "http://localhost/videos/";

protected function onComplete(e:TimeEvent):void
{
      var index:int = mediaPlaylist.selectedIndex;
      index++;

      if(index < arrList.source.length)
      {
            mediaPlaylist.selectedIndex = index;

            mediaPlayer.source = basePath + arrList.source[index].url;

            mediaPlayer.play();
      }
}

protected function onClick(e:Event):void
{
      var mediaItem:MediaItemVO;
      mediaItem = arrList[mediaPlaylist.selectedIndex];

      mediaPlayer.source = basePath + mediaItem.url;
}
- Update the <s:VideoPlayer> component so that it references the onComplete() event handler (Listing 9-12).
LISTING 9.12: Assigning the complete method in MediaPlayerAppHome.mxml
<s:VideoPlayer id="mediaPlayer"
               complete=“onComplete(event)”
               autoDisplayFirstFrame="true"
               autoPlay="false"
               autoRewind="true"
               fontSize="16"
               fontWeight="normal"
               interactionMode="touch"
               scaleMode="letterbox"
               source="{basePath}{mediaItem1.url}"
               volume="5"/>
- Under the basePath declaration, add four new protected functions: onCreationComplete(), onAddedToStage(), onOrientationChange(), and updateLayout(). Assign the onCreationComplete() method to the view's creationComplete attribute (Listing 9-13).
LISTING 9.13: Declaring the onCreationComplete(), onAddedToStage(), onOrientationChange() and updateLayout() methods in MediaPlayerAppHome.mxml
<s:View xmlns:fx="http://ns.adobe.com/mxml/2009" xmlns:s="library://ns.adobe.com/flex/spark" xmlns:vo="model.vo.*" title="Media Player App" creationComplete=“onCreationComplete()”> <fx:Script> <![CDATA[ import org.osmf.events.TimeEvent; [Bindable] private var basePath:String = "http://localhost/videos/"; protected function onCreationComplete():void {} protected function onAddedToStage():void {} protected function onOrientationChange():void {} protected function updateLayout():void {} - In updateLayout(), define two integers for width and height: w and h, respectively. Add a switch statement that uses the currentState property of the view to distinguish between the portrait and landscape layouts. When the view is in a portrait layout, set the actionBarVisible property of the view to true, and then use the systemManager.screen.width property to assign the full width of the device's screen to the w variable. Use the 4:3 screen ratio and width to calculate the height for variable h. For the landscape layout, set the actionBarVisible property to false, and then use the systemManager.screen.width and systemManager.screen.height properties to assign values to w and h, respectively. Following the switch statement, assign the w and h variables to the width and height properties, respectively, on mediaPlayer (Listing 9-14).
LISTING 9.14: Defining the width and height of media player via the updateLayout() method in MediaPlayerAppHome.mxml
protected function updateLayout():void { var w:int; var h:int; switch(currentState) { case “portrait”: { actionBarVisible = true; w = systemManager.screen.width; h = w / (4/3); } break; case “landscape”: { actionBarVisible = false; w = systemManager.screen.width; h = systemManager.screen.height; } break; } mediaPlayer.width = w; mediaPlayer.height = h; } - In onCreationComplete(), register the Event.ADDED_TO_STAGE event property with the view, assigning the onAddedToStage() function as the event handler and at the same time defining a single Event object parameter for the method, e. Then in onAddedToStage(), register the StageOrientationEvent.ORIENTATION_CHANGE event with the stage via the e.target.stage property, assigning onOrientationChange() as the event handler. For onOrientationChange(), add a single StageOrientationEvent object, e, as a parameter. Lastly, call the updateLayout() method in both onOrientationChange() and onAddedToStage() (Listing 9-15).
- Finally, update the MediaPlayerApp.mxml file to include styles for the application. Replace the <fx:Declarations> with an <fx:Style> declaration. Inside the <fx:Style> declaration, specify s as the spark namespace. Then define three style declarations that will be used in the application: one for the View component, one for the List component, and one for the Video Player component. For the <s:View> components, define the backgroundColor property as #3F3F3F, and the color property as #393839. Then for the <s:List> component, define the alternatingItemColors property as #3F3F3F, #3F3F3F, the contentBackgroundColor property as #3F3F3F, the selectionColor property as #B2B2B2, the fontSize property as 18, and the color property as #393839. Then for the <s:VideoPlayer> component, set the chromeColor property to #3F3F3F and the color property to #FFFFFF (Listing 9-16).
LISTING 9.16: Setting the styles via the <fx:Style> declaration in MediaPlayerApp.mxml
<?xml version="1.0" encoding="utf-8"?> <s:ViewNavigatorApplication xmlns:fx="http://ns.adobe.com/mxml/2009" xmlns:s="library://ns.adobe.com/flex/spark" firstView="views.MediaPlayerAppHome"> <fx:Style> @namespace s “library://ns.adobe.com/flex/spark”; s|View { backgroundColor:#3F3F3F; color:#393839; } s|List { fontSize:18; color:#FFFFFF; alternatingItemColors:#3F3F3F, #3F3F3F; selectionColor:#B2B2B2; contentBackgroundColor:#3F3F3F; } s|VideoPlayer - Now run the example using a desktop run configuration. When the Media Player application launches in the portrait view, underneath the Media Player App title for the app you'll see the video player and playlist component populated with the media items.
You can now click Play on the video player's controls to start video playback (Figure 9-2).
When you rotate the device to landscape view, you'll see that the player occupies the full screen and the playlist is no longer visible on screen (Figure 9-3).
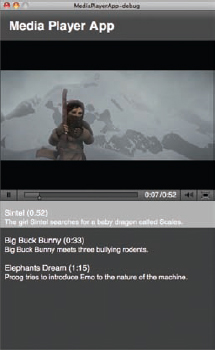
FIGURE 9-2: Playing the first item in the Media Player App
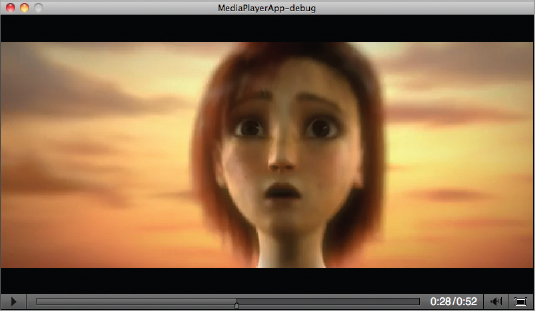
FIGURE 9-3: Rotating the device to change the layout of the components in Media Player App
When you rotate the device back to the portrait view, clicking a new item in the list will change the current video being played (Figure 9-4).
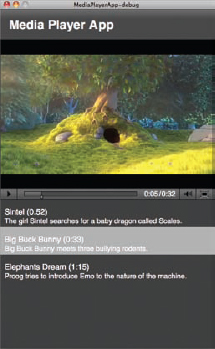
FIGURE 9-4: Playing the second item in the Media Player App
SUMMARY
Over the course of this chapter you have explored the key concepts of OSMF, learning from the core how to create resources and media elements, how to handle media trait events, and how to distinguish between different media trait characteristics.
You also took a look at creating a rather simple media player application that used the <s:VideoPlayer> component.
In the next chapter you take a look at using some of the device features available to AIR mobile applications. You'll take a look at how to utilize the device's camera, microphone, web browser, and geo-location instruments.
EXERCISES
- Add a Settings view to the Media Player application that allows the user to change some of the default settings on the <s:VideoPlayer> component — for example, auto play and continuous play.
- Include a still image of each video in the playlist.
- Update the playlist to include audio and image items.
- Package the Media Player application, selecting one of the target platforms and including associated video items.
![]() WHAT YOU LEARNED IN THIS CHAPTER
WHAT YOU LEARNED IN THIS CHAPTER
| TOPIC | KEY CONCEPT |
| Creating media resources | Use URLResource to create a media resource to a media item that uses an HTTP location reference. |
| Creating media elements | Reference the MediaElement class to create a generic media object.
Reference the AudioElement class to create an element specifically for audio playback. Reference the VideoElement class to create an element specifically for video playback. |
| Using media traits | Traits represent the characteristics of a media object.
The AudioTrait represents audible characteristics of media and exposes properties like AudioTrait.volume. The PlayTrait represents playable characteristics of media and exposes properties like PlayTrait. The BufferTrait represents bufferable characteristics of media and exposes properties like the BufferTrait. The TimeTrait represents temporal characteristics of media and exposes properties like the TimeTrait. |
| Handling media trait events | Reference the AudioEvent to handle events dispatched from an AudioTrait — for example, AudioEvent.VOLUME_CHANGE.
Reference the PlayEvent to handle events dispatched from a media objects PlayTrait — for example, PlayEvent.PAUSED. Reference the TimeEvent to handle events dispatched from a media objects TimeTrait — for example, TimeEvent.COMPLETE. |
| Using the MediaPlayer class | Assign a MediaElement object to the MediaPlayer.media property to reference media.
Use the MediaPlayer.play() method to start playback. |
| Using the MediaPlayerSprite class | Assign a URLResource object to the MediaPlayerSprite.resource property, or a MediaElement object to the MediaPlayerSprite.media property to reference media. |
| Using the Video Player component | Use the <s:VideoPlayer> Flex component.
Use a URL path to assign media to the component using the VideoPlayer.source. |
| Controlling media using the Video Player component | Use <s:VideoPlayer>.play() to play content.
Use <s:VideoPlayer>.pause() to pause content. Use <s:VideoPlayer>.stop() to stop content. |