![]()
7
Getting Creative with Exposure and Lighting
In This Chapter
![]() Understanding the basics of exposure
Understanding the basics of exposure
![]() Choosing the right exposure mode: P, S, A, or M?
Choosing the right exposure mode: P, S, A, or M?
![]() Reading meters and other exposure cues
Reading meters and other exposure cues
![]() Solving exposure problems
Solving exposure problems
![]() Getting better flash results
Getting better flash results
![]() Creating a safety net with automatic exposure bracketing
Creating a safety net with automatic exposure bracketing
Understanding exposure is one of the most intimidating challenges for a new photographer. Discussions of the topic are loaded with technical terms — aperture, metering, shutter speed, ISO, and the like. Add the fact that your camera offers many exposure controls, all sporting equally foreign names, and it’s no wonder that most people throw up their hands and decide that their best option is to stick with the Auto exposure mode and let the camera take care of all exposure decisions.
You can, of course, turn out good shots in Auto mode, and I fully relate to the confusion you may be feeling — I’ve been there. But I can also promise that when you take things nice and slow, digesting the exposure pie a piece at a time, the topic is not as complicated as it seems on the surface. I guarantee that the payoff will be well worth your time and brain energy, too. You’ll not only gain the know-how to solve just about any exposure problem but also discover ways to use exposure to put your creative stamp on a scene.
To that end, this chapter provides everything you need to know to really exploit your camera’s exposure options, from a primer in exposure science (it’s not as bad as it sounds) to explanations of all exposure controls, including those related to flash. In addition, because some controls aren’t accessible in the fully automatic exposure modes covered in Chapter 3, this chapter provides more details about the four advanced modes, P, S, A, and M.
Introducing the Exposure Trio: Aperture, Shutter Speed, and ISO
Any photograph, whether taken with a film or digital camera, is created by focusing light through a lens onto a light-sensitive recording medium. In a film camera, the film negative serves as that medium; in a digital camera, it’s the image sensor, which is an array of light-responsive computer chips.
Between the lens and the sensor are two barriers — the aperture and shutter — which work in concert to control how much light makes its way to the sensor of a digital camera. The actual design and arrangement of the aperture, shutter, and sensor vary depending on the camera, but Figure 7-1 offers an illustration of the basic concept.
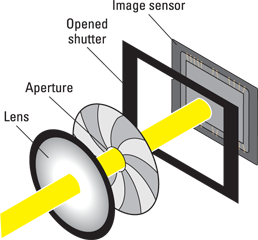
Figure 7-1: Aperture size and shutter speed determine how much light strikes the image sensor.
The aperture and shutter, along with a third feature — ISO — determine exposure, which is basically the picture’s overall brightness and contrast. This three-part exposure formula works as follows:
![]() Aperture (controls amount of light): The aperture is an adjustable hole in a diaphragm inside the lens. You change the aperture size to control the size of the light beam that can enter the camera.
Aperture (controls amount of light): The aperture is an adjustable hole in a diaphragm inside the lens. You change the aperture size to control the size of the light beam that can enter the camera.
Aperture settings are stated as f-stop numbers, or simply f-stops, and are expressed with the letter f followed by a number: f/2, f/5.6, f/16, and so on. The lower the f-stop number, the larger the aperture, and the more light is permitted into the camera, as illustrated by Figure 7-2. (If it seems backward to use a higher number for a smaller aperture, think of it this way: A higher value creates a bigger light barrier.)
![]() Shutter speed (controls duration of light): The shutter works something like, er, the shutters on a window. The camera’s shutter stays closed, preventing light from striking the image sensor (just as closed window shutters prevent sunlight from entering a room) until you press the shutter button. Then, the shutter opens briefly to allow light that passes through the aperture to hit the sensor. The exception to this scenario is when you compose in Live View mode: When you enable Live View, the shutter opens and remains open so that your image can form on the sensor and be displayed on the monitor. When you press the shutter button, the shutter first closes and then reopens for the exposure.
Shutter speed (controls duration of light): The shutter works something like, er, the shutters on a window. The camera’s shutter stays closed, preventing light from striking the image sensor (just as closed window shutters prevent sunlight from entering a room) until you press the shutter button. Then, the shutter opens briefly to allow light that passes through the aperture to hit the sensor. The exception to this scenario is when you compose in Live View mode: When you enable Live View, the shutter opens and remains open so that your image can form on the sensor and be displayed on the monitor. When you press the shutter button, the shutter first closes and then reopens for the exposure.

Figure 7-2: A lower f-stop number means a larger aperture, allowing more light into the camera.
Either way, the length of time that the shutter is open is the shutter speed, which is measured in seconds: 1/60 second, 1/250 second, 2 seconds, and so on.
![]() ISO (controls light sensitivity): ISO, which is a digital function rather than a mechanical structure on the camera, enables you to adjust how responsive the image sensor is to light.
ISO (controls light sensitivity): ISO, which is a digital function rather than a mechanical structure on the camera, enables you to adjust how responsive the image sensor is to light.
 The term ISO is a holdover from film days, when an international standards organization rated each film stock according to light sensitivity: ISO 200, ISO 400, ISO 800, and so on.
On a digital camera, the sensor itself doesn’t actually get more or less sensitive when you change the ISO. Instead, the light “signal” that hits the sensor is either amplified or dampened through electronics wizardry, sort of like how raising the volume on a radio boosts the audio signal. The upshot is the same as changing to a more light-reactive film stock: Using a higher ISO means that less light is needed to produce the image, enabling you to use a smaller aperture, faster shutter speed, or both. In other words, just remember that ISO equals light sensitivity.
![]() Together, aperture and shutter speed determine how much light strikes the image sensor.
Together, aperture and shutter speed determine how much light strikes the image sensor.
![]() ISO determines how much the sensor reacts to that light and thus how much light is needed to expose the picture.
ISO determines how much the sensor reacts to that light and thus how much light is needed to expose the picture.
The tricky part of the equation is that aperture, shutter speed, and ISO settings affect your pictures in ways that go beyond exposure. You need to be aware of these side effects, explained in the next sections, to determine which combination of the three exposure settings will work best for your picture.
Understanding exposure-setting side effects
![]() Aperture affects depth of field, or the distance over which focus remains acceptably sharp.
Aperture affects depth of field, or the distance over which focus remains acceptably sharp.
![]() Shutter speed determines whether moving objects appear blurry or sharply focused.
Shutter speed determines whether moving objects appear blurry or sharply focused.
![]() ISO affects the amount of image noise, which is a defect that looks like specks of sand.
ISO affects the amount of image noise, which is a defect that looks like specks of sand.
As you can imagine, understanding how aperture, shutter speed, and ISO affect your image enables you to have much more creative control over your photographs — and, in the case of ISO, to also ensure the quality of your images. The next three sections explore these exposure side effects in detail.
Aperture affects depth of field
Depth of field refers to the distance over which focus appears acceptably sharp in a photograph. With a shallow depth of field, your subject appears more sharply focused than faraway objects; with a large depth of field, the sharp-focus zone spreads over a greater distance.
It’s also important to understand that aperture is just one contributor to depth of field; other factors include the focal length of your lens and the distance between that lens and your subject. Chapter 8 has the complete story, but the short version is that depth of field decreases as you increase focal length or get closer to your subject. For example, if you shoot a subject close-up using a telephoto lens, you wind up with a much shorter depth of field than if you use a wide-angle lens and stand at a distance from the subject. I shot both example images in Figure 7-3 using the same focal length and from the same distance, so the only variable was the f-stop.
Shutter speed affects motion blur
At a slow shutter speed, moving objects appear blurry, whereas a fast shutter speed captures motion cleanly. This phenomenon has nothing to do with the focus point of the camera but rather on the movement occurring — and being recorded — during the time when the shutter is open.
Compare the photos in Figure 7-3, for example. The static elements are perfectly focused in both images although the background in the left photo appears sharper because I shot that image using a higher f-stop, increasing the depth of field. But how the camera rendered the moving portion of the scene — the fountain water — was determined by the shutter speed. At a shutter speed of 1/25 second (left photo), the water blurs, giving it a misty look. At 1/125 second (right photo), the droplets appear more sharply focused, almost frozen in mid-air. How high of a shutter speed you need to freeze action depends on the speed of your subject.
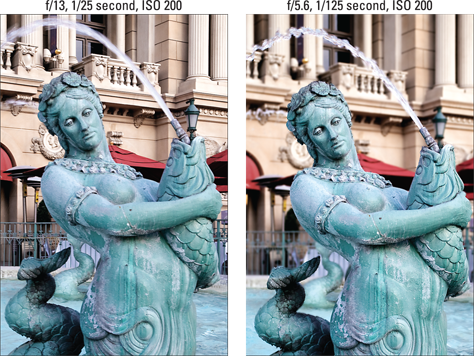
Figure 7-3: Widening the aperture (choosing a lower f-stop number) decreases depth of field.
Figure 7-4: If both stationary and moving objects are blurry, camera shake is the usual cause.
ISO affects image noise
As ISO increases, making the image sensor more reactive to light, you increase the risk of producing noise. Noise is a defect that looks like sprinkles of sand and is similar in appearance to film grain, a defect that often mars pictures taken with high ISO film. Figure 7-5 offers an example.
Ideally, then, you should always use the lowest ISO setting on your camera to ensure top image quality. Sometimes, though, the lighting conditions simply don’t permit you to do so and still use the aperture and shutter speeds you need. Take my rose image as an example. When I shot these pictures, I didn’t have a tripod, so I needed a shutter speed fast enough to allow a sharp handheld image. I opened the aperture to f/6.3, which was the maximum on the lens I was using, to allow as much light as possible into the camera. At ISO 100, I needed a shutter speed of 1/40 second to expose the picture, and that shutter speed wasn’t fast enough for a successful handheld shot. You see the blurred result on the left in Figure 7-6. By raising the ISO to 200, I was able to use a shutter speed of 1/80 second, which enabled me to capture the flower cleanly, as shown on the right in the figure.
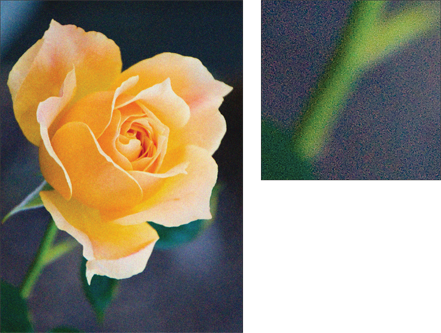
Figure 7-5: Caused by a very high ISO or long exposure time, noise becomes more visible as you enlarge the image.
Fortunately, you don’t encounter serious noise on the D7100 until you really crank up the ISO. In fact, you may even be able to get away with a fairly high ISO if you keep your print or display size small. Some people probably wouldn’t even notice the noise in the left image in Figure 7-5 unless they were looking for it, for example. But as with other image defects, noise becomes more apparent as you enlarge the photo, as shown on the right in that same figure. Noise is also easier to spot in shadow areas of your picture and in large areas of solid color.
How much noise is acceptable — and, therefore, how high of an ISO is safe — is your choice. Even a little noise isn’t acceptable for pictures that require the highest quality, such as images for a product catalog or a travel shot that you want to blow up to poster size.
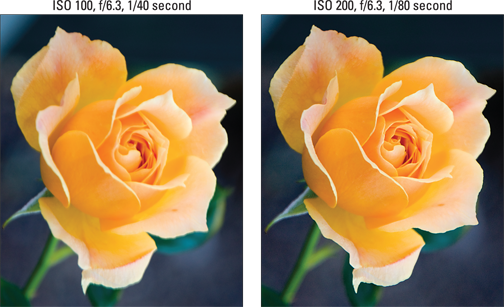
Figure 7-6: For this image, raising the ISO allowed me to bump up shutter speed enough to capture a blur-free shot while handholding the camera.
Doing the exposure balancing act
Again, changing these settings impacts your image in ways beyond exposure:
![]() Aperture affects depth of field, with a higher f-stop number increasing the distance over which objects appear sharp.
Aperture affects depth of field, with a higher f-stop number increasing the distance over which objects appear sharp.
![]() Shutter speed affects whether motion of the subject or camera results in a blurry photo. A faster shutter “freezes” action and also helps safeguard against all-over blur that can result from camera shake.
Shutter speed affects whether motion of the subject or camera results in a blurry photo. A faster shutter “freezes” action and also helps safeguard against all-over blur that can result from camera shake.
![]() ISO affects the camera’s sensitivity to light. A higher ISO makes the camera more responsive to light but increases the chance of image noise.
ISO affects the camera’s sensitivity to light. A higher ISO makes the camera more responsive to light but increases the chance of image noise.
So when you boost that shutter speed to capture your soccer subjects, you have to decide whether you prefer the shorter depth of field that comes with a larger aperture or the increased risk of noise that accompanies a higher ISO.
![]() I use ISO 100, the lowest ISO setting on the camera, unless the lighting conditions are so poor that I can’t use the aperture and shutter speed I want without raising the ISO.
I use ISO 100, the lowest ISO setting on the camera, unless the lighting conditions are so poor that I can’t use the aperture and shutter speed I want without raising the ISO.
![]() If my subject is moving, I give shutter speed the next highest priority in my exposure decision. I might choose a fast shutter speed to ensure a blur-free photo or, on the flip side, select a slow shutter to intentionally blur the subject, an effect that can create a heightened sense of motion.
If my subject is moving, I give shutter speed the next highest priority in my exposure decision. I might choose a fast shutter speed to ensure a blur-free photo or, on the flip side, select a slow shutter to intentionally blur the subject, an effect that can create a heightened sense of motion.
![]() For stationary subjects, I make aperture a priority over shutter speed, setting the aperture according to the depth of field I have in mind.
For stationary subjects, I make aperture a priority over shutter speed, setting the aperture according to the depth of field I have in mind.
Keeping all this straight is a little overwhelming at first, but the more you work with your camera, the more the whole exposure equation will make sense to you. In the meantime, keep moving through this chapter for details on how to actually adjust aperture, shutter speed, and ISO settings and for help with solving exposure problems.
Exploring the Advanced Exposure Modes
In the automatic modes I describe in Chapter 3, you have little control over exposure. You may be able to choose from one or two Flash modes, and you can adjust ISO. To gain full control over exposure, set the Mode dial to one of the advanced modes highlighted in Figure 7-7: P, S, A, or M. You also need to use these modes to take advantage of many other camera features.
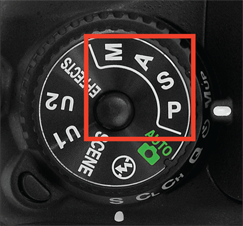
Figure 7-7: You can control exposure and certain other picture properties fully only in P, S, A, or M mode.
![]() P (programmed autoexposure): In this mode, the camera selects both aperture and shutter speed, but you can choose from different combinations of the two for creative flexibility.
P (programmed autoexposure): In this mode, the camera selects both aperture and shutter speed, but you can choose from different combinations of the two for creative flexibility.
![]() S (shutter-priority autoexposure): In this mode, you select a shutter speed, and the camera chooses the aperture setting that produces a good exposure at your selected ISO setting.
S (shutter-priority autoexposure): In this mode, you select a shutter speed, and the camera chooses the aperture setting that produces a good exposure at your selected ISO setting.
![]() A (aperture-priority autoexposure): The opposite of shutter-priority autoexposure, this mode asks you to select the aperture setting. The camera then selects the appropriate shutter speed.
A (aperture-priority autoexposure): The opposite of shutter-priority autoexposure, this mode asks you to select the aperture setting. The camera then selects the appropriate shutter speed.
![]() M (manual exposure): You specify both shutter speed and aperture.
M (manual exposure): You specify both shutter speed and aperture.
Manual mode puts all exposure control in your hands. If you’re a longtime photographer who comes from the days when manual exposure was the only game in town, you may prefer to stick with this mode. If it ain’t broke, don’t fix it, as they say. And in some ways, manual mode is simpler than the semi-auto modes because if you’re not happy with the exposure, you just change the aperture, shutter speed, or ISO setting and shoot again. You don’t have to fiddle with features that enable you to modify your autoexposure results.
My personal choice is to use aperture-priority autoexposure when I’m shooting still subjects and want to control depth of field — aperture is my priority — and to switch to shutter-priority autoexposure when I’m shooting a moving subject and am most concerned with controlling shutter speed. Frankly, my brain is taxed enough by all the other issues involved in taking pictures — what my Release mode setting is, what resolution I need, where I’m going for lunch as soon as I make this shot work — that I appreciate having the camera do some of the exposure lifting.
However, when I know exactly what aperture and shutter speed I want to use, or I’m after an out-of-the-ordinary exposure, I use manual exposure. For example, sometimes when I’m doing a still life in my studio, I want to create a certain mood by underexposing a subject or even shooting it in silhouette. The camera is always going to fight you on that result in the P, S, and A modes because it so dearly wants to provide a good exposure. Rather than dialing in all the autoexposure tweaks that could eventually force the result I want, I simply set the mode to M, adjust the shutter speed and aperture directly, and give the autoexposure system the afternoon off.
But even in manual mode, you’re never really flying without a net: The camera assists you by displaying the exposure meter, explained next.
Reading (And Adjusting) the Meter
To help you determine whether your exposure settings are on cue in M (manual) exposure mode, the camera displays an exposure meter in the viewfinder and Information display. You can see a close-up look at how the meter looks in the viewfinder in Figure 7-8; Figure 7-9 shows you where to find the meter in the Information display. To activate the meter displays, just press the shutter button halfway and then release it.

Figure 7-8: The meter indicates whether your exposure settings are on target.
The minus-sign end of the meter represents underexposure; the plus sign, overexposure. So if the little notches on the meter fall to the left of 0, as shown in the first example in Figure 7-8, the image will be underexposed. If the indicator moves to the right of 0, as shown in the second example, the image will be overexposed. The farther the indicator moves toward the plus or minus sign, the greater the potential problem. When the meter shows a balanced exposure, as in the third example, you’re good to go.
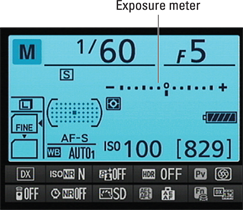
Figure 7-9: In M exposure mode, the exposure meter appears in the Information display.
Keep in mind, too, that the meter’s suggestion on exposure may not always be the one you want to follow. For example, you may want to shoot a backlit subject in silhouette, in which case you want that subject to be underexposed. In other words, the meter is a guide, not a dictator. In addition, remember that the exposure information the meter reports is based on the exposure metering mode, which determines which part of the frame the camera considers when calculating exposure. At the default setting, exposure is based on the entire frame, but you can select two other metering modes. See the upcoming section “Choosing an Exposure Metering Mode” for details.
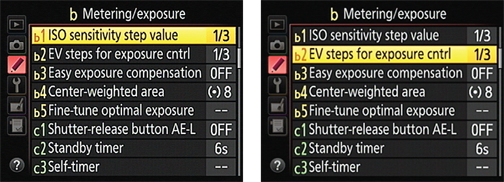
![]() Adjust the meter shutoff timing. The meter turns on anytime you press the shutter button halfway, but then it turns off automatically if you don’t press the button again for a period of time — 6 seconds, by default. You can adjust the shutoff timing through the Standby Timer option, found on the Timers/AE Lock submenu of the Custom Setting menu and shown on the left in Figure 7-10. Choices range from 4 seconds to 30 minutes. You can also disable the auto meter shutdown by choosing No Limit, but remember that the metering system uses battery power, so keeping it active for long periods of time isn’t a good move.
Adjust the meter shutoff timing. The meter turns on anytime you press the shutter button halfway, but then it turns off automatically if you don’t press the button again for a period of time — 6 seconds, by default. You can adjust the shutoff timing through the Standby Timer option, found on the Timers/AE Lock submenu of the Custom Setting menu and shown on the left in Figure 7-10. Choices range from 4 seconds to 30 minutes. You can also disable the auto meter shutdown by choosing No Limit, but remember that the metering system uses battery power, so keeping it active for long periods of time isn’t a good move.
![]() Reverse the meter orientation. For photographers used to a camera that orients the meter with the positive (overexposure) side appearing on the left and the negative (underexposure) side on the right, the D7100 offers the option to flip the meter to that orientation. This option also lies on the Custom Setting menu, on the Controls submenu. Hunt down the Reverse Indicators option, as shown on the right in Figure 7-10. (The setting shown in the figure is the default.)
Reverse the meter orientation. For photographers used to a camera that orients the meter with the positive (overexposure) side appearing on the left and the negative (underexposure) side on the right, the D7100 offers the option to flip the meter to that orientation. This option also lies on the Custom Setting menu, on the Controls submenu. Hunt down the Reverse Indicators option, as shown on the right in Figure 7-10. (The setting shown in the figure is the default.)
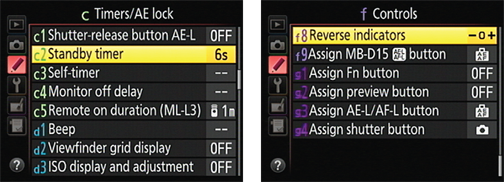
Figure 7-10: You can customize the behavior of the exposure meter.
Setting Aperture, Shutter Speed, and ISO
The next sections detail how to view and adjust these critical exposure settings. For a review of how each setting affects your pictures, check out the first part of this chapter.
Adjusting aperture and shutter speed
You can view the current aperture (f-stop) and shutter speed in the Control panel, viewfinder, and Information display, as shown in Figure 7-11. If you don’t see the values, the exposure meter isn’t awake; to bring it out of its slumber, press the shutter button halfway.
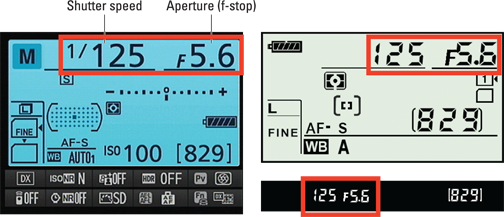
Figure 7-11: You can view the f-stop and shutter speed setting in all three displays.
![]() Shutter speeds are presented in the viewfinder and Control panel as whole numbers, even if the shutter speed is set to a fraction of a second. For example, the number 125 indicates a shutter speed of 1/125 second. When the shutter speed slows to 1 second or longer, quote marks appear after the number — 1" indicates a shutter speed of 1 second, 4" means 4 seconds, and so on.
Shutter speeds are presented in the viewfinder and Control panel as whole numbers, even if the shutter speed is set to a fraction of a second. For example, the number 125 indicates a shutter speed of 1/125 second. When the shutter speed slows to 1 second or longer, quote marks appear after the number — 1" indicates a shutter speed of 1 second, 4" means 4 seconds, and so on.
![]() In M (manual) exposure mode, you can access two shutter speed options not available in other modes:
In M (manual) exposure mode, you can access two shutter speed options not available in other modes:
• Bulb: At this setting, which you access by going one step past the slowest shutter speed (30 seconds), the shutter remains open as long as you hold down the shutter button. Again, you can shoot bulb exposures only in the M (manual) exposure mode. And if you select the bulb setting in M mode and then change to the S (shutter-priority auto) mode, the word Bulb flashes in the display to remind you to change to manual exposure. Well, to remind you that something’s amiss, anyway.
• Time: This setting, represented by two dashes ( - - ) in the displays, is related to the ML-L3 wireless remote control. The shutter opens when you press the remote’s shutter-release button and stays open for 30 minutes or until you press the button a second time. Remember that to use the remote control, you must set the Remote Control Mode (ML-L3) option on the Shooting menu to On. (You also can enable the option via the Information display control strip.) See Chapter 2 for more about remote-control shooting.
![]() In M and S (shutter-priority autoexposure mode), you also see one shutter speed marked with an x, which indicates the flash sync speed. This setting indicates the fastest shutter speed that works with flash. The default flash sync speed is 1/250 second, but you can set another speed through a Custom Setting option. See the later section “Enabling high-speed flash (Auto FP)” for details. If you want to use 1/250 second as your shutter speed, you can select either the x250 setting or the plain ol’ 1/250 setting. (The x250 setting appears one setting below the 30 second setting in S mode and one notch below the Time setting in M mode.)
In M and S (shutter-priority autoexposure mode), you also see one shutter speed marked with an x, which indicates the flash sync speed. This setting indicates the fastest shutter speed that works with flash. The default flash sync speed is 1/250 second, but you can set another speed through a Custom Setting option. See the later section “Enabling high-speed flash (Auto FP)” for details. If you want to use 1/250 second as your shutter speed, you can select either the x250 setting or the plain ol’ 1/250 setting. (The x250 setting appears one setting below the 30 second setting in S mode and one notch below the Time setting in M mode.)
With those tidbits out of the way, the following list tells you how to select the aperture and shutter speed in each exposure mode:
![]() P (programmed auto): The camera shows you its recommended f-stop and shutter speed when you press the shutter button halfway, but you can rotate the Main command dial to select a different combination of settings. The number of possible combinations depends upon the aperture settings and shutter speeds the camera can select, which in turn depend on the lighting conditions, your lens, and the ISO setting.
P (programmed auto): The camera shows you its recommended f-stop and shutter speed when you press the shutter button halfway, but you can rotate the Main command dial to select a different combination of settings. The number of possible combinations depends upon the aperture settings and shutter speeds the camera can select, which in turn depend on the lighting conditions, your lens, and the ISO setting.
An asterisk (*) appears next to the P symbol in the Information display after you rotate the Main command dial. You also see a P* symbol in the Control panel. These symbols indicate that you adjusted the aperture/shutter speed settings from those the camera initially suggested. To get back to the initial combo of shutter speed and aperture, rotate the Main command dial until the asterisk disappears from the Information display and the P* symbol vanishes from the Control panel.
![]() S (shutter-priority autoexposure): Rotate the Main dial to change the shutter speed. As you do, the camera adjusts the aperture as needed to maintain what it considers the proper exposure.
S (shutter-priority autoexposure): Rotate the Main dial to change the shutter speed. As you do, the camera adjusts the aperture as needed to maintain what it considers the proper exposure.
 Remember that as the aperture shifts, so does depth of field. So even though you’re working in shutter-priority mode, keep an eye on the f-stop, too, if depth of field is important to your photo. Also note that in extreme lighting conditions, the camera may not be able to adjust the aperture enough to produce a good exposure at your current shutter speed — again, possible aperture settings depend on your lens. You may need to compromise on shutter speed or ISO.
![]() A (aperture-priority autoexposure): In this mode, you control aperture, and the camera adjusts shutter speed automatically. To set the aperture (f-stop), rotate the Sub-command dial.
A (aperture-priority autoexposure): In this mode, you control aperture, and the camera adjusts shutter speed automatically. To set the aperture (f-stop), rotate the Sub-command dial.
 When you stop-down the aperture (raise the f-stop value), be careful that the shutter speed doesn’t drop so low that you run the risk of camera shake if you’re handholding the camera. And if your scene contains moving objects, make sure that the shutter speed that the camera selects is fast enough to stop action (or slow enough to blur it, if that’s your creative goal). These same warnings apply when you use P mode.
![]() M (manual exposure): In this mode, you select both aperture and shutter speed, like so:
M (manual exposure): In this mode, you select both aperture and shutter speed, like so:
• To adjust shutter speed: Rotate the Main command dial.
• To adjust aperture: Rotate the Sub-command dial.
![]() Apply Exposure Compensation. This option tells the camera to produce a darker or lighter exposure on your next shot. See “Applying Exposure Compensation,” later in this chapter, for details.
Apply Exposure Compensation. This option tells the camera to produce a darker or lighter exposure on your next shot. See “Applying Exposure Compensation,” later in this chapter, for details.
![]() Select a different metering mode. The Metering mode setting tells the camera which part of the frame to consider when setting exposure; by default, the entire frame is used. I explain this option a couple sections down the road, too.
Select a different metering mode. The Metering mode setting tells the camera which part of the frame to consider when setting exposure; by default, the entire frame is used. I explain this option a couple sections down the road, too.
Of course, you can always simply switch to M mode and dial in the f-stop and shutter speed that deliver the exposure you want, too. Also check out the later sections related to Active D-Lighting and HDR mode for some exposure-tweaking features designed for shooting high-contrast subjects; these features work for M mode as well as P, S, and A modes.
Controlling ISO
You can choose ISO values ranging from 100 to 6400 plus several additional settings at the upper limit: Hi 0.3, Hi 0.7, Hi 1, and Hi 2; which translate to ISO values ranging from 8000 to 25600. At the Hi settings, of course, you can expect increased image noise, so avoid using those settings unless you have no other way to get the shot.
In addition to selecting a specific ISO setting, you have the option of choosing Auto ISO. At this setting, the camera selects the ISO needed to expose the picture at the current shutter speed and aperture.
![]() You can view the ISO setting in the Information display, as shown on the left in Figure 7-12. But the Control panel and viewfinder show the ISO setting only when Auto ISO is enabled. At other settings, press the ISO button to hide all other data but the ISO value in the Control panel and to replace the shots remaining value with the ISO setting, as shown on the right in the figure.
You can view the ISO setting in the Information display, as shown on the left in Figure 7-12. But the Control panel and viewfinder show the ISO setting only when Auto ISO is enabled. At other settings, press the ISO button to hide all other data but the ISO value in the Control panel and to replace the shots remaining value with the ISO setting, as shown on the right in the figure.
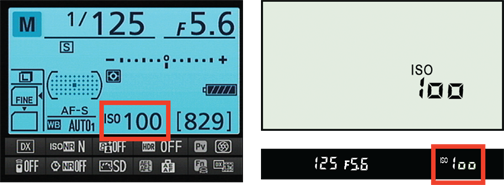
Figure 7-12: Press the ISO button while rotating the Main command dial to adjust ISO.
You can adjust the setting in two ways:
![]()
![]() ISO button: While pressing the button, use these techniques to select a setting, depending on your exposure mode:
ISO button: While pressing the button, use these techniques to select a setting, depending on your exposure mode:
• Auto, Auto Flash Off, Scene, and Effects modes: Rotate the Main command dial.
• P, S, A, and M modes: Rotate the Main command dial to select any ISO setting but Auto; rotate the Sub-command dial to toggle Auto ISO on and off.
![]() Shooting menu: Select ISO Sensitivity Settings, as shown on the left in Figure 7-13, and then choose ISO Sensitivity, as shown on the right. Again, things work differently depending on your exposure mode; the settings shown on the second screen of the figure are available in the P, S, A, and M modes only. In other modes, the ISO Sensitivity option is available but the others are off-limits.
Shooting menu: Select ISO Sensitivity Settings, as shown on the left in Figure 7-13, and then choose ISO Sensitivity, as shown on the right. Again, things work differently depending on your exposure mode; the settings shown on the second screen of the figure are available in the P, S, A, and M modes only. In other modes, the ISO Sensitivity option is available but the others are off-limits.
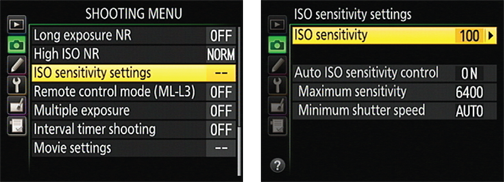
Figure 7-13: You can access additional ISO options through the Shooting menu.
A few fine points about using Auto ISO:
![]() Auto ISO in the fully automatic exposure modes: In Auto, Auto Flash Off, Scene, and Effects modes, the camera selects the ISO for you.
Auto ISO in the fully automatic exposure modes: In Auto, Auto Flash Off, Scene, and Effects modes, the camera selects the ISO for you.
![]()
 Auto ISO in P, S, A, and M modes: In these modes, you can enable Auto ISO as sort of a safety net. Here’s how it works: You dial in a specific ISO setting — say, ISO 100. If the camera decides that it can’t expose the image at that ISO given your current aperture and shutter speed, it automatically adjusts ISO as necessary.
Even better, you can tell the camera exactly when and how it should step in and offer ISO assistance. Put in your order via the ISO Sensitivity Settings option on the Shooting menu. First turn Auto ISO Sensitivity Control to On, as shown in Figure 7-14. You can then gain access to the two options that set the Auto ISO limits, which work as follows:
• Maximum Sensitivity: Specify the highest ISO setting the camera may select when it overrides your ISO decision.
• Minimum Shutter Speed: Set the minimum shutter speed at which the ISO override engages. At the Auto setting, the camera selects the minimum shutter speed for override based on the focal length of your lens, the idea being that with a longer lens, you need a faster shutter speed to avoid the blur that camera shake can cause when you handhold the camera. However, exposure is given priority over camera-shake considerations, so if the camera can’t expose the picture at what it thinks is a safe shutter speed for the lens focal length, it will use a slower speed.
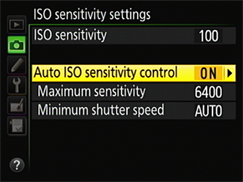
Figure 7-14: In P, S, A, and M modes, you can set limits for Auto ISO override.
 If the camera is about to override your ISO setting, it alerts you by blinking an ISO-Auto label in the displays. And in playback mode, the ISO value appears in red if you view your photos in a display mode that includes the ISO value. (Chapter 5 has details.)
You’d think that with a setting as seemingly simple as ISO, that would be the end of your options, but there’s actually one more: ISO Display and Adjustment, found in the Shooting/Display section of the Custom Setting menu and shown in Figure 7-15. This option affects the display of the ISO setting in the Control panel.
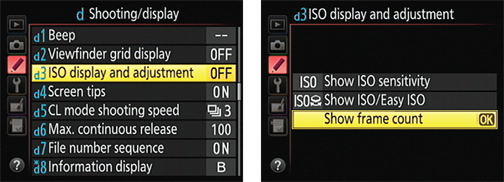
Figure 7-15: This option lets you replace the shots remaining value in the Control panel with the current ISO setting.
The options work as follows:
![]() Show ISO Sensitivity: The ISO setting takes the place of the shots remaining value in the Control panel so that you can view the ISO setting without pressing the ISO button. Of course, then you have to look at the Information display or viewfinder to see the shots remaining value — not, in my opinion, a good tradeoff.
Show ISO Sensitivity: The ISO setting takes the place of the shots remaining value in the Control panel so that you can view the ISO setting without pressing the ISO button. Of course, then you have to look at the Information display or viewfinder to see the shots remaining value — not, in my opinion, a good tradeoff.
![]() Show ISO/Easy ISO: The ISO setting takes the place of the shots remaining value in the Control panel, as with menu option 1. The Easy ISO part of the name means that you can adjust ISO in P and S exposure modes by simply rotating the Sub-command dial and in A mode by rotating the Main command dial. You don’t have to press the ISO button to change the setting. Again, not a great choice, in my opinion: It’s too easy to forget that this function is enabled and accidentally change the ISO setting without realizing it.
Show ISO/Easy ISO: The ISO setting takes the place of the shots remaining value in the Control panel, as with menu option 1. The Easy ISO part of the name means that you can adjust ISO in P and S exposure modes by simply rotating the Sub-command dial and in A mode by rotating the Main command dial. You don’t have to press the ISO button to change the setting. Again, not a great choice, in my opinion: It’s too easy to forget that this function is enabled and accidentally change the ISO setting without realizing it.
![]() Show Frame Count: This setting is the default (and I recommend sticking with it). The shots remaining value tells you how many more pictures will fit on your memory card, and you press the ISO button to display the ISO value in the Control panel.
Show Frame Count: This setting is the default (and I recommend sticking with it). The shots remaining value tells you how many more pictures will fit on your memory card, and you press the ISO button to display the ISO value in the Control panel.
Choosing an Exposure Metering Mode
![]() In the P, S, A, and M modes, you can adjust the metering mode by pressing the Metering button (top of the camera) while rotating the Main command dial. An icon representing the current metering mode appears in the Information display and Control panel, as shown in Figure 7-16.
In the P, S, A, and M modes, you can adjust the metering mode by pressing the Metering button (top of the camera) while rotating the Main command dial. An icon representing the current metering mode appears in the Information display and Control panel, as shown in Figure 7-16.
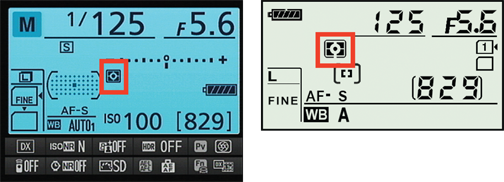
Figure 7-16: This symbol represents the matrix metering mode.
Your camera offers three metering modes, represented by the icons you see in the margins here:
![]()
![]() Matrix: The camera bases exposure on the entire frame. This setting is the default for the P, S, A, and M exposure modes and is the only option when you shoot in any other exposure mode (Auto, Scene, and so on).
Matrix: The camera bases exposure on the entire frame. This setting is the default for the P, S, A, and M exposure modes and is the only option when you shoot in any other exposure mode (Auto, Scene, and so on).
![]()
![]() Spot: In this mode, the camera bases exposure on a circular area about 3.5mm in diameter. Exactly which part of the frame that circle covers depends on focus settings that I detail in Chapter 8:
Spot: In this mode, the camera bases exposure on a circular area about 3.5mm in diameter. Exactly which part of the frame that circle covers depends on focus settings that I detail in Chapter 8:
 • If you use autofocusing and set the AF-area mode to Auto Area, in which the camera chooses the focus point for you, exposure is based on the center focus point.
• When you use the other AF-area mode settings or manual focusing, you use the Multi Selector to select a focus point, and the camera bases metering on that point.
![]()
![]() Center-weighted: A blend of matrix and spot metering, this mode bases exposure on the entire frame but puts extra emphasis — or weight — on the center of the frame.
Center-weighted: A blend of matrix and spot metering, this mode bases exposure on the entire frame but puts extra emphasis — or weight — on the center of the frame.
Normally, the area that’s given priority in this mode is about 8mm in diameter. You can alter the critical metering area through the Center-Weighted Area option, found in the Metering/Exposure section of the Custom Setting menu and shown in Figure 7-17. You can change the size of the metering circle to 6mm, 10mm, 13mm. (The menu option is available only when the Mode dial is set to P, S, A, or M.)
The Center-Weighted Area option also offers an Avg setting, which tells the camera to take a reading of the entire frame and then base exposure on the average brightness values it sees. The difference between this option and the Matrix setting is that Matrix is based on a newer, more capable technology, whereas Avg is based on a system used in earlier Nikon cameras. Longtime Nikon shooters who are familiar with this metering option may appreciate its inclusion, but the matrix system typically delivers a better exposure if you’re concerned about objects throughout the frame, so I suggest that you stick with that when you want to expose the photo with the entire frame in mind.
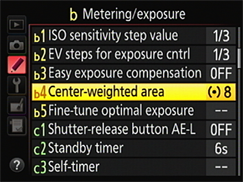
Figure 7-17: You can customize the center-weighted metering area.
As an example of how metering mode affects exposure, Figure 7-18 shows the same image captured at each mode. In the matrix example, the bright background caused the camera to select an exposure that left the statue quite dark. Switching to center-weighted metering helped somewhat but didn’t quite bring the statue out of the shadows. Spot metering produced the best result as far as the statue goes, although the resulting increase in exposure left the sky and background monument a little washed out.
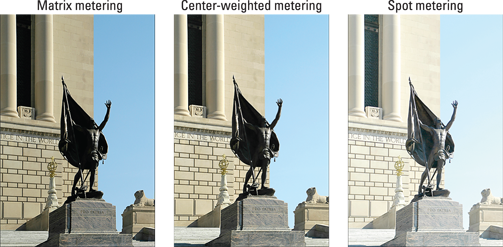
Figure 7-18: Spot and center-weighted metering can produce a better exposure of backlit subjects.
Sorting through Your Camera’s Exposure-Correction Tools
In addition to the normal controls over aperture, shutter speed, ISO, and metering mode, your camera offers tools that enable you to solve exposure problems. The next several sections introduce you to these features.
Applying Exposure Compensation
When you shoot in the P, S, or A modes, the camera automatically selects settings that it thinks will produce a proper exposure. If you don’t agree with the result, you can force a darker or brighter exposure on your next shot by using Exposure Compensation. As an example, see the first image in Figure 7-19. The initial exposure selected by the camera left the balloon too dark; I used Exposure Compensation to produce the brighter exposure on the right.
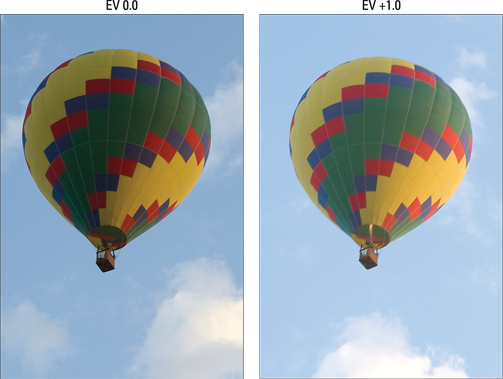
Figure 7-19: For a brighter exposure, raise the Exposure Compensation value.
![]() To apply Exposure Compensation, hold down the Exposure Compensation button, found near the shutter button. All data except the Exposure Compensation value disappears from the Control panel and is dimmed in the Information display. In the viewfinder, the Shots Remaining value is replaced by the Exposure Compensation value. While holding the button, rotate the Main command dial to adjust the value. The exposure meter reflects your change as you adjust the value.
To apply Exposure Compensation, hold down the Exposure Compensation button, found near the shutter button. All data except the Exposure Compensation value disappears from the Control panel and is dimmed in the Information display. In the viewfinder, the Shots Remaining value is replaced by the Exposure Compensation value. While holding the button, rotate the Main command dial to adjust the value. The exposure meter reflects your change as you adjust the value.
Here’s what you need to know to make sense of the numbers:
![]() Exposure Compensation settings are stated in terms of EV values, as in EV +2.0. Possible values range from EV +5.0 to EV –5.0. (EV stands for exposure value.)
Exposure Compensation settings are stated in terms of EV values, as in EV +2.0. Possible values range from EV +5.0 to EV –5.0. (EV stands for exposure value.)
 Each full number on the EV scale represents an exposure shift of one stop. See the earlier sidebar “Exposure stops: How many do you want to see?” to see how you can tweak the increments of EV adjustment the camera offers.
![]() A setting of EV 0.0 results in no exposure adjustment.
A setting of EV 0.0 results in no exposure adjustment.
![]() For a brighter image, raise the EV value; for a darker image, lower the EV value.
For a brighter image, raise the EV value; for a darker image, lower the EV value.
After you release the Exposure Compensation button, the 0 on the meter blinks to remind you that Exposure Compensation is active, and the meter indicates the amount of compensation in force. For example, in the left screen in Figure 7-20, the meter indicates an adjustment of EV +1.0. (If you have difficulty making out the meter reading, press the Exposure Compensation button again to view the numerical value in the displays.) You also see a little plus/minus symbol (the same one that decorates the Exposure Compensation button) in the Control panel and Information display, labeled in the figure.
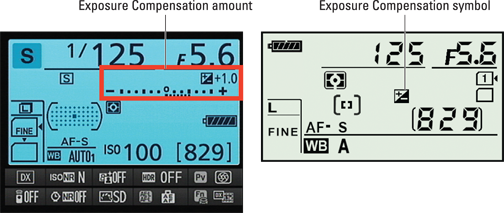
Figure 7-20: The plus/minus symbol tells you that Exposure Compensation is being applied.
A few other tips about using Exposure Compensation:
![]() How the camera arrives at the brighter or darker image depends on the exposure mode:
How the camera arrives at the brighter or darker image depends on the exposure mode:
• In A (aperture-priority autoexposure) mode, the camera adjusts the shutter speed but leaves your selected f-stop in force.
• In S (shutter-priority autoexposure) mode, the opposite occurs: The camera opens or stops down the aperture, leaving your selected shutter speed alone.
• In P (programmed autoexposure) mode, the camera decides whether to adjust aperture, shutter speed, or both.
• In all three modes, the camera may also adjust ISO if you have Auto ISO Sensitivity Control enabled.
Don’t forget that the camera can adjust f-stop only so much, according to the aperture range of your lens. And the range of shutter speeds, too, is limited by the camera itself, although you’re not likely to reach those limits on the D7100, which offers speeds from 30 seconds to 1/8000 second. If you hit the aperture or shutter speed wall, you either have to compromise on shutter speed or aperture or adjust ISO.
![]() When you use flash, the Exposure Compensation setting affects both background brightness and flash power by default, but you have the option to disable the setting’s effect on flash. Pull up the Bracketing/Flash section of the Custom Setting menu and look for the Exposure Comp for Flash setting, shown in Figure 7-21. If you don’t want flash output to be affected by the Exposure Compensation setting, choose Background Only as the setting. You can then adjust flash power if needed via the Flash Compensation setting, explained in the upcoming section “Adjusting flash output.”
When you use flash, the Exposure Compensation setting affects both background brightness and flash power by default, but you have the option to disable the setting’s effect on flash. Pull up the Bracketing/Flash section of the Custom Setting menu and look for the Exposure Comp for Flash setting, shown in Figure 7-21. If you don’t want flash output to be affected by the Exposure Compensation setting, choose Background Only as the setting. You can then adjust flash power if needed via the Flash Compensation setting, explained in the upcoming section “Adjusting flash output.”
![]()
 The Metering/Exposure section of the Custom Setting menu contains an Easy Exposure Compensation option. If you enable this feature, you can adjust the Exposure Compensation setting in the P and S exposure modes simply by rotating the Sub-command dial. In A exposure mode, you use the Main command dial instead of the Sub-command dial (because you use the Sub-command dial in A mode to adjust the f-stop). I don’t recommend enabling this feature: You can easily rotate the dials by mistake and not realize that you adjusted the setting.
![]() If you don’t want to fiddle with Exposure Compensation, just switch to manual exposure mode and select whatever aperture and shutter speed settings produce the exposure you’re after. Start with the settings selected by the camera in the autoexposure mode you were using and then just go from there. Exposure Compensation has no effect on manual exposures; again, that adjustment is made only in the P, S, and A modes.
If you don’t want to fiddle with Exposure Compensation, just switch to manual exposure mode and select whatever aperture and shutter speed settings produce the exposure you’re after. Start with the settings selected by the camera in the autoexposure mode you were using and then just go from there. Exposure Compensation has no effect on manual exposures; again, that adjustment is made only in the P, S, and A modes.
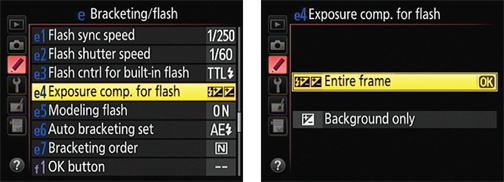
Figure 7-21: This setting determines whether Exposure Compensation affects flash output in flash photos.
 Although the camera doesn’t change your selected exposure settings in manual mode if Exposure Compensation is enabled, the exposure meter is affected by the current setting, which can lead to some confusion. The meter indicates whether your shot will be properly exposed based on the Exposure Compensation setting. So if you don’t realize that Exposure Compensation is enabled, you may mistakenly adjust your exposure settings when they’re actually on target for your subject. This is yet another reason why it’s best to always reset the Exposure Compensation setting back to EV 0.0 after you’re done using that feature.
Using Autoexposure Lock
To help ensure a proper exposure, your camera continually meters the light in a scene until the moment you depress the shutter button fully and capture the image. In autoexposure modes — that is, any mode but M — it also keeps adjusting exposure settings as needed to maintain a good exposure.
For most situations, this approach works great, resulting in the right settings for the light that’s striking your subject at the moment you capture the image. On occasion, though, you may want to lock in exposure settings. For example, perhaps you want your subject to appear at the far edge of the frame. If you were to use the normal shooting technique, you’d place the subject under a focus point, press the shutter button halfway to lock focus and set the initial exposure, and then reframe to your desired composition to take the shot. The problem is that exposure is then recalculated based on the new framing, which can leave your subject under- or overexposed.
The easiest way to lock exposure settings is to switch to M (manual) exposure mode and use the f-stop, shutter speed, and ISO settings that work best for your subject. If you prefer to stay in P, S, or A mode, you can press the AE-L/AF-L button to lock exposure and focus before you reframe. By keeping the button pressed between shots, you can even keep using the same exposure and focus for a series of photographs. Here’s the technique I recommend:
1. Set the metering mode to spot metering.
![]() Press the Metering button while rotating the Main command dial to change the setting.
Press the Metering button while rotating the Main command dial to change the setting.
2. If autofocusing, set the Autofocus mode to AF-S and the AF-area mode to Single Point.
Press the AF-mode button and rotate the Main command dial to change the Autofocus mode; press the button while spinning the Sub-command dial to change the AF-area mode. (The AF-mode button is the unmarked button at the center of the Focus-mode selector on the left front side of the camera.)
When using these autofocus settings or manual focusing, you see a single focus point in the viewfinder.
3. Use the Multi Selector to move the focus point over your subject.
You may need to press the shutter button halfway and release it to activate the exposure meters before you can do so. Also, be sure that the Focus Selector Lock switch on back of the camera is set to the white dot and not the L position. Otherwise, you can’t adjust the focus point.
 In spot-metering mode, the focus point determines the area used to calculate exposure, so this step is critical whether you use autofocusing or manual focusing.
4. Press the shutter button halfway.
The camera sets the initial exposure settings. If you’re using autofocusing, focus is also set at this point. For manual focusing, turn the focusing ring on the lens to bring the subject into focus.
![]() 5. Press and hold the AE-L/AF-L button.
5. Press and hold the AE-L/AF-L button.
This button sits just to the right of the viewfinder. While the button is pressed, the letters AE-L appear at the left end of the viewfinder.
By default, focus is locked at the same time if you’re using autofocusing. You can change this behavior by customizing the AE-L/AF-L button function, as outlined in Chapter 11.
6. Reframe the shot if desired and take the photo.
Be sure to keep holding the AE-L/AF-L button until you release the shutter button! And if you want to use the same focus and exposure settings for your next shot, just keep the AE-L/AF-L button pressed.
Expanding tonal range with Active D-Lighting
A scene like the one in Figure 7-22 presents a classic challenge: Choosing exposure settings that capture the darkest parts of the subject appropriately causes the brightest areas to be overexposed. And if you instead expose for the highlights — that is, set the exposure settings to capture the brightest regions properly — the darker areas are underexposed.
In the past, you had to choose between favoring the highlights or the shadows. But thanks to Active D-Lighting, you have a better chance of keeping your highlights intact while better exposing the darkest areas. To put it another way, you can expand the tonal range, or dynamic range, of the image, which are two different terms used to describe the range of brightness values in an image.

Figure 7-22: Active D-Lighting captured the shadows without blowing out the highlights.
In my seal scene, turning on Active D-Lighting produced a brighter rendition of the darkest parts of the rocks and the seals, for example, and yet the color in the sky didn’t get blown out as it did when I captured the image with Active D-Lighting turned off. The highlights in the seal and in the rocks on the lower-right corner of the image also are toned down a tad in the Active D-Lighting version.
In Auto, Auto Flash Off, Scene, and Effects modes, the camera decides how much Active D-Lighting adjustment is needed. In the P, S, A, and M modes, you can specify the amount of adjustment in two ways:
![]()
![]() Information display control strip: Press the I button to activate the control strip. Then use the Multi Selector to highlight the Active D-Lighting icon, as shown in Figure 7-23, and press OK.
Information display control strip: Press the I button to activate the control strip. Then use the Multi Selector to highlight the Active D-Lighting icon, as shown in Figure 7-23, and press OK.
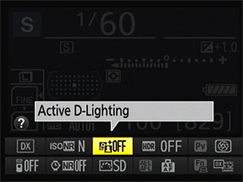
Figure 7-23: The fastest route to the Active D-Lighting option is via the Information display control strip.
![]() Shooting menu: Select Active D-Lighting from the Shooting menu, as shown on the left in Figure 7-24. Press OK.
Shooting menu: Select Active D-Lighting from the Shooting menu, as shown on the left in Figure 7-24. Press OK.
Either way, you’re taken to the screen shown on the right in Figure 7-24, where you can set the adjustment level. At the Auto setting, the camera determines how much adjustment is needed. I used this setting for the seal photo in Figure 7-22. If you prefer to take control, you can select from Extra High, High, Normal, and Low. Choose Off to disable the adjustment.
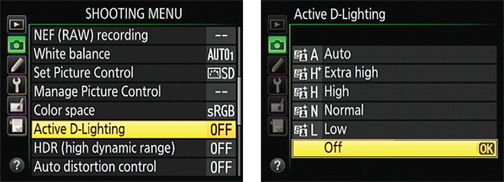
Figure 7-24: At the Auto setting, the camera automatically applies the amount of Active D-Lighting adjustment as it sees fit.
A few other pointers:
![]() The Active D-Lighting symbol in the control strip shows you the current setting. In the Control panel, you see the letters ADL next to the metering mode symbol at any setting but Off, but the symbol doesn’t tell you what setting is in force (Auto, High, and so on).
The Active D-Lighting symbol in the control strip shows you the current setting. In the Control panel, you see the letters ADL next to the metering mode symbol at any setting but Off, but the symbol doesn’t tell you what setting is in force (Auto, High, and so on).
![]() You get the best Active D-Lighting results in matrix metering mode.
You get the best Active D-Lighting results in matrix metering mode.
![]() In the M exposure mode, the camera doesn’t change your shutter speed or f-stop to achieve the darker exposure it needs for Active D-Lighting to work; instead, the meter readout guides you to select the right settings unless you have automatic ISO override enabled. In that case, the camera may instead adjust ISO to manipulate the exposure.
In the M exposure mode, the camera doesn’t change your shutter speed or f-stop to achieve the darker exposure it needs for Active D-Lighting to work; instead, the meter readout guides you to select the right settings unless you have automatic ISO override enabled. In that case, the camera may instead adjust ISO to manipulate the exposure.
![]() You can’t use Active D-Lighting at ISO Hi 0.3 or above or when shooting movies.
You can’t use Active D-Lighting at ISO Hi 0.3 or above or when shooting movies.
![]() If you’re not sure how much adjustment to apply, try Active D-Lighting bracketing, which automatically records the scene using different adjustment levels. See the last section in this chapter for details.
If you’re not sure how much adjustment to apply, try Active D-Lighting bracketing, which automatically records the scene using different adjustment levels. See the last section in this chapter for details.
![]() The Retouch menu offers a D-Lighting filter that applies a similar adjustment to existing pictures. (See Chapter 10 for help.) Some photo-editing programs, including Nikon ViewNX 2, which ships with your camera, also have good shadow and highlight recovery filters. In either case, when you shoot with Active D-Lighting disabled, you’re better off choosing exposure settings that will record the highlights as you want them. It’s difficult to bring back lost highlight detail after the fact, but you typically can unearth at least a little detail from the shadows.
The Retouch menu offers a D-Lighting filter that applies a similar adjustment to existing pictures. (See Chapter 10 for help.) Some photo-editing programs, including Nikon ViewNX 2, which ships with your camera, also have good shadow and highlight recovery filters. In either case, when you shoot with Active D-Lighting disabled, you’re better off choosing exposure settings that will record the highlights as you want them. It’s difficult to bring back lost highlight detail after the fact, but you typically can unearth at least a little detail from the shadows.
Exploring high dynamic range (HDR) photography
In the past few years, many photographers have been experimenting with a technology called high dynamic range (HDR) photography. Dynamic range refers to the spectrum of brightness values that a camera or other imaging device can record. The idea behind HDR is to capture the same shot multiple times, using different exposure settings for each image. You then use special imaging software — tone-mapping software — to combine the exposures in a way that uses specific brightness values from each shot to create a merged image with a much higher dynamic range than the camera can capture in a single frame.
So how is HDR different from Active D-Lighting, other than the fact that it records two photos instead of manipulating a single capture? Well, with the HDR feature, you can request an exposure shift of up to three stops between the two photos. That enables you to create an image that has a broader dynamic range than you can get with Active D-Lighting.
Figure 7-25 shows an example of the type of results you can expect. In this scene, half of the area is in bright sunshine, and the other is in shadow. For the top-left photo in the figure, I exposed for the highlights, which left the right side of the scene too dark. For the top-right image, I set exposure for the shaded area, which blew out the highlights in the sunny areas. When snapping the third image, I enabled the HDR feature, setting the option to a three-stop adjustment. The shadows aren’t completely eliminated, and some parts of the rose bush on the left side of the shot are a little brighter than I want, but on the whole, the camera balanced out the exposure fairly well.
Before you get too excited about the HDR feature, however, note these points:
![]() Because the camera records and merges two photos, the feature works well only on stationary subjects. If the subject is moving, it will appear as two translucent forms in different areas in the merged frame.
Because the camera records and merges two photos, the feature works well only on stationary subjects. If the subject is moving, it will appear as two translucent forms in different areas in the merged frame.
![]() Use a tripod to make sure that you don’t move the camera between shots.
Use a tripod to make sure that you don’t move the camera between shots.
![]() You can’t use the HDR feature if you set the Image Quality option to Raw (NEF) or Raw+JPEG. It works only for JPEG photos.
You can’t use the HDR feature if you set the Image Quality option to Raw (NEF) or Raw+JPEG. It works only for JPEG photos.
![]() The following features also are incompatible with HDR: flash, autobracketing, movie recording, bulb and time shutter speeds, multiple exposure, and time-lapse photography.
The following features also are incompatible with HDR: flash, autobracketing, movie recording, bulb and time shutter speeds, multiple exposure, and time-lapse photography.
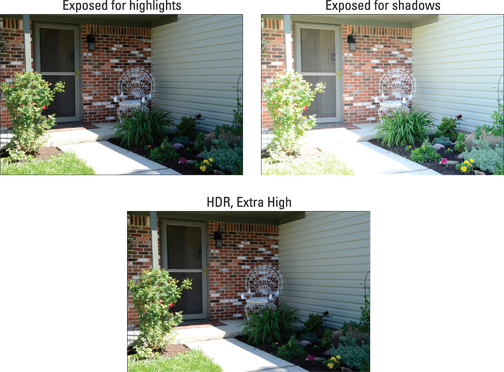
Figure 7-25: HDR enables you to produce an image with an even greater tonal range than Active D-Lighting.
More critically, if you want to do “real” HDR imagery — and by that, I mean the type you see in photography and art magazines — you need to go beyond the two-frame, three-stop limitations of the in-camera HDR feature. Just to give you a point of comparison, Figure 7-26 shows an example that I created by blending five frames with a variation of five stops between frames. The first two images show you the brightest and darkest exposures; the bottom image shows the HDR composite.
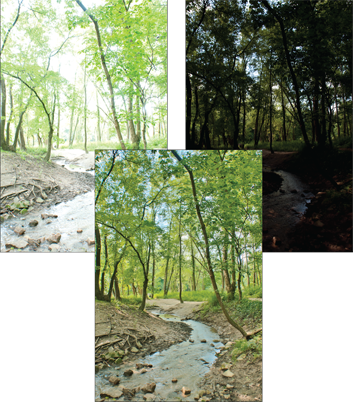
Figure 7-26: Using HDR software tools, I merged the brightest and darkest exposures (top) along with several intermediate exposures, to produce the composite image (bottom).
On the other hand, the effect created by the camera’s HDR tool looks more realistic than the one in Figure 7-26 because the tonal range isn’t stretched to such an extent. When applied to its extreme limits, HDR produces images that have something of a graphic-novel look. My example in Figure 7-26 is pretty tame; some people might not even realize that any digital trickery has been involved. To me, it has the look of a hand-tinted photo.
And of course, even though the in-camera HDR tool may not be enough to produce the surreal HDR look that’s all the rage these days, you can still use your camera for HDR work — you just have to adjust the exposure settings yourself between shots and then merge the frames using your own HDR software. Shoot the images in the Raw format because HDR tone-mapping tools work best on Raw images, which contain more bits of picture data than JPEG files.
To try out the version of HDR on the D7100, take these steps:
1. Access the HDR feature using one of these techniques:
![]() • Press the i button to activate the Information display control strip and then highlight the HDR option, as shown on the left in Figure 7-27.
• Press the i button to activate the Information display control strip and then highlight the HDR option, as shown on the left in Figure 7-27.
• Open the Shooting menu and highlight the HDR option, as shown on the right in the figure.
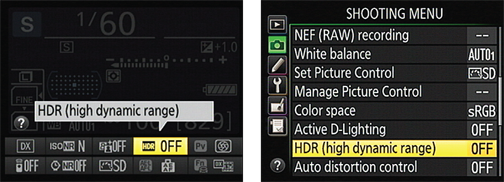
Figure 7-27: You can access the HDR feature from the control strip (left) or Shooting menu (right).
2. Press OK to display the screen shown in Figure 7-28.
3. Select your HDR settings, as follows:
• HDR Mode: Select On (Series) to enable HDR for all shots until you disable the feature. Choose On (Single Photo) to enable the option for just your next shot. Choose Off to disable the feature.
• HDR Strength: You can choose from four levels of HDR exposure shift: Low, Normal, High, or Extra High. Choose Extra High for the 3-stop exposure maximum. I used this setting to produce the image in Figure 7-25. At the Auto setting, the camera chooses what it considers the best adjustment. However, when a metering mode other than Matrix is in effect, choosing Auto results in the same adjustment you get at the Normal setting.
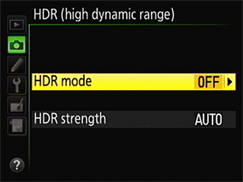
Figure 7-28: Set up your HDR session via these menu options.
4. Press the shutter button halfway and release it to exit the menu screen.
The letters HDR appear in the Control panel, and if you press the shutter button halfway, they appear in the shots remaining area of the viewfinder. The Information display indicates the HDR Strength setting.
5. Select the exposure settings and other picture settings as usual.
6. Frame, focus, and shoot.
 Frame your subject a little loosely; the camera may need to trim the edges of the frame to perfectly align the two shots in the HDR image.
The camera records two frames in quick succession and then creates the merged HDR image.
Working with Flash
Sometimes, no amount of fiddling with aperture, shutter speed, and ISO produces a bright-enough exposure — in which case, you simply have to add light. Your camera’s built-in flash offers the most convenient solution, but you can also attach an external flash to the camera’s hot shoe, labeled in Figure 7-29. (When you first take the camera out of the box, the contacts on the shoe are protected by a little cover; remove the cover to attach a flash.)
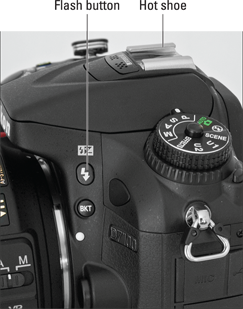
Figure 7-29: Press the Flash button to pop up the built-in flash in the P, S, A, and M exposure modes.
How much flash control you have depends on your exposure mode:
![]() Auto, Scene, and Effects modes: With one exception, the Food Scene mode, these modes all feature automatic flash, meaning that in dim lighting, the camera automatically raises and fires the built-in flash (assuming that an external flash isn’t attached, in which case popping up the built-in flash would deliver a nasty punch in the nose). Regardless of whether you’re relying on the onboard flash or an external unit, you may be able to choose from a couple of Flash modes, but other flash controls are roped off. And certain Scene and Effects modes disable flash.
Auto, Scene, and Effects modes: With one exception, the Food Scene mode, these modes all feature automatic flash, meaning that in dim lighting, the camera automatically raises and fires the built-in flash (assuming that an external flash isn’t attached, in which case popping up the built-in flash would deliver a nasty punch in the nose). Regardless of whether you’re relying on the onboard flash or an external unit, you may be able to choose from a couple of Flash modes, but other flash controls are roped off. And certain Scene and Effects modes disable flash.
![]()
![]() P, S, A, and M modes and the Food Scene mode: In these modes, you take total control over flash. If you want to use the built-in flash, press the Flash button, also labeled in Figure 7-29. To go flash-free, just press the top of the flash unit gently down to close it.
P, S, A, and M modes and the Food Scene mode: In these modes, you take total control over flash. If you want to use the built-in flash, press the Flash button, also labeled in Figure 7-29. To go flash-free, just press the top of the flash unit gently down to close it.
Even in these modes, however, the camera displays a blinking flash (lightning bolt) symbol in the viewfinder if it thinks you’re off your rocker not to use flash. Find that feature annoying? You can disable it via the Flash Warning option on the Custom Setting menu. Look for the option in the Shooting/Display section of the menu. (You have to set the Mode dial to P, S, A, or M to access the setting.)
Chapter 3 offers help with using the flash in the Auto and Scene modes; the rest of this chapter digs into features available in the P, S, A, and M modes.
Setting the Flash mode
Whether you’re using the built-in flash or an external flash, you can choose from several Flash modes. This setting determines the timing of the flash and also affects how much of the picture is exposed by ambient light and how much is lit by the flash.
![]() To set the mode, press the Flash button while rotating the Main command dial. As soon as you press the button, the Information display and Control panel change to show an icon representing the Flash mode and, in P, S, A, and M exposure modes, the Flash Compensation value, as shown in Figure 7-30. (Flash Compensation enables you to adjust flash power; look for details later in this chapter.) In the viewfinder, you see the Flash Compensation value plus a lightning bolt icon indicating that flash is ready to fire.
To set the mode, press the Flash button while rotating the Main command dial. As soon as you press the button, the Information display and Control panel change to show an icon representing the Flash mode and, in P, S, A, and M exposure modes, the Flash Compensation value, as shown in Figure 7-30. (Flash Compensation enables you to adjust flash power; look for details later in this chapter.) In the viewfinder, you see the Flash Compensation value plus a lightning bolt icon indicating that flash is ready to fire.
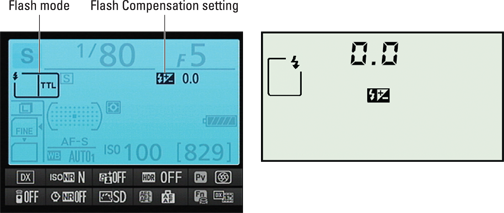
Figure 7-30: Press the Flash button while rotating the Main command dial to change the Flash mode.
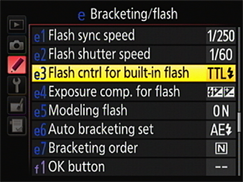
Figure 7-31: For normal flash operation, set this menu item to TTL.
In the P, S, A, and M exposure modes, your Flash mode choices break down into three basic categories, described in the next sections: normal flash; Red-Eye Reduction flash; and the special-purpose sync modes, Slow-Sync and Rear-Sync. In the Auto exposure mode, you have access to the first two flash options although they go by different names (Auto and Auto with Red-Eye Reduction), and the camera fires the flash only if the ambient light is sufficiently dim. In the Scene and Effects modes, flash choices depend on the scene or effect you choose, so see Chapters 3 and 10, respectively, for details.
Normal flash (Front-Curtain Sync)
![]() For normal flash, select the setting represented in the Control panel by the symbol you see in the margin here. The symbol looks nearly the same in the Information display, but includes the letters TTL. (Refer to Figure 7-30).
For normal flash, select the setting represented in the Control panel by the symbol you see in the margin here. The symbol looks nearly the same in the Information display, but includes the letters TTL. (Refer to Figure 7-30).
Although most people think of flash as a tool to use only in dim lighting, it can improve outdoor photos taken in strong daylight, too. After all, your main light source — the sun — is overhead, so although the top of the subject may be adequately lit, the front typically needs some additional illumination. As an example, Figure 7-32 shows a floral image taken both with and without a flash. For outdoor portraits, a flash is even more important, especially if your subject is wearing a hat, which throws shade on the face. (See Chapter 9 for more tips on using flash for portraits.)
![]() You may need to stop-down the aperture or lower ISO to avoid overexposing the photo. Because of how the camera needs to synchronize the firing of the flash with the opening of the shutter, the fastest shutter speed you can use with the built-in flash by default is 1/250 second. The upcoming section “Enabling high-speed flash (Auto FP)” explains how you can raise the top shutter speed to 1/320 for the built-in flash, but even so, you may need to stop-down the aperture significantly or lower the ISO setting to avoid overexposing the image when shooting in bright sun. When you use some external flash units, you can set the flash to sync at any shutter speed.
You may need to stop-down the aperture or lower ISO to avoid overexposing the photo. Because of how the camera needs to synchronize the firing of the flash with the opening of the shutter, the fastest shutter speed you can use with the built-in flash by default is 1/250 second. The upcoming section “Enabling high-speed flash (Auto FP)” explains how you can raise the top shutter speed to 1/320 for the built-in flash, but even so, you may need to stop-down the aperture significantly or lower the ISO setting to avoid overexposing the image when shooting in bright sun. When you use some external flash units, you can set the flash to sync at any shutter speed.
As another option, you can place a neutral density filter over your lens; this accessory reduces the light that comes through the lens without affecting colors. Of course, if possible, you can simply move your subject into the shade.
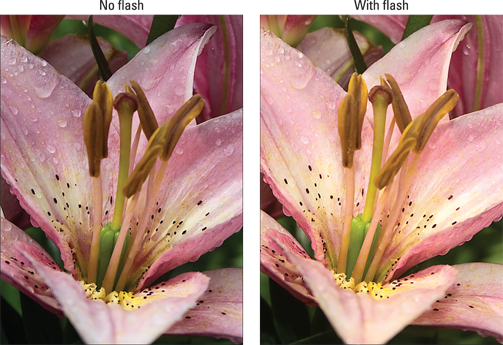
Figure 7-32: For this flower photo, adding flash resulted in better illumination and a slight warming effect.
![]() Colors may need tweaking when you mix light sources. When you combine multiple light sources, such as flash with daylight, colors may appear warmer or cooler than neutral. In Figure 7-32, colors became warmer with the addition of flash. For outdoor portraits, the warming effect is usually flattering, and I usually like the result with nature shots as well. If you prefer a neutral color rendition, see the Chapter 8 section related to the white balance control to find out how to address this issue. You can adjust white balance only in P, S, A, and M exposure modes.
Colors may need tweaking when you mix light sources. When you combine multiple light sources, such as flash with daylight, colors may appear warmer or cooler than neutral. In Figure 7-32, colors became warmer with the addition of flash. For outdoor portraits, the warming effect is usually flattering, and I usually like the result with nature shots as well. If you prefer a neutral color rendition, see the Chapter 8 section related to the white balance control to find out how to address this issue. You can adjust white balance only in P, S, A, and M exposure modes.
![]() In P and A modes, shutter speeds may drop low enough to require a tripod to steady the camera. Remember, in these two modes, the camera controls shutter speed. And by default, the camera can drop the shutter speed as low as 1/60 second to ensure a good exposure when you use flash. A slower shutter speed raises the risk of blurring caused by camera shake or any movement of the subject, as explained in the introduction to shutter speed at the beginning of this chapter. Use a tripod if you’re unsure whether you can handhold the camera at 1/60 second, and warn your subject to stay still as well.
In P and A modes, shutter speeds may drop low enough to require a tripod to steady the camera. Remember, in these two modes, the camera controls shutter speed. And by default, the camera can drop the shutter speed as low as 1/60 second to ensure a good exposure when you use flash. A slower shutter speed raises the risk of blurring caused by camera shake or any movement of the subject, as explained in the introduction to shutter speed at the beginning of this chapter. Use a tripod if you’re unsure whether you can handhold the camera at 1/60 second, and warn your subject to stay still as well.
![]() You can lower the slow limit of the shutter speed used for the P and A modes. Again, the camera restricts itself to using a shutter speed no slower than 1/60 second when you use flash in the P and A modes. If you need a longer exposure, you can waive that limit through the Flash Shutter Speed option; shown in Figure 7-33, you can set the minimum shutter speed as slow as 30 seconds. The option appears in the Bracketing/Flash section of the Custom Setting menu.
You can lower the slow limit of the shutter speed used for the P and A modes. Again, the camera restricts itself to using a shutter speed no slower than 1/60 second when you use flash in the P and A modes. If you need a longer exposure, you can waive that limit through the Flash Shutter Speed option; shown in Figure 7-33, you can set the minimum shutter speed as slow as 30 seconds. The option appears in the Bracketing/Flash section of the Custom Setting menu.
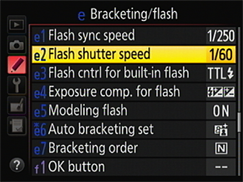
Figure 7-33: You can set the minimum shutter speed the camera can select when you use flash in the P and A exposure modes.
 This setting applies only to the normal, Front-Curtain Sync Flash mode as well as to the Red-Eye Reduction mode and Rear-Sync mode, both discussed in upcoming sections. The camera completely ignores your limit if you choose Slow-Sync flash, Slow-Sync with Red Eye, or Slow Rear-Curtain Sync, also discussed later.
Red-Eye Reduction flash
Red-Eye is caused when flash light bounces off a subject’s retinas and is reflected back to the camera lens. Red-eye is a human phenomenon, though; with animals, the reflected light usually glows yellow, white, or green.
Man or beast, this issue isn’t nearly the problem with the type of pop-up flash found on your camera as it is on non-SLR cameras. Your camera’s flash is positioned in such a way that the flash light usually doesn’t hit a subject’s eyes straight on, which lessens the chances of red-eye. However, red-eye may still be an issue when you use a lens with a long focal length (a telephoto lens) or you shoot subjects from a distance.
![]() If you notice red-eye, try the Red-Eye Reduction mode, represented by the icon shown in the margin here. In this mode, the AF-assist lamp on the front of the camera lights up briefly before the flash fires. The subject’s pupils constrict in response to the light, allowing less flash light to enter the eye and cause that glowing red reflection. Be sure to warn your subjects to wait for the flash, or they may step out of the frame or stop posing after they see the light from the AF-assist lamp.
If you notice red-eye, try the Red-Eye Reduction mode, represented by the icon shown in the margin here. In this mode, the AF-assist lamp on the front of the camera lights up briefly before the flash fires. The subject’s pupils constrict in response to the light, allowing less flash light to enter the eye and cause that glowing red reflection. Be sure to warn your subjects to wait for the flash, or they may step out of the frame or stop posing after they see the light from the AF-assist lamp.
For an even better solution, try the flash-free portrait tips covered in Chapter 9. If you do a lot of portrait work that requires flash, consider investing in an external flash unit that offers a rotating head. You then can aim the flash toward the ceiling and “bounce” the light off the ceiling instead of aiming it directly at your subject. That technique produces softer lighting and also virtually eliminates the possibility of red-eye.
If all else fails, check out Chapter 10, which shows you how to use the built-in red-eye removal tool on your camera’s Retouch menu.
Slow-Sync and Rear-Curtain Sync flash
In Front-Curtain Sync (normal flash) and Red-Eye Reduction Flash modes, the flash and shutter are synchronized so that the flash fires at the exact moment the shutter opens; technical types refer to this flash arrangement as Front-Curtain Sync.
Your camera also offers some special sync modes, which work as follows:
![]()
![]() Slow-Sync Flash: This mode, available in the P and A exposure modes and used by default in some Scene modes, also uses Front-Curtain Sync but allows a shutter speed slower than the 1/60 second minimum that is in force by default when you use normal Front-Curtain Sync flash and Red-Eye Reduction flash. Remember that in these two exposure modes, you can’t directly control shutter speed, so the camera automatically lowers the shutter speed for you.
Slow-Sync Flash: This mode, available in the P and A exposure modes and used by default in some Scene modes, also uses Front-Curtain Sync but allows a shutter speed slower than the 1/60 second minimum that is in force by default when you use normal Front-Curtain Sync flash and Red-Eye Reduction flash. Remember that in these two exposure modes, you can’t directly control shutter speed, so the camera automatically lowers the shutter speed for you.
The benefit of this longer exposure is that the camera has time to absorb more ambient light, which in turn has two effects: Background areas that are beyond the reach of the flash appear brighter, and less flash power is needed, resulting in softer lighting.
 The downside of the slow shutter speed is, well, the slow shutter speed. As I discuss earlier in this chapter, the longer the exposure time, the more you have to worry about blur caused by movement of your subject or your camera. A tripod is essential to a good outcome, as are subjects that can hold very, very still. I find that the best practical use for this mode is shooting nighttime still-life subjects, such as the one in Figure 7-34. If you have an adult portrait subject, using Slow-Sync can also produce good results; Chapter 9 has an example.
Some photographers, though, turn the downside of Slow-Sync flash to an upside, using it to blur their subjects, thereby emphasizing motion.
Whatever your creative goals, if you want to use flash with a slow shutter in the S or M exposure mode, just choose the normal Flash mode (Front-Curtain Sync) and then select the shutter speed you want to use. The flash will fire at the beginning of the exposure. Or as an alternative choice, choose Rear-Curtain Sync, explained next.
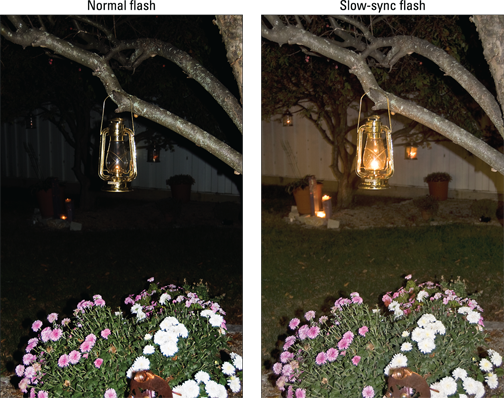
Figure 7-34: Slow-Sync flash produces softer, more even lighting than normal flash in nighttime pictures.
![]()
![]() Rear-Curtain Sync: In this mode, available in P, S, A, and M exposure modes, the flash fires at the very end of the exposure, just before the shutter’s second curtain draws across the frame to prevent any more light from hitting the image sensor.
Rear-Curtain Sync: In this mode, available in P, S, A, and M exposure modes, the flash fires at the very end of the exposure, just before the shutter’s second curtain draws across the frame to prevent any more light from hitting the image sensor.
The classic use of this mode is to combine the flash with a slow shutter speed to create trailing-light effects like the one shown in Figure 7-35. With Rear-Curtain Sync, the light trails extend behind the moving object (my hand, and the match, in this case), which makes visual sense. If instead you use Slow-Sync flash (or Front-Curtain Sync with a slow shutter), the light trails appear in front of the moving object.
When you shoot in the P and A exposure modes, the camera actually combines Slow-Sync flash with Rear-Curtain Sync when you select this Flash mode. Shutter speeds automatically drop below normal because the camera assumes that when you use Rear-Curtain flash, you’re after the longer exposure time needed to produce the “trailing ghost” effect. In the M and S modes, you dial in that slow shutter speed yourself.
![]()
![]() Slow-Sync with Red-Eye Reduction: In P and A exposure modes, you can also combine a Slow-Sync flash with the Red-Eye Reduction feature. Given the potential for blur that comes with a slow shutter, plus the potential for subjects to mistake the prelight from the AF-assist lamp for the real flash and walk out of the frame before the image is actually recorded, I vote this Flash mode as the most difficult to pull off.
Slow-Sync with Red-Eye Reduction: In P and A exposure modes, you can also combine a Slow-Sync flash with the Red-Eye Reduction feature. Given the potential for blur that comes with a slow shutter, plus the potential for subjects to mistake the prelight from the AF-assist lamp for the real flash and walk out of the frame before the image is actually recorded, I vote this Flash mode as the most difficult to pull off.
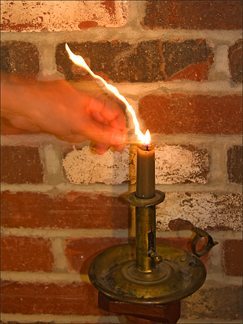
Figure 7-35: I used Rear-Curtain flash and a shutter speed of about 1.5 seconds to create this candle-lighting image.
All these modes are somewhat tricky to use successfully. Have fun playing around, but at the same time, don’t feel too badly if you don’t have time right now to master these modes plus all the other exposure options presented to you in this chapter. In the meantime, do a web search for Slow-Sync and Rear-Sync image examples if you want to get a better idea of the effects that other photographers create with these Flash modes.
Adjusting flash output
![]() In matrix and center-weighted modes, flash power is adjusted to expose the picture using a balance of ambient light and flash light. Nikon uses the term i-TTL Balanced Fill Flash for this technology. The i stands for intelligent; again, the TTL means that the camera calculates exposure by reading the light that’s coming through-the-lens. The balanced fill part refers to the fact that the flash is used to fill in shadow areas, while brighter areas are exposed by the available light, resulting (usually) in a pleasing balance of the two light sources.
In matrix and center-weighted modes, flash power is adjusted to expose the picture using a balance of ambient light and flash light. Nikon uses the term i-TTL Balanced Fill Flash for this technology. The i stands for intelligent; again, the TTL means that the camera calculates exposure by reading the light that’s coming through-the-lens. The balanced fill part refers to the fact that the flash is used to fill in shadow areas, while brighter areas are exposed by the available light, resulting (usually) in a pleasing balance of the two light sources.
![]() In spot-metering mode, the camera assumes that you’re primarily interested in a single area of the frame, so it calculates flash power on the same single area it uses to calculate overall exposure, without much regard for the background. This mode is Standard i-TTL Flash. (See the earlier discussion of metering modes to find out how the specific metering spot, which is based on a single autofocus point, is chosen.)
In spot-metering mode, the camera assumes that you’re primarily interested in a single area of the frame, so it calculates flash power on the same single area it uses to calculate overall exposure, without much regard for the background. This mode is Standard i-TTL Flash. (See the earlier discussion of metering modes to find out how the specific metering spot, which is based on a single autofocus point, is chosen.)
Regardless of your metering mode, if you want a little more or less flash light than the camera thinks is appropriate, you can adjust the flash output by using Flash Compensation. Available only when you set the exposure mode to P, S, A, or M, this feature works just like Exposure Compensation, discussed earlier in the chapter, except that it enables you to tweak flash power instead of the overall exposure. As with Exposure Compensation, the Flash Compensation settings are stated in terms of EV numbers. A setting of 0.0 indicates no flash adjustment; you can increase the flash power to EV +1.0 or decrease it to EV –3.0.
As an example of the benefit of this feature, look at the carousel images in Figure 7-36. The first image shows you a flash-free shot. Clearly, I needed a flash to compensate for the fact that the horses were shadowed by the roof of the carousel. But at normal flash power, as shown in the image, the flash was too strong, creating glare in some spots on the horse’s neck and blowing out the highlights in the white mane. By dialing the flash power down to EV –1.0, I got a softer flash that straddled the line perfectly between no flash and too much flash.
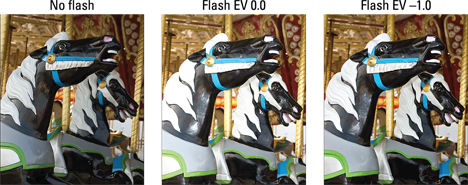
Figure 7-36: When normal flash output is too strong, dial in a lower Flash Compensation setting.
As for boosting the flash output, well, you may find it necessary on some occasions, but don’t expect the built-in flash to work miracles even at a Flash Compensation of +1.0. Any built-in flash has a limited range, and you simply can’t expect the flash light to reach faraway objects. In other words, don’t even try taking flash pictures of a darkened recital hall from your seat in the balcony — all you’ll wind up doing is annoying everyone.
With that preface in mind, here are the two controls you need to know to take advantage of this feature:
![]()
![]() Setting the Flash Compensation amount: Press the Flash button while rotating the Sub-command dial to adjust the setting. (Rotating the Main command dial adjusts the Flash mode.) As long as you hold the Flash button, the Flash Compensation setting appears in the Control panel and Information display. (See Figure 7-37.) In the viewfinder, the current setting takes the place of the usual shots-remaining value, and a plus or minus sign also appears to indicate whether you’re dialing in a positive or negative value.
Setting the Flash Compensation amount: Press the Flash button while rotating the Sub-command dial to adjust the setting. (Rotating the Main command dial adjusts the Flash mode.) As long as you hold the Flash button, the Flash Compensation setting appears in the Control panel and Information display. (See Figure 7-37.) In the viewfinder, the current setting takes the place of the usual shots-remaining value, and a plus or minus sign also appears to indicate whether you’re dialing in a positive or negative value.
After you release the Flash button, you see the Flash Compensation amount in the Information display, but the viewfinder and Control panel show just the Flash Compensation icon. You can press the Flash button at any time to reveal the value in those two displays.
![]()
 Disabling flash adjustment during Exposure Compensation: By default, if you use flash when Exposure Compensation is in force, the flash power is affected by your Exposure Compensation setting. But as I cover in the earlier section “Applying Exposure Compensation,” you can tell the camera to leave the flash out of the equation when you apply Exposure Compensation. To do so, track down the Exposure Compensation for Flash Option on the Custom Setting menu and choose Background Only as the setting. You then can use Flash Compensation to vary the flash output as you see fit.
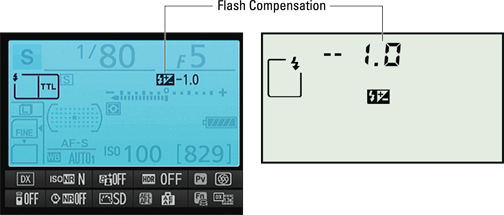
Figure 7-37: Rotate the Sub-command dial while pressing the Flash button to adjust flash power.
Locking flash exposure on your subject
With FV Lock (or Flash Value Lock), you can lock flash power similar to the way you can use the AE-L/AF-L button to lock autoexposure. (Note that not all external flash units support this function; the camera manual and your flash manual provide a list of supported flash features.)
This option can come in handy when you want to compose your photo so that your subject is located at the edge of the frame, for example. You frame the scene initially so the subject is at the center of the frame, lock the flash power, and then reframe. If you didn’t lock the flash value, the camera would calculate flash power on your final framing, which could be inappropriate for your subject. You also can use FV Lock to maintain a consistent flash power for a series of shots.
This feature is one of the few advanced flash options that works in Auto mode and in the Scene and Effects modes that permit flash — but only if the camera sees the need for flash in the first place. In Food Scene mode, you must pop up the flash to use flash.
After assigning a button to the FV Lock feature, follow these steps to use it:
1. Frame the shot so that your subject is in the center of the viewfinder.
2. Press and hold the shutter button halfway to engage the exposure meter and, if autofocusing is used, set focus.
3. Press and release the button that you assigned to FV Lock.
The flash fires a little preflash to determine the correct flash power. When flash power is locked, you see a little flash symbol with the letter L at the left end of the viewfinder, next to the metering mode icon. The same symbol appears in the Information display (look under the exposure meter).
4. Recompose the picture if desired and then take the shot.
To release the FV Lock, just press the assigned button again.
Exploring a few additional flash options
For most people, the flash options covered to this point in the chapter are the most useful on a regular basis, but your camera does offer a few other flash options that you may appreciate on occasion, so the next several sections provide a quick look-see. Again, keep in mind that I’m touching on the highlights — be sure to dive into the camera manual or your flash manual, if you use an external flash unit, for all the nitty-gritty.
Enabling high-speed flash (Auto FP)
To properly expose flash pictures, the camera has to synchronize the timing of the flash output with the opening and closing of the shutter. On the D7100, this synchronization normally dictates a maximum shutter speed of 1/250 second when you use the built-in flash.
Through a Nikon feature called Auto FP flash, you can bump the maximum sync speed up to 1/320 second for the built-in flash, however. Furthermore, if you attach some specific Nikon flash units, you can access the full range of shutter speeds.
Because of this limitation, high-speed flash is mostly useful for shooting portraits or other close-up subjects. In fact, it’s very useful when you’re shooting portraits outside in the daytime because it permits you to use a wider aperture to blur the background. At a shutter speed of 1/250 second, a very wide aperture would normally overexpose the picture even at ISO 100. With high-speed flash, you can increase the shutter speed enough to compensate for the large aperture.
To access the high-speed flash option, open the Bracketing/Flash section of the Custom Setting menu and select the Flash Sync Speed option, as shown in Figure 7-38. You can choose from the following settings:
![]() 1/320 s (Auto FP): At this setting, you can use the built-in flash with shutter speeds up to 1/320 second. For select Nikon flash units (including models SB-910, SB-900, SB-800, SB-700, SB-600, and SB-R200), you can use any shutter speed.
1/320 s (Auto FP): At this setting, you can use the built-in flash with shutter speeds up to 1/320 second. For select Nikon flash units (including models SB-910, SB-900, SB-800, SB-700, SB-600, and SB-R200), you can use any shutter speed.
![]() 1/250 s (Auto FP): For compatible external flash units, the high-speed flash behavior kicks in at shutter speeds over 1/250 second. With the built-in flash, the flash sync speed is set to 1/250 second. In P and A exposure modes, the high-speed flash sync is activated if the camera needs to use a shutter speed faster than 1/250 second. (Note that the camera may sometimes use a shutter speed faster than 1/250 second in those modes even if the shutter speed readout is 1/250.)
1/250 s (Auto FP): For compatible external flash units, the high-speed flash behavior kicks in at shutter speeds over 1/250 second. With the built-in flash, the flash sync speed is set to 1/250 second. In P and A exposure modes, the high-speed flash sync is activated if the camera needs to use a shutter speed faster than 1/250 second. (Note that the camera may sometimes use a shutter speed faster than 1/250 second in those modes even if the shutter speed readout is 1/250.)
![]() 1/250 s to 1/60 s: The other settings on the menu (see the right image in Figure 7-37) establish a fixed maximum sync speed. By default, it’s set to 1/250 second, and high-speed flash operation is disabled.
1/250 s to 1/60 s: The other settings on the menu (see the right image in Figure 7-37) establish a fixed maximum sync speed. By default, it’s set to 1/250 second, and high-speed flash operation is disabled.
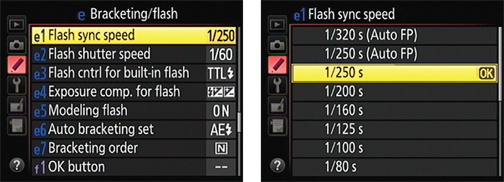
Figure 7-38: Through this option, you can enable high-speed flash, permitting a faster maximum shutter speed for flash photos.
Enabling manual, repeating, or commander-mode flash
The Bracketing/Flash submenu of the Custom Setting menu also offers a setting called Flash Cntrl (Control) for Built-In Flash, as shown in Figure 7-39. Normally, your flash operates in the TTL mode, in which the camera automatically determines the right flash output for you.
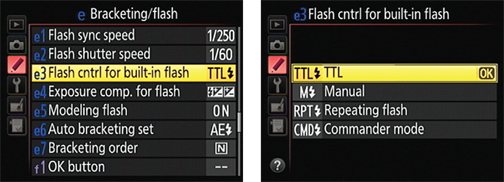
Figure 7-39: You also can change the behavior of the built-in flash through this menu option.
However, if you’re an advanced flash user, you may want to a few other options available when you shoot in the P, S, A, or M exposure modes:
![]() Manual: You can select a specific flash power, with settings ranging from full power to 1/128 power. (If you’re hip to rating flash power by Guide Numbers, the manual spells out the ratings for the built-in flash.)
Manual: You can select a specific flash power, with settings ranging from full power to 1/128 power. (If you’re hip to rating flash power by Guide Numbers, the manual spells out the ratings for the built-in flash.)
![]() Repeating Flash: The flash fires repeatedly as long as the shutter is open. The resulting picture looks as though it was shot with a strobe light — a special-effects function. You can modify certain aspects of the flash output, including how often the flash fires per second.
Repeating Flash: The flash fires repeatedly as long as the shutter is open. The resulting picture looks as though it was shot with a strobe light — a special-effects function. You can modify certain aspects of the flash output, including how often the flash fires per second.
![]() Commander Mode: Enables the built-in flash to act as a master flash, which just means that you can use it to trigger off-camera, remote-control flash units. (When the remote units “see” the light from the master flash, they fire.) You can set the power of the remote flashes through the Commander Mode options and specify whether you want the built-in flash to simply trigger other flashes or add its light to the scene.
Commander Mode: Enables the built-in flash to act as a master flash, which just means that you can use it to trigger off-camera, remote-control flash units. (When the remote units “see” the light from the master flash, they fire.) You can set the power of the remote flashes through the Commander Mode options and specify whether you want the built-in flash to simply trigger other flashes or add its light to the scene.
 To use this feature, your remote flash heads must support the Nikon Creative Lighting System, or CLS. Visit Nikon online to get a better idea of how the system works. It’s pretty cool, and it can provide great added lighting flexibility without requiring you to spend tons of money or rely on bulky, traditional lighting equipment.
Firing a modeling flash
Found on the right front side of the camera, just under the AF-assist lamp, the Depth-of-Field Preview button has two functions by default. First, pressing the button enables you to preview the depth of field that your current f-stop setting will produce. (Chapter 8 explains in detail.) When you use flash, pressing the button also causes the flash to emit a modeling flash when you shoot in the P, S, A, or M exposure modes.
When the modeling flash feature is turned on, the flash emits a repeating, strobelike series of flash light while you press the button. The idea is to enable you to preview how the light will fall on your subject. However, living subjects aren’t likely to appreciate the feature — it’s a bit blinding to have the flash going off repeatedly in your face. And obviously, using the feature drains the camera battery or the battery of an external flash.
To disable the modeling flash, hunt down the Modeling Flash option, found on the Bracketing/Flash submenu of the Custom Setting menu, and set the option to Off. Changing the function of the Depth-of-Field Preview button from the default setting, which I show you how to do in Chapter 11, also disables the modeling flash.
Bracketing Exposures
Many photographers use exposure bracketing to ensure that at least one shot of a subject is properly exposed. Bracketing simply means to shoot the same subject multiple times, slightly varying the exposure settings for each image.
In the P, S, A, and M exposure modes, your camera offers automatic bracketing. When you enable this feature, your only job is to press the shutter button to record the shots; the camera adjusts exposure settings between each image. The D7100, however, takes things one step further than most cameras that offer automatic bracketing, enabling you to bracket not just exposure, but also flash power, Active D-Lighting, and white balance.
The next section explains how to bracket exposure and flash. Following that, you can find details about bracketing Active D-Lighting. Chapter 8 walks you through the process of bracketing white balance.
Bracketing exposure and flash
After setting the mode dial to P, S, A, or M, follow these steps to bracket exposure only, flash only, or both together. (Don’t be put off by the length of these steps; although describing the features takes quite a few words, actually using them isn’t all that complicated.)
1. Specify what you want to bracket through the Auto Bracketing Set option, located in the Bracketing/Flash section of the Custom Setting menu.
Shown in Figure 7-40, this option determines what aspect of your picture you want to vary between shots. For exposure and flash bracketing, you have three choices:
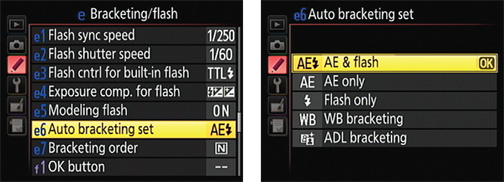
Figure 7-40: Use this option to select the setting you want the camera to adjust between shots.
• AE & Flash: Brackets exposure settings and flash power.
• AE Only: Brackets exposure settings only.
 In P mode, the camera may vary shutter speed, aperture, or both between shots to produce the different exposures. In S mode, it adjusts aperture only; in A and M modes, it changes shutter speed only. In all modes, ISO may be adjusted if you enable ISO Sensitivity Auto Control, as I outline earlier in this chapter.
• Flash Only: Brackets flash power only.
2. Choose the order in which you want the bracketed shots recorded.
Make the call via the Bracketing Order option, found with the other bracketing options on the Custom Setting menu. As shown in Figure 7-41, you have two options:
• MTR>Under>Over: This setting is the default. For a three-shot exposure bracketing series, your first shot is captured at your original settings. (MTR stands for metered and designates the initial settings suggested by the camera’s exposure meter.) The second image is captured at settings that produce a darker image, and the third, at settings that produce a brighter image.
This sequence can vary depending on how many frames you include in your bracketed series; if you’re a detail nut, you can find out the specific order used in every scenario in the camera manual.
• Under>MTR>Over: The darkest image is captured first, then the metered image, and then the brightest image.
![]() 3. Select the number of frames in each series by pressing the BKT button while rotating the Main command dial.
3. Select the number of frames in each series by pressing the BKT button while rotating the Main command dial.
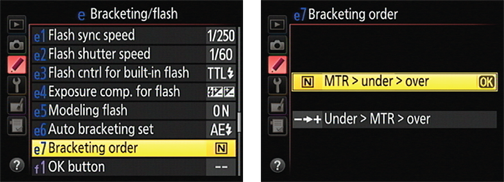
Figure 7-41: You can choose the order in which you want the bracketed shots to be captured.
As soon as you press the button, you see the current bracketing settings in the Control panel and Information display, as shown in Figure 7-42. You also see an exposure meter with some symbols related to bracketing; more on how to interpret the bracketing information a little later.
With the BKT button pressed, rotate the Main command dial to cycle to through the available settings. Here’s what you can accomplish at each of the frame-count settings:
• +3F: One image at the selected exposure settings and two brighter frames.
• --3F: One image at the selected exposure settings and two darker frames.
• +2F: One image at the selected exposure settings and one brighter frame.
• --2F: One image at the selected exposure settings and one darker frame.
• 3F: One image at the selected exposure settings, one darker image, and one brighter image.
• 5F: One image at the selected exposure settings, two darker frames, and two brighter frames.
4. Set the level of exposure adjustment between frames by pressing the BKT button while rotating the Sub-command dial.
You can choose values ranging from 1/3 stop (0.3, in the display) to two stops (2.0).
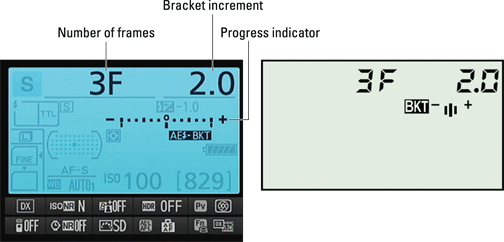
Figure 7-42: Rotate the Main command dial while pressing BKT button to adjust the number of bracketed frames; press the button and rotate the Sub-command dial to adjust the bracketing increment.
 Now for the promised decoder guide to the bracketing information displayed with the meter: In the Information display, the meter serves as a bracketing progress indicator and appears as shown on the left in Figure 7-42 when you enable the three-frame bracketing option (3F). The markings near the meter indicate the following:
• The symbol below the meter tells you what you’re bracketing — AE+Flash, in the figure.
• The notches under the meter show you how many frames are enabled and the amount of adjustment between frames. For example, in the figure, the notch at the zero point represents the neutral shot — the one that will be recorded with no adjustment. The notches to the left and right show that the other two shots will be recorded at settings that produce a two-stop increase and a two-stop decrease in exposure.
The Control panel shows a miniaturized version of the progress indicator; for a three-shot series, you see a three vertical lines, with a plus and minus at each end, as shown on the right in the figure. Frankly, the indicator is so miniature that I can’t make it out even with my strongest reading glasses on, but that’s the price of living past your twenties, I guess.
5. Release the BKT button to return to shooting mode.
The bracketing frame and increment settings disappear from the Control panel and Information display; the bracketing indicators remain.
6. Take your first shot.
After you take the picture, the indicator representing the shot you just took disappears from under the meter in the Information display. For example, if you’re bracketing three frames, the notch at the 0 position disappears after your first shot. Likewise, the middle bar of the indicator in the Control panel goes away.
7. Take the remaining shots in the series.
When the series is done, the indicator scale returns to its original appearance, and you can begin shooting the next bracketed series.
8. To disable bracketing, press the BKT button and rotate the Main command dial until the number of frames returns to 0.
Bracketing Active D-Lighting
Active D-Lighting, introduced earlier in this chapter, adjusts exposure in a way that brightens shadows without blowing out highlights. In the P, S, A, or M exposure modes, you can set up a bracketed series that applies different levels of the adjustment to each shot.
The process varies only slightly from the steps in the preceding section, so instead of repeating it all here, I’ll just hit the highlights:
1. Set the Auto Bracketing Set option to ADL Bracketing, as shown in Figure 7-43.
Look in the Bracketing/Flash section of the Custom Setting menu.
The Bracketing Order option discussed in Step 2 in the preceding section doesn’t matter for Active D-Lighting bracketing; the camera always uses the default setting.
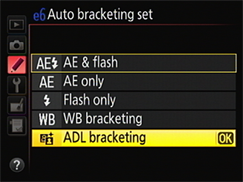
Figure 7-43: You can capture a series of up to three shots, each with a different amount of Active D-Lighting applied.
![]() 2. Press the BKT button while rotating the Main command dial to set up the bracketed series.
2. Press the BKT button while rotating the Main command dial to set up the bracketed series.
When you press the BKT button, the Information display and Control panel display the data shown in Figure 7-44. Notice that instead of the bracket increment that appears for exposure and flash bracketing, you see just the frame count, the symbol ADL (to let you know that Active D-Lighting bracketing is enabled), and a progress indicator. With Active D-Lighting bracketing, you don’t set the frame count and level of shot-to-shot adjustment as you do for exposure and flash bracketing. Instead, the number of frames you select determines what Active D-Lighting setting is used for each frame.
Here are your options:
• 2 Frames: Records one image with Active D-Lighting turned off and another at the value currently selected for Active D-Lighting. (You set that value via the Shooting menu or the Information panel control strip; see the earlier section “Expanding tonal range with Active D-Lighting” for help.) If Active D-Lighting happens to be set to Off, the second shot is recorded using the Auto setting.
• 3 Frames: Records one shot with Active D-Lighting off, one at the Normal setting, and one at the High setting.
In the Information display, the labels next to the progress indicator tell you which settings are used for the different frame counts. For example, in Figure 7-44, the labels display the settings associated with recording three frames: Off, N (Normal), and H (High). The Control panel shows — er, wait, I have to go find a stronger pair of glasses — two bars and a triangle for three frames, and two bars for two frames.
3. Release the BKT button and take your shots.
As with exposure and flash bracketing, each little bar under the meter represents one frame in the series. After you capture a shot, the bar representing that frame disappears. When you’ve captured all shots in the series, the meter indicators return to their starting position.
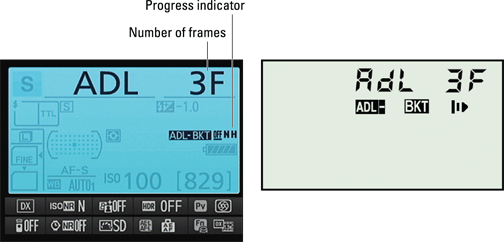
Figure 7-44: With Active D-Lighting, a single value controls both the frame count and the level of Active D-Lighting adjustment.

