![]()
2
Choosing Basic Picture Settings
In This Chapter
![]() Spinning the Mode dial
Spinning the Mode dial
![]() Changing the shutter-release mode
Changing the shutter-release mode
![]() Choosing the right Image Size setting
Choosing the right Image Size setting
![]() Understanding the Image Quality setting: JPEG or Raw?
Understanding the Image Quality setting: JPEG or Raw?
![]() Taking advantage of the 1.3x crop option (Image Area setting)
Taking advantage of the 1.3x crop option (Image Area setting)
Every camera manufacturer strives to provide a good out-of-box experience — that is, to ensure that your initial encounter with the camera is a happy one. To that end, the camera’s default settings are selected to make it easy for you to take a good picture the first time you press the shutter button.
Although the default settings produce a nice picture in many cases, they’re not designed to produce the optimal results in every situation. You may be able to use the defaults to take a decent portrait, for example, but you probably need to tweak a few settings to capture action. Adjusting a few options can help turn that decent portrait into a stunning one, too.
So that you can start fine-tuning camera settings to your subject, this chapter explains the most basic picture-taking options: exposure mode, shutter-release mode, picture resolution, file type, and image area. They’re not the most exciting options (don’t think I didn’t notice you stifling a yawn), but they make a big difference in how easily you can capture the photo you have in mind.
Choosing an Exposure Mode
Your choice determines how much control you have over two critical exposure settings — aperture and shutter speed — as well as many other options, including those related to color and flash photography.
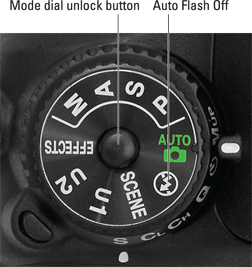
Figure 2-1: The Mode setting determines how much input you have over exposure, color, and other picture options.
Your exposure mode choices break down as follows:
![]() Fully automatic exposure modes: For people who haven’t yet explored photography concepts such as aperture and shutter speed, the D7100 offers the following point-and-shoot modes:
Fully automatic exposure modes: For people who haven’t yet explored photography concepts such as aperture and shutter speed, the D7100 offers the following point-and-shoot modes:
• Auto: The camera analyzes the scene and tries to select the most appropriate settings to capture the image. In dim lighting, the built-in flash may fire.
• Auto Flash Off: This mode, represented by the icon labeled in Figure 2-1, works just like Auto but disables flash.
• Scene modes: Set the Mode dial to Scene and then rotate the Main command dial to choose from automatic modes geared to capturing specific types of shots: portraits, landscapes, child photos, and such.
• Effects modes: Set the Mode dial to this setting and rotate the Main command dial to select from seven special effects, such as Night Vision mode (which creates a grainy, black-and-white photo) and Color Sketch mode (which creates a picture that resembles a drawing produced with colored pencils).
 Because these modes are designed to make picture-taking simple, they prevent you from accessing many of the camera’s features. You can’t use the White Balance control, for example, to tweak picture colors. Options that are off-limits appear dimmed in the camera menus.
For help using Auto, Auto Flash Off, and Scene modes, travel to Chapter 3; for information about Effects mode, check out Chapter 10.
![]() Semi-automatic modes: To take more creative control but still get some exposure assistance from the camera, choose one of these modes:
Semi-automatic modes: To take more creative control but still get some exposure assistance from the camera, choose one of these modes:
• P (programmed autoexposure): The camera selects the aperture and shutter speed necessary to ensure a good exposure. But you can choose from different combinations of the two to vary the creative results. For example, shutter speed affects whether moving objects appear blurry or sharp. So you might use a fast shutter speed to freeze action, or you might go the other direction, choosing a shutter speed slow enough to blur the action, creating a heightened sense of motion. Because this mode gives you the option to choose different aperture/shutter speed combos, it’s sometimes referred to as flexible programmed autoexposure.
• S (shutter-priority autoexposure): You select the shutter speed, and the camera selects the aperture. This mode is ideal for capturing sports or other moving subjects because it gives you direct control over shutter speed.
• A (aperture-priority autoexposure): In this mode, you choose the aperture, and the camera sets the shutter speed. Because aperture affects depth of field, or the distance over which objects in a scene appear sharply focused, this setting is great for portraits because you can select an aperture that results in a soft, blurry background, putting the emphasis on your subject. For landscape shots, on the other hand, you might choose an aperture that produces a large depth of field so that both near and distant objects appear sharp and therefore have equal visual weight in the scene.
 All three modes give you access to all the camera’s features. So even if you’re not ready to explore aperture and shutter speed, go ahead and set the mode dial to P if you need to access a setting that’s off-limits in the fully automated modes. The camera then operates pretty much as it does in Auto mode but without limiting your ability to control picture settings if you need to do so.
When you’re ready to make the leap to P, S, or A mode, look to Chapter 7 for assistance. In addition, check out Chapter 8 to find out ways beyond aperture to manipulate depth of field.
![]() Manual (M): In this mode, you select both the aperture and shutter speed. But the camera still offers an assist by displaying an exposure meter to help you dial in the right settings. You have control over all other picture settings, too. For more on this mode, see Chapter 7.
Manual (M): In this mode, you select both the aperture and shutter speed. But the camera still offers an assist by displaying an exposure meter to help you dial in the right settings. You have control over all other picture settings, too. For more on this mode, see Chapter 7.
![]() U1 and U2: These two settings represent the pair of custom exposure modes that you can create. (The U stands for user.) They give you a quick way to immediately switch to all the picture settings you prefer for a specific type of shot. For example, you might store the options you like to use for indoor portraits as U1 and store settings for sports shots as U2.
U1 and U2: These two settings represent the pair of custom exposure modes that you can create. (The U stands for user.) They give you a quick way to immediately switch to all the picture settings you prefer for a specific type of shot. For example, you might store the options you like to use for indoor portraits as U1 and store settings for sports shots as U2.
For step-by-step instructions, check out Chapter 11.
Choosing the Shutter-Release Mode
Chapter 7 explains the shutter, which is the thing inside the camera that controls when light is allowed to enter through the lens, strike the image sensor, and expose the image. The shutter opens when you press the shutter button, and it closes after the image is exposed. Photo lingo uses the term shutter release to refer to the action of the shutter opening.
By default, the D7100 is set to capture one image each time you press the shutter button. But you have a variety of other options. You can delay the shutter release for a few seconds after the button is pressed, for example, or record a continuous burst of images as long as you hold down the shutter button.
The primary point of control for shutter release is the Release mode dial, shown in Figure 2-2. To change the setting, press and hold the Release mode dial unlock button (labeled in Figure 2-2) while rotating the dial. The letter displayed next to the white marker represents the selected setting. For example, in Figure 2-2, the S is aligned with the marker, showing that the Single Frame mode is selected. The Information display shows you the current mode as well, as shown in Figure 2-3.
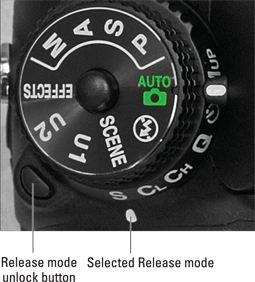
Figure 2-2: You can choose from a variety of Release modes.
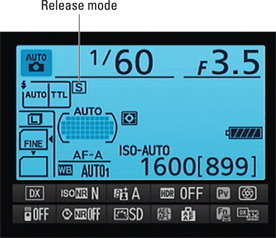
Figure 2-3: This symbol represents the current Release mode.
One note in advance: If you’ve worked with another Nikon dSLR with a Release mode dial, you may expect to find a dial setting designed for use with the wireless ML-L3 remote control unit. But Nikon moved that option off the dial on the D7100. Instead, you enable wireless remote shooting via the Remote Control Mode (ML-L3) option on the Shooting menu. See “Enabling remote control shooting,” later in the chapter, for details.
Single Frame and Quiet modes
![]() At the default Release mode setting, Single Frame, you get one picture each time you press the shutter button. In other words, this is normal-photography mode.
At the default Release mode setting, Single Frame, you get one picture each time you press the shutter button. In other words, this is normal-photography mode.
![]() Quiet Shutter Release mode works just like Single Frame mode but makes less noise as it goes about its business. Designed for situations when you want the camera to be as silent as possible, this mode disables the beep that the autofocus system may sound when it achieves focus. (The beep sounds only if you enable it through the Beep setting on the Custom Setting menu; it’s turned off by default.)
Quiet Shutter Release mode works just like Single Frame mode but makes less noise as it goes about its business. Designed for situations when you want the camera to be as silent as possible, this mode disables the beep that the autofocus system may sound when it achieves focus. (The beep sounds only if you enable it through the Beep setting on the Custom Setting menu; it’s turned off by default.)
Additionally, Quiet Shutter Release mode affects the operation of the internal mirror that causes the scene coming through the lens to be visible in the viewfinder. Normally, the mirror flips up when you press the shutter button and then flips back down after the shutter opens and closes. This mirror movement makes some noise. In Quiet Shutter Release mode, you can prevent the mirror from flipping down by keeping the shutter button pressed after the shot. This feature enables you to delay the final mirror movement — and its accompanying sound — to a moment when the noise won’t be objectionable.
Continuous (burst mode) shooting
Setting the Release mode dial to Continuous Low or Continuous High enables burst mode shooting. That is, the camera records a continuous burst of images for as long as you hold down the shutter button, making it easier to capture fast-paced action.
Here’s how the two modes differ:
![]()
![]() Continuous Low: In this mode, you can tell the camera to capture from 1 to 6 frames per second. You set the maximum frames-per-second (fps) count via the CL Mode Shooting Speed option, found on the Shooting/Display section of the Custom Setting menu and featured in Figure 2-4. The default is 3 fps.
Continuous Low: In this mode, you can tell the camera to capture from 1 to 6 frames per second. You set the maximum frames-per-second (fps) count via the CL Mode Shooting Speed option, found on the Shooting/Display section of the Custom Setting menu and featured in Figure 2-4. The default is 3 fps.
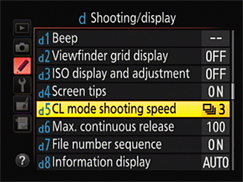
Figure 2-4: You can specify the maximum frames-per-second rate for Continuous Low Release mode.
Why would you want to capture fewer than the maximum number of shots? Well, frankly, unless you’re shooting something that’s moving at a really fast pace, not too much is going to change between frames when you shoot at 6 frames per second. So when you set the burst rate that high, you typically wind up with lots of shots that show the exact same thing, wasting space on your memory card. I keep this value set to the default 3 fps and then, if I want a higher burst rate, I use the Continuous High setting, explained next.
 The Release mode symbol in the Information display shows you the current frames-per-second setting. (Refer to Figure 2-3.)
![]()
![]() Continuous High: This mode works just like Continuous Low except that it records up to 6 frames per second. You can’t adjust the maximum capture rate as you can for Continuous Low. However, you may be able to boost the rate to 7 frames per second by adjusting some other camera settings. (Keep reading for details.)
Continuous High: This mode works just like Continuous Low except that it records up to 6 frames per second. You can’t adjust the maximum capture rate as you can for Continuous Low. However, you may be able to boost the rate to 7 frames per second by adjusting some other camera settings. (Keep reading for details.)
For both modes, you can limit the maximum number of shots the camera takes with each press of the shutter button. Again, the idea behind this feature is simply to prevent firing off lots of wasted frames. Make the adjustment via the Max Continuous Release option, found just below the CL Mode Shooting Speed option, as shown in Figure 2-5.
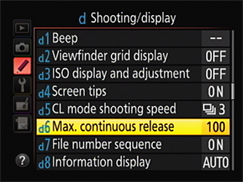
Figure 2-5: This option limits the number of shots recorded with each press of the shutter button in the Continuous Low and Continuous High modes.
![]() You can’t use flash. Continuous mode doesn’t work with flash because the time that the flash needs to recycle between shots slows down the capture rate too much. So even if the Release mode dial is set to CL or CH, you get one shot for each press of the shutter button if the flash is raised.
You can’t use flash. Continuous mode doesn’t work with flash because the time that the flash needs to recycle between shots slows down the capture rate too much. So even if the Release mode dial is set to CL or CH, you get one shot for each press of the shutter button if the flash is raised.
![]() Images are stored temporarily in the memory buffer. The camera has a little bit of internal memory — a buffer — where it stores picture data until it has time to record them to the memory card. The number of pictures the buffer can hold depends on certain camera settings, such as resolution and file type (JPEG or Raw). The viewfinder displays an estimate of how many pictures will fit in the buffer; see the sidebar “What does [r 24] in the viewfinder mean?” later in this chapter, for details.
Images are stored temporarily in the memory buffer. The camera has a little bit of internal memory — a buffer — where it stores picture data until it has time to record them to the memory card. The number of pictures the buffer can hold depends on certain camera settings, such as resolution and file type (JPEG or Raw). The viewfinder displays an estimate of how many pictures will fit in the buffer; see the sidebar “What does [r 24] in the viewfinder mean?” later in this chapter, for details.
 After shooting a burst of images, wait for the memory card access light on the back of the camera to go out before turning off the camera. That’s your signal that the camera has successfully moved all data from the buffer to the memory card. Turning off the camera before that happens may corrupt the image file.
![]() The maximum frames-per-second (fps) rate depends on the Image Quality and Image Area settings. I detail both settings later in this chapter. For now, just be aware of their impact on the actual capture rate the camera delivers:
The maximum frames-per-second (fps) rate depends on the Image Quality and Image Area settings. I detail both settings later in this chapter. For now, just be aware of their impact on the actual capture rate the camera delivers:
• If the Image Area option is set to DX (the default) and the Image Quality option is set to 14-bit NEF (Raw): The maximum fps drops from 6 to 5 for both the Continuous Low and Continuous High Release modes. (Even if you select 6 fps as the CL Mode Shooting Speed option, the camera maxes out at 5 fps.) Why the slowdown? Because the 14-bit NEF (Raw) setting increases the image file size, and it takes more time for the camera to write the data to the memory card.
• If the Image Area setting is 1.3x and the Image Quality setting is JPEG (the default) or 12-bit NEF (Raw): The maximum fps for Continuous High goes up to 7 fps. The camera can achieve this faster pace because the 1.3x Image Area setting captures a smaller image than normal, resulting in a smaller file size and faster data transfer. You just have to avoid setting the Image Quality setting to the 14-bit NEF (Raw) option, or you offset the reduction in file size.
![]() Your mileage may vary. The actual number of frames you can capture depends on a number of other factors, too, including your shutter speed. At a slow shutter speed, the camera may not be able to reach the maximum frame rate. Enabling Vibration Reduction also can reduce the frame rate, as can a weak battery. Additionally, although you can capture as many as 100 frames in a single burst, the frame rate can drop if the buffer gets full.
Your mileage may vary. The actual number of frames you can capture depends on a number of other factors, too, including your shutter speed. At a slow shutter speed, the camera may not be able to reach the maximum frame rate. Enabling Vibration Reduction also can reduce the frame rate, as can a weak battery. Additionally, although you can capture as many as 100 frames in a single burst, the frame rate can drop if the buffer gets full.
Self-timer shooting
![]() You’re no doubt familiar with Self-Timer mode, which delays the shutter release for a few seconds after you press the shutter button, giving you time to dash into the picture. Here’s how it works on the D7100: After you press the shutter button, the autofocus-assist illuminator on the front of the camera starts to blink. If you enabled the camera’s voice via the Beep option on the Custom Setting menu, you also hear a series of beeps. A few seconds later, the camera captures the image.
You’re no doubt familiar with Self-Timer mode, which delays the shutter release for a few seconds after you press the shutter button, giving you time to dash into the picture. Here’s how it works on the D7100: After you press the shutter button, the autofocus-assist illuminator on the front of the camera starts to blink. If you enabled the camera’s voice via the Beep option on the Custom Setting menu, you also hear a series of beeps. A few seconds later, the camera captures the image.
![]() Self-Timer Delay: Choose a delay time of 2, 5, 10, or 20 seconds.
Self-Timer Delay: Choose a delay time of 2, 5, 10, or 20 seconds.
![]() Number of Shots: Specify how many frames you want to capture with each press of the shutter button; the maximum is nine frames.
Number of Shots: Specify how many frames you want to capture with each press of the shutter button; the maximum is nine frames.
![]() Interval between Shots: If you choose to record multiple shots, this setting determines how long the camera waits between each one. You can set the delay to a half second (the default setting), 1 second, 2 seconds, or 3 seconds.
Interval between Shots: If you choose to record multiple shots, this setting determines how long the camera waits between each one. You can set the delay to a half second (the default setting), 1 second, 2 seconds, or 3 seconds.
Two more points to note about self-timer shooting:
![]() Using flash disables the multiple frames recording option. The camera records just a single image, regardless of the Number of Shots setting.
Using flash disables the multiple frames recording option. The camera records just a single image, regardless of the Number of Shots setting.
![]() Cover the viewfinder if possible. Otherwise, light may seep into the camera through the viewfinder and affect exposure. Your camera comes with a viewfinder cover made just for this purpose.
Cover the viewfinder if possible. Otherwise, light may seep into the camera through the viewfinder and affect exposure. Your camera comes with a viewfinder cover made just for this purpose.
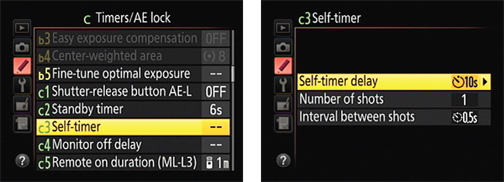
Figure 2-6: You can adjust the self-timer capture delay via the Custom Setting menu.
Mirror lockup (MUP)
One component of the optical system of your camera is a mirror that moves every time you press the shutter button. The small vibration caused by the action of the mirror can result in slight blurring of the image when you use a very slow shutter speed, shoot with a long telephoto lens, or take extreme close-up shots.
![]() To cope with that issue, the D7100 offers mirror-lockup shooting, which delays opening the shutter until after the mirror movement is complete. Enable the feature by setting the Release mode to Mirror Up (labeled MUP on the Release Mode dial).
To cope with that issue, the D7100 offers mirror-lockup shooting, which delays opening the shutter until after the mirror movement is complete. Enable the feature by setting the Release mode to Mirror Up (labeled MUP on the Release Mode dial).
1. After framing and focusing, press the shutter button all the way down to lock up the mirror.
At this point, you can no longer see anything through the viewfinder. Don’t panic — that’s normal. The mirror’s function is to enable you to see in the viewfinder the scene that the lens will capture, and mirror lockup prevents it from serving that purpose.
2. To record the shot, let up on the shutter button and then press it all the way down again.
If you don’t take the shot within about 30 seconds, the camera will record a picture for you automatically.
Remember that you still need to worry about moving the camera itself during the shot — even with the mirror locked up, the slightest jostle of the camera can cause blurring. In other words, situations that call for mirror lockup also call for a tripod. With the kit lens, turn off Vibration Reduction as well; with other lenses, check the manufacturer’s recommendations about this issue.
Adding a remote-control shutter-release further ensures a shake-free shot — even the action of pressing the shutter button can move the camera enough to cause some slight blurring. Or you can just wait the 30 seconds needed for the camera to take the picture automatically, if your subject permits.
Off-the-dial shutter release features
In addition to the Release modes you can select from the Release mode dial, you have access to three other features that tweak the way the shutter is released, all explained next.
Exposure Delay mode
Look for the setting in the Shooting/Display section of the Custom Setting menu, as shown in Figure 2-7. Just don’t forget you enabled the feature, or you’ll drive yourself batty trying to figure out why the camera isn’t responding to your shutter-button finger. (I say this from experience.) To help remind you, the Information display sports the letters DLY under the shutter speed value.
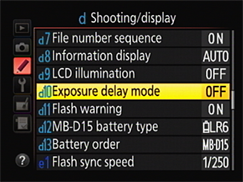
Figure 2-7: Enabling Exposure Delay is another way to make sure that mirror vibrations don’t cause blurring.
Also, the Exposure Delay feature isn’t compatible with Continuous High or Continuous Low shooting — if you enable it in those modes, you get one image for each press of the shutter button rather than a burst of frames.
Enabling remote-control shooting
To use the optional Nikon ML-L3 wireless remote control unit to trigger the shutter button, you must enable the feature via the Remote Control Mode (ML-L3) option on the Shooting menu, as shown on the left in Figure 2-8, or via the Information display control strip, as shown on the right. (Press the i button to activate the control strip.) Either way, press OK to display a screen where you can select from the following capture options:
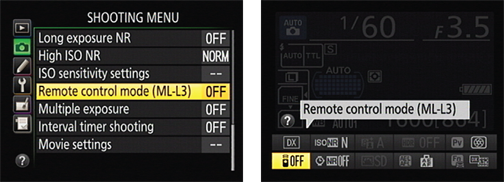
Figure 2-8: Set preferences for wireless remote control shutter release via the Shooting menu or control strip.
![]() Delayed Remote: The shutter is released 2 seconds after you press the button on the remote control unit.
Delayed Remote: The shutter is released 2 seconds after you press the button on the remote control unit.
![]() Quick-Response Remote: The shutter opens immediately after you press the button.
Quick-Response Remote: The shutter opens immediately after you press the button.
![]() Remote Mirror-Up: As its name implies, this setting enables you to use the remote for mirror-up shooting, a technique explained in the preceding section.
Remote Mirror-Up: As its name implies, this setting enables you to use the remote for mirror-up shooting, a technique explained in the preceding section.
![]() Off (default): The camera doesn’t respond to the remote control unit.
Off (default): The camera doesn’t respond to the remote control unit.
Automatic time-lapse photography
With Interval Timer Shooting, you can record a whole memory card full of images and space the shots minutes or even hours apart. This feature enables you to capture a subject as it changes over time — a technique commonly known as time-lapse photography. Here’s how to do it:
1. Set the Release mode to any setting but Self-Timer or Mirror Up.
Those modes aren’t compatible with interval-timing shooting. You also can’t use the optional ML-L3 wireless remote control for this task.
2. Choose Interval Timer Shooting from the Shooting menu, as shown on the left in Figure 2-9, and press OK.
The screen on the right in Figure 2-9 appears.
3. To begin setting up your capture session, highlight Now or Start Time.
• If you want to start the captures right away, highlight Now.
• To set a later start time for the captures, highlight Start Time.
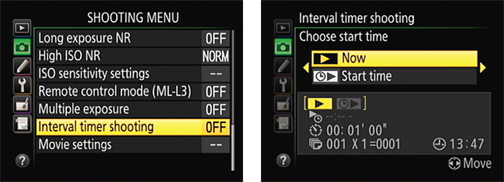
Figure 2-9: The Interval Timer Shooting feature enables you to do time-lapse photography.
4. Press the Multi Selector right to display the capture-setup screen.
If you selected Start Time in Step 3, the screen looks like the one in Figure 2-10. If you selected Now, the Start Time option is dimmed, and the Interval option is highlighted instead.
5. Set up your recording session.
You get three options: Start Time, Interval (time between shots), and Number of Times x Number of Shots (determines total number of shots recorded). The current settings for each option appear in the bottom half of the screen, as labeled in Figure 2-10.
At the top of the screen, value boxes appear. The highlighted box is active and relates to the setting that’s highlighted at the bottom of the screen. For example, in the figure, the hour box for the Start Time setting is active. Press the Multi Selector right or left to cycle through the value boxes; to change the value in a box, press up or down.
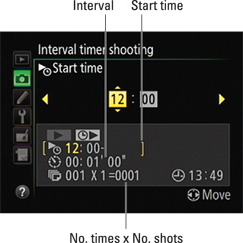
Figure 2-10: Press the Multi Selector right or left to cycle through the setup options; press up or down to change the highlighted value.
A few notes about your options:
• The Interval and Start Time options are based on a 24-hour clock. (The current time appears in the bottom-right corner of the screen and is based upon the date/time information you entered when setting up the camera.)
• For the Interval option, the left column box is for the hour setting; the middle, minutes; and the right, seconds. Make sure that the value you enter is longer than the shutter speed you plan to use.
• For the Start Time option, you can set hour and minute values only.
• The Number of Times value multiplied by the Number of Shots per interval determines how many pictures will be recorded.
6. Press the Multi Selector right until you see the screen shown in Figure 2-11.
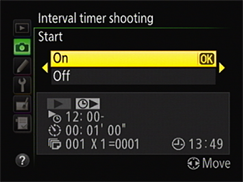
Figure 2-11: When you see this screen, highlight On and press OK to begin timed interval shooting.
7. Highlight On and press OK.
If you selected Now as your interval-capture starting option, the first shot is recorded about 3 seconds later. If you set a delayed start time, the camera displays a “Timer Active” message for a few seconds, and then the monitor turns off.
A few final factoids:
![]() Monitoring the shot progress: The letters INTVL blink in the Control panel while an interval sequence is in progress. Before each shot is captured, the display changes to show the number of intervals remaining and the number of shots remaining in the current interval. The first value appears in the space usually occupied by the shutter speed; the second takes the place of the f-stop setting. You also can view the values at any time by pressing the shutter button halfway.
Monitoring the shot progress: The letters INTVL blink in the Control panel while an interval sequence is in progress. Before each shot is captured, the display changes to show the number of intervals remaining and the number of shots remaining in the current interval. The first value appears in the space usually occupied by the shutter speed; the second takes the place of the f-stop setting. You also can view the values at any time by pressing the shutter button halfway.
![]() Interrupting interval shooting: Between shots, bring up the Interval Timing menu item, press OK, highlight Pause, and press OK. You can also interrupt the interval sequence by turning off the camera — which gives you the chance to install an empty memory card if the current ones are full. When you turn on the camera again, reselect the Interval Timer Shooting menu option, press the Multi Selector right, choose Restart, and press OK to continue shooting. To cancel the sequence entirely, choose Off instead of Restart.
Interrupting interval shooting: Between shots, bring up the Interval Timing menu item, press OK, highlight Pause, and press OK. You can also interrupt the interval sequence by turning off the camera — which gives you the chance to install an empty memory card if the current ones are full. When you turn on the camera again, reselect the Interval Timer Shooting menu option, press the Multi Selector right, choose Restart, and press OK to continue shooting. To cancel the sequence entirely, choose Off instead of Restart.
![]() Autofocusing: If you’re using autofocusing, the camera initiates focusing before each shot.
Autofocusing: If you’re using autofocusing, the camera initiates focusing before each shot.
![]() Between shots: You can view pictures in Playback mode or adjust menu settings between shots. The monitor goes dark about 4 seconds before the next shot is taken.
Between shots: You can view pictures in Playback mode or adjust menu settings between shots. The monitor goes dark about 4 seconds before the next shot is taken.
Choosing the Right Image Size and Image Quality Settings
Almost every review of the D7100 contains glowing reports about the camera’s picture quality. As you’ve no doubt discovered, those claims are true: This baby can create large, beautiful images. What you may not have discovered is that Nikon’s default Image Quality setting isn’t the highest that the D7100 offers.
Why would Nikon do such a thing? Why not set up the camera to produce the best images right out of the box? The answer is that using the top setting has some downsides. Nikon’s default choice represents a compromise between avoiding those disadvantages while still producing images that will please most photographers.
Whether that compromise is right for you, however, depends on your needs. To help you decide, the next several sections of this chapter explain the Image Quality setting, along with the Image Size setting, which is also critical to the quality of images that you print. Just in case you’re having quality problems related to other issues, though, the next section provides a defect diagnosis guide.
Diagnosing quality problems
When I say picture quality, I’m not talking about the composition, exposure, or other traditional characteristics of a photograph. Instead, I’m referring to how finely the image is rendered in the digital sense. Figure 2-12 illustrates the concept: The first example is a high-quality image with clear details and smooth color transitions. The other examples show five common image defects.
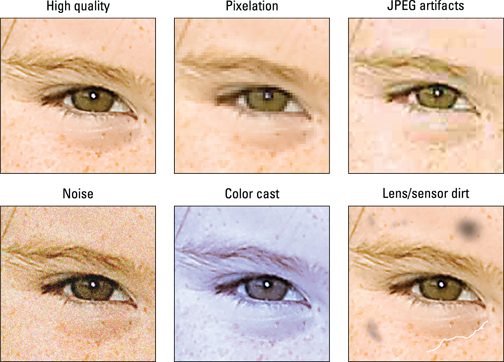
Figure 2-12: Refer to this symptom guide to determine the cause of poor image quality.
Each of these defects is related to a different issue, and only one is affected by the Image Quality setting on your D7100. So if you aren’t happy with your image quality, first compare your photos to those in the figure to properly diagnose the problem. Then try these remedies:
![]() Pixelation: When an image doesn’t have enough pixels (the colored tiles used to create digital images), details aren’t clear, and curved and diagonal lines appear jagged. The fix is to increase image resolution, which you do via the Image Size control. See the next section, “Considering image size: How many pixels are enough?” for details.
Pixelation: When an image doesn’t have enough pixels (the colored tiles used to create digital images), details aren’t clear, and curved and diagonal lines appear jagged. The fix is to increase image resolution, which you do via the Image Size control. See the next section, “Considering image size: How many pixels are enough?” for details.
![]() JPEG artifacts: The “parquet tile” texture and random color defects that mar the third image in Figure 2-12 can occur in photos captured in the JPEG (jay-peg) file format, which is why these flaws are referred to as JPEG artifacts. This is the defect related to the Image Quality setting; see “Understanding Image Quality options (JPEG or Raw),” later in this chapter, to find out more.
JPEG artifacts: The “parquet tile” texture and random color defects that mar the third image in Figure 2-12 can occur in photos captured in the JPEG (jay-peg) file format, which is why these flaws are referred to as JPEG artifacts. This is the defect related to the Image Quality setting; see “Understanding Image Quality options (JPEG or Raw),” later in this chapter, to find out more.
![]() Noise: This defect gives your image a speckled look, as shown in the lower-left example in Figure 2-12. Noise can occur with very long exposure times or when you choose a high ISO Sensitivity setting on your camera. You can explore both issues in Chapter 7.
Noise: This defect gives your image a speckled look, as shown in the lower-left example in Figure 2-12. Noise can occur with very long exposure times or when you choose a high ISO Sensitivity setting on your camera. You can explore both issues in Chapter 7.
![]() Color cast: If your colors are seriously out of whack, as shown in the lower-middle example in the figure, try adjusting the camera’s White Balance setting. Chapter 8 covers this control and other color issues.
Color cast: If your colors are seriously out of whack, as shown in the lower-middle example in the figure, try adjusting the camera’s White Balance setting. Chapter 8 covers this control and other color issues.
![]() Lens/sensor dirt: A dirty lens is the first possible cause of the kind of defects you see in the last example in the figure. If cleaning your lens doesn’t solve the problem, dust or dirt may have made its way onto the camera’s image sensor.
Lens/sensor dirt: A dirty lens is the first possible cause of the kind of defects you see in the last example in the figure. If cleaning your lens doesn’t solve the problem, dust or dirt may have made its way onto the camera’s image sensor.
Your D7100 offers an automated sensor-cleaning mechanism (you control its operation via the Clean Image Sensor command on the Setup menu). But if you frequently change lenses or shoot in a dirty environment, the internal cleaning mechanism may not be adequate, in which case a manual sensor cleaning is necessary. You can do this job yourself, but I don’t recommend it. Image sensors are delicate beings, and you can easily damage them if you aren’t careful. Instead, find a local camera store that offers this service. Sensor cleaning typically costs about $50, but some places offer the service free if you bought the camera there.
I should also tell you that I exaggerated the flaws in my example images to make the symptoms easier to see. With the exception of an unwanted color cast or a big blob of lens or sensor dirt, these defects may not even be noticeable unless you print or view your image at a very large size. And the subject matter of your image may camouflage some flaws; most people probably wouldn’t detect a little JPEG artifacting in a photograph of a densely wooded forest, for example.
In other words, don’t consider Figure 2-12 as an indication that your D7100 is suspect in the image quality department. First, any digital camera can produce these defects under the right circumstances. Second, by following the guidelines in this chapter and the others mentioned in the preceding list, you can resolve any quality issues that you may encounter.
Considering image size: How many pixels are enough?
Like other digital devices, your D7100 creates pictures out of pixels, which is short for picture elements. You can see some pixels close up in the right example of Figure 2-13, which shows a greatly magnified view of the eye area in the left image.
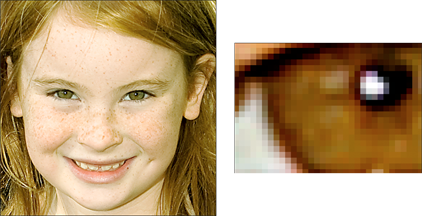
Figure 2-13: Pixels are the building blocks of digital photos.
You can specify the pixel count of your images, also known as the resolution, in two ways:
![]()
![]() Qual button + Sub-command dial: Hold down the Qual (Quality) button while rotating the Sub-command dial to cycle through the available settings. You can monitor the setting in the Control panel and Information display, in the areas highlighted in Figure 2-14.
Qual button + Sub-command dial: Hold down the Qual (Quality) button while rotating the Sub-command dial to cycle through the available settings. You can monitor the setting in the Control panel and Information display, in the areas highlighted in Figure 2-14.
![]() Shooting menu: Select the Image Size option and press OK to access the available settings, as shown in Figure 2-15.
Shooting menu: Select the Image Size option and press OK to access the available settings, as shown in Figure 2-15.
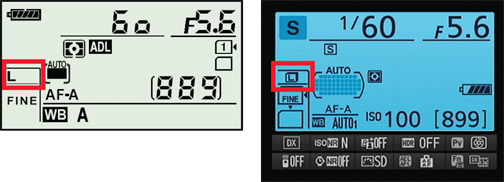
Figure 2-14: The current setting appears in the Control panel and Information display.
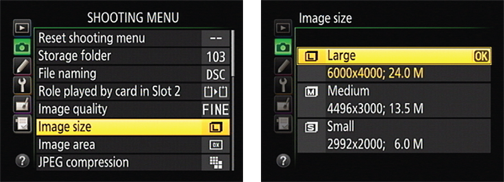
Figure 2-15: You can view the pixel count for each setting in the Shooting menu.
Either way, you can choose from three settings: Large, Medium, and Small. You can view the resulting resolution value for each setting if you adjust the option via the Shooting menu, as shown on the right in Figure 2-15.
The first pair of numbers shown for each setting represents the image pixel dimensions — that is, the number of horizontal pixels and the number of vertical pixels. The second value indicates the approximate total resolution, which you get by multiplying the two pixel dimension values. This number is usually stated in megapixels, abbreviated M on the menu screen (but typically abbreviated as MP in other resources, including this book). One megapixel equals 1 million pixels.
So how many pixels are enough? To make the call, you need to understand the three ways that pixel count affects your pictures:
![]() Print size: Pixel count determines the size at which you can produce a high-quality print. If you don’t have enough pixels, your prints may exhibit the defects you see in the pixelation example in Figure 2-12, or worse, you may be able to see the individual pixels, as in the right example in Figure 2-13. Depending on your photo printer, you typically need anywhere from 200 to 300 pixels per linear inch, or ppi, of the print. To produce an 8 x 10 print at 200 ppi, for example, you need a pixel count of 1600 x 2000, or about 3.2 megapixels.
Print size: Pixel count determines the size at which you can produce a high-quality print. If you don’t have enough pixels, your prints may exhibit the defects you see in the pixelation example in Figure 2-12, or worse, you may be able to see the individual pixels, as in the right example in Figure 2-13. Depending on your photo printer, you typically need anywhere from 200 to 300 pixels per linear inch, or ppi, of the print. To produce an 8 x 10 print at 200 ppi, for example, you need a pixel count of 1600 x 2000, or about 3.2 megapixels.
 Even though many photo-editing programs enable you to add pixels to an existing image, doing so isn’t a good idea. For reasons I won’t bore you with, adding pixels — known as upsampling — doesn’t enable you to successfully enlarge your photo. In fact, upsampling typically makes matters worse.
![]() Screen display size: Resolution doesn’t affect the quality of images viewed on a monitor, television, or other screen device the way it does for printed photos. Instead, resolution determines the size at which the image appears. This issue is one of the most misunderstood aspects of digital photography, so I explain it thoroughly in Chapter 6. For now, just know that you need way fewer pixels for onscreen photos than you do for printed photos. In fact, even the Small resolution setting on your camera creates a picture too big to be viewed in its entirety in most e-mail programs.
Screen display size: Resolution doesn’t affect the quality of images viewed on a monitor, television, or other screen device the way it does for printed photos. Instead, resolution determines the size at which the image appears. This issue is one of the most misunderstood aspects of digital photography, so I explain it thoroughly in Chapter 6. For now, just know that you need way fewer pixels for onscreen photos than you do for printed photos. In fact, even the Small resolution setting on your camera creates a picture too big to be viewed in its entirety in most e-mail programs.
![]() File size: Every additional pixel increases the amount of data required to create a digital picture file. So a higher-resolution image has a larger file size than a low-resolution image.
File size: Every additional pixel increases the amount of data required to create a digital picture file. So a higher-resolution image has a larger file size than a low-resolution image.
 Large files present several problems:
• You can store fewer images on your memory card, on your computer’s hard drive, and on removable storage media such as a DVD.
• When you share photos online, larger files take longer to upload and download.
• When you edit your photos in your photo software, your computer needs more resources and time to process large files.
As you can see, resolution is a bit of a sticky wicket. What if you aren’t sure how large you want to print your images? What if you want to print your photos and share them online?
I take the better-safe-than-sorry route, which leads to the following recommendations about which Image Size setting to use:
![]() Always shoot at a resolution suitable for print. You then can create a low-resolution copy of the image in your photo editor for use online. In fact, your camera offers a built-in resizing option; Chapter 6 shows you how to use it.
Always shoot at a resolution suitable for print. You then can create a low-resolution copy of the image in your photo editor for use online. In fact, your camera offers a built-in resizing option; Chapter 6 shows you how to use it.
![]() For everyday images, Medium is a good choice. I find the Large setting (24.0MP) to be overkill for most casual shooting, which means that you’re creating huge files for no good reason. Keep in mind that even at the Small setting (2992 x 2000 pixels), you have enough resolution to produce an 8-x-10-inch print at 200 ppi.
For everyday images, Medium is a good choice. I find the Large setting (24.0MP) to be overkill for most casual shooting, which means that you’re creating huge files for no good reason. Keep in mind that even at the Small setting (2992 x 2000 pixels), you have enough resolution to produce an 8-x-10-inch print at 200 ppi.
![]()
 Choose Large for an image that you plan to crop, print very large, or both. The benefit of maxing out resolution is that you have the flexibility to crop your photo and still generate a decent-sized print of the remaining image. Figures 2-16 and 2-17 offer an example. When I was shooting this photo, I couldn’t get close enough to fill the frame with the main subject of interest, the two juvenile herons in the center. But because I had the resolution cranked up to Large, I could later crop the shot to the composition you see in Figure 2-17 and still produce a great print. In fact, I could’ve printed the cropped image at a much larger size than fits here.
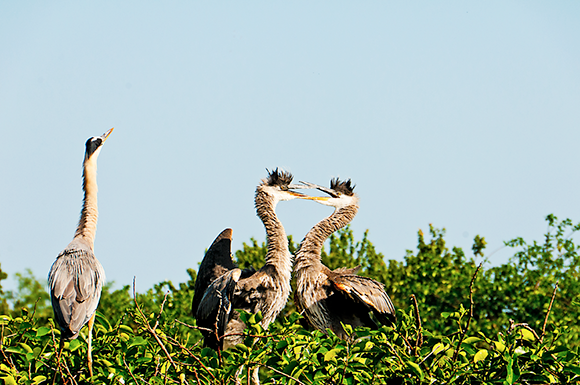
Figure 2-16: I couldn’t get close enough to fill the frame with the subject, so I captured this image at the Large resolution setting.
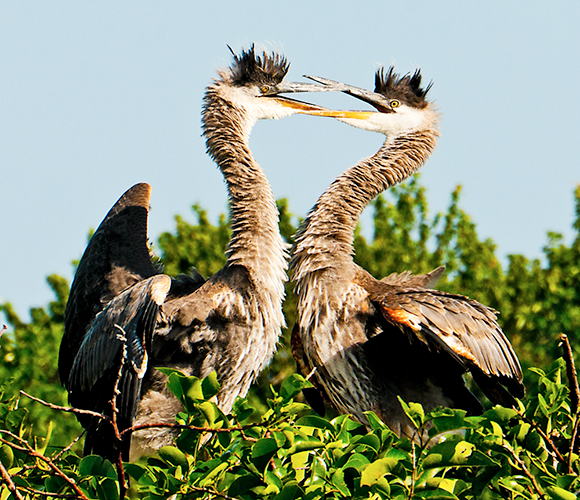
Figure 2-17: A high-resolution original enabled me to crop the photo tightly and still have enough pixels to produce a quality print.
Understanding Image Quality options (JPEG or Raw)
If I had my druthers, the Image Quality option would instead be called File Type because that’s what the setting controls.
At any rate, your D7100 offers two file types: JPEG and Camera Raw, or just Raw for short. You also can choose to record two copies of each picture, one in the Raw format and one in the JPEG format.
You can view the current format in the Control panel and Information display, as shown in Figure 2-18. For JPEG, the displays indicate the JPEG quality level — Fine, Normal, or Basic. (The next section explains these three options.)
The rest of this chapter explains the pros and cons of each file format to help you decide which one works best for the types of pictures you take. If you already have your mind made up, you can select the format you want to use in two ways:
![]()
![]() Qual button + Main command dial: Hold down the Qual (Quality) button while rotating the Main command dial to cycle through all the format options.
Qual button + Main command dial: Hold down the Qual (Quality) button while rotating the Main command dial to cycle through all the format options.
Be sure to spin the Main command dial: Rotating the Sub-command dial while pressing the Qual button adjusts the Image Size (resolution) setting.
![]() Shooting menu: You also can set the Image Quality option via the Shooting menu, as shown in Figure 2-19.
Shooting menu: You also can set the Image Quality option via the Shooting menu, as shown in Figure 2-19.
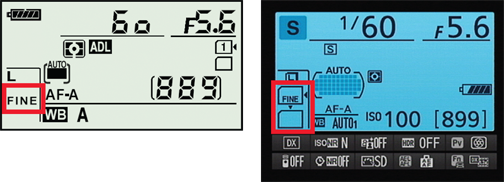
Figure 2-18: The current Image Quality setting appears here.
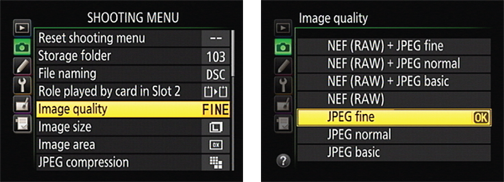
Figure 2-19: The Shooting menu enables you to select the Image Quality setting plus a few related options.
JPEG: The imaging (and web) standard
Pronounced jay-peg, the JPEG format is the default setting on your D7100, as it is for most digital cameras. The next two sections tell you what you need to know about JPEG.
JPEG pros and cons
JPEG has become the de facto digital camera file format for two main reasons:
![]() Immediate usability: All web browsers and e-mail programs can display JPEG files, so you can share your pictures online immediately after you shoot them. The same can’t be said for Raw (NEF) files, which must be converted to JPEG for online use. You also can print and edit JPEG files immediately, whether you want to use your own software or have pictures printed at a retail site. You can view and print Raw files by using Nikon ViewNX 2, the software that comes with your camera, as well as from some third-party programs. But many programs can’t open Raw images, and retail printing sites typically don’t accept Raw files either. You can read more about the conversion process in the upcoming section “Raw (NEF): The purist’s choice.”
Immediate usability: All web browsers and e-mail programs can display JPEG files, so you can share your pictures online immediately after you shoot them. The same can’t be said for Raw (NEF) files, which must be converted to JPEG for online use. You also can print and edit JPEG files immediately, whether you want to use your own software or have pictures printed at a retail site. You can view and print Raw files by using Nikon ViewNX 2, the software that comes with your camera, as well as from some third-party programs. But many programs can’t open Raw images, and retail printing sites typically don’t accept Raw files either. You can read more about the conversion process in the upcoming section “Raw (NEF): The purist’s choice.”
![]() Small files: JPEG files are much smaller than Raw files. And smaller files consume less room on your camera memory card and in your computer’s storage tank.
Small files: JPEG files are much smaller than Raw files. And smaller files consume less room on your camera memory card and in your computer’s storage tank.
The downside — you knew there had to be one — is that JPEG creates smaller files by applying lossy compression. This process actually throws away some image data. Too much compression leads to the defects you see in the JPEG artifacts example shown earlier in Figure 2-12.
Customizing your JPEG capture settings
You have two levels of control over how your JPEG images are recorded:
![]() Fine, Normal, or Basic: When choosing the Image Quality setting, you can select from three JPEG options, each of which produces a different level of compression.
Fine, Normal, or Basic: When choosing the Image Quality setting, you can select from three JPEG options, each of which produces a different level of compression.
• JPEG Fine: At this setting, the compression ratio is 1:4 — that is, the file is four times smaller than it’d otherwise be. In plain English, that means that very little compression is applied, so you shouldn’t see many compression artifacts, if any.
• JPEG Normal: Switch to Normal, and the compression ratio rises to 1:8. The chance of seeing some artifacting increases as well. This setting is the default option.
• JPEG Basic: Shift to this setting, and the compression ratio jumps to 1:16. That’s a substantial amount of compression and brings more risk of artifacting.
![]() Compression priority: The size of the file produced at any of the three quality levels varies from picture to picture depending on the subject matter. The difference occurs because a picture with lots of detail and a wide color palette can’t be as easily compressed as one with large areas of flat color and a limited color spectrum.
Compression priority: The size of the file produced at any of the three quality levels varies from picture to picture depending on the subject matter. The difference occurs because a picture with lots of detail and a wide color palette can’t be as easily compressed as one with large areas of flat color and a limited color spectrum.
By default, the camera applies compression with a goal of producing consistent file sizes, which means that highly detailed photos can take a larger quality hit from compression. But through the JPEG Compression option on the Shooting menu, shown in Figure 2-20, you can tell the camera to instead give priority to producing optimum picture quality when applying compression. To go that route, choose the Optimal Quality setting, as shown in the figure. For the default option, choose Size Priority.
Note that the compression ratios just mentioned for the Fine, Normal, and Basic options assume that you use the Size Priority option. The ratios will vary from picture to picture, as will the picture file sizes, if you select Optimal Quality.
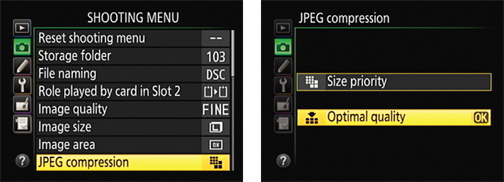
Figure 2-20: Set the JPEG Compression option to Optimal Quality to get the best-looking JPEG pictures.
Even if you choose the Size Priority option and combine it with JPEG Basic — thereby producing the lowest-quality JPEG results — you don’t get anywhere near the level of artifacting that you see in my example in Figure 2-12, however. Again, that example is exaggerated to help you be able to recognize artifacting defects and understand how they differ from other image quality issues. In fact, if you keep your image print or display size small, you aren’t likely to notice a great deal of quality difference between the compression settings. It’s only when you greatly enlarge a photo that the differences become apparent.
Nikon chose the Normal and Size Priority options as the default JPEG settings — in other words, a notch down from the top quality settings. For my money, though, the file-size benefit you gain from dropping the quality down from Fine to Normal and using the Size Priority option instead of Optimal Quality isn’t worth even a little quality loss, especially with the price of camera memory cards getting lower every day. You never know when a casual snapshot is going to turn out to be so great that you want to print or display it large enough that even minor quality loss becomes a concern. And of all the defects that you can correct in a photo editor, artifacting is one of the hardest to remove. So if I shoot in the JPEG format, I stick with Fine and set the JPEG Compression option to Optimal Quality.
However, I suggest that you do your own test shots, carefully inspect the results in your photo editor, and make your own judgment about what level of artifacting you can accept. Artifacting is often much easier to spot when you view images onscreen. It’s difficult to reproduce artifacting here in print because the print process obscures some of the tiny defects caused by compression.
If you don’t want any risk of artifacting, bypass JPEG altogether and change the file type to Raw (NEF), explained next.
Raw (NEF): The purist’s choice
The second picture file type you can create is Camera Raw, or just Raw (as in uncooked) for short.
Raw pros and cons
Raw is popular with advanced, very demanding photographers for these reasons:
![]() Greater creative control: With JPEG, internal camera software tweaks your images, making adjustments to color, exposure, and sharpness as needed to produce the results that Nikon believes its customers prefer. With Raw, the camera simply records the original, unprocessed image data. The photographer then uses a tool known as a Raw converter to produce the actual image, making decisions about color, exposure, and so on at that point.
Greater creative control: With JPEG, internal camera software tweaks your images, making adjustments to color, exposure, and sharpness as needed to produce the results that Nikon believes its customers prefer. With Raw, the camera simply records the original, unprocessed image data. The photographer then uses a tool known as a Raw converter to produce the actual image, making decisions about color, exposure, and so on at that point.
![]() Higher bit depth: Bit depth is a measure of how many distinct color values an image file can contain. When you choose JPEG as the Image Quality setting, your pictures contain 8 bits each for the red, blue, and green color components, or channels, that make up a digital image, for a total of 24 bits. That translates to roughly 16.7 million possible colors.
Higher bit depth: Bit depth is a measure of how many distinct color values an image file can contain. When you choose JPEG as the Image Quality setting, your pictures contain 8 bits each for the red, blue, and green color components, or channels, that make up a digital image, for a total of 24 bits. That translates to roughly 16.7 million possible colors.
Choosing the Raw setting delivers a higher bit count. You can set the camera to collect 12 bits per channel or 14 bits per channel. (More about that option and some other Raw-related options momentarily.)
Although jumping from 8 to 14 bits sounds like a huge difference, you may not really ever notice any impact on your photos — that 8-bit palette of 16.7 million values is more than enough for superb images. Where having the extra bits can come in handy is if you really need to adjust exposure, contrast, or color after the shot in your photo-editing program. In cases where you apply extreme adjustments, having the extra original bits sometimes helps avoid a problem known as banding or posterization, which creates abrupt color breaks where you should see smooth, seamless transitions. (A higher bit depth doesn’t always prevent the problem, however, so don’t expect miracles.)
![]() Better picture quality: Raw doesn’t apply the destructive, lossy compression associated with JPEG, so you don’t run the risk of the artifacting that can occur with JPEG. On the D7100, you can apply two alternative types of compression to reduce Raw file sizes slightly, but neither impact image quality to the extent of JPEG compression.
Better picture quality: Raw doesn’t apply the destructive, lossy compression associated with JPEG, so you don’t run the risk of the artifacting that can occur with JPEG. On the D7100, you can apply two alternative types of compression to reduce Raw file sizes slightly, but neither impact image quality to the extent of JPEG compression.
As with most things in life, Raw isn’t without its disadvantages, however. To wit:
![]() You can’t do much with your pictures until you process them in a Raw converter. You can’t share them online, for example, or put them into a text document or multimedia presentation. You can print them immediately if you use Nikon ViewNX 2 as well as some advanced photo programs, but most entry-level photo programs require you to convert the Raw files to a standard format such as JPEG or TIFF (a popular format for images destined for professional printing) first.
You can’t do much with your pictures until you process them in a Raw converter. You can’t share them online, for example, or put them into a text document or multimedia presentation. You can print them immediately if you use Nikon ViewNX 2 as well as some advanced photo programs, but most entry-level photo programs require you to convert the Raw files to a standard format such as JPEG or TIFF (a popular format for images destined for professional printing) first.
![]()
 To get the full benefit of Raw, you need software other than Nikon ViewNX 2. The ViewNX software that ships free with your camera does have a command that enables you to convert Raw files to JPEG or to TIFF. However, this free tool gives you limited control over how your original data is translated in terms of color, exposure, and other characteristics — which defeats one of the primary purposes of shooting Raw.
A different Nikon program, Nikon Capture NX 2, offers a sophisticated Raw converter, but it costs about $180. You can read more about Capture NX 2 as well as some competing programs in Chapter 6.
Of course, the D7100 also offers an in-camera Raw converter, which I also cover in Chapter 6. But although it’s convenient, this tool isn’t the easiest to use because you must rely on the small camera monitor when making judgments about color, exposure, sharpness, and so on. The in-camera tool also doesn’t offer the complete cadre of features available in Capture NX 2 and other converter software utilities.
![]() Raw files are larger than JPEGs. The type of file compression that you can enable for Raw files doesn’t degrade image quality to the degree you get with JPEG compression, but the tradeoff is a larger file. In addition, Raw files are always captured at the maximum resolution available on the camera, even if you don’t really need all those pixels. For both reasons, Raw files are significantly larger than JPEGs, so they take up more room on your memory card and on your computer’s hard drive or other picture-storage device.
Raw files are larger than JPEGs. The type of file compression that you can enable for Raw files doesn’t degrade image quality to the degree you get with JPEG compression, but the tradeoff is a larger file. In addition, Raw files are always captured at the maximum resolution available on the camera, even if you don’t really need all those pixels. For both reasons, Raw files are significantly larger than JPEGs, so they take up more room on your memory card and on your computer’s hard drive or other picture-storage device.
Whether the upside of Raw outweighs the downside is a decision that you need to ponder based on your photographic needs, your schedule, and your computer-comfort level. If you do decide to try Raw shooting, the next section explains a few Raw setup options.
Customizing your Raw capture settings
If you opt for Raw, you can control three aspects of how your pictures are captured:
![]() Raw only or Raw+JPEG: You can choose to capture the picture in the Raw format or create two files for each shot, one in the Raw format and another in the JPEG format, as shown in Figure 2-21. The figure shows the list of options that appears when you change the Image Quality setting through the Shooting menu; you can select from the same settings when you adjust the option by pressing the Qual button and rotating the Main command dial.
Raw only or Raw+JPEG: You can choose to capture the picture in the Raw format or create two files for each shot, one in the Raw format and another in the JPEG format, as shown in Figure 2-21. The figure shows the list of options that appears when you change the Image Quality setting through the Shooting menu; you can select from the same settings when you adjust the option by pressing the Qual button and rotating the Main command dial.
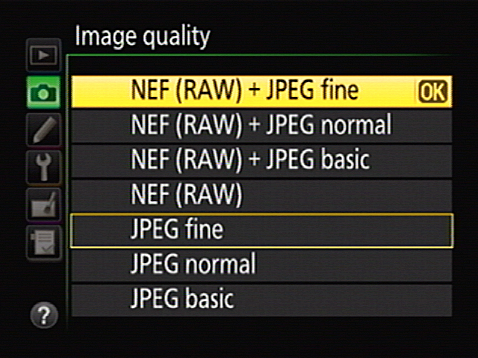
Figure 2-21: You can create two files for each picture, one in the Raw format and a second in the JPEG format.
For Raw+JPEG, you can specify whether you want the JPEG version captured at the Fine, Normal, or Basic quality level, and you can set the resolution of the JPEG file through the Image Size option, explained earlier in this chapter. Again, the Image Size setting doesn’t affect the Raw file; the camera always captures the file at the maximum resolution.
 I often choose the Raw+JPEG Fine option when I’m shooting pictures I want to share right away with people who don’t have software for viewing Raw files. I upload the JPEGs to a photo-sharing site where everyone can view them and order prints, and then I process the Raw versions of my favorite images for my own use when I have time. Having the JPEG version also enables you to display your photos on a DVD player or TV that has a slot for an SD memory card — most can’t display Raw files but can handle JPEGs. Ditto for portable media players and digital photo frames.
![]() Raw bit depth: You can specify whether you want a 12-bit Raw file or a 14-bit Raw file. More bits mean a bigger file but a larger spectrum of possible colors, as explained in the preceding section. You make the call through the NEF (Raw) Recording option on the Shooting menu, as shown in Figure 2-22. The default setting is 14 bits.
Raw bit depth: You can specify whether you want a 12-bit Raw file or a 14-bit Raw file. More bits mean a bigger file but a larger spectrum of possible colors, as explained in the preceding section. You make the call through the NEF (Raw) Recording option on the Shooting menu, as shown in Figure 2-22. The default setting is 14 bits.
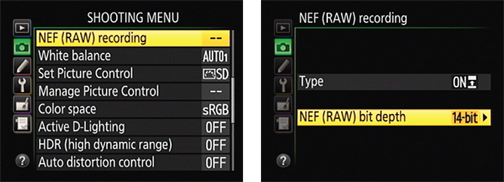
Figure 2-22: Set the file bit depth through this Shooting menu option.
![]() Raw compression: By default, the camera applies lossless compression to Raw files. As its name implies, this type of compression results in no visible loss of image quality and yet still reduces file sizes by about 20 to 40 percent. In addition, the compression is reversible, meaning that any quality loss that does occur through the compression process is reversed at the time you process your Raw images. Technically, some original data may be altered, but you’re unlikely to notice the difference in your pictures.
Raw compression: By default, the camera applies lossless compression to Raw files. As its name implies, this type of compression results in no visible loss of image quality and yet still reduces file sizes by about 20 to 40 percent. In addition, the compression is reversible, meaning that any quality loss that does occur through the compression process is reversed at the time you process your Raw images. Technically, some original data may be altered, but you’re unlikely to notice the difference in your pictures.
You can change to a setting that delivers a greater degree of file-size savings if you prefer. Again, select the Raw (NEF) Recording option on the Shooting menu, but this time choose Type, as shown on the left in Figure 2-23, and press OK to display the screen shown on the right. Selecting the Compressed setting instead of Lossless Compressed shrinks files by about 35 to 55 percent. Nikon promises that this setting has “almost no effect” on image quality. But the compression in this case is not reversible, so if you do experience some quality loss, there’s no going back.
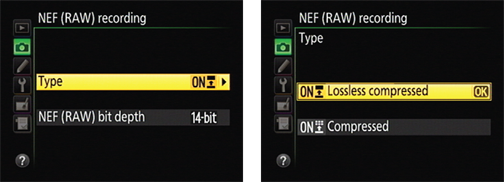
Figure 2-23: To keep Raw file compression to a minimum, select the Lossless Compressed option.
If you choose to create both a Raw and JPEG file, note a couple of things:
![]() If you’re using only one memory card, you see the JPEG version of the photo during playback. However, the Image Quality data that appears with the photo reflects your capture setting (Raw+Basic, for example). The size value relates to the JPEG version; Raw files are always captured at the Large size. To use the in-camera Raw processing option on the Retouch menu, display the JPEG image and then proceed as outlined in Chapter 6.
If you’re using only one memory card, you see the JPEG version of the photo during playback. However, the Image Quality data that appears with the photo reflects your capture setting (Raw+Basic, for example). The size value relates to the JPEG version; Raw files are always captured at the Large size. To use the in-camera Raw processing option on the Retouch menu, display the JPEG image and then proceed as outlined in Chapter 6.
![]() If two memory cards are installed, you can choose to send the Raw files to one card and the JPEG files to another by setting the Role Played by Card in Slot 2 option on the Shooting menu to Raw Slot 1 - JPEG Slot 2 setting.
If two memory cards are installed, you can choose to send the Raw files to one card and the JPEG files to another by setting the Role Played by Card in Slot 2 option on the Shooting menu to Raw Slot 1 - JPEG Slot 2 setting.
![]()
 If both the JPEG and Raw files are stored on the same memory card, deleting the JPEG image also deletes the Raw copy if you use the in-camera delete function. After you transfer the two files to your computer, deleting one doesn’t affect the other.
Chapter 5 explains more about viewing and deleting photos. Chapter 1 explains how to configure a two-memory-card setup.
Reducing the Image Area (DX versus 1.3x Crop)
Normally, your D7100 captures photos using the entire image sensor, which is the part of the camera on which the picture is formed — similar to the negative in a film camera. However, you have the option of telling the camera to record the picture using a smaller area at the center of the sensor. When you use this alternative setting, the result is the same as if you shot the picture using the entire sensor and then cropped the image by a factor of 1.3.
If you opt for the 1.3x crop setting, framing guidelines appear in the viewfinder to show you the image area that will be captured, as shown in Figure 2-24. You also see a little crop symbol in the upper-right corner of the viewfinder.
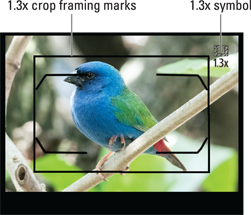
Figure 2-24: Using the 1.3x crop option captures the scene using a smaller portion of the image sensor.
What’s the point, you ask? Well, the idea is that you wind up with a picture that has the same angle of view you would get by switching to a lens with a longer focal length. In simplest terms, your subject fills more of the frame, and less background is included. To put it another way, you can think of this option as providing on-the-fly photo cropping.
Of course, because you’re using a smaller portion of the image sensor, you’re recording the image using fewer pixels, so the resulting image has a lower resolution than one captured using the entire sensor. And as discussed earlier in this chapter, the higher the pixel count, the larger you can print the photo and maintain good print quality. On the flip side, because the camera is working with fewer pixels, the resulting file size is smaller, and it takes less time to record the image to the camera memory card. You also can capture more frames per second when you set the Release mode to the Continuous High or Continuous Low options, as I detail in the earlier section devoted to those two Release modes.
Personally, I prefer to shoot using the entire sensor and then crop the image myself if I deem it necessary. You can even crop the image in the camera, by using the Trim feature that I cover in Chapter 10. And even when I’m shooting fast action, I don’t find that the small bump up in the maximum frames per second worth the loss of frame area in most situations.
If you want to try out the 1.3x Image Area option for yourself, you can set things up in several ways:
![]()
![]() Information display control strip: After displaying the Information screen (press the Info button), press the i button to activate the control strip at the bottom of the screen. Highlight the Image Area setting, as shown on the left in Figure 2-25, and press OK to reveal the screen shown on the right.
Information display control strip: After displaying the Information screen (press the Info button), press the i button to activate the control strip at the bottom of the screen. Highlight the Image Area setting, as shown on the left in Figure 2-25, and press OK to reveal the screen shown on the right.
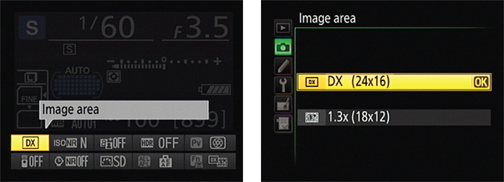
Figure 2-25: You can adjust the Image Area setting by using the Information display control strip.
 The whole-sensor setting is the one labeled DX; the cropped setting is named 1.3x. The numbers in parentheses indicate the image sensor size in millimeters: 24 x 16 for the DX setting, and 18 x 12mm for the cropped setting. (DX is simply the Nikon name for the size of sensor used in the D7100 and many other Nikon dSLR cameras.)
![]() Fn button + command dial: By default, the Fn button is set to provide access to the Image Area setting. Press the button while rotating either command dial to toggle between the DX and 1.3x settings. As you change the setting, the viewfinder display, Information screen, and Control panel display the selected sensor size (24 x 16 or 18 x 12).
Fn button + command dial: By default, the Fn button is set to provide access to the Image Area setting. Press the button while rotating either command dial to toggle between the DX and 1.3x settings. As you change the setting, the viewfinder display, Information screen, and Control panel display the selected sensor size (24 x 16 or 18 x 12).
![]() Shooting menu: You also can adjust the setting via the Image Area option on the Shooting menu, as shown in Figure 2-26.
Shooting menu: You also can adjust the setting via the Image Area option on the Shooting menu, as shown in Figure 2-26.
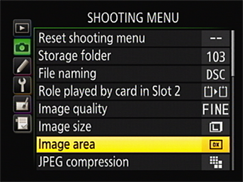
Figure 2-26: You can also look for the option on the Shooting menu.

 What does [r 24] in the viewfinder mean?