![]()
8
Manipulating Focus and Color
In This Chapter
![]() Controlling the camera’s autofocusing performance
Controlling the camera’s autofocusing performance
![]() Understanding depth of field
Understanding depth of field
![]() Exploring white balance and its effect on color
Exploring white balance and its effect on color
![]() Investigating other color options
Investigating other color options
To many people, the word focus has just one interpretation when applied to a photograph: Either the subject is in focus or it’s blurry. But an artful photographer knows that there’s more to focus than simply getting a sharp image of a subject. You also need to consider depth of field, or the distance over which objects appear sharply focused.
This chapter explains all the ways to control depth of field and also explains how to use your camera’s advanced focusing options. Additionally, this chapter dives into the topic of color, explaining such features as white balance, which compensates for the varying color casts created by different light sources.
Note: Autofocusing features covered here relate to viewfinder photography; Chapter 4 focuses (yuk yuk) on Live View and movie autofocusing, which involves a different techniques.
Mastering the Autofocusing System
The first step in putting the autofocus system to work is to set the Focus-mode selector on the front of the camera to AF, as shown in Figure 8-1. With the 18–105mm kit lens, also set the switch on the lens to the A position, as shown in the figure.
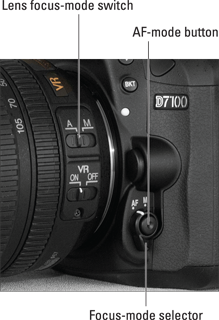
Figure 8-1: These switches control whether the camera uses autofocusing or manual focusing.
For autofocusing, you then need to specify two settings:
![]() Autofocus mode: Determines whether the camera locks focus when you press the shutter button halfway, or it continually adjusts focus up to the time you take the picture.
Autofocus mode: Determines whether the camera locks focus when you press the shutter button halfway, or it continually adjusts focus up to the time you take the picture.
![]() AF-area mode: Determines which of the camera’s 51 autofocusing points are used to establish focus.
AF-area mode: Determines which of the camera’s 51 autofocusing points are used to establish focus.
The next few sections explain both options in detail. For now, familiarize yourself with how you check and adjust these settings:
![]() Checking the current settings: Symbols representing the current Autofocus mode and AF-area mode appear in the Information display and Control panel, in the areas labeled in Figure 8-2. Upcoming sections help you decode the symbols you see here.
Checking the current settings: Symbols representing the current Autofocus mode and AF-area mode appear in the Information display and Control panel, in the areas labeled in Figure 8-2. Upcoming sections help you decode the symbols you see here.
![]()
 Changing the settings: The key to adjusting the settings is the AF-mode button, labeled in Figure 8-1:
• To change the Autofocus mode: Press the button while rotating the Main command dial.
• To change the AF-area mode: Press the button while rotating the Sub-command dial.
While the button is pressed, all data disappears from the Information screen and Control panel except readouts representing the Autofocus mode setting and the AF-area mode, as shown in Figure 8-3.
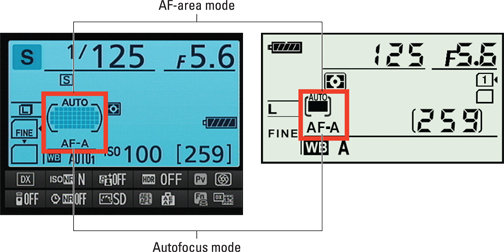
Figure 8-2: You can see the current Autofocus mode and AF-area mode settings here.
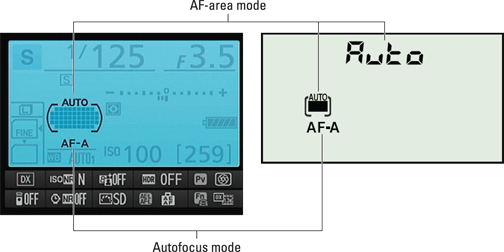
Figure 8-3: Press the AF-mode button to access the settings; then use the command dials to adjust them.
The viewfinder display also changes, with the Autofocus mode and AF-area mode settings appearing in the areas labeled in Figure 8-4. The viewfinder also shows the autofocus brackets, which indicate the area of the frame that contain the camera’s autofocus points, and rectangles representing the active points. One quirk here, though: In the default AF-area mode, Auto Area, all 51 autofocus points are active. But the viewfinder display shows points only around the perimeter of the autofocus brackets, as shown in the figure, so that you can still get a good view of your subject. All 51 points are active just the same; the rest are spaced evenly throughout the area enclosed by the autofocus brackets.
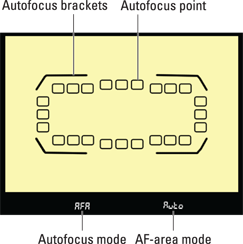
Figure 8-4: The viewfinder also shows the current settings while you press the AF-mode button.
Okay, with the how-to’s out of the way, read on for details that will help you understand which Autofocus mode and AF-area mode options work best for different types of subjects.
Choosing an Autofocus mode
When you use autofocusing, you press the shutter button halfway to kick-start the autofocusing system. Whether the camera locks focus at that point or continually adjusts focus until you press the button the rest of the way depends on the Autofocus mode. You can choose from three options, which work as follows:
![]() AF-S (single-servo autofocus): With this option, designed for shooting stationary subjects, the camera locks focus when you depress the shutter button halfway. (Think S for still, stationary.)
AF-S (single-servo autofocus): With this option, designed for shooting stationary subjects, the camera locks focus when you depress the shutter button halfway. (Think S for still, stationary.)
![]() AF-C (continuous-servo autofocus): In this mode, designed for moving subjects, the camera focuses continuously for the entire time you hold the shutter button halfway down. (Think C for continuous motion.)
AF-C (continuous-servo autofocus): In this mode, designed for moving subjects, the camera focuses continuously for the entire time you hold the shutter button halfway down. (Think C for continuous motion.)
![]() AF-A (auto-servo autofocus): This mode is the default setting. The camera analyzes the scene, and if it detects motion, automatically selects continuous-servo mode (AF-C). If the camera instead believes you’re shooting a stationary object, it selects single-servo mode (AF-S).
AF-A (auto-servo autofocus): This mode is the default setting. The camera analyzes the scene, and if it detects motion, automatically selects continuous-servo mode (AF-C). If the camera instead believes you’re shooting a stationary object, it selects single-servo mode (AF-S).
This mode is easiest to use, but it can get confused sometimes. For example, if your subject is motionless but something is moving in the background, the camera may mistakenly switch to continuous autofocus. By the same token, if the subject is moving only slightly, the camera may not make the switch to continuous autofocusing. So my advice is to choose either AF-S or AF-C instead.
One other critical thing to know about this setting: By default, the camera refuses to take a picture in AF-S mode if it can’t achieve focus. With AF-C mode, the opposite occurs. The camera assumes that because this mode is designed for shooting action, you want to capture the shot at the instant you fully depress the shutter button, regardless of whether it had time to set focus.
You can change this behavior through the AF Priority Selection options found in the Autofocus section of the Custom Setting menu and shown in Figure 8-5. The AF-C Priority Selection option affects how things work in AF-C mode; the AF-S Priority Selection option, the AF-S mode. For both options, you can choose from two settings:
![]() Release: You can take the picture regardless of whether focus is achieved.
Release: You can take the picture regardless of whether focus is achieved.
![]() Focus: You can’t take the picture until focus is achieved.
Focus: You can’t take the picture until focus is achieved.
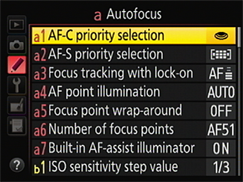
Figure 8-5: You can tell the camera whether to go ahead and take the picture even if focus hasn’t been achieved.
Choosing an AF-area mode: One focus point or many?
The AF-area mode setting determines which autofocusing points the camera considers when choosing its focusing target. To adjust the setting, press the AF-mode button while rotating the Sub-command dial. (Refer to Figure 8-1 for a look at the button.)
When the button is pressed, all data except the current AF-area mode setting and the Autofocus mode setting disappear from the Information screen and Control panel, as shown in Figure 8-3. The viewfinder also shows you which autofocus points are active, and the current AF-area mode setting appears at the right end of the display, as shown in Figure 8-4.
Here’s how each of the AF-area mode settings works:
![]()
![]() Single Point: This mode is designed to help you quickly and easily lock focus on a still subject. You select a single focus point, and the camera bases focus on that point only. See the next section for details on selecting an autofocus point.
Single Point: This mode is designed to help you quickly and easily lock focus on a still subject. You select a single focus point, and the camera bases focus on that point only. See the next section for details on selecting an autofocus point.
![]()
![]() Dynamic Area: This option is designed for focusing on a moving subject. You select an initial focus point, but if your subject moves out of that point before you snap the picture, the camera looks to surrounding points for focusing information.
Dynamic Area: This option is designed for focusing on a moving subject. You select an initial focus point, but if your subject moves out of that point before you snap the picture, the camera looks to surrounding points for focusing information.
 To use Dynamic Area autofocusing, you must set the Autofocus mode to AF-C or AF-A. Assuming that condition is met, you can choose from three Dynamic Area settings:
• 9-point Dynamic Area: The camera takes focusing cues from your selected point plus the eight surrounding points. This setting is ideal when you have a moment or two to compose your shot and your subject is moving in a predictable way, making it easy to reframe as needed to keep the subject within the 9-point area.
This setting also provides the fastest Dynamic Area autofocusing because the camera has to analyze the fewest autofocusing points.
• 21-point Dynamic Area: Focusing is based on the selected point plus the 20 surrounding points. This setting enables your subject to move a little farther afield from your selected focus point and still remain in the target zone, so it works better than 9-point mode when you can’t quite predict the path your subject is going to take.
• 51-point Dynamic Area: The camera makes use of the full complement of autofocus points. This mode is designed for subjects that are moving so rapidly that it’s hard to keep them within the framing area of the 21-point or 9-point setting — a flock of birds, for example. The drawback to this setting is focusing time: With all 51 points on deck, the camera has to work a little harder to find a focus target.
![]()
![]() 3D Tracking: This one is a variation of 51-point Dynamic Area autofocusing. As in that mode, you start by selecting a single focus point and then press the shutter button halfway to set focus. The goal of the 3D Tracking mode is to maintain focus on your subject if you recompose the shot after you press the shutter button halfway to lock focus.
3D Tracking: This one is a variation of 51-point Dynamic Area autofocusing. As in that mode, you start by selecting a single focus point and then press the shutter button halfway to set focus. The goal of the 3D Tracking mode is to maintain focus on your subject if you recompose the shot after you press the shutter button halfway to lock focus.
The problem with 3D Tracking is that the way the camera detects your subject is by analyzing the colors of the object under your selected focus point. So, if not much difference exists between the subject and other objects in the frame, the camera can get fooled. And if your subject moves out of the frame, you must release the shutter button and reset focus by pressing it halfway again.
If you want to try 3D Tracking autofocus, set the Autofocus mode to AF-C or AF-A; you can’t access this AF-area mode when the Autofocus mode is set to AF-S.
![]()
![]() Auto Area: At this setting, the camera automatically chooses which of the 51 focus points to use. Focus priority is typically assigned to the object closest to the camera. Remember that in this mode, only the points around the perimeter of the autofocus brackets light up in the viewfinder when you press the AF-mode button (refer to Figure 8-4), but all 51 points are active nonetheless.
Auto Area: At this setting, the camera automatically chooses which of the 51 focus points to use. Focus priority is typically assigned to the object closest to the camera. Remember that in this mode, only the points around the perimeter of the autofocus brackets light up in the viewfinder when you press the AF-mode button (refer to Figure 8-4), but all 51 points are active nonetheless.
 Although Auto Area mode requires the least input from you, it’s also typically the slowest option because of the technology it uses to set focus. First, the camera analyzes all 51 focus points. Then it consults an internal database to try to match the information reported by those points to a huge collection of reference photographs. From that analysis, it makes an educated guess about which focus points are most appropriate for your scene. Although it’s still amazingly fast considering what’s happening in the camera’s brain, it’s slower than the other AF-area options.
Choosing the right autofocus combo
You’ll get the best autofocus results if you pair your chosen Autofocus mode with the most appropriate AF-area mode because the two settings work in tandem. Here are the combinations that I suggest for the maximum autofocus control:
![]() For still subjects: Opt for AF-S and Single Point. You select a specific focus point, and the camera locks focus on that point when you press the shutter button halfway. Focus remains locked on your subject even if you reframe the shot after you press the button halfway. (It helps to remember the s factor: For still subjects, Single Point and AF-S.)
For still subjects: Opt for AF-S and Single Point. You select a specific focus point, and the camera locks focus on that point when you press the shutter button halfway. Focus remains locked on your subject even if you reframe the shot after you press the button halfway. (It helps to remember the s factor: For still subjects, Single Point and AF-S.)
![]() For moving subjects: Choose AF-C and 51-point Dynamic Area. You still begin by selecting a focus point, but the camera adjusts focus as needed if your subject moves within the frame after you press the shutter button halfway to establish focus. (Think motion, dynamic, continuous.) Remember to reframe as needed to keep your subject within the boundaries of the autofocus points, though. And if you want speedier autofocusing, consider switching to 21-point or 9-point Dynamic Area mode — just remember that you need to keep your subject within that smaller portion of the frame for the focus adjustment to work properly.
For moving subjects: Choose AF-C and 51-point Dynamic Area. You still begin by selecting a focus point, but the camera adjusts focus as needed if your subject moves within the frame after you press the shutter button halfway to establish focus. (Think motion, dynamic, continuous.) Remember to reframe as needed to keep your subject within the boundaries of the autofocus points, though. And if you want speedier autofocusing, consider switching to 21-point or 9-point Dynamic Area mode — just remember that you need to keep your subject within that smaller portion of the frame for the focus adjustment to work properly.
Upcoming sections in this chapter spell out the steps for setting focus with these autofocus pairings. First, though, I need to take a detour to explain how you select a specific focus point when you use Single Point, Dynamic Area, or 3D Tracking mode.
Selecting (and locking) an autofocus point
When you use any AF-area mode except Auto Area, you see a single autofocus point in the viewfinder. That point is the selected autofocus point — the one the camera will use to set focus in the Single Point mode and to choose the starting focusing distance in the Dynamic Area and 3D Tracking modes. By default, the center point is selected, as shown in Figure 8-6.
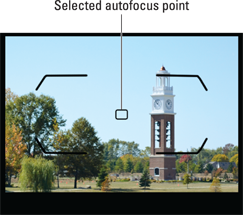
Figure 8-6: By default, the center focus point is selected.
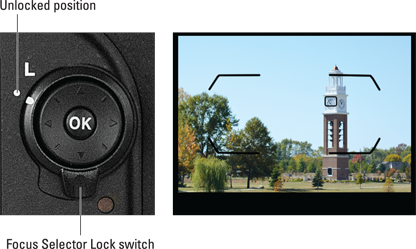
Figure 8-7: When the Focus Selector Lock switch is set to this position, you can press the Multi Selector to select a different focus point.
A couple of additional tips:
![]() You can reduce the number of focus points available for selection from 51 to 11. Why would you do this? Because it enables you to choose a focus point more quickly — you don’t have to keep pressing the Multi Selector zillions of times to get to the one you want to use. Make the change via the Number of Focus Points option, found on the Autofocus section of the Custom Setting menu and shown on the left in Figure 8-8. The right half of the figure shows you which autofocus points are available at the reduced setting.
You can reduce the number of focus points available for selection from 51 to 11. Why would you do this? Because it enables you to choose a focus point more quickly — you don’t have to keep pressing the Multi Selector zillions of times to get to the one you want to use. Make the change via the Number of Focus Points option, found on the Autofocus section of the Custom Setting menu and shown on the left in Figure 8-8. The right half of the figure shows you which autofocus points are available at the reduced setting.
Note that when the camera establishes focus, it still uses the full complement of normal focus points in the Dynamic Area and 3D Tracking modes. This setting just limits the points you can choose for your initial focus point.
![]() You can quickly select the center focus point by pressing OK. This assumes that you haven’t changed the function of that button, an option you can explore in Chapter 11.
You can quickly select the center focus point by pressing OK. This assumes that you haven’t changed the function of that button, an option you can explore in Chapter 11.
![]() If you want to use a certain focus point for a while, you can “lock in” that point by moving the Focus Selector Lock switch to the L position. This feature ensures that an errant press of the Multi Selector doesn’t accidentally change your selected point.
If you want to use a certain focus point for a while, you can “lock in” that point by moving the Focus Selector Lock switch to the L position. This feature ensures that an errant press of the Multi Selector doesn’t accidentally change your selected point.
![]() The selected focus point is also used to meter exposure when you use spot metering. See Chapter 7 for details about metering.
The selected focus point is also used to meter exposure when you use spot metering. See Chapter 7 for details about metering.
![]() Focus-point wraparound is disabled by default. That simply means that when you’re cycling through the available focus points, you hit a “wall” when you reach the top, bottom, left, or right focus point in the group. So if the leftmost point is selected, for example, pressing left again gets you nowhere. But if you turn on the Focus Point Wrap-Around option, found with the other autofocus options on the Custom Setting menu, you instead jump to the rightmost point.
Focus-point wraparound is disabled by default. That simply means that when you’re cycling through the available focus points, you hit a “wall” when you reach the top, bottom, left, or right focus point in the group. So if the leftmost point is selected, for example, pressing left again gets you nowhere. But if you turn on the Focus Point Wrap-Around option, found with the other autofocus options on the Custom Setting menu, you instead jump to the rightmost point.
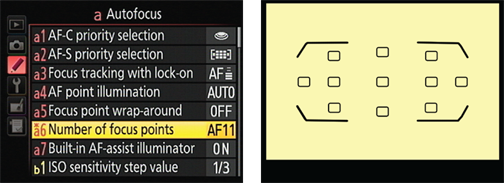
Figure 8-8: You can limit the number of available focus points to the 11 shown here.
Autofocusing with still subjects: AF-S + Single Point
Next, follow these steps to establish focus and take the picture:
1. Looking through the viewfinder, use the Multi Selector to position the focus point over your subject.
If the focus point doesn’t respond, press the shutter button halfway and release it to jog the camera awake. Then try again. Also be sure that the Focus Selector Lock switch is set to the position shown in Figure 8-7.
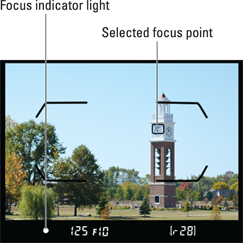
Figure 8-9: The focus light tells you that focus has been achieved.
2. Press the shutter button halfway to set focus.
The camera displays a focus light in the viewfinder, as shown in Figure 8-9.
Focus remains locked as long as you keep the shutter button pressed halfway. In any exposure mode but M, the initial exposure settings are also chosen at the moment you press the shutter button halfway, but they’re adjusted as needed up to the time you take the shot.
3. Press the shutter button the rest of the way to take the shot.
 By default, the camera doesn’t let you take the picture when focus isn’t set. To modify that behavior, change the AF-S Priority Selection option on the Custom Setting menu from Focus to Release.
Now for a few nuances of this autofocusing process:
![]() A triangle symbol in the viewfinder indicates incorrect focusing. I cover this issue in the part of Chapter 3 that shows you how to take a picture in the Auto and Auto Flash Off exposure modes, but what the heck, the illustrations are small, so Figure 8-10 shows you what the triangles look like again so you don’t have to tromp back to Chapter 3. A right-pointing arrow means that focus is set in front of the object under the focus point; a left-pointing arrow means that focus is set behind the object. Typically, you see one or both of the triangles while the camera is hunting for the correct focusing distance. If the triangles don’t go away, the subject is confusing the autofocus system, and your best bet is to switch to manual focusing in that situation. You also may simply be too close to your subject, so try backing away a little to see whether that helps.
A triangle symbol in the viewfinder indicates incorrect focusing. I cover this issue in the part of Chapter 3 that shows you how to take a picture in the Auto and Auto Flash Off exposure modes, but what the heck, the illustrations are small, so Figure 8-10 shows you what the triangles look like again so you don’t have to tromp back to Chapter 3. A right-pointing arrow means that focus is set in front of the object under the focus point; a left-pointing arrow means that focus is set behind the object. Typically, you see one or both of the triangles while the camera is hunting for the correct focusing distance. If the triangles don’t go away, the subject is confusing the autofocus system, and your best bet is to switch to manual focusing in that situation. You also may simply be too close to your subject, so try backing away a little to see whether that helps.
![]() You can position your subject outside a focus point if needed. Just compose the scene initially so that your subject is under a point, press the shutter button halfway to lock focus, and then reframe. However, note that if you’re using autoexposure, you may want to lock focus and exposure together by pressing the AE-L/AF-L button, as covered in Chapter 7. Otherwise, exposure is adjusted to match your new framing, which may not work well for your subject. In fact, the Chapter 7 technique for locking exposure is designed to work when teamed up with the AF-S/Single Point autofocus settings.
You can position your subject outside a focus point if needed. Just compose the scene initially so that your subject is under a point, press the shutter button halfway to lock focus, and then reframe. However, note that if you’re using autoexposure, you may want to lock focus and exposure together by pressing the AE-L/AF-L button, as covered in Chapter 7. Otherwise, exposure is adjusted to match your new framing, which may not work well for your subject. In fact, the Chapter 7 technique for locking exposure is designed to work when teamed up with the AF-S/Single Point autofocus settings.
![]() Which focus points you can select depends on the setting of the Number of Focus Points option on the Custom Setting menu. By default, you can choose from all 51 points, but if you change the menu setting to 11, you’re limited to the points shown in Figure 8-8. See the preceding section for details on this topic.
Which focus points you can select depends on the setting of the Number of Focus Points option on the Custom Setting menu. By default, you can choose from all 51 points, but if you change the menu setting to 11, you’re limited to the points shown in Figure 8-8. See the preceding section for details on this topic.

Figure 8-10: The triangles indicate that focus isn’t accurately set on the object under the selected focus point.
![]() For an audio cue that focus is set in AF-S mode, enable the Beep option on the Custom Setting menu. You can find the option in the Shooting/Display section of the menu. If you enable the option, you also hear the beep during self-timer shooting and in a number of other scenarios.
For an audio cue that focus is set in AF-S mode, enable the Beep option on the Custom Setting menu. You can find the option in the Shooting/Display section of the menu. If you enable the option, you also hear the beep during self-timer shooting and in a number of other scenarios.
Focusing on moving subjects: AF-C + Dynamic Area
The focusing process is the same as just outlined, with a couple of exceptions:
![]() When you press the shutter button halfway, the camera sets the initial focusing distance based on your selected autofocus point. If your subject moves from that point, the camera checks surrounding points for focus information.
When you press the shutter button halfway, the camera sets the initial focusing distance based on your selected autofocus point. If your subject moves from that point, the camera checks surrounding points for focus information.
![]() Focus is adjusted until you take the picture. You see the focus indicator light in the viewfinder, but it may flash on and off as focus is adjusted.
Focus is adjusted until you take the picture. You see the focus indicator light in the viewfinder, but it may flash on and off as focus is adjusted.
![]() Try to keep the subject under the selected focus point to increase the odds of good focus. As long as the subject falls within one of the other focus points (9, 21, or 51, depending on which Dynamic Area mode you select), focus should be adjusted accordingly, however. Note that you don’t see the focus point actually move in the viewfinder, but the focus tweak happens just the same. (You can hear the focus motor doing its thing if you listen closely.)
Try to keep the subject under the selected focus point to increase the odds of good focus. As long as the subject falls within one of the other focus points (9, 21, or 51, depending on which Dynamic Area mode you select), focus should be adjusted accordingly, however. Note that you don’t see the focus point actually move in the viewfinder, but the focus tweak happens just the same. (You can hear the focus motor doing its thing if you listen closely.)
![]()
 By default, the camera lets you take the picture regardless of whether focus has been achieved. To change this behavior, head for the AF-C Priority Selection option on the Custom Setting menu and change the option from Release to Focus. At that setting, the camera won’t release the shutter until focus is achieved.
Getting comfortable with continuous autofocusing takes some time, so practice before you need to photograph an important event. After you get the hang of the AF-C/Dynamic Area system, though, I think you’ll really like it. When you’re up to speed on the basics, explore these related options:
![]()
![]() Using autofocus lock: Should you want to stop the focus adjustment so that focus remains set at a specific distance, press and hold the AE-L/AF-L button. Remember, though, that the default setup for this button locks both focus and exposure. If you use this option a lot, you may want to decouple the two functions by using the button customization options covered in Chapter 11. You can use the AE-L/AF-L button to lock exposure only, for example, and then set the Fn or Depth-of-Field preview button to lock focus.
Using autofocus lock: Should you want to stop the focus adjustment so that focus remains set at a specific distance, press and hold the AE-L/AF-L button. Remember, though, that the default setup for this button locks both focus and exposure. If you use this option a lot, you may want to decouple the two functions by using the button customization options covered in Chapter 11. You can use the AE-L/AF-L button to lock exposure only, for example, and then set the Fn or Depth-of-Field preview button to lock focus.
![]() Preventing focusing miscues with tracking lock-on: So you’re shooting your friend’s volleyball game, practicing your action-autofocusing skills. You set the initial focus, and the camera is doing its part by adjusting focus to accommodate her pre-serve moves. Then all of a sudden, some clueless interloper walks in front of the camera. Okay, it was the referee, who probably did have a right to be there, but still.
Preventing focusing miscues with tracking lock-on: So you’re shooting your friend’s volleyball game, practicing your action-autofocusing skills. You set the initial focus, and the camera is doing its part by adjusting focus to accommodate her pre-serve moves. Then all of a sudden, some clueless interloper walks in front of the camera. Okay, it was the referee, who probably did have a right to be there, but still.
The good news is that as long as the ref gets out of the way before the action happens, you’re probably okay. A feature called focus tracking with lock-on, designed for just this scenario, tells the camera to ignore objects that appear temporarily in the scene after you begin focusing. Instead of resetting focus on the newcomer, the camera continues focusing on the original subject.
You can vary the length of time the camera waits before starting to refocus through the Focus Tracking with Lock-On option, found on the Custom Setting menu and shown in Figure 8-11. Normal (3 seconds) is the default setting. You can choose a longer or shorter delay or turn off the lock-on altogether. If you turn off the lock-on, the camera starts refocusing on any object that appears in the frame between you and your original subject.
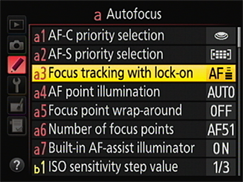
Figure 8-11: This option controls how the autofocus system deals with objects that come between the lens and the subject after you initiate focusing.
Exploring a few last autofocus tweaks
All these autofocus options making your brain hurt? Hang in there — just a few more to go, and they’re no-brainers. Well, easy-brainers, at least. They’re found in the Autofocus section of the Custom Setting menu and work as follows:
![]() AF Point Illumination: It happens so fast that you might not notice it unless you pay close attention, but when you press the shutter button halfway, the selected focus point in the viewfinder flashes red and then goes back to black. At the default setting for this option (Auto), the red highlights are displayed only when the background is dark, which would make the black focus points difficult to see. You can choose the On setting to force the highlights no matter whether the background is dark. Or you can choose Off to disable the highlights altogether.
AF Point Illumination: It happens so fast that you might not notice it unless you pay close attention, but when you press the shutter button halfway, the selected focus point in the viewfinder flashes red and then goes back to black. At the default setting for this option (Auto), the red highlights are displayed only when the background is dark, which would make the black focus points difficult to see. You can choose the On setting to force the highlights no matter whether the background is dark. Or you can choose Off to disable the highlights altogether.
![]() Built-in AF-Assist Illuminator: In dim lighting, the camera may emit a beam of light from the AF-assist light, the little lamp just below the Control panel, on the front of the camera, when you press the shutter button halfway to set focus. If the light is distracting to your subject or others in the room, you can disable it by setting this menu option to Off. You may need to focus manually, though, because without the light to help it find its target, the autofocus system may have trouble.
Built-in AF-Assist Illuminator: In dim lighting, the camera may emit a beam of light from the AF-assist light, the little lamp just below the Control panel, on the front of the camera, when you press the shutter button halfway to set focus. If the light is distracting to your subject or others in the room, you can disable it by setting this menu option to Off. You may need to focus manually, though, because without the light to help it find its target, the autofocus system may have trouble.
And now for the very last (I promise) autofocus customization options: Through settings on the Controls section of the Custom Setting menu, you can set the Function (Fn) button, AE-L/AF-L button, and Depth-of-Field Preview button to lock focus or lock focus and exposure together. And you can set the OK button to highlight the active autofocus point instead of selecting the center point. But what say we leave this whole button customization discussion for Chapter 11, okay?
Focusing Manually
Some subjects confuse even the most sophisticated autofocusing systems, causing the camera’s autofocus motor to spend a long time hunting for its focus point. Animals behind fences, reflective objects, water, and low-contrast subjects are just some of the autofocus troublemakers. Autofocus systems also struggle in dim lighting, although that difficulty is often offset on the D7100 by the AF-assist lamp, which shoots out a beam of light to help the camera find its focusing target.
When you encounter situations that cause an autofocus hang-up, you can try adjusting the autofocus options discussed earlier in this chapter. Often, it’s simply easier to focus manually. For best results, follow these manual-focusing steps:
1. If your lens has a manual/auto focusing switch, set that switch to the manual position.
On the 18–105mm kit lens, set the switch to M.
2. Set the Focus-mode selector switch (front left side of the camera) to the M position.
Refer to Figure 8-1 if you need help locating the switch.
 If you’re using an AF-S lens (the kit lens is included in this category), you actually can skip this step. However, if you’re not sure whether your lens is an AF-S type, set the switch to the M position to be safe. Otherwise, damage to the lens and camera can occur.
3. Select a focus point.
Use the same technique as when selecting a point during autofocusing: Looking through the viewfinder, press the Multi Selector right, left, up, or down until the point you want to use flashes red. Again, you may need to press the shutter button halfway and release it to wake up the display first. And make sure that the Focus Selector Lock switch is set to the position shown in Figure 8-7.
 During autofocusing, the selected focus point tells the camera what part of the frame to use when establishing focus. And technically speaking, you don’t have to choose a focus point for manual focusing — the camera will set the focus according to the position that you set by turning the focusing ring. However, choosing a focus point is still a good idea, for two reasons: First, even though you’re focusing manually, the camera provides some feedback to let you know whether the focus is correct, and that feedback is based on your selected focus point. Second, if you use spot metering, an exposure option covered in Chapter 7, exposure is based on the selected focus point.
4. Frame the shot so that your subject is under your selected focus point.
5. Turn the lens focusing ring to focus.
 When the focus is set on the object under your focus point, the focus lamp in the lower-left corner of the viewfinder lights, just as it does during autofocusing. If you see a triangle in that part of the display instead, focus is set in front of or behind the object in the focus point. (Refer to Figure 8-10.)
6. Press the shutter button halfway to initiate exposure metering.
Adjust exposure as needed; see Chapter 7 for help.
7. Press the shutter button the rest of the way to take the shot.
Manipulating Depth of Field
Getting familiar with the concept of depth of field is one of the biggest steps you can take to becoming a better photographer. I introduce you to depth of field in Chapters 3 and 7, but here’s a quick recap:
![]() Depth of field refers to the distance over which objects in a photograph appear acceptably sharp.
Depth of field refers to the distance over which objects in a photograph appear acceptably sharp.
![]() With a shallow, or small, depth of field, distant objects appear more softly focused than the main subject (assuming that you set focus on the main subject, of course).
With a shallow, or small, depth of field, distant objects appear more softly focused than the main subject (assuming that you set focus on the main subject, of course).
![]() With a large depth of field, the zone of sharp focus extends to include objects at a distance from your subject.
With a large depth of field, the zone of sharp focus extends to include objects at a distance from your subject.
Which arrangement works best depends entirely on your creative vision and your subject. In portraits, for example, a classic technique is to use a short depth of field, as I did for the photo in Figure 8-12. This approach increases emphasis on the subject while diminishing the impact of the background. But for the photo shown in Figure 8-13, I wanted to emphasize that the foreground figures were in St. Peter’s Square, so I used a large depth of field, which kept the background buildings sharply focused and gave them equal weight in the scene.

Figure 8-12: A shallow depth of field blurs the background and draws added attention to the subject.
So how do you manipulate depth of field? You have three points of control:
![]() Aperture setting (f-stop): The aperture is one of three main exposure settings, all explained fully in Chapter 7. Depth of field increases as you stop down the aperture (by choosing a higher f-stop number). For shallow depth of field, open the aperture (by choosing a lower f-stop number). Figure 8-14 offers an example; in the f/22 version, focus is sharp all the way through the frame; in the f/13 version, focus softens as the distance from the center lure increases. I snapped both images using the same focal length and camera-to-subject distance, setting focus on the front of the center lure.
Aperture setting (f-stop): The aperture is one of three main exposure settings, all explained fully in Chapter 7. Depth of field increases as you stop down the aperture (by choosing a higher f-stop number). For shallow depth of field, open the aperture (by choosing a lower f-stop number). Figure 8-14 offers an example; in the f/22 version, focus is sharp all the way through the frame; in the f/13 version, focus softens as the distance from the center lure increases. I snapped both images using the same focal length and camera-to-subject distance, setting focus on the front of the center lure.

Figure 8-13: A large depth of field keeps both foreground and background subjects in focus.
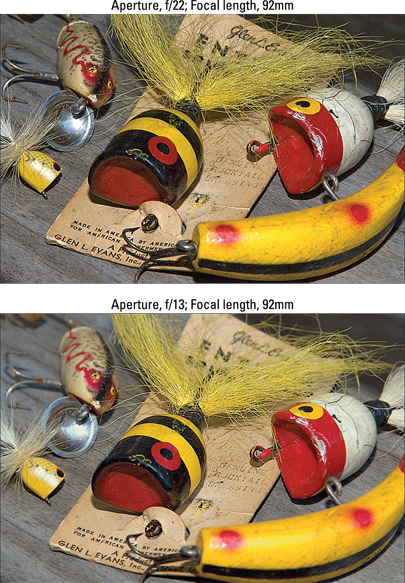
Figure 8-14: A lower f-stop number (wider aperture) decreases depth of field.
![]() Lens focal length: In lay terms, focal length determines what the lens “sees.” As you increase focal length, measured in millimeters, the angle of view narrows, objects appear larger in the frame, and — the important point for this discussion — depth of field decreases. Additionally, the spatial relationship of objects changes as you adjust focal length. As an example, Figure 8-15 compares the same scene shot at a focal length of 127mm and 183mm. I used the same aperture, f/5.6, for both examples.
Lens focal length: In lay terms, focal length determines what the lens “sees.” As you increase focal length, measured in millimeters, the angle of view narrows, objects appear larger in the frame, and — the important point for this discussion — depth of field decreases. Additionally, the spatial relationship of objects changes as you adjust focal length. As an example, Figure 8-15 compares the same scene shot at a focal length of 127mm and 183mm. I used the same aperture, f/5.6, for both examples.
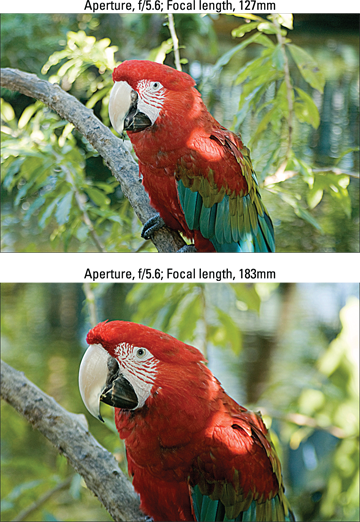
Figure 8-15: Zooming to a longer focal length also reduces depth of field.
Whether you have any focal length flexibility depends on your lens: If you have a zoom lens, you can adjust the focal length by zooming in or out. If you don’t have a zoom lens, the focal length is fixed, so scratch this means of manipulating depth of field.
For more details about focal length and your camera, flip to Chapter 1 and explore the section related to choosing lenses.
![]() Camera-to-subject distance: As you move the lens closer to your subject, depth of field decreases. This assumes that you don’t zoom in or out to reframe the picture, thereby changing the focal length. If you do, depth of field is affected by both the camera position and focal length.
Camera-to-subject distance: As you move the lens closer to your subject, depth of field decreases. This assumes that you don’t zoom in or out to reframe the picture, thereby changing the focal length. If you do, depth of field is affected by both the camera position and focal length.
![]() To produce the shallowest depth of field: Open the aperture as wide as possible (the lowest f-stop number), zoom in to the maximum focal length of your lens, and get as close as possible to your subject.
To produce the shallowest depth of field: Open the aperture as wide as possible (the lowest f-stop number), zoom in to the maximum focal length of your lens, and get as close as possible to your subject.
![]() To produce maximum depth of field: Stop down the aperture to the highest possible f-stop number, zoom out to the shortest focal length (widest angle) your lens offers, and move farther from your subject.
To produce maximum depth of field: Stop down the aperture to the highest possible f-stop number, zoom out to the shortest focal length (widest angle) your lens offers, and move farther from your subject.
A couple of final tips related to depth of field:
![]() Aperture-priority autoexposure mode (A) enables you to easily control depth of field while enjoying exposure assistance from the camera. In this mode, you rotate the Sub-command dial to set the f-stop, and the camera selects the appropriate shutter speed to produce a good exposure. The range of available aperture settings depends on your lens.
Aperture-priority autoexposure mode (A) enables you to easily control depth of field while enjoying exposure assistance from the camera. In this mode, you rotate the Sub-command dial to set the f-stop, and the camera selects the appropriate shutter speed to produce a good exposure. The range of available aperture settings depends on your lens.
![]() For greater background blurring, move the subject farther from the background. The extent to which background focus shifts as you adjust depth of field also is affected by the distance between the subject and the background.
For greater background blurring, move the subject farther from the background. The extent to which background focus shifts as you adjust depth of field also is affected by the distance between the subject and the background.
![]() Press the Depth-of-Field Preview button to get an idea of how your f-stop will affect depth of field. When you look through your viewfinder and press the shutter button halfway, you can get only a partial indication of the depth of field that your current camera settings will produce. You can see the effect of focal length and the camera-to-subject distance, but not how your selected f-stop will affect depth of field because the camera doesn’t close down the aperture to your selected setting until you take the picture.
Press the Depth-of-Field Preview button to get an idea of how your f-stop will affect depth of field. When you look through your viewfinder and press the shutter button halfway, you can get only a partial indication of the depth of field that your current camera settings will produce. You can see the effect of focal length and the camera-to-subject distance, but not how your selected f-stop will affect depth of field because the camera doesn’t close down the aperture to your selected setting until you take the picture.
By using the Depth-of-Field Preview button, however, you can preview how the f-stop will affect the image. Almost hidden away on the front of your camera, the button is highlighted in Figure 8-16. When you press the button, the camera temporarily sets the aperture to your selected f-stop so that you can preview depth of field. At small apertures (high f-stop settings), the viewfinder display may become quite dark, but this doesn’t indicate a problem with exposure — it’s just a function of how the preview works.
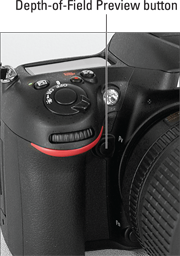
Figure 8-16: Press this button to get a preview of the effect of aperture on depth of field.
By default, the camera also emits a modeling flash when you preview depth of field and have flash enabled. If you want to experiment with this feature, visit the flash discussion in Chapter 7 for details. Turn the feature off via the Modeling Flash option on the Custom Setting menu. And if you don’t use the Depth-of-Field Preview button often, see Chapter 11 to find out how to assign the button a different role in life.
Controlling Color
Compared with understanding some aspects of digital photography — resolution, aperture and shutter speed, depth of field, and so on — making sense of your camera’s color options is easy-breezy. First, color problems aren’t all that common, and when they are, they’re usually simple to fix with a quick shift of your camera’s white balance control. And getting a grip on color requires learning only a couple of new terms, an unusual state of affairs for an endeavor that often seems more like high-tech science than art.
The rest of this chapter explains the aforementioned white balance control, plus a couple of menu options that enable you to fine-tune the way your camera renders colors.
Correcting colors with white balance
Every light source emits a particular color cast. Science-y types measure the color of light, officially known as color temperature, on the Kelvin scale, which is named after its creator. You can see the Kelvin scale in Figure 8-17.
When photographers talk about “warm light” and “cool light,” though, they aren’t referring to the position on the Kelvin scale — or at least not in the way we usually think of temperatures, with a higher number meaning hotter. Instead, the terms describe the visual appearance of the light. Warm light, produced by candles and incandescent lights, falls in the red-yellow spectrum you see at the bottom of the Kelvin scale in Figure 8-17; cool light, in the blue-green spectrum, appears at the top of the Kelvin scale.

Figure 8-17: Each light source emits a specific color.
At any rate, most people don’t notice these fluctuating colors of light because our eyes automatically compensate for them. Similarly, a digital camera compensates for different colors of light through white balancing. Simply put, white balancing neutralizes light so that whites are always white, which in turn ensures that other colors are rendered accurately. If the camera senses warm light, it shifts colors slightly to the cool side of the color spectrum; in cool light, the camera shifts colors in the opposite direction.
By default, the camera uses automatic white balancing — the AWB setting (for Auto White Balance) — which tackles this process remarkably well in most situations. But if your scene is lit by two or more light sources that cast different colors, the white balance sensor can get confused, producing an unwanted color cast.
For example, when shooting the figurine shown in Figure 8-18, I lit the scene with photo lights that use tungsten bulbs, which produce light with a color temperature similar to regular household incandescent bulbs. Some strong daylight was filtering in through nearby windows, though, and in Auto White Balance mode, the camera reacted to that daylight — which has a cool color cast — and applied too much warming, giving my original image (left) a yellow tint. No problem: I just switched the White Balance mode from Auto to the Incandescent setting. The right image in Figure 8-18 shows the corrected colors.
The next section explains how to make a simple white balance correction; following that, you can explore some advanced white balance options.
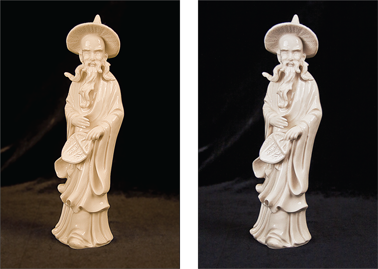
Figure 8-18: For this photo, multiple light sources resulted in a yellow color cast in Auto White Balance mode (left); switching to the Incandescent setting solved the problem (right).
Changing the White Balance setting
The current White Balance setting appears in the Control panel and Information display, as shown in Figure 8-19. The figures show the symbols that represent the Auto setting; other settings are represented by the icons you see in Table 8-1.
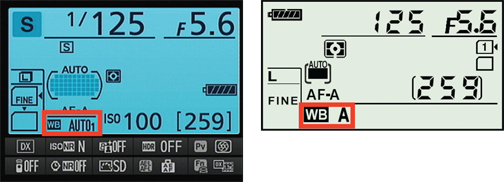
Figure 8-19: These icons represent the current White Balance setting.

![]() The quickest way to change the setting is to press and hold the WB button as you rotate the Main command dial, but you also can get the job done via the Shooting menu, as shown in Figure 8-20. After highlighting the setting you want to use, press OK.
The quickest way to change the setting is to press and hold the WB button as you rotate the Main command dial, but you also can get the job done via the Shooting menu, as shown in Figure 8-20. After highlighting the setting you want to use, press OK.
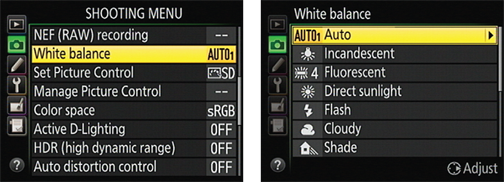
Figure 8-20: The White Balance option on the Shooting menu gives you access to some fine-tuning options.
![]() Selecting from two Auto settings: I know what you’re thinking: “For heaven’s sake, even the Auto setting is complicated?” Yeah, but just a little: You can choose from two Auto White Balance settings. At the default setting, Normal, things happen as you’d expect: The camera analyzes the color temperature of the light and adjusts colors to render the scene accurately. If you use the other setting, Keep Warm Lighting Colors, the warm hues produced by incandescent lighting are left intact. I prefer the default, but if you want to choose the other setting, open the Shooting menu, choose White Balance, and then choose Auto and press the Multi Selector right. You see the screen shown in Figure 8-21; make your choice and press OK.
Selecting from two Auto settings: I know what you’re thinking: “For heaven’s sake, even the Auto setting is complicated?” Yeah, but just a little: You can choose from two Auto White Balance settings. At the default setting, Normal, things happen as you’d expect: The camera analyzes the color temperature of the light and adjusts colors to render the scene accurately. If you use the other setting, Keep Warm Lighting Colors, the warm hues produced by incandescent lighting are left intact. I prefer the default, but if you want to choose the other setting, open the Shooting menu, choose White Balance, and then choose Auto and press the Multi Selector right. You see the screen shown in Figure 8-21; make your choice and press OK.
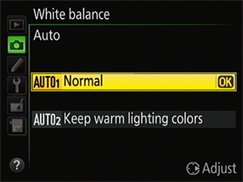
Figure 8-21: The Auto 2 setting preserves some of the warm hues that incandescent lighting lends to a scene.
 You can tell which Auto setting is selected by looking at the Shooting menu and Information display; a little 1 appears next to the word Auto when the Normal option is active, as shown in the left screens in Figures 8-19 and 8-20. A 2 appears when the other setting is in force.
![]() Specifying a color temperature through the K White Balance setting: If you know the exact color temperature of your light source — perhaps you’re using some special studio bulbs, for example — you can tell the camera to balance colors for that precise temperature. (Well, technically, you have to choose from a preset list of temperatures, but you should be able to get close to the temperature you have in mind.) First, select the K White Balance setting. (K for Kelvin, get it?) Then, while pressing the WB button, rotate the Sub-command dial to set the color temperature, which appears at the top of the Control panel and Information display.
Specifying a color temperature through the K White Balance setting: If you know the exact color temperature of your light source — perhaps you’re using some special studio bulbs, for example — you can tell the camera to balance colors for that precise temperature. (Well, technically, you have to choose from a preset list of temperatures, but you should be able to get close to the temperature you have in mind.) First, select the K White Balance setting. (K for Kelvin, get it?) Then, while pressing the WB button, rotate the Sub-command dial to set the color temperature, which appears at the top of the Control panel and Information display.
You also can set the temperature through the White Balance option on the Shooting menu. Select Choose Color Temp as your White Balance setting and then press the Multi Selector right to display a list of the available temperature options. Highlight your choice and press OK.
![]() Specifying a fluorescent bulb type: For the Fluorescent setting, you can select a specific type of bulb. To do so, you must go through the Shooting menu. Select Fluorescent as the White Balance setting and then press the Multi Selector right to display the list of bulbs, as shown in Figure 8-22. Select the option that most closely matches your bulbs and then press OK.
Specifying a fluorescent bulb type: For the Fluorescent setting, you can select a specific type of bulb. To do so, you must go through the Shooting menu. Select Fluorescent as the White Balance setting and then press the Multi Selector right to display the list of bulbs, as shown in Figure 8-22. Select the option that most closely matches your bulbs and then press OK.
 After you select a fluorescent bulb type, that option is always used when you use the WB button to select the Fluorescent White Balance setting. Again, you can change the bulb type only through the Shooting menu.
![]() Creating a custom White Balance preset: The PRE (Preset Manual) option enables you to create and store a precise, customized White Balance setting, as explained in the upcoming “Creating custom White Balance presets” section. This setting is the fastest way to achieve accurate colors when your scene is lit by multiple light sources that have differing color temperatures.
Creating a custom White Balance preset: The PRE (Preset Manual) option enables you to create and store a precise, customized White Balance setting, as explained in the upcoming “Creating custom White Balance presets” section. This setting is the fastest way to achieve accurate colors when your scene is lit by multiple light sources that have differing color temperatures.
![]() Fine-tuning a White Balance setting: You can tweak the way colors are rendered at any setting via the Shooting menu as well; the next section shows you how.
Fine-tuning a White Balance setting: You can tweak the way colors are rendered at any setting via the Shooting menu as well; the next section shows you how.
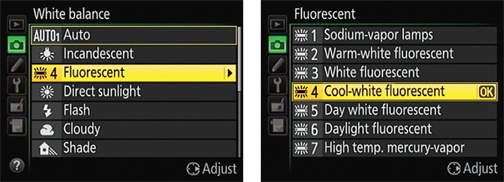
Figure 8-22: You can select a specific type of fluorescent bulb.
Fine-tuning White Balance settings
To fine-tune any White Balance option but PRE (Preset Manual), take the following steps. (For the PRE option, you first need to create your preset, which I tell you how to do in the next two sections; see the “Editing presets” section later on to find out how to fine-tune a preset.)
1. Set the Mode dial to P, S, A, or M.
You can modify white balance in these exposure modes only.
2. Display the Shooting menu, highlight White Balance, and press OK.
3. Highlight the White Balance setting you want to adjust, and press the Multi Selector right.
You’re taken to a screen where you can do your fine-tuning, as shown in Figure 8-23.
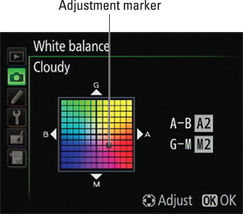
Figure 8-23: You can fine-tune the White Balance settings via the Shooting menu.
 If you select Auto, Fluorescent, or K (Choose Color Temp.), you first go to a screen where you select the Auto setting you want to use, the specific type of bulb, or Kelvin color temperature, as covered in the preceding section. After you take that step, press the Multi Selector right to get to the fine-tuning screen.
4. Fine-tune the setting by using the Multi Selector to move the adjustment marker in the color grid.
The grid is set up around two color pairs: Green and Magenta, represented by G and M; and Blue and Amber, represented by B and A. By pressing the Multi Selector, you can move the adjustment marker around the grid. (The adjustment marker is labeled in Figure 8-23.)
As you move the marker, the A–B and G–M boxes on the right side of the screen show you the current amount of color shift. A value of 0 indicates the default amount of color compensation applied by the selected White Balance setting. In Figure 8-23, for example, I moved the marker two levels toward amber and two levels toward magenta to specify that I wanted colors to be a tad warmer.
 If you’re familiar with traditional colored lens filters, you may know that the density of a filter, which determines the degree of color correction it provides, is measured in mireds (pronounced my-redds). The white balance grid is designed around this system: Moving the marker one level is the equivalent of adding a filter with a density of five mireds.
5. Press OK to complete the adjustment.
After you adjust a White Balance setting, an asterisk appears next to that setting in the White Balance menu and next to the WB symbol in the Information display and Control panel.
Creating custom White Balance presets
![]() Base white balance on a direct measurement of the actual lighting conditions.
Base white balance on a direct measurement of the actual lighting conditions.
![]() Match white balance to an existing photo.
Match white balance to an existing photo.
You can create up to six custom White Balance presets, which are assigned the names d-1 through d-6. The next two sections provide you with the step-by-step instructions; following that, you can find out how to fine-tune, protect, and otherwise edit presets.
Setting white balance with direct measurement
To use this technique, you need a piece of card stock that’s either neutral gray or absolute white — not eggshell white, sand white, or any other close-but-not-perfect white. (You can buy reference cards made just for this purpose in many camera stores for less than $20.)
Position the reference card so that it receives the same lighting you’ll use for your photo. Then take these steps:
1. Set the exposure mode to P, S, A, or M.
As with all white balance features, you can take advantage of this one only in those exposure modes.
2. Open the Shooting menu, choose White Balance, and highlight PRE (Preset Manual), as shown on the left in Figure 8-24.
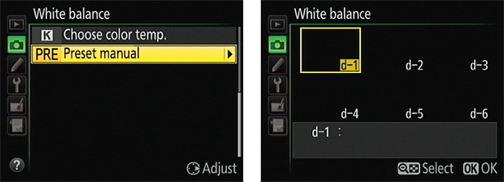
Figure 8-24: You can store as many as six custom White Balance presets.
3. Press the Multi Selector right to display the screen shown on the right in Figure 8-24.
4. Highlight the preset number (d-1 through d-6) you want to assign to the custom White Balance setting.
Preset d-1 is selected by default the first time you go through this process, as shown in Figure 8-24. If you select an existing preset, it will be overwritten by your new preset.
5. Press OK, press the shutter button halfway, and release it to return to shooting mode.
6. Frame your shot so that the reference card completely fills the viewfinder.
7. Check exposure and adjust settings if needed.
This process won’t work if your settings produce an underexposed or overexposed shot of your reference card.
![]() 8. Press the WB button.
8. Press the WB button.
You see the letters PRE in the white balance area of the Control panel as well as in the Information display. You also see the number of the preset you chose in Step 4.
9. Keep pressing the WB button until the letters PRE begin flashing in the Control panel and viewfinder.
10. Release the WB button and take a picture of the reference card before the PRE warning stops flashing.
You have about 6 seconds to snap the picture.
If the camera is successful at recording the white balance data, the letters Gd flash in the viewfinder. In the Control panel, the word Good flashes. If you instead see the message No Gd, adjust your lighting or exposure settings and then try again. Remember, the reference card shot must be properly exposed for the camera to create the preset successfully.
![]()
![]() WB button + command dials: First, select PRE as the White Balance setting by pressing the WB button as you rotate the Main command dial. Keep holding the button and rotate the Sub-command dial to cycle through the available presets (d-1 through d-6). The number of the selected preset appears in the Control panel and Information display while the button is pressed.
WB button + command dials: First, select PRE as the White Balance setting by pressing the WB button as you rotate the Main command dial. Keep holding the button and rotate the Sub-command dial to cycle through the available presets (d-1 through d-6). The number of the selected preset appears in the Control panel and Information display while the button is pressed.
![]() Shooting menu: Repeat Steps 1–5 of the preceding list to select your custom preset from the menu. In Step 4, you see a thumbnail representing your preset, as shown in Figure 8-25. The thumbnail will be white (or gray) if you based the preset on a reference card, as shown in the figure.
Shooting menu: Repeat Steps 1–5 of the preceding list to select your custom preset from the menu. In Step 4, you see a thumbnail representing your preset, as shown in Figure 8-25. The thumbnail will be white (or gray) if you based the preset on a reference card, as shown in the figure.
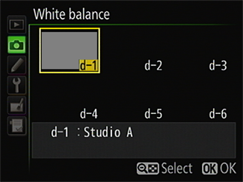
Figure 8-25: Highlight the thumbnail representing the preset you want to use.
One final tip: In Live View mode, you can base your preset on any neutral gray or white object in the frame — you don’t have to fill the frame with a reference card. Follow Steps 1–5, skip Step 6, and then continue on through Step 9 to display a small white-balance target (a yellow rectangle) in the frame. Position that frame over your neutral object and then press OK to establish the preset.
Matching white balance to an existing photo
Suppose that you’re the marketing manager for a small business, and one of your jobs is to shoot portraits of the company bigwigs for the annual report. You build a small studio just for that purpose, complete with a couple of photography lights and a nice, conservative, beige backdrop.
Of course, the bigwigs can’t all come to get their pictures taken in the same month, let alone on the same day. Still, you have to make sure that the colors in that beige backdrop remain consistent for each shot, no matter how much time passes between photo sessions. This scenario is one possible use for an advanced white balance feature that enables you to base white balance on an existing photo.
To give this option a try, follow these steps:
1. Copy the picture that you want to use as the reference photo to a camera memory card, if it isn’t already stored there.
You can copy the picture to the card using a card reader and whatever method you usually use to transfer files from one drive to another. The main folder on the card is DCIM; open that folder and store the picture in the camera’s image folder, named 100D7100 by default.
You can put the card containing the photo in either memory card slot.
2. Set the exposure mode to P, S, A, or M; then open the Shooting menu, highlight White Balance, and press OK.
3. Select PRE (Preset Manual) and press the Multi Selector right.
You see the screen shown earlier in Figure 8-25. (If you haven’t yet created any presets, the d-1 thumbnail appears black instead of gray.)
4. Use the Multi Selector to highlight the number of the preset you want to create (d-1 through d-6).
If you already created a preset, choosing its number will overwrite that first preset with your new one.
![]() 5. Press the ISO button.
5. Press the ISO button.
You see the menu shown in Figure 8-26.
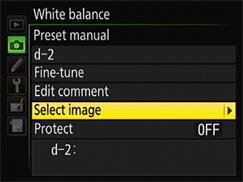
Figure 8-26: Choose this option to select an image to use as the basis for a White Balance preset.
6. Highlight Select Image and press the Multi Selector right.
You see thumbnails of your photos.
7. Use the Multi Selector to move the yellow highlight box over the picture you want to use as your white balance photo.
8. Press OK.
You return to the screen showing your White Balance preset thumbnails. The thumbnail for the photo you selected in Step 7 appears as the thumbnail for the preset slot you chose in Step 4.
9. Press OK to return to the Shooting menu.
The White Balance setting you just created is now selected. See the end of the preceding section to find out how to select a different preset.
Editing presets
After creating a preset, you can’t delete it — the only way to get rid of it is to overwrite it by creating a new preset with the same number (d-1 through d-6). However, you can edit a preset in a couple ways.
![]() To access these features, choose White Balance from the Shooting menu. Then select PRE (Preset Manual), press the Multi Selector right, and highlight the number of the preset you want to edit. Finally, press the ISO button to display the screen shown on the left in Figure 8-27.
To access these features, choose White Balance from the Shooting menu. Then select PRE (Preset Manual), press the Multi Selector right, and highlight the number of the preset you want to edit. Finally, press the ISO button to display the screen shown on the left in Figure 8-27.
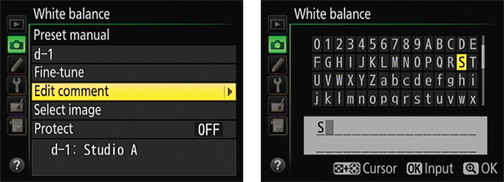
Figure 8-27: Add a text label to a preset to remind you which lighting conditions you used when creating it.
Here’s what you can accomplish with each menu option:
![]() Preset number (d-1, in the figure): To edit a different preset, highlight this first option and press the Multi Selector right or left to cycle through the six presets.
Preset number (d-1, in the figure): To edit a different preset, highlight this first option and press the Multi Selector right or left to cycle through the six presets.
![]() Fine-tune: Press the Multi Selector right to access the same fine-tuning screen that’s available for other White Balance settings. See “Fine-tuning White Balance settings,” earlier in this chapter, for help.
Fine-tune: Press the Multi Selector right to access the same fine-tuning screen that’s available for other White Balance settings. See “Fine-tuning White Balance settings,” earlier in this chapter, for help.
![]() Edit comment: This is a great option: It enables you to add a brief text label to the preset so that you can easily remember what lighting conditions the White Balance setting is designed to address. For example, you might add the label “Studio A” to one preset and “Studio B” to another to help you remember which is which. The label then appears with the preset thumbnail.
Edit comment: This is a great option: It enables you to add a brief text label to the preset so that you can easily remember what lighting conditions the White Balance setting is designed to address. For example, you might add the label “Studio A” to one preset and “Studio B” to another to help you remember which is which. The label then appears with the preset thumbnail.
After highlighting Edit Comment, press the Multi Selector right to display the text-entry screen shown on the right in Figure 8-27. Use these techniques to create your text comment:
• To enter a character: On the “keyboard” in the top half of the screen, use the Multi Selector to highlight the letter you want to enter. Then press OK.
![]() • To move the cursor in the text entry area: Hold down the ISO button while pressing the Multi Selector right or left. Release the ISO button to return to the keyboard.
• To move the cursor in the text entry area: Hold down the ISO button while pressing the Multi Selector right or left. Release the ISO button to return to the keyboard.
![]() • To delete a character: First use the preceding technique to highlight the offending character in the text-entry box. Then release the ISO button and press the Delete button to erase the character.
• To delete a character: First use the preceding technique to highlight the offending character in the text-entry box. Then release the ISO button and press the Delete button to erase the character.
![]() When you finish entering your label, press the Qual button to finalize things and store the comment with your preset.
When you finish entering your label, press the Qual button to finalize things and store the comment with your preset.
![]() Select Image: This option enables you to base a preset on an existing photo; see the preceding section for how-to’s.
Select Image: This option enables you to base a preset on an existing photo; see the preceding section for how-to’s.
![]() Protect: Set this option to On to lock a preset so that you can’t accidentally overwrite it when you create a new one. If you enable this feature, however, you can’t alter the preset comment or fine-tune the setting.
Protect: Set this option to On to lock a preset so that you can’t accidentally overwrite it when you create a new one. If you enable this feature, however, you can’t alter the preset comment or fine-tune the setting.
To exit the edit screen and return to shooting, press the shutter button halfway and release it, or press Menu to return to the menu screens.
Bracketing white balance
Chapter 7 introduces you to your camera’s automatic bracketing feature, which enables you to easily record the same image at several different exposure settings. In addition to being able to bracket autoexposure, flash, and Active D-Lighting settings, you can use the feature to bracket white balance.
![]() You must set the Mode dial to P, S, A, or M. You can’t take advantage of auto bracketing in the other exposure modes.
You must set the Mode dial to P, S, A, or M. You can’t take advantage of auto bracketing in the other exposure modes.
![]() You can bracket JPEG shots only. You can’t use white balance bracketing if you set the camera’s Image Quality setting to either Raw (NEF) or any of the RAW+JPEG options. And frankly, there isn’t any need to do so because you can precisely tune colors of Raw files when you process them in your Raw converter. Chapter 6 has details on Raw processing.
You can bracket JPEG shots only. You can’t use white balance bracketing if you set the camera’s Image Quality setting to either Raw (NEF) or any of the RAW+JPEG options. And frankly, there isn’t any need to do so because you can precisely tune colors of Raw files when you process them in your Raw converter. Chapter 6 has details on Raw processing.
![]() You take just one picture to record each bracketed series. Each time you press the shutter button, the camera records a single image and then makes the bracketed copies, each at a different White Balance setting. One frame is always captured with no white balance adjustment.
You take just one picture to record each bracketed series. Each time you press the shutter button, the camera records a single image and then makes the bracketed copies, each at a different White Balance setting. One frame is always captured with no white balance adjustment.
![]() You can apply white balance bracketing only along the blue-to-amber axis of the fine-tuning color grid. You can’t shift colors along the green-to-magenta axis, as you can when tweaking a specific White Balance setting. (For a reminder of this feature, see the earlier section “Fine-tuning White Balance settings.”)
You can apply white balance bracketing only along the blue-to-amber axis of the fine-tuning color grid. You can’t shift colors along the green-to-magenta axis, as you can when tweaking a specific White Balance setting. (For a reminder of this feature, see the earlier section “Fine-tuning White Balance settings.”)
![]() You can shift colors a maximum of three steps between frames. For those familiar with traditional lens filters, each step on the axis is equivalent to a filter density of five mireds.
You can shift colors a maximum of three steps between frames. For those familiar with traditional lens filters, each step on the axis is equivalent to a filter density of five mireds.
I used white balance bracketing to record the three candle photos in Figure 8-28. For the blue and amber versions, I set the bracketing to shift colors the maximum three steps from neutral. In this photo, I find the shift most noticeable in the color of the backdrop.
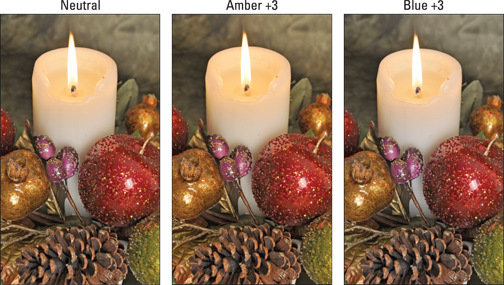
Figure 8-28: I used white balance bracketing to record three variations on the subject.
To apply white balance bracketing, you first need to take these steps:
1. Set the Mode dial to P, S, A, or M.
2. Set the Image Quality setting to one of the JPEG options (Fine, Normal, or Basic).
![]() Chapter 2 explains these options. To adjust the setting quickly, press the Qual button while rotating the Main command dial.
Chapter 2 explains these options. To adjust the setting quickly, press the Qual button while rotating the Main command dial.
3. Display the Custom Setting menu, select the Bracketing/Flash submenu, and press OK.
4. Select Auto Bracketing Set, as shown on the left in Figure 8-29, and press OK.
You see the screen shown on the right in the figure.
5. Select WB Bracketing and press OK.
The bracketing feature is now set up to adjust white balance between your bracketed shots.
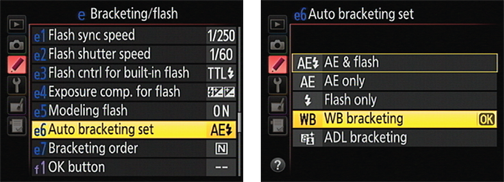
Figure 8-29: Set the Auto Bracketing Set option to WB Bracketing.
From here on, bracketing works pretty much as detailed in the steps at the end of Chapter 7. Rather than repeating everything here, I’ll save some page space and provide just a quick summary of how to establish the bracketing settings.
![]()
![]() To set the number of frames and direction of the bracketing adjustment: Press and hold the BKT button (right-front side of the camera) while rotating the Main command dial. For white balance bracketing, the options are as follows:
To set the number of frames and direction of the bracketing adjustment: Press and hold the BKT button (right-front side of the camera) while rotating the Main command dial. For white balance bracketing, the options are as follows:
• b3F: Records three frames: one with no adjustment and two shifted toward blue.
• a3F: Records three frames: one neutral and two shifted toward amber.
• b2F: Records two frames: one without any adjustment and one shifted toward blue.
• a2F: Again, you get two frames, but the second is shifted toward amber.
• 3F: This setting records three frames: one neutral, one pushed toward amber, and one shifted toward blue.
• 5F: Produces one neutral shot, two shifted toward amber and two shifted toward blue.
• 0F: Select this setting to turn off bracketing.
![]() To set the amount of white-balance adjustment: Press the BKT button and rotate the Sub-command dial. Again, you can set the bracketing amount to 1, 2, or 3.
To set the amount of white-balance adjustment: Press the BKT button and rotate the Sub-command dial. Again, you can set the bracketing amount to 1, 2, or 3.
While the BKT button is pressed, you can view both settings in the Control panel and Information display. When you release the button, you see the same BKT symbol and progress indicator that appears when you bracket exposure settings. (Again, check out Chapter 7 for details.)
After establishing the bracketing parameters, just shoot your bracketed frames. Remember: Press the shutter button just once, and the camera records the entire bracketed series. Bracketing remains in force until you disable it (by setting the frame number to 0F).
Choosing a Color Space: sRGB versus Adobe RGB
By default, your camera captures images using the sRGB color mode, which refers to an industry-standard spectrum of colors. (The s is for standard, and the RGB is for red-green-blue, which are the primary colors in the digital color world.) The sRGB color mode was created to help ensure color consistency as an image moves from camera (or scanner) to monitor and printer; the idea was to create a spectrum of colors that all devices can reproduce.
However, the sRGB color spectrum leaves out some colors that can be reproduced in print and onscreen, at least by some devices. So as an alternative, your camera also enables you to shoot in the Adobe RGB color mode, which includes a larger spectrum (or gamut) of colors. Figure 8-30 offers an illustration of the two spectrums.
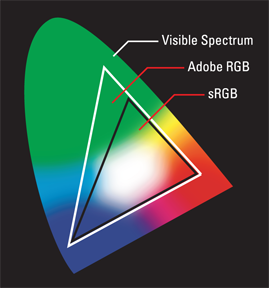
Figure 8-30: Adobe RGB includes some colors not found in the sRGB spectrum.
Some colors in the Adobe RGB spectrum can’t be reproduced in print. (The printer just substitutes the closest printable color, if necessary.) Still, I usually shoot in Adobe RGB mode because I see no reason to limit myself to a smaller spectrum from the get-go.
However, just because I use Adobe RGB doesn’t mean that it’s right for you. First, if you plan to print and share your photos without making any adjustments in your photo editor, you’re better off sticking with sRGB because most printers and web browsers are designed around that color space. Second, know that to retain all your original Adobe RGB colors when you work with your photos, your editing software must support that color space — not all programs do. You also must be willing to study the whole topic of digital color a little bit because you need to use some specific settings to avoid really mucking up the color works.
If you want to go with Adobe RGB instead of sRGB, you can make the change via the Color Space option on the Shooting menu, as shown in Figure 8-31.
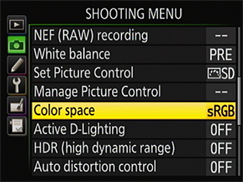
Figure 8-31: Stick with sRGB unless you understand color management and have software that supports the Adobe RGB color space.
Taking a Quick Look at Picture Controls
The Picture Control setting gives you one more way to modify color intensity as well as to adjust image contrast and sharpening. Sharpening, in case you’re new to the term, refers to a software process that adjusts contrast in a way that creates the illusion of slightly sharper focus. I emphasize, “slightly sharper focus.” Sharpening produces a subtle tweak, not a fix for poor focus.
Two things to note before you explore Picture Controls:
![]() Picture Controls affect only those photos that you shoot in the JPEG format. If you select Raw (NEF) as the format, the Picture Control setting affects only the picture preview you see during playback and when you view the picture thumbnail in your photo software. (See Chapter 2 for help understanding the JPEG and Raw formats.)
Picture Controls affect only those photos that you shoot in the JPEG format. If you select Raw (NEF) as the format, the Picture Control setting affects only the picture preview you see during playback and when you view the picture thumbnail in your photo software. (See Chapter 2 for help understanding the JPEG and Raw formats.)
![]() You can specify a Picture Control only in the P, S, A, and M exposure modes. In all other modes, the camera selects the Picture Control for you.
You can specify a Picture Control only in the P, S, A, and M exposure modes. In all other modes, the camera selects the Picture Control for you.
You can choose from the six Picture Control settings:
![]() Standard (SD): The default setting, this option captures the image normally — that is, using the characteristics that Nikon offers as suitable for the majority of subjects.
Standard (SD): The default setting, this option captures the image normally — that is, using the characteristics that Nikon offers as suitable for the majority of subjects.
![]() Neutral (NL): At this setting, the camera doesn’t enhance color, contrast, and sharpening as much as in the other modes. The setting is designed for people who want to precisely manipulate these picture characteristics in a photo editor. By not overworking colors, sharpening, and so on when producing your original file, the camera delivers an original that gives you more latitude in the digital darkroom.
Neutral (NL): At this setting, the camera doesn’t enhance color, contrast, and sharpening as much as in the other modes. The setting is designed for people who want to precisely manipulate these picture characteristics in a photo editor. By not overworking colors, sharpening, and so on when producing your original file, the camera delivers an original that gives you more latitude in the digital darkroom.
![]() Vivid (VI): In this mode, the camera amps up color saturation, contrast, and sharpening.
Vivid (VI): In this mode, the camera amps up color saturation, contrast, and sharpening.
![]() Monochrome (MC): This setting produces black-and-white photos. Only in the digital world, they’re called grayscale images because a true black-and-white image contains only black and white, with no shades of gray.
Monochrome (MC): This setting produces black-and-white photos. Only in the digital world, they’re called grayscale images because a true black-and-white image contains only black and white, with no shades of gray.
 I’m not keen on creating grayscale images this way. I prefer to shoot in full color and then do my own grayscale conversion in my photo editor. That technique just gives you more control over the look of your black-and-white photos. Assuming that you work with a decent photo editor, you can control what original tones are emphasized in your grayscale version, for example. Additionally, keep in mind that you can always convert a color image to grayscale, but you can’t go the other direction. You can create a black-and-white copy of your color image right in the camera, in fact; Chapter 10 shows you how.
![]() Portrait (PT): This mode tweaks colors and sharpening in a way that is designed to produce nice skin texture and pleasing skin tones. (If you shoot in the Portrait or Night Portrait Scene modes, the camera selects this Picture Control for you.)
Portrait (PT): This mode tweaks colors and sharpening in a way that is designed to produce nice skin texture and pleasing skin tones. (If you shoot in the Portrait or Night Portrait Scene modes, the camera selects this Picture Control for you.)
![]() Landscape (LS): This mode emphasizes blues and greens. As you might expect, it’s the mode used by the Landscape Scene mode.
Landscape (LS): This mode emphasizes blues and greens. As you might expect, it’s the mode used by the Landscape Scene mode.
The extent to which the Picture Control setting affects your image depends on the subject as well as the exposure settings you choose and the lighting conditions, but Figure 8-32 gives you a general idea of what to expect. As you can see, the differences between the Picture Controls are pretty subtle, with the exception of the Monochrome setting.
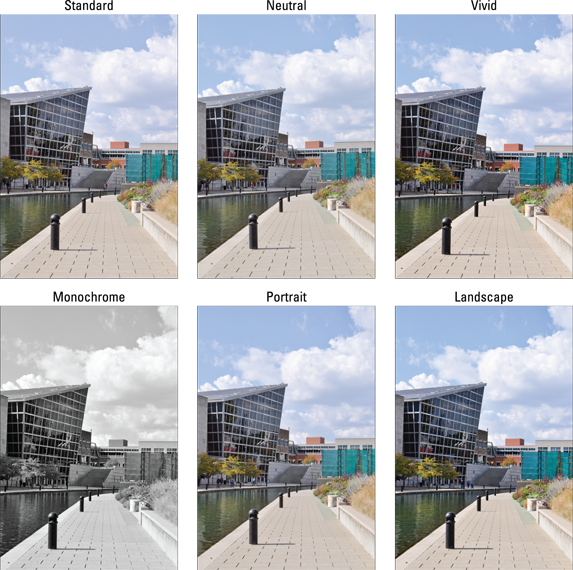
Figure 8-32: Picture Controls apply preset adjustments to color, sharpening, and contrast to images you shoot in the JPEG file format.
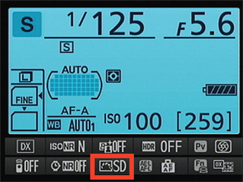
Figure 8-33: This two-letter code represents the current Picture Control setting.
To adjust the setting, follow either of these paths:
![]() Shooting menu: Select Set Picture Control and press OK to display the list of options, as illustrated in Figure 8-34. Highlight your choice and press OK.
Shooting menu: Select Set Picture Control and press OK to display the list of options, as illustrated in Figure 8-34. Highlight your choice and press OK.
![]()
![]() Information display control strip: Here’s an even faster option: Press the i button to go activate the control strip, highlight the Picture Control setting, and press OK to display the Picture Control menu screen (the right screen in Figure 8-34).
Information display control strip: Here’s an even faster option: Press the i button to go activate the control strip, highlight the Picture Control setting, and press OK to display the Picture Control menu screen (the right screen in Figure 8-34).
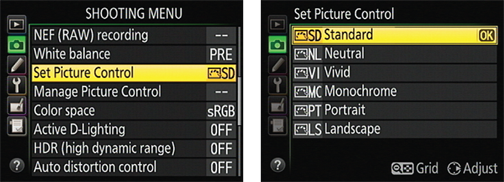
Figure 8-34: You can adjust the setting via the Shooting menu.
Second, if you really want to mess with the characteristics that the Picture Control options affect, you’re much better off shooting in the Raw (NEF) format and then making those adjustments on a picture-by-picture basis in your Raw converter. In Nikon ViewNX 2, you can even assign any of the existing Picture Controls to your Raw files and then compare how each one affects the image. The camera does tag your Raw file with whatever Picture Control is active when you take the shot, but the image adjustments are in no way set in stone, or even in sand — you can tweak your photo at will.
However, in the interest of full disclosure, I should alert you to a feature that may make Picture Controls a little more useful to some people: You can modify any Picture Control to more closely render a scene the way you envision it. So, for example, if you like the bold colors of Landscape mode but don’t think the effect goes far enough, you can adjust the setting to amp up colors even more.
To reserve page space in this book for functions that experience tells me will be the most useful to the most readers, I opted not to provide full details about customizing Picture Controls. The following steps provide a quick overview of the process so that if you encounter the menu screens that contain the related options, you’ll have some idea of what you’re seeing:
1. Set the Mode dial to P, S, A, or M.
You can select and modify Picture Controls only in these exposure modes.
![]() 2. Access the Set Picture Control option via the Information display control strip (press the i button to activate the strip) or the Shooting menu. Then press OK.
2. Access the Set Picture Control option via the Information display control strip (press the i button to activate the strip) or the Shooting menu. Then press OK.
Either way, you see the screen shown on the left in Figure 8-35.
3. Highlight the Picture Control you want to modify.
For example, I highlighted the Vivid setting on the left screen in Figure 8-35.
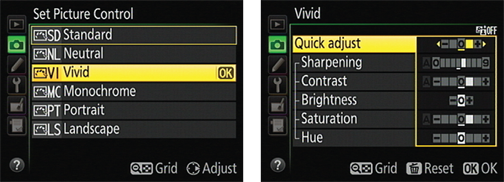
Figure 8-35: After selecting a Picture Control, press right to display options for adjusting its effect on your pictures.
4. Press the Multi Selector right.
You see the screen shown on the right in Figure 8-35, containing sliders that you use to modify the Picture Control. Which options you can adjust depend on your selected Picture Control.
5. Highlight a picture characteristic and then press the Multi Selector right or left to adjust the setting.
 A few tips:
• Some Picture Controls offer a Quick Adjust setting, which enables you to easily increase or decrease the overall effect of the Picture Control. A positive value produces a more exaggerated effect; set the slider to 0 to return to the default setting.
• The large vertical line in the slider bar indicates the current setting for the option.
• After you adjust a setting, you see a little line under the slider bar to represent the default setting.
![]() • Reset all the options to their defaults by pressing the Delete button.
• Reset all the options to their defaults by pressing the Delete button.
![]() • To display a grid that lets you see how your selected Picture Control compares with the others in terms of color saturation and contrast, as shown in Figure 8-36, press and hold the ISO button. (I vote this screen most likely to confound new camera users who stumble across it.) Note that the Standard and Portrait settings are identical in terms of contrast and saturation, so the P for Portrait doesn’t appear in the grid unless you selected that Picture Control initially.
• To display a grid that lets you see how your selected Picture Control compares with the others in terms of color saturation and contrast, as shown in Figure 8-36, press and hold the ISO button. (I vote this screen most likely to confound new camera users who stumble across it.) Note that the Standard and Portrait settings are identical in terms of contrast and saturation, so the P for Portrait doesn’t appear in the grid unless you selected that Picture Control initially.
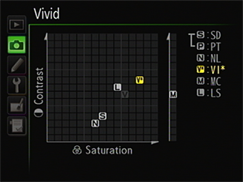
Figure 8-36: Press the Zoom In button to display a grid that ranks each Picture Control according to its level of saturation and contrast.
If you changed any settings before getting to the screen, you see an asterisk next to the setting, as in the figure. You also see two grid markers for the Picture Control you’re adjusting: the highlighted one represents the current, adjusted setting, and the dimmed gray one shows you where the default settings put the Picture Control on the grid.
You can’t change any settings via the grid — it’s for informational purposes only. However, if you display the grid from the first Set Picture Control menu (the left screen in Figure 8-35), you can press the Multi Selector up or down to select a different Picture Control. You then can press right to access the Picture Control adjustment screen.
6. Press OK to save your changes and exit the adjustment screen.
As when you fine-tune a White Balance setting, an asterisk appears next to the edited Picture Control in the menu and Information screen to remind you that you have adjusted it.
Again, these steps are intended just as a starting point for those who are interested in playing with Picture Controls. Complete details on each of the Picture Control adjustment options are found in the camera manual.
