![]()
3
Taking Great Pictures, Automatically
In This Chapter
![]() Getting the best results in automatic exposure modes
Getting the best results in automatic exposure modes
![]() Understanding the pros and cons of Auto and Auto Flash Off modes
Understanding the pros and cons of Auto and Auto Flash Off modes
![]() Shooting your first pictures
Shooting your first pictures
![]() Exploring Scene modes
Exploring Scene modes
Are you old enough to remember the Certs television commercials from the 1960s and ’70s? “It’s a candy mint!” declared one actor. “It’s a breath mint!” argued another. Then a narrator declared the debate a tie and spoke the famous catchphrase: “It’s two, two, two mints in one!”
Well, that’s sort of how I see the Nikon D7100. On one hand, it provides a full range of powerful controls, offering just about every feature a serious photographer could want. On the other, it offers automated photography modes that enable people with absolutely no experience to capture beautiful images. “It’s a sophisticated photographic tool!” “It’s as easy as ‘point and shoot!’” “It’s two, two, two cameras in one!”
Now, my guess is that you bought this book for help with your camera’s advanced side, so that’s what other chapters cover. This chapter, however, is devoted to your camera’s easiest exposure modes, showing you how to get the best results in the Auto, Auto Flash Off, and Scene modes.
Note: This chapter assumes that you’re using the viewfinder to compose your pictures. Things work differently in Live View mode, which enables you to use the monitor instead of the viewfinder, so Chapter 4 concentrates on that option as well as movie recording.
Setting Up for Automatic Success
Your first step in taking advantage of easy-breezy shooting is to set the Mode dial to Auto, as shown in Figure 3-1, or Auto Flash Off or Scene. Remember that you must press and hold the center button in order to rotate the Mode dial.
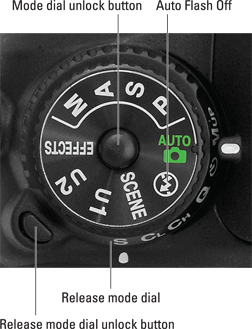
Figure 3-1: For almost-automatic photography, use the Auto, Auto Flash Off, or Scene modes.
Here’s a recap what each setting offers:
![]() Auto is a general purpose, point-and-shoot type of option.
Auto is a general purpose, point-and-shoot type of option.
![]() Auto Flash Off does the same thing as Auto but without flash.
Auto Flash Off does the same thing as Auto but without flash.
![]() Scene gives you access to 16 automatic modes geared to shooting specific types of pictures.
Scene gives you access to 16 automatic modes geared to shooting specific types of pictures.
![]() Release mode: This setting, fully detailed in Chapter 2, determines the number of images that are recorded with each press of the shutter button and the timing of each shot. Choose the Release mode via the dial that’s directly under the Mode dial, labeled in Figure 3-1. (Don’t forget to press the little dial unlock button before moving the dial.)
Release mode: This setting, fully detailed in Chapter 2, determines the number of images that are recorded with each press of the shutter button and the timing of each shot. Choose the Release mode via the dial that’s directly under the Mode dial, labeled in Figure 3-1. (Don’t forget to press the little dial unlock button before moving the dial.)
For normal shooting, set the dial to the S (Single Frame) position, as shown in the figure; at this setting, you get one picture for each press of the shutter button.
![]() Focusing method: You can enjoy autofocusing, if your lens supports it, or focus manually. On the 18–105mm lens featured in this book, select the lens focus mode via the switch labeled in Figure 3-2. Choose A for autofocusing and M for manual focusing.
Focusing method: You can enjoy autofocusing, if your lens supports it, or focus manually. On the 18–105mm lens featured in this book, select the lens focus mode via the switch labeled in Figure 3-2. Choose A for autofocusing and M for manual focusing.
Also, set the camera’s Focus mode selector switch to AF for autofocus, as shown in Figure 3-2, or M for manual focusing.
![]() Vibration Reduction (VR): If your lens offers this feature, enabling it helps produce sharper images by compensating for camera movement that can occur when you handhold the camera. On the 18–105 kit lens, turn Vibration Reduction on or off via the switch labeled in Figure 3-2. Set the switch to Off when you mount the camera on a tripod.
Vibration Reduction (VR): If your lens offers this feature, enabling it helps produce sharper images by compensating for camera movement that can occur when you handhold the camera. On the 18–105 kit lens, turn Vibration Reduction on or off via the switch labeled in Figure 3-2. Set the switch to Off when you mount the camera on a tripod.
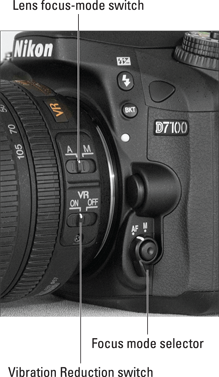
Figure 3-2: You can choose automatic or manual focusing.
For other lenses, check the lens manual for details about using this feature.
![]() Image Quality and Image Size (Shooting menu): By default, pictures are recorded at the Large Image Size setting and the Normal Image Quality setting, which creates a JPEG picture file with a moderate amount of compression. Chapter 2 explains both options and offers advice on when you may want to stray from the default settings.
Image Quality and Image Size (Shooting menu): By default, pictures are recorded at the Large Image Size setting and the Normal Image Quality setting, which creates a JPEG picture file with a moderate amount of compression. Chapter 2 explains both options and offers advice on when you may want to stray from the default settings.
![]() Image Area (Shooting menu): By default, the camera uses the DX setting, which records the photo using the entire image sensor. If you switch to the 1.3x crop setting, a smaller area at the center of the sensor is used, giving you the same result as if you shot the picture using the entire sensor and then cropped the photo. Framing guidelines appear in the viewfinder to show you the smaller image area. Stick with the default (DX) until you have time to visit Chapter 2 and digest the implications of using the crop mode.
Image Area (Shooting menu): By default, the camera uses the DX setting, which records the photo using the entire image sensor. If you switch to the 1.3x crop setting, a smaller area at the center of the sensor is used, giving you the same result as if you shot the picture using the entire sensor and then cropped the photo. Framing guidelines appear in the viewfinder to show you the smaller image area. Stick with the default (DX) until you have time to visit Chapter 2 and digest the implications of using the crop mode.
![]() Flash mode: In Auto exposure mode, as well as in many of the Scene modes, the camera automatically raises and fires the built-in flash in dim lighting. In some cases, you can alter the behavior of the flash through the Flash mode setting.
Flash mode: In Auto exposure mode, as well as in many of the Scene modes, the camera automatically raises and fires the built-in flash in dim lighting. In some cases, you can alter the behavior of the flash through the Flash mode setting.
Chapter 7 provides complete details about Flash modes and other flash settings, but here’s a look at the basics:
 • Checking the Flash mode: Symbols representing the current mode appear in the Control panel and Information display, in the areas highlighted in Figure 3-3. (Press the Info button to bring up the Information display.) The Auto Flash mode, whose symbol appears in the figure and the margin here, means that the camera will automatically fire the flash if it thinks the ambient lighting is insufficient. This Flash mode is the default setting.
 The TTL label that appears with the icon in the Information screen stands for through-the-lens, which refers to the way that the camera measures the ambient light when it calculates how much flash power is needed.
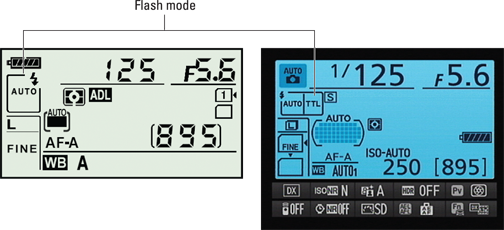
Figure 3-3: These symbols show the current Flash mode.
![]() • Changing the Flash mode: Press the Flash button while rotating the Main command dial.
• Changing the Flash mode: Press the Flash button while rotating the Main command dial.
![]() • Disabling flash: You can’t simply close the flash to disable it — the camera will just raise it again if it thinks extra light is needed. But in some automatic exposure modes, including Auto, you can prevent the flining area of the viewfinder also changes from showing you how ash from firing by choosing Flash Off mode, represented in the displays by the symbol shown in the margin.
• Disabling flash: You can’t simply close the flash to disable it — the camera will just raise it again if it thinks extra light is needed. But in some automatic exposure modes, including Auto, you can prevent the flining area of the viewfinder also changes from showing you how ash from firing by choosing Flash Off mode, represented in the displays by the symbol shown in the margin.
![]() • Using red-eye reduction flash: Auto mode and some Scene modes also offer this feature, represented in the Flash mode display by the little eye icon shown here. In this Flash mode, the camera emits a burst of light from the AF-assist illuminator lamp on the front of the camera before the flash fires. This light constricts the subject’s pupils, which reduces the chances of red-eye.
• Using red-eye reduction flash: Auto mode and some Scene modes also offer this feature, represented in the Flash mode display by the little eye icon shown here. In this Flash mode, the camera emits a burst of light from the AF-assist illuminator lamp on the front of the camera before the flash fires. This light constricts the subject’s pupils, which reduces the chances of red-eye.
 • Combining a slow shutter speed with flash: Some Scene modes combine flash with a slow shutter speed in order to produce brighter backgrounds in dimly lit scenes. The word Slow in the Flash mode display indicates that this feature is in force. Because of the slow shutter speed — longer exposure time — use a tripod and ask your subject to remain still during the exposure to avoid a blurry picture.
![]()
![]() ISO Sensitivity: You have access to one exposure-adjustment option, ISO Sensitivity, which determines how much light is needed to properly expose the image. (Adjust the setting by holding down the ISO button and rotating the Main command dial.) At the default setting, Auto, the camera adjusts the ISO Sensitivity as needed. Stick with this setting until you have time to explore the whys and wherefores of your other options in Chapter 7.
ISO Sensitivity: You have access to one exposure-adjustment option, ISO Sensitivity, which determines how much light is needed to properly expose the image. (Adjust the setting by holding down the ISO button and rotating the Main command dial.) At the default setting, Auto, the camera adjusts the ISO Sensitivity as needed. Stick with this setting until you have time to explore the whys and wherefores of your other options in Chapter 7.
As Easy as It Gets: Auto and Auto Flash Off
The following steps walk you through taking a picture in Auto and Auto Flash Off modes. A couple of notes before you start:
![]() The steps show you how to take the picture using autofocusing. To focus manually, ignore the autofocusing instructions.
The steps show you how to take the picture using autofocusing. To focus manually, ignore the autofocusing instructions.
![]() Autofocusing information presented here assumes that you’re using the viewfinder. You use a different autofocusing technique in Live View mode, so see Chapter 4 to go that route.
Autofocusing information presented here assumes that you’re using the viewfinder. You use a different autofocusing technique in Live View mode, so see Chapter 4 to go that route.
With that preamble done, walk this way to snap a photo:
1. Set the Mode dial to Auto or Auto Flash Off. (Refer to Figure 3-1.)
2. Set the focusing method, Release mode, and other basic settings as outlined in the preceding section.
3. Looking through the viewfinder, compose the shot so that your subject is within the autofocus brackets, labeled in Figure 3-4.
The camera’s autofocusing points are scattered throughout the area indicated by the brackets.
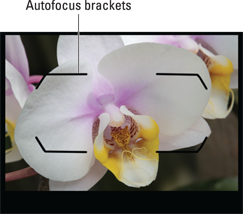
Figure 3-4: Position your subject within the area surrounded by the autofocus brackets.
4. Press and hold the shutter button halfway down.
The following occurs:
• Exposure metering begins. The autoexposure meter analyzes the light and selects initial aperture (f-stop) and shutter speed settings, which are two critical exposure controls. These two settings appear in the viewfinder; in Figure 3-5, the shutter speed is 1/125 second, and the f-stop is f/10. (Chapter 7 explains these two options in detail.) The autoexposure meter continues monitoring the light up to the time you take the picture, however, so the f-stop and shutter speed values may change if the lighting conditions change.
The shots-remaining area of the viewfinder also changes from showing you how many more pictures can fit on your memory card to how many can fit in the camera’s buffer — 28, in Figure 3-5. This number is critical only when you’re shooting a burst of images using the Continuous High or Continuous Low Release mode options, so don’t worry about it for single-frame shooting. (If the number drops to zero when you’re shooting a burst of images, you may need to pause shooting momentarily until the camera can finish writing all the image data to the memory card.)
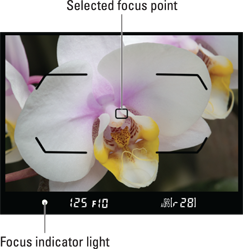
Figure 3-5: The round white dot indicates that the camera has locked focus on the objects under the selected focus point.
• In Auto exposure mode, the built-in flash pops up if the camera thinks additional light is needed. You can set the Flash mode to auto (normal) or red-eye reduction mode. Or you can disable the flash by changing the Flash mode to Off, as explained in the preceding section.
• The camera’s autofocus system begins to do its thing. In dim light, the AF-assist lamp on the front of the camera shoots out a beam of light to help the camera find its focusing target.
5. Check the focus indicators in the viewfinder.
When the camera has established focus, one or more little rectangles within the focus brackets flash red for a split second. Those rectangles represent the focus points. Then just a single black focus point remains to show you the final focusing area selected by the camera. For example, in Figure 3-5, the camera selected the center focus point.
In the display at the bottom of the viewfinder, the round focus indicator, labeled in Figure 3-5, lights to give you further notice that focus has been achieved.
 A triangle to the right or left of the spot where the focus dot should appear means that focus isn’t yet spot on. If the triangle is pointing right, as shown in the top image in Figure 3-6, focus is set in front of the subject; if the triangle is points left, focus is set behind the subject. And if both triangles blink, the autofocus system is stymied, so switch to manual focusing or release the shutter button and press halfway again to try refocusing.
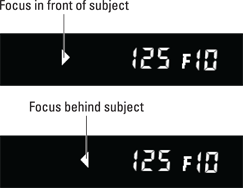
Figure 3-6: Triangles in the area where the focus light should appear indicate a focusing problem.
6. Press the shutter button the rest of the way down to record the image.
![]() Exposure: In dim lighting, the camera may need to use a very high ISO setting or very slow shutter speed when the flash is disabled. Unfortunately, a high ISO can create noise, a defect that makes your picture look grainy. And a slow shutter speed can produce blur if either the camera or subject moves during the exposure. If you spot either problem, enable flash or add some other light source.
Exposure: In dim lighting, the camera may need to use a very high ISO setting or very slow shutter speed when the flash is disabled. Unfortunately, a high ISO can create noise, a defect that makes your picture look grainy. And a slow shutter speed can produce blur if either the camera or subject moves during the exposure. If you spot either problem, enable flash or add some other light source.
![]() Autofocusing: Autofocusing behavior is determined by two settings, the AF-area mode and the Autofocus mode. By default, the camera uses the following settings:
Autofocusing: Autofocusing behavior is determined by two settings, the AF-area mode and the Autofocus mode. By default, the camera uses the following settings:
• AF-area mode: The Auto Area option is selected, which means that the camera selects which autofocus point to use when establishing focus.
• Autofocus mode: The default setting is AF-A, which stands for auto-servo autofocus. If the subject isn’t moving, focus remains locked as long as you hold the shutter button halfway down. If the camera detects motion, it continually adjusts focus up to the time you press the button fully to record the picture. (In this situation, the focus indicator light may blink on and off as the camera adjusts focus.) To ensure that focus is correct, you must keep your subject within the area of the viewfinder covered by the focusing brackets.
You can adjust both settings in the Auto and Auto Flash Off modes, but before you do, visit Chapter 8 to find out how the other autofocusing options work.
Taking Advantage of Scene Modes
In Auto and Auto Flash Off exposure modes, the camera tries to figure out what type of picture you want to take by assessing what it sees through the lens. If you don’t want to rely on the camera to make that judgment, your D7100 offers Scene modes, which are designed to automatically capture specific scenes in ways that are traditionally considered best from a creative standpoint. For example, most people prefer portraits that have softly focused backgrounds. So in Portrait mode, the camera selects settings that can produce that type of background.
Usually, Scene modes also apply color, exposure, contrast, and sharpness adjustments to the picture according to the traditional characteristics of the scene type. Landscape mode typically results in more vibrant colors, especially in the blue-green range, for example, whereas Portrait mode typically produces a softer image with more natural tones.
To access the Scene modes, set the Mode dial to Scene, as shown in Figure 3-7. The following section explains how to select a scene type; following that, you can get brief information about each one.
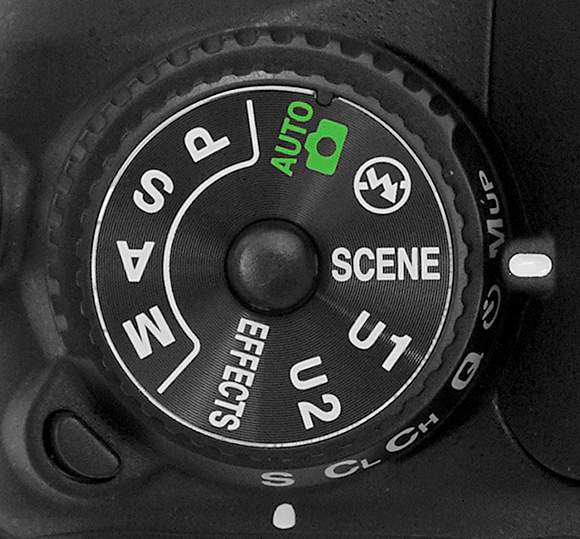
Figure 3-7: Set the Mode dial to Scene to experiment with automatic exposure modes based on different types of photographic scenes.
Long story short: Experiment with the Scene modes while you’re discovering more about photography. If you’re not happy with your results, don’t just keep trying over and over with the same Scene mode — you’re not going to achieve anything different. Instead, head for Part III of this book, where you can find out how to master the advanced exposure modes and take full control over your pictures.
Selecting a Scene mode
To experiment with Scene modes, follow these steps:
1. Set the Mode dial to Scene.
![]() 2. Press the Info button to display the Information screen.
2. Press the Info button to display the Information screen.
An icon representing the current Scene mode appears in the upper-left corner of the Information display, as shown on the left in Figure 3-8. (This particular icon represents the Portrait mode.) The next section describes each Scene mode.
3. Rotate the Main command dial to choose a different scene.
As soon as you rotate the dial, the display changes to show a scrolling panel of scene types, as shown on the right in Figure 3-8. Keep spinning the dial to cycle through all the options. An example photo appears to give you an idea of what the selected mode produces.
![]() You can also press the WB button to get a text tip that explains more about what the scene type is designed to do.
You can also press the WB button to get a text tip that explains more about what the scene type is designed to do.
4. When you find a Scene mode you like, stop rotating the Main command dial.
The camera sets itself up to take the picture.
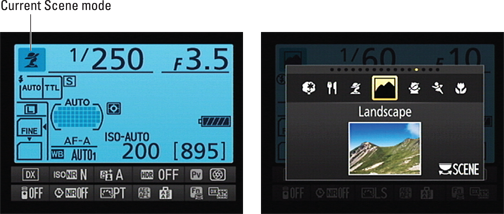
Figure 3-8: Rotate the Main command dial to cycle through the available scene types.
5. Frame, focus, and shoot.
From here on in, everything works as it does for the Auto and Auto Flash Off exposure modes with the exception of your Flash mode choices and the default autofocusing behavior, which vary depending on the scene type you select. (I describe your options in the next section.)
Checking out the Scene(s)
Your camera offers 16 Scene modes, each designed to produce a specific result in terms of lighting, color, and focus. Before you start exploring the Scene choices, note these general pointers:
![]()
![]() Flash: For modes that permit flash, you may be able to select a different Flash mode; press the Flash button while rotating the Main command dial to cycle through the available settings. (Refer to the first section of this chapter, “Setting Up for Automatic Success,” for more details about changing the Flash mode.)
Flash: For modes that permit flash, you may be able to select a different Flash mode; press the Flash button while rotating the Main command dial to cycle through the available settings. (Refer to the first section of this chapter, “Setting Up for Automatic Success,” for more details about changing the Flash mode.)
![]() Autofocus: For most Scene modes, the default autofocusing settings work as they do when you use the Auto mode. The Autofocus mode is set to AF-A, which means that focus is locked when you depress the shutter button halfway unless the camera senses a moving subject, in which case it adjusts focus until the time you take the picture. And the AF-area mode is set to Auto, meaning that the camera chooses the focus point.
Autofocus: For most Scene modes, the default autofocusing settings work as they do when you use the Auto mode. The Autofocus mode is set to AF-A, which means that focus is locked when you depress the shutter button halfway unless the camera senses a moving subject, in which case it adjusts focus until the time you take the picture. And the AF-area mode is set to Auto, meaning that the camera chooses the focus point.
 For a few Scene modes, however, the AF-area mode isn’t set to Auto. Instead, you’re involved in choosing the focus point, as follows:
• Close Up, Candlelight, and Food: These modes use Single Point AF-area mode. By default, focus is based on a single focus point at the center of the frame. You can use the Multi Selector to move the point to a different position if necessary. (You may need to press the shutter button halfway and then release it to wake up the display first.)
• Sports and Pet Portrait: In these modes, the camera sets the AF-area mode to 51-point Dynamic Area. You start by selecting a single focus point, but if the subject leaves that point, the camera looks to other points for focusing information.
Chapter 8 shows you how to make best use of all these focusing options and how to adjust them to suit your subject.
And now without further ado, here’s a review of all bazillion Scene modes:
![]() Portrait: Choose this mode to produce the classic portrait look, with the subject set against a softly focused background, as shown in Figure 3-9. Colors are adjusted to produce natural-looking skin tones.
Portrait: Choose this mode to produce the classic portrait look, with the subject set against a softly focused background, as shown in Figure 3-9. Colors are adjusted to produce natural-looking skin tones.

Figure 3-9: Portrait mode produces soft backgrounds to help emphasize your subject.
![]() Landscape: In the time-honored tradition of landscape photography, this mode uses settings that keep both foreground and background objects as sharp as possible. It also manipulates the image in a way that produces crisp images with vivid blues and greens to create that bold, vacation-magazine look. (See Figure 3-10.) Flash is disabled.
Landscape: In the time-honored tradition of landscape photography, this mode uses settings that keep both foreground and background objects as sharp as possible. It also manipulates the image in a way that produces crisp images with vivid blues and greens to create that bold, vacation-magazine look. (See Figure 3-10.) Flash is disabled.
![]() Child: A variation of Portrait mode, Child mode also aims for a blurry background and natural skin tones. Colors of clothing and other objects, however, are rendered more vividly. I’m not a fan of this mode — I don’t want background objects or clothing to take the eye away from the face of my subject.
Child: A variation of Portrait mode, Child mode also aims for a blurry background and natural skin tones. Colors of clothing and other objects, however, are rendered more vividly. I’m not a fan of this mode — I don’t want background objects or clothing to take the eye away from the face of my subject.
![]() Sports: Select this mode to have a better chance of capturing a moving target without blur, as I did for my romping furboy in Figure 3-11. To accomplish this outcome, the camera selects a fast shutter speed, if possible. In dim lighting, though, it may need to use a slow shutter speed to expose the image — which typically means a shutter speed too low to freeze action. Flash is disabled. Note that in bright lighting, the Pet Portrait mode (see the upcoming bullet on that mode) would produce similar results to what you see in Figure 3-11; that mode is also geared to using a fast shutter speed when possible.
Sports: Select this mode to have a better chance of capturing a moving target without blur, as I did for my romping furboy in Figure 3-11. To accomplish this outcome, the camera selects a fast shutter speed, if possible. In dim lighting, though, it may need to use a slow shutter speed to expose the image — which typically means a shutter speed too low to freeze action. Flash is disabled. Note that in bright lighting, the Pet Portrait mode (see the upcoming bullet on that mode) would produce similar results to what you see in Figure 3-11; that mode is also geared to using a fast shutter speed when possible.
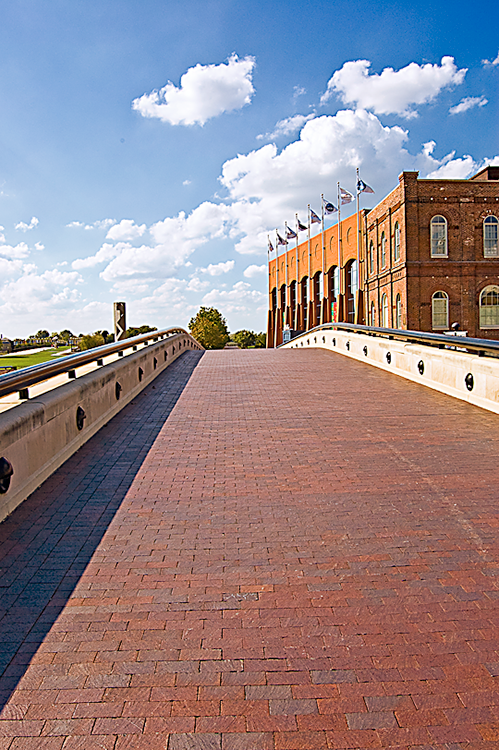
Figure 3-10: Landscape mode features bold colors and a large zone of sharp focus (depth of field).
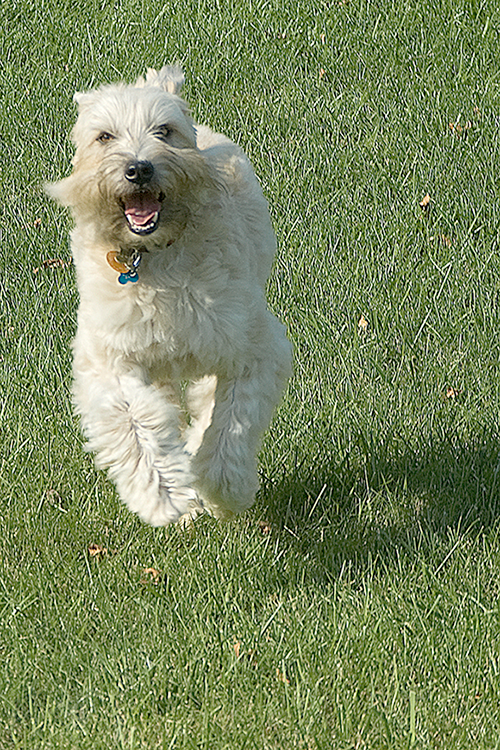
Figure 3-11: Try Sports mode to capture action.
![]() Close Up: As with Portrait and Child mode, this mode is designed to produce a blurry background to keep background objects from competing for attention with your subject, as shown in Figure 3-12.
Close Up: As with Portrait and Child mode, this mode is designed to produce a blurry background to keep background objects from competing for attention with your subject, as shown in Figure 3-12.
![]() Night Portrait: This mode is designed to deliver a better-looking flash portrait at night (or in any dimly lit environment). It does so by constraining your Flash mode choices to Auto Slow-Sync, Auto Slow-Sync with Red-Eye Reduction, or Off. In the first two Flash modes, the camera selects a shutter speed that results in a long exposure time. That slow shutter speed enables the camera to rely more on ambient light and less on the flash to expose the picture, which produces softer, more even lighting. If you disable flash, an even slower shutter speed is used.
Night Portrait: This mode is designed to deliver a better-looking flash portrait at night (or in any dimly lit environment). It does so by constraining your Flash mode choices to Auto Slow-Sync, Auto Slow-Sync with Red-Eye Reduction, or Off. In the first two Flash modes, the camera selects a shutter speed that results in a long exposure time. That slow shutter speed enables the camera to rely more on ambient light and less on the flash to expose the picture, which produces softer, more even lighting. If you disable flash, an even slower shutter speed is used.
 I cover the issue of long-exposure and slow-sync flash photography in detail in Chapter 7. For now, the critical thing to know is that the slower shutter speed means that you should use a tripod to avoid blur-inducing camera shake. Your subjects also must stay perfectly still during the exposure.
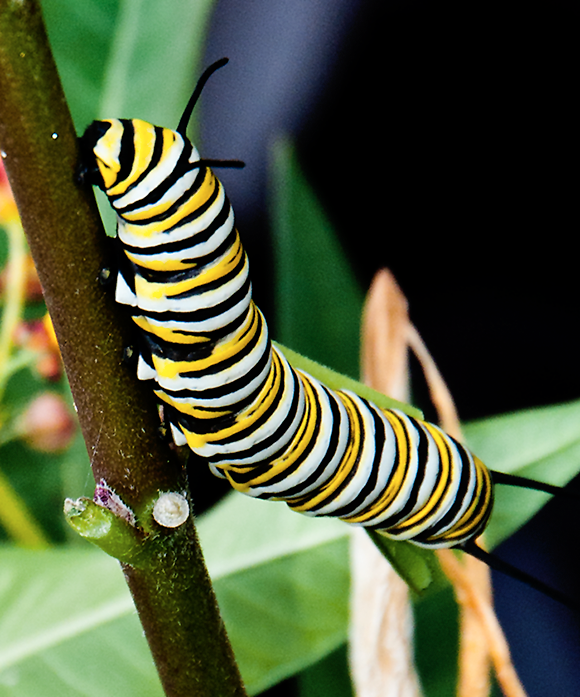
Figure 3-12: Close Up mode helps emphasize the subject by throwing the background out of focus.
![]() Night Landscape: This setting uses a slow shutter speed to capture nighttime city scenes, such as the one in Figure 3-13. Because of the long exposure time, use a tripod to avoid camera shake, which can blur the picture. Note that even when the camera remains perfectly still, any moving objects in the scene appear blurry, as does the fountain water in this example. This mode also is designed to reduce noise (a defect that looks like grains of sand) and avoid unnatural colors, both of which are common problems in night landscape shots. Flash is disabled.
Night Landscape: This setting uses a slow shutter speed to capture nighttime city scenes, such as the one in Figure 3-13. Because of the long exposure time, use a tripod to avoid camera shake, which can blur the picture. Note that even when the camera remains perfectly still, any moving objects in the scene appear blurry, as does the fountain water in this example. This mode also is designed to reduce noise (a defect that looks like grains of sand) and avoid unnatural colors, both of which are common problems in night landscape shots. Flash is disabled.
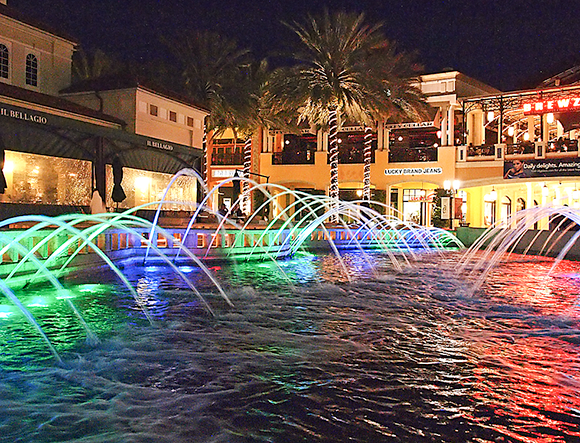
Figure 3-13: To capture this kind of after-dark photo, use Night Landscape mode and a tripod.
![]() Party/Indoor: This mode is designed to capture indoor scenes that are lit by room lighting as well as the flash, using settings that produce a nice balance between the two light sources. If the lighting is very dim, the camera may use a slow shutter speed, so use a tripod to avoid blurring.
Party/Indoor: This mode is designed to capture indoor scenes that are lit by room lighting as well as the flash, using settings that produce a nice balance between the two light sources. If the lighting is very dim, the camera may use a slow shutter speed, so use a tripod to avoid blurring.
![]() Beach/Snow: Use this mode for scenes with lots of bright areas, such as sand or snow, which can fool the camera’s autoexposure system into underexposing the image. Flash is disabled.
Beach/Snow: Use this mode for scenes with lots of bright areas, such as sand or snow, which can fool the camera’s autoexposure system into underexposing the image. Flash is disabled.
![]() Sunset: Use this mode when photographing sunsets or sunrises and the sun is in the picture; the camera chooses settings designed to preserve the brilliant colors seen at those times of day. Using a tripod gives you a better chance of producing a sharp shot because the light will be dim and the camera will need to use a slow shutter speed. Flash is disabled.
Sunset: Use this mode when photographing sunsets or sunrises and the sun is in the picture; the camera chooses settings designed to preserve the brilliant colors seen at those times of day. Using a tripod gives you a better chance of producing a sharp shot because the light will be dim and the camera will need to use a slow shutter speed. Flash is disabled.
![]() Dusk/Dawn: Use this mode to better capture the colors of the sky when shooting landscapes just before the sun rises, or just after the sun sets. Flash is disabled. To avoid the possibility of blurry images, use a tripod; this mode may use a slow shutter speed, which can result in blur from camera shake if you handhold the camera.
Dusk/Dawn: Use this mode to better capture the colors of the sky when shooting landscapes just before the sun rises, or just after the sun sets. Flash is disabled. To avoid the possibility of blurry images, use a tripod; this mode may use a slow shutter speed, which can result in blur from camera shake if you handhold the camera.
![]() Pet Portrait: This mode is just like Sports mode except that in dim lighting, the flash fires unless you set the Flash mode to Off. Note that if flash is required, the camera can raise the shutter speed no higher than 1/250 second, by default, which may not be fast enough to capture a speedy animal. See Chapter 7 for details about flash and shutter speed.
Pet Portrait: This mode is just like Sports mode except that in dim lighting, the flash fires unless you set the Flash mode to Off. Note that if flash is required, the camera can raise the shutter speed no higher than 1/250 second, by default, which may not be fast enough to capture a speedy animal. See Chapter 7 for details about flash and shutter speed.
![]() Candlelight: Use this mode when shooting subjects lit by candlelight. Flash is disabled, and because the ambient light will be dim, the shutter speed will likely be slow. Again, mount your camera on a tripod to avoid a blurry photo.
Candlelight: Use this mode when shooting subjects lit by candlelight. Flash is disabled, and because the ambient light will be dim, the shutter speed will likely be slow. Again, mount your camera on a tripod to avoid a blurry photo.
![]() Blossom: If you’re photographing a field of flowers instead of a single bloom, experiment with this mode. Flash is disabled; again, use a tripod when photographing in low-light situations.
Blossom: If you’re photographing a field of flowers instead of a single bloom, experiment with this mode. Flash is disabled; again, use a tripod when photographing in low-light situations.
![]() Autumn Colors: This mode applies a color shift that yields pictures with saturated reds and yellows. The built-in flash is disabled. Mount your camera on a tripod in low-light situations.
Autumn Colors: This mode applies a color shift that yields pictures with saturated reds and yellows. The built-in flash is disabled. Mount your camera on a tripod in low-light situations.
![]()
![]() Food: This mode increases color saturation to render food more vividly. An important note about flash: Unlike other Scene modes, Food mode requires you to raise the built-in flash yourself if you want to add flash. To do so, press the Flash button; the flash pops up and sets itself to Fill Flash mode, which fires the flash regardless of the ambient light. To go flash free, just close the flash unit. You can’t adjust the Flash mode.
Food: This mode increases color saturation to render food more vividly. An important note about flash: Unlike other Scene modes, Food mode requires you to raise the built-in flash yourself if you want to add flash. To do so, press the Flash button; the flash pops up and sets itself to Fill Flash mode, which fires the flash regardless of the ambient light. To go flash free, just close the flash unit. You can’t adjust the Flash mode.

 In fact, if you’re not up to sorting through any of these choices, ignore everything but the focusing method, Vibration Reduction setting, and the Release mode setting. After all, the default settings are chosen because they’re the best solutions for most shooting scenarios. See the end of