![]()
11
Ten More Ways to Customize Your Camera
In This Chapter
![]() Creating your own exposure modes and menu
Creating your own exposure modes and menu
![]() Adding copyright data and hidden text to picture files
Adding copyright data and hidden text to picture files
![]() Using your own folder and filenames
Using your own folder and filenames
![]() Changing the behavior of some buttons and dials
Changing the behavior of some buttons and dials
As you’ve no doubt deduced, Nikon is more than eager to let you customize almost every aspect of the camera’s operation. This chapter discusses customization options not considered in earlier chapters, including ways to embed a copyright notice in your picture files, create custom folder and file names, and even tweak the function of external controls.
Creating Custom Exposure Modes
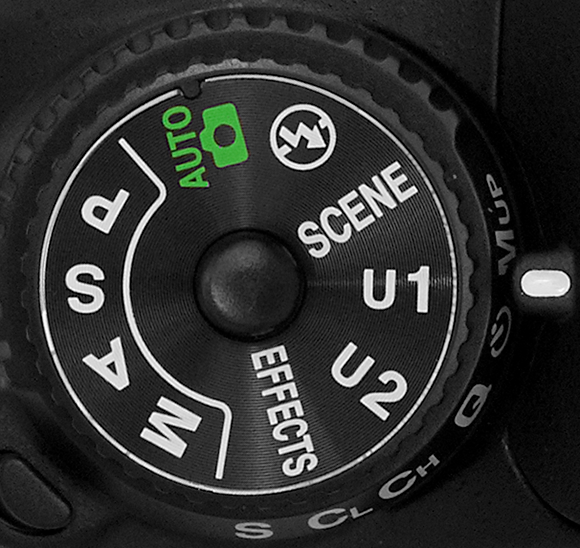
Figure 11-1: You can create two custom exposure modes: U1 and U2.
Setting up your custom exposure modes is easy:
1. Set the Mode dial to P, S, A, or M.
The mode you choose determines what picture settings you can control, and thus what options you can store as part of your custom exposure mode. For example, in A mode, you control the f-stop, or aperture setting; in S mode, you control the shutter speed.
2. Select the camera settings you want to store.
In A mode, for example, select the initial f-stop that you want the camera to use any time you switch to the custom exposure mode. In S mode, select the initial shutter speed. Also choose settings such as Image Quality, Image Size, Exposure Compensation, Flash Compensation, Flash mode, White Balance, Autofocus mode, and so on.
A handful of settings can’t be stored: Image Area, Storage Folder, File Naming, Manage Picture Control, Multiple Exposure, Remote Control Mode (ML-Le), and Interval Timer Shooting.
3. Display the Setup menu and choose Save User Settings, as shown on the left in Figure 11-2.
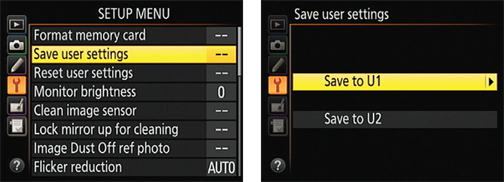
Figure 11-2: Choose the Save User Settings option to store the current camera settings as custom exposure mode U1 or U2.
4. Press OK to display the right screen in Figure 11-2.
5. Highlight the user mode (U1 or U2) that you want to use to store your settings.
6. Press the Multi Selector right.
7. Select Save Settings and press OK.
To use the settings you stored, just turn the Mode dial to the custom mode you created (U1 or U2). You can still adjust any settings — you don’t have to stick with your default f-stop or shutter speed, for example. The camera just starts you out with the settings that you dialed in when creating the custom mode. You can return to the stored settings at any time by rotating the Mode dial to another setting and then back to your custom mode.
To reset U1 or U2 to the default factory settings for each option, choose the Reset User Settings option on the Setup menu. It lives just beneath the Save User Settings option. (Refer to the left screen in Figure 11-2.)
Creating Your Own Menu
In addition to creating custom exposure modes, you can build your own menu that holds up to 20 of the options you use most frequently. Check it out:
1. Display the My Menu menu, as shown on the left in Figure 11-3.
If the Recent Settings menu appears instead, select Choose Tab, press OK, select My Menu, and press OK again. The My Menu screen appears.
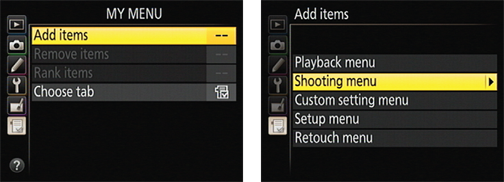
Figure 11-3: You can create a custom menu to hold up to 20 of your favorite settings.
2. Highlight Add Items and press OK.
Now you see the five other menus, as shown on the right in Figure 11-3.
3. Highlight a menu that contains an option you want to add to your custom menu and then press the Multi Selector right.
You see all options on that menu, as shown on the left in Figure 11-4.
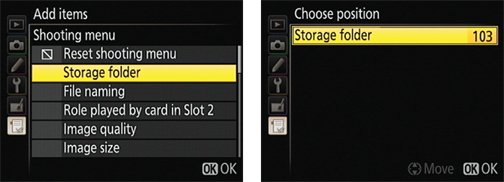
Figure 11-4: Highlight a menu item and press OK to add it to your custom menu.
 A few items can’t be added to a custom menu. A little box with a slash through it appears next to those items.
4. To add an item to your custom menu, highlight it and press OK.
Now you see the Choose Position screen, shown on the right in Figure 11-4, where you can change the order of your menu items. For now, just press OK to return to the My Menu screen; you can adjust the order of your menu items later.
5. Repeat Steps 2–4 to add more items to your menu.
After creating your custom menu, you can access it by pressing the Menu button and choosing the Recent Settings/My Menu screen. (If you want to switch to the Recent Settings menu, select Choose Tab and then select Recent Settings.)
You can reorder the menu items and remove items as follows:
![]() Change the order of menu options. Display your custom menu, highlight Rank Items (as shown in Figure 11-5), and press OK. Highlight a menu item, press OK, and then use the Multi Selector to move it up or down the list. Press OK to lock in its new position. Press the Multi Selector left to return to the My Menu screen.
Change the order of menu options. Display your custom menu, highlight Rank Items (as shown in Figure 11-5), and press OK. Highlight a menu item, press OK, and then use the Multi Selector to move it up or down the list. Press OK to lock in its new position. Press the Multi Selector left to return to the My Menu screen.
![]() Remove menu items. Again, head for the My Menu screen. Select Remove Items and press OK. You see all the current menu items, with an empty box next to each item. To remove an item, highlight it and press the Multi Selector right. A check mark appears in that item’s box. After tagging all the items you want to remove, press OK. A confirmation screen appears; press OK to wrap up.
Remove menu items. Again, head for the My Menu screen. Select Remove Items and press OK. You see all the current menu items, with an empty box next to each item. To remove an item, highlight it and press the Multi Selector right. A check mark appears in that item’s box. After tagging all the items you want to remove, press OK. A confirmation screen appears; press OK to wrap up.
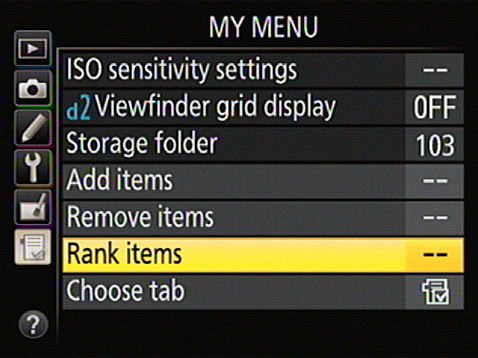
Figure 11-5: Choose Rank Items to change the order of menu items.
Adding Image Comments
Through the Image Comment feature, you can add text comments to your picture files. Suppose, for example, that you’re on vacation and visiting a different destination every day. You can annotate all the pictures you take on each day with the name of the location.
Here’s how the Image Comment feature works:
1. Display the Setup menu and highlight Image Comment, as shown on the left in Figure 11-6.
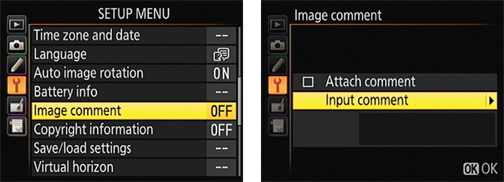
Figure 11-6: You can tag pictures with text comments through this feature.
2. Press OK to display the right screen in the figure.
3. Highlight Input Comment and press the Multi Selector right.
You see a keyboard-type screen like the one shown in Figure 11-7.
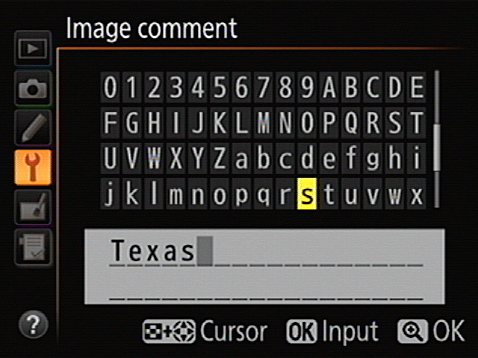
Figure 11-7: Comments can contain as many as 36 characters.
4. Use the Multi Selector to highlight the first letter of the text you want to add.
5. Press OK to enter the letter into the text box at the bottom of the screen.
6. Keep entering letters to complete your comment text.
Your comment can be up to 36 characters long. You can use these text-entry tricks:
![]() • To move the text cursor: Press and hold the ISO button as you press the Multi Selector in the direction you want to shift the cursor. Release the button to return to the keyboard section of the screen.
• To move the text cursor: Press and hold the ISO button as you press the Multi Selector in the direction you want to shift the cursor. Release the button to return to the keyboard section of the screen.
![]() • To delete a letter: Move the cursor under the offending letter and then press the Delete button.
• To delete a letter: Move the cursor under the offending letter and then press the Delete button.
![]() 7. To save the comment, press the Qual button.
7. To save the comment, press the Qual button.
You’re returned to the Image Comment menu.
8. Highlight Attach Comment and press the Multi Selector right to put a check mark in the box, as shown in Figure 11-8.
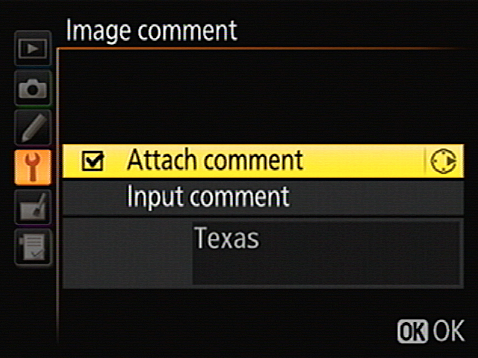
Figure 11-8: Press the Multi Selector right to toggle the Attach Comment box on and off.
The check mark turns the Image Comment feature on.
9. Press OK.
You’re returned to the Setup menu. The Image Comment menu item should now be set to On.
Embedding a Copyright Notice
1. Display the Setup menu and highlight Copyright Information, as shown on the left in Figure 11-9.
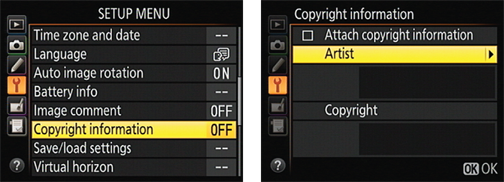
Figure 11-9: Use this feature to embed copyright information into each picture file.
2. Press OK to display the second screen shown in Figure 11-9.
3. Highlight Artist and press the Multi Selector right to display a text-entry screen.
4. Enter your name.
The text-entry screen works just as when you add image comments:
• Use the Multi Selector to highlight a letter and then press OK to enter that character. You can enter up to 36 characters.
![]() • To move the cursor within the text-entry box, press and hold the ISO button as you press the Multi Selector in the direction you want to move the cursor.
• To move the cursor within the text-entry box, press and hold the ISO button as you press the Multi Selector in the direction you want to move the cursor.
![]() • To delete a character, move the cursor under it and press the Delete button.
• To delete a character, move the cursor under it and press the Delete button.
![]() 5. Press the Qual button to store your name and exit the text entry screen.
5. Press the Qual button to store your name and exit the text entry screen.
6. Highlight Copyright, press the Multi Selector right, and then enter your copyright notice.
This time, you can enter a whopping 54 characters.
7. Press the Qual button to return to the Copyright Information screen.
The information you entered should appear, as shown in Figure 11-10.
8. Highlight Attach Copyright Information and press the Multi Selector right to place a check mark in the adjacent box, as shown in Figure 11-10.
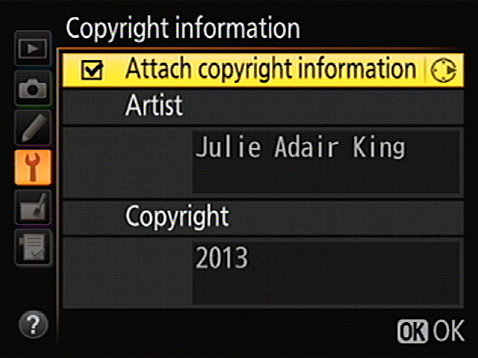
Figure 11-10: Press the Multi Selector right to toggle the Attach setting on and off.
9. Press OK.
The Copyright Information item on the Setup menu (left screen in Figure 11-9) should be set to On, indicating that the camera will now include your copyright text as part of the file metadata for all subsequent shots.
To stop adding the copyright data, just revisit the Copyright Information screen, toggle the Attach Copyright Information box off, and then press OK.
Customizing File and Folder Names
By default, your camera initially stores all your images in one folder, which it names 100D7100. Folders have a storage limit of 999 images; when you exceed that number, the camera creates a new folder, assigning a name that indicates the folder number — 101D7100, 102D7100, and so on.
If you choose, you can create your own folder-numbering scheme. For example, perhaps you sometimes use your camera for business and sometimes for personal use. To keep your images separate, you can set up one folder numbered 200D7100 for work images and use the regular 100D7100 folder for personal photos.
What’s more, you can customize the first three letters of your picture filenames. Normally, filenames begin either with the characters DSC_, for photos captured in the sRGB color space, or _DSC, for images that use the Adobe RGB color space. (Chapter 8 explains color spaces.) So, for example, you could set the camera to replace DSC with TIM if you’re taking pictures of your brother Tim’s family and then change the characters to SUE when you move to cousin Sue’s house. The next sections provide details.
Creating a custom storage folder
To create a new storage folder, follow these steps:
1. Display the Shooting menu and highlight Storage Folder, as shown on the left in Figure 11-11.
The number you see for the menu option reflects the first three numbers of the folder name. On the menu, you see only those three numbers; during playback, you see the entire folder name (100D7100, for example) in playback modes that show the folder name.
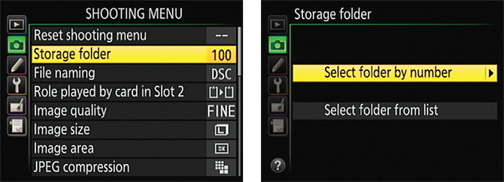
Figure 11-11: You can assign custom folder numbers.
2. Press OK to display the screen shown on the right in Figure 11-11.
3. Choose Select Folder by Number and press the Multi Selector right.
You see a screen similar to the one shown on the left in Figure 11-12. Two things to note here:
• Folder icon: A folder icon next to the folder number indicates that the folder already exists. A half-full icon like the one in Figure 11-12 shows you that the folder contains images. A full icon means that the folder is stuffed to its capacity (999 images) or contains a picture with the file number 9999. Either way, that full icon means that you can’t put any more pictures in the folder.
• Memory card: If two memory cards are installed in the camera, the one highlighted in the upper-right corner (card 1, in the figure) will be the home of your new folder. This card selection is controlled by the Role Played by Card in Slot 2 option on the Shooting menu. If that option is set to Overflow, the new folder goes on the card in current use. For the other two options, Backup and Raw Slot 1–JPEG Slot 2, the new folder is created on both cards. (Chapter 1 details how to configure the camera for using two memory cards.)
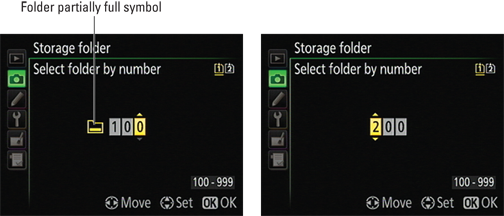
Figure 11-12: Use this screen to create a new folder.
4. Assign the new folder a number.
Use the Multi Selector to highlight one of the three digits and then press up and down to change the number, as shown on the right in Figure 11-12. When you create a new folder, the little folder icon disappears because the folder doesn’t yet contain any photos.
5. Press OK.
The camera creates your new folder and automatically selects it as the current storage folder.
Customizing filenames
To customize the first three characters of filenames, follow these steps:
1. Open the Shooting menu, highlight File Naming, as shown on the left in Figure 11-13, and press OK.
You see the screen shown on the right in the figure. The current file naming structure for sRGB and Adobe RGB files appears on the screen. Pictures taken in the sRGB color space start with DSC_; pictures shot in the Adobe RGB color space begin with _DSC.
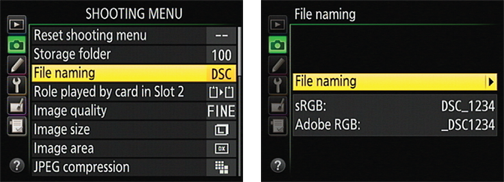
Figure 11-13: This option enables you to change the first three characters of filenames.
2. Select File Naming and press the Multi Selector right to display the text entry screen shown in Figure 11-14.
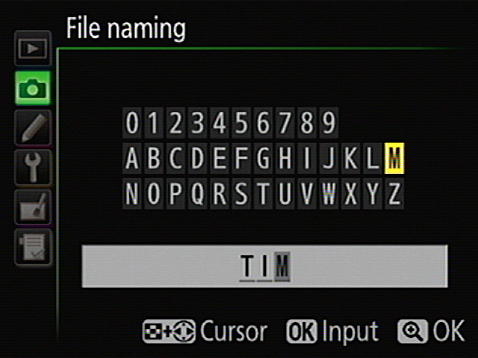
Figure 11-14: Highlight a character and press the Multi Selector center button to enter it.
3. Enter your three custom characters by using these techniques:
• Use the Multi Selector to highlight a character; press the OK button to enter that character in the text-entry box.
![]() • To move the cursor in the text-entry box, press the ISO button while pressing the Multi Selector right or left.
• To move the cursor in the text-entry box, press the ISO button while pressing the Multi Selector right or left.
![]() • To delete a character, move the cursor under it in the text-entry box and press the Delete button.
• To delete a character, move the cursor under it in the text-entry box and press the Delete button.
![]() 4. Press the Qual button to return to the Shooting menu.
4. Press the Qual button to return to the Shooting menu.
The File Naming option should reflect the changes you just made.
Changing the Purpose of the OK Button
You can customize the role that the OK button plays during shooting, playback, and Live View mode through the aptly named OK Button option, found in the Controls section of the Custom Setting menu and shown on the left in Figure 11-15. Highlight the option and press OK to display the screen on the right in the figure.
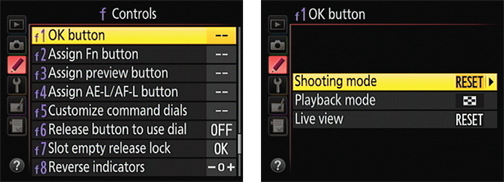
Figure 11-15: You can change the role the OK button plays during shooting, during playback, and in Live View mode.
The settings work like so:
![]() Shooting mode: You can choose from three options:
Shooting mode: You can choose from three options:
• RESET (Select Center Focus Point): At this setting, which is the default, the button automatically selects the center autofocus point. I think that’s a pretty handy feature, so it’s my choice.
• Highlight Active Focus Point: Pressing the OK button highlights the active focus point in the viewfinder. Keep in mind that you can accomplish the same thing during autofocusing by pressing the shutter button halfway.
• Not Used: This setting disables the OK button during shooting altogether — although I don’t know why you would unless you somehow keep pressing the button by accident.
![]() Playback mode: For playback, you get four options:
Playback mode: For playback, you get four options:
• Thumbnail on/off: This setting is the default; pressing OK toggles the display between thumbnails view and single-image view.
• View histograms: Pressing the OK button displays a histogram in both single-image and thumbnails view.
• Zoom on/off: Normally, you magnify an image by pressing the Qual button. But if you select this OK Button option, you can press OK to toggle between single-image or thumbnails view to a magnified view of your photo, with the zoomed view centered on the active focus point. After highlighting the option, press the Multi Selector right to select the initial magnification level (low, medium, or high).
• Choose slot and folder: Select this option to use the OK button to display the screen that lets you select the memory card and image folder containing the photos you want to view. (You can still use the default method of displaying this screen, which is to press the BKT button and press the Multi Selector up.)
Regardless of your choice, you still press OK to start movie playback. Chapter 4 details movie playback; Chapter 5 covers still photo playback.
![]() Live View mode: Finally, for Live View mode, which I detail in Chapter 4, you can choose from these three settings:
Live View mode: Finally, for Live View mode, which I detail in Chapter 4, you can choose from these three settings:
• RESET (Select Center Focus Point): This one works as it does during viewfinder shooting: Pressing OK selects the center focus point. It’s the default.
• Zoom on/off: Choose this setting to use the OK button to magnify the Live View display, which the magnified view centered on the active focus point. (Normally, you accomplish this by pressing the Qual button.) After selecting the option from the menu, press the Multi Selector right to choose the initial magnification level.
• Not Used: The OK button plays no role during Live View.
Customizing the Command Dials
Through the Customize Command Dials option, found on the Controls section of the Custom Setting menu and shown in Figure 11-16, you can control several aspects of how the command dials behave, as follows:
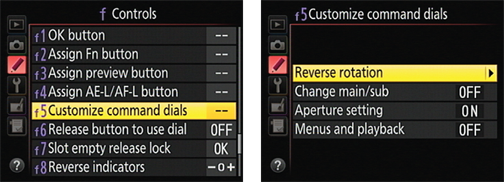
Figure 11-16: You also can modify the functions performed by the command dials.
![]() Reverse Rotation: At the default setting, Off, the dials work as indicated throughout this book and the camera manual when you make adjustments to Exposure Compensation, shutter speed, or aperture: Rotating the dial to the right results in a higher value, and rotating to the left lowers the value.
Reverse Rotation: At the default setting, Off, the dials work as indicated throughout this book and the camera manual when you make adjustments to Exposure Compensation, shutter speed, or aperture: Rotating the dial to the right results in a higher value, and rotating to the left lowers the value.
You can reverse this behavior for Exposure Compensation and shutter/aperture control separately. Highlight Reverse Rotation and press the Multi Selector right. To reverse the orientation for one of the settings, highlight it and press the Multi Selector right to place a check mark in the adjacent box. Then press OK.
![]() Change Main/Sub: This setting controls which dial you use to adjust aperture and shutter speed. After highlighting the setting, press the Multi Selector right to uncover these options:
Change Main/Sub: This setting controls which dial you use to adjust aperture and shutter speed. After highlighting the setting, press the Multi Selector right to uncover these options:
• Off: This setting is the default. The Main command dial adjusts shutter speed, and the Sub-command dial controls aperture.
• On (Mode A): Choose this setting if you want to use the Main command dial to adjust the f-stop when you shoot in the A exposure mode.
• On: This setting reverses the dials for the S, A, and M exposure modes. You use the Sub-command dial to adjust shutter speed in the M and S modes and use the Main command dial to adjust the f-stop in the A and M modes.
![]() Aperture Setting: For this option, you have two settings:
Aperture Setting: For this option, you have two settings:
• Sub-Command Dial: This is the default setting; the Sub-command dial controls aperture (assuming that you didn’t alter the setting of the Change Main/Sub option just discussed). When you select this option, the Aperture Setting item on the menu appears set to On, as shown on the right in Figure 11-16.
• Aperture Ring: This setting relates only to lenses that have an aperture ring; if you select this option, you can adjust the f-stop only by using the aperture ring. The Aperture Setting item on the menu appears set to Off when you select this option.
![]() Menus and Playback: For this option, you choose from three settings: Off, On, and On (Image Review Excluded). At the default setting, Off, you use the Multi Selector to scroll through your pictures and change the data-display style during playback. And during shooting, you use the Multi Selector to navigate menus.
Menus and Playback: For this option, you choose from three settings: Off, On, and On (Image Review Excluded). At the default setting, Off, you use the Multi Selector to scroll through your pictures and change the data-display style during playback. And during shooting, you use the Multi Selector to navigate menus.
At the On setting, you can use the command dials as follows:
• Playback: Use the Main command dial to scroll through pictures in single-image view and move the image-highlight box left or right during thumbnails playback. Use the Sub-command dial to adjust the data-display mode during single-image playback and move the highlight box up and down through thumbnails.
• Menu navigation: Rotate the Main command dial to scroll up and down through a menu. Rotate the Sub-command dial right to display the submenu for the selected item; rotate left to jump to the previous menu.
If you instead select On (Image Review Excluded), things work the same as they do when you choose the On setting, but the command dials don’t work during the image-review period.
If you find it cumbersome to keep pressing the button while you rotate the dial, you can tell the two controls that you prefer them to dance separately instead of cheek to cheek. The relevant option is located on the Controls submenu of the Custom Setting menu; it’s called Release Button to Use Dial. Set the option to Yes, and you let up on the button and then rotate the command dial to adjust a camera setting. So to change Flash mode, for example, you press and release the Flash button and then rotate the Main command dial. Note that the menu item says On instead of Yes when the option is enabled.
There’s a gotcha to remember if you accept this variation, however: The setting you’re adjusting remains active until you press the button again, you press the shutter button halfway, or the exposure meters turn off. And if you forget and leave the setting “open,” you can easily adjust the setting with the command dial when you’re meaning to do something else. For this reason, I prefer to use the default setting. Choose No to use this setting; the menu screen then shows Off as the selected option.
Customizing the Fn, Depth-of-Field Preview, and AE-L/AF-L Buttons
You can assign a variety of tasks to the Fn (Function) button, Depth-of-Field Preview buttons, and the AE-L/AF-L button. The next two sections explain your options for still photography and movie recording.
Customizing buttons for still photography
By default, the three buttons are set to perform the following tasks when you’re shooting still pictures:
![]() Fn button: Pressing the button while rotating either command dial toggles the Image Area setting between the DX and 1.3x crop settings.
Fn button: Pressing the button while rotating either command dial toggles the Image Area setting between the DX and 1.3x crop settings.
![]() Depth-of-Field Preview button: When you look through the viewfinder and press the button, the display changes to give you an idea of how your current f-stop setting will affect depth of field. If flash is enabled, the flash also emits a modeling flash (a brief burst of flash light to help you preview how your subject will be lit).
Depth-of-Field Preview button: When you look through the viewfinder and press the button, the display changes to give you an idea of how your current f-stop setting will affect depth of field. If flash is enabled, the flash also emits a modeling flash (a brief burst of flash light to help you preview how your subject will be lit).
![]() AE-L/AF-L button: Autofocus and autoexposure are locked when you press the button, and they remain locked as long as you keep your finger on the button.
AE-L/AF-L button: Autofocus and autoexposure are locked when you press the button, and they remain locked as long as you keep your finger on the button.
If you don’t use the default features very often, you can assign different functions to the buttons. In fact, you can specify what you want the camera to do when you press the button only and when you press the button and rotate a command dial.
You can get to the modification options in two ways:
![]() Custom Setting menu: Select Assign Fn Button, as shown in Figure 11-17, to customize the Function button; choose Assign Preview Button to customize the Depth-of-Field Preview button; and choose Assign AE-L/AF-L button to . . . well, you get the drift.
Custom Setting menu: Select Assign Fn Button, as shown in Figure 11-17, to customize the Function button; choose Assign Preview Button to customize the Depth-of-Field Preview button; and choose Assign AE-L/AF-L button to . . . well, you get the drift.
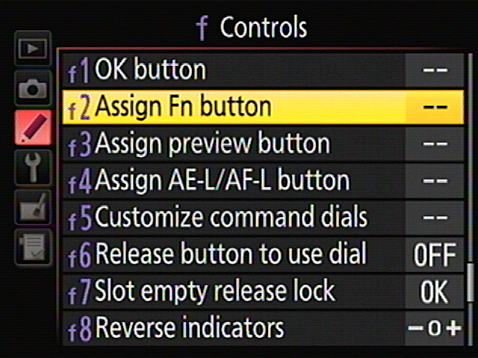
Figure 11-17: You can access the button-modification options via the Custom Setting menu.
![]()
![]() Information display control strip: Symbols representing the current button settings appear in the control strip of the Information screen, as shown on the left of Figure 11-18. To access one of the settings, press the i button to activate the control strip, as shown on the right in the figure. Then use the Multi Selector to highlight the button you want to change. I highlighted the Fn button option on the right in Figure 11-18, for example.
Information display control strip: Symbols representing the current button settings appear in the control strip of the Information screen, as shown on the left of Figure 11-18. To access one of the settings, press the i button to activate the control strip, as shown on the right in the figure. Then use the Multi Selector to highlight the button you want to change. I highlighted the Fn button option on the right in Figure 11-18, for example.
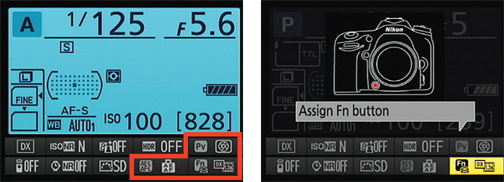
Figure 11-18: You also can view and adjust the button functions through the Information screen.
Either way, press OK to display a screen similar to the one you see in Figure 11-19. Select the operation you want to customize: Choose Press to change the function that’s accomplished by pressing the button only; choose Press + Command Dials to set the action that occurs when you press the button and rotate a command dial.
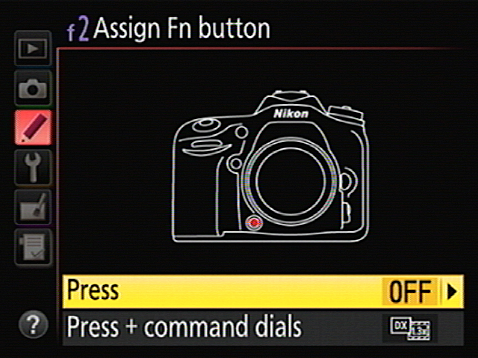
Figure 11-19: You can specify what happens when you press the button with and without using a command dial.
Next, press the Multi Selector right to display a list of all the available functions you can assign. (Your options depend on which button you’re modifying.) Make your selection and press OK.
![]() If you’re not sure what a particular option does, press the WB button to display a help screen that spells things out. Your camera user manual also details all the myriad variations you can assign to these buttons.
If you’re not sure what a particular option does, press the WB button to display a help screen that spells things out. Your camera user manual also details all the myriad variations you can assign to these buttons.
Customizing buttons for movie recording
By default, the Fn, Depth-of-Field Preview, and AE-L/AF-L buttons serve the following roles when the camera is set to Live View Movie mode, which I cover in Chapter 4:
![]() Fn button: The button is nonfunctional.
Fn button: The button is nonfunctional.
![]() Depth-of-Field Preview button: Ditto.
Depth-of-Field Preview button: Ditto.
![]() AE-L/AF-L button: Pressing the button locks autofocus and autoexposure, the same as during still photography.
AE-L/AF-L button: Pressing the button locks autofocus and autoexposure, the same as during still photography.
Through the Movie submenu of the Custom Setting menu, you can adjust the role the buttons play during recording, as shown in Figure 11-20. Select the button you want to modify and press OK to display a list of available functions.
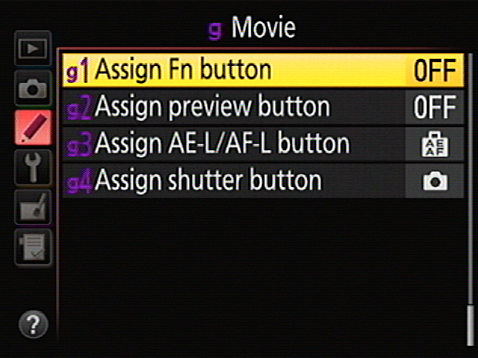
Figure 11-20: Use the options in the Movie section of the Custom Setting menu to define the button roles during movie recording.
![]() Again, if you’re not sure what a setting does, press the WB button to display a help screen, and check your camera manual for complete details.
Again, if you’re not sure what a setting does, press the WB button to display a help screen, and check your camera manual for complete details.
Modifying the Role of the Shutter Button
Getting a headache considering all the ways you can customize the D7100 buttons and dials? Me, too. Remember, you wanted an advanced camera. LOL, as the kids say. The good news is that only one more button requires discussion — in this chapter, anyway. You can modify the shutter button’s behavior in the following two ways:
![]() Locking exposure with the shutter button: Normally, pressing the shutter button halfway initiates exposure metering but doesn’t lock exposure — the camera continuously adjusts the exposure settings as needed up to the time you take the picture. If you want to lock exposure, you can use the AE-L/AF-L button to do the job, as explained in Chapter 7. When you use single-servo autofocus (AF-S mode), focus is also locked when you press the shutter button halfway. By default, pressing the AE-L/AF-L button also locks exposure and focus.
Locking exposure with the shutter button: Normally, pressing the shutter button halfway initiates exposure metering but doesn’t lock exposure — the camera continuously adjusts the exposure settings as needed up to the time you take the picture. If you want to lock exposure, you can use the AE-L/AF-L button to do the job, as explained in Chapter 7. When you use single-servo autofocus (AF-S mode), focus is also locked when you press the shutter button halfway. By default, pressing the AE-L/AF-L button also locks exposure and focus.
You also have the option to set the shutter button to lock exposure and focus together. The setting in question is found on the Timers/AE Lock submenu of the Custom Setting menu and is called Shutter-Release Button AE-L, as shown in Figure 11-21. If you set the option to On, your half-press of the shutter button locks both focus and exposure. This option affects movie recording as well as still photography.
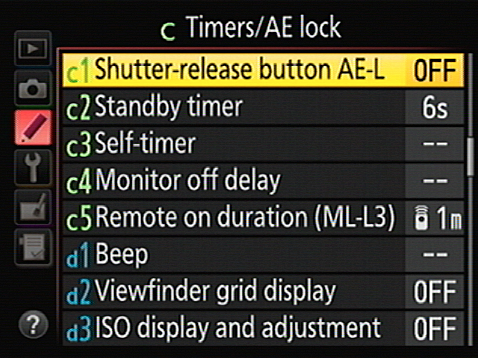
Figure 11-21: This option controls whether the shutter button can be used to lock focus and exposure.
![]() Using the shutter button for movie recording: The Assign Shutter Button option, found in the Movie section of the Custom Setting menu and shown in Figure 11-22, determines what role the shutter button plays when you’re shooting movies. You have two options: Take Photos and Record Movies. By default, Take Photos is selected, and pressing the shutter button ends movie recording and snaps a still photo. The aspect ratio of your picture is 16:9, encompassing the same image area as a movie frame.
Using the shutter button for movie recording: The Assign Shutter Button option, found in the Movie section of the Custom Setting menu and shown in Figure 11-22, determines what role the shutter button plays when you’re shooting movies. You have two options: Take Photos and Record Movies. By default, Take Photos is selected, and pressing the shutter button ends movie recording and snaps a still photo. The aspect ratio of your picture is 16:9, encompassing the same image area as a movie frame.
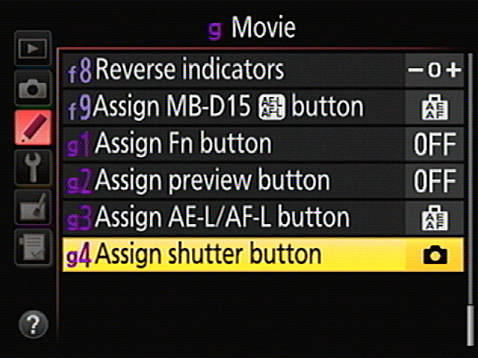
Figure 11-22: And this one determines whether pressing the shutter button in Live View movie mode records a photograph or starts and stops movie recording.
If you choose Record Movies and set the Live View switch to the movie camera position, pressing the shutter button halfway fires up the Live View display. You then release the button and press halfway again to initiate autofocusing. When you’re ready to record, press the button all the way down; press all the way a second time to stop recording. To end Live View, press the LV button (in the center of the Live View switch).
 At first blush, this option seems pretty meaningless, given that engaging Live View normally requires just a press of the LV button, and starting and stopping recording using the default setting is as simple as pressing the red movie-record button that lies right next to the shutter button. The Record Movies setting may come in handy, though, if you attach a wired remote-release cord to the camera. This setup enables you to put the camera on a tripod and then use the shutter button on the remote to control recording from a distance. You might use this setup to record movies of a hummingbird visiting a feeder, for example, when standing close to the feeder with the camera might scare away the bird.
 Unfortunately, this feature doesn’t work with the ML-L3 wireless remote control, although it is compatible with the WR-1 and WR-R10 wireless camera remote control units. Also note that when the feature is enabled, you can’t display the default shooting information, virtual horizon guide, or grid on the screen. Instead, pressing the Info button simply hides or displays the settings that appear along the bottom of the monitor.
