
![]()
9
Putting It All Together
In This Chapter
![]() Reviewing the best all-around picture-taking settings
Reviewing the best all-around picture-taking settings
![]() Adjusting the camera for portrait photography
Adjusting the camera for portrait photography
![]() Discovering the keys to super action shots
Discovering the keys to super action shots
![]() Dialing in the right settings to capture landscapes and other scenic vistas
Dialing in the right settings to capture landscapes and other scenic vistas
![]() Capturing close-up views of your subject
Capturing close-up views of your subject
Earlier chapters of this book break down each and every picture-taking feature on your camera, describing in detail how the various controls affect exposure, picture quality, focus, color, and the like. This chapter pulls together all that information to help you set up your camera for specific types of photography.
Keep in mind, though, that there are no hard-and-fast rules as to the “right way” to shoot a portrait, a landscape, or whatever. So feel free to wander off on your own, tweaking this exposure setting or adjusting that focus control, to discover your own creative vision. Experimentation is part of the fun of photography, after all — and thanks to your camera monitor and the Delete button, it’s an easy, completely free proposition.
Recapping Basic Picture Settings
Your subject, creative goals, and lighting conditions determine which settings you should use for some picture-taking options, such as aperture and shutter speed. I offer my take on those options throughout this chapter. But for many basic options, I recommend the same settings for almost every shooting scenario. Table 9-1 shows you those recommendations and also lists the chapter where you can find details about each setting.
 One key point: Instructions in this chapter assume that you set the exposure mode to P, S, A, or M, as indicated in the table. These modes, detailed in Chapter 7, are the only ones that give you access to the entire cadre of camera features. In most cases, I recommend using S (shutter-priority auto-exposure) when controlling motion blur is important, and A (aperture-priority autoexposure) when controlling depth of field is important. These two modes let you concentrate on one side of the exposure equation and let the camera handle the other. Of course, if you’re comfortable making both the aperture and shutter speed decisions, you may prefer to work in M (manual) exposure mode instead. P (programmed autoexposure) is my last choice because it makes choosing a specific aperture or shutter speed more cumbersome.
Additionally, this chapter discusses choices for viewfinder photography; Chapter 4 guides you through the options available for Live View photography and movie recording. (For Live View photography, however, most settings work the same as discussed here, with the exception of the autofocus options.)
Table 9-1 All-Purpose Picture-Taking Settings
|
Option |
Recommended Setting |
Chapter |
|
Exposure mode |
P, S, A, or M |
7 |
|
Image Quality |
JPEG Fine or Raw (NEF) |
2 |
|
Image Size |
Large or medium |
2 |
|
White Balance |
Auto |
8 |
|
ISO Sensitivity |
100 |
7 |
|
Focus mode |
For autofocusing on still subjects, AF-S; moving subjects, AF-C |
8 |
|
AF-area mode |
Still subjects, Single Point; moving subjects, 9-, 21-, or 39-point Dynamic Area |
8 |
|
Release mode |
Action photos: Continuous Low or High; all others: Single Frame |
2 |
|
Metering |
Matrix |
7 |
|
Active D-Lighting |
Off |
7 |
Shooting Still Portraits
By still portrait, I mean that your subject isn’t moving. For subjects who aren’t keen on sitting still, skip to the next section and use the techniques given for action photography instead. Assuming that you do have a subject willing to pose, the classic portraiture approach is to keep the subject sharply focused while throwing the background into soft focus. This artistic choice emphasizes the subject and helps diminish the impact of any distracting background objects. The following steps show you how to achieve this look:
1. Set the Mode dial to A (aperture-priority autoexposure) and select a low f-stop value.
A low f-stop setting opens the aperture, which not only allows more light to enter the camera but also shortens depth of field, or the distance over which focus appears sharp. So dialing in a low f-stop value is the first step in softening your portrait background. However, for a group portrait, don’t go too low, or the depth of field may not be enough to keep everyone in the sharp-focus zone. Take test shots and inspect your results at different f-stops to find the right setting.
 I recommend using aperture-priority mode when depth of field is a concern, because you can control the f-stop while relying on the camera to select the shutter speed. Just rotate the Command dial to select your f-stop. (You need to pay attention to shutter speed as well, however, to make sure that it’s not so slow that movement of the subject or camera will blur the image.)
You can monitor the current f-stop and shutter speed in the Information display and viewfinder, as shown in Figure 9-1.
2. To further soften the background, zoom in, get closer, and put more distance between the subject and background.
Zooming in to a longer focal length also reduces depth of field, as does moving physically closer to your subject. And the greater the distance between the subject and background, the more the background blurs. (A good rule is to place the subject at least an arm’s length away from the background.)
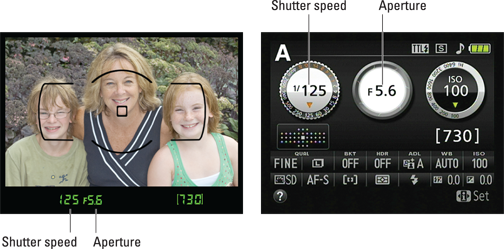
Figure 9-1: You can monitor aperture (f-stop) and shutter speed settings in the displays.
 A lens with a focal length of 85–120mm is ideal for a classic head-and-shoulders portrait. You should avoid using a short focal length (a wider angle lens) for portraits. They can cause features to appear distorted — sort of like how people look when you view them through a security peephole in a door.
3. Check composition.
Just two quick pointers on this topic:
• Consider the background. Scan the entire frame looking for background objects that may distract the eye from the subject. If necessary, reposition the subject against a more flattering backdrop.
• Frame the subject loosely to allow for later cropping to a variety of frame sizes. Your camera produces images that have an aspect ratio of 3:2. That means that your portrait perfectly fits a 4 x 6" print size but will require cropping to print at any other proportions, such as 5 x 7 or 8 x 10. I talk more about this issue in the Chapter 6 section related to printing.
4. For indoor portraits, shoot flash-free if possible.
Shooting by available light rather than flash produces softer illumination and avoids the problem of red-eye. To get enough light to go flash-free, turn on room lights or, during daylight, pose your subject next to a sunny window, as I did for the image in Figure 9-2.
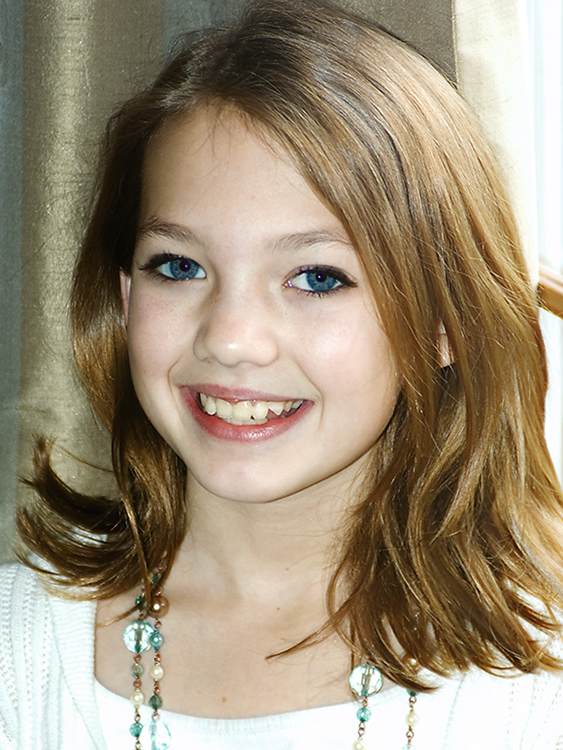
Figure 9-2: For more pleasing indoor portraits, shoot by available light instead of using flash.
In the A exposure mode, simply keeping the built-in flash unit closed disables the flash. If flash is unavoidable, see my list of flash tips at the end of these steps to get better results.
5. For outdoor portraits, use a flash if possible.
Even in daylight, a flash adds a beneficial pop of light to subjects’ faces, as illustrated in Figure 9-3. A flash is especially important when the background is brighter than the subjects, as in this example.
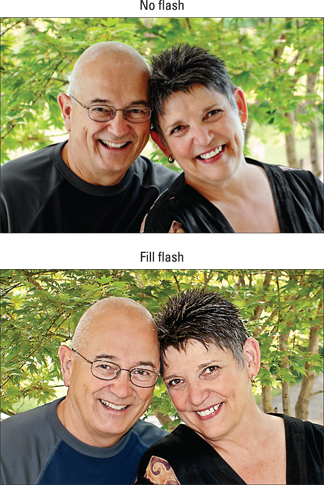
Figure 9-3: To properly illuminate the face in outdoor portraits, use flash.
![]() In the A exposure mode, press the Flash button on the side of the camera to raise the built-in flash. For daytime portraits, set the Flash mode to Fill Flash. (That’s the regular, basic Flash mode.) For nighttime images, try red-eye reduction or slow-sync flash; again, see the flash tips at the end of these steps to use either mode most effectively.
In the A exposure mode, press the Flash button on the side of the camera to raise the built-in flash. For daytime portraits, set the Flash mode to Fill Flash. (That’s the regular, basic Flash mode.) For nighttime images, try red-eye reduction or slow-sync flash; again, see the flash tips at the end of these steps to use either mode most effectively.
By default, the top shutter speed for flash photography is 1/200 second, so in bright light, you may need to stop down the aperture to avoid overexposing the photo, as I did for the bottom image in Figure 9-3. Doing so, of course, brings the background into sharper focus, so if that creates an issue, move the subject into a shaded area instead.
6. Press and hold the shutter button halfway to initiate exposure metering and autofocusing.
If the camera has trouble finding the correct focusing distance, set your lens to manual focus mode and then twist the focusing ring to set focus. See Chapter 8 for help with focusing.
7. Press the shutter button the rest of the way to capture the image.
When flash is unavoidable, try these tricks to produce better results:
![]() Indoors, turn on as many room lights as possible. With more ambient light, you reduce the flash power that’s needed to expose the picture. Adding light also causes the pupils to constrict, further reducing the chances of red-eye. (Pay heed to my white balance warning, however.) As an added benefit, the smaller pupil allows more of the subject’s iris to be visible in the portrait, so you see more eye color.
Indoors, turn on as many room lights as possible. With more ambient light, you reduce the flash power that’s needed to expose the picture. Adding light also causes the pupils to constrict, further reducing the chances of red-eye. (Pay heed to my white balance warning, however.) As an added benefit, the smaller pupil allows more of the subject’s iris to be visible in the portrait, so you see more eye color.
![]() Try using a Flash mode that enables red-eye reduction or slow-sync flash. If you choose the first option, warn your subject to expect both a preliminary light from the AF-assist lamp, which constricts pupils, and the flash. And remember that slow-sync flash modes use a slower-than-normal shutter speed, which produces softer lighting and brighter backgrounds than normal flash. (Chapter 7 explains the various Flash modes.)
Try using a Flash mode that enables red-eye reduction or slow-sync flash. If you choose the first option, warn your subject to expect both a preliminary light from the AF-assist lamp, which constricts pupils, and the flash. And remember that slow-sync flash modes use a slower-than-normal shutter speed, which produces softer lighting and brighter backgrounds than normal flash. (Chapter 7 explains the various Flash modes.)
Take a look at Figure 9-4 for an example of how using slow-sync flash can improve an indoor portrait. When I used regular flash, the shutter speed was 1/60 second. At that speed, the camera has little time to soak up any ambient light. As a result, the scene is lit primarily by the flash. That caused two problems: The strong flash created some glare on the subject’s skin, and the window panes and frame are much more prominent because of the contrast between them and the darker bushes outside the window. Although it was daylight when I took the picture, the skies were overcast, so at 1/60 second, the exterior appears dark.
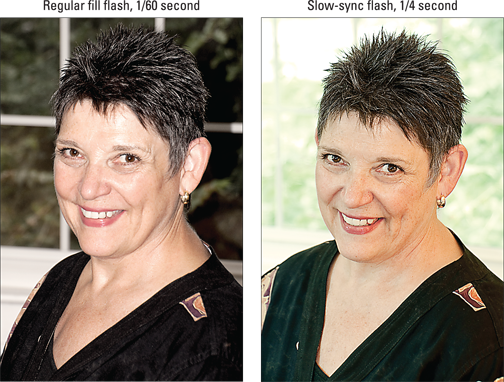
Figure 9-4: Slow-sync flash produces softer, more even lighting and brighter backgrounds.
In the slow-sync example, shot at 1/4 second, the exposure time was long enough to permit the ambient light to brighten the exteriors to the point that the window frame almost blends into the background. And because much less flash power was needed to expose the subject, the lighting is much more flattering. In this case, the bright background also helps to set the subject apart because of her dark hair and shirt. If the subject had been a pale blonde, this setup wouldn’t have worked as well. Again, too, note the warming effect that can occur when you use Auto White Balance and shoot in a combination of flash and daylight.
Don’t forget that using a slower-than-normal shutter speed means an increased risk of blur due to camera shake, so use a tripod or otherwise steady the camera. Remind your subjects to stay absolutely still, too, because they’ll appear blurry if they move during the exposure. I was fortunate to have both a tripod and a cooperative subject for my examples, but I probably wouldn’t opt for slow-sync for portraits of young children or pets.
![]() For professional results, use an external flash with a rotating flash head. Aim the flash head upward so that the flash light bounces off the ceiling and falls softly down onto the subject. External flashes can be pricey, but the results make the purchase worthwhile if you shoot lots of portraits. Compare the two portraits in Figure 9-5 for an illustration. In the first example, using the built-in flash resulted in strong shadowing behind the subject and harsh, concentrated light. To produce the better result on the right, I used a Nikon Speedlight external flash and bounced the light off the ceiling. I also moved the subject a few feet farther in front of the background to create more background blur.
For professional results, use an external flash with a rotating flash head. Aim the flash head upward so that the flash light bounces off the ceiling and falls softly down onto the subject. External flashes can be pricey, but the results make the purchase worthwhile if you shoot lots of portraits. Compare the two portraits in Figure 9-5 for an illustration. In the first example, using the built-in flash resulted in strong shadowing behind the subject and harsh, concentrated light. To produce the better result on the right, I used a Nikon Speedlight external flash and bounced the light off the ceiling. I also moved the subject a few feet farther in front of the background to create more background blur.
Make sure that the ceiling or other surface you use to bounce the light is white; otherwise, the flash light will pick up the color of the surface and influence the color of your subject.
![]() Invest in a flash diffuser to further soften the light. Whether you use the built-in flash or an external flash, attaching a diffuser is also a good idea. A diffuser is simply a piece of translucent plastic or fabric that you place over the flash to soften and spread the light — much like how sheer curtains diffuse window light. Diffusers come in lots of different designs, including small, fold-flat models that fit over the built-in flash.
Invest in a flash diffuser to further soften the light. Whether you use the built-in flash or an external flash, attaching a diffuser is also a good idea. A diffuser is simply a piece of translucent plastic or fabric that you place over the flash to soften and spread the light — much like how sheer curtains diffuse window light. Diffusers come in lots of different designs, including small, fold-flat models that fit over the built-in flash.
![]() Pay attention to white balance if your subject is lit by both flash and ambient light. If you set the White Balance setting to Auto, as I recommend in Table 9-1, enabling flash tells the camera to warm colors to compensate for the cool light of a flash. If your subject is also lit by other light sources, such as sunlight, the result may be colors that are slightly warmer or cooler (more blue) than neutral. A warming effect typically looks nice in portraits, giving the skin a subtle glow. If you aren’t happy with the result, see Chapter 8 to find out how to fine-tune white balance.
Pay attention to white balance if your subject is lit by both flash and ambient light. If you set the White Balance setting to Auto, as I recommend in Table 9-1, enabling flash tells the camera to warm colors to compensate for the cool light of a flash. If your subject is also lit by other light sources, such as sunlight, the result may be colors that are slightly warmer or cooler (more blue) than neutral. A warming effect typically looks nice in portraits, giving the skin a subtle glow. If you aren’t happy with the result, see Chapter 8 to find out how to fine-tune white balance.
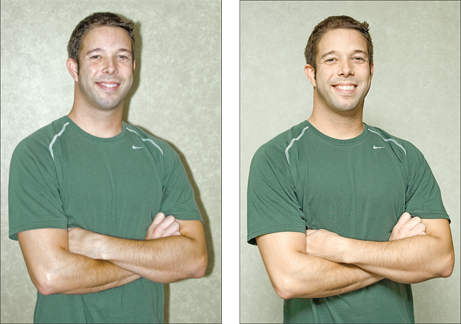
Figure 9-5: To eliminate harsh lighting and strong shadows (left), use bounce flash and move the subject farther from the background (right).
Capturing Action
Using a fast shutter speed is the key to capturing a blur-free shot of any moving subject, whether it’s a flower in the breeze, a spinning Ferris wheel, or, as in the case of Figure 9-6, a racing cyclist.
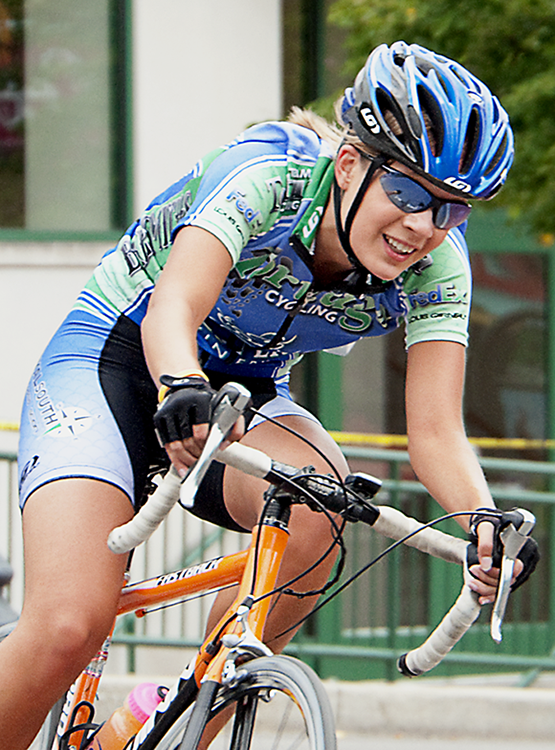
Figure 9-6: Use a high shutter speed to freeze motion.
Along with the basic capture settings outlined earlier in Table 9-1, try the techniques in the following steps to photograph a subject in motion:
1. Set the Mode dial to S (shutter-priority autoexposure).
In this mode, you control the shutter speed, and the camera takes care of choosing an aperture setting that will produce a good exposure.
2. Rotate the Command dial to select the shutter speed.
Refer to Figure 9-1 to locate shutter speed in the Information display and viewfinder. After you select the shutter speed, the camera selects an aperture (f-stop) to match.
What shutter speed should you choose? Well, it depends on the speed at which your subject is moving, so you need to experiment. But generally speaking, 1/320 second should be plenty for all but the fastest subjects (race cars, boats, and so on). For very slow subjects, you can even go as low as 1/250 or 1/125 second. My subject in Figure 9-6 was zipping along at a pretty fast pace, so I set the shutter speed to 1/500 second. Remember, though, that when you increase shutter speed, the camera opens the aperture to maintain the same exposure. At low f-stop numbers, depth of field becomes shorter, so you have to be more careful to keep your subject within the sharp-focus zone as you compose and focus the shot.
You also can take an entirely different approach to capturing action: Instead of choosing a fast shutter speed, select a speed slow enough to blur the moving objects, which can create a heightened sense of motion and, in scenes that feature very colorful subjects, cool abstract images. I took this approach when shooting the carnival ride featured in Figure 9-7, for example. For the left image, I set the shutter speed to 1/30 second; for the right version, I slowed things down to 1/5 second. In both cases, I used a tripod, but because nearly everything in the frame was moving, the entirety of both photos is blurry — the 1/5 second version is simply more blurry because of the slower shutter.
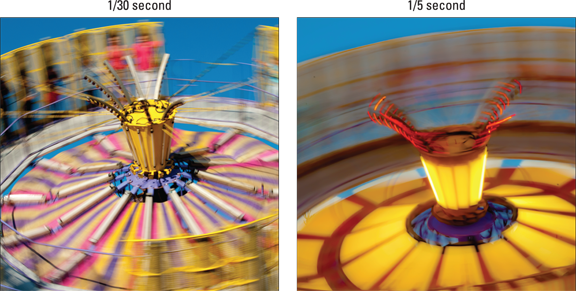
Figure 9-7: Using a shutter speed slow enough to blur moving objects can be a fun creative choice, too.
3. In dim lighting, raise the ISO setting if necessary to allow a fast shutter speed.
Unless you’re shooting in bright daylight, you may not be able to use a fast shutter speed at a low ISO, even if the camera opens the aperture as far as possible. If auto ISO override is in force, ISO may go up automatically when you increase the shutter speed — Chapter 7 has details on that feature. Raising the ISO does increase the possibility of noise, so you have to decide whether a noisy shot is better than a blurry shot.
Why not add flash to brighten the scene? Well, adding flash is tricky for action shots, unfortunately. First, the flash needs time to recycle between shots, which slows your capture rate. Second, the built-in flash has limited range, so don’t waste your time if your subject isn’t close by. And third, remember that the fastest shutter speed you can use with flash is 1/200 second by default, which may not be high enough to capture a quickly moving subject without blur.
4. For rapid-fire shooting, set the Release mode to Continuous Low or Continuous High.
In both modes, you can capture multiple images with a single press of the shutter button. Continuous Low captures up to 3 frames per second (fps), and Continuous High bumps the frame rate up to about 5 fps. As long as you hold down the button, the camera continues to record images. Here again, though, you need to go flash-free; otherwise, you get one shot per press of the shutter button, just as in Single Frame release mode.
5. Select speed-oriented focusing options.
For fastest shooting, try manual focusing: It eliminates the time the camera needs to lock focus when you use autofocusing. If you use autofocus, select these two autofocus settings for best performance:
• Set the AF-area mode to one of the Dynamic Area settings. Chapter 8 has information to help you decide whether the 9-point, 21-point, or 39-point Dynamic Area setting is best for your subject.
• Set the Autofocus mode to AF-C (continuous-servo autofocus).
At these settings, the camera sets focus initially on your selected focus point but then looks to the surrounding points for focusing information if your subject moves away from the selected one. Focus is adjusted continuously until you take the shot.
6. Compose the subject to allow for movement across the frame.
Frame your shot a little wider than you normally might so that you lessen the risk that your subject will move out of the frame before you record the image. You can always crop to a tighter composition later. (I used this approach for my cyclist image — the original shot includes a lot of background that I later cropped away.) It’s also a good idea to leave more room in front of the subject than behind it. This makes it obvious that your subject is going somewhere.
Using these techniques should give you a better chance of capturing any fast-moving subject, but action-shooting strategies also are helpful for shooting candid portraits of kids and pets. Even if they aren’t currently running, leaping, or otherwise cavorting, snapping a shot before they do move is often tough. So if an interaction catches your eye, set your camera into action mode and fire off a series of shots as fast as you can.
Capturing Scenic Vistas
Providing specific capture settings for landscape photography is tricky because there’s no single best approach to capturing a beautiful stretch of countryside, a city skyline, or other vast subject. Most people, for example, prefer using a wide-angle lens to incorporate a large area of the landscape into the scene, but if you’re far away from your subject, you may like the results you get from a telephoto or medium-angle lens. When shooting the scene in Figure 9-8, for example, I had to position myself across the street from the buildings, so I captured the shot using a focal length of 82mm. And consider depth of field: One person’s idea of a super cityscape might be to keep all buildings in the scene sharply focused, but another photographer might prefer to shoot the same scene so that a foreground building is sharply focused while the others are less so, thus drawing the eye to that first building.
That said, I can offer a few tips to help you photograph a landscape the way you see it:
![]() Shoot in aperture-priority autoexposure mode (A) so that you can control depth of field. If you want extreme depth of field so that both near and distant objects are sharply focused, as in Figure 9-8, select a high f-stop value. I used an aperture of f/18 for this shot. For short depth of field, use a low value.
Shoot in aperture-priority autoexposure mode (A) so that you can control depth of field. If you want extreme depth of field so that both near and distant objects are sharply focused, as in Figure 9-8, select a high f-stop value. I used an aperture of f/18 for this shot. For short depth of field, use a low value.
![]() If the exposure requires a slow shutter speed, use a tripod to avoid blurring. The downside to a high f-stop is that you may need a slower shutter speed to produce a good exposure. If the shutter speed drops below what you can comfortably handhold, use a tripod to avoid picture-blurring camera shake. Remember that if you’re using the 18–55mm kit lens, you should turn off Vibration Reduction when the camera is mounted on a tripod. (Just move the VR switch on the lens to the Off position.) For other lenses, see the lens manual for recommendations on tripod shooting.
If the exposure requires a slow shutter speed, use a tripod to avoid blurring. The downside to a high f-stop is that you may need a slower shutter speed to produce a good exposure. If the shutter speed drops below what you can comfortably handhold, use a tripod to avoid picture-blurring camera shake. Remember that if you’re using the 18–55mm kit lens, you should turn off Vibration Reduction when the camera is mounted on a tripod. (Just move the VR switch on the lens to the Off position.) For other lenses, see the lens manual for recommendations on tripod shooting.
No tripod handy? Look for any solid surface on which you can steady the camera. You can increase the ISO Sensitivity setting to allow a faster shutter, too, but that option brings with it the chances of increased image noise, which gives your photo a speckled look.
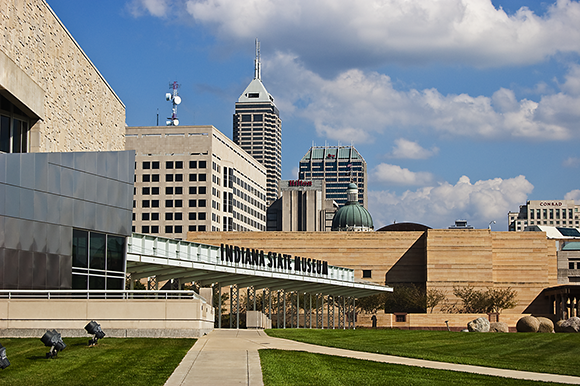
Figure 9-8: Use a high f-stop value to keep foreground and background sharply focused.
![]() For dramatic waterfall shots, consider using a slow shutter to create that “misty” look. The slow shutter blurs the water, giving it a soft, romantic appearance, as shown in Figure 9-9. Again, use a tripod to ensure that the rest of the scene doesn’t also blur due to camera shake. Shutter speed for the image in Figure 9-9 was 1/5 second.
For dramatic waterfall shots, consider using a slow shutter to create that “misty” look. The slow shutter blurs the water, giving it a soft, romantic appearance, as shown in Figure 9-9. Again, use a tripod to ensure that the rest of the scene doesn’t also blur due to camera shake. Shutter speed for the image in Figure 9-9 was 1/5 second.
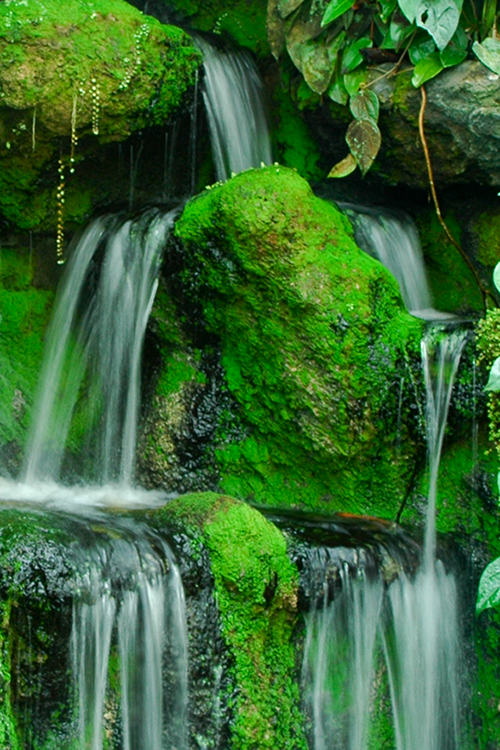
Figure 9-9: For misty waterfalls, use a slow shutter speed and a tripod.
In very bright light, you may overexpose the image at a very slow shutter, even if you stop the aperture all the way down and select the camera’s lowest ISO setting. As a solution, consider investing in a neutral density filter for your lens. This type of filter works something like sunglasses for your camera: It simply reduces the amount of light that passes through the lens, without affecting image colors, so that you can use a slower shutter than would otherwise be possible.
![]() At sunrise or sunset, base exposure on the sky. The foreground will be dark, but you can usually brighten it in a photo editor if needed. If you base exposure on the foreground, on the other hand, the sky will become so bright that all the color will be washed out — a problem you usually can’t fix after the fact. You can also invest in a graduated neutral-density filter, which is clear on one side and dark on the other. You orient the filter so that the dark half falls over the sky and the clear side over the dimly lit portion of the scene. This setup enables you to better expose the foreground without blowing out the sky colors.
At sunrise or sunset, base exposure on the sky. The foreground will be dark, but you can usually brighten it in a photo editor if needed. If you base exposure on the foreground, on the other hand, the sky will become so bright that all the color will be washed out — a problem you usually can’t fix after the fact. You can also invest in a graduated neutral-density filter, which is clear on one side and dark on the other. You orient the filter so that the dark half falls over the sky and the clear side over the dimly lit portion of the scene. This setup enables you to better expose the foreground without blowing out the sky colors.
Also experiment with the Active D-Lighting and HDR features that I cover in Chapter 7; both are designed to create images that contain a greater range of brightness values than is normally possible.
![]() For cool nighttime city pics, experiment with slow shutter speeds. Assuming that cars or other vehicles with their lights on are moving through the scene, the result is neon trails of light like those you see in the foreground of the image in Figure 9-10. Shutter speed for this image was about 10 seconds.
For cool nighttime city pics, experiment with slow shutter speeds. Assuming that cars or other vehicles with their lights on are moving through the scene, the result is neon trails of light like those you see in the foreground of the image in Figure 9-10. Shutter speed for this image was about 10 seconds.
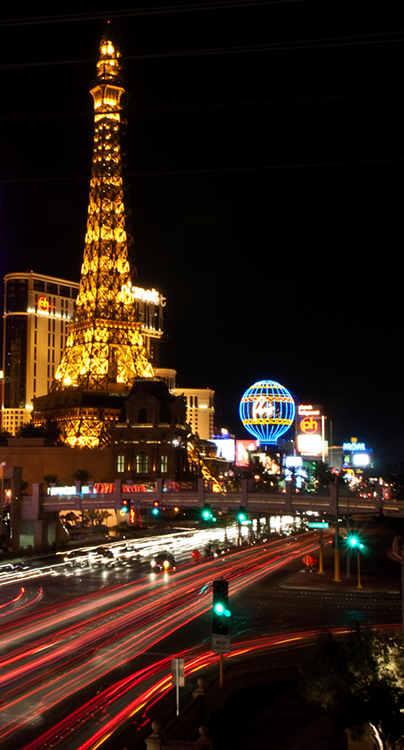
Figure 9-10: Using a slow shutter speed creates neon light trails in nighttime city street scenes.
Instead of changing the shutter speed manually between each shot, try Bulb mode. Available only in M (manual) exposure mode, this option records an image for as long as you hold down the shutter button. So just take a series of images, holding down the button for different lengths of time for each shot. In Bulb mode, you also can exceed the standard maximum exposure time of 30 seconds.
![]() For the best lighting, shoot during the magic hours. That’s the term photographers use for early morning and late afternoon, when the light cast by the sun is soft and warm, giving everything that beautiful, gently warmed look.
For the best lighting, shoot during the magic hours. That’s the term photographers use for early morning and late afternoon, when the light cast by the sun is soft and warm, giving everything that beautiful, gently warmed look.
Can’t wait for the perfect light? Tweak your camera’s White Balance setting, using the instructions laid out in Chapter 8, to simulate the color of magic-hour light.
![]() In tricky light, bracket exposures. Bracketing simply means to take the same picture at several different exposure settings to increase the odds that at least one of them will capture the scene the way you envision. Bracketing is especially a good idea in difficult lighting situations, such as sunrise and sunset. Chapter 7 shows you how to make bracketing easier by using automatic exposure bracketing.
In tricky light, bracket exposures. Bracketing simply means to take the same picture at several different exposure settings to increase the odds that at least one of them will capture the scene the way you envision. Bracketing is especially a good idea in difficult lighting situations, such as sunrise and sunset. Chapter 7 shows you how to make bracketing easier by using automatic exposure bracketing.
![]() When shooting fireworks, use manual exposure, manual focus, and a tripod. Fireworks require a long exposure, and trying to handhold your camera simply isn’t going to work. If using a zoom lens, zoom out to the shortest focal length (widest angle). Switch to manual focusing and set focus at the farthest focus point possible on your lens. Set the exposure mode to manual, choose a relatively high f-stop setting — say, f/16 or so — and start at a shutter speed of 1 to 5 seconds. From there, it’s simply a matter of experimenting with different shutter speeds. Also play with the timing of the shutter release, starting some exposures at the moment the fireworks are shot up, some at the moment they burst open, and so on. For the example featured in Figure 9-11, I used a shutter speed of about 5 seconds and began the exposure as the rocket was going up.
When shooting fireworks, use manual exposure, manual focus, and a tripod. Fireworks require a long exposure, and trying to handhold your camera simply isn’t going to work. If using a zoom lens, zoom out to the shortest focal length (widest angle). Switch to manual focusing and set focus at the farthest focus point possible on your lens. Set the exposure mode to manual, choose a relatively high f-stop setting — say, f/16 or so — and start at a shutter speed of 1 to 5 seconds. From there, it’s simply a matter of experimenting with different shutter speeds. Also play with the timing of the shutter release, starting some exposures at the moment the fireworks are shot up, some at the moment they burst open, and so on. For the example featured in Figure 9-11, I used a shutter speed of about 5 seconds and began the exposure as the rocket was going up.
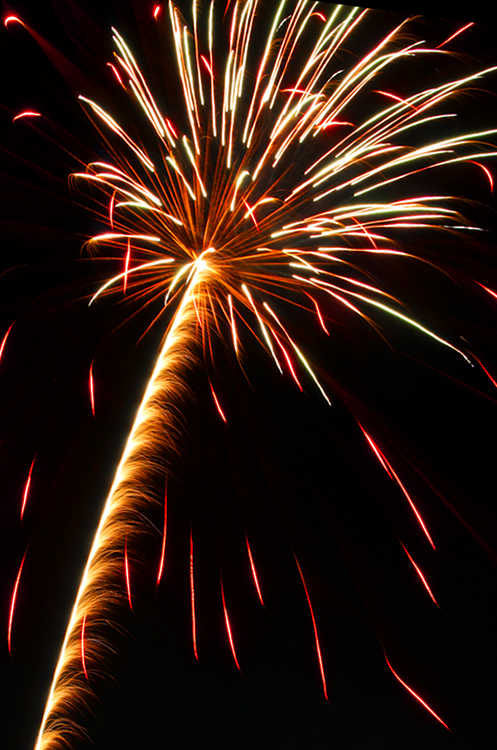
Figure 9-11: Use a slow shutter speed to capture fireworks.
Again, for an easy way to vary exposure time between shots, try using the Bulb shutter speed. This technique enables you to experiment with shutter speed more easily because you don’t have to use the Command dial to adjust the setting between each shot. Remember that this option is available only in the M (manual) exposure mode; it’s the setting one step below the slowest shutter speed (30 seconds).
Capturing Dynamic Close-Ups
For great close-up shots, try these techniques:
![]() Check your lens manual to find out its minimum close-focusing distance. How “up close and personal” you can get to your subject depends on your lens, not the camera body.
Check your lens manual to find out its minimum close-focusing distance. How “up close and personal” you can get to your subject depends on your lens, not the camera body.
![]() Take control over depth of field by setting the camera mode to A (aperture-priority autoexposure) mode. Whether you want a shallow, medium, or extreme depth of field depends on the point of your photo. In classic nature photography, for example, the artistic tradition is a very shallow depth of field, as shown in Figure 9-12, and requires an open aperture (low f-stop value). If you want the viewer to be able to clearly see all details throughout the frame — for example, you’re shooting a product shot for a sales catalog — you need to go the other direction, stopping down the aperture as far as possible.
Take control over depth of field by setting the camera mode to A (aperture-priority autoexposure) mode. Whether you want a shallow, medium, or extreme depth of field depends on the point of your photo. In classic nature photography, for example, the artistic tradition is a very shallow depth of field, as shown in Figure 9-12, and requires an open aperture (low f-stop value). If you want the viewer to be able to clearly see all details throughout the frame — for example, you’re shooting a product shot for a sales catalog — you need to go the other direction, stopping down the aperture as far as possible.
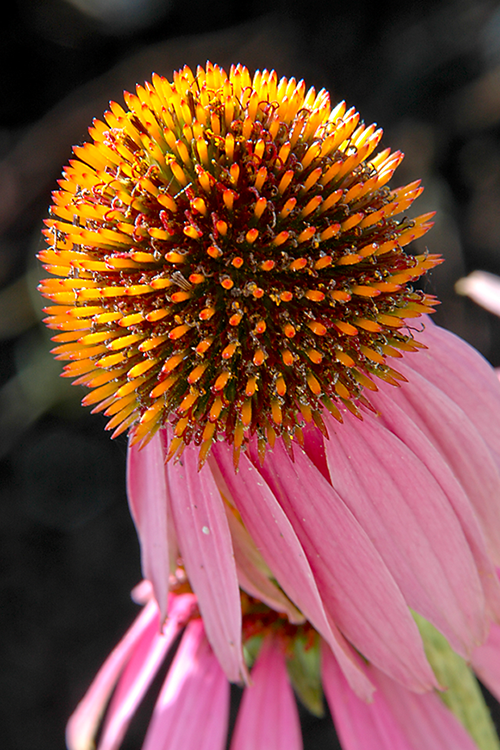
Figure 9-12: Shallow depth of field is a classic technique for close-up floral images.
![]() Remember that zooming in and getting close to your subject both decrease depth of field. So back to that product shot: If you need depth of field beyond what you can achieve with the aperture setting, you may need to back away, zoom out, or both. (You can always crop your image to show just the parts of the subject that you want to feature.)
Remember that zooming in and getting close to your subject both decrease depth of field. So back to that product shot: If you need depth of field beyond what you can achieve with the aperture setting, you may need to back away, zoom out, or both. (You can always crop your image to show just the parts of the subject that you want to feature.)
![]() When shooting flowers and other nature scenes outdoors, pay attention to shutter speed, too. Even a slight breeze may cause your subject to move, causing blurring at slow shutter speeds.
When shooting flowers and other nature scenes outdoors, pay attention to shutter speed, too. Even a slight breeze may cause your subject to move, causing blurring at slow shutter speeds.
![]() Use flash for better outdoor lighting. Just as with portraits, a tiny bit of flash typically improves close-ups when the sun is your primary light source. Again, though, keep in mind that the maximum shutter speed possible when you use the built-in flash is 1/200 second. So in very bright light, you may need to use a high f-stop setting to avoid overexposing the picture. You can also adjust the flash output via the Flash Compensation control. Chapter 7 offers details.
Use flash for better outdoor lighting. Just as with portraits, a tiny bit of flash typically improves close-ups when the sun is your primary light source. Again, though, keep in mind that the maximum shutter speed possible when you use the built-in flash is 1/200 second. So in very bright light, you may need to use a high f-stop setting to avoid overexposing the picture. You can also adjust the flash output via the Flash Compensation control. Chapter 7 offers details.
![]() When shooting indoors, try not to use flash as your primary light source. Because you’re shooting at close range, the light from your flash may be too harsh even at a low Flash Compensation setting. If flash is inevitable, turn on as many room lights as possible to reduce the flash power that’s needed — even a shop light from a hardware store can do in a pinch as a lighting source. (Remember that if you have multiple light sources, though, you may need to tweak the White Balance setting.)
When shooting indoors, try not to use flash as your primary light source. Because you’re shooting at close range, the light from your flash may be too harsh even at a low Flash Compensation setting. If flash is inevitable, turn on as many room lights as possible to reduce the flash power that’s needed — even a shop light from a hardware store can do in a pinch as a lighting source. (Remember that if you have multiple light sources, though, you may need to tweak the White Balance setting.)
![]() To really get close to your subject, invest in a macro lens or a set of diopters. A true macro lens, which enables you to get really, really close to your subjects, is an expensive proposition; prices range from a few hundred to a couple thousand dollars. If you enjoy capturing the tiny details in life, though, it’s worth the investment.
To really get close to your subject, invest in a macro lens or a set of diopters. A true macro lens, which enables you to get really, really close to your subjects, is an expensive proposition; prices range from a few hundred to a couple thousand dollars. If you enjoy capturing the tiny details in life, though, it’s worth the investment.
Nikon has a great guide to its macro lenses — officially titled "Micro-Nikkor Lenses" — at its www.nikonusa.com website, if you're ready to start shopping.
For a less expensive way to go, you can spend about $40 for a set of diopters, which are sort of like reading glasses that you screw onto your existing lens. Diopters come in several strengths — +1, +2, +4, and so on — with a higher number indicating a greater magnifying power. I took this approach to capture the extreme close-up in Figure 9-13, attaching a +2 diopter to my lens. The downfall of using diopters, sadly, is that they typically produce images that are very soft around the edges, a problem that doesn’t occur with a good macro lens.
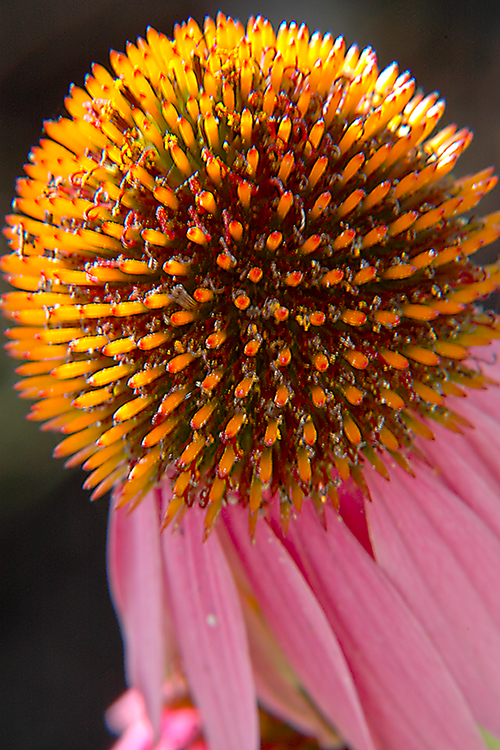
Figure 9-13: To extend your lens’s close-focus capability, you can add magnifying diopters.