![]()
7
Getting Creative with Exposure and Lighting
In This Chapter
![]() Understanding the basics of exposure
Understanding the basics of exposure
![]() Choosing the right exposure mode: P, S, A, or M?
Choosing the right exposure mode: P, S, A, or M?
![]() Reading meters and other exposure cues
Reading meters and other exposure cues
![]() Solving exposure problems
Solving exposure problems
![]() Getting better flash results
Getting better flash results
![]() Creating a safety net with automatic bracketing
Creating a safety net with automatic bracketing
Understanding exposure is one of the most intimidating challenges for a new photographer. Discussions of the topic are loaded with technical terms — aperture, metering, shutter speed, ISO, and the like. Add the fact that your camera offers many exposure controls, all sporting equally foreign names, and it’s no wonder that most people throw up their hands and decide that their best option is to stick with the Auto exposure mode and let the camera take care of all exposure decisions.
You can, of course, turn out good shots in Auto mode, and I fully relate to the confusion you may be feeling — I’ve been there. But I can also promise that when you take things nice and slow, digesting a piece of the exposure pie at a time, the topic is not as complicated as it seems on the surface. I guarantee that the payoff will be well worth your time and brain energy, too. You’ll not only gain the know-how to solve just about any exposure problem but also discover ways to use exposure to put your creative stamp on a scene.
To that end, this chapter provides everything you need to know to really exploit your camera’s exposure options, from a primer in exposure science (it’s not as bad as it sounds) to explanations of all exposure controls, including those related to flash. In addition, because some controls aren’t accessible in the fully automatic exposure modes covered in Chapter 3, this chapter provides more details about the four advanced modes, P, S, A, and M.
Introducing the Exposure Trio: Aperture, Shutter Speed, and ISO
Any photograph, whether taken with a film or digital camera, is created by focusing light through a lens onto a light-sensitive recording medium. In a film camera, the film negative serves as that medium; in a digital camera, it’s the image sensor, which is an array of light-responsive computer chips.
Between the lens and the sensor are two barriers — the aperture and shutter — which work in concert to control how much light makes its way to the sensor of a digital camera. The actual design and arrangement of the aperture, shutter, and sensor vary depending on the camera, but Figure 7-1 offers an illustration of the basic concept.

Figure 7-1: The aperture size and shutter speed determine how much light strikes the image sensor.
The aperture and shutter, along with a third feature — ISO — determine exposure, which is basically the picture’s overall brightness and contrast. This three-part exposure formula works as follows:
![]() Aperture (controls amount of light): The aperture is an adjustable hole in a diaphragm inside the lens. You change the aperture size to control the size of the light beam that can enter the camera.
Aperture (controls amount of light): The aperture is an adjustable hole in a diaphragm inside the lens. You change the aperture size to control the size of the light beam that can enter the camera.
Aperture settings are stated as f-stop numbers, or simply f-stops, and are expressed with the letter f followed by a number: f/2, f/5.6, f/16, and so on. The lower the f-stop number, the larger the aperture, and the more light is permitted into the camera, as illustrated by Figure 7-2. (If it seems backward to use a higher number for a smaller aperture, think of it this way: A higher value creates a bigger light barrier than a lower value.) The range of available aperture settings varies from lens to lens.
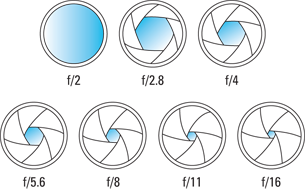
Figure 7-2: A lower f-stop number means a larger aperture, allowing more light into the camera.
![]() Shutter speed (controls duration of light): The shutter works something like, er, the shutters on a window. The camera’s shutter stays closed, preventing light from striking the image sensor (just as closed window shutters prevent sunlight from entering a room) until you press the shutter button. Then, the shutter opens briefly to allow light that passes through the aperture to hit the sensor. The exception to this scenario is when you compose in Live View mode: When you enable Live View, the shutter opens and remains open so that your image can form on the sensor and be displayed on the monitor. When you press the shutter button, the shutter first closes and then reopens for the actual exposure.
Shutter speed (controls duration of light): The shutter works something like, er, the shutters on a window. The camera’s shutter stays closed, preventing light from striking the image sensor (just as closed window shutters prevent sunlight from entering a room) until you press the shutter button. Then, the shutter opens briefly to allow light that passes through the aperture to hit the sensor. The exception to this scenario is when you compose in Live View mode: When you enable Live View, the shutter opens and remains open so that your image can form on the sensor and be displayed on the monitor. When you press the shutter button, the shutter first closes and then reopens for the actual exposure.
Either way, the length of time that the shutter is open is the shutter speed, which is measured in seconds: 1/60 second, 1/250 second, 2 seconds, and so on.
![]() ISO (controls light sensitivity): ISO, which is a digital function rather than a mechanical structure on the camera, enables you to adjust how responsive the image sensor is to light.
ISO (controls light sensitivity): ISO, which is a digital function rather than a mechanical structure on the camera, enables you to adjust how responsive the image sensor is to light.
 The term ISO is a holdover from film days, when an international standards organization rated each film stock according to light sensitivity: ISO 200, ISO 400, ISO 800, and so on. On a digital camera, the sensor itself doesn’t actually get more or less sensitive when you change the ISO. Instead, the light “signal” that hits the sensor is either amplified or dampened through electronics wizardry, sort of like how raising the volume on a radio boosts the audio signal. The upshot is the same as changing to a more light-reactive film stock. Using a higher ISO means that less light is needed to produce the image, enabling you to use a smaller aperture, faster shutter speed, or both.
![]() Together, aperture and shutter speed determine how much light strikes the image sensor.
Together, aperture and shutter speed determine how much light strikes the image sensor.
![]() ISO determines how much the sensor reacts to that light and thus how much light is needed to expose the picture.
ISO determines how much the sensor reacts to that light and thus how much light is needed to expose the picture.
The tricky part of the equation is that aperture, shutter speed, and ISO settings affect your pictures in ways that go beyond exposure. You need to be aware of these side effects, explained in the next sections, to determine which combination of the three exposure settings will work best for your picture.
Understanding exposure-setting side effects
![]() Aperture affects depth of field, or the distance over which focus remains acceptably sharp.
Aperture affects depth of field, or the distance over which focus remains acceptably sharp.
![]() Shutter speed determines whether moving objects appear blurry or sharply focused.
Shutter speed determines whether moving objects appear blurry or sharply focused.
![]() ISO affects the amount of image noise, which is a defect that looks like specks of sand.
ISO affects the amount of image noise, which is a defect that looks like specks of sand.
As you can imagine, understanding how aperture, shutter speed, and ISO affect your image enables you to have much more creative control over your photographs — and, in the case of ISO, to also ensure the quality of your images. The next three sections explore these exposure side effects in detail.
Aperture affects depth of field
The aperture setting, or f-stop, affects depth of field, which is the distance over which focus appears acceptably sharp. With a shallow depth of field, your subject appears more sharply focused than faraway objects; with a large depth of field, the sharp-focus zone spreads over a greater distance.
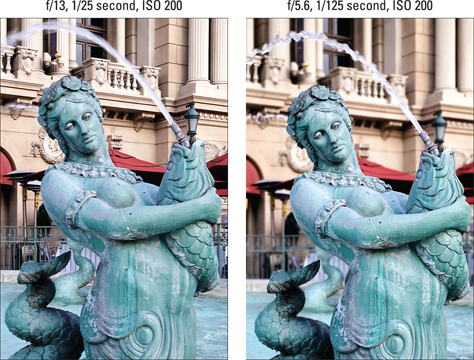
Figure 7-3: Widening the aperture (choosing a lower f-stop number) decreases depth of field.
Shutter speed affects motion blur
At a slow shutter speed, moving objects appear blurry, whereas a fast shutter speed captures motion cleanly. This phenomenon has nothing to do with the actual focus point of the camera but rather on the movement occurring — and being recorded by the camera — during the time when the shutter is open.
Compare the photos in Figure 7-3, for example. The static elements are perfectly focused in both images although the background in the left photo appears sharper because I shot that image using a higher f-stop, increasing the depth of field. But how the camera rendered the moving portion of the scene — the fountain water — was determined by the shutter speed. At a shutter speed of 1/25 second (left photo), the water blurs, giving it a misty look. At 1/125 second (right photo), the droplets appear more sharply focused, almost frozen in mid-air. How high of a shutter speed you need to freeze action depends on the speed of your subject.
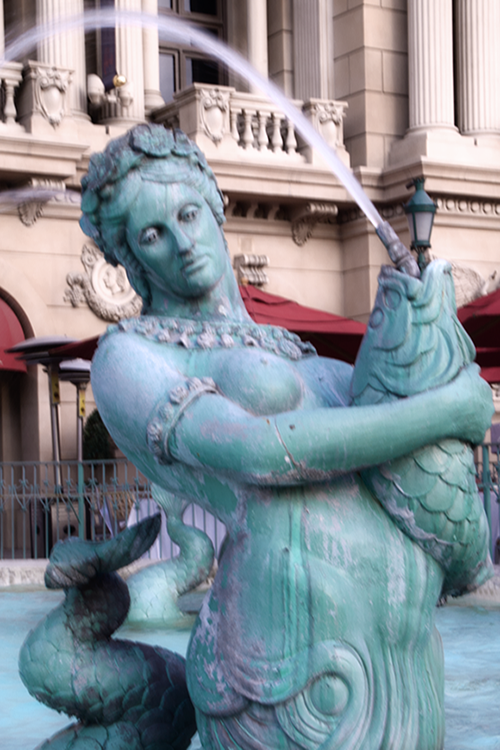
Figure 7-4: If both stationary and moving objects are blurry, camera shake is the usual cause.
ISO affects image noise
As ISO increases, making the image sensor more reactive to light, you increase the risk of producing noise. Noise is a defect that looks like sprinkles of sand and is similar in appearance to film grain, a defect that often mars pictures taken with high ISO film. Figure 7-5 offers an example.
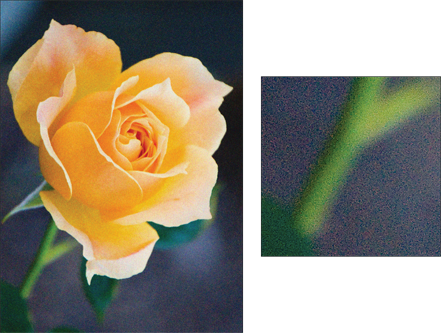
Figure 7-5: Caused by a very high ISO or long exposure time, noise becomes more visible as you enlarge the image.
Ideally, then, you should always use the lowest ISO setting on your camera to ensure top image quality. Sometimes, though, the lighting conditions simply don’t permit you to do so and still use the aperture and shutter speeds you need. Take my rose image as an example. When I shot these pictures, I didn’t have a tripod, so I needed a shutter speed fast enough to allow a sharp handheld image. I opened the aperture to f/6.3, which was the maximum on the lens I was using, to allow as much light as possible into the camera. At ISO 100, I needed a shutter speed of 1/40 second to expose the picture, and that shutter speed wasn’t fast enough for a successful handheld shot. You see the blurred result on the left in Figure 7-6. By raising the ISO to 200, I was able to use a shutter speed of 1/80 second, which enabled me to capture the flower cleanly, as shown on the right in the figure.
Fortunately, you don’t encounter serious noise on the D5200 until you really crank up the ISO. In fact, you may even be able to get away with a fairly high ISO if you keep your print or display size small. Some people probably wouldn’t even notice the noise in the left image in Figure 7-5 unless they were looking for it, for example. But as with other image defects, noise becomes more apparent as you enlarge the photo, as shown on the right in that same figure. Noise is also easier to spot in shadow areas of your picture and in large areas of solid color.
How much noise is acceptable — and, therefore, how high of an ISO is safe — is your choice. Even a little noise isn’t acceptable for pictures that require the highest quality, such as images for a product catalog or a travel shot that you want to blow up to poster size.
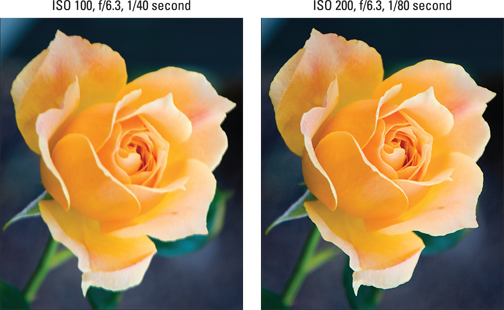
Figure 7-6: For this image, raising the ISO allowed me to bump up shutter speed enough to capture a blur-free shot while handholding the camera.
Doing the exposure balancing act
Again, changing these settings impacts your image in ways beyond exposure:
![]() Aperture affects depth of field, with a higher f-stop number increasing the distance over which objects appear sharp.
Aperture affects depth of field, with a higher f-stop number increasing the distance over which objects appear sharp.
![]() Shutter speed affects whether motion of the subject or camera results in a blurry photo. A faster shutter “freezes” action and also helps safeguard against all-over blur that can result from camera shake when you’re handholding the camera.
Shutter speed affects whether motion of the subject or camera results in a blurry photo. A faster shutter “freezes” action and also helps safeguard against all-over blur that can result from camera shake when you’re handholding the camera.
![]() ISO affects the camera’s sensitivity to light. A higher ISO makes the camera more responsive to light but also increases the chance of image noise.
ISO affects the camera’s sensitivity to light. A higher ISO makes the camera more responsive to light but also increases the chance of image noise.
So when you boost that shutter speed to capture your soccer subjects, you have to decide whether you prefer the shorter depth of field that comes with a larger aperture or the increased risk of noise that accompanies a higher ISO.
![]() I use ISO 100, the lowest setting on the camera, unless the lighting conditions are so poor that I can’t use the aperture and shutter speed I want without raising the ISO.
I use ISO 100, the lowest setting on the camera, unless the lighting conditions are so poor that I can’t use the aperture and shutter speed I want without raising the ISO.
![]() If my subject is moving (or might move, as with a squiggly toddler or an antsy pet), I give shutter speed the next highest priority in my exposure decision. I might choose a fast shutter speed to ensure a blur-free photo or, on the flip side, select a slow shutter to intentionally blur that moving object, an effect that can create a heightened sense of motion.
If my subject is moving (or might move, as with a squiggly toddler or an antsy pet), I give shutter speed the next highest priority in my exposure decision. I might choose a fast shutter speed to ensure a blur-free photo or, on the flip side, select a slow shutter to intentionally blur that moving object, an effect that can create a heightened sense of motion.
![]() For nonmoving subjects, I make aperture a priority over shutter speed, setting the aperture according to the depth of field I have in mind. For portraits, for example, I use a large aperture — say, in the range of f/2.8 to f/5.6 — so that I get a short depth of field, creating a nice, soft background for my subject. For landscapes, I usually go the opposite direction, stopping down the aperture as much as possible to capture the subject at the greatest depth of field. (Again, remember that the range of f-stops you can choose depends on your lens.)
For nonmoving subjects, I make aperture a priority over shutter speed, setting the aperture according to the depth of field I have in mind. For portraits, for example, I use a large aperture — say, in the range of f/2.8 to f/5.6 — so that I get a short depth of field, creating a nice, soft background for my subject. For landscapes, I usually go the opposite direction, stopping down the aperture as much as possible to capture the subject at the greatest depth of field. (Again, remember that the range of f-stops you can choose depends on your lens.)
Keeping all this straight is a little overwhelming at first, but the more you work with your camera, the more the whole exposure equation will make sense to you. You can find tips for choosing exposure settings for specific types of pictures in Chapter 9; keep moving through this chapter for details on how to actually adjust aperture, shutter speed, and ISO settings.
Exploring the Advanced Exposure Modes
In the automatic modes I describe in Chapter 3, you have little control over exposure. You may be able to choose from one or two Flash modes, and you can adjust ISO in the Scene modes. To gain full control over exposure, set the Mode dial to one of the advanced modes highlighted in Figure 7-7: P, S, A, or M. You also need to use these modes to take advantage of many other camera features, including some of its color and autofocus options.
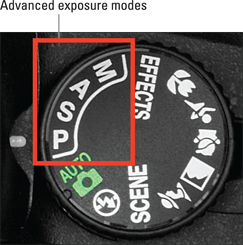
Figure 7-7: You can control exposure and certain other picture properties fully only in P, S, A, or M mode.
![]() P (programmed autoexposure): In this mode, the camera selects both aperture and shutter speed, but you can choose from different combinations of the two for creative flexibility.
P (programmed autoexposure): In this mode, the camera selects both aperture and shutter speed, but you can choose from different combinations of the two for creative flexibility.
![]() S (shutter-priority autoexposure): In this mode, you select a shutter speed, and the camera chooses the aperture setting that produces a good exposure at your selected ISO setting.
S (shutter-priority autoexposure): In this mode, you select a shutter speed, and the camera chooses the aperture setting that produces a good exposure at your selected ISO setting.
![]() A (aperture-priority autoexposure): The opposite of shutter-priority autoexposure, this mode asks you to select the aperture setting. The camera then selects the appropriate shutter speed to properly expose the picture.
A (aperture-priority autoexposure): The opposite of shutter-priority autoexposure, this mode asks you to select the aperture setting. The camera then selects the appropriate shutter speed to properly expose the picture.
![]() M (manual exposure): In this mode, you specify both shutter speed and aperture.
M (manual exposure): In this mode, you specify both shutter speed and aperture.
Manual mode puts all exposure control in your hands. If you’re a longtime photographer who comes from the days when manual exposure was the only game in town, you may prefer to stick with this mode. If it ain’t broke, don’t fix it, as they say. And in some ways, manual mode is simpler than the semi-auto modes because if you’re not happy with the exposure, you just change the aperture, shutter speed, or ISO setting and shoot again. You don’t have to fiddle with features that enable you to modify your autoexposure results.
My personal choice is to use aperture-priority autoexposure when I’m shooting stationary subjects and want to control depth of field — aperture is my priority — and to switch to shutter-priority autoexposure when I’m shooting a moving subject and am most concerned with controlling shutter speed. Frankly, my brain is taxed enough by all the other issues involved in taking pictures — what my Release mode setting is, what resolution I need, where I’m going for lunch as soon as I make this shot work — that I appreciate having the camera do some of the exposure lifting.
However, when I know exactly what aperture and shutter speed I want to use, or I’m after an out-of-the-ordinary exposure, I use manual exposure. For example, sometimes when I’m doing a still life in my studio, I want to create a certain mood by underexposing a subject or even shooting it in silhouette. The camera is always going to fight you on that result in the P, S, and A modes because it so dearly wants to provide a good exposure. Rather than dialing in all the autoexposure tweaks that could eventually force the result I want, I simply set the mode to M, adjust the shutter speed and aperture directly, and give the autoexposure system the afternoon off.
But even in manual mode, you’re never really flying without a net: The camera assists you by displaying the exposure meter, explained next.
Reading (And Adjusting) the Meter
To help you determine whether your exposure settings are on cue in M (manual) exposure mode, the camera displays an exposure meter in the Information display and viewfinder, as shown in Figure 7-8. You can see a close-up look at how the meter looks in the viewfinder in Figure 7-9. (If you don’t see the meter, press the shutter button halfway and then release it to activate the metering system.)
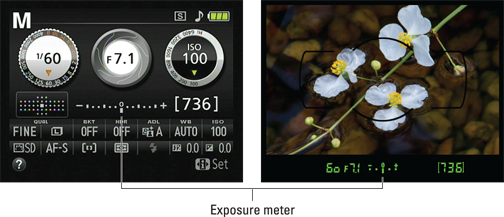
Figure 7-8: In M exposure mode, the exposure meter appears in the Information display and viewfinder.

Figure 7-9: The bars under the meter indicate the amount of under- or overexposure.
Here’s a short course in meter reading:
![]() Interpreting the meter: The minus-sign end of the meter represents underexposure; the plus sign, overexposure. So if the little notches on the meter fall to the left of 0, as shown in the first example in Figure 7-9, the image will be underexposed. If the notches move to the right of 0, as shown in the second example, the image will be overexposed. When all the notches except the center bar disappear, as in the third example in Figure 7-9, you’re good to go.
Interpreting the meter: The minus-sign end of the meter represents underexposure; the plus sign, overexposure. So if the little notches on the meter fall to the left of 0, as shown in the first example in Figure 7-9, the image will be underexposed. If the notches move to the right of 0, as shown in the second example, the image will be overexposed. When all the notches except the center bar disappear, as in the third example in Figure 7-9, you’re good to go.
A couple of details to note:
 • The markings on the meter indicate exposure stops. In photography, the term stop refers to an increment of exposure. To increase exposure by one stop means to adjust the aperture or shutter speed to allow twice as much light into the camera as the current settings permit. To reduce exposure a stop, you use settings that allow half as much light. Doubling or halving the ISO value also adjusts exposure by one stop.
On the D5200, the squares on either side of the 0 represent one full stop each. The small lines below, which appear only when the meter needs to indicate over- or underexposure, break each stop into thirds. So the middle readout in Figure 7-9, for example, indicates an overexposure of 1 and 2/3 stop. The left readout indicates the same amount of underexposure.
• If the meter blinks, the amount of over- or underexposure exceeds the two-stop range of the meter. In other words, you have a serious exposure problem.
![]() Understanding how exposure is calculated (Metering mode): The exposure information the meter reports is based on the exposure Metering mode, which determines which part of the frame the camera considers when calculating exposure. At the default setting, exposure is based on the entire frame, but you can select two other Metering modes. See the upcoming section “Choosing an Exposure Metering Mode” for details.
Understanding how exposure is calculated (Metering mode): The exposure information the meter reports is based on the exposure Metering mode, which determines which part of the frame the camera considers when calculating exposure. At the default setting, exposure is based on the entire frame, but you can select two other Metering modes. See the upcoming section “Choosing an Exposure Metering Mode” for details.
![]()
 Interpreting the meter in S, A, and P modes: In these exposure modes, the meter doesn’t appear unless the camera anticipates an exposure problem — for example, if you’re shooting in S (shutter-priority autoexposure) mode, and the camera can’t select an f-stop that will properly expose your image at your chosen shutter speed and ISO. In dim lighting, you may also see a blinking flash symbol, which is a not-so-subtle suggestion to add some light to the scene. A blinking question mark tells you that you can press the Zoom Out button to display a Help screen with more information.
![]() Adjusting the meter shutoff timing. The meter turns on anytime you press the shutter button halfway, but then it turns off automatically if you don’t press the button again for a period of time — 8 seconds, by default. You can adjust the shutoff timing through the Auto Off Timers option, found on the Timers/AE Lock submenu of the Custom Setting menu. Short results in a shutdown time of 4 seconds; Normal, 8 seconds; and Long, 1 minute.
Adjusting the meter shutoff timing. The meter turns on anytime you press the shutter button halfway, but then it turns off automatically if you don’t press the button again for a period of time — 8 seconds, by default. You can adjust the shutoff timing through the Auto Off Timers option, found on the Timers/AE Lock submenu of the Custom Setting menu. Short results in a shutdown time of 4 seconds; Normal, 8 seconds; and Long, 1 minute.
Remember that your choice also affects the auto shutoff for menu and playback display, Live View display, and the image-review period (the time the picture appears onscreen after you take a shot). To set meter shutdown separately of those features, choose Custom, as shown on the left in Figure 7-10, and select Standby Timer, as shown on the right. Press the Multi Selector right to access the available settings, which range from 4 seconds to 30 minutes. Understand, though, that the metering system uses battery power, so keeping it active for long periods of time on a regular basis isn’t a good move.
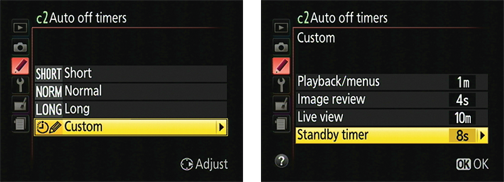
Figure 7-10: You can vary the meter’s automatic shutdown timing via the Standby Timer option.
![]() Reversing the meter orientation. For photographers used to a camera that orients the meter with the positive (overexposure) side appearing on the left and the negative (underexposure) side on the right — the design that Nikon used for years — the D5200 offers the option to flip the meter to that orientation. This option also lies on the Custom Setting menu, on the Controls submenu. Look for the Reverse Indicators option, as shown on in Figure 7-11. (The setting shown in the figure is the default.)
Reversing the meter orientation. For photographers used to a camera that orients the meter with the positive (overexposure) side appearing on the left and the negative (underexposure) side on the right — the design that Nikon used for years — the D5200 offers the option to flip the meter to that orientation. This option also lies on the Custom Setting menu, on the Controls submenu. Look for the Reverse Indicators option, as shown on in Figure 7-11. (The setting shown in the figure is the default.)

Figure 7-11: In addition, you can control the meter orientation.
Setting Aperture, Shutter Speed, and ISO
The next sections detail how to view and adjust these critical exposure settings. For a review of how each setting affects your pictures, check out the first part of this chapter.
Adjusting aperture and shutter speed
You can view the current aperture (f-stop) and shutter speed in the Information display and viewfinder, as shown in Figure 7-12. If you use the Graphic setting for the Info Display Format option on the Setup menu (the default setting), the two settings are displayed on the monitor as shown in the figure. As you raise the f-stop value, the center of the aperture graphic shrinks, representing the narrowing of the aperture.
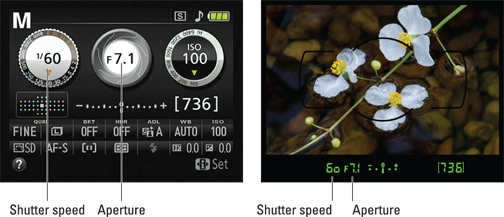
Figure 7-12: Look for the current f-stop and shutter speed here.
To select aperture and shutter speed, start by pressing the shutter button halfway to kick the exposure system into gear. You can then release the button. The next step depends on the exposure mode, as follows:
![]() P (programmed autoexposure): In this mode, the camera shows you its recommended f-stop and shutter speed when you press the shutter button halfway. But you can rotate the Command dial to select a different combination of settings. (This flexibility is why the official Nikon name of this mode is flexible programmed autoexposure.) The number of possible combinations depends upon the aperture settings the camera can select, which depends on your lens.
P (programmed autoexposure): In this mode, the camera shows you its recommended f-stop and shutter speed when you press the shutter button halfway. But you can rotate the Command dial to select a different combination of settings. (This flexibility is why the official Nikon name of this mode is flexible programmed autoexposure.) The number of possible combinations depends upon the aperture settings the camera can select, which depends on your lens.
 An asterisk (*) appears next to the P exposure mode symbol in the upper-left corner of the Information display if you rotate the Command dial to adjust the aperture/shutter speed settings. You see a tiny P* symbol at the left end of the viewfinder display as well. To get back to the initial combo of shutter speed and aperture, rotate the Command dial until the asterisk disappears from the Information display and the P* symbol turns off in the viewfinder.
![]() S (shutter-priority autoexposure): In this mode, you select the shutter speed. Just rotate the Command dial to get the job done. The camera automatically adjusts the aperture as needed to maintain proper exposure.
S (shutter-priority autoexposure): In this mode, you select the shutter speed. Just rotate the Command dial to get the job done. The camera automatically adjusts the aperture as needed to maintain proper exposure.
Available shutter speeds range from 30 seconds to 1/4000 second except when flash is enabled. When you use flash, the top shutter speed is 1/200 second. This limitation is due to the way the camera must time the flash with the opening of the shutter.
 Remember that as the aperture shifts, so does depth of field — so even though you’re working in shutter-priority mode, keep an eye on the f-stop, too, if depth of field is important to your photo. Also note that in extreme lighting conditions, the camera may not be able to adjust the aperture enough to produce a good exposure at your current shutter speed — again, possible aperture settings depend on your lens. So you may need to compromise on shutter speed or ISO.
![]() A (aperture-priority autoexposure): In this mode, you control aperture, and the camera adjusts shutter speed automatically. To set the aperture (f-stop), rotate the Command dial. The range of available f-stop settings depends on your lens. For zoom lenses, the range typically also changes as you zoom in and out. For example, a lens may offer a maximum aperture of f/3.5 when set to its widest angle (shortest focal length) but limit you to f/5.6 when you zoom in to a longer focal length. Check your lens manual for details on the minimum and maximum aperture settings available to you.
A (aperture-priority autoexposure): In this mode, you control aperture, and the camera adjusts shutter speed automatically. To set the aperture (f-stop), rotate the Command dial. The range of available f-stop settings depends on your lens. For zoom lenses, the range typically also changes as you zoom in and out. For example, a lens may offer a maximum aperture of f/3.5 when set to its widest angle (shortest focal length) but limit you to f/5.6 when you zoom in to a longer focal length. Check your lens manual for details on the minimum and maximum aperture settings available to you.
 When you raise the f-stop value, be careful that the shutter speed doesn’t drop so low that you risk camera shake if you handhold the camera. And if your scene contains moving objects, make sure that the shutter speed that the camera selects is fast enough to stop action (or slow enough to blur it, if that’s your creative goal). These same warnings apply when you use P mode.
![]() M (manual exposure): In this mode, you select both aperture and shutter speed, like so:
M (manual exposure): In this mode, you select both aperture and shutter speed, like so:
• To adjust shutter speed: Rotate the Command dial. Again, the top shutter speed is limited to 1/200 second when flash is used; otherwise, you can choose from speeds as slow as 30 seconds and as fast as 1/4000 second.
 In Manual mode, you can access two shutter speed settings not available in the other modes: Rotate the dial one notch past the slowest speed (30 seconds) to access the Bulb setting, which keeps the shutter open as long as the shutter button is pressed. If you use the ML-L3 wireless remote control unit, rotate the dial one more time to display the Time setting. At this setting, you press the remote’s shutter button once to begin the exposure and a second time to end it; maximum exposure time is 30 minutes. Note that if you set the shutter speed to either of these options and then change the Mode dial to S, an alert appears at the bottom of the Information display to let you know that you can’t use those options in S mode; you must shift back to M mode to take advantage of them.
![]() • To adjust aperture: Press the Exposure Compensation button while rotating the Command dial. Notice the little aperture-like symbol that lies next to the button, on the top of the camera? That’s your reminder of the button’s role in setting the f-stop in manual mode.
• To adjust aperture: Press the Exposure Compensation button while rotating the Command dial. Notice the little aperture-like symbol that lies next to the button, on the top of the camera? That’s your reminder of the button’s role in setting the f-stop in manual mode.
Keep in mind that in P, S, or A mode, the settings that the camera selects are based on what it thinks is the proper exposure. If you don’t agree with the camera, you can switch to manual exposure mode and dial in the aperture and shutter speed that deliver the exposure you want, or if you want to stay in P, S, or A mode, you can tweak exposure using the features explained in the section “Sorting through Your Camera’s Exposure-Correction Tools,” later in this chapter.
The best practice is to use the monitor to select your initial shutter speed, or aperture, or both, if necessary. Then frame the shot in the viewfinder, press the shutter button halfway to meter the scene in front of the lens, and then, if the viewfinder exposure meter indicates a problem, adjust the exposure settings as necessary without taking your eye away from the viewfinder. (After you get familiar with the operation of the camera, this technique won’t be as hard as it first seems, I promise.)
Controlling ISO
On the D5200, you can choose ISO values ranging from 100 to 6400, plus four Hi settings: Hi 0.3, 0.7, 1, and 2, which translate to ISO values ranging from 8000 to 25600. You also have the option of choosing Auto ISO; at this setting, the camera selects the ISO needed to expose the picture at the current shutter speed and aperture.
To view the current ISO setting, just bring up the Information display: The value appears in two places, both labeled on the left in Figure 7-13.
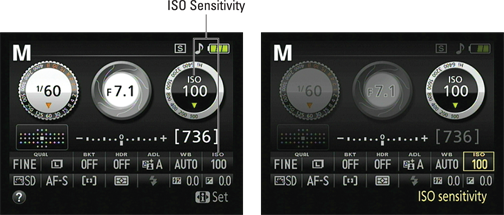
Figure 7-13: You can spot the current ISO setting in the Information display (left); to change the value quickly, press the Fn button while rotating the Command dial (right).
You can’t adjust ISO in Auto and Auto Flash Off exposure modes; the camera sets the ISO automatically. In any other exposure mode, you can set ISO as follows:
![]()
![]() Fn (Function) button: By default, pressing the Fn button on the side of the camera selects the ISO setting in the Information display control strip, as shown on the right in Figure 7-13. Keep holding the button while rotating the Command dial to change the ISO setting. (See Chapter 11 if you prefer to use the Fn button to access a setting other than ISO; you can set the button to perform a variety of functions.)
Fn (Function) button: By default, pressing the Fn button on the side of the camera selects the ISO setting in the Information display control strip, as shown on the right in Figure 7-13. Keep holding the button while rotating the Command dial to change the ISO setting. (See Chapter 11 if you prefer to use the Fn button to access a setting other than ISO; you can set the button to perform a variety of functions.)
![]()
![]() Info Edit button: You also can use the normal procedure for adjusting the setting via the display strip: When the Information display is visible, press the Info Edit button to activate the control strip and then highlight the ISO setting, as shown on the left in Figure 7-14. Press OK to display the screen offering all the available settings, as shown on the right.
Info Edit button: You also can use the normal procedure for adjusting the setting via the display strip: When the Information display is visible, press the Info Edit button to activate the control strip and then highlight the ISO setting, as shown on the left in Figure 7-14. Press OK to display the screen offering all the available settings, as shown on the right.
![]() Shooting menu: Finally, you can change the setting via the ISO Sensitivity Settings on the Shooting menu, shown in Figure 7-15. The second screen in the figure shows options available in the P, S, A, and M modes; you can access only the top option in the other exposure modes. Either way, that’s the option that sets a specific ISO level. More about the other options momentarily.
Shooting menu: Finally, you can change the setting via the ISO Sensitivity Settings on the Shooting menu, shown in Figure 7-15. The second screen in the figure shows options available in the P, S, A, and M modes; you can access only the top option in the other exposure modes. Either way, that’s the option that sets a specific ISO level. More about the other options momentarily.
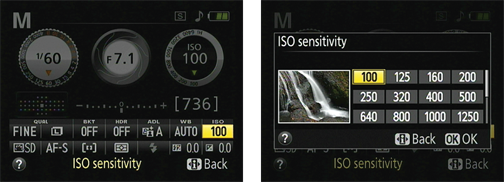
Figure 7-14: You can also use the normal control strip process to adjust the setting.
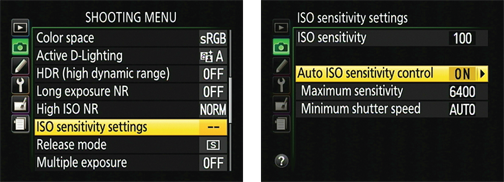
Figure 7-15: You can access advanced ISO options through the Shooting menu.
Keep these additional ISO points in mind:
![]() Auto ISO in the fully automatic exposure modes: In Auto and Auto Flash Off modes, the camera uses the Auto ISO setting and selects the ISO setting for you. In the Scene and Effects modes, you can stick with Auto ISO (the default setting) or select a specific ISO value.
Auto ISO in the fully automatic exposure modes: In Auto and Auto Flash Off modes, the camera uses the Auto ISO setting and selects the ISO setting for you. In the Scene and Effects modes, you can stick with Auto ISO (the default setting) or select a specific ISO value.
![]()
 Auto ISO in P, S, A, and M modes: Auto ISO doesn’t appear on the ISO settings list, but you still can enable Auto ISO as a safety net. Here’s how it works: You dial in a specific ISO setting — say, ISO 100. If the camera decides that it can’t properly expose the image at that ISO given your current aperture and shutter speed, it automatically adjusts ISO as necessary.
To get to this option, select ISO Sensitivity Settings on the Shooting menu, as shown on the left in Figure 7-15, and press OK. On the next screen, turn the Auto ISO Sensitivity Control option to On, as shown on the right in the figure. The camera will now override your ISO choice when it thinks a proper exposure is not possible with the settings you’ve specified.
Next, use the two options under the Auto ISO Sensitivity Control setting to tell the camera exactly when it should step in and offer ISO assistance:
• Maximum Sensitivity: This option lets you set the highest ISO value that the camera can use when it overrides your selected ISO setting — a great feature because it enables you to decide how much noise potential you’re willing to accept in order to get a good exposure. For example, the value in Figure 7-13 is set to ISO 6400. So even if the picture can’t be properly exposed at ISO 6400, the camera won’t go any higher than that limit.
• Minimum Shutter Speed: Set the minimum shutter speed at which the ISO override engages when you use the P and A exposure modes. If you set this option to Auto, the camera will select the minimum shutter speed setting based on the focal length of your lens, the idea being that with a longer lens, you need a faster shutter speed to avoid the blur that camera shake can cause when you handhold the camera. After selecting Auto, press the Multi Selector right to access a screen that lets you assign a faster or slower shutter speed to this setting. However, ultimately, exposure trumps camera shake issues: If the camera can’t expose the picture at what it thinks is a safe shutter speed for your lens focal length, it will use a slower speed.
 When the camera is about to override your ISO setting, it alerts you by blinking the ISO Auto label in the viewfinder. The message “ISO-A” blinks in the ISO graphic in the Information screen as well. And in playback mode, the ISO value appears in red if you view your photos in a display mode that includes the ISO value. (Chapter 5 has details.)
To disable Auto ISO override, just reset the Auto ISO Sensitivity Control option to Off.
![]() ISO value display in the viewfinder: Although the Information screen always displays the current ISO setting, the viewfinder reports the ISO value only when the option is set to Auto. The value appears just to the left of the shots remaining value, on the right end of the viewfinder display. Otherwise, the ISO area of the viewfinder is empty.
ISO value display in the viewfinder: Although the Information screen always displays the current ISO setting, the viewfinder reports the ISO value only when the option is set to Auto. The value appears just to the left of the shots remaining value, on the right end of the viewfinder display. Otherwise, the ISO area of the viewfinder is empty.
If you don’t like this setup, you can modify things through the ISO Display option, found in the Shooting/Display section of the Custom Setting menu. At the default setting, Off, things work as just described. Choose On to replace the shots remaining value in the viewfinder with the ISO value at all times. You can still see the shots remaining value in the Information display.
Choosing an Exposure Metering Mode
Your camera offers three Metering modes, described in the following list and represented in the Information display by the icons you see in the margins:
![]()
![]() Matrix: The camera analyzes the entire frame and then selects an exposure that’s designed to produce a balanced exposure.
Matrix: The camera analyzes the entire frame and then selects an exposure that’s designed to produce a balanced exposure.
Your camera manual refers to this mode as 3D Color Matrix II, which is the label that Nikon created to describe the specific technology used in this mode.
![]()
![]() Center-weighted: The camera bases exposure on the entire frame but puts extra emphasis — or weight — on the center of the frame. Specifically, the camera assigns 75 percent of the metering weight to an 8mm circle in the center of the frame.
Center-weighted: The camera bases exposure on the entire frame but puts extra emphasis — or weight — on the center of the frame. Specifically, the camera assigns 75 percent of the metering weight to an 8mm circle in the center of the frame.
![]()
![]() Spot: In this mode, the camera bases exposure entirely on a circular area that’s about 3.5mm in diameter, or about 2.5 percent of the frame. The location used for this pin-point metering depends on an autofocusing option called the AF-area mode. Detailed in Chapter 8, this option determines which of the camera’s focus points the autofocusing system uses to establish focus. Here’s how the setting affects exposure:
Spot: In this mode, the camera bases exposure entirely on a circular area that’s about 3.5mm in diameter, or about 2.5 percent of the frame. The location used for this pin-point metering depends on an autofocusing option called the AF-area mode. Detailed in Chapter 8, this option determines which of the camera’s focus points the autofocusing system uses to establish focus. Here’s how the setting affects exposure:
• If you choose the Auto Area mode, in which the camera chooses the focus point for you, exposure is based on the center focus point.
• If you use any of the other AF-area modes, which enable you to select a specific focus point, the camera bases exposure on that point.
 Because of this autofocus/autoexposure relationship, it’s best to switch to one of the AF-area modes that allow focus-point selection when you want to use spot metering. In the Auto Area mode, exposure may be incorrect if you compose your shot so that the subject isn’t at the center of the frame.
As an example of how Metering mode affects exposure, Figure 7-16 shows the same image captured in each mode. In the matrix example, the bright background caused the camera to select an exposure that left the statue quite dark. Switching to center-weighted metering helped somewhat but didn’t quite bring the statue out of the shadows. Spot metering produced the best result as far as the statue goes, although the resulting increase in exposure left the sky a little washed out.
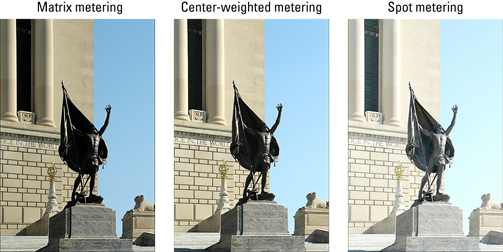
Figure 7-16: The Metering mode determines which area of the frame the camera considers when calculating exposure.
![]() Matrix metering is the default setting, and you can change the Metering mode only in the P, S, A, and M exposure modes. To adjust the setting, use the Information display control strip, as shown in Figure 7-17. (Activate the strip by pressing the Info Edit button.)
Matrix metering is the default setting, and you can change the Metering mode only in the P, S, A, and M exposure modes. To adjust the setting, use the Information display control strip, as shown in Figure 7-17. (Activate the strip by pressing the Info Edit button.)
The one exception to this advice might be when you’re shooting a series of images in which a significant contrast in lighting exists between subject and background. Then, switching to center-weighted metering or spot metering may save you the time of having to adjust the exposure for each image.
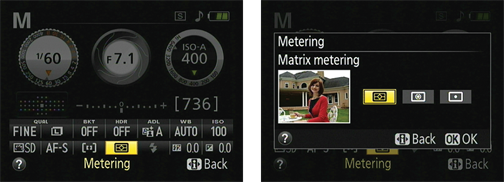
Figure 7-17: Adjust the Metering mode setting via the Information display control strip.
Sorting through Your Camera’s Exposure-Correction Tools
In addition to the normal controls over aperture, shutter speed, and ISO, your camera offers a collection of tools that enable you to solve tricky exposure problems. The next several sections introduce you to these features.
Applying Exposure Compensation
When you set your camera to the P, S, or A modes, you can enjoy autoexposure support but still retain some control over the final exposure. If you think that the image the camera produced is too dark or too light, you can use Exposure Compensation. This feature enables you to tell the camera to produce a darker or lighter exposure than what its autoexposure mechanism thinks is appropriate. You also can use Exposure Compensation in the Night Vision Effects mode, explained in Chapter 10.
Here’s what you need to know to take advantage of Exposure Compensation:
![]() Exposure Compensation settings are stated in terms of EV numbers, as in EV +2.0. Possible values range from EV +5.0 to EV –5.0. (EV stands for exposure value.) Each full number on the EV scale represents an exposure shift of one stop.
Exposure Compensation settings are stated in terms of EV numbers, as in EV +2.0. Possible values range from EV +5.0 to EV –5.0. (EV stands for exposure value.) Each full number on the EV scale represents an exposure shift of one stop.
![]() A setting of EV 0.0 results in no exposure adjustment.
A setting of EV 0.0 results in no exposure adjustment.
![]() For a brighter image, raise the Exposure Compensation value. The higher you go, the brighter the image becomes.
For a brighter image, raise the Exposure Compensation value. The higher you go, the brighter the image becomes.
![]() For a darker image, lower the EV.
For a darker image, lower the EV.
As an example, take a look at the first image in Figure 7-18. The initial exposure selected by the camera left the balloon a tad too dark for my taste. So I raised the Exposure Compensation setting to EV +1.0, which produced the brighter exposure on the right.
To change the setting, you have two options:
![]()
![]() Press the Exposure Compensation button while rotating the Command dial. As soon as you press the button, the Exposure Compensation setting in the Information display control strip becomes active, as shown in Figure 7-19. If you’re looking through the viewfinder, the shots remaining value is temporarily replaced by the Exposure Compensation value when you press the Exposure Compensation button.
Press the Exposure Compensation button while rotating the Command dial. As soon as you press the button, the Exposure Compensation setting in the Information display control strip becomes active, as shown in Figure 7-19. If you’re looking through the viewfinder, the shots remaining value is temporarily replaced by the Exposure Compensation value when you press the Exposure Compensation button.
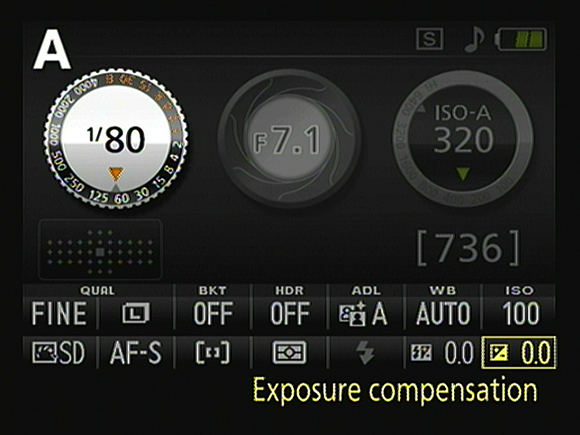
Figure 7-19: Press the Exposure Compensation button and rotate the Command dial to quickly adjust the setting.
While holding the Exposure Compensation button, rotate the Command dial to adjust the setting. As you do, the exposure meter in the viewfinder and the Information display updates to show you the degree of adjustment you’re making. Each bar that appears under the meter equals an adjustment of 1/3 stop (EV +/–0.3).
After you release the button, the Information display goes back to normal, and the shots remaining value returns to the viewfinder.
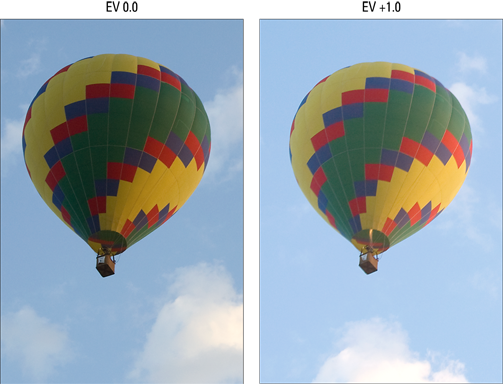
Figure 7-18: For a brighter exposure, raise the Exposure Compensation value.
![]()
![]() Use the normal Information display control strip process. You also can use the standard method of adjusting options via the control strip: While the Information display is visible, you press the Info Edit button to activate the control strip. Highlight the Exposure Compensation value, as shown on the left in Figure 7-20, press OK to display the right screen in the figure. Press the Multi Selector up or down to adjust the EV value and then press OK to return to the control strip. Press the Info Edit button again or give the shutter button a half-press to exit the control strip and return to shooting.
Use the normal Information display control strip process. You also can use the standard method of adjusting options via the control strip: While the Information display is visible, you press the Info Edit button to activate the control strip. Highlight the Exposure Compensation value, as shown on the left in Figure 7-20, press OK to display the right screen in the figure. Press the Multi Selector up or down to adjust the EV value and then press OK to return to the control strip. Press the Info Edit button again or give the shutter button a half-press to exit the control strip and return to shooting.
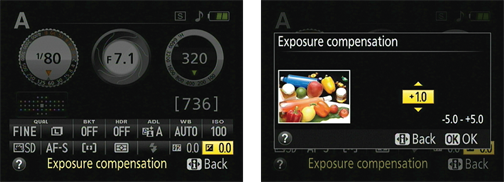
Figure 7-20: You also can raise or lower Exposure Compensation through the normal control strip process.
In either case, the 0 on the meter in the viewfinder and Shooting Information display blinks to remind you that Exposure Compensation is active. You also see a little plus/minus symbol (the same one that decorates the Exposure Compensation button) in the viewfinder display, and the meter readout indicates the amount of compensation you applied.
In Night Vision mode, the value is automatically reset to 0 as soon as you change to a different exposure mode.
Just a few other tips:
![]() How the camera arrives at the brighter or darker image you request through your Exposure Compensation setting depends on the exposure mode:
How the camera arrives at the brighter or darker image you request through your Exposure Compensation setting depends on the exposure mode:
• In A (aperture-priority autoexposure) mode, the camera adjusts the shutter speed but leaves your selected f-stop in force. Be sure to check the resulting shutter speed to make sure that it isn’t so slow that camera shake or blur from moving objects is problematic.
• In S (shutter-priority autoexposure) mode, the camera opens or stops down the aperture.
• In P (programmed autoexposure) mode, the camera decides whether to adjust aperture, shutter speed, or both.
• In all three modes, the camera may also adjust ISO if you have Auto ISO enabled.
• In Night Vision mode, the camera may adjust ISO, shutter speed, or aperture.
Keep in mind that the camera can adjust f-stop only so much, according to the aperture range of your lens. And the range of shutter speeds, too, is limited by the camera itself. So if you reach the ends of those ranges, you either have to compromise on shutter speed or aperture or adjust ISO.
![]() When you use flash, the Exposure Compensation setting affects both background brightness and flash power. But you can further modify the flash power through a related option, Flash Compensation. You can find out more about that feature later in this chapter.
When you use flash, the Exposure Compensation setting affects both background brightness and flash power. But you can further modify the flash power through a related option, Flash Compensation. You can find out more about that feature later in this chapter.
![]() Finally, if you don’t want to fiddle with Exposure Compensation, just switch to manual exposure mode — M, on the Mode dial — and select whatever aperture and shutter speed settings produce the exposure you’re after.
Finally, if you don’t want to fiddle with Exposure Compensation, just switch to manual exposure mode — M, on the Mode dial — and select whatever aperture and shutter speed settings produce the exposure you’re after.
 Although the camera doesn’t change your selected exposure settings in manual mode even if Exposure Compensation is enabled, the exposure meter is affected by the current setting, which can lead to some confusion. The meter indicates whether your shot will be properly exposed based on the Exposure Compensation setting. So if you don’t realize that Exposure Compensation is enabled, you may mistakenly adjust your exposure settings when they’re actually on target for your subject. This is yet another reason why it’s best to always reset the Exposure Compensation setting back to EV 0.0 after you’re done using that feature.
Using autoexposure lock
To help ensure a proper exposure, your camera continually meters the light until the moment you depress the shutter button fully. In autoexposure modes, it also keeps adjusting exposure settings as needed to maintain a good exposure.
For most situations, this approach works great, resulting in the right settings for the light that’s striking your subject at the moment you capture the image. But on occasion, you may want to lock in a certain combination of exposure settings. For example, perhaps you want your subject to appear at the far edge of the frame. If you were to use the normal shooting technique, you’d place the subject under a focus point, press the shutter button halfway to lock focus and set the initial exposure, and then reframe to your desired composition to take the shot. The problem is that exposure is then recalculated based on the new framing, which can leave your subject under- or overexposed.
The easiest way to lock in exposure settings is to switch to M (manual) exposure mode and use the f-stop, shutter speed, and ISO settings that work best for your subject. But if you prefer to stay with an autoexposure mode, you can press the AE-L/AF-L button to lock exposure before you reframe. This feature is known as autoexposure lock, or AE Lock for short.
You can take advantage of AE Lock in any autoexposure mode except Auto or Auto Flash Off. However, for best results, stick with P, S, or A mode, which are the only ones that give you access to certain settings that produce the optimal results. In those modes, take these steps:
1. Set the Metering mode to spot metering.
Select the option via the Information display control strip. The icon representing spot metering looks like the one shown in Figure 7-21.
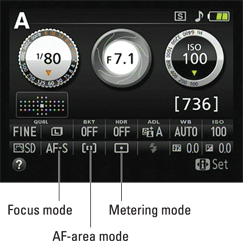
Figure 7-21: Use these metering and autofocus settings for best results when applying autoexposure lock.
2. If autofocusing, set the Focus mode to AF-S and the AF-area mode to Single Point.
Again, select both settings via the control strip; Figure 7-21 shows you how the icons that represent each setting appear in the Shooting Information display. You should see a single focus point (indicated by a black rectangle) in the viewfinder.
3. Use the Multi Selector to move the focus point over your subject.
You sometimes need to press the shutter button halfway and release it to activate the exposure meters before you can do so.
 In spot metering mode, the focus point determines the area used to calculate exposure, so this step is critical whether you use autofocusing or manual focusing.
4. Press the shutter button halfway.
The camera sets the initial exposure settings. If you’re using autofocusing, focus is also set at this point. For manual focusing, rotate the focusing ring on the lens to bring the subject into focus.
![]() 5. Press and hold the AE-L/AF-L button.
5. Press and hold the AE-L/AF-L button.
This button is just to the left of the Command dial.
While the button is pressed, the letters AE-L appear at the left end of the viewfinder to remind you that exposure lock is applied.
By default, focus is locked at the same time if you’re using autofocusing. You can change this behavior by customizing the AE-L/AF-L button function, as outlined in Chapter 11.
6. Reframe the shot if desired and take the photo.
Be sure to keep holding the AE-L/AF-L button until you release the shutter button! And if you want to use the same focus and exposure settings for your next shot, just keep the AE-L/AF-L button pressed.
Expanding tonal range
A scene like the one in Figure 7-22 presents the classic photographer’s challenge: Choosing exposure settings that capture the darkest parts of the subject appropriately causes the brightest areas to be overexposed. And if you instead expose for the highlights — that is, set the exposure settings to capture the brightest regions properly — the darker areas are underexposed.
In the past, you had to choose between favoring the highlights or the shadows. But with the D5200, you can expand the possible tonal range — that’s photo speak for the range of brightness values in an image — through two features: Active D-Lighting and HDR (high dynamic range). The next two sections explain both options.
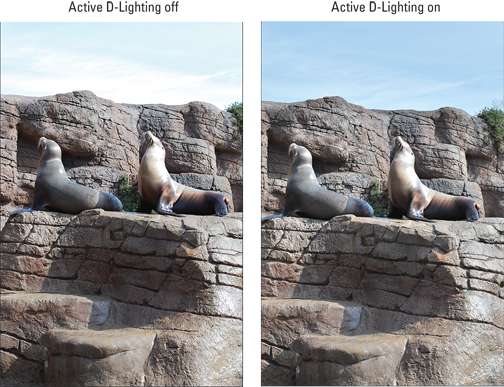
Figure 7-22: Active D-Lighting captured the shadows without blowing out the highlights.
Applying Active D-Lighting
One way to cope with a high-contrast scene like the one in Figure 7-22 is to turn on Active D-Lighting. This feature is designed to give you a better chance of keeping your highlights intact while better exposing the darkest areas.
In my seal scene, Active D-Lighting produced a brighter rendition of the darkest parts of the rocks and the seals, for example, and yet the color in the sky didn’t get blown out as it did when I captured the image with Active D-Lighting turned off. The highlights in the seal and in the rocks on the lower-right corner of the image also are toned down a tad in the Active D-Lighting version.
Active D-Lighting actually does its thing in two stages. First, it selects exposure settings that result in a slightly darker exposure than normal. This half of the equation guarantees that you retain details in your highlights. After you snap the photo, the camera brightens the darkest areas of the image. This adjustment rescues shadow detail.
In Auto, Scene, and Effects exposure modes, the camera decides how much Active D-Lighting adjustment is needed. In the P, S, A, and M modes, you can control the adjustment as follows:
![]()
![]() Information display control strip: After displaying the Information screen, press the Info Edit button to activate the control strip. Then highlight the Active D-Lighting option, as shown on the left in Figure 7-23, and press OK to get to the screen shown on the right in the figure. You can choose from Auto (the camera sets the adjustment amount), H* (extra high), H (high), N (normal), L (low), and Off. I used the Auto setting for my seal photo.
Information display control strip: After displaying the Information screen, press the Info Edit button to activate the control strip. Then highlight the Active D-Lighting option, as shown on the left in Figure 7-23, and press OK to get to the screen shown on the right in the figure. You can choose from Auto (the camera sets the adjustment amount), H* (extra high), H (high), N (normal), L (low), and Off. I used the Auto setting for my seal photo.
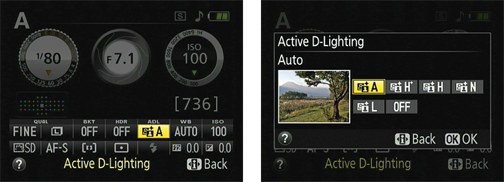
Figure 7-23: You can change the Active D-Lighting setting easily via the Information display control strip.
![]() Shooting menu: If you prefer menus to the control strip, you can adjust the Active D-Lighting adjustment from the Shooting menu, as shown in Figure 7-24.
Shooting menu: If you prefer menus to the control strip, you can adjust the Active D-Lighting adjustment from the Shooting menu, as shown in Figure 7-24.
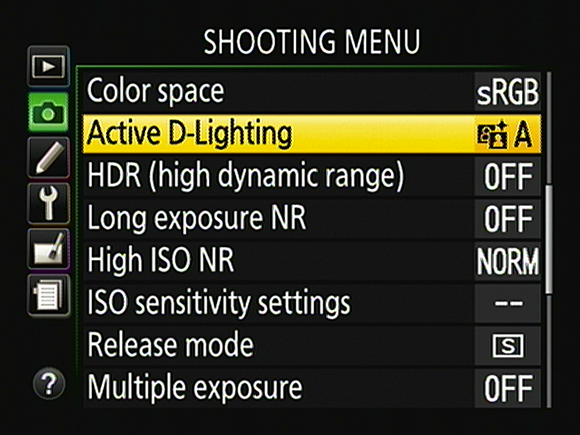
Figure 7-24: Or select the setting via the Shooting menu.
![]() You get the best Active D-Lighting results in matrix metering mode.
You get the best Active D-Lighting results in matrix metering mode.
![]() Active D-Lighting doesn’t work when the ISO is set to Hi 0.3 or above.
Active D-Lighting doesn’t work when the ISO is set to Hi 0.3 or above.
![]() In the M exposure mode, the camera doesn’t change your shutter speed or f-stop to achieve the darker exposure it needs for Active D-Lighting to work; instead, the meter readout guides you to select the right settings unless you have automatic ISO override enabled. In that case, the camera may instead adjust ISO to manipulate the exposure.
In the M exposure mode, the camera doesn’t change your shutter speed or f-stop to achieve the darker exposure it needs for Active D-Lighting to work; instead, the meter readout guides you to select the right settings unless you have automatic ISO override enabled. In that case, the camera may instead adjust ISO to manipulate the exposure.
![]() When you shoot in the M exposure mode or set the Metering mode to spot or center-weighted, the Auto Active D-Lighting setting produces the amount of adjustment that is applied by the Normal setting.
When you shoot in the M exposure mode or set the Metering mode to spot or center-weighted, the Auto Active D-Lighting setting produces the amount of adjustment that is applied by the Normal setting.
Auto is the default setting, but I prefer to keep this option set to Off so that I can decide for myself whether I want any adjustment rather than having the camera apply it to every shot. Even with a high-contrast scene that’s designed for the Active D-Lighting feature, you may decide that you prefer the contrasty look that results from disabling the option.
![]() If you’re not sure how much adjustment to apply, try Active D-Lighting bracketing, which automatically records the scene using different adjustment levels. See the last section in this chapter for details.
If you’re not sure how much adjustment to apply, try Active D-Lighting bracketing, which automatically records the scene using different adjustment levels. See the last section in this chapter for details.
Exploring high dynamic range (HDR) photography
In the past few years, many digital photographers have been experimenting with a technology called HDR photography. HDR stands for high dynamic range — again, dynamic range refers to the spectrum of brightness values that a camera or other imaging device can record.
The idea behind HDR is to capture the same shot multiple times, using different exposure settings for each image. You then use special imaging software, called tone mapping software, to combine the exposures in a way that uses specific brightness values from each shot. By using this process, you get a shot that contains a much higher dynamic range than the camera can capture in a single image.
The HDR feature built into your camera is designed to let you enjoy HDR photography without having to mess with any special software. When you enable the option, the camera records two images, each at different exposure settings, and then does the tone-mapping manipulation for you to produce a single HDR image.
So how is HDR different from Active D-Lighting — other than the fact that it records two photos instead of manipulating a single capture? Well, with the HDR feature, you can request an exposure shift that results in up to three stops difference between the two photos. That enables you to create an image that has a broader dynamic range than you can get with Active D-Lighting.
Figure 7-25 shows an example of the type of results you can expect. In this scene, half of the area is in bright sunshine, and the other is in shadow. For the top-left photo in the figure, I exposed for the highlights, which left the right side of the scene too dark. For the top-right image, I set exposure for the shaded area, which blew out the highlights in the sunny areas. With the HDR feature, I was able to produce the bottom image in the figure. The shadows aren’t completely eliminated, and some parts of the rose bush on the left side of the shot are a little brighter than I want, but on the whole, the camera balanced out the exposure fairly well.
Before you try the HDR feature, note these important points about its operation:
![]() Although the camera records two initial images, you wind up with just a single HDR photo. You can’t play back or access the original two shots.
Although the camera records two initial images, you wind up with just a single HDR photo. You can’t play back or access the original two shots.
![]() Because the camera is recording and merging two photos, the feature works well only on stationary subjects. If the subject is moving, it appears as two translucent forms in different areas in the merged frame.
Because the camera is recording and merging two photos, the feature works well only on stationary subjects. If the subject is moving, it appears as two translucent forms in different areas in the merged frame.
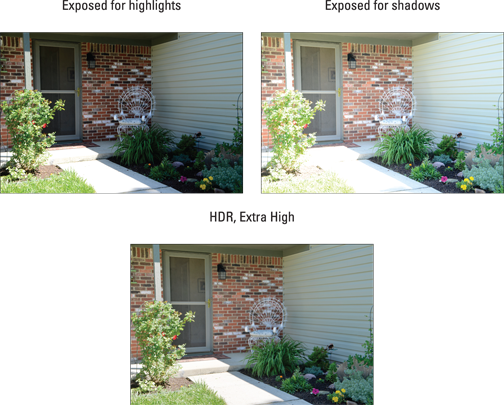
Figure 7-25: HDR enables you to produce an image with an even greater tonal range than Active D-Lighting.
![]() Use a tripod to make sure that you don’t move the camera between shots. Otherwise, the merged shots may not align properly.
Use a tripod to make sure that you don’t move the camera between shots. Otherwise, the merged shots may not align properly.
![]() You can’t use the HDR feature if you set the Image Quality option to Raw (NEF). It works only for photos that you capture in the JPEG format.
You can’t use the HDR feature if you set the Image Quality option to Raw (NEF). It works only for photos that you capture in the JPEG format.
![]() Flash isn’t compatible with the feature.
Flash isn’t compatible with the feature.
![]() You can choose from four levels of HDR exposure shift: Low, Normal, High, or Extra High. Choose Extra High for the 3-stop exposure maximum. I used this setting to produce the image in Figure 7-25.
You can choose from four levels of HDR exposure shift: Low, Normal, High, or Extra High. Choose Extra High for the 3-stop exposure maximum. I used this setting to produce the image in Figure 7-25.
If you select Auto, the camera chooses what it considers the best adjustment. However, when a Metering mode other than matrix is in effect, choosing Auto results in the same adjustment you get at the Normal setting.
![]() Finally, the feature disables itself automatically after your first two frames are captured and merged. That makes experimenting cumbersome because you have to continuously enable the feature each time you want to try different exposure settings or simply shoot another HDR frame. Annoying, to say the least.
Finally, the feature disables itself automatically after your first two frames are captured and merged. That makes experimenting cumbersome because you have to continuously enable the feature each time you want to try different exposure settings or simply shoot another HDR frame. Annoying, to say the least.
More critically, if you want to do “real” HDR imagery — and by that, I mean the type you see in photography and art magazines — you need to go beyond the two-frame, three-stop limitations of the in-camera HDR feature. Just to give you a point of comparison, Figure 7-26 shows an example that I created by blending five frames with a variation of five stops between frames. The first two images show you the brightest and darkest exposures; the bottom image shows the HDR composite.
On the other hand, the effect created by the camera’s HDR tool looks more realistic than mine because the tonal range isn’t stretched to such an extent. When applied to its extreme limits, HDR produces images that have something of a graphic-novel look. My example is pretty tame; some people might not even realize that any digital trickery has been involved. To me, it has the look of a hand-tinted photo.
And of course, even though the in-camera HDR tool may not be enough to produce the surreal HDR look that’s all the rage these days, you can still use your D5200 for HDR work — you just have to adjust the exposure settings yourself between shots and then merge the frames using your own HDR software. You should also shoot the images in the Raw format because HDR tone-mapping tools work best on Raw images, which contain more bits of picture data than JPEG files.
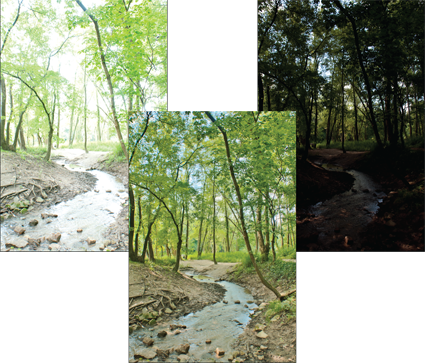
Figure 7-26: Using HDR software tools, I merged the brightest and darkest exposures (top) along with several intermediate exposures, to produce the composite image (bottom).
To sum up, the HDR feature is definitely worth investigating when you’re confronted with a high-contrast scene and want to see how much you can broaden the dynamic range of the shot. You can enable the feature in two ways:
![]()
![]() Information display control strip: Press the Info Edit button to activate the control strip. Highlight the HDR option, as shown on the left in Figure 7-27, and then press OK to display the settings shown on the right in the figure. Choose Extra High for the maximum, 3-step exposure shift.
Information display control strip: Press the Info Edit button to activate the control strip. Highlight the HDR option, as shown on the left in Figure 7-27, and then press OK to display the settings shown on the right in the figure. Choose Extra High for the maximum, 3-step exposure shift.

Figure 7-27: The fastest way to access the HDR feature is via the Information display control strip.
![]() Shooting menu: You also can set up your HDR shot via the Shooting menu, as shown in Figure 7-28.
Shooting menu: You also can set up your HDR shot via the Shooting menu, as shown in Figure 7-28.
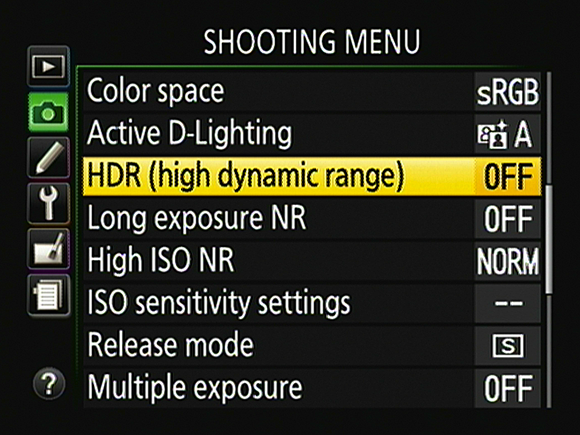
Figure 7-28: You also can enable HDR via the Shooting menu.
Investigating Advanced Flash Options
Sometimes, no amount of fiddling with aperture, shutter speed, and ISO produces a bright-enough exposure — in which case, you simply have to add more light. The built-in flash on your camera offers the most convenient solution, but you can also attach an external flash to the hot shoe, labeled in Figure 7-29. When you first take the camera out of the box, the contacts on the shoe are protected by a little cover; remove the cover to reveal the contacts, as shown in the figure, to attach a flash.
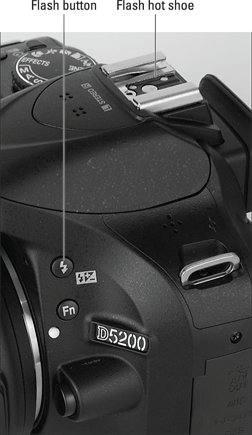
Figure 7-29: Press the Flash button to pop up the built-in flash in the P, S, A, and M exposure modes and in Food Scene mode.
How much flash control you have depends on your exposure mode:
![]() Auto, Scene, and Effects modes: With one exception, the Food Scene mode, these modes all feature automatic flash, meaning that in dim lighting, the camera automatically raises and fires the built-in flash (assuming that an external flash isn’t attached, in which case popping up the built-in flash would deliver a nasty punch in the nose). Regardless of whether you’re relying on the onboard flash or an external unit, you may be able to choose from a couple of Flash modes — including, in some instances, a mode that turns off the flash — but other flash controls are roped off. And certain Scene and Effects modes disable flash altogether.
Auto, Scene, and Effects modes: With one exception, the Food Scene mode, these modes all feature automatic flash, meaning that in dim lighting, the camera automatically raises and fires the built-in flash (assuming that an external flash isn’t attached, in which case popping up the built-in flash would deliver a nasty punch in the nose). Regardless of whether you’re relying on the onboard flash or an external unit, you may be able to choose from a couple of Flash modes — including, in some instances, a mode that turns off the flash — but other flash controls are roped off. And certain Scene and Effects modes disable flash altogether.
![]()
![]() P, S, A, and M modes and the Food Scene mode: In these modes, you control whether the flash fires. If you want to use the built-in flash, press the Flash button, also labeled in Figure 7-29. To go flashfree, just press the top of the flash unit gently down to close it.
P, S, A, and M modes and the Food Scene mode: In these modes, you control whether the flash fires. If you want to use the built-in flash, press the Flash button, also labeled in Figure 7-29. To go flashfree, just press the top of the flash unit gently down to close it.
Chapter 3 offers assistance with using the flash in the Auto and Scene modes; Chapter 10 discusses Effects modes. The rest of this chapter digs into features available in the advanced exposure modes.
![]() Nikon's United States website (
Nikon's United States website (www.nikonusa.com) offers some great tutorials on flash photography (as well as other subjects). Start in the Learn & Explore section of the site.
![]() A website completely dedicated to flash photography,
A website completely dedicated to flash photography, www.strobist.com, enables you to learn from and share with other photographers.
![]() You can find several good books detailing the entire Nikon flash system, which it calls the Creative Lighting System (CLS for short).
You can find several good books detailing the entire Nikon flash system, which it calls the Creative Lighting System (CLS for short).
![]() Chapter 9 of this book offers additional flash and lighting tips related to portraits and other specific types of photographs.
Chapter 9 of this book offers additional flash and lighting tips related to portraits and other specific types of photographs.
Choosing the right Flash mode
You can view the current Flash mode in the Information display control strip, in the area labeled in Figure 7-30. The single lightning bolt shown in the figure represents the standard Fill Flash (normal flash) mode. In the viewfinder, you see this symbol at the far right end of the data display, but it indicates only that flash is enabled and ready to fire. The symbol doesn’t change to reflect the current Flash mode.
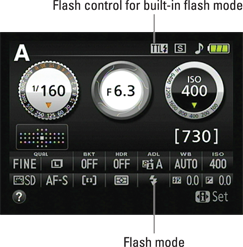
Figure 7-30: The current Flash mode appears in the Shooting Info display.
As for the Flash mode setting, you can change it in two ways:
![]()
![]() Press the Flash button as you rotate the Command dial. As soon as you press the button, the Flash mode option in the Information display control strip becomes selected, as shown in Figure 7-31. Keep the button pressed while rotating the dial to cycle through the available Flash modes.
Press the Flash button as you rotate the Command dial. As soon as you press the button, the Flash mode option in the Information display control strip becomes selected, as shown in Figure 7-31. Keep the button pressed while rotating the dial to cycle through the available Flash modes.
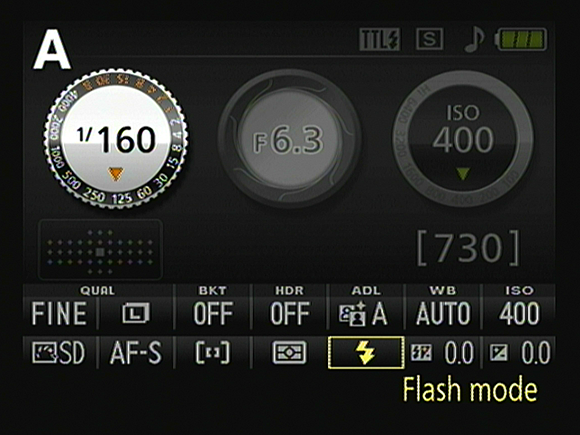
Figure 7-31: After raising the flash, press the Flash button while rotating the Command dial to change the Flash mode.
![]()
![]() Use the normal Information display control strip method. You know the drill: Press the Info Edit button, highlight the Flash mode option, and press OK to display a screen listing the mode settings, as shown in Figure 7-32. The available Flash modes depend on your exposure mode.
Use the normal Information display control strip method. You know the drill: Press the Info Edit button, highlight the Flash mode option, and press OK to display a screen listing the mode settings, as shown in Figure 7-32. The available Flash modes depend on your exposure mode.
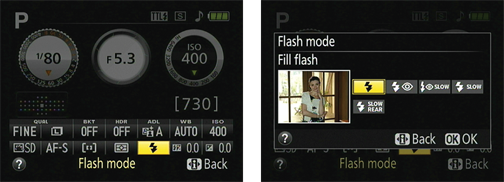
Figure 7-32: You also can adjust the Flash mode by using the normal control strip method; press the Info Edit button to activate the control strip.
The camera does give you a little auto-flash input though: You see a blinking question mark, flash symbol, or both in the viewfinder in the P, S, and A modes if the camera thinks you need flash, and the Information display also tells you that the scene is too dark. Press the Zoom Out button (the one with the question mark above it), and a message appears recommending that you use flash.
Fill Flash
![]() The Fill Flash setting is represented by the plain-old lightning-bolt symbol you see in the margin here. You can think of this setting as “normal flash” — at least in the way that most think of using a flash. You may also hear this mode called force flash because the flash fires no matter what the available light, unlike in the Auto Flash mode provided for the fully automatic exposure modes, in which the camera decides when flash is needed. In Fill Flash mode, the flash fires even in bright daylight — which, by the way, is sometimes a good idea.
The Fill Flash setting is represented by the plain-old lightning-bolt symbol you see in the margin here. You can think of this setting as “normal flash” — at least in the way that most think of using a flash. You may also hear this mode called force flash because the flash fires no matter what the available light, unlike in the Auto Flash mode provided for the fully automatic exposure modes, in which the camera decides when flash is needed. In Fill Flash mode, the flash fires even in bright daylight — which, by the way, is sometimes a good idea.
As an example, Figure 7-33 shows a floral image taken both with and without a flash. The small pop of light provided by the built-in flash is also extremely beneficial when shooting subjects that happen to be slightly shaded. For outdoor portraits, a flash is even more important to properly illuminate the face; the section on shooting still portraits in Chapter 9 discusses that subject and offers a look at the difference flash can make.
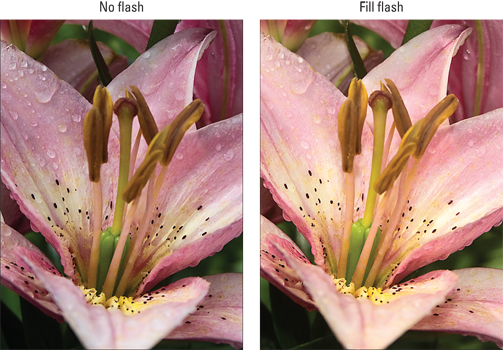
Figure 7-33: Adding flash resulted in better illumination and a slight warming effect.
![]() Colors may need tweaking when you mix light sources. When you combine multiple light sources, such as flash with daylight, colors may appear warmer or cooler than neutral. In Figure 7-33, colors became warmer with the addition of flash. For outdoor portraits, the warming effect is usually flattering, and I usually like the result with nature shots as well. But if you prefer a neutral color rendition, see the Chapter 8 section related to the White Balance control to find out how to address this issue. You can adjust white balance only in P, S, A, and M exposure modes.
Colors may need tweaking when you mix light sources. When you combine multiple light sources, such as flash with daylight, colors may appear warmer or cooler than neutral. In Figure 7-33, colors became warmer with the addition of flash. For outdoor portraits, the warming effect is usually flattering, and I usually like the result with nature shots as well. But if you prefer a neutral color rendition, see the Chapter 8 section related to the White Balance control to find out how to address this issue. You can adjust white balance only in P, S, A, and M exposure modes.
![]() Keep an eye on shutter speed. Because of the way the camera needs to synchronize the firing of the flash with the opening of the shutter, the fastest shutter speed you can use with the built-in flash is 1/200 second. In bright sun, you may need to stop down the aperture significantly or lower ISO, if possible, to avoid overexposing the image even at 1/200 second. As another option, you can place a neutral density filter over your lens; this accessory reduces the light that comes through the lens without affecting colors. Of course, if possible, you can simply move your subject into the shade.
Keep an eye on shutter speed. Because of the way the camera needs to synchronize the firing of the flash with the opening of the shutter, the fastest shutter speed you can use with the built-in flash is 1/200 second. In bright sun, you may need to stop down the aperture significantly or lower ISO, if possible, to avoid overexposing the image even at 1/200 second. As another option, you can place a neutral density filter over your lens; this accessory reduces the light that comes through the lens without affecting colors. Of course, if possible, you can simply move your subject into the shade.
On the flip side, the camera may select a shutter speed as slow as 1/60 second in the P and A modes, depending on the lighting conditions. So if your subject is moving, it’s a good idea to work in the S or M modes so that you control shutter speed.
![]() For close-ups, you may need to reduce flash power to avoid overexposing the subject. I find that at the default flash power, the built-in flash is almost always too strong. No worries — you can dial down the flash output via the Flash Compensation option, explained later in this chapter, in the section “Adjusting flash output.”
For close-ups, you may need to reduce flash power to avoid overexposing the subject. I find that at the default flash power, the built-in flash is almost always too strong. No worries — you can dial down the flash output via the Flash Compensation option, explained later in this chapter, in the section “Adjusting flash output.”
Red-Eye Reduction flash
Red-eye is caused when flash light bounces off a subject’s retinas and is reflected back to the camera lens. Red-eye is a human phenomenon, though; with animals, the reflected light usually glows yellow, white, or green, producing an image that looks like your pet is possessed by some demon.
Man or beast, this issue isn’t nearly the problem with the type of pop-up flash found on your D5200 as it is on non-SLR cameras. Its flash is positioned in such a way that the flash light usually doesn’t hit a subject’s eyes straight on, which lessens the chances of red-eye. However, red-eye may still be an issue when you use a lens with a long focal length (a telephoto lens) or you shoot subjects from a distance. Even then, the problem usually crops up only in dark settings — in outdoor shots and other brightly lit scenes, the pupils constrict in reaction to the light, lessening the chance of red-eye. And because of the bright light, the flash power needed to expose the picture is lessened, also helping eliminate red-eye.
![]() If you do notice red-eye, you can try the Red-Eye Reduction mode, represented by the icon shown in the margin here. In this mode, the AF-assist lamp on the front of the camera lights up briefly before the flash fires. The subject’s pupils constrict in response to the light, allowing less flash light to enter the eye and cause that glowing red reflection. Be sure to warn your subjects to wait for the flash, or they may step out of the frame or stop posing after they see the light from the AF-assist lamp.
If you do notice red-eye, you can try the Red-Eye Reduction mode, represented by the icon shown in the margin here. In this mode, the AF-assist lamp on the front of the camera lights up briefly before the flash fires. The subject’s pupils constrict in response to the light, allowing less flash light to enter the eye and cause that glowing red reflection. Be sure to warn your subjects to wait for the flash, or they may step out of the frame or stop posing after they see the light from the AF-assist lamp.
For an even better solution, try the flash-free portrait tips covered in Chapter 9. If you do a lot of portrait work that requires flash, you may also want to consider an external flash unit, which enables you to aim the flash light in ways that virtually eliminate red-eye.
If all else fails, check out Chapter 10, which shows you how to use the built-in red-eye removal tool on your camera’s Retouch menu. Sadly, though, this feature removes only red-eye, not the yellow/green/white eye that you get with animal portraits.
Slow-Sync and Rear-Sync flash
In Fill Flash and Red-Eye Reduction Flash modes, the flash and shutter are synchronized so that the flash fires at the exact moment the shutter opens.
Your D5200 also offers four special sync modes, which work as follows:
![]()
![]() Slow-Sync: This mode, available only in the P and A exposure modes, also uses front-curtain sync but allows a shutter speed slower than the 1/60 second minimum that’s in force when you use Fill Flash and Red-Eye Reduction flash.
Slow-Sync: This mode, available only in the P and A exposure modes, also uses front-curtain sync but allows a shutter speed slower than the 1/60 second minimum that’s in force when you use Fill Flash and Red-Eye Reduction flash.
The benefit of this longer exposure is that the camera has time to absorb more ambient light, which in turn has two effects: Background areas that are beyond the reach of the flash appear brighter; and less flash power is needed, resulting in softer lighting.
 The downside of the slow shutter speed is, well, the slow shutter speed. As discussed earlier in this chapter, the longer the exposure time, the more you have to worry about blur caused by movement of your subject or your camera. A tripod is essential to a good outcome, as are subjects that can hold very, very still. I find that the best practical use for this mode is shooting nighttime still-life subjects like the one you see in Figure 7-34. However, if you’re shooting a nighttime portrait and you have a subject that can maintain a motionless pose, slow-sync flash can produce softer, more flattering light. Again, the portrait section of Chapter 9 offers an example.
Some photographers, on the other hand, turn the downside of slow-sync flash to an upside, using it to purposely blur their subjects. The idea is to use the blur to emphasize motion.
 Note that even though the official Slow-Sync mode appears only in the P and A exposure modes, you can get the same result in the M and S modes by simply using a slow shutter speed and the normal, Fill Flash mode. You can use a shutter speed as slow as 30 seconds when using flash in those modes. In fact, I prefer using those modes when I want the slow-sync look because I can directly control shutter speed.
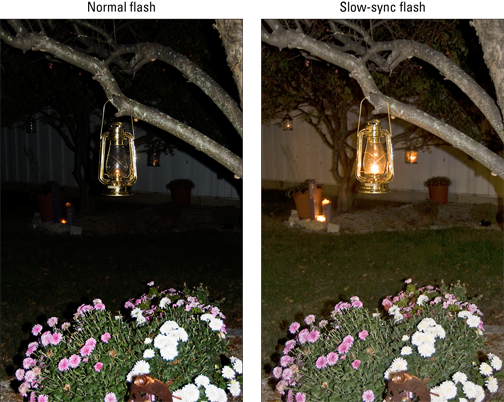
Figure 7-34: Slow-sync flash produces softer, more even lighting than normal flash in nighttime pictures.
![]()
![]() Rear-Curtain Sync: In this mode, available only in shutter-priority (S) and manual (M) exposure modes, the flash fires at the very end of the exposure, just before the shutter closes. The classic use of this mode is to combine the flash with a slow shutter speed to create trailing-light effects like the one you see in Figure 7-35. With Rear-Curtain Sync, the light trails extend behind the moving object (my hand, and the match, in this case), which makes visual sense. If instead you use slow-sync flash, the light trails appear in front of the moving object.
Rear-Curtain Sync: In this mode, available only in shutter-priority (S) and manual (M) exposure modes, the flash fires at the very end of the exposure, just before the shutter closes. The classic use of this mode is to combine the flash with a slow shutter speed to create trailing-light effects like the one you see in Figure 7-35. With Rear-Curtain Sync, the light trails extend behind the moving object (my hand, and the match, in this case), which makes visual sense. If instead you use slow-sync flash, the light trails appear in front of the moving object.
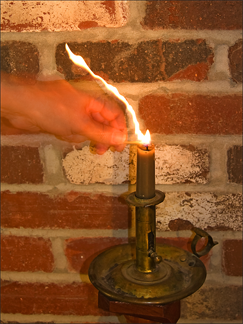
Figure 7-35: I used Rear-Curtain Sync Flash to create this candle-lighting image.
You can set the shutter speed as low as 30 seconds and as high as 1/200 second in this Flash mode.
![]() Slow-Sync with Rear-Curtain Sync: Hey, not confusing enough for you yet? This mode enables you to produce the same motion trail effects as with Rear-Curtain Sync, but in the P and A exposure modes. The camera automatically chooses a slower shutter speed than normal after you set the f-stop, just as with regular Slow-Sync mode.
Slow-Sync with Rear-Curtain Sync: Hey, not confusing enough for you yet? This mode enables you to produce the same motion trail effects as with Rear-Curtain Sync, but in the P and A exposure modes. The camera automatically chooses a slower shutter speed than normal after you set the f-stop, just as with regular Slow-Sync mode.
Note that as you scroll through the available Flash modes, the symbol for this mode initially shows just the flash symbol and the word Rear; after you finish selecting the setting, the label changes to Slow Rear.
![]() Slow-Sync with Red-Eye Reduction: In P and A exposure modes, you can also combine a slow-sync flash with the red-eye reduction feature. Given the potential for blur that comes with a slow shutter, plus the potential for subjects to mistake the prelight from the AF-assist lamp for the real flash and walk out of the frame before the image is actually recorded, I vote this Flash mode as the most difficult to pull off successfully.
Slow-Sync with Red-Eye Reduction: In P and A exposure modes, you can also combine a slow-sync flash with the red-eye reduction feature. Given the potential for blur that comes with a slow shutter, plus the potential for subjects to mistake the prelight from the AF-assist lamp for the real flash and walk out of the frame before the image is actually recorded, I vote this Flash mode as the most difficult to pull off successfully.
All these modes are somewhat tricky to use successfully, however. So have fun playing around, but at the same time, don’t feel too badly if you don’t have time right now to master these modes plus all the other exposure options presented to you in this chapter. In the meantime, search the web for slow-sync and rear-sync image examples if you want to get a better idea of the special effects that other photographers create with these Flash modes.
Adjusting flash output
This feature works just like Exposure Compensation, discussed earlier in the chapter, except that it enables you to override the camera’s flash-power decision instead of its autoexposure decision. As with Exposure Compensation, the Flash Compensation settings are stated in terms of EV (exposure value) numbers. A setting of 0.0 indicates no flash adjustment; you can increase the flash power to EV +1.0 or decrease it to EV –3.0.
As an example of the benefit of this feature, look at the carousel images in Figure 7-36. The first image shows you a flash-free shot. Clearly, I needed a flash to compensate for the fact that the horses were shadowed by the roof of the carousel. But at normal flash power, as shown in the middle image, the flash was too strong, creating glare in some spots and blowing out the highlights in the white mane. By dialing the flash power down to EV –0.7, I got a softer flash that straddled the line perfectly between no flash and too much flash.
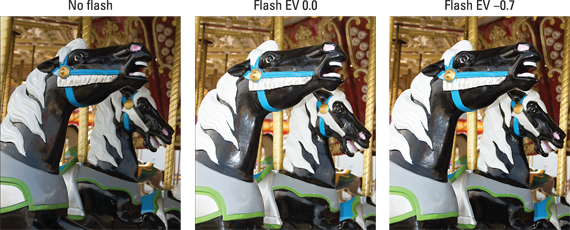
Figure 7-36: When normal flash output is too strong, dial in a lower Flash Compensation setting.
As for boosting the flash output, well, you may find it necessary on some occasions, but don’t expect the built-in flash to work miracles even at a Flash Compensation of +1.0. Any built-in flash has a limited range, and you simply can’t expect the flash light to reach faraway objects. In other words, don’t even try taking flash pictures of a darkened recital hall from your seat in the balcony — all you’ll wind up doing is annoying everyone.
The current Flash Compensation setting appears in the Information display, in the area highlighted in Figure 7-37. Don’t confuse the setting with the neighboring Exposure Compensation setting, also labeled in the figure. (The flash symbol in the Flash Compensation icon is the key reminder to which setting does what.)
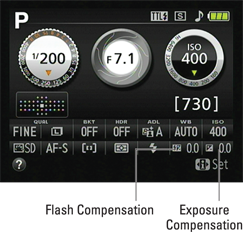
Figure 7-37: The Flash Compensation setting lives just next door to the Exposure Compensation setting.
To adjust the amount of Flash Compensation, you have two options:
![]()
![]()
![]() Use the two-button plus Command dial maneuver. First, press the Flash button to pop up the built-in flash. Then press and hold the Flash button and the Exposure Compensation button simultaneously. When you press the buttons, you see the screen shown in Figure 7-38. In the viewfinder, the current setting takes the place of the usual frames remaining value. While keeping both the buttons pressed, rotate the Command dial to adjust the setting. I find that any technique that involves coordinating this many fingers a little complex, but you may find it easier than I do.
Use the two-button plus Command dial maneuver. First, press the Flash button to pop up the built-in flash. Then press and hold the Flash button and the Exposure Compensation button simultaneously. When you press the buttons, you see the screen shown in Figure 7-38. In the viewfinder, the current setting takes the place of the usual frames remaining value. While keeping both the buttons pressed, rotate the Command dial to adjust the setting. I find that any technique that involves coordinating this many fingers a little complex, but you may find it easier than I do.
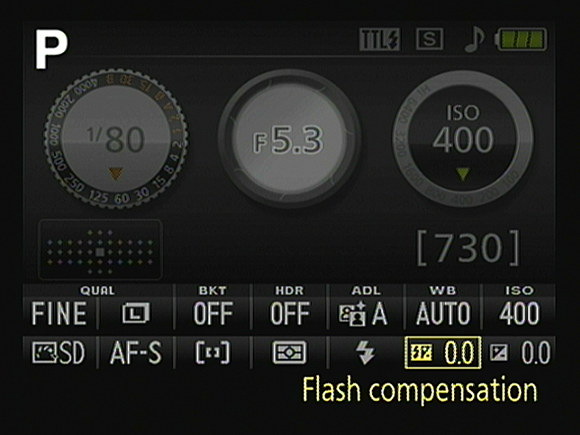
Figure 7-38: Rotate the Command dial while pressing the Flash and Exposure Compensation buttons to adjust flash power.
![]()
![]() Use the Information display control strip. Just bring up the Shooting Info display, press the Info Edit button to activate the control strip, and highlight the Flash Compensation setting, as shown on the left in Figure 7-39. Press OK to display a screen where you can set the flash power, as shown in the second screen of the figure. Press the Multi Selector up or down to change the setting and then press OK. Give the shutter button a quick half-press and release to exit the control strip and return to shooting.
Use the Information display control strip. Just bring up the Shooting Info display, press the Info Edit button to activate the control strip, and highlight the Flash Compensation setting, as shown on the left in Figure 7-39. Press OK to display a screen where you can set the flash power, as shown in the second screen of the figure. Press the Multi Selector up or down to change the setting and then press OK. Give the shutter button a quick half-press and release to exit the control strip and return to shooting.
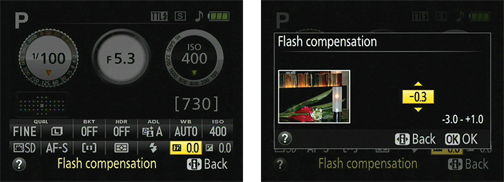
Figure 7-39: You also can adjust the setting by using the normal Information display control strip method.
Controlling flash output manually
If you’re experienced in the way of the flash, you can manually set the flash output instead of letting the camera dictate the right amount of flash light. Just open the Custom Setting menu, choose Bracketing/Flash, press OK, and then choose Flash Cntrl for Built-In Flash, as shown on the left in Figure 7-40. Press OK, select Manual, as shown on the right, and press the Multi Selector right again to display the available settings. Your options are from Full power to 1/32 power.
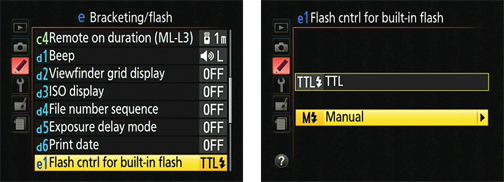
Figure 7-40: Through this option, you can control the flash output manually.
When flash is set to manual control, the TTL icon that normally appears in the top-right corner of the Information display (refer to Figure 7-30) is replaced by a blinking letter M. In the viewfinder, an icon that looks like the Shooting Info screen’s Flash Compensation icon (a lightning bolt with a plus-minus sign) blinks. If you want to get really tricky, you can employ Flash Compensation even with manual flash control.
Bracketing Exposures
Many photographers use exposure bracketing to ensure that at least one shot of a subject is properly exposed. Bracketing simply means to shoot the same subject multiple times, slightly varying the exposure settings for each image.
In the P, S, A, and M exposure modes, your camera offers automatic bracketing. When you enable this feature, your only job is to press the shutter button to record the shots; the camera automatically adjusts the exposure settings between each image. This feature is especially helpful for situations where you don’t have time to review images and adjust exposure settings between shots. The D5200, however, takes things one step further than most cameras that offer automatic bracketing, enabling you to bracket not just basic exposure, but also Active D-Lighting or white balance.
Chapter 8 explains how to use the white-balance bracketing option. To try your hand at exposure or Active D-Lighting bracketing, follow these steps:
1. Set your camera to the P, S, A, or M exposure mode.
You can’t take advantage of the feature in any other modes.
2. Display the Custom Setting menu, highlight Bracketing/Flash, and press OK.
3. Select Auto Bracketing Set, as shown on the left in Figure 7-41, and press OK.
You see the options shown on the right in the figure. This screen is where you tell the camera whether you want to bracket exposure (AE), white balance (WB), or Active D-Lighting (ADL). Note that even though the first option is called AE (for autoexposure), it enables you to bracket exposure in M (manual exposure) mode just the same.
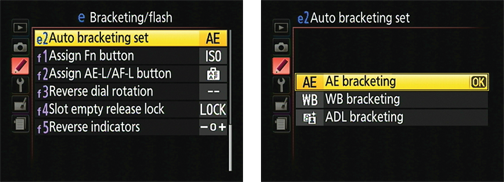
Figure 7-41: Before enabling auto bracketing, select the feature you want the camera to adjust between shots.
4. Select the desired bracketing option and press OK.
5. Use the Information display control strip to specify the bracketing increment.
![]() Press the Info Edit button to activate the control strip, highlight the BKT setting, as shown on the left in Figure 7-42, and press OK to display the second screen in the figure. The available settings depend on the feature you’re bracketing (exposure or Active D-Lighting), as follows:
Press the Info Edit button to activate the control strip, highlight the BKT setting, as shown on the left in Figure 7-42, and press OK to display the second screen in the figure. The available settings depend on the feature you’re bracketing (exposure or Active D-Lighting), as follows:
• For exposure bracketing, the settings control the amount of exposure shift between frames. The settings are based on Exposure Compensation values. For example, if you choose 0.7 for an autoexposure bracketing set, the camera makes three exposures, one with exposure values as metered by the camera, one exposure with EV +0.7, and one exposure with EV –0.7 Your choices are from 0.3 EV to 2.0 EV. Choosing Off disables bracketing.
• For Active D-Lighting bracketing, you get only two options: ADL and Off. Select ADL. (This option is a little weird — if you select Off, you just disable bracketing.)
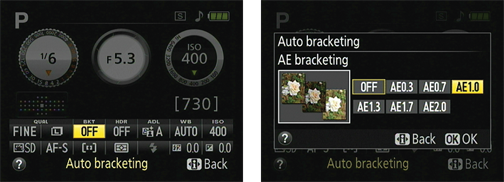
Figure 7-42: Set the bracketing amount through the Information display control strip.
6. After selecting the bracketing increment, press OK to return to the control strip.
To exit the control strip, press the Info Edit button again or give the shutter button a quick half-press and release it.
7. Shoot your first bracketed series.
Remember, for autoexposure bracketing, a series consists of three shots. For Active D-Lighting, the camera records only two shots per series.
 When bracketing is enabled, the exposure meter in the Information display offers a bracketing indicator, as shown in Figure 7-43. That’s a pretty technical way of saying, “Little bars appear under the meter, each one representing one shot in your bracketed series.” The indicator updates after each picture to show you how many more shots are left in the series. For example, the middle bar represents your first shot; after you take your first picture, it disappears. You then see one or two bars — and thus, one or two shots left to shoot — depending on whether you’re bracketing exposure or Active D-Lighting. A little label on top of the meter reminds you which feature you’re bracketing — AE (autoexposure) bracketing, in the figure.
![]() You can speed up things when bracketing exposures if you specify Continuous Low or Continuous High for the Release mode. When you press the shutter, the camera takes three exposures using the setting you specify in Step 5. To change the Release mode, press the Release mode button or select Release Mode from the Shooting menu. See Chapter 2 for details about using the continuous Release modes.
You can speed up things when bracketing exposures if you specify Continuous Low or Continuous High for the Release mode. When you press the shutter, the camera takes three exposures using the setting you specify in Step 5. To change the Release mode, press the Release mode button or select Release Mode from the Shooting menu. See Chapter 2 for details about using the continuous Release modes.
8. To disable bracketing, repeat Step 5 and select Off from the second screen shown in Figure 7-43.
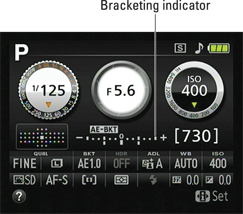
Figure 7-43: The bars under the meter tell you which frame of the bracketed series you’re about to shoot.
Don’t be put off by the length of these steps, by the way. Although describing the feature takes quite a few words, using bracketing really isn’t all that complicated. Bracketing is a wonderful way to hedge your bet, especially when you’re taking pictures of a place you may never visit again, or experiencing a once-in-a-lifetime photo opportunity such as your son’s first birthday party.

