![]()
2
Choosing Basic Picture Settings
In This Chapter
![]() Spinning the Mode dial
Spinning the Mode dial
![]() Changing the shutter-release mode
Changing the shutter-release mode
![]() Taking advantage of automated time-lapse photography
Taking advantage of automated time-lapse photography
![]() Choosing the right Image Size (resolution) setting
Choosing the right Image Size (resolution) setting
![]() Understanding the Image Quality setting: JPEG or Raw?
Understanding the Image Quality setting: JPEG or Raw?
Every camera manufacturer strives to provide a good out-of-box experience — that is, to ensure that your initial encounter with the camera is a happy one. To that end, the camera’s default settings are selected to make it as easy as possible for you to take a good picture the first time you press the shutter button. On the D5200, the default settings are designed to let you take a picture the same way you do using automatic, point-and-shoot cameras: Just compose the shot, press the shutter button halfway to set focus and exposure, and then press the button the rest of the way to record the image.
Although the default settings deliver nice pictures in many cases, they don’t produce optimal results in every situation. You may be able to take a decent portrait using the default setup, for example, but probably need to tweak a few settings to capture action. Adjusting a few settings can help turn that decent portrait into a stunning one, too.
So that you can start fine-tuning camera settings to your subject, this chapter explains the most basic picture-taking options, such as the exposure mode, shutter-release mode, and the image size and quality. They’re not the most exciting options (don’t think I didn’t notice you stifling a yawn), but they make a big difference in how easily you can capture the photo you have in mind.
Note: Information in this chapter applies to still photography. For details on movie settings, see Chapter 4.
Choosing an Exposure Mode
The first picture-taking setting to consider is the exposure mode, which you select via the Mode dial, shown in Figure 2-1. Your choice determines how much control you have over two critical exposure settings — aperture and shutter speed — as well as many other options, including those related to color and flash photography.
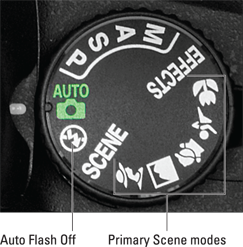
Figure 2-1: The Mode dial determines how much input you have over exposure, color, and other picture options.
Your exposure mode choices break down as follows:
![]() Fully automatic modes: For people who haven’t yet explored photography concepts such as aperture and shutter speed — or who just aren’t interested in going there — the D5200 offers the following point-and-shoot modes:
Fully automatic modes: For people who haven’t yet explored photography concepts such as aperture and shutter speed — or who just aren’t interested in going there — the D5200 offers the following point-and-shoot modes:
• Auto: The camera analyzes the scene and tries to select the most appropriate settings to capture the image.
• Auto Flash Off: This mode, represented by the icon labeled in Figure 2-1, works just like Auto but disables flash.
• Scene modes: The D5200 offers 16 automatic modes geared to capturing specific types of scenes: portraits, landscapes, child photos, and such. The five most commonly used modes — Portrait, Landscape, Child, Sports, and Close Up — have their own positions on the Mode dial; they’re the ones represented by the pictographs and labeled “Primary Scene modes” in Figure 2-1. You access the others by setting the dial to Scene and then rotating the Command dial to choose the scene type.
• Effects: This mode works like Auto except that the camera applies one of seven special effects to the image as it writes the picture data to the memory card.
Chapter 3 provides details about using the Auto, Auto Flash Off, and Scene modes; Chapter 10 discusses the Effects mode.
 For any of these modes, understand that because they’re designed to make picture-taking simple, they prevent you from accessing many camera features. You can’t use the White Balance control, for example, to tweak picture colors. Options that are off-limits appear dimmed in the camera menus and Information display. If you press a button that leads to an advanced setting, either nothing happens or the monitor displays a message telling you that the option is unavailable.
![]() Semi-automatic modes: To take more creative control but still get some exposure assistance from the camera, choose one of these modes:
Semi-automatic modes: To take more creative control but still get some exposure assistance from the camera, choose one of these modes:
• P (programmed autoexposure): The camera selects the aperture and shutter speed necessary to ensure a good exposure. But you can choose from different combinations of the two to vary the creative results. For example, shutter speed affects whether moving objects appear blurry or sharp. So you might use a fast shutter speed to freeze action, or you might go the other direction, choosing a shutter speed slow enough to blur the action, creating a heightened sense of motion.
• S (shutter-priority autoexposure): You select the shutter speed, and the camera selects the proper aperture to properly expose the image. This mode is ideal for capturing sports or other moving subjects because it gives you direct control over shutter speed.
• A (aperture-priority autoexposure): In this mode, you choose the aperture, and the camera automatically chooses a shutter speed to properly expose the image. Because aperture affects depth of field, or the distance over which objects in a scene remain acceptably sharp, this setting is great for portraits because you can select an aperture that results in a soft, blurry background, putting the emphasis on your subject. For landscape shots, on the other hand, you might choose an aperture that keeps the entire scene sharply focused so that both near and distant objects have equal visual weight.
 These semi-auto modes give you complete access to all camera features. So even if you’re not ready to explore aperture and shutter speed, go ahead and set the mode dial to P if you need to access a setting that’s off-limits in the fully automated modes. The camera then operates pretty much as it does in Auto mode but without limiting your ability to control picture settings if you need to do so.
When you’re ready to dig into exposure issues and try these exposure modes, head for Chapter 7.
![]() Manual: In this mode, represented by the letter M on the Mode dial, you select both the aperture and shutter speed. But the camera still offers an assist by displaying an exposure meter to help you dial in the right settings. See Chapter 7 for details. You have complete control over all other picture settings, too.
Manual: In this mode, represented by the letter M on the Mode dial, you select both the aperture and shutter speed. But the camera still offers an assist by displaying an exposure meter to help you dial in the right settings. See Chapter 7 for details. You have complete control over all other picture settings, too.
Choosing the Release Mode
By default, the camera captures a single image each time you press the shutter button. You can vary this behavior by changing the Release mode setting. For example, you can set the camera to Self-Timer mode so that you can press the shutter button and then run in front of the camera and be part of the picture. Or you can switch to one of two continuous-release modes, both of which record a burst of images as long as you hold down the shutter button — a great feature for photographing a fast-moving subject.
Upcoming sections detail each Release Mode. But first, acquaint yourself with the nuts and bolts of changing the setting: Start by checking the Information display, which contains an icon representing the current Release mode. Figure 2-2 shows you where to look.
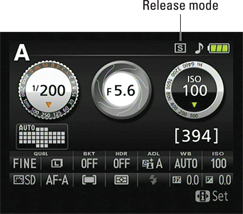
Figure 2-2: This S represents the Single Frame shutter-release option, which produces one picture for each press of the shutter button.
To adjust the setting, you can use either of these methods:
![]()
![]() Release mode button: Press this button, labeled on the left in Figure 2-3, to display the screen shown on the right in the figure. The selected setting is highlighted and appears with its name and a photo that’s supposed to suggest the type of image that is appropriate for the setting. Use the Multi Selector to highlight the setting you want to use and then press OK to lock in your choice, exit the selection screen, and return to the Information display.
Release mode button: Press this button, labeled on the left in Figure 2-3, to display the screen shown on the right in the figure. The selected setting is highlighted and appears with its name and a photo that’s supposed to suggest the type of image that is appropriate for the setting. Use the Multi Selector to highlight the setting you want to use and then press OK to lock in your choice, exit the selection screen, and return to the Information display.
![]() Shooting menu: Scroll to the second page of the menu to find the setting, as shown in Figure 2-4.
Shooting menu: Scroll to the second page of the menu to find the setting, as shown in Figure 2-4.

Figure 2-3: Pressing the Release Mode button (left) is the fastest way to access the Release mode setting (right).
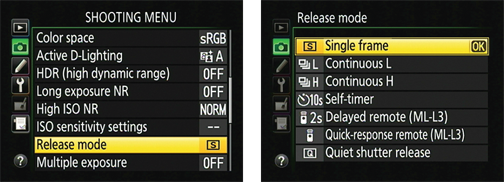
Figure 2-4: The Release Mode option is also found on the second page of the Shooting menu.
Single Frame and Quiet Shutter Release modes
![]() At the default Release mode setting, Single Frame, you get one picture each time you press the shutter button. In other words, this is normal-photography mode. The only other thing you need to know is that you must press the shutter button in two stages for autoexposure and autofocusing to work correctly: Press the button halfway, pause to let the camera set focus and exposure, and then press the rest of the way to take the picture.
At the default Release mode setting, Single Frame, you get one picture each time you press the shutter button. In other words, this is normal-photography mode. The only other thing you need to know is that you must press the shutter button in two stages for autoexposure and autofocusing to work correctly: Press the button halfway, pause to let the camera set focus and exposure, and then press the rest of the way to take the picture.
![]() Quiet Shutter Release mode works just like Single Frame mode but makes less noise as it goes about its business. Designed for situations when you want the camera to be as silent as possible, this mode disables the beep that the autofocus system normally sounds when it achieves focus. (If you prefer, you can disable the beep for all Release modes through the Beep option on the Shooting/Display section of the Custom Setting menu.)
Quiet Shutter Release mode works just like Single Frame mode but makes less noise as it goes about its business. Designed for situations when you want the camera to be as silent as possible, this mode disables the beep that the autofocus system normally sounds when it achieves focus. (If you prefer, you can disable the beep for all Release modes through the Beep option on the Shooting/Display section of the Custom Setting menu.)
Additionally, Quiet Shutter Release mode affects the operation of the internal mirror that causes the scene coming through the lens to be visible in the viewfinder. Normally, the mirror flips up when you press the shutter button and then flips back down after the shutter opens and closes. This mirror movement makes some noise. In Quiet Shutter Release mode, you can prevent the mirror from flipping back down by keeping the shutter button fully pressed after the shot. This feature enables you to delay the final mirror movement and its accompanying sound to a moment when the noise won’t be objectionable.
Continuous (burst mode) shooting
Setting the Release mode dial to Continuous Low or Continuous High enables shooting in burst mode. That is, the camera records a continuous series of images for as long as you hold down the shutter button, making it easier to capture fast-paced action.
Here’s how the two modes differ:
![]()
![]() Continuous Low: At this setting, the camera can capture a maximum of 3 frames per second (fps).
Continuous Low: At this setting, the camera can capture a maximum of 3 frames per second (fps).
![]()
![]() Continuous High: This mode works just like Continuous Low except that it records about 5 frames per second.
Continuous High: This mode works just like Continuous Low except that it records about 5 frames per second.
Why capture fewer than the maximum number of shots? Well, unless you’re shooting something that’s moving at a really fast pace, not too much is going to change between frames when you shoot at 5 fps. So, when you use Continuous High, you typically wind up with lots of shots that show the exact same thing, wasting space on your memory card. For all but the fastest action, Continuous Low usually gives you plenty of frames to capture the shot without the unnecessary file bloat.
![]() If flash is enabled, you get one shot per each press of the shutter button, as in Single Frame mode. Continuous mode doesn’t work with flash because the time that the flash needs to recycle between shots slows down the capture rate too much.
If flash is enabled, you get one shot per each press of the shutter button, as in Single Frame mode. Continuous mode doesn’t work with flash because the time that the flash needs to recycle between shots slows down the capture rate too much.
![]() Images are stored temporarily in the memory buffer. The camera has some internal memory — a buffer — where it stores picture data until it has time to record the entire photo to the memory card. The number of pictures the buffer can hold depends on certain camera settings, such as resolution and file type (JPEG or Raw). The viewfinder displays an estimate of how many pictures will fit in the buffer; see the sidebar “What does [r24] in the viewfinder mean?” later in this chapter, for details.
Images are stored temporarily in the memory buffer. The camera has some internal memory — a buffer — where it stores picture data until it has time to record the entire photo to the memory card. The number of pictures the buffer can hold depends on certain camera settings, such as resolution and file type (JPEG or Raw). The viewfinder displays an estimate of how many pictures will fit in the buffer; see the sidebar “What does [r24] in the viewfinder mean?” later in this chapter, for details.
 After shooting a burst of images, wait for the memory card access light to go out before turning off the camera. (The light is in the lower-right corner of the camera back, just above the Delete button.) That’s your signal that the camera has moved all data from the buffer to the memory card. Turning off the camera before that happens may corrupt the image file.
![]() Your mileage may vary. The maximum number of frames per second is an approximation. The actual number depends on a number of factors, including shutter speed. Additionally, although you can capture as many as 100 frames in a single burst, the frame rate can drop if the buffer gets full.
Your mileage may vary. The maximum number of frames per second is an approximation. The actual number depends on a number of factors, including shutter speed. Additionally, although you can capture as many as 100 frames in a single burst, the frame rate can drop if the buffer gets full.
Self-timer shooting
![]() You’re no doubt familiar with the Self-Timer Release mode, which delays the shutter release for a few seconds after you press the shutter button, giving you time to dash into the picture. Here’s how it works on the D5200: After you press the shutter button, the AF-assist lamp on the front of the camera starts to blink, and the camera emits a series of beeps (assuming that you didn’t disable its voice via the Beep option on the Custom Setting menu). A few seconds later, the camera captures the image.
You’re no doubt familiar with the Self-Timer Release mode, which delays the shutter release for a few seconds after you press the shutter button, giving you time to dash into the picture. Here’s how it works on the D5200: After you press the shutter button, the AF-assist lamp on the front of the camera starts to blink, and the camera emits a series of beeps (assuming that you didn’t disable its voice via the Beep option on the Custom Setting menu). A few seconds later, the camera captures the image.
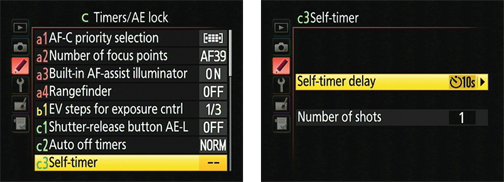
Figure 2-5: You can adjust the self-timer capture delay and the number of frames taken at a time via the Custom Setting menu.
![]() Self-Timer Delay: Choose a delay time of 2, 5, 10, or 20 seconds. The selected delay time appears with the Self-Timer symbol in the Information display.
Self-Timer Delay: Choose a delay time of 2, 5, 10, or 20 seconds. The selected delay time appears with the Self-Timer symbol in the Information display.
![]() Number of Shots: Specify how many frames you want to capture with each press of the shutter button; the maximum is nine frames. When you opt for recording multiple frames, shots are taken at 4-second intervals.
Number of Shots: Specify how many frames you want to capture with each press of the shutter button; the maximum is nine frames. When you opt for recording multiple frames, shots are taken at 4-second intervals.
![]() Using flash disables the multiple frames recording option. If you enable flash, the camera records just a single image, regardless of the Number of Shots setting.
Using flash disables the multiple frames recording option. If you enable flash, the camera records just a single image, regardless of the Number of Shots setting.
![]() After the specified number of shots are captured, the camera resets the Release mode to Single Frame, Quiet, or Continuous Low or High. Turning off the camera also resets the release mode. Either way, the camera selects the Release mode you used before Self-Timer mode.
After the specified number of shots are captured, the camera resets the Release mode to Single Frame, Quiet, or Continuous Low or High. Turning off the camera also resets the release mode. Either way, the camera selects the Release mode you used before Self-Timer mode.
![]() Cover the viewfinder if possible during self-timer shooting. Otherwise, light may seep into the camera through the viewfinder and affect exposure. Your camera comes with a viewfinder cover made just for this purpose. Remove the rubber cover that surrounds the viewfinder and then insert the cover in its place. (Orient the cover with the word Nikon facing the camera.)
Cover the viewfinder if possible during self-timer shooting. Otherwise, light may seep into the camera through the viewfinder and affect exposure. Your camera comes with a viewfinder cover made just for this purpose. Remove the rubber cover that surrounds the viewfinder and then insert the cover in its place. (Orient the cover with the word Nikon facing the camera.)
Wireless remote-control modes
The final two Release mode settings relate to the optional Nikon ML-L3 wireless remote-control unit and work as follows:
![]()
![]() Delayed Remote: After you press the shutter-release button on the remote unit, the AF-assist lamp blinks for about two seconds, and then the camera takes the picture.
Delayed Remote: After you press the shutter-release button on the remote unit, the AF-assist lamp blinks for about two seconds, and then the camera takes the picture.
![]()
![]() Quick Response Remote: The image is captured immediately. In this mode, the AF-assist lamp blinks after the shot is taken.
Quick Response Remote: The image is captured immediately. In this mode, the AF-assist lamp blinks after the shot is taken.
After choosing the remote setting you want to use, aim the remote control at one of the camera’s two infrared sensors. One is located on the back of the camera; the other, on the front. Figure 2-6 points out both sensors.
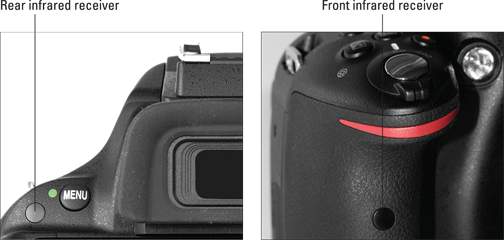
Figure 2-6: When using the optional wireless remote control, aim the unit at one of these two sensors.
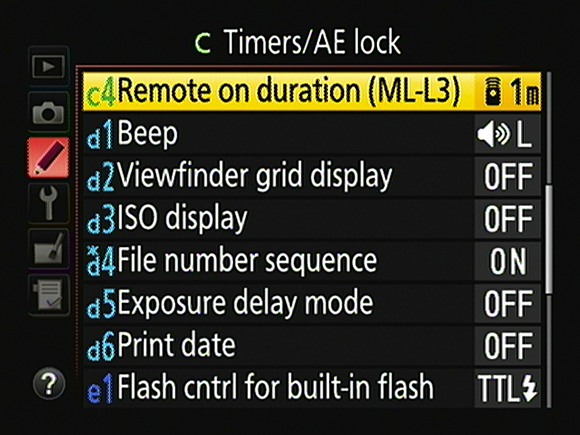
Figure 2-7: Set preferences for wireless remote shutter release via this menu option.
One final note: As with self-timer shooting, it’s a good idea to cover the viewfinder when you’re using these modes to prevent exposure problems that can be caused by light entering the camera through the viewfinder. The best option is to replace the rubber eyepiece that surrounds the viewfinder with the viewfinder cover that ships with the camera.
Investigating other shutter-release options
In addition to the official Release mode setting, your camera offers two related features, Exposure Delay Mode and Interval Timer Shooting. The first is designed to help eliminate picture-blurring camera shake; the second, to enable automated time-lapse photography. Check ’em out in the next two sections.
Exposure Delay Mode
One component of the optical system of a dSLR camera is a tiny mirror that moves every time you press the shutter button. The small vibration caused by the mirror action — sometimes referred to as mirror slap — can result in slight blurring of the image when you use a very slow shutter speed, shoot with a long telephoto lens, or take extreme close-up shots.
To cope with that issue, some cameras offer mirror-lockup shooting, which delays opening the shutter until after the mirror movement is complete. Although the D5200 doesn’t offer mirror-lockup shooting — its mirror-lockup function is provided solely for the purpose of accessing the sensor for cleaning — it does offer another solution, Exposure Delay Mode. When you enable this feature, the camera waits about 1 second after the mirror is raised to release the shutter, ensuring that the mirror movement is complete before the image is recorded.
Look for the Exposure Delay Mode option on the Shooting/Display street of the Custom Setting menu, as shown in Figure 2-8. You can use Exposure Delay Mode with any Release mode. Just don’t forget you enabled the feature, or you’ll drive yourself batty trying to figure out why the camera isn’t responding to your shutter-button finger. I say this from experience. . . .
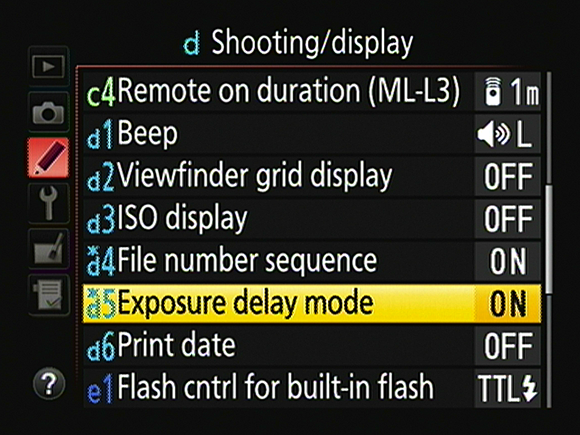
Figure 2-8: Enabling Exposure Delay Mode is a way to make sure that mirror vibrations don’t cause blurring.
Interval Timer Shooting
With Interval Timer Shooting, you can set the camera to automatically release the shutter at intervals ranging from seconds to hours apart. This feature enables you to capture a subject as it changes over time — a technique commonly known as time-lapse photography — without having to stand around pressing the shutter button the whole time.
Here’s how to take advantage of this feature:
1. Set the Release mode to Single Frame.
You can also use either of the continuous modes, but the camera still takes one shot at a time, just as if you had selected Single Frame. Quiet Shutter Release mode is also possible; however, the Self-Timer and remote control modes aren’t compatible with Interval Timer Shooting.
2. Display the Shooting menu, highlight Interval Timer Shooting, as shown on the left in Figure 2-9, and press OK.
The screen on the right in Figure 2-9 appears.
3. To begin setting up your capture session, highlight Now or Start Time.
• To start the captures right away, highlight Now.
• To set a later start time, highlight Start Time.
4. Press the Multi Selector right to display the capture-setup screen.
If you selected Start Time in Step 3, the screen looks like the one in Figure 2-10. If you selected Now, the Start Time option is dimmed, and the Interval option is highlighted instead.
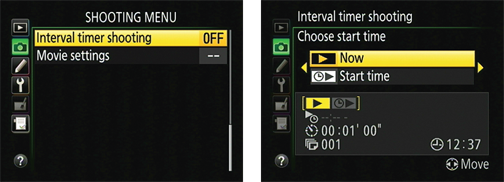
Figure 2-9: The Interval Timer Shooting feature enables you to do time-lapse photography.
5. Set up your recording session.
You get three options: Start Time, Interval (time between shots), and Number of Times (total number of shots recorded). The current settings for each option appear in the bottom half of the screen, as labeled in Figure 2-10.
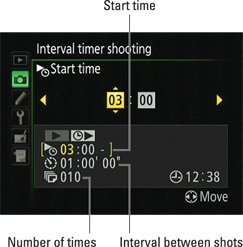
Figure 2-10: Press the Multi Selector right or left to cycle through the setup options; press up or down to change the highlighted value.
At the top of the screen, little value boxes appear. The highlighted box is the active option and relates to the setting that’s highlighted at the bottom of the screen. For example, in the figure, the hour box for the Start Time setting is active. Press the Multi Selector right or left to cycle through the value boxes; to change the value in a box, press the Multi Selector up or down.
A few notes about these options:
• The Interval and Start Time options are based on a 24-hour clock. The current time appears in the bottom-right corner of the screen and is based on the date/time information you entered when setting up the camera.
• For the Interval option, the left column box is for the hour setting; the middle, minutes; and the right, seconds. Make sure that the value you enter is for a longer time than the shutter speed you plan to use.
• For the Start Time option, you can set only the hour and minute values. Again, the Start Time option is available only if you selected Start Time in Step 3.
6. When you’re done setting up the capture options, press the Multi Selector right until you see the On and Off options on the screen, as shown in Figure 2-11.
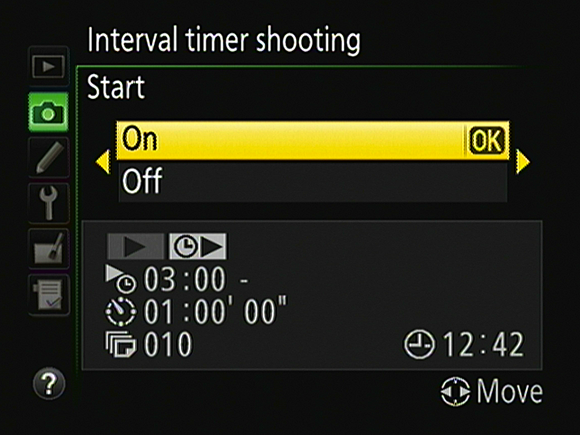
Figure 2-11: Highlight On and press OK to finalize the Interval Timer Shooting setup.
7. Highlight On and press OK.
If you selected Now as your interval-capture starting option in Step 3, the first shot is recorded about 3 seconds later. If you set a delayed start time, the camera displays a Timer Active message for a few seconds before returning to the Shooting menu.
A few final factoids:
![]() Interval Timer Shooting isn’t available for Live View photography. The menu option is disabled any time Live View is active.
Interval Timer Shooting isn’t available for Live View photography. The menu option is disabled any time Live View is active.
![]() The card access light blinks while Interval Timer Shooting is in progress. It’s the little light just above the Delete button on the back of the camera.
The card access light blinks while Interval Timer Shooting is in progress. It’s the little light just above the Delete button on the back of the camera.
![]() To interrupt Interval Timer Shooting, turn off the camera. Or move the Mode dial to a different setting.
To interrupt Interval Timer Shooting, turn off the camera. Or move the Mode dial to a different setting.
![]() Menus are disabled while the interval sequence is in progress. You can’t access the control strip of the Information screen either. If you display the Information screen, you see the message Interval Timer Shooting on the screen.
Menus are disabled while the interval sequence is in progress. You can’t access the control strip of the Information screen either. If you display the Information screen, you see the message Interval Timer Shooting on the screen.
![]() Autobracketing, high dynamic range (HDR), and multiple-exposure are disabled features when Interval Timer Shooting is active. Chapter 7 explains the first two features; Chapter 10 covers the third.
Autobracketing, high dynamic range (HDR), and multiple-exposure are disabled features when Interval Timer Shooting is active. Chapter 7 explains the first two features; Chapter 10 covers the third.
![]() If you’re using autofocusing, be sure that the camera can focus on your subject. It will initiate focusing before each shot. See Chapter 8 for details about autofocusing.
If you’re using autofocusing, be sure that the camera can focus on your subject. It will initiate focusing before each shot. See Chapter 8 for details about autofocusing.
![]() When the interval sequence is complete, the Interval Timer Shooting menu option is reset to Off. The card access light stops blinking shortly after the final image is recorded to the memory card.
When the interval sequence is complete, the Interval Timer Shooting menu option is reset to Off. The card access light stops blinking shortly after the final image is recorded to the memory card.
Choosing the Right Quality Settings
Almost every review of the D5200 contains glowing reports about the camera’s picture quality. As you’ve no doubt discovered, those claims are true: This baby can create large, beautiful images.
What you may not have discovered is that Nikon’s default Image Quality setting isn’t the highest that the camera offers. Why, you ask, would Nikon do such a thing? Why not set up the camera to produce the best images right out of the box? The answer is that using the top setting has some downsides. Nikon’s default choice represents a compromise that avoids those disadvantages while still producing images that will please most photographers.
Whether that compromise is right for you, however, depends on your photographic needs. To help you decide, the rest of this chapter explains the Image Quality setting, along with the Image Size setting, which is also critical to the quality of images that you print. Just in case you’re having quality problems related to other issues, however, the next section provides a handy quality-defect diagnosis guide.
If you already know what settings you want to use and just need to find out how to select those options, skip to the last section of the chapter.
Diagnosing picture-quality problems
When I use the term picture quality, I’m not talking about the composition, exposure, or other traditional characteristics of a photograph. Instead, I mean how finely the image is rendered in the digital sense.
Figure 2-12 illustrates the concept: The first example is a high-quality image, with clear details and smooth color transitions. The other examples show five common digital-image defects.
Each of these defects is related to a different issue, and only one is affected by the Image Quality setting. So if you aren’t happy with your image quality, first compare your photos to those in the figure to properly diagnose the problem. Then try these remedies:
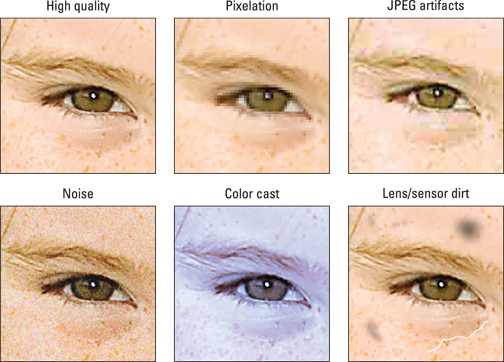
Figure 2-12: Refer to this symptom guide to determine the cause of poor image quality.
![]() Pixelation: When an image doesn’t have enough pixels (the colored tiles used to create digital images), details aren’t clear, and curved and diagonal lines appear jagged. The fix is to increase image resolution, which you do via the Image Size control. See the next section, “Considering image size: How many pixels are enough?” for details.
Pixelation: When an image doesn’t have enough pixels (the colored tiles used to create digital images), details aren’t clear, and curved and diagonal lines appear jagged. The fix is to increase image resolution, which you do via the Image Size control. See the next section, “Considering image size: How many pixels are enough?” for details.
![]() JPEG artifacts: The “parquet tile” texture and random color defects that mar the third image in Figure 2-12 can occur in photos captured in the JPEG (jay-peg) file format, which is why these flaws are referred to as JPEG artifacts. This is the defect related to the Image Quality setting; see “Understanding Image Quality options (JPEG or Raw),” later in this chapter, to find out more.
JPEG artifacts: The “parquet tile” texture and random color defects that mar the third image in Figure 2-12 can occur in photos captured in the JPEG (jay-peg) file format, which is why these flaws are referred to as JPEG artifacts. This is the defect related to the Image Quality setting; see “Understanding Image Quality options (JPEG or Raw),” later in this chapter, to find out more.
![]() Noise: This defect gives your image a speckled look, as shown in the lower-left example in Figure 2-12. Noise can occur with very long exposure times or when you choose a high ISO Sensitivity setting on your camera. You can explore both issues in Chapter 7.
Noise: This defect gives your image a speckled look, as shown in the lower-left example in Figure 2-12. Noise can occur with very long exposure times or when you choose a high ISO Sensitivity setting on your camera. You can explore both issues in Chapter 7.
![]() Color cast: If your colors are seriously out of whack, as shown in the lower-middle example in the figure, try adjusting the camera’s White Balance setting. Chapter 8 covers this control and other color issues.
Color cast: If your colors are seriously out of whack, as shown in the lower-middle example in the figure, try adjusting the camera’s White Balance setting. Chapter 8 covers this control and other color issues.
![]() Lens/sensor dirt: A dirty lens is the first possible cause of the kind of defects you see in the last example in the figure. If cleaning your lens doesn’t solve the problem, dust or dirt may have made its way onto the camera’s image sensor. See Chapter 11 for information on lens and sensor cleaning.
Lens/sensor dirt: A dirty lens is the first possible cause of the kind of defects you see in the last example in the figure. If cleaning your lens doesn’t solve the problem, dust or dirt may have made its way onto the camera’s image sensor. See Chapter 11 for information on lens and sensor cleaning.
I should also tell you that I used a little digital enhancement to exaggerate the flaws in my example images to make the symptoms easier to see. With the exception of an unwanted color cast or a big blob of lens or sensor dirt, these defects may not even be noticeable unless you print or view your image at a very large size. And the subject matter of your image may camouflage some flaws; most people probably wouldn’t detect a little JPEG artifacting in a photograph of a densely wooded forest, for example.
In other words, don’t consider Figure 2-12 as an indication that your D5200 is suspect in the image-quality department. First, any camera can produce these defects under the right circumstances. Second, by following the guidelines in this chapter — and the noise and color recommendations that I explore in other chapters — you can resolve any quality issues that you may encounter.
Considering image size: How many pixels are enough?
Pixels are the little square tiles from which all digital images are made. You can see some pixels close up in the right image in Figure 2-13, which shows a greatly magnified view of the eye area in the left image.
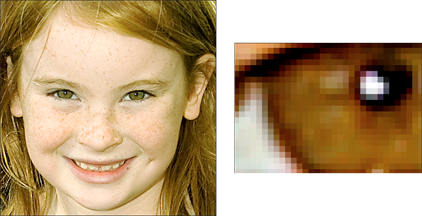
Figure 2-13: Pixels are the building blocks of digital photos.
The D5200 offers three resolution options, which you select via the Image Size setting, accessible via the Shooting menu and the Information display control strip. (The last section of this chapter provides how-tos.) Either way, you can choose from Large, Medium, and Small. Table 2-1 lists the resolution values for each setting. (Megapixel values are rounded off.)
Table 2-1 Image Size (Resolution) Options
|
Setting |
Resolution |
|
Large |
6000 x 4000 (24.0 MP) |
|
Medium |
4496 x 3000 (13.5 MP) |
|
Small |
2992 x 2000 (6.0 MP) |
To choose the right resolution setting, you need to understand the three ways that pixel count affects your pictures:
![]() Print size: Pixel count determines the size at which you can produce a high-quality print. If you don’t have enough pixels, your prints may exhibit the defects you see in the pixelation example in Figure 2-12, or worse, you may be able to see the individual pixels, as in the right example in Figure 2-13. Depending on your photo printer, you typically need anywhere from 200 to 300 pixels per linear inch, or ppi, of the print. To produce an 8 x 10 print at 200 ppi, for example, you need a pixel count of 1600 x 2000, or about 3.2 megapixels.
Print size: Pixel count determines the size at which you can produce a high-quality print. If you don’t have enough pixels, your prints may exhibit the defects you see in the pixelation example in Figure 2-12, or worse, you may be able to see the individual pixels, as in the right example in Figure 2-13. Depending on your photo printer, you typically need anywhere from 200 to 300 pixels per linear inch, or ppi, of the print. To produce an 8 x 10 print at 200 ppi, for example, you need a pixel count of 1600 x 2000, or about 3.2 megapixels.
 Even though many photo-editing programs enable you to add pixels to an existing image, doing so isn’t a good idea. For reasons I won’t bore you with, adding pixels — known as upsampling — doesn’t enable you to successfully enlarge your photo. In fact, upsampling typically makes matters worse. The printing discussion in Chapter 6 includes some example images that illustrate this issue.
![]() Screen display size: Resolution doesn’t affect the quality of images viewed on a monitor, television, or other screen device the way it does for printed photos. Instead, resolution determines the size at which the image appears. This issue is one of the most misunderstood aspects of digital photography, so I explain it thoroughly in Chapter 6. For now, just know that you need way fewer pixels for onscreen photos than you do for printed photos. In fact, even the Small resolution setting on your camera creates a picture too big to be viewed in its entirety in many e-mail programs.
Screen display size: Resolution doesn’t affect the quality of images viewed on a monitor, television, or other screen device the way it does for printed photos. Instead, resolution determines the size at which the image appears. This issue is one of the most misunderstood aspects of digital photography, so I explain it thoroughly in Chapter 6. For now, just know that you need way fewer pixels for onscreen photos than you do for printed photos. In fact, even the Small resolution setting on your camera creates a picture too big to be viewed in its entirety in many e-mail programs.
![]() File size: Every additional pixel increases the amount of data required to create a digital picture file. So a higher-resolution image has a larger file size than a low-resolution image.
File size: Every additional pixel increases the amount of data required to create a digital picture file. So a higher-resolution image has a larger file size than a low-resolution image.
 Large files present several problems:
• You can store fewer images on your memory card, on your computer’s hard drive, and on removable storage media such as DVDs.
• The camera needs more time to process and store the image data on the memory card after you press the shutter button. This extra time can hamper fast-action shooting.
• When you share photos online, larger files take longer to upload and download.
• When you edit your photos in your photo software, your computer needs more resources and time to process large files.
As you can see, resolution is a bit of a sticky wicket. What if you aren’t sure how large you want to print your images? What if you want to print your photos and share them online?
I take the better-safe-than-sorry route, which leads to the following recommendations about which Image Size setting to use:
![]() Always shoot at a resolution suitable for print. You then can create a low-resolution copy of the image in your photo editor for use online. In fact, your camera offers a built-in resizing option; Chapter 6 shows you how to use it.
Always shoot at a resolution suitable for print. You then can create a low-resolution copy of the image in your photo editor for use online. In fact, your camera offers a built-in resizing option; Chapter 6 shows you how to use it.
 Again, you can’t go in the opposite direction, adding pixels to a low-resolution original in your photo editor to create a good, large print. Even with the very best software, adding pixels doesn’t improve the print quality of a low-resolution image.
![]() For everyday images, Medium is a good choice. I find the Large setting to be overkill for most casual shooting, which means that you’re creating huge files for no good reason. Keep in mind that even at the Small setting, your pixel count (2992 x 2000) gives you enough resolution to produce an 8 x 10-inch print at 200 ppi.
For everyday images, Medium is a good choice. I find the Large setting to be overkill for most casual shooting, which means that you’re creating huge files for no good reason. Keep in mind that even at the Small setting, your pixel count (2992 x 2000) gives you enough resolution to produce an 8 x 10-inch print at 200 ppi.
![]()
 Choose Large for an image that you plan to crop, print very large, or both. The benefit of maxing out resolution is that you have the flexibility to crop your photo and still generate a decent-sized print of the remaining image. Figures 2-14 and 2-15 offer an example. When I was shooting this photograph, I couldn’t get close enough to fill the frame with my main interest — the two juvenile herons at the center of the scene. But because I had the resolution cranked up to Large, I could later crop the shot to the composition you see in Figure 2-15 and still produce a great print. In fact, I could have printed the cropped image at a much larger size than fits here.
![]() Reduce resolution if shooting speed is paramount. If you’re shooting action and the shot-to-shot capture time is slower than you want — that is, the camera takes too long after you take one shot before it lets you take another — dialing down the resolution may help.
Reduce resolution if shooting speed is paramount. If you’re shooting action and the shot-to-shot capture time is slower than you want — that is, the camera takes too long after you take one shot before it lets you take another — dialing down the resolution may help.
Understanding Image Quality options (JPEG or Raw)
If I had my druthers, the Image Quality option would instead be called File Type because that’s what the setting controls. Here’s the deal: The file type, sometimes also known as a file format, determines how your picture data is recorded and stored. Your choice does impact picture quality, but so do other factors, as outlined at the beginning of this chapter. In addition, your choice of file type has ramifications beyond picture quality.

Figure 2-14: I couldn’t get close enough to fill the frame with the two juvenile herons, so I captured this image at the Large resolution setting.
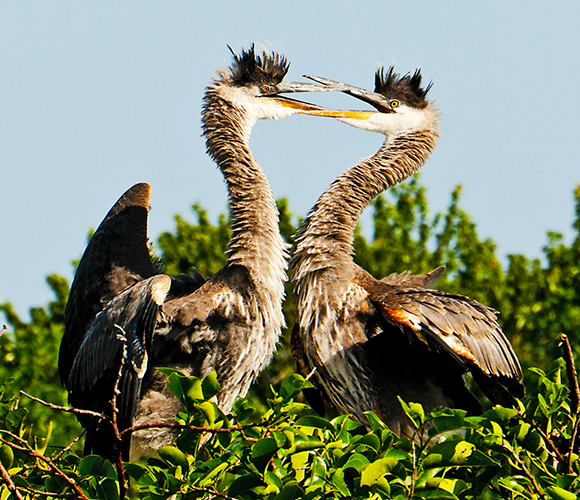
Figure 2-15: A high-resolution original enabled me to crop the photo tightly and still have enough pixels to produce a quality print.
At any rate, your D5200 offers the two file types common on most of today’s digital cameras: JPEG and Camera Raw, or just Raw for short, which goes by the specific moniker NEF (Nikon Electronic Format) on Nikon cameras. The next sections explain the pros and cons of each format. If your mind is already made up, skip ahead to “Setting Image Size and Quality,” at the end of this chapter, to find out how to make your selection.
JPEG: The imaging (and web) standard
Pronounced jay-peg, this format is the default setting on your D5200, as it is for most digital cameras. JPEG is popular for two main reasons:
![]() Immediate usability: All web browsers and e-mail programs can display JPEG files, so you can share them online immediately after you shoot them. The same can’t be said for Raw (NEF) files, which must be processed and converted to JPEG files before you can share them online. And although you can view and print your camera’s Raw files in Nikon ViewNX 2 without converting them, many third-party photo programs don’t enable you to do that. You can read more about the conversion process in the upcoming section “Raw (NEF): The purist’s choice.”
Immediate usability: All web browsers and e-mail programs can display JPEG files, so you can share them online immediately after you shoot them. The same can’t be said for Raw (NEF) files, which must be processed and converted to JPEG files before you can share them online. And although you can view and print your camera’s Raw files in Nikon ViewNX 2 without converting them, many third-party photo programs don’t enable you to do that. You can read more about the conversion process in the upcoming section “Raw (NEF): The purist’s choice.”
![]() Small files: JPEG files are smaller than Raw files. And smaller files consume less room on your camera memory card and in your computer’s storage tank.
Small files: JPEG files are smaller than Raw files. And smaller files consume less room on your camera memory card and in your computer’s storage tank.
The downside — you knew there had to be one — is that JPEG creates smaller files by applying lossy compression. This process actually throws away some image data. Too much compression leads to the defects you see in the example of JPEG artifacts shown in Figure 2-12.
Fortunately, your camera enables you to specify how much compression you’re willing to accept. You can choose from three JPEG settings, which produce the following results:
![]() JPEG Fine: At this setting, the compression ratio is 1:4 — that is, the file is four times smaller than it would otherwise be. In plain English, that means that very little compression is applied, so you shouldn’t see many compression artifacts, if any.
JPEG Fine: At this setting, the compression ratio is 1:4 — that is, the file is four times smaller than it would otherwise be. In plain English, that means that very little compression is applied, so you shouldn’t see many compression artifacts, if any.
![]() JPEG Normal: Switch to Normal, and the compression ratio rises to 1:8. The chance of seeing some artifacting increases as well.
JPEG Normal: Switch to Normal, and the compression ratio rises to 1:8. The chance of seeing some artifacting increases as well.
![]() JPEG Basic: Shift to this setting, and the compression ratio jumps to 1:16. That’s a substantial amount of compression and brings with it a lot more risk of artifacting.
JPEG Basic: Shift to this setting, and the compression ratio jumps to 1:16. That’s a substantial amount of compression and brings with it a lot more risk of artifacting.
Note, though, that even the JPEG Basic setting doesn’t result in anywhere near the level of artifacting that you see in my example in Figure 2-12. Again, that example is exaggerated to help you be able to recognize artifacting defects and understand how they differ from other image-quality issues. In fact, if you keep your image print or display size small, you aren’t likely to notice a great deal of quality difference between the Fine, Normal, and Basic compression levels, although details in the Fine and Normal versions may appear slightly crisper than they do in the Basic one. It’s only when you greatly enlarge a photo that the differences become apparent.
To make the best decision, do your own test shots, carefully inspect the results in your photo editor, and make your own judgment about what level of artifacting you can accept. Artifacting is often much easier to spot when you view images onscreen. It’s difficult to reproduce artifacting here in print because the printing press obscures some of the tiny defects caused by compression. Your inkjet prints are more likely to reveal these defects.
If you don’t want any risk of artifacting, bypass JPEG altogether and change the file type to Raw (NEF). Or consider your other option, which is to record two versions of each file, one Raw and one JPEG. The next section offers details.
Raw (NEF): The purist’s choice
The other picture file type you can create is Camera Raw, or just Raw (as in uncooked) for short.
Raw is popular with advanced, very demanding photographers for three reasons:
![]() Greater creative control: With JPEG, internal camera software tweaks your images, adjusting color, exposure, and sharpness as needed to produce the results that Nikon believes its customers prefer. With Raw, the camera simply records the original, unprocessed image data. The photographer then copies the image file to the computer and uses special software known as a Raw converter to produce the actual image, making decisions about color, exposure, and so on at that point. The D5200 also has a built-in Raw converter. Either way, the upshot is that “shooting Raw” enables you, not the camera, to have the final say on the visual characteristics of your image.
Greater creative control: With JPEG, internal camera software tweaks your images, adjusting color, exposure, and sharpness as needed to produce the results that Nikon believes its customers prefer. With Raw, the camera simply records the original, unprocessed image data. The photographer then copies the image file to the computer and uses special software known as a Raw converter to produce the actual image, making decisions about color, exposure, and so on at that point. The D5200 also has a built-in Raw converter. Either way, the upshot is that “shooting Raw” enables you, not the camera, to have the final say on the visual characteristics of your image.
![]() Higher bit depth: Bit depth is a measure of how many distinct color values an image file can contain. JPEG files restrict you to 8 bits each for the red, blue, and green color components, or channels, that make up a digital image, for a total of 24 bits. That translates to roughly 16.7 million possible colors. On the D5200, a Raw file delivers a higher bit count, collecting 14 bits per channel.
Higher bit depth: Bit depth is a measure of how many distinct color values an image file can contain. JPEG files restrict you to 8 bits each for the red, blue, and green color components, or channels, that make up a digital image, for a total of 24 bits. That translates to roughly 16.7 million possible colors. On the D5200, a Raw file delivers a higher bit count, collecting 14 bits per channel.
Although jumping from 8 to 14 bits sounds like a huge difference, you may never notice any difference in your photos — that 8-bit palette of 16.7 million values is more than enough for superb images. Where having the extra bits can come in handy is if you really need to adjust exposure, contrast, or color after the shot in your photo-editing program. In cases where you apply extreme adjustments, having the extra original bits sometimes helps avoid a problem known as banding or posterization, which creates abrupt color breaks where you should see smooth, seamless transitions. (A higher bit depth doesn’t always prevent this problem, however, so don’t expect miracles.)
![]() Best picture quality: Because Raw doesn’t apply the destructive compression associated with JPEG, you don’t run the risk of the artifacting that can occur with JPEG.
Best picture quality: Because Raw doesn’t apply the destructive compression associated with JPEG, you don’t run the risk of the artifacting that can occur with JPEG.
But of course, as with most things in life, Raw isn’t without its disadvantages. To wit:
![]() You can’t do much with your pictures until you process them in a Raw converter. You can’t share them online, for example, or put them into a text document or multimedia presentation. You can view and print them immediately if you use the free Nikon ViewNX 2 software, but most other photo programs require you to convert the Raw files to a standard format first. Ditto for retail photo printing. So when you shoot Raw, you add to the time you must spend in front of the computer instead of behind the camera lens. Chapter 6 shows you how to process your Raw files using Nikon ViewNX 2 as well as the converter built into the camera.
You can’t do much with your pictures until you process them in a Raw converter. You can’t share them online, for example, or put them into a text document or multimedia presentation. You can view and print them immediately if you use the free Nikon ViewNX 2 software, but most other photo programs require you to convert the Raw files to a standard format first. Ditto for retail photo printing. So when you shoot Raw, you add to the time you must spend in front of the computer instead of behind the camera lens. Chapter 6 shows you how to process your Raw files using Nikon ViewNX 2 as well as the converter built into the camera.
![]() Raw files are larger than JPEGs. Unlike JPEG, Raw doesn’t apply lossy compression to shrink files. In addition, Raw files are always captured at the maximum resolution available on your camera, even if you don’t really need all those pixels. For both reasons, Raw files are significantly larger than JPEGs, so they take up more room on your memory card and on your computer’s hard drive or other picture-storage device.
Raw files are larger than JPEGs. Unlike JPEG, Raw doesn’t apply lossy compression to shrink files. In addition, Raw files are always captured at the maximum resolution available on your camera, even if you don’t really need all those pixels. For both reasons, Raw files are significantly larger than JPEGs, so they take up more room on your memory card and on your computer’s hard drive or other picture-storage device.
Whether the upside of Raw outweighs the down is a decision that you need to ponder based on your photographic needs, your schedule, and your computer-comfort level. If you do decide to try Raw shooting, you can select from the following two Image Quality options:
![]() Raw: This setting produces a single Raw file at the maximum resolution (24.0 megapixels).
Raw: This setting produces a single Raw file at the maximum resolution (24.0 megapixels).
![]() Raw+JPEG: This setting produces two files: the standard Raw file plus a JPEG. The Raw file is captured at the maximum resolution; the JPEG version is captured at the resolution specified via the Image Size setting. You also can choose whether you want the JPEG version to be captured at the Fine, Normal, or Basic quality level.
Raw+JPEG: This setting produces two files: the standard Raw file plus a JPEG. The Raw file is captured at the maximum resolution; the JPEG version is captured at the resolution specified via the Image Size setting. You also can choose whether you want the JPEG version to be captured at the Fine, Normal, or Basic quality level.
My take: Choose JPEG Fine or Raw (NEF)
At this point, you may be finding all this technical goop a bit much — I recognize that panicked look in your eyes — so allow me to simplify things for you. Until you have time or energy to completely digest all the ramifications of JPEG versus Raw, here’s a quick summary of my thoughts on the matter:
![]() If you require the absolute best image quality and have the time and interest to do the Raw conversion, shoot Raw. See Chapter 6 for more information on the conversion process.
If you require the absolute best image quality and have the time and interest to do the Raw conversion, shoot Raw. See Chapter 6 for more information on the conversion process.
![]() If great photo quality is good enough for you, you don’t have wads of spare time, or you aren’t that comfortable with the computer, stick with JPEG Fine.
If great photo quality is good enough for you, you don’t have wads of spare time, or you aren’t that comfortable with the computer, stick with JPEG Fine.
![]() If you don’t mind the added file-storage space requirement and want the flexibility of both formats, choose Raw+JPEG Fine.
If you don’t mind the added file-storage space requirement and want the flexibility of both formats, choose Raw+JPEG Fine.
![]() If you go with JPEG only, stay away from JPEG Normal and Basic. The tradeoff for smaller files isn’t, in my opinion, worth the risk of compression artifacts. As with my recommendations on image size, this fits the better-safe-than-sorry formula: You never know when you may capture a spectacular, enlargement-worthy subject, and it would be a shame to have the photo spoiled by compression defects.
If you go with JPEG only, stay away from JPEG Normal and Basic. The tradeoff for smaller files isn’t, in my opinion, worth the risk of compression artifacts. As with my recommendations on image size, this fits the better-safe-than-sorry formula: You never know when you may capture a spectacular, enlargement-worthy subject, and it would be a shame to have the photo spoiled by compression defects.
Setting Image Size and Quality
![]() The Image Size and Image Quality options both affect the quality of your pictures and also play a large role in image file size.
The Image Size and Image Quality options both affect the quality of your pictures and also play a large role in image file size.
![]() Choose a high Image Quality setting — Raw (NEF) or JPEG Fine — and the maximum Image Size setting (Large), and you get top-quality pictures and large file sizes.
Choose a high Image Quality setting — Raw (NEF) or JPEG Fine — and the maximum Image Size setting (Large), and you get top-quality pictures and large file sizes.
![]() Combining the lowest Quality setting (JPEG Basic) with the lowest Size setting (Small) greatly shrinks files, enabling you to fit lots more pictures on your memory card, but it also increases the chances that you’ll be disappointed with the quality of those pictures, especially if you make large prints.
Combining the lowest Quality setting (JPEG Basic) with the lowest Size setting (Small) greatly shrinks files, enabling you to fit lots more pictures on your memory card, but it also increases the chances that you’ll be disappointed with the quality of those pictures, especially if you make large prints.
You can view the current Image Size and Image Quality settings on the Information screen, in the area labeled in Figure 2-16. To adjust the settings, you have the following choices:
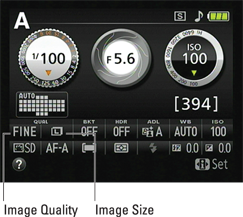
Figure 2-16: The current Image Quality and Image Size settings appear here.
![]()
![]() Information display control strip: After bringing up the Information display, press the Info Edit button to access the control strip of options at the bottom of the screen. Use the Multi Selector to highlight one of the two options and then press OK to view the screen where you can select the setting you want to use. Figure 2-17 illustrates the process of setting the Image Quality option.
Information display control strip: After bringing up the Information display, press the Info Edit button to access the control strip of options at the bottom of the screen. Use the Multi Selector to highlight one of the two options and then press OK to view the screen where you can select the setting you want to use. Figure 2-17 illustrates the process of setting the Image Quality option.
Notice that in the screen shown on the right in Figure 2-17, the left side of the screen shows you the file size that will result from your selected setting along with the number of pictures that will fit on the memory card at that size. (Keep in mind that certain other factors also affect file size, such as the level of detail and color in the subject.)

Figure 2-17: You can use the Information display control strip to change the Image Size and Quality settings.
![]() Shooting menu: As an alternative, you can adjust the settings via the Shooting menu, as shown in Figure 2-18. If you select the Image Size setting from the menu, the options screen shows the pixel counts for each setting.
Shooting menu: As an alternative, you can adjust the settings via the Shooting menu, as shown in Figure 2-18. If you select the Image Size setting from the menu, the options screen shows the pixel counts for each setting.
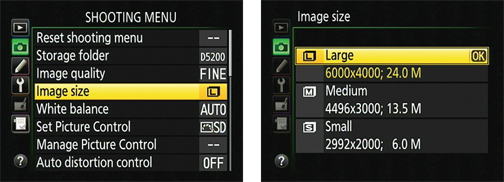
Figure 2-18: You also can set Image Size and Image Quality via the Shooting menu.

 One important — and often misunderstood — aspect of the exposure modes: Although the Mode dial setting determines your access to exposure and color controls, as well as to other advanced camera features, it has no bearing on your
  Why
Why