
![]()
10
Ten Fun (And Practical) Ways to Manipulate Your Photos
In This Chapter
![]() Applying Retouch menu filters
Applying Retouch menu filters
![]() Removing red-eye
Removing red-eye
![]() Correcting crooked horizon lines, lens distortion, and perspective
Correcting crooked horizon lines, lens distortion, and perspective
![]() Cropping away excess background
Cropping away excess background
![]() Tweaking exposure, contrast, and color
Tweaking exposure, contrast, and color
![]() Creating a black-and-white version of a photo
Creating a black-and-white version of a photo
![]() Having fun with special effects
Having fun with special effects
Every photographer produces a clunker now and then. When it happens to you, don’t be too quick to press the Delete button, because many common problems are surprisingly easy to fix. In fact, you often can repair your photos right in the camera, thanks to tools found on the Retouch menu.
This chapter starts with the basics of navigating the Retouch menu and then provides specifics for using its photo-repair tools. Then I show you how to create special effects by using other Retouch menu options and by shooting in the Effects exposure mode.
Applying the Retouch Menu Filters
You can get to most Retouch menu features in two ways:
![]() Display the menu, select the tool you want to use, and press OK. You’re presented with thumbnails of your photos; use the Multi Selector to move the yellow highlight box over the photo you want to adjust and press OK. You then see options related to the selected tool.
Display the menu, select the tool you want to use, and press OK. You’re presented with thumbnails of your photos; use the Multi Selector to move the yellow highlight box over the photo you want to adjust and press OK. You then see options related to the selected tool.
The only menu item you can’t access this way is Side-By-Side Comparison, explained shortly.
![]()
![]() Switch the camera to playback mode, display your photo in single-frame view, and press OK. The Retouch menu appears superimposed over your photo, as shown in Figure 10-1. Select the tool you want to use and press OK to display options related to that tool. I prefer the second method so that’s how I approach things in this chapter, but it’s entirely a personal choice.
Switch the camera to playback mode, display your photo in single-frame view, and press OK. The Retouch menu appears superimposed over your photo, as shown in Figure 10-1. Select the tool you want to use and press OK to display options related to that tool. I prefer the second method so that’s how I approach things in this chapter, but it’s entirely a personal choice.

Figure 10-1: In single-frame playback view, press OK to access the Retouch menu tools.
However, you can’t use this method to access the Image Overlay menu item. That feature, which combines two Raw (NEF) photos to create a third, blended image, requires you to use the first method of accessing the menu. You also must start at the Retouch menu to use the Edit Movie option, which I cover in Chapter 4. (All other Retouch menu features work with still photos only.)
A few other critical facts to note:
![]()
 Your originals remain intact. When you apply a Retouch menu tool, the camera creates a copy of your original photo and makes the changes to the copy only. A little icon that looks like the one that represents the Retouch menu (a box with a little paintbrush) appears with the image during playback to let you know that you’re not looking at an original photo. The filename also clues you in to a retouched photo: For images created through the Resize menu option (covered in Chapter 6), filenames begin with SSC; for all other retouched images, filenames begin with CSC.
![]() All menu options work with either JPEG or Raw (NEF) originals except Image Overlay and NEF (Raw) Processing. Those two tools work only with Raw files. See Chapter 2 for an explanation of JPEG and Raw.
All menu options work with either JPEG or Raw (NEF) originals except Image Overlay and NEF (Raw) Processing. Those two tools work only with Raw files. See Chapter 2 for an explanation of JPEG and Raw.
![]() Retouched copies for all alterations except Image Overlay are saved in the JPEG file format. The retouched copy uses the same JPEG quality setting as the original (Fine, Normal, or Basic). Retouched copies of Raw originals are saved in the JPEG format. For the Image Overlay option, the retouched image is stored using the current Image Quality and Image Size settings (selected via the control strip or Shooting menu).
Retouched copies for all alterations except Image Overlay are saved in the JPEG file format. The retouched copy uses the same JPEG quality setting as the original (Fine, Normal, or Basic). Retouched copies of Raw originals are saved in the JPEG format. For the Image Overlay option, the retouched image is stored using the current Image Quality and Image Size settings (selected via the control strip or Shooting menu).
![]() You can apply each correction to a picture only once. The exception, again, is Image Overlay. If you save the composite image in the Raw format, you can combine the composite with a third Raw image. In fact, you can keep combining photos until your memory card is full, if the urge hits you.
You can apply each correction to a picture only once. The exception, again, is Image Overlay. If you save the composite image in the Raw format, you can combine the composite with a third Raw image. In fact, you can keep combining photos until your memory card is full, if the urge hits you.
![]()
 The camera automatically assigns the next available file number to the retouched image. Make note of the filename of the retouched version so that you can easily track it down later.
![]() You can compare the original and the retouched version through the Side-by-Side Comparison menu option. To use this feature, start by displaying either the original or the retouched version in full-frame playback. Then press OK, select Side-by-Side Comparison, as shown on the left in Figure 10-2, and press OK. You see the original image on one side and the retouched version on the other, as shown in the second screen in the figure. At the top of the screen, a label indicates the Retouch tool that you applied to the photo. (I applied the D-Lighting adjustment to the image in Figure 10-2.)
You can compare the original and the retouched version through the Side-by-Side Comparison menu option. To use this feature, start by displaying either the original or the retouched version in full-frame playback. Then press OK, select Side-by-Side Comparison, as shown on the left in Figure 10-2, and press OK. You see the original image on one side and the retouched version on the other, as shown in the second screen in the figure. At the top of the screen, a label indicates the Retouch tool that you applied to the photo. (I applied the D-Lighting adjustment to the image in Figure 10-2.)

Figure 10-2: Use Side-by-Side Comparison to see whether you prefer the retouched version to the original.
These additional tricks work in Side-by-Side Comparison display:
• If you applied more than one Retouch tool to the picture, press the Multi Selector right and left to display thumbnails that show how each tool affected the picture.
• If you create multiple retouched versions of the same original — for example, you create a monochrome version, save that, and then crop the original image and save that — use a different technique to compare the versions. First, press the Multi Selector right or left to surround the after image with the yellow highlight box. Now press the Multi Selector up and down to scroll through the retouched versions.
![]() • To temporarily view the original or retouched image at full-frame view, use the Multi Selector to highlight its thumbnail and then press and hold the Zoom In button. Release the button to return to Side-by-Side Comparison view.
• To temporarily view the original or retouched image at full-frame view, use the Multi Selector to highlight its thumbnail and then press and hold the Zoom In button. Release the button to return to Side-by-Side Comparison view.
To exit Side-by-Side Comparison view and return to single-image playback, press the Playback button. The retouched photo appears on the screen.
If you want to view the original image in full-screen playback instead of the retouched version, use the Multi Selector to highlight the original while the Side-by-Side Comparison screen is active. Then press OK instead of the Playback button.
Removing Red-Eye
From my experience, red-eye isn’t a major problem with the D5200. Typically, the problem occurs only in very dark lighting, which makes sense: When little ambient light is available, the pupils of the subjects’ eyes widen, creating more potential for the flash light to cause red-eye reflection.
If you spot red-eye, however, give the Red-Eye Correction filter a try. After you select the filter from the Retouch menu, as shown on the left in Figure 10-3, one of two things happens: If the camera can’t find any red-eye, it displays a message telling you so. But if it does detect red-eye, it applies the removal filter and displays the results in the monitor, as shown on the right in the figure.
![]() After the filter does its thing, press the Zoom In button to magnify the display so that you can check the camera’s work. To scroll the display, press the Multi Selector up, down, right, or left.
After the filter does its thing, press the Zoom In button to magnify the display so that you can check the camera’s work. To scroll the display, press the Multi Selector up, down, right, or left.
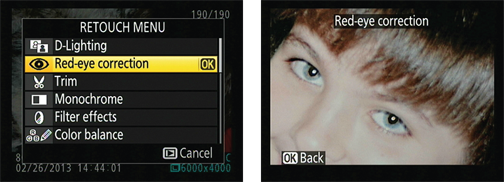
Figure 10-3: An automated red-eye remover is built right into your camera.
To go forward with the correction, press OK twice. The first OK returns the display to normal magnification; the second creates the retouched copy. To instead cancel the repair, press OK to return to normal magnification and then press the Playback button.
Straightening Tilting Horizon Lines
I have a knack for shooting with the camera slightly misaligned with respect to the horizon, which means that photos like the one on the left in Figure 10-4 often wind up crooked — in this case, everything tilts down toward the right corner of the frame. Perhaps those who say I have a skewed view of life are right? At any rate, my inability to “shoot straight” makes me especially fond of the Straighten tool on the Retouch menu. With this filter, you can rotate tilting horizons back to the proper angle, as shown in the right image in the figure.
To achieve this rotation magic, the camera must crop your image and then enlarge the remaining area — that’s why the after photo in Figure 10-4 contains slightly less subject matter than the original. (The same cropping occurs if you make this kind of change in a photo editor.) The camera updates the display as you rotate the photo so that you can get an idea of how much of the original scene may be lost.

Figure 10-4: You can rotate crooked photos back to a level orientation with the Straighten tool.
Here’s how to put the tool to work:
1. Display the photo in Single-Image playback mode and then press OK to get to the Retouch menu.
2. Highlight Straighten, as shown on the left in Figure 10-5, and press OK.
You see a screen similar to the one on the right in the figure, with a grid superimposed on your photo to serve as an alignment aid.
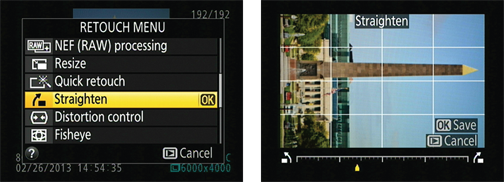
Figure 10-5: Press the Multi Selector right or left to rotate the image in increments of .25 degrees.
3. To rotate the picture clockwise, press the Multi Selector right.
Each press spins the picture by about .25 degrees. You can achieve a maximum rotation of five degrees. The yellow pointer on the little scale under the photo shows you the current amount of rotation.
4. To rotate the picture counterclockwise, press the Multi Selector left.
5. When things are no longer off-kilter, press OK to create your retouched copy.
Removing (Or Creating) Lens Distortion
Certain lenses can produce a type of distortion that causes straight lines to appear curved. Wide-angle lenses, for example, often create barrel distortion, in which objects at the center of a picture appear to be magnified and pushed forward — as if you wrapped the photo around the outside of a barrel. The effect is perhaps easiest to spot in a rectangular subject like the oil painting in Figure 10-6. Notice that in the original image, on the left, the edges of the painting appear to bow slightly outward. Pincushion distortion affects the photo in the opposite way, making center objects appear smaller and farther away.
If you notice either type of distortion, try enabling the Auto Distortion Control option on the Shooting menu. This feature attempts to correct distortion as you take the picture. (Chapter 8 has details.) Or you may prefer to wait until after reviewing your photos and then use the Distortion Control on the Retouch menu to try to fix things. I applied the filter to create the second version of the subject in Figure 10-6, for example. Less helpful, in my opinion, is a related filter, the Fisheye filter, that actually creates distortion in an attempt to replicate the look of a photo taken with a fisheye lens.
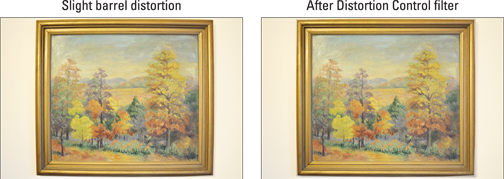
Figure 10-6: Barrel distortion makes straight lines appear to bow outward.
 The extent of the in-camera adjustment you can apply is minimal. Additionally, I find it a little difficult to gauge my results on the camera monitor because you can’t display an alignment grid over the image to help you find the right degree of correction. For those reasons, I prefer to do this kind of work in my photo editor. Wherever you make the correction, understand that you lose part of your original image area as a result of the distortion correction, just as you do when you apply the Straighten tool, covered earlier in this chapter.
All that said, the first step in applying either filter is to display your photo in Single-Image playback mode and then press OK to display the Retouch menu. Highlight the filter you want to use (Distortion Control or Fisheye) and press OK again. From that point, the process depends on which of the two filters you’re using:
![]() Distortion Control: Select Distortion Control, as shown on the left in Figure 10-7, and then press the Multi Selector right to see the screen shown on the right. An Auto option is available for some lenses, as long as you didn’t apply the Auto Distortion Control feature when taking the picture. As its name implies, the Auto option attempts to automatically apply the right degree of correction. If the Auto option is dimmed or you prefer to do the correction on your own, choose Manual, as shown on the right in the figure and press OK. You then see the screen featured in Figure 10-8. The scale under the image represents the degree and direction of shift that you’re applying. Press the Multi Selector right to reduce barrel distortion; press left to reduce pincushioning. Press OK to make your corrected copy of the photo.
Distortion Control: Select Distortion Control, as shown on the left in Figure 10-7, and then press the Multi Selector right to see the screen shown on the right. An Auto option is available for some lenses, as long as you didn’t apply the Auto Distortion Control feature when taking the picture. As its name implies, the Auto option attempts to automatically apply the right degree of correction. If the Auto option is dimmed or you prefer to do the correction on your own, choose Manual, as shown on the right in the figure and press OK. You then see the screen featured in Figure 10-8. The scale under the image represents the degree and direction of shift that you’re applying. Press the Multi Selector right to reduce barrel distortion; press left to reduce pincushioning. Press OK to make your corrected copy of the photo.
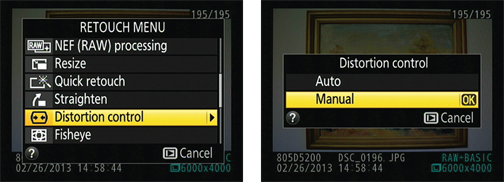
Figure 10-7: Use the Distortion Control filter to reduce barrel or pincushion distortion.
![]() Fisheye: After you highlight the filter name and press OK, you see a screen similar to the one in Figure 10-8, but this time, you see the word Fisheye at the top of the screen, and the scale at the bottom of the image indicates the strength of the distortion effect. Press the Multi Selector right or left to adjust the amount. Then press OK to create the fisheye copy.
Fisheye: After you highlight the filter name and press OK, you see a screen similar to the one in Figure 10-8, but this time, you see the word Fisheye at the top of the screen, and the scale at the bottom of the image indicates the strength of the distortion effect. Press the Multi Selector right or left to adjust the amount. Then press OK to create the fisheye copy.

Figure 10-8: Press the Multi Selector right or left to adjust the amount and type of correction.
Correcting Perspective
When you photograph a tall building and tilt the camera up to get it all in the frame, a convergence or keystoning effect occurs. This effect causes vertical structures to appear to be leaning toward the center of the frame. Buildings sometimes even appear to be falling away from you, as shown in the left image in Figure 10-9. (If the lens is tilting down, verticals instead appear to lean outward, and the building appears to be falling toward you.) Through the Retouch menu’s Perspective Control feature, you can right those leaning verticals, as shown in the after photo on the right in Figure 10-9.

Figure 10-9: The original photo exhibited convergence (left); applying the Perspective Control filter corrected the problem (right).
Note, though, that just like the Straighten tool, you lose some area around the perimeter of your photo as part of the correction process. So when you’re shooting this type of subject, frame loosely — that way, you ensure that you don’t sacrifice an important part of the scene due to the correction.
To try out the feature, follow these steps:
1. Display your photo in single-image view and press OK to bring the Retouch menu to life.
2. Select Perspective Control, as shown on the left in Figure 10-10, and press OK.
You see a grid and a horizontal and vertical scale, as shown on the right in the figure.
3. Press the Multi Selector left and right to move the out-of-whack object horizontally.
4. Press the Multi Selector up and down to rotate the object toward or away from you.
5. Use the guides to get the perspective as close to normal as possible and then press OK to make a copy of the original image with your changes.
Depending on the scene, you may not be able to get all structures fully corrected, so just pay attention to the most prominent ones in the scene. For severe distortion problems, you may be able to get better results in your photo editor; in some programs, you can pull and push each side of the image around independently of the others, which enables you to more freely shift perspective than is possible with the type of tool provided in the camera.

Figure 10-10: Press the Multi Selector to adjust the correction type and amount.
Cropping (Trimming) Your Photo
To crop a photo means to trim away some of its perimeter. Cropping away excess background can often improve an image, as illustrated by Figures 10-11 and 10-12. When shooting this scene, I couldn’t get close enough to the ducks to fill the frame with them, so I simply cropped it after the fact to achieve the desired composition.
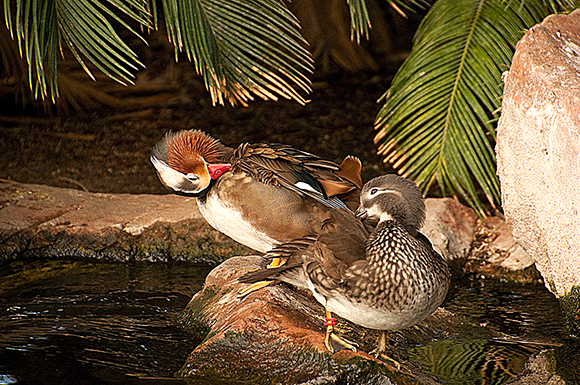
Figure 10-11: The original contains too much extraneous background.
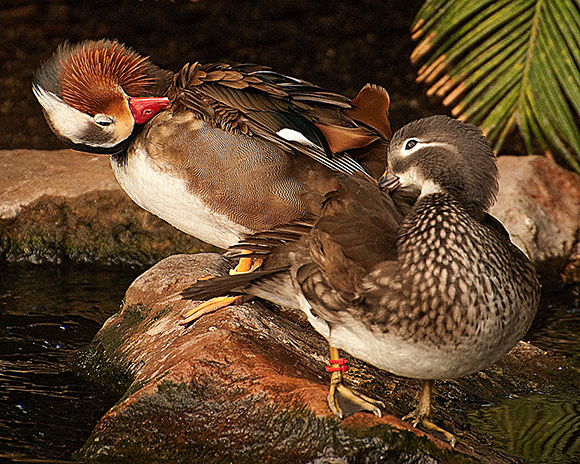
Figure 10-12: Cropping creates a better composition and eliminates background clutter.
With the Trim function on the Retouch menu, you can crop a photo right in the camera. Note a few things about this feature:
![]() Crop aspect ratio: You can crop to one of five aspect ratios: 3:2, which maintains the original proportions and matches that of a 4-x-6-inch print; 4:3, the proportions of a standard computer monitor or television (that is, not a widescreen model); 5:4, which gives you the same proportions as an 8-x-10-inch print; 1:1, which results in a square photo; and 16:9, which is the same aspect ratio as a widescreen monitor or television. If your purpose for cropping is to prepare your image for a frame size that doesn’t match any of these aspect ratios, crop in your photo software instead.
Crop aspect ratio: You can crop to one of five aspect ratios: 3:2, which maintains the original proportions and matches that of a 4-x-6-inch print; 4:3, the proportions of a standard computer monitor or television (that is, not a widescreen model); 5:4, which gives you the same proportions as an 8-x-10-inch print; 1:1, which results in a square photo; and 16:9, which is the same aspect ratio as a widescreen monitor or television. If your purpose for cropping is to prepare your image for a frame size that doesn’t match any of these aspect ratios, crop in your photo software instead.
![]() Crop size: For each aspect ratio, you can choose from a variety of crop sizes, which depend on the size of your original. The sizes are stated in pixel terms, such as 3600 x 2880. If you’re cropping in advance of printing the image, remember to aim for at least 200 pixels per linear inch of the print — 800 x 1200 pixels for a 4 x 6 print, for example.
Crop size: For each aspect ratio, you can choose from a variety of crop sizes, which depend on the size of your original. The sizes are stated in pixel terms, such as 3600 x 2880. If you’re cropping in advance of printing the image, remember to aim for at least 200 pixels per linear inch of the print — 800 x 1200 pixels for a 4 x 6 print, for example.
![]() File format of the cropped photo: If you captured the original using the Raw or one of the Raw+JPEG Image Quality settings, the cropped version is saved as a JPEG Fine image. For other JPEG images, the crop version has the same Image Quality level as the original.
File format of the cropped photo: If you captured the original using the Raw or one of the Raw+JPEG Image Quality settings, the cropped version is saved as a JPEG Fine image. For other JPEG images, the crop version has the same Image Quality level as the original.
After you crop, you can’t apply any other fixes from the Retouch menu. So make cropping the last of your retouching steps.
Keeping those caveats in mind, trim your image as follows:
1. Display your photo in single-image view and press OK to launch the Retouch menu.
2. Select Trim, as shown on the left in Figure 10-13, and press OK.
You see the screen shown on the right in the figure. The yellow highlight box indicates the current cropping frame. Anything outside the frame is set to be trimmed away.
3. Rotate the Command dial to change the crop aspect ratio.
The selected aspect ratio appears in the upper-right corner of the screen, as shown in Figure 10-13.
4. Adjust the cropping frame size and placement as needed.
The current crop size appears in the upper-left corner of the screen. You can adjust the size and placement of the cropping frame like so:
![]() • Reduce the size of the cropping frame. Press and release the Zoom Out button. Each press of the button further reduces the crop size.
• Reduce the size of the cropping frame. Press and release the Zoom Out button. Each press of the button further reduces the crop size.
![]() • Enlarge the cropping frame. Press the Zoom In button to expand the crop boundary and leave more of your image intact.
• Enlarge the cropping frame. Press the Zoom In button to expand the crop boundary and leave more of your image intact.
• Reposition the cropping frame. Press the Multi Selector up, down, right, and left to shift the frame position.
5. Press OK to create your cropped copy.
When you view the picture in playback mode, a scissors symbol appears next to the image size to indicate a cropped photo.
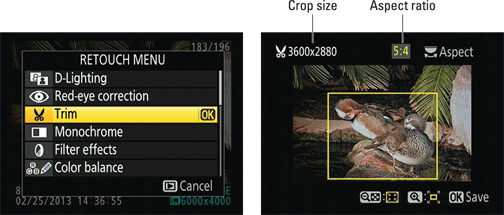
Figure 10-13: Rotate the Command dial to change the proportions of the crop box.
Manipulating Exposure and Color
Chapters 7 and 8 discuss the bazillion exposure and color controls on the D5200. But even pros at using those controls sometimes produce images that are just a little off. For major problems, using a photo-editing program to make corrections is usually the answer, but for images that need just a little exposure or color tweak, try these four Retouch menu tools:
![]() D-Lighting: Chapter 7 explains Active D-Lighting, a feature that brightens too-dark shadows in a way that leaves highlight details intact. You can apply a similar adjustment after you take a picture by choosing the D-Lighting filter on the Retouch menu. I used the filter on the photo in Figure 10-14, where strong backlighting left the balloon underexposed in the original image.
D-Lighting: Chapter 7 explains Active D-Lighting, a feature that brightens too-dark shadows in a way that leaves highlight details intact. You can apply a similar adjustment after you take a picture by choosing the D-Lighting filter on the Retouch menu. I used the filter on the photo in Figure 10-14, where strong backlighting left the balloon underexposed in the original image.
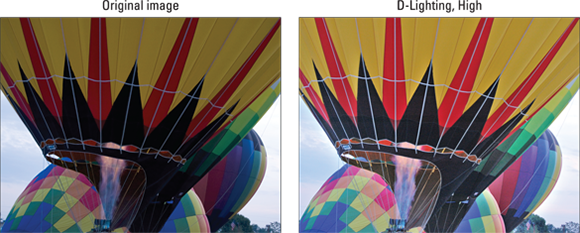
Figure 10-14: An underexposed photo (left) gets help from the D-Lighting filter (right).
![]() When you choose the D-Lighting filter, you see before-and-after views of the image, as shown in Figure 10-15. Press the Multi Selector up or down to set the strength of the adjustment to Low, Normal, or High. I used High for the balloon image. To get a closer view of the adjusted photo, press and hold the Zoom In button. Release the button to return to the two-thumbnail display.
When you choose the D-Lighting filter, you see before-and-after views of the image, as shown in Figure 10-15. Press the Multi Selector up or down to set the strength of the adjustment to Low, Normal, or High. I used High for the balloon image. To get a closer view of the adjusted photo, press and hold the Zoom In button. Release the button to return to the two-thumbnail display.
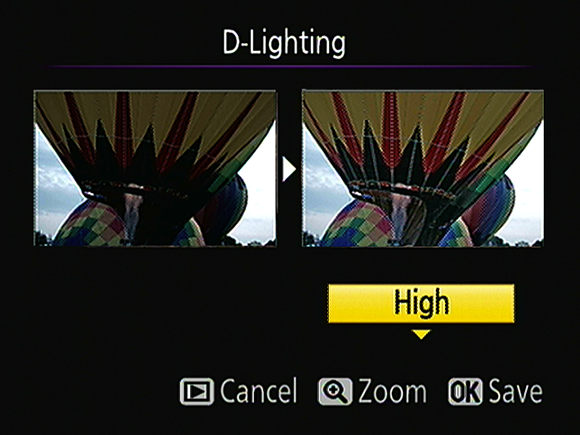
Figure 10-15: Press the Multi Selector up or down to vary the strength of the correction.
You can’t apply D-Lighting to a picture taken using the Monochrome Picture Control, introduced in Chapter 8. Nor does D-Lighting work on any pictures to which you’ve applied the Quick Retouch filter, covered next, or the Monochrome filter, detailed a little later in this chapter.
![]() Quick Retouch: This filter increases contrast and color saturation and, if your subject is backlit, also applies a D-Lighting adjustment to restore some shadow detail that otherwise might be lost. In other words, Quick Retouch is sort of like D-Lighting on steroids.
Quick Retouch: This filter increases contrast and color saturation and, if your subject is backlit, also applies a D-Lighting adjustment to restore some shadow detail that otherwise might be lost. In other words, Quick Retouch is sort of like D-Lighting on steroids.
As with D-Lighting, you can choose from three levels of Quick Retouch correction. And the same restrictions apply: You can’t apply the filter to monochrome images or on pictures that you adjusted via D-Lighting. (However, you can create two retouched copies of your original image, applying D-Lighting to one and Quick Retouch to the other. You then can use the Side-by-Side Comparison feature, explained at the beginning of this chapter, to see which version you prefer.)
![]() Filter Effects: Shown in Figure 10-16, the Filter Effects option offers filters that are designed to mimic the results produced by traditional lens filters. The first five are color-manipulation filters. The other two, Cross Screen and Soft (not shown in the figure), are special-effects filters; you can read about both later in this chapter.)
Filter Effects: Shown in Figure 10-16, the Filter Effects option offers filters that are designed to mimic the results produced by traditional lens filters. The first five are color-manipulation filters. The other two, Cross Screen and Soft (not shown in the figure), are special-effects filters; you can read about both later in this chapter.)
The color filters work like so:
• Skylight filter: This filter reduces the amount of blue in an image. The result is a very subtle warming effect.
• Warm filter: This one produces a warming effect that’s just a bit stronger than the Skylight filter.
• Color intensifiers: You can boost the intensity of reds, greens, or blues individually by applying these filters. When you choose these filters, you can press the Multi Selector up or down to control the strength of the adjustment.
As an example, Figure 10-17 shows you an original image and three adjusted versions. As you can see, the Skylight and Warm filters are both very subtle; in this image, the effects are most noticeable in the sky. The fourth example shows a variation created by using the Color Balance filter, explained next, and shifting colors toward the cool (bluish) side of the color spectrum.
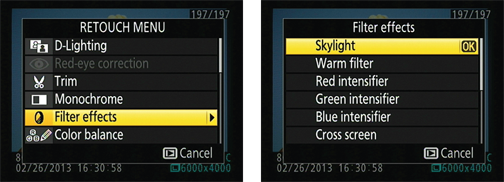
Figure 10-16: You can choose from filter effects that mimic traditional lens filters.

Figure 10-17: Here you see the results of applying two Filter Effects adjustments and a Color Balance shift.
![]() Color Balance: Offering more flexibility than the Filter Effects options, this tool enables you to shift colors toward any part of the color spectrum. For example, shifting colors toward the bluer spectrum produced the fourth example in Figure 10-17.
Color Balance: Offering more flexibility than the Filter Effects options, this tool enables you to shift colors toward any part of the color spectrum. For example, shifting colors toward the bluer spectrum produced the fourth example in Figure 10-17.
When you choose the filter from the Retouch menu, as shown on the left in Figure 10-18, you see the screen shown on the right. The important control is the color grid in the lower-left corner. You shift image colors by using the Multi Selector to move the tiny black square (labeled Color shift marker in the figure) around the grid. In the figure, I positioned the marker to strengthen blue tones, for example.
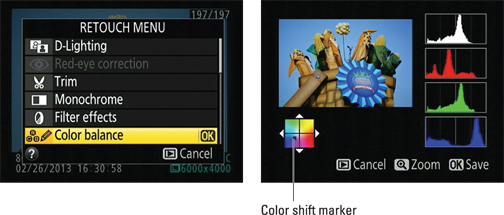
Figure 10-18: Press the Multi Selector to move the color shift marker and adjust color balance.
 The histograms on the right side of the display show you the resulting impact on overall image brightness as well as on the individual red, green, and blue brightness values — a bit of information that’s helpful if you’re experienced in the science of reading histograms. Chapter 5 gives you an introduction.
![]()
![]() Press the Zoom In button to magnify the image and display the usual picture-in-picture zoom navigation thumbnail. Then press the AE-L/AF-L button to toggle between that thumbnail and the color-balance control box. When the thumbnail is active, pressing the Multi Selector scrolls the display; when the control box is active, pressing the Multi Selector adjusts color balance. Use the Zoom Out button to reduce the magnification.
Press the Zoom In button to magnify the image and display the usual picture-in-picture zoom navigation thumbnail. Then press the AE-L/AF-L button to toggle between that thumbnail and the color-balance control box. When the thumbnail is active, pressing the Multi Selector scrolls the display; when the control box is active, pressing the Multi Selector adjusts color balance. Use the Zoom Out button to reduce the magnification.
Creating Monochrome Images
With the Monochrome Picture Control feature covered in Chapter 8, you can shoot black-and-white photos. As an alternative, you can create a black-and-white copy of an existing color photo by applying the Monochrome option on the Retouch menu. You can also create sepia and cyanotype (blue and white) images via the Monochrome option. Figure 10-19 shows you examples of all three effects.
I prefer to convert my color photos to monochrome images in my photo editor; going that route simply offers more control, not to mention it’s easier to preview your results on a large computer monitor than on the camera monitor. Still, I know that not everyone’s as much of a photo-editing geek as I am, and there’s certainly no harm in trying the in-camera filter. Just select Monochrome from the Retouch menu, press OK, select the type of monochrome image you want to create (black and white, sepia, or cyanotype) and press OK again. For the Sepia and Cyanotype options, you then see a screen that asks you to set the intensity of the tint; press the Multi Selector up and down to do so and then give OK one final tap.
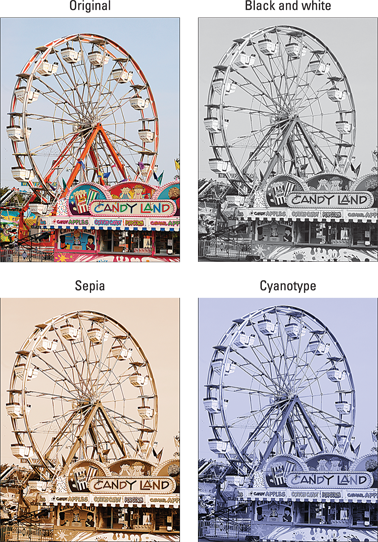
Figure 10-19: You can create three monochrome effects through the Monochrome tool on the Retouch menu.
Playing with Special Effects
For photographers who want to alter reality beyond what you can achieve with the tools mentioned so far, the Retouch menu offers a number of special-effects filters. And through the Effects exposure mode, you can add certain effects at the moment you capture the image — you don’t have to shoot the picture and then tweak it through the Retouch menu. The Effects exposure mode also enables you to record movies using special effects.
The next section describes the remaining Retouch menu effects; following that, I show you how to take advantage of the Effects exposure mode.
Retouch menu special-effects filters
For some easy special-effects fun, experiment with these Retouch menu filters:
![]() Cross Screen: The Cross Screen filter adds a starburst effect to the brightest part of your image, as shown in Figure 10-20. To try it, select Filter Effects from the Retouch menu and then scroll down to the Cross Screen option.
Cross Screen: The Cross Screen filter adds a starburst effect to the brightest part of your image, as shown in Figure 10-20. To try it, select Filter Effects from the Retouch menu and then scroll down to the Cross Screen option.
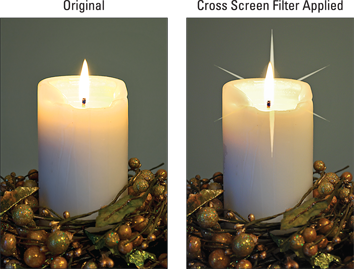
Figure 10-20: The Cross Screen filter adds a starburst effect to the brightest parts of the photo.
When you choose the filter, you see a screen showing an image preview along with a column of options along the right side of the screen. The options enable you to adjust the number of points on the star, the intensity of the effect, the length of the star’s rays, and the angle of the effect. Just use the Multi Selector to highlight an option (the label at the top of the screen tells you the name of the current option) and then press right to display the available settings. Highlight your choice and press OK. To update the preview after changing a filter setting, highlight Confirm and press OK. When you’re happy with the effect, choose Save and press OK.
The number of starbursts the filter applies depends on your image. You can’t change that number; the camera automatically adds the twinkle effect wherever it finds very bright objects. If you want to control the exact placement of the starbursts, forgo the in-camera filter and find out whether your photo software offers a more flexible star-filter effect. Or you can create the effect manually by painting the starburst strokes onto the image in a photo editor.
It’s also important to frame your original image with a little extra “head room” around the object that will get the starburst, as I did in my example. Otherwise, there isn’t room in the picture for the effect.
![]() Soft: Also found on the Filter Effects menu, the Soft filter blurs your photo to give it a dreamy, watercolor-like look. You can choose from three levels of blur: Low, Normal, and High.
Soft: Also found on the Filter Effects menu, the Soft filter blurs your photo to give it a dreamy, watercolor-like look. You can choose from three levels of blur: Low, Normal, and High.
![]() Color Outline: Select this tool to create a black-and-white line drawing based on a photo, as illustrated in Figure 10-21. This is a fun project to do with kids — you can, in essence, create a custom coloring-book page that they can then fill in with watercolors, crayons, or markers.
Color Outline: Select this tool to create a black-and-white line drawing based on a photo, as illustrated in Figure 10-21. This is a fun project to do with kids — you can, in essence, create a custom coloring-book page that they can then fill in with watercolors, crayons, or markers.
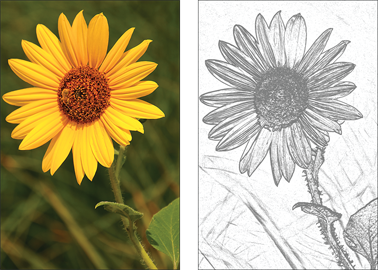
Figure 10-21: Use Color Outline to create a black-and-white line drawing out of a photo.
![]() Color Sketch: This filter also creates a sketch of your photo, but this time with a result similar to a drawing done in colored pencils. I used the filter on the architectural image shown in Figure 10-22, for example. When you select the effect, you can play with two options: Vividness, which affects the boldness of the colors; and Outlines, which determines the thickness of outlines. Highlight an option and press the Multi Selector right or left to adjust the setting. Press OK when you create a look you like.
Color Sketch: This filter also creates a sketch of your photo, but this time with a result similar to a drawing done in colored pencils. I used the filter on the architectural image shown in Figure 10-22, for example. When you select the effect, you can play with two options: Vividness, which affects the boldness of the colors; and Outlines, which determines the thickness of outlines. Highlight an option and press the Multi Selector right or left to adjust the setting. Press OK when you create a look you like.

Figure 10-22: Color Sketch produces this type of effect.
![]() Miniature Effect: Have you ever seen an architect’s small-scale models of planned developments? The ones complete with tiny trees and even people? The Miniature Effect attempts to create a photographic equivalent by applying a strong blur to all but one portion of a landscape, as shown in Figure 10-23. The left photo is the original; the right shows the result of applying the filter. For this example, I set the focus point on the part of the street occupied by the cars.
Miniature Effect: Have you ever seen an architect’s small-scale models of planned developments? The ones complete with tiny trees and even people? The Miniature Effect attempts to create a photographic equivalent by applying a strong blur to all but one portion of a landscape, as shown in Figure 10-23. The left photo is the original; the right shows the result of applying the filter. For this example, I set the focus point on the part of the street occupied by the cars.
This look is based on an effect that you can create by using a tilt-shift lens. This type of lens can also capture pictures of tall buildings with-out the converging vertical lines that occur when you shoot with a normal lens.
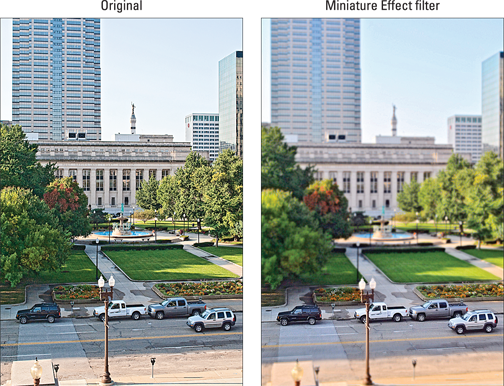
Figure 10-23: The Miniature Effect throws all but a small portion of a scene into very soft focus.
The Miniature Effect works best if you shoot your subject from a high angle — otherwise, you don’t get the miniaturization result. To try it, display your photo in playback mode, press OK, and then choose Miniature Effect from the Retouch menu, as shown on the left in Figure 10-24. Press OK to display a preview like the one shown on the right. Then experiment with the effect as follows:
• Use the Multi Selector to position the yellow box over the area you want to keep in sharp focus.
![]() • To rotate the focus box 90 degrees, press the Zoom Out button.
• To rotate the focus box 90 degrees, press the Zoom Out button.
![]() • To preview the effect, press the Zoom In button.
• To preview the effect, press the Zoom In button.
• When you get a result you like, press OK to save a copy of the original with the effect applied.
![]() Selective Color: This effect enables you to desaturate (remove color from) parts of a photo while leaving specific colors intact. For example, in Figure 10-25, I desaturated everything but the yellows and peaches in the rose. The result lends additional drama to your subject because the eye goes first to the areas of color.
Selective Color: This effect enables you to desaturate (remove color from) parts of a photo while leaving specific colors intact. For example, in Figure 10-25, I desaturated everything but the yellows and peaches in the rose. The result lends additional drama to your subject because the eye goes first to the areas of color.
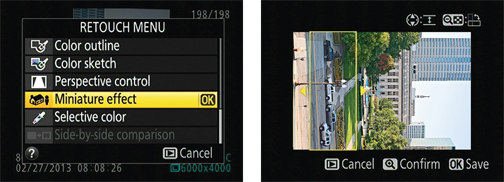
Figure 10-24: Use the Multi Selector to position the yellow rectangle over the area you want to keep in sharp focus.
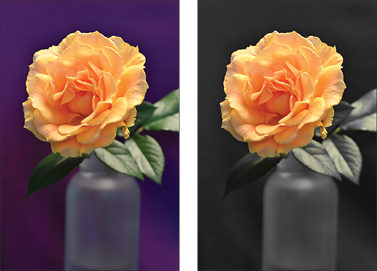
Figure 10-25: I used the Selective Color filter to desaturate everything but the rose petals.
When you choose the filter from the Retouch menu, you see a screen similar to the one on the left in Figure 10-26. Here, you can select up to three colors to retain and specify how much a color can vary from the selected one and still be retained. Make your wishes known as follows:
![]() • Select the first color to be retained. Using the Multi Selector, move the yellow highlight box over the color. Then press the AE-L/AF-L button to tag that color, which appears in the left color swatch at the top of the screen, as shown on the left in Figure 10-26.
• Select the first color to be retained. Using the Multi Selector, move the yellow highlight box over the color. Then press the AE-L/AF-L button to tag that color, which appears in the left color swatch at the top of the screen, as shown on the left in Figure 10-26.

Figure 10-26: To select a color you want to keep, move the yellow box over it and press the AE-L/AF-L button.
• Set the range of the selected color. Rotate the Command dial to display a preview of the desaturated image and highlight the number box to the right of the color swatch, as shown on the right in the figure. Then press the Multi Selector up or down to choose a value from 1 to 7. The higher the number, the more a pixel can vary in color from the selected hue and still be retained. At a low value, only pixels that are very similar to the one you selected are retained. The display updates to show you the impact of the setting.
• Choose one or two additional colors. Rotate the Command dial to highlight the second color swatch box. Then repeat the selection process: Move the yellow highlight box over the color and press the AE-L/AF-L button to select that color. Rotate the Command dial to display the preview and activate the range value box; press the Multi Selector up and down to set the range. To choose a third color, lather, rinse, and repeat.
• Fine-tune your settings. You can keep rotating the Command dial to cycle through the color swatch boxes and range values, adjusting each as necessary.
![]() • Reset a color swatch box. To empty a selected swatch box, press the Delete button. You can then move the yellow highlight box over a new color and press the AE-L/AF-L button to select it.
• Reset a color swatch box. To empty a selected swatch box, press the Delete button. You can then move the yellow highlight box over a new color and press the AE-L/AF-L button to select it.
To reset all the swatch boxes, hold down the Delete button until you see a message asking whether you want to get rid of all selected colors. Highlight Yes and press OK.
• Save a copy of the image with the effect applied. Press OK.
Shooting in Effects mode
When you set the Mode dial to Effects, as shown in Figure 10-27, you can apply special effects on the fly: That is, the effect is added as the camera writes the picture to the memory card.

Figure 10-27: Effects mode lets you apply special effects to movies and still photos.
For still photos, I prefer to capture my originals sans effect and then go through the Retouch menu to alter them. That way, I wind up with one normal image and one with the effect applied, just in case I decide I prefer the unaltered photo to the effects version. Shooting in the Effects mode also brings up another problem: To create the effects, the camera puts most picture-taking controls, such as White Balance and Metering mode, off limits, just as it does when you shoot in the Auto, Auto Flash Off, and Scene modes.
However, Effects mode does offer some artistic filters not available through the Retouch menu. In addition, it enables you to add effects to movies, which isn’t possible through the Retouch menu. So even though I suspect that you won’t find use for the Effects mode very often, I’d be remiss if I didn’t spend a little time discussing it.
As soon as you set the Mode dial to Effects, an icon representing the currently selected effect appears in the top-left corner of the Information display, as shown on the left in Figure 10-28. (The icon shown in the figure indicates the Night Vision effect.) Rotate the Command dial to cycle through the available effects, as shown on the right in the figure.
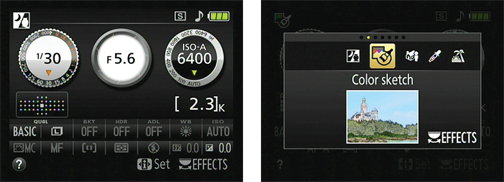
Figure 10-28: Rotate the Command dial to cycle through the available effects.
Although the screen displays a thumbnail to indicate the result of each effect, as shown on the right in Figure 10-28, you don’t have to rely on that artwork: Instead, set the camera to Live View mode. The monitor then shows a live preview of each effect as you select it. To shift to Live View mode, just rotate the Live View (LV) switch on top of the camera. (See Chapter 4 for complete details on Live View.)
Either way, you can choose from the following effects:
![]() Night Vision: Use this setting in low-light situations to produce a grainy, black-and-white image that resembles what you see with night-vision goggles. Figure 10-29 has an example. To achieve the grainy effect, the camera uses a high ISO Sensitivity setting — that high ISO produces noise, which results in the grainy look. How high the ISO climbs and, thus, how much noise becomes visible, depends on the ambient light.
Night Vision: Use this setting in low-light situations to produce a grainy, black-and-white image that resembles what you see with night-vision goggles. Figure 10-29 has an example. To achieve the grainy effect, the camera uses a high ISO Sensitivity setting — that high ISO produces noise, which results in the grainy look. How high the ISO climbs and, thus, how much noise becomes visible, depends on the ambient light.
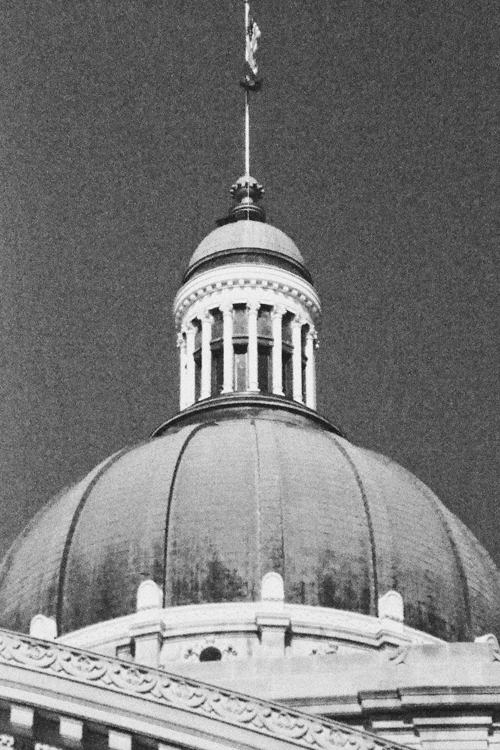
Figure 10-29: The Night Vision effect creates an exceptionally noisy black-and-white image.
A few critical points about using Night Vision mode:
• Autofocusing is available only in Live View mode. For viewfinder photography, you must focus manually. Remember to set the lens switch to the M position before turning the focusing ring!
• Flash is disabled, as is the AF-assist lamp. The whole idea is to create a picture taken in little light, after all.
• Use a tripod to avoid blur. A slow shutter speed is needed to capture the image in dark conditions, and you must be careful to avoid camera movement during the exposure. If your subject is moving, however, it could appear blurry even if the camera is on a tripod.
• You can capture the photo only in the JPEG format. The Image Quality setting offers only the JPEG Fine, Normal, and Basic options; Raw (NEF) files are off limits.
![]() Color Sketch: This produces the same effect as the Color Sketch filter on the Retouch menu. (Refer to Figure 10-22.) And, if you engage Live View when the effect is selected, you can adjust the same options available through the Retouch menu: Vividness and Color Outlines. First, press OK to display the options; then press the Multi Selector up or down to highlight the option you want to change, and press right or left to adjust the value for that option. Press OK again to hide the options and return to shooting. The camera remembers your settings and uses them any time you select the Color Sketch effect until you change them again.
Color Sketch: This produces the same effect as the Color Sketch filter on the Retouch menu. (Refer to Figure 10-22.) And, if you engage Live View when the effect is selected, you can adjust the same options available through the Retouch menu: Vividness and Color Outlines. First, press OK to display the options; then press the Multi Selector up or down to highlight the option you want to change, and press right or left to adjust the value for that option. Press OK again to hide the options and return to shooting. The camera remembers your settings and uses them any time you select the Color Sketch effect until you change them again.
Three points to ponder:
• It’s best to compose the image by using the viewfinder and then switch to Live View. When the effect is selected, the Live View display updates very slowly, making it a pain to play with composition using the monitor.
• Using the effect puts some limitations on movie recording. Movies recorded using this effect play back as a series of still images rather than a standard movie. In addition, autofocusing during recording is disabled.
• For still photos, you can shoot only in the JPEG format. As with the Night Vision mode, you can’t create a Raw (NEF) file with this effect.
![]() Miniature Effect: This one is also a double of the one on the Retouch menu; Figure 10-23 shows an example of the result.
Miniature Effect: This one is also a double of the one on the Retouch menu; Figure 10-23 shows an example of the result.
You must set the camera to Live View mode in order to position the box that specifies the part of the scene that will remain in sharp focus. After switching to Live View, position the rectangular focus frame over the area that you want to keep in focus. Then press OK to display horizontal markings that indicate the width of the sharp-focus region. Press the Multi Selector up and down to adjust the width of the in-focus region; press right or left to change the orientation of the box. When you achieve the look you want, press OK again.
A few other limitations also apply: Flash is disabled, as is the AF-assist lamp. If you use the Continuous Release mode, the frames per second rate is reduced. For movies, sound recording is disabled, autofocus is disabled during recording, and movies play back at high speed. (The high-speed playback means that a movie that contains about 45 minutes of footage is compressed into a 3-minute clip, for example.) Finally, you’re limited to creating a JPEG file for still photography.
![]() Selective Color: Use this effect to create an image in which all but one to three colors are desaturated, just as when you use the Selective Color option on the Retouch menu. Figure 10-25 has an example.
Selective Color: Use this effect to create an image in which all but one to three colors are desaturated, just as when you use the Selective Color option on the Retouch menu. Figure 10-25 has an example.
To choose the colors you want to retain and specify the range of similar colors that are included, you must use Live View. You see the normal three-color swatch boxes and their accompanying value boxes at the top of the screen, but the process of choosing the colors and setting the range is a little different than when you go through the Retouch menu. Use these tactics instead:
• Access the color options: Press OK. A little white selection box appears on the screen.
• Choose a color to retain: Frame the image so that the white selection box is over the color you want to preserve. Then press the Multi Selector up.
• Set the color range: After setting the color, press the Multi Selector up or down to adjust the color range value. A higher value retains a broader spectrum of similar shades than the one you chose.
• Choose additional color to retain: Rotate the Command dial to select the second color swatch box and repeat the process of choosing a color and setting its range value.
![]() • Deselect a color: Change your mind about retaining one of your chosen colors? Rotate the Command dial to highlight its color swatch and then press the Delete button. Or hold down the button for a few seconds to delete all your selected colors.
• Deselect a color: Change your mind about retaining one of your chosen colors? Rotate the Command dial to highlight its color swatch and then press the Delete button. Or hold down the button for a few seconds to delete all your selected colors.
After setting your color preferences, press OK to lock in your decisions and hide the options. The camera will use those settings any time you choose the Selective Color effect until you specify new settings.
Note that just as with the preceding Effects settings, you’re limited to using JPEG as the file type when you use the Selective Color mode. Flash is disabled.
![]() Silhouette: Choosing this setting ensures that backlit subjects will be captured as dark silhouettes against a bright background, as shown in Figure 10-30. To help ensure that the subject is dark, flash is disabled. If you want your subject instead to be properly exposed, Chapter 7 has some tips for dealing with back lighting.
Silhouette: Choosing this setting ensures that backlit subjects will be captured as dark silhouettes against a bright background, as shown in Figure 10-30. To help ensure that the subject is dark, flash is disabled. If you want your subject instead to be properly exposed, Chapter 7 has some tips for dealing with back lighting.

Figure 10-30: The Silhouette effect purposely underexposes backlit subjects.
![]() High Key: A high key photo is dominated by white or very light areas, such as a white china cup resting on a white doily in front of a sunny window. This setting is designed to produce a good exposure for this type of scene, which the camera otherwise tends to underexpose in response to all the high brightness values. Flash is disabled.
High Key: A high key photo is dominated by white or very light areas, such as a white china cup resting on a white doily in front of a sunny window. This setting is designed to produce a good exposure for this type of scene, which the camera otherwise tends to underexpose in response to all the high brightness values. Flash is disabled.
How does the name relate to the characteristics of the picture? Well, photographers refer to the dominant tones — or brightness values — as the key tones. In most photos, the midtones, or areas of medium brightness, are the key tones. In a high key image, the majority of tones are at the high end of the brightness scale.
![]() Low Key: The opposite of a high key photo, a low key photo is dominated by shadows. Use this mode to prevent the camera from brightening the scene too much and thereby losing the dark and dramatic nature of the image. Flash is disabled.
Low Key: The opposite of a high key photo, a low key photo is dominated by shadows. Use this mode to prevent the camera from brightening the scene too much and thereby losing the dark and dramatic nature of the image. Flash is disabled.
After selecting an effect, you can exit Live View to take your picture using the viewfinder if you prefer. Or, to record a movie, remain in Live View mode and just press the red movie-record button to stop and start recording.
Two Roads to a Multi-Image Exposure
Your camera offers two features that enable you to combine multiple photographs into one:
![]() Multiple Exposure (Shooting menu): With this option, you can combine your next two to three shots. After you enable the option and take your shots, the camera merges them into one file. The shots used to create the composite aren’t recorded and saved separately. The Multiple Exposure option isn’t available in Live View mode.
Multiple Exposure (Shooting menu): With this option, you can combine your next two to three shots. After you enable the option and take your shots, the camera merges them into one file. The shots used to create the composite aren’t recorded and saved separately. The Multiple Exposure option isn’t available in Live View mode.
![]() Image Overlay (Retouch menu): This option enables you to merge two existing Raw images. I used this option to combine a photo of a werewolf friend, shown on the top left in Figure 10-31, with a nighttime garden scene, shown on the top right. The result is the ghostly image shown beneath the two originals. Oooh, scary!
Image Overlay (Retouch menu): This option enables you to merge two existing Raw images. I used this option to combine a photo of a werewolf friend, shown on the top left in Figure 10-31, with a nighttime garden scene, shown on the top right. The result is the ghostly image shown beneath the two originals. Oooh, scary!
On the surface, both options sound kind of cool. The problem is that you can’t control the opacity or positioning of the individual images in the combined photo. For example, my overlay picture would have been more successful if I could move the werewolf to the left in the combined image so that he and the lantern aren’t blended. And I’d also prefer to keep the background of image 2 at full opacity in the overlay image rather than getting a 50/50 mix of that background and the one in image 1, which only creates a fuzzy looking background in this particular example.
However, there is one effect that you can create successfully with either option: a “two views” composite like the one in Figure 10-32. For this image, I used Image Overlay to combine the front and rear views of the antique match striker, shown at the top of the figure, into the composite on the bottom.

Figure 10-31: Image Overlay merges two Raw (NEF) photos into one.
For this trick to work, the background in both images must be the same solid color (black seems to be best), and you must compose your photos so that the subjects don’t overlap in the combined photo, as shown here. Otherwise, you get the ghostly portrait effect like what you see in Figure 10-31.
To be honest, I don’t use Image Overlay or Multiple Exposure for the purpose of serious photo compositing. I prefer to do this kind of work in my photo-editing software, where I have more control over the blend. Understand, too, that neither feature is designed to produce an HDR (high dynamic range) image, which lifts different brightness ranges from different images to create the composite. For HDR, you need software that can do tone mapping, not just whole-image blending. (See the Chapter 7 section related to exposure bracketing for more about HDR, including the built-in HDR tool on the Shooting menu.)
In the interest of reserving space in this book for features that I think you will find much more useful, I leave you to explore these two features on your own. The electronic version of the camera manual (found on a CD that ships with your camera) explains the steps involved in using each of them. Again, though, I think that you’ll find photo compositing much easier and much more flexible if you do the job in your photo-editing software.

Figure 10-32: If you want each subject to appear solid, use a black background and position the subjects so that they don’t overlap.