
![]()
1
Getting the Lay of the Land
In This Chapter
![]() Familiarizing yourself with the lens, viewfinder, and monitor
Familiarizing yourself with the lens, viewfinder, and monitor
![]() Working with memory cards
Working with memory cards
![]() Exploring external controls and menus
Exploring external controls and menus
![]() Viewing and adjusting camera settings
Viewing and adjusting camera settings
![]() Customizing basic operations
Customizing basic operations
![]() Restoring the camera’s default settings
Restoring the camera’s default settings
If you’re like me, shooting for the first time with a camera as sophisticated as the Nikon D5200 produces a blend of excitement and anxiety. On one hand, you can’t wait to start using your new equipment, but on the other, you’re a little intimidated by all its buttons, dials, and menu options.
Well, fear not: This chapter provides the information you need to start getting comfortable with your D5200. Along with an introduction to the camera’s external features, including its fancy articulating monitor, I offer details about working with lenses and memory cards, viewing and adjusting camera settings, and choosing basic camera setup options.
Looking at Lenses
One of the biggest differences between a digital point-and-shoot camera and a dSLR (digital single-lens reflex) camera is the lens. With a dSLR, you can change lenses to suit different photographic needs, going from an extreme close-up lens to a super-long telephoto, for example. In addition, a dSLR lens has a focusing ring that gives you the option of focusing manually instead of relying on the camera’s autofocus mechanism.
I don’t have room in this book to go into detail about the science of lenses, nor do I think that an in-depth knowledge of the subject is terribly important to your photographic success. But the next few sections offer advice that may help when you’re shopping for lenses, figuring out whether the lenses you inherited from Uncle Ted or found on eBay will work with your D5200, and taking the steps involved in actually mounting and using a lens.
Choosing a lens
To decide which lens is the best partner for your camera, start by considering these factors:
![]() Lens compatibility: You can mount a wide range of lenses on your D5200, but some lenses aren’t fully compatible with all camera features. For example, to enjoy autofocusing, you need an AF-S or AF-I lens. (If you bought one of the so-called “kit lenses” — the 18–55mm or 18–105mm zoom lens that Nikon offers as a bundle with the camera body — you own an AF-S lens.) Your camera manual offers more details about lens compatibility.
Lens compatibility: You can mount a wide range of lenses on your D5200, but some lenses aren’t fully compatible with all camera features. For example, to enjoy autofocusing, you need an AF-S or AF-I lens. (If you bought one of the so-called “kit lenses” — the 18–55mm or 18–105mm zoom lens that Nikon offers as a bundle with the camera body — you own an AF-S lens.) Your camera manual offers more details about lens compatibility.
 The AF in AF-S stands for autofocus, and the S stands for silent wave, a Nikon autofocus technology. AF-I lenses are older, professional-grade (expensive) lenses that are no longer made but may be available on the secondhand market.
![]() Focal length and the crop factor: The focal length of a lens, stated in millimeters, determines the angle of view that the lens can capture and the spatial relationship of objects in the frame. Focal length also affects depth of field, or the distance over which focus appears acceptably sharp.
Focal length and the crop factor: The focal length of a lens, stated in millimeters, determines the angle of view that the lens can capture and the spatial relationship of objects in the frame. Focal length also affects depth of field, or the distance over which focus appears acceptably sharp.
You can loosely categorize lenses by focal length as follows:
• Wide-angle: Lenses with short focal lengths — generally, anything under 35mm — are known as wide-angle lenses. A wide-angle lens has the visual effect of pushing the subject away from you and making it appear smaller. As a result, you can fit more of the scene into the frame without moving back. Additionally, a wide-angle lens has a large depth of field so that the zone of apparent sharp focus extends a greater distance. These characteristics make wide-angle lenses ideal for landscape photography.
• Telephoto: Lenses with focal lengths longer than about 70mm are telephoto lenses. These lenses create the illusion of bringing the subject closer to you, increase the subject’s size in the frame, and produce a short depth of field so that the subject is sharply focused but distant objects are blurry. Telephoto lenses are great for capturing wildlife and other subjects that don’t permit up-close shooting.
• Normal: A focal length in the neighborhood of 35mm to 70mm is considered “normal” — that is, somewhere between a wide-angle and telephoto. This focal length produces the angle of view and depth of field that are appropriate for the kinds of snapshots that most people take.
Figure 1-1 offers an illustration of the difference that focal length makes, showing the same scene captured at 42mm (left image) and 112mm (right image). Of course, the illustration shows just two of countless possibilities, and the question of which focal length best captures a scene depends on your creative goals.
 Note, however, that the focal lengths stated here and elsewhere in the book are 35mm equivalent focal lengths. Here’s the deal: For reasons that aren’t really important, when you put a standard lens on most digital cameras, including your D5200, the available frame area is reduced, as if you took a picture on a camera that uses 35mm film negatives and then cropped it.
This so-called crop factor varies depending on the camera, which is why the photo industry adopted the 35mm-equivalent measuring stick as a standard. With the D5200, the crop factor is roughly 1.5. So the 18–55mm kit lens, for example, captures the approximate area you would get from a 27–83mm lens on a 35mm film camera. (Multiply the crop factor by the lens focal length to get the actual angle of view.) In Figure 1-2, the red line indicates the image area that results from the 1.5 crop factor, as compared with the shot you’d get from a lens with the same focal length mounted on a 35mm film camera.
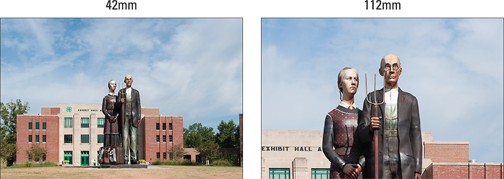
Figure 1-1: I used a focal length of 42mm to capture the first image and then zoomed to a focal length of 112mm to capture the second one.

Figure 1-2: The 1.5 crop factor produces the angle of view indicated by the red outline.
When shopping for a lens, it’s important to remember this crop factor to make sure that you get the focal length designed for the type of pictures you want to take.
 Not sure which focal length to choose? Here's a really cool online tool to help you understand the subject more: Point your web browser to
 http://imaging.nikon.com, click the link for Nikkor lenses, and then click the link for the Nikkor Lenses Simulator. Using this interactive tool, you can see exactly how different lenses capture the same scene.
![]() Prime versus zoom lenses: A prime lens is one with only a single focal length. With a zoom lens, you get a range of focal lengths in one unit. For example, the kit lens I feature in this book has a focal-length range of 18–55mm.
Prime versus zoom lenses: A prime lens is one with only a single focal length. With a zoom lens, you get a range of focal lengths in one unit. For example, the kit lens I feature in this book has a focal-length range of 18–55mm.
Why select a lens that offers a single focal length when a zoom lens offers a range of focal lengths? In a word, quality. Because of some lens science I won’t bore you with, you typically see some reduction in picture quality at certain points in the range of a zoom lens. On the flip side, a zoom lens is certainly more convenient than carting around a bag of prime lenses with different focal lengths. And you can get exceptional image quality from many zoom lenses, even with some so-called super zooms, which offer a huge range of focal lengths.
![]() Aperture range: The aperture is an adjustable diaphragm in a lens. By adjusting the aperture size, you can control the amount of light that enters through the lens and strikes the image sensor, thereby controlling exposure. The aperture setting also affects depth of field: A wide-open aperture produces a short depth of field, so the subject is sharply focused but distant objects appear blurry; a narrow aperture produces a long depth of field so that both the subject and distant objects appear sharp.
Aperture range: The aperture is an adjustable diaphragm in a lens. By adjusting the aperture size, you can control the amount of light that enters through the lens and strikes the image sensor, thereby controlling exposure. The aperture setting also affects depth of field: A wide-open aperture produces a short depth of field, so the subject is sharply focused but distant objects appear blurry; a narrow aperture produces a long depth of field so that both the subject and distant objects appear sharp.
Chapters 7 and 8 cover these issues in detail. For the purposes of lens shopping, you need to know just a few things.
• Every lens has a specific range of aperture settings. Obviously, the larger the range, the more control you have over exposure and depth of field.
• The larger the maximum aperture, the “faster” the lens. Aperture settings are stated in f-stops, with a lower number meaning a larger aperture. For example, a setting of f/2 results in a more open aperture than f/4. And if you have one lens with a maximum aperture of f/2 and another with a maximum aperture of f/4, the f/2 lens is said to be faster because you can open the aperture wider, thereby allowing more light into the camera and permitting the image to be captured in less time. This not only benefits you in low-light situations but also when photographing action, which requires a fast shutter speed (short exposure time). So, all other things being equal, look for the fastest lens in your budget.
• With some zoom lenses, the maximum and minimum aperture change as you zoom the lens. For example, when you zoom to a telephoto focal length, the maximum aperture generally gets smaller — that is, you can’t open the aperture as much as you can at a wide-angle setting. You can buy lenses that maintain the same maximum and minimum aperture throughout the whole zoom lens, but you pay more for this feature.
After studying these issues and narrowing down your choices, finding the right lens in the category you want is just a matter of doing some homework. Study lens reviews in photography magazines and online photography sites to find the lens that performs best while still staying in your budget.
Attaching and removing lenses
Whatever lens you buy, follow these steps to mount it on the camera body:
1. Turn off the camera and remove the cap that covers the lens mount on the front of the camera.
2. Remove the cap that covers the back of the lens.
3. Hold the lens in front of the camera so that the little white dot on the lens aligns with the matching dot on the camera body.
Official photography lingo uses the term mounting index instead of little white dot. Either way, you can see the markings in question in Figure 1-3.
Figures in this book show the D5200 with its 18–55mm kit lens. If you buy a different lens, check your lens manual for complete operating instructions. The mounting index on your lens may not look the same as the one featured in Figure 1-3.
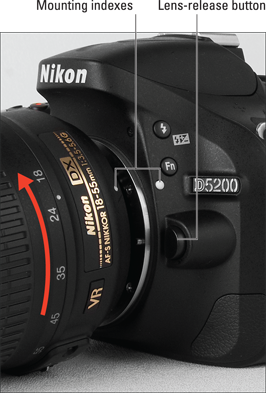
Figure 1-3: When attaching the lens, rotate it in the direction indicated by the arrow.
4. Keeping the mounting indexes aligned, position the lens on the camera’s lens mount.
When you do so, grip the lens by its back collar, not the movable, forward end of the lens barrel.
5. Turn the lens in a counterclockwise direction until the lens clicks into place.
To put it another way, turn the lens toward the side of the camera that sports the shutter button, as indicated by the red arrow in the figure.
6. On a lens that has an aperture ring, set and lock the ring so the aperture is set at the highest f-stop number.
Check your lens manual to find out whether your lens sports an aperture ring and how to adjust it. (The 18–55mm and 18–105mm kit lenses don’t have this feature.) After locking the aperture on the lens, use the normal camera controls to adjust the f-stop setting.
To remove a lens, press the lens-release button, labeled in Figure 1-3, and then turn the lens toward that button — that is, the opposite of what the arrow indicates in the figure — until it detaches from the lens mount. Put the rear protective cap onto the back of the lens and, if you aren’t putting another lens on the camera, cover the lens mount with its protective cap, too.
 Always attach or switch lenses in a clean environment to reduce the risk of getting dust, dirt, and other contaminants inside the camera or lens. Changing lenses on a sandy beach, for example, isn’t a good idea. For added safety, point the camera body slightly down when performing this maneuver; doing so helps prevent any flotsam in the air from being drawn into the camera by gravity.
Choosing a focusing method (auto or manual)
To take advantage of the D5200’s autofocusing system, you must use an AF-S or AF-I lens. For times when you attach a lens that doesn’t support autofocusing or the autofocus system has trouble locking on your subject, you can focus manually. (If you’ve never used manual focus, don’t be intimidated — there’s really nothing to it.)
Set the focusing method via the A/M switch, labeled in Figure 1-4. Choose A for autofocusing; M for manual focusing. Again, the figure features the 18–155mm kit lens; if you use a different lens, check the lens instruction guide for information on how to set the focusing method.
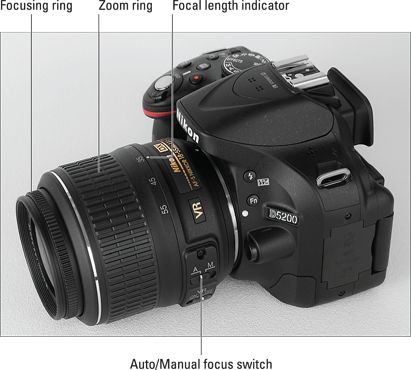
Figure 1-4: Set the focusing method (auto or manual) via the A/M switch.
Chapter 8 offers complete details on focusing, but here are a few basics on focusing with the kit lens and others that use the same design:
![]() To autofocus, press and hold the shutter button halfway. Whether focus is locked at that point and which area of the frame is used to set the focusing distance depends on two options you can explore in Chapter 8: Focus mode and AF-area mode. At the default settings, the camera typically focuses on the closest object and locks focus with your half-press of the shutter button. A little green light appears at the left end of the viewfinder display to indicate that focus was achieved. However, for moving subjects, focus may be adjusted up to the time you take the shot, and the green focus light may blink as focus shifts.
To autofocus, press and hold the shutter button halfway. Whether focus is locked at that point and which area of the frame is used to set the focusing distance depends on two options you can explore in Chapter 8: Focus mode and AF-area mode. At the default settings, the camera typically focuses on the closest object and locks focus with your half-press of the shutter button. A little green light appears at the left end of the viewfinder display to indicate that focus was achieved. However, for moving subjects, focus may be adjusted up to the time you take the shot, and the green focus light may blink as focus shifts.
![]() To focus manually, rotate the focusing ring on the lens barrel. The location of the focusing ring varies from lens to lens; Figure 1-4 shows you where to find the ring on the 18–55mm kit lens.
To focus manually, rotate the focusing ring on the lens barrel. The location of the focusing ring varies from lens to lens; Figure 1-4 shows you where to find the ring on the 18–55mm kit lens.
Remember to set the lens switch to the M position before you rotate the focusing ring! Otherwise, you can damage the lens.
![]() If you have trouble focusing, you may be too close to your subject. Every lens has a minimum focusing distance, which you can find in your lens manual. For the kit lens, it’s about 11 inches.
If you have trouble focusing, you may be too close to your subject. Every lens has a minimum focusing distance, which you can find in your lens manual. For the kit lens, it’s about 11 inches.
![]() Some subjects make autofocusing difficult. Highly reflective objects, subjects behind fences, scenes that contain little contrast, and dim lighting are just some causes of autofocus problems. The easiest solution when you can’t get the camera to target your subject is to focus manually.
Some subjects make autofocusing difficult. Highly reflective objects, subjects behind fences, scenes that contain little contrast, and dim lighting are just some causes of autofocus problems. The easiest solution when you can’t get the camera to target your subject is to focus manually.
![]() Be sure to adjust the viewfinder to accommodate your eyesight. Otherwise you can’t accurately gauge focus. The section “Adjusting the Viewfinder to Your Eyesight,” later in this chapter, provides help with this adjustment.
Be sure to adjust the viewfinder to accommodate your eyesight. Otherwise you can’t accurately gauge focus. The section “Adjusting the Viewfinder to Your Eyesight,” later in this chapter, provides help with this adjustment.
Zooming in and out
If you bought a zoom lens, it has a movable zoom ring. The location of the zoom ring on the 18–55mm kit lens is shown in Figure 1-4. To zoom in or out, rotate the ring.
The numbers at the edge of the zoom ring, by the way, represent focal lengths. When the kit lens is mounted on the camera, the number that’s aligned with the white dot labeled focal length indicator in Figure 1-4 represents the current focal length. In the figure, for example, the focal length is 35mm. Some lenses use a different marking, so check your lens manual if you use a lens other than the kit lens.
Using a VR (Vibration Reduction) lens
The 18–55mm kit lens, as well as many other Nikon lenses, offers Vibration Reduction, indicated by the initials VR in the lens name. Vibration Reduction attempts to compensate for small amounts of camera shake that are common when photographers handhold their cameras and use a slow shutter speed (long exposure time), a lens with a long focal length (telephoto lens), or both. That camera movement during the exposure can produce blurry images. Although Vibration Reduction can’t work miracles, it enables most people to capture sharper handheld shots in many situations than they otherwise could.
Here’s what you need to know about taking best advantage of this feature:
![]() Enabling Vibration Reduction on the kit lens: Turn Vibration Reduction on or off by using the VR switch, labeled in Figure 1-5.
Enabling Vibration Reduction on the kit lens: Turn Vibration Reduction on or off by using the VR switch, labeled in Figure 1-5.
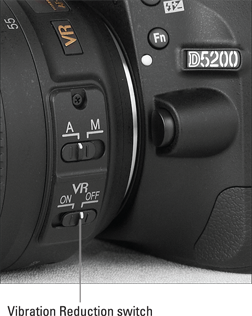
Figure 1-5: Turn off Vibration Reduction when you use a tripod.
![]() For other lenses, check the lens manual to find out whether your lens offers a similar feature. On non-Nikon lenses, it may go by another name: image stabilization, optical stabilization, anti-shake, vibration compensation, and so on.
For other lenses, check the lens manual to find out whether your lens offers a similar feature. On non-Nikon lenses, it may go by another name: image stabilization, optical stabilization, anti-shake, vibration compensation, and so on.
![]() Vibration Reduction is initiated when you depress the shutter button halfway. If you pay close attention, the image in the viewfinder may appear to be a little blurry immediately after you take the picture. That’s a normal result of the Vibration Reduction operation and doesn’t indicate a problem with your camera or focus.
Vibration Reduction is initiated when you depress the shutter button halfway. If you pay close attention, the image in the viewfinder may appear to be a little blurry immediately after you take the picture. That’s a normal result of the Vibration Reduction operation and doesn’t indicate a problem with your camera or focus.
![]() With the kit lens, turn off Vibration Reduction when you mount the camera on a tripod. When you use a tripod, Vibration Reduction can have detrimental effects because the system may try to adjust for movement that isn’t actually occurring. This recommendation assumes that the tripod is locked down so that the camera is immovable.
With the kit lens, turn off Vibration Reduction when you mount the camera on a tripod. When you use a tripod, Vibration Reduction can have detrimental effects because the system may try to adjust for movement that isn’t actually occurring. This recommendation assumes that the tripod is locked down so that the camera is immovable.
![]() With other lenses, check the instruction manuals for recommendations about tripod shooting. In some cases, the manufacturers may recommend that you leave the system turned on or select a special setting when you use a tripod or pan the camera (move it horizontally or vertically as you take the picture). For the kit lens, however, you don’t need to disable Vibration Reduction when panning.
With other lenses, check the instruction manuals for recommendations about tripod shooting. In some cases, the manufacturers may recommend that you leave the system turned on or select a special setting when you use a tripod or pan the camera (move it horizontally or vertically as you take the picture). For the kit lens, however, you don’t need to disable Vibration Reduction when panning.
Adjusting the Viewfinder to Your Eyesight
Tucked behind the right side of the rubber eyepiece that surrounds the viewfinder is a tiny dial that enables you to adjust the focus of your viewfinder to accommodate your eyesight. Figure 1-6 offers a close-up look at the dial, which is officially known as the diopter adjustment control.
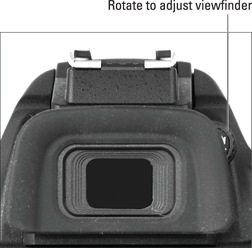
Figure 1-6: Use the diopter adjustment control to set the viewfinder focus for your eyesight.
If you don’t adjust the viewfinder, scenes that appear out of focus through the viewfinder may actually be sharply focused through the lens, and vice versa. Here’s how to make the necessary adjustment:
1. Remove the lens cap from the front of the lens and turn the camera on.
2. Look through the viewfinder and press the shutter button halfway to display picture data at the bottom of the viewfinder.
You can then let up on the shutter button.
3. Rotate the diopter adjustment dial until the viewfinder data appears sharpest to your eye.
As you rotate the dial, the markings in the center of the viewfinder, which are related to autofocusing, also become more or less sharp.
The Nikon manual warns you not to poke yourself in the eye as you perform this maneuver. This warning seems so obvious that I laugh every time I read it — which makes me feel doubly stupid the next time I poke myself in the eye as I perform this maneuver.
Using the Articulating Monitor
When you first take the camera out of its box, the monitor is positioned with the screen facing inward, protecting it from scratches and smudges, as shown on the left in Figure 1-7. It’s a good idea to place the monitor in this position when you’re not using the camera. When you’re ready to start shooting or reviewing your photos, you can lock the monitor in the traditional position on the camera back, as shown on the right in Figure 1-7. Or, for more flexibility, you can swing the monitor out and away from the camera body and then rotate it to find the best viewing angle, as shown in Figure 1-8.
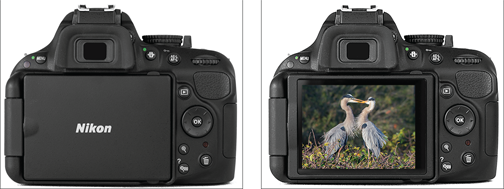
Figure 1-7: Here you see just two of the possible monitor positions.
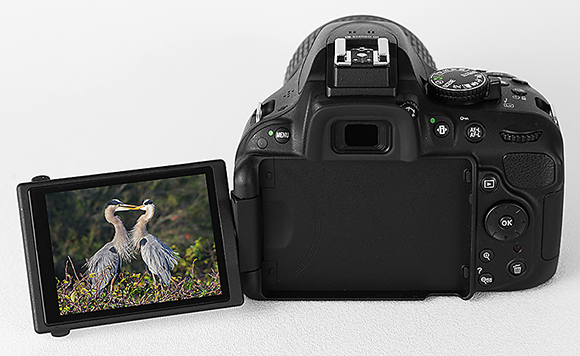
Figure 1-8: You can angle the monitor to get the best view of your subject.
Because playing with the monitor is no doubt one of the first things you did after unpacking your new camera, I won’t waste space walking you through the process of adjusting the screen. (If you need help, the camera manual shows you what to do.) But I do want to offer a few monitor-related tips:
![]() Don’t force things. Although the monitor assembly is sturdy, treat it with respect as you adjust the screen position. The monitor twists only in certain directions, and it’s easy to forget which way it’s supposed to move. So if you feel resistance, don’t force things — you could break the monitor. Instead, rely on that feeling of resistance to remind you to turn the screen the other way.
Don’t force things. Although the monitor assembly is sturdy, treat it with respect as you adjust the screen position. The monitor twists only in certain directions, and it’s easy to forget which way it’s supposed to move. So if you feel resistance, don’t force things — you could break the monitor. Instead, rely on that feeling of resistance to remind you to turn the screen the other way.
![]() Watch the crunch factor. When positioning the monitor back into the camera (whether face in or face out), take care that nothing gets in the way. Use a lens brush or soft cloth to clean the monitor housing on the camera back so there’s nothing in the way that could damage the monitor.
Watch the crunch factor. When positioning the monitor back into the camera (whether face in or face out), take care that nothing gets in the way. Use a lens brush or soft cloth to clean the monitor housing on the camera back so there’s nothing in the way that could damage the monitor.
![]() Clean smart. It’s virtually impossible to keep nose prints and fingerprints off the monitor — well, it is for me, anyway. When you get the urge to clean the screen, use only the special cloths and cleaning solutions made for this purpose. (You can find them in any camera store.) Don’t use paper products, such as paper towels, because they can contain wood fibers that can scratch the LCD surface.
Clean smart. It’s virtually impossible to keep nose prints and fingerprints off the monitor — well, it is for me, anyway. When you get the urge to clean the screen, use only the special cloths and cleaning solutions made for this purpose. (You can find them in any camera store.) Don’t use paper products, such as paper towels, because they can contain wood fibers that can scratch the LCD surface.
One other housekeeping warning: Never use a can of compressed air to blow dust off the camera — the air is cold and can crack the monitor.
![]() Live View photography has some drawbacks. The Live View feature enables you to compose your photos using the monitor rather than the viewfinder. Live View may feel more comfortable than using the viewfinder if you’re stepping up to the D5200 from a point-and-shoot camera that didn’t have a viewfinder. But the monitor is one of the biggest drains on battery power, and autofocusing in Live View mode is slower than when you use the viewfinder. For these reasons (and a few others you can explore in Chapter 4), I stick with the viewfinder for most regular photography and reserve Live View for movie recording. (You can’t use the viewfinder when shooting movies.)
Live View photography has some drawbacks. The Live View feature enables you to compose your photos using the monitor rather than the viewfinder. Live View may feel more comfortable than using the viewfinder if you’re stepping up to the D5200 from a point-and-shoot camera that didn’t have a viewfinder. But the monitor is one of the biggest drains on battery power, and autofocusing in Live View mode is slower than when you use the viewfinder. For these reasons (and a few others you can explore in Chapter 4), I stick with the viewfinder for most regular photography and reserve Live View for movie recording. (You can’t use the viewfinder when shooting movies.)
Working with Memory Cards
Instead of recording images on film, digital cameras store pictures on memory cards. Your D5200 uses a specific type of memory card — an SD card (for Secure Digital).
Most SD cards sold today carry the designation SDHC (for High Capacity) or SDXC (for eXtended Capacity), depending on how many gigabytes (GB) of data they hold. SDHC cards hold from 4GB to 32GB of data; the SDXC moniker is assigned to cards with capacities greater than 32GB.
The following list offers a primer in the care and feeding of your memory cards:
![]() Inserting a card: Turn off the camera and then put the card in the card slot with the label facing the back of the camera, as shown in Figure 1-9. Push the card into the slot until it clicks into place; the memory card access light (labeled in Figure 1-9) blinks for a second to let you know the card is inserted properly.
Inserting a card: Turn off the camera and then put the card in the card slot with the label facing the back of the camera, as shown in Figure 1-9. Push the card into the slot until it clicks into place; the memory card access light (labeled in Figure 1-9) blinks for a second to let you know the card is inserted properly.
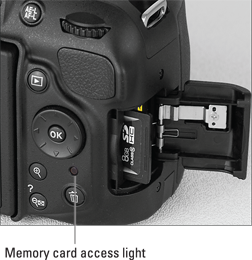
Figure 1-9: Insert the card with the label facing the camera back.
![]() Formatting a card: The first time you use a new memory card — or insert a card that’s been used in other devices (such as an MP3 player) — you need to format it. Formatting ensures that the card is properly prepared to record your pictures. Here’s what you need to know about this important housekeeping task:
Formatting a card: The first time you use a new memory card — or insert a card that’s been used in other devices (such as an MP3 player) — you need to format it. Formatting ensures that the card is properly prepared to record your pictures. Here’s what you need to know about this important housekeeping task:
• Formatting erases everything on your memory card. So before you format a card, be sure that you’ve copied any pictures or other data on it to your computer.
If you accidentally erase valuable data, don’t panic, though. You can buy data-recovery software that may be able to retrieve the missing files, and some companies also offer this service — a quick online search will turn up lots of options. To give the recovery process the best chances of success, stop shooting and remove the card from the camera immediately. There are no guarantees, but it’s worth a try if you really need that deleted data back.
• Format the card by using the Format Memory Card option on the Setup menu. The upcoming section “Ordering from Camera Menus” explains how to use the menus, if you need help. Some computer programs enable you to format cards as well, but it’s not a good idea to go that route. Your camera is better equipped to optimally format cards.
• The blinking letters For in the viewfinder mean that the card requires formatting. On the monitor, the camera displays a less subtle message: “This card is not formatted. Format the card.” Either way, the camera won’t let you take any pictures until you give in to its formatting demand.
![]() Removing a card: After making sure that the memory card access light is off, indicating that the camera has finished recording your most recent photo, turn off the camera. Open the memory card door, depress the memory card slightly until you hear a little click, and then let go. The card pops halfway out of the slot, enabling you to grab it by the tail and remove it.
Removing a card: After making sure that the memory card access light is off, indicating that the camera has finished recording your most recent photo, turn off the camera. Open the memory card door, depress the memory card slightly until you hear a little click, and then let go. The card pops halfway out of the slot, enabling you to grab it by the tail and remove it.
If you turn on the camera when no card is installed, the symbol [-E-] blinks in the lower-right corner of the viewfinder. The image area of the viewfinder also displays a blinking memory card symbol. A message on the monitor also nudges you to insert a memory card. If you do have a card in the camera and you get these messages, try taking it out and reinserting it.
![]() Handling cards: Don’t touch the gold contacts on the back of the card. (See the left card in Figure 1-10.) When cards aren’t in use, store them in the protective cases they came in or in a memory card wallet. Keep cards away from extreme heat and cold as well.
Handling cards: Don’t touch the gold contacts on the back of the card. (See the left card in Figure 1-10.) When cards aren’t in use, store them in the protective cases they came in or in a memory card wallet. Keep cards away from extreme heat and cold as well.
![]() Locking cards: The tiny switch on the side of the card, labeled lock switch in Figure 1-10, enables you to lock your card, which prevents any data from being erased or recorded to the card. Press the switch toward the bottom of the card to lock the card contents; press it toward the top of the card to unlock the data. (If you insert a locked card into the camera, you see a message on the monitor alerting you to the fact, and the symbol [d blinks in the viewfinder.)
Locking cards: The tiny switch on the side of the card, labeled lock switch in Figure 1-10, enables you to lock your card, which prevents any data from being erased or recorded to the card. Press the switch toward the bottom of the card to lock the card contents; press it toward the top of the card to unlock the data. (If you insert a locked card into the camera, you see a message on the monitor alerting you to the fact, and the symbol [d blinks in the viewfinder.)
Do you need high-speed memory cards?
Secure Digital (SD) memory cards are rated according to speed classes: Class 2, Class 4, Class 6, and Class 10, with the number indicating the minimum number of megabytes (MB; units of computer data) that can be transferred per second. A Class 2 card, for example, has a minimum transfer speed of 2MB per second. In addition to these speed classes, The Powers That Be recently added a new category of speed rating — Ultra High Speed (UHS). UHS cards also carry a number designation; at present, there is only one class of UHS card, UHS 1. These cards currently offer the fastest performance. The D5200 supports this new card speed.
Of course, with the increase in card speed comes a price increase, which leads to the question: Do you really have a need for speed? The answer is “maybe.” If you shoot movies, I recommend a Class 10 card at minimum — the faster data-transfer rate helps ensure smooth movie-recording and playback performance. For still photography, users who shoot at the highest resolution or prefer the Raw (NEF) file format may also gain from high-speed cards; both options increase file size and, thus, the time needed to store the picture on the card.
As for picture downloading, how long it takes files to shuffle from card to computer depends not just on card speed, but also on the capabilities of your computer and, if you use a memory card reader to download files, on the speed of that device.
Long story short, to push your camera to its performance limits, a high-speed card is worth the expense, especially for video recording. If you’re primarily interested in still photography or you already own slower-speed cards, try using them first — you may find that they’re more than adequate.

Figure 1-10: Avoid touching the gold contacts on the card.
You also can protect individual images on a card from accidental erasure by using the camera’s Protect feature, which I cover in Chapter 5.
This protection doesn’t apply to formatting cards, however; it only works for pictures that you try to delete using the camera’s Delete function.
![]() Using Eye-Fi memory cards: Your camera works with Eye-Fi memory cards, which are special cards that enable you to transmit your files wirelessly to other devices. That's a cool feature, but unfortunately, the cards themselves are more expensive than regular cards and require some configuring that I don't have room to cover in this book. For more details, visit
Using Eye-Fi memory cards: Your camera works with Eye-Fi memory cards, which are special cards that enable you to transmit your files wirelessly to other devices. That's a cool feature, but unfortunately, the cards themselves are more expensive than regular cards and require some configuring that I don't have room to cover in this book. For more details, visit www.eye.fi.
If you do use Eye-Fi cards, enable and disable wireless transmission via the Eye-Fi Upload option on the Setup menu. When no Eye-Fi card is installed in the camera, this menu option disappears.
Exploring External Camera Controls
Scattered across your camera’s exterior are numerous controls that you use to change picture-taking settings, review and edit your photos, and perform various other operations. In later chapters, I discuss all your camera’s functions in detail and provide the exact steps to follow to access them. This section provides just a basic introduction to the external features.
Topside controls
Your virtual tour begins with the bird’s-eye view shown in Figure 1-11. There are a number of features of note here:
![]() On/Off switch and shutter button: Okay, I’m pretty sure you already figured out this combo button. But you may not be aware that you need to press the shutter button in two stages: Press and hold the button halfway and wait for the camera to initiate exposure metering and, if you’re using autofocusing, to set the focusing distance. Then press the button the rest of the way to take the picture.
On/Off switch and shutter button: Okay, I’m pretty sure you already figured out this combo button. But you may not be aware that you need to press the shutter button in two stages: Press and hold the button halfway and wait for the camera to initiate exposure metering and, if you’re using autofocusing, to set the focusing distance. Then press the button the rest of the way to take the picture.
![]()
![]() Exposure Compensation button: This button activates Exposure Compensation, a feature that enables you to tweak exposure when working in three of your camera’s exposure modes: P (programmed autoexposure), A (aperture-priority autoexposure), and S (shutter-priority autoexposure). Press the button while rotating the Command dial to set the amount of Exposure Compensation. In M (manual exposure) mode, you press this button while rotating the Command dial to adjust the aperture setting.
Exposure Compensation button: This button activates Exposure Compensation, a feature that enables you to tweak exposure when working in three of your camera’s exposure modes: P (programmed autoexposure), A (aperture-priority autoexposure), and S (shutter-priority autoexposure). Press the button while rotating the Command dial to set the amount of Exposure Compensation. In M (manual exposure) mode, you press this button while rotating the Command dial to adjust the aperture setting.
![]()
![]() Info button: Press this button to display the Information screen on the camera monitor. The screen not only enables you to easily view the current picture-taking settings, but also enables you to adjust some settings more quickly than by using the camera menus. (Look for details later in this chapter, in the sections “Viewing Picture Settings” and “Adjusting Settings via the Information Display” for details.) To turn off the screen, press the Info button again.
Info button: Press this button to display the Information screen on the camera monitor. The screen not only enables you to easily view the current picture-taking settings, but also enables you to adjust some settings more quickly than by using the camera menus. (Look for details later in this chapter, in the sections “Viewing Picture Settings” and “Adjusting Settings via the Information Display” for details.) To turn off the screen, press the Info button again.
You also can display the screen by pressing the Information Edit button on the back of the camera (see Figure 1-12) or by pressing the shutter button halfway and releasing it. I find these methods easier, so I use the Info button only when I want to turn off the screen.
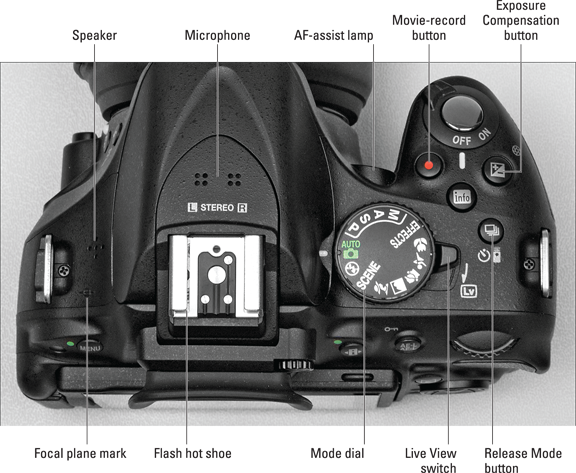
Figure 1-11: The tiny pictures on the Mode dial represent the automatic exposure modes known as Scene modes.
![]() Live View switch: As its name implies, this switch turns Live View on and off. As soon as you turn on Live View, the scene in front of the lens appears on the monitor, and you no longer can see anything through the viewfinder. You then can compose a still photo using the monitor or begin recording a movie. Chapter 4 details Live View photography and movie recording.
Live View switch: As its name implies, this switch turns Live View on and off. As soon as you turn on Live View, the scene in front of the lens appears on the monitor, and you no longer can see anything through the viewfinder. You then can compose a still photo using the monitor or begin recording a movie. Chapter 4 details Live View photography and movie recording.
![]()
![]() Movie-record button: After shifting to Live View mode, press this button to start recording a movie using the default recording settings. Press again to stop recording.
Movie-record button: After shifting to Live View mode, press this button to start recording a movie using the default recording settings. Press again to stop recording.
![]()
![]() Release Mode button: Press this button to change the camera’s shutter-release mode. By default, the option is set to Single Frame, which results in one picture each time you press the shutter button. You also can opt for Self-Timer mode, Remote Control mode, and a few other settings that I cover in Chapter 2.
Release Mode button: Press this button to change the camera’s shutter-release mode. By default, the option is set to Single Frame, which results in one picture each time you press the shutter button. You also can opt for Self-Timer mode, Remote Control mode, and a few other settings that I cover in Chapter 2.
![]() Mode dial: With this dial, labeled in Figure 1-11, you set the camera to fully automatic, semi-automatic, or manual exposure mode. Setting the dial to Effects enables you to apply special effects as the image or movie is captured. Chapter 3 covers the fully automatic modes, including Scene modes; Chapter 7 covers semi-automatic and manual modes (P, S, A, and M); and Chapter 10 shows you how to use Effects mode.
Mode dial: With this dial, labeled in Figure 1-11, you set the camera to fully automatic, semi-automatic, or manual exposure mode. Setting the dial to Effects enables you to apply special effects as the image or movie is captured. Chapter 3 covers the fully automatic modes, including Scene modes; Chapter 7 covers semi-automatic and manual modes (P, S, A, and M); and Chapter 10 shows you how to use Effects mode.
![]() AF-assist lamp: In dim lighting, the camera may emit a beam of light from this lamp when you use autofocusing. The light helps the camera find its focusing target. If you’re shooting in a setting where the light is distracting or otherwise annoying, you can disable it via the Built-In AF-Assist Illuminator option, found in the Autofocus section of the Custom Setting menu. On the flip side, there are some situations in which the lamp is automatically disabled: It doesn’t light in Live View mode or during movie recording, for example.
AF-assist lamp: In dim lighting, the camera may emit a beam of light from this lamp when you use autofocusing. The light helps the camera find its focusing target. If you’re shooting in a setting where the light is distracting or otherwise annoying, you can disable it via the Built-In AF-Assist Illuminator option, found in the Autofocus section of the Custom Setting menu. On the flip side, there are some situations in which the lamp is automatically disabled: It doesn’t light in Live View mode or during movie recording, for example.
The AF-assist lamp also shoots out light when you use red-eye reduction flash and the Self-Timer shutter-release mode, both covered in Chapter 2. You can’t disable the lamp for these two functions.
![]() Flash hot shoe: A hot shoe is a connection for attaching an external flash head. When not in use, the contacts on the shoe are protected by a little black cover; remove the cover to expose the contacts, as shown in Figure 1-11, to attach the external flash.
Flash hot shoe: A hot shoe is a connection for attaching an external flash head. When not in use, the contacts on the shoe are protected by a little black cover; remove the cover to expose the contacts, as shown in Figure 1-11, to attach the external flash.
![]() Microphone: The two clusters of holes labeled microphone in the figure lead to the camera’s internal stereo microphone. You also can attach an external mic via the port found under the cover on the left side of the camera (refer to Figure 1-14, in the upcoming section “Hidden connections”).
Microphone: The two clusters of holes labeled microphone in the figure lead to the camera’s internal stereo microphone. You also can attach an external mic via the port found under the cover on the left side of the camera (refer to Figure 1-14, in the upcoming section “Hidden connections”).
![]() Speaker: When you play a movie, the sound comes wafting out of these little holes, labeled in Figure 1-11.
Speaker: When you play a movie, the sound comes wafting out of these little holes, labeled in Figure 1-11.
![]() Focal plane indicator: Should you need to know the exact distance between your subject and the camera, the focal plane mark labeled in Figure 1-11 is key. The mark indicates the plane at which light coming through the lens is focused onto the negative in a film camera or the image sensor in a digital camera. Basing your measurement on this mark produces a more accurate camera-to-subject distance than using the end of the lens or some other external point on the camera body as your reference point.
Focal plane indicator: Should you need to know the exact distance between your subject and the camera, the focal plane mark labeled in Figure 1-11 is key. The mark indicates the plane at which light coming through the lens is focused onto the negative in a film camera or the image sensor in a digital camera. Basing your measurement on this mark produces a more accurate camera-to-subject distance than using the end of the lens or some other external point on the camera body as your reference point.
Back-of-the-body controls
Traveling over the top of the camera to its back side, shown in Figure 1-12, you encounter the following features:

Figure 1-12: Use the Multi Selector to navigate menus and access certain other camera options.
![]() Command dial: After you activate certain camera features, you rotate this dial, labeled in Figure 1-12, to select a specific setting. For example, to choose a shutter speed when shooting in shutter-priority (S) mode, you rotate the Command dial.
Command dial: After you activate certain camera features, you rotate this dial, labeled in Figure 1-12, to select a specific setting. For example, to choose a shutter speed when shooting in shutter-priority (S) mode, you rotate the Command dial.
![]()
![]() AE-L/AF-L button: Pressing this button initiates autoexposure lock (AE-L) and autofocus lock (AF-L). Chapter 7 explains autoexposure lock; Chapter 8 talks about autofocus lock.
AE-L/AF-L button: Pressing this button initiates autoexposure lock (AE-L) and autofocus lock (AF-L). Chapter 7 explains autoexposure lock; Chapter 8 talks about autofocus lock.
In playback mode, pressing the button activates the Protect feature, which locks the picture file — hence the little key symbol that appears above the button — so that it isn’t erased if you use the picture-delete functions. See Chapter 5 for details. (The picture is erased if you format the memory card, however.)
You can adjust the performance of the button as it relates to locking focus and exposure, too. Instructions in this book assume that you stick with the default setting, but if you want to explore your options, see Chapter 11.
In sections of the Nikon manual that discuss the Protect feature, this button is sometimes referenced just with the little key symbol. To keep things simple, I always refer to it as the AE-L/AF-L button and show the button in the margin to avoid any confusion.
![]() Multi Selector/OK button: This dual-natured control, labeled in Figure 1-12, plays a role in many camera functions. You press the outer edges of the Multi Selector left, right, up, or down to navigate camera menus and access certain other options. At the center of the control is OK, which you press to finalize a menu selection or other camera adjustment.
Multi Selector/OK button: This dual-natured control, labeled in Figure 1-12, plays a role in many camera functions. You press the outer edges of the Multi Selector left, right, up, or down to navigate camera menus and access certain other options. At the center of the control is OK, which you press to finalize a menu selection or other camera adjustment.
![]()
![]() Delete button: Sporting a trash can icon, the universal symbol for delete, this button enables you to erase pictures from your memory card. Chapter 5 has specifics.
Delete button: Sporting a trash can icon, the universal symbol for delete, this button enables you to erase pictures from your memory card. Chapter 5 has specifics.
![]()
![]() Playback button: Press this button to switch the camera into picture review mode. Chapter 5 details playback features.
Playback button: Press this button to switch the camera into picture review mode. Chapter 5 details playback features.
![]() Menu button: Press this button to access menus of camera options. See the section “Ordering from Camera Menus,” later in this chapter, for details on navigating menus.
Menu button: Press this button to access menus of camera options. See the section “Ordering from Camera Menus,” later in this chapter, for details on navigating menus.
![]()
![]() Zoom Out button: As you can probably deduce from the three symbols that mark this button, it has not one, but three primary functions:
Zoom Out button: As you can probably deduce from the three symbols that mark this button, it has not one, but three primary functions:
• Display help screens: The little question mark symbol is a reminder that you can press this button to display helpful information about certain menu options. See “Displaying Help Screens,” later in this chapter, for details.
• Display thumbnails during playback: In playback mode, pressing the button enables you to display multiple image thumbnails on the screen, thus the little thumbnail grid on the button face. Chapter 5 details picture playback.
• Reduce image magnification during playback: If you magnify an image during playback, pressing the button reduces the magnification amount. The magnifying glass with the minus sign tips you off to this function.
![]()
![]() Zoom In button: In playback mode, pressing this button magnifies the currently displayed image and also reduces the number of thumbnails displayed at a time. Note the plus sign in the middle of the magnifying glass — plus for zoom in.
Zoom In button: In playback mode, pressing this button magnifies the currently displayed image and also reduces the number of thumbnails displayed at a time. Note the plus sign in the middle of the magnifying glass — plus for zoom in.
![]()
![]() Information Edit button: Press this button once to display the Information screen. Press again to activate the control strip at the bottom of the screen, which enables you to quickly access certain shooting settings. See the upcoming section “Adjusting Settings via the Information Display” for details.
Information Edit button: Press this button once to display the Information screen. Press again to activate the control strip at the bottom of the screen, which enables you to quickly access certain shooting settings. See the upcoming section “Adjusting Settings via the Information Display” for details.
Front-left buttons
On the front-left side of the camera, shown in Figure 1-13, you find the following features:
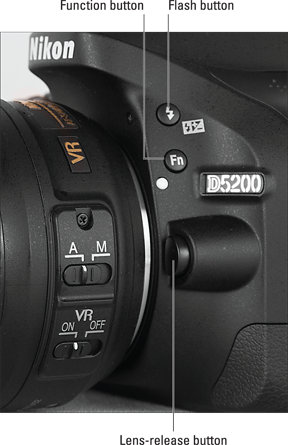
Figure 1-13: Press the Flash button to pop up the built-in flash when you shoot in the P,S, A, or M modes.
![]()
![]() Flash button: In the advanced exposure modes (P, S, A, and M) as well as in the Food Scene mode, pressing this button pops up the camera’s built-in flash. (In other modes, the camera decides whether the flash is needed.) By holding the button down and rotating the Command dial, you can adjust the Flash mode (fill flash, red-eye reduction, and so on). In advanced exposure modes, you also can adjust the flash power by pressing the button while simultaneously pressing the Exposure Compensation button and rotating the Command dial. The little plus/minus symbol that appears below the button — the same symbol that’s on the Exposure Compensation button — is a reminder of the button’s role in flash-power adjustment.
Flash button: In the advanced exposure modes (P, S, A, and M) as well as in the Food Scene mode, pressing this button pops up the camera’s built-in flash. (In other modes, the camera decides whether the flash is needed.) By holding the button down and rotating the Command dial, you can adjust the Flash mode (fill flash, red-eye reduction, and so on). In advanced exposure modes, you also can adjust the flash power by pressing the button while simultaneously pressing the Exposure Compensation button and rotating the Command dial. The little plus/minus symbol that appears below the button — the same symbol that’s on the Exposure Compensation button — is a reminder of the button’s role in flash-power adjustment.
Check out Chapter 7 for details on these and other flash options.
![]()
![]() Function (Fn) button: By default, this button gives you quick access to the ISO setting, which controls the camera’s sensitivity to light. (Chapter 7 explains.) If you don’t use that feature often, you can use the button to perform a variety of other operations. Chapter 11 shows you how to change the button’s purpose. (Note: All instructions in this book assume that you haven’t changed the function.)
Function (Fn) button: By default, this button gives you quick access to the ISO setting, which controls the camera’s sensitivity to light. (Chapter 7 explains.) If you don’t use that feature often, you can use the button to perform a variety of other operations. Chapter 11 shows you how to change the button’s purpose. (Note: All instructions in this book assume that you haven’t changed the function.)
![]() Lens-release button: Press this button to disengage the lens from the camera’s lens mount so that you can remove the lens.
Lens-release button: Press this button to disengage the lens from the camera’s lens mount so that you can remove the lens.
Hidden connections
Hidden under cover on the left side of the camera, you find the following four connection ports, labeled in Figure 1-14:
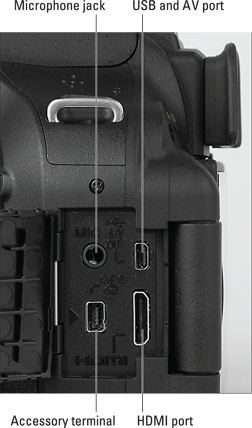
Figure 1-14: Open the cover on the side of the camera to reveal these connections.
![]() Accessory terminal: You can plug in the optional Nikon MC-DC2 remote shutter-release cable, WR-R10 wireless remote control, or GP-1 GPS (Global Positioning System) unit here. I don’t cover these optional accessories in this book, but the manual that comes with the devices can get you up and running. Check the camera manual for help with the related settings provided via the Accessory Terminal option on the Setup menu.
Accessory terminal: You can plug in the optional Nikon MC-DC2 remote shutter-release cable, WR-R10 wireless remote control, or GP-1 GPS (Global Positioning System) unit here. I don’t cover these optional accessories in this book, but the manual that comes with the devices can get you up and running. Check the camera manual for help with the related settings provided via the Accessory Terminal option on the Setup menu.
![]() Microphone jack: If you’re not happy with the audio quality provided by the internal microphone, you can plug in the optional ME-1 stereo microphone here.
Microphone jack: If you’re not happy with the audio quality provided by the internal microphone, you can plug in the optional ME-1 stereo microphone here.
![]() USB and AV port: Through this port, you can connect your camera to your computer for picture downloading. The same port enables you to cable the camera to a television for picture playback. Nikon supplies the cables you need for both connections in the camera box; see Chapter 5 for information on television connections and Chapter 6 for help with downloading pictures.
USB and AV port: Through this port, you can connect your camera to your computer for picture downloading. The same port enables you to cable the camera to a television for picture playback. Nikon supplies the cables you need for both connections in the camera box; see Chapter 5 for information on television connections and Chapter 6 for help with downloading pictures.
You use the same port to attach the optional WU-1a Wireless Mobile Adapter, which enables you to transfer pictures to some smart phones and tablets via a wireless network. I talk more about this accessory in Chapter 6.
![]() HDMI port: You can use this port to connect your camera to a high-definition TV, but you need to buy an HDMI cable to do so. Look for a Type C mini-pin cable. Chapter 5 offers more details on HD television playback.
HDMI port: You can use this port to connect your camera to a high-definition TV, but you need to buy an HDMI cable to do so. Look for a Type C mini-pin cable. Chapter 5 offers more details on HD television playback.
If you turn the camera over, you find a tripod socket, which enables you to mount the camera on a tripod that uses a 1/4-inch screw, plus the battery chamber.
Ordering from Camera Menus
Pressing the Menu button gives you access to a slew of options in addition to those you control via the external buttons and dials. When you press the button, you see a screen similar to the one shown on the left in Figure 1-15. The icons along the left side of the screen represent the available menus. (Table 1-1 labels the icons and includes a brief description of the goodies found on each menu.) In the menu screens, the icon that’s highlighted or appears in color is the active menu; options on that menu automatically appear to the right. In the figure, the Shooting menu is active, for example.


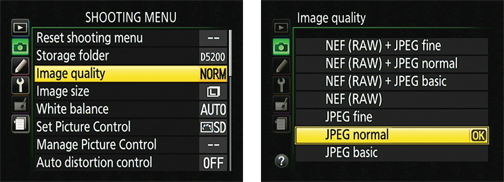
Figure 1-15: Highlight a menu in the left column to display its contents.
I explain all the important menu options elsewhere in the book; for now, just familiarize yourself with the process of navigating menus and selecting options therein. The Multi Selector (refer to Figure 1-12) is the key to the game. You press the edges of the Multi Selector to navigate up, down, left, and right through the menus.
In this book, the instruction “Press the Multi Selector left” simply means to press the left edge of the control. “Press the Multi Selector right” means to press the right edge, and so on.
Here’s a bit more detail about the process of navigating menus:
![]() To select a different menu: Press the Multi Selector left to jump to the column containing the menu icons. Then press up or down to highlight the menu you want to display. Finally, press right to jump over to the options on the menu.
To select a different menu: Press the Multi Selector left to jump to the column containing the menu icons. Then press up or down to highlight the menu you want to display. Finally, press right to jump over to the options on the menu.
![]() To select and adjust a function on the current menu: Again, use the Multi Selector to scroll up or down the list of options to highlight the feature you want to adjust and then press OK. Settings available for the selected item then appear. For example, if you select the Image Quality item from the Shooting menu, as shown on the left in Figure 1-15, and press OK, the available Image Quality options appear, as shown on the right in the figure. Repeat the old up-and-down scroll routine until the choice you prefer is highlighted. Then press OK to return to the previous screen.
To select and adjust a function on the current menu: Again, use the Multi Selector to scroll up or down the list of options to highlight the feature you want to adjust and then press OK. Settings available for the selected item then appear. For example, if you select the Image Quality item from the Shooting menu, as shown on the left in Figure 1-15, and press OK, the available Image Quality options appear, as shown on the right in the figure. Repeat the old up-and-down scroll routine until the choice you prefer is highlighted. Then press OK to return to the previous screen.
In some cases, you may see a right-pointing arrowhead instead of the OK symbol next to a menu item. That’s your cue to press the Multi Selector right to display a submenu or other list of options (Most of the time, however, you can just press the OK button if you prefer.)
![]() To select items from the Custom Setting menu: Displaying the Custom Setting menu, whose icon is a little pencil, takes you to a screen that contains six submenus that carry the labels A through F. Each of the submenus holds clusters of options related to a specific aspect of the camera’s operation. Highlight a submenu and press OK to get to those actions.
To select items from the Custom Setting menu: Displaying the Custom Setting menu, whose icon is a little pencil, takes you to a screen that contains six submenus that carry the labels A through F. Each of the submenus holds clusters of options related to a specific aspect of the camera’s operation. Highlight a submenu and press OK to get to those actions.
In the Nikon manual, instructions sometimes reference the Custom Setting menu items by a menu letter and number. For example, “Custom Setting a1” refers to the first option on the a (Autofocus) submenu. I try to be more specific in this book, however, so I use the actual setting names. (Really, we all have enough numbers to remember, don’t you think?)
After you jump to the first submenu, you can simply scroll up and down the list to view options from other submenus. You don’t have to keep going back to the initial menu screen, selecting the submenu, pressing OK, and so on.
![]() Create a custom menu or view your 20 most recently adjusted menu items: The sixth menu is actually two menus bundled into one: Recent Settings and My Menu, both shown in Figure 1-16. The menu icon changes depending on which of these two functions is active; Table 1-1 shows both icons. Each menu contains a Choose Tab option; select this option, as shown in the figures, and press OK to shift between the two menus.
Create a custom menu or view your 20 most recently adjusted menu items: The sixth menu is actually two menus bundled into one: Recent Settings and My Menu, both shown in Figure 1-16. The menu icon changes depending on which of these two functions is active; Table 1-1 shows both icons. Each menu contains a Choose Tab option; select this option, as shown in the figures, and press OK to shift between the two menus.
Here’s what the two menus offer:
• My Menu: Through this screen, you can create a custom menu that contains your favorite options. Chapter 11 details the steps.
• Recent Settings: This screen lists the 20 menu items you ordered most recently. So to adjust those settings, you don’t have to wade through all the other menus looking for them — just head to the Recent Settings menu instead.
![]() To remove an item from the Recent Settings menu, highlight the item and press the Delete button. Press again to confirm your decision and go forward with trashing the item.
To remove an item from the Recent Settings menu, highlight the item and press the Delete button. Press again to confirm your decision and go forward with trashing the item.
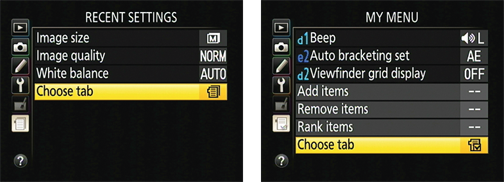
Figure 1-16: The Recent Settings menu offers quick access to the last 20 menu options you selected; the My Menu menu enables you to design a custom menu.
Displaying Help Screens
![]() If you see a small question mark in the lower-left corner of a menu, as shown on the left in Figure 1-17, press and hold the Zoom Out button — note the question-mark label above the button — to display information about the current menu option. For example, the right screen in Figure 1-17 shows the help screen associated with the White Balance setting. If you need to scroll the screen to view all the help text, keep the button depressed and scroll by using the Multi Selector. Release the button to close the Information screen.
If you see a small question mark in the lower-left corner of a menu, as shown on the left in Figure 1-17, press and hold the Zoom Out button — note the question-mark label above the button — to display information about the current menu option. For example, the right screen in Figure 1-17 shows the help screen associated with the White Balance setting. If you need to scroll the screen to view all the help text, keep the button depressed and scroll by using the Multi Selector. Release the button to close the Information screen.
On occasion, you also may spot the question-mark symbol blinking in the lower-left corner of the Information display; in this case, the camera’s alerting you to a potential shooting problem. Again, just press the Zoom Out button to see what solution the camera suggests. When the symbol isn’t blinking, pressing the button displays a screen that explains the current exposure mode (A, Auto, P, and so on).
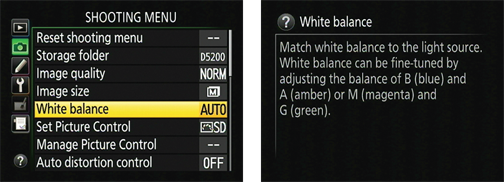
Figure 1-17: Press and hold the Zoom Out button to display onscreen help.
Viewing Picture Settings
Your D5200 gives you the following ways to monitor critical picture-taking settings.
![]() Information display: Figure 1-18 gives you a look at this display, which you can bring up on monitor by taking any of these steps:
Information display: Figure 1-18 gives you a look at this display, which you can bring up on monitor by taking any of these steps:
![]() • Press the Info button. Press once to display the screen; press again to turn off the monitor.
• Press the Info button. Press once to display the screen; press again to turn off the monitor.
• Press the shutter button halfway and release it. Pressing and holding the button halfway down turns off the screen and fires up the autofocusing and exposure metering systems. Because those two systems use battery power, you may want to avoid this technique when the battery is running low.
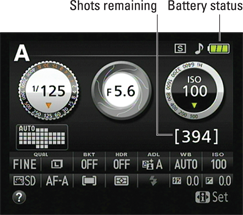
Figure 1-18: Press the Info or Info Edit button to view picture-taking settings on the monitor.
![]() • Press the Information Edit button. Note, though, that pressing the button a second time doesn’t turn off the display — instead, it accesses a control strip at the bottom of the display, which you can then use to adjust certain picture settings. I explain this neat feature in the next section. To hide the Information display without activating the control strip, press the Info button.
• Press the Information Edit button. Note, though, that pressing the button a second time doesn’t turn off the display — instead, it accesses a control strip at the bottom of the display, which you can then use to adjust certain picture settings. I explain this neat feature in the next section. To hide the Information display without activating the control strip, press the Info button.
In this book, I show and explain the display as it works by default. But you can modify its behavior and appearance via the Setup menu; look for details in Chapter 11.
![]() Viewfinder: You also can view some camera settings in the data display at the bottom of the viewfinder, as shown on the left in Figure 1-19. The information that appears depends on what action you’re currently undertaking.
Viewfinder: You also can view some camera settings in the data display at the bottom of the viewfinder, as shown on the left in Figure 1-19. The information that appears depends on what action you’re currently undertaking.
You can display gridlines in the viewfinder, as shown on the right in Figure 1-19, by visiting the Shooting/Display section of the Custom Setting menu and turning the Viewfinder Grid Display option to On. The gridlines are a great help when you need to ensure the alignment of objects in your photo — for example, to make sure that the horizon is level in a landscape.
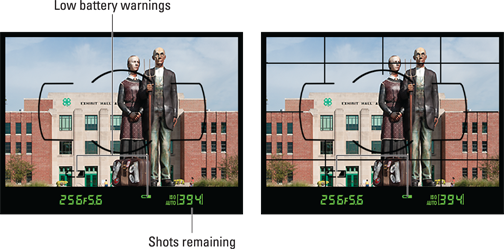
Figure 1-19: Picture settings also appear at the bottom of the viewfinder (left); enable the grid for help aligning objects in the frame (right).
Adjusting automatic shutdown timing
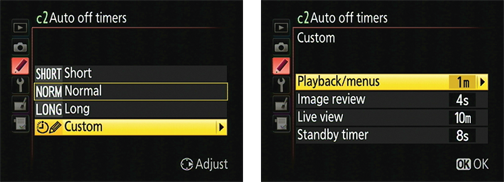
To save battery power, your camera automatically shuts off the monitor and the viewfinder display after a period of inactivity. You can specify how long you want the camera to wait before taking that step through Auto Off Timers option, found in the Timers/AE Lock section of the Custom Setting menu. You can specify the auto-off timing separately for shooting, picture playback, displaying menus, and using Live View. Additionally, you can adjust the length of time the camera displays a picture immediately after you press the shutter button, known as the image-review period.
When you choose the Auto Off Timers option, you gain access to four settings: Short, Normal, Long, and Custom. If you choose Custom, as shown in the figures here, you can modify the timing for each component individually. (The Standby Timer option controls auto shutoff during shooting.) The Short, Normal, and Long options result in the following shutoff delays:
![]() Short: Playback/menus, 20 seconds; Image Review, 4 seconds; Live View, 5 minutes; Standby Timer, 4 seconds
Short: Playback/menus, 20 seconds; Image Review, 4 seconds; Live View, 5 minutes; Standby Timer, 4 seconds
![]() Normal (default): Playback/menus, 1 minute; Image Review, 4 seconds; Live View, 10 minutes; Standby Timer, 8 seconds
Normal (default): Playback/menus, 1 minute; Image Review, 4 seconds; Live View, 10 minutes; Standby Timer, 8 seconds
![]() Long: Playback/menus, 5 minutes; Image Review, 20 seconds; Live View, 20 minutes; Standby Timer, 1 minute.
Long: Playback/menus, 5 minutes; Image Review, 20 seconds; Live View, 20 minutes; Standby Timer, 1 minute.
If what you see in Figures 1-18 and 1-19 looks like a confusing mess, don’t worry. Many of the settings relate to options that won’t mean anything to you until you make your way through later chapters and explore the advanced exposure modes. But do make note of the following bits of data that are helpful even when you shoot in the fully automatic modes:
![]() Battery status indicator: A full-battery icon like the one in Figure 1-18 shows that the battery is fully charged; if the icon appears empty, look for your battery charger.
Battery status indicator: A full-battery icon like the one in Figure 1-18 shows that the battery is fully charged; if the icon appears empty, look for your battery charger.
Your viewfinder displays a tiny low-battery icon when things get to the dangerous point. The icon appears just to the right of center in the settings strip at the bottom of the viewfinder. If the icon blinks, the battery is totally kaput, and shutter release is disabled. Just for good measure, the camera also displays a low-battery symbol in the image area of the viewfinder. The left image in Figure 1-19 shows you both symbols.
![]() Shots remaining: Labeled in Figures 1-18 and 1-19, this value indicates how many additional pictures you can store on the memory card. If the number exceeds 999, the value is presented a little differently. The initial K appears above the value to indicate that the first value represents the picture count in thousands. For example, 1.0K means that you can store 1,000 more pictures (K being a universally accepted symbol indicating 1,000 units). The number is then rounded down to the nearest hundred. So if the card has room for, say, 1,230 more pictures, the value reads 1.2K.
Shots remaining: Labeled in Figures 1-18 and 1-19, this value indicates how many additional pictures you can store on the memory card. If the number exceeds 999, the value is presented a little differently. The initial K appears above the value to indicate that the first value represents the picture count in thousands. For example, 1.0K means that you can store 1,000 more pictures (K being a universally accepted symbol indicating 1,000 units). The number is then rounded down to the nearest hundred. So if the card has room for, say, 1,230 more pictures, the value reads 1.2K.
Adjusting Settings via the Information Display
![]() The Information display isn’t just for checking current picture-taking settings; it also gives you quick access to some of the most critical of those settings. The key to this feature is the Information Edit button, found on the back of the camera, to the right of the viewfinder, and shown in the margin here.
The Information display isn’t just for checking current picture-taking settings; it also gives you quick access to some of the most critical of those settings. The key to this feature is the Information Edit button, found on the back of the camera, to the right of the viewfinder, and shown in the margin here.
Here’s how it works:
1. Display the Information screen.
You can get there by pressing the shutter button halfway and releasing it, by pressing the Info button, or by pressing the Info Edit button.
2. Press the Info Edit button.
The top part of the display dims, and the two rows of settings at the bottom of the screen become accessible. The currently selected setting appears highlighted, and its name is displayed at the bottom of the screen. For example, in the left screen in Figure 1-20, the Image Quality option is selected.
For expediency’s sake, I refer to this part of the Information display as the control strip.
3. Use the Multi Selector to highlight the setting you want to change.
4. Press OK.
You then see a screen that displays the available options for the selected setting, as shown on the right in Figure 1-20.
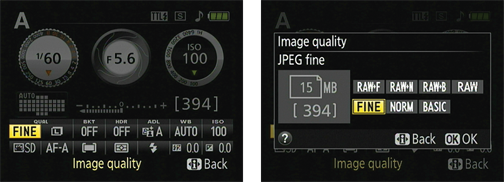
Figure 1-20: Press the Info Edit button to activate the control strip (left); highlight the option you want to adjust and press OK to display the available settings (right).
5. Use the Multi Selector to highlight the desired option and press OK.
You’re returned to the control strip. You can then adjust another setting if needed.
6. To exit the control strip, press the Info Edit button again.
Or just give the shutter button a quick half-press and release it. The Information display returns to its normal appearance.
Taking a Few Critical Setup Steps
Your camera offers scads of options for customizing its performance. Later chapters explain settings related to actual picture-taking, such as those that affect flash behavior and autofocusing, and Chapter 11 talks about some options that are better left at their default settings until you’re fully familiar with your camera. That leaves just a handful of setup options covered in the next two sections that I recommend you consider at the get-go.
Setup menu options
The following important options live on the Setup menu, which is the one marked with the little wrench icon and featured in Figure 1-21. The menu is a three-page affair (page three isn’t visible in the figure); use the Multi Selector to scroll up and down through the pages and access these settings:

Figure 1-21: Visit the Setup menu to customize your camera’s basic appearance and operation.
![]() Monitor Brightness: This option enables you to make the display brighter or darker. If you take this step, keep in mind that what you see on the monitor may not be an accurate rendition of the actual exposure of your image. Crank up the monitor brightness, for example, and an underexposed photo may look just fine. So I recommend that you keep the brightness at the default setting (0).
Monitor Brightness: This option enables you to make the display brighter or darker. If you take this step, keep in mind that what you see on the monitor may not be an accurate rendition of the actual exposure of your image. Crank up the monitor brightness, for example, and an underexposed photo may look just fine. So I recommend that you keep the brightness at the default setting (0).
![]() Time Zone and Date: When you turn on your camera for the very first time, it automatically displays this option and asks you to set the current date and time. Keeping the date and time accurate is important because that information is recorded as part of the image file. In your photo browser, you can then see when you shot an image and, equally handy, search for images by the date they were taken.
Time Zone and Date: When you turn on your camera for the very first time, it automatically displays this option and asks you to set the current date and time. Keeping the date and time accurate is important because that information is recorded as part of the image file. In your photo browser, you can then see when you shot an image and, equally handy, search for images by the date they were taken.
![]() Language: You’re asked to specify a language along with the date and time when you fire up your camera for the first time. Your choice determines the language of text on the camera monitor.
Language: You’re asked to specify a language along with the date and time when you fire up your camera for the first time. Your choice determines the language of text on the camera monitor.
![]() Firmware Version: Select this option and press OK to view what version of the camera firmware, or internal software, your camera runs. You see the firmware items, C and L. At the time this book was written, C was version 1.00; L was 1.006.
Firmware Version: Select this option and press OK to view what version of the camera firmware, or internal software, your camera runs. You see the firmware items, C and L. At the time this book was written, C was version 1.00; L was 1.006.
Keeping your camera firmware up to date is important, so visit the Nikon website (www.nikon.com) regularly to find out whether your camera sports the latest version. You can find detailed instructions on how to download and install any firmware updates on the site.
Custom Setting options
Also check the status of these Custom Setting menu options before you shoot any more pictures:
![]() Beep: By default, your camera beeps at you after certain operations, such as after it sets focus when you shoot in autofocus mode. If you need the camera to hush up, open the Custom Setting menu, select the Shooting/Display submenu, and then turn off the Beep option. You can also adjust the volume of the beep through the same menu option. On the Information display, a little musical note icon appears near the top-right corner of the screen when the beep is enabled. Turn off the beep, and the icon appears in a circle with a slash through it.
Beep: By default, your camera beeps at you after certain operations, such as after it sets focus when you shoot in autofocus mode. If you need the camera to hush up, open the Custom Setting menu, select the Shooting/Display submenu, and then turn off the Beep option. You can also adjust the volume of the beep through the same menu option. On the Information display, a little musical note icon appears near the top-right corner of the screen when the beep is enabled. Turn off the beep, and the icon appears in a circle with a slash through it.
![]() File Number Sequence: This option, found on the Shooting/Display submenu and highlighted in Figure 1-22, controls how the camera names your picture files. When the option is set to Off, as it is by default, the camera restarts file numbering at 0001 every time you format your memory card or insert a new memory card. Numbering is also restarted if a new image-storage folder is created. (Chapter 11 explains folders.)
File Number Sequence: This option, found on the Shooting/Display submenu and highlighted in Figure 1-22, controls how the camera names your picture files. When the option is set to Off, as it is by default, the camera restarts file numbering at 0001 every time you format your memory card or insert a new memory card. Numbering is also restarted if a new image-storage folder is created. (Chapter 11 explains folders.)
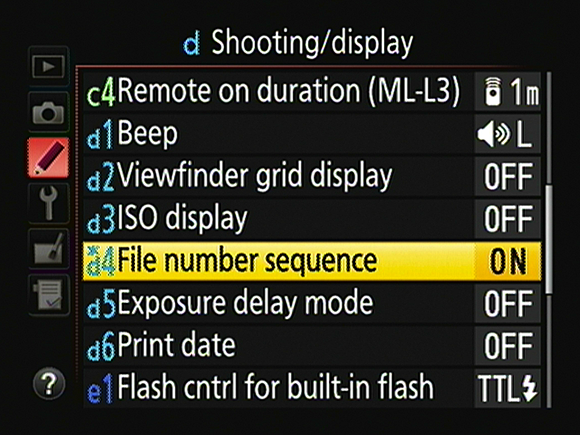
Figure 1-22: Danger, Will Robinson! Change the File Number Sequence to On to avoid winding up with multiple pictures that have the same filename.
Needless to say, this setup can cause problems over time, creating a scenario where you wind up with multiple images that have the same filename — not on the current memory card, but when you download images to your computer. So I strongly encourage you to set the option to On, as shown in Figure 1-22. Note that when you get to picture number 9999, file numbering is still reset to 0001, however. The camera automatically creates a new folder to hold for your next 9999 images.
As for the Reset option, it enables you to assign the first file number (which ends in 0001) to the next picture you shoot. Then the camera behaves as if you selected the On setting.
Should you be a really, really prolific shooter and snap enough pictures to reach image 9999 in folder 999, the camera will refuse to take another photo until you choose that Reset option and either format the memory card or insert a brand new one.
![]() Print Date: Through this option, which lives two doors down from the File Number Sequence option, you can choose to imprint on the photo the shooting date, date and time, or the number of days between the day you took the picture and another date that you specify. This feature works only with pictures that you shoot in the JPEG file format; see Chapter 2 for details about file formats.
Print Date: Through this option, which lives two doors down from the File Number Sequence option, you can choose to imprint on the photo the shooting date, date and time, or the number of days between the day you took the picture and another date that you specify. This feature works only with pictures that you shoot in the JPEG file format; see Chapter 2 for details about file formats.
The default setting, which disables the imprint, is the best way to go, however; you don’t need to permanently mar your photos to find out when you took them. Every picture file includes a hidden vat of text data, or metadata, that records the shooting date and time, as well as all the camera settings you used — f-stop, shutter speed, and lots more. You can view this data during playback and, after downloading, in the free software provided with your camera as well as in many photo programs. Chapter 6 shows you how.
![]() Slot Empty Release Lock: This cryptically named feature, found on the Controls section of the Custom Setting menu, determines whether the camera lets you take a picture when no memory card is installed in the camera. If you set it to Enable Release, the camera no longer warns you if a memory card isn’t installed. You can take a temporary picture, which appears in the monitor with the word Demo but isn’t recorded anywhere. The feature is provided mainly for use in camera stores, enabling salespeople to demonstrate the camera without having to keep a memory card installed. I can think of no good reason why anyone else would change the setting from the default, Release Locked.
Slot Empty Release Lock: This cryptically named feature, found on the Controls section of the Custom Setting menu, determines whether the camera lets you take a picture when no memory card is installed in the camera. If you set it to Enable Release, the camera no longer warns you if a memory card isn’t installed. You can take a temporary picture, which appears in the monitor with the word Demo but isn’t recorded anywhere. The feature is provided mainly for use in camera stores, enabling salespeople to demonstrate the camera without having to keep a memory card installed. I can think of no good reason why anyone else would change the setting from the default, Release Locked.
Restoring Default Settings
Should you ever want to return your camera to its original, out-of-the-box state, the camera manual contains a complete list of most of the default settings. Look on the pages that introduce each of the menus.
You can also partially restore default settings by taking these steps:
![]() Reset all Shooting Menu options: Open the Shooting menu, choose Reset Shooting Menu, and press OK. Note that resetting the menu does not affect the Storage Folder option, which is a concern only if you create custom folders, as outlined in Chapter 11.
Reset all Shooting Menu options: Open the Shooting menu, choose Reset Shooting Menu, and press OK. Note that resetting the menu does not affect the Storage Folder option, which is a concern only if you create custom folders, as outlined in Chapter 11.
![]() Reset all Custom Setting Menu options: Choose Reset Custom Settings at the top of the Custom Setting menu.
Reset all Custom Setting Menu options: Choose Reset Custom Settings at the top of the Custom Setting menu.
Resetting the Custom Setting menu restores the File Number Sequence option to its default, Off, which is most definitely Not a Good Thing. So if you restore the menu defaults, be sure that you revisit that option and return it to the On setting. See the preceding section for details.
![]()
![]()
![]() Restore critical picture-taking settings without affecting all options on the Custom Setting menu: Use the two-button reset method: Press and hold the Menu button and the Info Edit button simultaneously for longer than 2 seconds. (The little green dots near these two buttons are a reminder of this function.) See the camera manual for a list of exactly what settings are restored.
Restore critical picture-taking settings without affecting all options on the Custom Setting menu: Use the two-button reset method: Press and hold the Menu button and the Info Edit button simultaneously for longer than 2 seconds. (The little green dots near these two buttons are a reminder of this function.) See the camera manual for a list of exactly what settings are restored.
One last tip with regard to Custom Setting menu defaults: When you choose a setting other than the default, an asterisk appears above the number of the menu item. For example, in Figure 1-22, you see an asterisk above the a in a4, the number of the File Number Sequence option, because I changed the setting from the default.