Chapter 7
Putting It All Together to Capture Some Video
In This Chapter
- Preparing for a shoot
- Directing actors effectively
- Finding great-looking camera angles
- Managing voice and diction
The big day has arrived and it's time to shoot some video! You're ready to stride onto the set as the big-shot director or producer and yell “Action!” It's all a breeze from this point, right?
Not quite. A video shoot can be an incredibly high-pressure environment, with too much to do and too little time to get it done. You must perform an amazing juggling act that keeps the cast, crew, camera, script, set, props, costumes, and all those inevitable but unplanned events all moving forward to get your video “in the can” by the deadline.
The good news is that a video shoot can also be one of the most creative and rewarding experiences you'll ever have. When all the elements click and you see that outstanding performance or fantastic camera angle, you'll feel a sense of deep personal satisfaction and pride that you nailed it. When the shoot is going well, the payoff far outweighs the pain.
This chapter explains how to prepare for the shoot — from developing a checklist the night before to setting up on the big day. We lay out the steps involved in every good camera take, and we list the little details that every first-class director must keep an eye on in order to capture the outstanding footage you need.
Setting Up for a Shoot
Directing or producing a video is similar to running a marathon — you must be rested and ready before you can go the distance. The night before you run 26.2 miles, for example, you don't want to begin wondering whether you should have bought new running shoes. Similarly, the night before the big shoot, you want to be as prepared as possible. The more you prep, the smoother your shoot — and the better you sleep the night before.
Getting organized
 Buy a production notebook to make your film or video production extremely well organized. We recommend a good old-fashioned, three-ring binder, the type often carried by schoolchildren. It's the perfect one-stop spot to store all your shoot-related information, and it will soon become your new best friend.
Stock your production notebook with these items:
- Dividers: Add instant organization, and make the items you need during the shoot easy to find.
- Pens and pencils: Pens are the first thing you lose, so be sure to have more than one.
- Blank paper: You may need scratch paper or sheets of paper to illustrate shots.
- An envelope: Store the receipts from your expenditures.
Completing your checklists and “shoot sack”
After you have the basic items for your production notebook (as described in the preceding section), expand its contents by storing these items in it as well:
- Script: Your copy of the dialogue to be used in the shoot should always stay with you so that you can make notes, change the dialogue, or stay abreast of scenes that have been shot.
- Call sheet: This is a list of your cast and crew's arrival times on set. If you expect them to arrive at different times, keep track of their schedules.
- Cast and crew contact sheet: This list of contact information (such as email addresses and phone numbers) is the easiest way to ensure that participants can contact each other.
- Schedule: A schedule is useful when a number of cast or crew members are arriving on the same day and you want to better schedule the shoot, by determining which scenes to shoot and when, and when to let everyone take a break.
- Storyboard: This series of panels shows the individual shots within a scene. Keep the storyboard handy to show your crew the shots you want.
- Prop and costume list: Double-check this list after the shooting day ends to ensure that all items are returned to the appropriate person or place.
- Script breakdown: List cast members, props, costumes, and types of shots for every individual scene, and specify whether the scene is an interior or exterior.
- Cast breakdown: This reverse version of the script breakdown lists actors and the scenes in which they appear. Creating this list helps you schedule the shooting order of scenes.
Though the script breakdown and cast breakdown may be unnecessary for a simple shoot, if you have multiple scenes and actors, consider the breakdowns as insurance against losing important elements of the shoot. (We've seen actors released from a shoot for the day only to find that they were still needed for another scene later the same day.)
The night before your shoot, complete these tasks:
- Charge all batteries. Charge up all related devices, such as your camera, lights, laptop, and cellphone.
- Clear out any reusable media. If your camera records video to SD or CF cards, format them (otherwise known as erasing them) and clear some space.
- Double-check your equipment. Quickly test your camera, lights, and audio equipment. Ensure that every item works and that you know the exact location of all your equipment and accessories.
- Pack props and costumes. Don't wait until the morning of the shoot to pack everything!
- Make copies of the script. While you're at it, take the extra step of labeling every copy individually for your cast and crew.
- Stock up on petty cash. Withdraw cash from a nearby ATM so that you can purchase food, water, extra batteries, last-minute cab rides, coffee, and any other necessities you may need for the shoot. This is where the receipt envelope comes in handy.
- Confirm call times. Call, text, or email all participants to ensure that they know when and where to show up.
- Check the weather forecast. Make sure that the atmospheric conditions will not affect you adversely. Pay attention to rain forecasts, storm warnings, and make sure you're prepared for all conditions.
While you're charging batteries and anxiously awaiting the last of the cast to confirm their call times, turn your attention to another vital element of the shoot: the shoot sack. Simply fill a gym bag, large backpack, or (our favorite) rolling suitcase with the following essential items, and then you can take this film-production survival kit with you anywhere:
- Batteries and chargers: Store any batteries that aren't already installed in your equipment, and add any extra AA or AAA batteries you may need.
- Extension cords: Bring along at least two heavy-duty cords.
- Power strips: Bring two of these also.
- Gaffer tape: This heavy-duty tape has a million uses.
- Lights and mic: As long as these items fit into your shoot sack, add them.
- Screwdriver and knife: You never know when you'll need to tighten the tripod plate or cut some rope on set.
- Gloves: The lights may get too hot to touch after being on for a while.
- Tripod and monopod: Even if these items don't fit in the bag, pack them as part of your preparation ritual. (A monopod is a one legged tripod, typically used for shots requiring a more dynamic feel, or a quick paced live event or production.)
- Laptop (and optional external hard drive): These devices are likely to have separate cases, but you should make them part of your preparation ritual, too. You may need them for transferring footage among cards on the set.
Take a moment to look over everything you've packed. You've created a production notebook, double-checked equipment, charged batteries, confirmed schedules and locations with your cast and crew, and made for yourself the world's best shoot sack. You're ready to go, so take a deep breath, and get a good night's sleep.
Arriving on set
Whatever call time you've given your cast, plan for your crew to be on-site at least one hour earlier. Even if the hour is more time than you need to set up, having enough time to get ready without feeling pressured starts the shooting day on the right note. Besides, you'll quickly fill that hour.
Every shoot requires these three distinct spaces:
- Shooting area: This area should be ready for use when you arrive on the set so that you can begin setting up camera angles and lighting. Be polite but firm about claiming your space, and remove any items that don't belong in the scene.
- Equipment area: Designate a quiet corner in which to store equipment, props, and costumes and to serve as a charging station for batteries.
- Green room: Give your cast and crew (and perhaps certain equipment) a place to relax — and stay out of the way — between takes. In an office space, for example, a conference room is the perfect spot, but you may have to take whatever you can get. The green room is also a good spot for setting up an alcove to serve coffee and water to your cast and crew.
After you determine the boundaries of your space, you can set up the following equipment in it:
- Charging station: Plug in a power strip, and set up your camera's battery charger (and the chargers for light batteries, if you're using them).
- Data station: Plug in your laptop and external hard drive so that you can periodically “dump” footage.
- Camera, tripod, lights: After you unpack these items, you can start setting up the first shot. Check the natural ambient light in the room by looking at the camera's viewfinder to see what adjustments you need to make. Experiment to find the camera angles that work best.
Planning a realistic shooting schedule
When you watch a short scene in a video, you may believe that creating the scene was a simple task. And if the video is no good, it probably was a simple task. Virtually anyone can flip a switch on a camera and ask an actor to speak. Finding a unique and memorable way to shoot a scene takes time to prepare and pull off — even for simple scenes — and this amount of time has to be figured into your shooting schedule.
Two forces are at work in every film and video shoot: the creative need to make the production special, and the technical need to complete the production as quickly and inexpensively as possible and still look good. These needs are equally important. If you can't complete the shoot on schedule, you'll have nothing to show, but if you rush to complete the video with no regard for creativity, what's the point in even making it?
We would love to boil down the standard schedule to the simple mathematical formula “x number of shots divided by y setup time equals z,” but scheduling simply doesn't work that way. (Besides, math is not our forté.) To come up with a realistic estimate of the time you need, consider these factors:
- The number of shots your production needs
- The length of each shot
- The amount of time you need to realistically set up, shoot several takes, and break down the set
Shooting usually takes longer (often, much longer) than most people anticipate. The technical setup can be complex, and actors may need a few takes to nail their performances. If you're working with non-actors, you may want to add an extra 30 to 60 minutes to their scenes, just in case it takes longer to get the performance you need.
These guidelines can help streamline the shoot:
- Spend no more than 5 minutes setting up a shot. A 5-minute limit keeps the setup process lean and mean. You should have enough time to adjust the lights and position the camera. Obviously, some shots require more time than others, but when you're working on a deadline, time magically passes faster than normal.
- Shoot scenes out of order. Few film productions shoot scenes in the exact order they'll appear in the finished product. Usually, the shooting schedule is created by determining which resources (such as locations, actors, props, or lighting) can be reused in other scenes. Those scenes are then filmed consecutively.
By shooting out of order, you can schedule certain actors' scenes one after the other and then release the actors when they finish, leaving fewer people to manage as the day progresses.
- Shoot “big” scenes first. If you're shooting a crowd scene or another type of complicated shot, get it out of the way early in the day. Your cast and crew will be more energized, and you'll have that worry out of the way as the day wears on and pressure grows to wrap up the shoot.
- Experiment. Once, anyway. If you want (or a cast member wants) to try a radical idea, just to see whether it works, do it. But shoot the scene as specified in the script, too. Don't get too creative at the expense of the clock.
- Cut freely. If you find that your schedule is overstuffed, pull out the script and storyboard and cut some shots. Not scenes, mind you, just shots. We generally encourage you to shoot scenes with multiple shots (called coverage, which we address later in this chapter, in the section “Determining the best shot”). If time is running out, be prepared to change the shot list.

 The fewer people who are on the set, the faster you can shoot. The more people who watch a scene, the more your shoot can turn into a party rather than a production. When something strange or funny happens on the set (and suddenly everyone is laughing or chatting and no longer working), you have to play the role of benign dictator. Firmly, but with a friendly smile, ask all bystanders to clear out — pronto. When you have a camera, you wield power!
Practicing good habits before a shot
Your camera is set up, your actors are in place, and all eyes are on you. You're ready for the first take of the day. What do you say and when do you say it? You can actually set up a smooth, productive workflow by using a series of commands to move through each shot within a scene.
Draw from this handy list of words and phrases to communicate with your cast and crew — and to help them to communicate with you:
- “Quiet on the set.” When you let everyone know that you're about to “roll camera,” the only audible sound should come from whatever is happening in front of the camera. Side conversations, coughing, and mobile phones can all spoil a take, and you should have zero tolerance for them.
- “Roll camera.” When your actors and crew are set, cue the camera person to start shooting.
- “Camera rolling.” The camera person should reply to “Roll camera” with this phrase after shooting begins. If you're doing the shooting, just say “Camera rolling.”
- “Sound rolling.” Someone who is listening to sound separately on headphones says this phrase to indicate that the audio sounds good.
- “Action.” Finally! This famous cue tells actors to start the scene and lets everyone else know to remain quiet. Wait a few seconds after the camera and sound are rolling to say it.
- “Hold.” If a sudden event (such as a passing police siren) interrupts a shot, call “Hold” to let everyone know to stop what they're doing until the interruption ends. Then call “Action” again.
- “Cut.” After a scene ends, wait a few seconds to say this famous cue so that the crew continues shooting video and recording sound until the moment you say it.
After a few tries, your cast and crew will have the order and rhythm of these cues down pat, and your set will quickly sound professional (as long as an actor doesn't announce, “I'll be in my trailer”).
 Every take of a shot should have handles on it — a waiting period of a few seconds before you say “Action” and after you say “Cut.” This way, an editor (who may be you) who works on the scene in postproduction has a clearly defined segment of video to work with. “Action” and “Cut” are also cues for them.
 Don't wait to press the Record button immediately after calling “Action” or “Cut” (a mistake typically made by novice filmmakers). This bad habit leaves the editor with a scene that is potentially missing its first and last seconds — a huge amount of editing time. (Applying a cool transition effect, such as a dissolve or a fade-in, during the editing process is then impossible.) Also, actors shouldn't break character until you say “Cut.” As they finish their lines, they should remain in place until you stop shooting.
Maintaining continuity
Continuity is the purely technical requirement of maintaining a consistent look and action in every shot, including the background and lighting of the set and the actors' costumes, hair, and (most frequently) movement. A mobile phone that's held in a character's right hand in one shot and shifts to the left hand in the next shot jars the audience out of the moment.
If continuity mistakes happen to you, you're in good company. Many successful Hollywood movies are full of continuity mistakes. Throughout The Wizard of Oz, for example, the length of Judy Garland's hair and dress changes several times. If that type of huge production can slip up, your video can, too.
A simple way to keep an eye on actors' positions between shots is to call “Hold!” (refer to the list in the earlier section “Practicing good habits before a shot”) and quickly set up for the next shot. You can also show actors an earlier take so that they can position themselves to match their own movements. If your characters are drinking from a glass, for example, make the liquid level consistent from shot to shot (to prevent the audience from wondering how the glass was seemingly refilled). If you're shooting over several days, take a photo of your actors in full costume so that they can match their looks for the next day.
Continuity has an additional meaning for actors. It refers to their characters' mental and emotional states from scene to scene. When you're shooting scenes out of order, matching these states from the previous scene can be challenging. As a director, it's your job to keep actors on track from scene to scene by reminding them of their previous circumstances, such as where they're coming from, what has just taken place, and where they're headed. You can even draw a timeline for reference. Actors should see the big-picture view of their entire performances and their scene-to-scene progress.
Shooting a Great-Looking Video
To say that camerawork is a technical process, and not a creative one, is a mistake. Film and video are visual media, and the camera resembles a paintbrush. A huge dose of creativity determines where to place the camera. If you look at the camerawork in the films of Alfred Hitchcock, Steven Spielberg, or Peter Jackson, for example, you see one stunning memorable image after another. This section tells you how to use your camera effectively, from choosing angles and specifying movement to framing scenes and capturing extraordinary imagery.
To illustrate the techniques we describe in this section, we use the following familiar scenario to show how to use the camera and the frame (the rectangular image you see on a movie, TV, or computer screen) to better tell a story: When a young child plays ball in the house and his mother warns him to move outside, he ignores her request and instead breaks an expensive vase. Oops! The child's unhappy mother confronts him.
Composing and dividing the screen
Composition is the process of creating a picture that helps to effectively tell a story within the camera frame for each shot. Just as a photo needs composition to possess more visual power, a moving picture needs composition to help tell the story more powerfully.
The rule of thirds (a visual arts composition guideline) divides a rectangular picture, such as a camera frame, into nine smaller rectangles of equal size — three across and three down. Though this concept originated in photography and painting, it has its place in film and video production.
Using the rule of thirds to position the subject one-third of the way from the edge of the frame (rather than in the center of the frame) makes the picture stronger and more interesting visually.
Because the rule of thirds also applies to framing the background of an image, you can create beautiful, symmetrical images in outdoor shoots by positioning the ground across the lower third of the frame and positioning buildings and trees and the sky in the upper two-thirds of the frame.
The rule of thirds is an artistic concept related to the way the human brain interprets imagery. It simply makes images “look better.”
In the example, you can create tension in the shot (again, because of the way the brain processes images) by moving the camera so that the child is onethird of the way from the edge of the frame. When the child tosses the ball, you see the nearby empty living room, full of breakable objects, and you start to anticipate the ball flying from his hands and into Aunt Bertha's expensive Ming vase.
If you have a photo camera, try this experiment for capturing a better, stronger image. Frame the subject in the center of the shot, and take a picture. Then move the camera to frame the subject approximately one-third of the way from the edge of the shot, and compare the photos.
Determining the best shot
Your selection of camera angles, or shots, is limited, technically, only by your imagination, though you should master the basic principles before trying any fancy tricks. This section explains the building-block shots you see in most film and TV productions, and most scenes are built using a combination of these shots. In Hollywood, coverage is the practice of shooting a scene from various angles.
When you start shooting video, take these types of shots first:
- Master: The master shot is the foundation of your coverage. It shows everything — every important element of your scene. Place the camera far enough away to capture all the action, and shoot the entire scene from beginning to end. You can always cut back to the master shot to remind the audience where the characters are located in relation to each other.
- Medium: The medium shot moves in to show characters (or a single character) in an area from roughly just above their waists to a little over their heads. The medium shot is commonly used because it shows facial detail but still conveys a sense of the bigger picture.
- Close-up: In the close-up shot, the camera moves in tightly on a subject's face or on an object, such as the bouncing ball in this section's running example. The close-up is a powerful tool to show lots of facial detail and to build tension and emotion in a scene.
- Extreme close-up: In this type of shot, the camera (obviously) moves in even more tightly on a subject to show lots of detail. A shot of a character's eyes or of fingers drumming on a table or of a doorknob turning slowly shows an intimate level of detail to drive home a particular moment. Though an extreme close-up is rarely followed by a master shot (it's too much of a leap for viewers to make from small to large), you can follow it with a close-up or a medium shot.
These steps show one way to break down the scene in the bouncing-ball example:
- The master shot shows a child tossing a ball in the living room. The shot is framed to show the child positioned one-third of the way from the edge of the frame. You can hear his mother say, “Don't play ball in the house!”
- Cut to a medium shot of the child watching the ball move up and down. He smirks and says “No problem, Mom.”
- In the master shot, the child throws the ball high into the air. Uh-oh.
- A close-up shot of the child shows him watching the ball begin to descend.
- Cut to a close-up of the child's hand reaching for the ball — and missing it.
- An extreme close-up shot shows his eyes widening as you hear a vase shatter.
- Cut back to a medium shot of the child looking at the floor, horrified.
- A close-up shot of the broken vase shows the ball lying in the middle of the glass shards.
- Cut to a close-up of the child as he gulps and his mother scolds him.
- Return to the master shot, as the child turns to face his mother and blurts, “It wasn't my fault!” while she crosses her arms angrily.
These steps break down a scene, moment by moment, into shots that underscore the emotion of every beat of the scene. We won't win an award for this scene, but we can probably make an audience feel tension (and make them laugh at the child's excuse). That's how you “paint” a scene with your camera and the camera frame.
In any scene you shoot, keep your shots smooth and steady. In the age of point-and-shoot video cameras, people have a tendency to start the camera rolling and then point it at various characters in a scene, in one long take. They often attempt this all-over-the-map approach with a shaky hand so that the scene ends up looking like an earthquake just occurred. Unless you're shooting The Great Quake of the 21st Century, we recommend that you simply place the camera on a tripod. If your scene involves a lot of camera movement, shoot it with a smooth, steady hand.
Moving and grooving the camera
Anyone can put a camera on a tripod, turn it on, and shoot the scene before them in a single shot. But this style amounts to simply recording a scene, which is boring, rather than true directing, which uses the different shot choices that are available to tell a story, controls what an audience is seeing from moment to moment, and moves the camera to achieve great-looking images.
You can choose from a few basic camera moves:
- Pan: Simply move the camera from side to side, along the horizon. If the child in the bouncing-ball example enters a room, spots the ball on a table, and walks to it, you can follow his movement by panning from the doorway to the table.
- Tilt: Move the camera laterally, along a vertical plane. In the example, you would tilt the camera from the child's hand grabbing the ball and then lifting it to his chest as he looks at it mischievously.
- Track: In this tricky-but-fun shot, you simply follow the subject throughout the scene. You can track the child from an outdoor starting point, keep him at a distance, and then follow him right up to the ball. The tracking shot, which is used in lots of Hollywood films, can be an effective way to show off. (A famous 3-minute tracking shot from Martin Scorsese's Goodfellas follows Ray Liotta's character through the hallways and kitchen of a nightclub.)
You can pan and tilt by either using a handheld camera or placing it on a tripod or monopod. Tracking shots are typically accomplished with the use of a steadicam or dolly. To add a slick touch to your video, work out a brief tracking shot of one character.
Matching your eyelines
An eyeline is the invisible line leading from the eyes of a character on camera to a person or an object that the character is looking at off camera. The cut that you make to the next shot showing the off-camera person or object must be placed within the shot where the brain would expect it to be. If a character is looking upward, for example, you should then cut to the object that the viewer sees, placed above the camera. If the character's eyeline and the object's position don't match (if they look down at an object that you then see hanging over their heads, for example), the audience becomes disoriented and disconnects from the scene. The eyeline makes a subtle but crucial difference when cutting between two people who are speaking to each other within a scene.
In this section, we explain how to add two medium shots to the bouncing-ball example. One shows the mother furrowing her brow at her child, and the other shows the child lowering his head after being scolded. For these two shots, you can shoot the actors in this scene separately or even on different days because they don't appear in the frame together in this particular moment. Above all else, you have to match the eyelines of the mother and her child.
Suppose that the child looks up at his mother towering over him and then you cut to a shot of her face. Rather than look downward at him, as your brain expects, she instead looks directly across the shot at an object at the height of her eyes. Your brain would automatically connect the two shots to make you wonder what she's looking at (another person in the room, for example). Because she's the taller of the two, her eyes should aim downward at him, at a spot that's as close to the same spot in the frame where his eyes were looking up in the previous shot.
A character who looks off-screen at another character should be looking at the spot where the other character would stand. If you reverse the shot (to show the other character), the second character's eyes should be focused on the spot where the first character is positioned. Any well-made TV show or film has examples of shooting proper eyelines. In one with incorrect eyelines, you cannot determine where characters are oriented in a scene.
To ensure matching eyelines, position an off-screen actor behind the camera so that the on-screen actor can look at that person and deliver her lines. Encourage actors to stand immediately off-camera, even when they aren't part of a shot, to help make eyelines match. It also helps a cast member with her performance to speak directly to her scene partner, even if the partner is standing off camera.
Following the 180-degree rule
The 180-degree rule is a critical guideline in how scenes are shot in a film or video. When you watch a movie in which two characters are speaking and the cut moves from one to the other, you're likely seeing the 180-degree rule in action: It establishes the spatial relationship between characters or objects within a scene, specifically when the scene cuts between shots of them. Most viewers aren't aware of the 180-degree rule when it's followed; but when it isn't, viewers can become disoriented or confused about where characters are standing or sitting in relation to each other.
To use the 180-degree rule to construct a scene, imagine a straight line running down the middle of the characters, as shown in Figure 7-1. To avoid disorienting the audience, choose one side of the 180-degree line on which to shoot all your shots, and don't cross the line. Understanding this concept can be confusing, so we will walk you through an example.
Rather than show each actor individually, such as in the bouncing-ball example, you can use the popular Hollywood technique known as the over-the shoulder shot. For a shot of the child in the example looking up at his mother, you place the camera over her left shoulder and aim it at the child so that part of her left shoulder and hair frame the shot of his face.
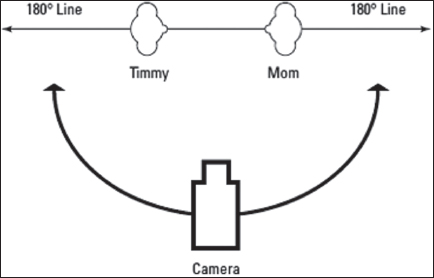
Figure 7-1: The imaginary line of the 180-degree rule.
Cut back to the mother looking crossly at her child. If you place the camera over his right shoulder, pointing up at the mother, who is towering over him, his right shoulder and hair frame the shot of his mother looking cross. Then you cut back to the first shot over her left shoulder, of the child looking remorseful.
In the example, we stay on one side of the line, over the mother's left shoulder and over the child's right shoulder. If we had moved from her left to his left, we would have crossed the line and confused the audience, because they wouldn't know where the characters were standing in relation to each other.
In another example, you see a shot of a train flying down the tracks, moving from right to left in the frame. Cut to a person waiting for the train, and then cut back to the same train, except that now you've crossed the tracks and you're shooting from an angle on the other side. The train is now moving from left to right! Your brain believes that it's another train, heading directly for the first train, and suddenly you've made a disaster film!
The 180-degree rule has one exception: If the camera is moving, you're allowed to cross the imaginary line if the shot itself moves across it. Then the audience will understand why you switch sides in the next shot.
Shooting an interview
Shooting an interview is a fairly easy task. In the world of marketing videos, you'll likely shoot a lot of sit-down interviews.
Follow these steps to shoot a simple but professional-looking interview:
- Set up two chairs. One is for the subject, and one is for the interviewer (who may be you). The subject should be seated.
- Set up your camera on a tripod. Place the tripod to the side of your chair, facing your subject.
- Frame the subject. Use a medium shot, moving upward from mid-torso or slightly closer.
- Light and mic your subject. This topic is covered in Chapter 6.
- Have your subject look at you, not at the camera. Looking into a camera lens tends to make a person self-conscious. You can conduct an excellent interview that has a conversational flow by having the subject speak to you. The camera serves to record the conversation you're having. (The most common camera style on YouTube is to have the subject speak directly into the camera; we recommend this style only if the subject can appear natural.)
A person who is verbose the first time he answers an interview question may want to answer a question a second time, after having the opportunity to find the best wording for his answer. To avoid being heard asking the interview questions, you can edit yourself out, by having the subject rephrase your question within the answer, as in this example:
You: “How long have you been the president of Smith Industries?”
The subject: “I have been president of Smith Industries for 40 years.”
Encourage your subject to answer as simply as possible, always including the crux of the question within the answer, and you'll have a professional-looking, easy-to-edit interview that you can replicate with different subjects.
Shooting extra footage and B-roll
Watch any political thriller (especially one with Harrison Ford or Morgan Freeman as the commander in chief) and you're bound to see an impressive shot of the White House while ominous music plays in the background. Did you know that the shot wasn't filmed by the movie's director? It may not have even been filmed by anyone working on the movie. That shot of the White House is a classic example of an establishing shot (that shows you where you are) and is a member of the family of B-roll footage.
B-roll footage is supplementary, traditionally used to accompany a documentary or TV news story. For example, in an interview with the president of Smith Industries, during an especially dry segment, you can cut away to show the Smith Industries factory floor or show workers picketing the president's office.
You can shoot and use B-roll to support the main storyline in your video. Film anything related to your business, or to the storyline of your video, and intercut it (cut back and forth) with your main (or A) storyline.
B-roll can be shot quickly, using your camera's internal mic. Shoot lots of footage until you find shots that blend well with the main part of your video. You can also shoot establishing shots of various buildings or areas where your scenes take place.
Capturing the perfect take — several times
Whether you're shooting a scripted scene or an interview, you probably won't get the perfect take the first time every time. Someone may flub a line or slam a door off-screen, a dog may begin barking, or a sudden rainstorm may interrupt a romantic picnic scene. Or, the “magic” just isn't happening right away and your actors need a few takes to warm up and discover the best way to play the scene. In any case, if you have to do it again, shrug your shoulders, yell “Cut,” and prepare everyone for another take.
Shooting multiple takes can be demanding because actors have to repeatedly speak the same lines and hit the same marks. However many takes you shoot of a scene, the acting always has to seem fresh. One way to achieve this goal is to let the actors vary their line readings slightly on every take. You can always revert to an earlier take if you don't like the revised version.
After you capture an excellent take, shoot a safety take immediately afterward. This extra version ensures that your editor has two good takes to work with, just in case something goes wrong with the footage during the postproduction process.
Working with Voice
When you shoot video, it's easy to get caught up in the visual aspect of each shot. However, you must also keep audio quality in mind at all times. See Chapter 6 for details about audio, but aside from mics and audio capturing devices, you have another tool in your audio arsenal that is provided for free by your actors: their voices. Whether you're dealing with seasoned or first-time actors, you can get the most from the mouths of your talent in a few ways, as described in the following sections.
Practicing diction and dialects
William Shakespeare, no slouch himself in producing one or two quality scripts, had some good advice 500 years ago for video actors: to speak their lines “trippingly on the tongue.” In other words, he suggested good diction, or the proper enunciation of the words in a script. Your actors need to practice diction in order to get your message across. Even unscripted interviewees can stand to use good diction.
Diction is all about several distinct vocal areas:
- Volume: Actors should speak loudly enough for the mic while still sounding believable. (Our experience tells us that nearly every actor can stand to be a bit louder.)
- Clarity: Determine whether actors are speaking unclearly, such as pronouncing words incorrectly or dropping sounds off the ends of their words. Most of us do this when we're speaking casually. Make sure that actors practice pronouncing the trickier words in your script. No one should sound like Mary Poppins, but every word should be clearly understood.
- Pace: Make sure that your actors aren't speaking too quickly or too slowly. Many people tend to rush through sentences when they're excited or stressed — which is exactly how actors will feel with the camera on them. Take time to rehearse the scene, and find an appropriate speaking pace.
- Vocal energy: Not to be confused with volume, vocal energy refers to the quality of an actor's voice, such as whether he's speaking with passion and animation or in a tired monotone. Because the camera is fairly close, actors don't have to speak the way they would to a crowded auditorium, though their voices should possess energy and make the dialogue sound authentic and believable.
Everyone speaks in a dialect, or regional accent. There's no universal, unaccented way to speak. A dialect can add huge amounts of believability and variety to a performance and truly drive home the content of your video. A dialect that's too strong, however, especially if an actor seems to be struggling with the lines in a script, can also detract the audience from engaging in your video. The key is to ensure that the words in your script are striking the audience as clearly and effectively as you need.
The power of the pause
People who speak to large groups or, worse, in front of a camera tend to barrel through their lines in an effort to reach the end of the script as soon as possible and stop speaking. Because they simply forget to pause, they're missing out on the most powerful audio tool available.
A well-placed pause carries a lot of weight. For a brief moment, suspense hangs in the air. The words you've just heard settle for a second, and then you hear more. A pause used by actors can add drama, dimension, and structure to the words they're saying.
Work with actors to find two or three spots to pause the dialogue. Don't overdo it, and don't make a pause last forever. Make sure that it's real, however, where the speaker can take a breath and feel in control of her words, not the other way around.
Managing crowd audio
Keep this Hollywood secret between you and us (and everyone else reading this book). Watch a crowd scene in a movie or TV show — a restaurant or bar scene is perfect. Notice how you hear the main characters speaking clearly while the crowd around them is quiet. How do the creators do that? Yes, mics are being used, but the bigger trick is that the crowd is completely silent during filming. All their talking is pantomimed, and the sounds are later added by editing.
Hollywood uses stock crowd sounds, which is why (if you're paying attention to these sort of things) you sometimes hear the same voices on different TV shows. When you're shooting a crowd scene, stock crowd sounds are available for different group sizes, and you can find the one that best suits your scene.
You can also direct the crowd to simply speak more quietly than normal. Depending on how many people you're working with, this suggestion can be an easy solution or a tough one to manage. The key is to get a great sound level from your main actors while retaining a believable amount of background noise. Remind crowd members that they're adding to the authenticity of a scene and offer to throw a party after the shoot is complete.