Chapter 14
Mining the YouTube Goldmine
In This Chapter
- Configuring your channel for monetization
- Creating an AdSense account for payment management and ad control
- Linking your YouTube channel with your AdSense account
- Understanding how ads work on your channel
- Making changes to increase ad revenue
If you have a great channel with fabulous content and you excel at social media and community interaction, you have a good shot at making some money from your all your hard YouTube work. In YouTube and digital advertising lingo, this is monetization. If you've already read Chapter 13, you know all about how advertisers pay for YouTube advertising. You've probably figured out that the advertising money has to go somewhere. It does — into the hands of Google, your partners, and you: the channel manager/publisher/creator.
You can make money from your YouTube work in many ways, too:
- Create a paid channel. Charge users to view some or all of the content on your channel.
- Monetize your video content. Allow ads to be placed against your content.
- Join a multichannel network. Become part of a MCN. (For more on MCNs, see Bonus Chapter 2.)
- Sell products. Use your YouTube content to help your viewers make a decision about your products or services.
- Get an endorsement deal. Sponsorship deals work when they're made without too much over-the-top promotion.
You can read about monetization in this chapter, and you may already have the basic info about MCNs and selling products from previous chapters.
Completing the last item in the preceding list means that you've hit the big-time if you're getting six-figure deals to promote products.
 Nothing prevents you from combining some of these various monetization approaches. MCNs are the exception, so you have to speak with your MCN managers and lawyers about the rules around monetization.
Be patient on your monetization journey, though. If you focus on the basics of building your channel with content, discoverability, subscribers, and engagement, the ad revenue you receive will grow in kind. Your YouTube earnings will come from multiple sources, including:
- The Google Display Network (GDN)
- AdSense auctions
- Reservation buys (those nonclickable ads)
- YouTube
 Don't waste your time trying to conjure up a viral video that you hope to monetize. Instead, focus on slow and steady channel growth.
Your first step to income involves tying together all the AdSense and YouTube plumbing. You can find out more about these topics in the remainder of this chapter.
Integrating AdSense
AdWords for Video is the way for advertisers to target YouTube and the Google Display network for ad placements. (For more on AdWords for Video, check out Chapter 13.) Publishers and creators can control what types of ads are shown against their content.
Content owners often take a great deal of pride in the content they produce, so it only makes sense that the ads conform to their brands and ensure a good overall experience for their viewers.
Google AdSense is how web content creators and YouTube channel managers control ads and get paid by advertisers who place ads against their YouTube content and websites. Like AdWords for Video, AdSense is a huge topic — we don't have room to cover every nook and cranny in this chapter, but we can give you a sense of what's necessary to get you started with YouTube monetization. AdSense, like all Google products, evolves regularly. To stay current, check out https://support.google.com/adsense.
Setting up YouTube monetization
Before you start seeing any money in your bank account, you need to set up your channel for monetization. Here's how it's done:
- Log on to your YouTube account.
- On your YouTube page, click your channel's icon and then choose Creator Studio from the menu that appears.
Doing so brings up the Creator Studio dashboard.
- Click the Channel section in the Navigation menu on the left.
If you see a Monetization link under the Status and Features link in the Channel section right under the Status and Features link, your channel is already set up for monetization and you can proceed to the next section, “Linking your channel with AdSense.” If you don't see a Monetization link, continue with Step 4.
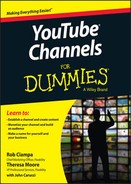
- Select Status and Features from the Channel section of Navigation menu on the left.
Doing so brings up a page similar to the one shown in Figure 14-1.
- In the Features section of the page, click the Enable button under the Status column.
A page about the YouTube partner program opens.
- Click the Enable My Account button.
You see a dialog box with lots of legal info about terms and conditions, honesty, and rights.
- If you (or your lawyer) agree with the terms, select all three agreement boxes and click the I Accept button.
You then see another dialog box that lets you select the ad formats you're willing to associate with your video content, such as overlay and TrueView in-stream. (For more on ad formats, check out Chapter 13.)
All display ad types are preconfigured, and none of them can be changed. - Select the ad formats to allow and then click Monetize.
You see the confirmation dialog box.
- Click the Got It button.
You're brought to the Videos page of the Video Manager.
- Select the video you want to monetize by clicking the $ button on the row with the video.
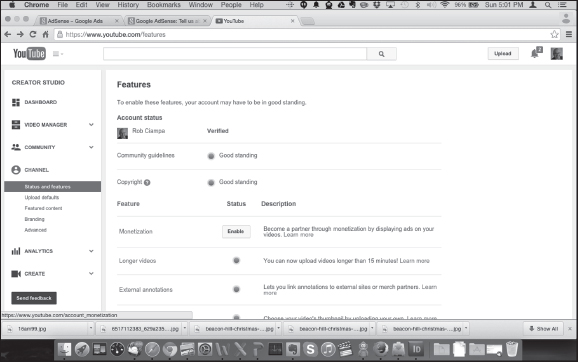
If you were to click on Channel in the Navigation menu, you'd see a new Monetization link on the Navigation menu. If you selected Status and Features from the Navigation menu, you see a green radio button next to Monetization, under Status. Your channel should now look like the one shown in Figure 14-2.
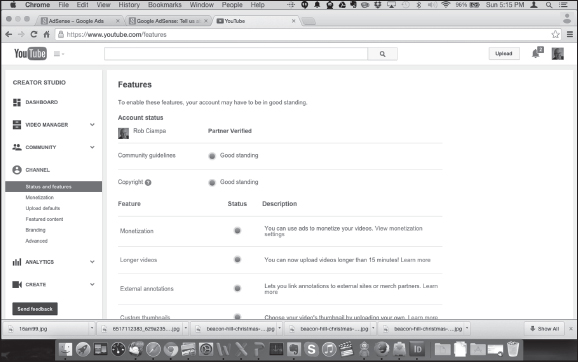
Figure 14-2: This YouTube channel is enabled for monetization.
With monetization now in place, you can set specific ad controls for you videos. Details are shown in the section, “Making Monetization Adjustments.” Before that, you'll have a few more housekeeping tasks that we discuss in the following sections.
Linking your channel with AdSense
To collect payment and control the types of ads shown on your YouTube channel, you need to link an AdSense account to that channel. If you already have an AdSense account, you can simply link that account. If don't already have an AdSense account, the following steps can help you do that. Either way, begin with the following steps:
- Log in to your YouTube account.
- On your YouTube page, click the channel icon and then choose Creator Studio from the menu that appears.
Doing so brings up the Creator Studio dashboard.
- Click the Channel heading in the Navigation menu on the left.
- Select Monetization under the Channel heading
You see the Monetization Account status page.
You can also disable monetization at any point by clicking the Disable Monetization button. - Click the How Will I Be Paid? link.
Doing so brings up more information about AdSense.
- Click the Associate an AdSense Account link.
You're brought to the Monetization screen.
- Click the Next button.
You're redirected to a YouTube and Google AdSense setup page. If you already have an AdSense account, log in to complete the association. If you need to set up an AdSense account, follow the directions in the next section.
Creating your AdSense account for YouTube
If you're in the process of linking your YouTube and Google AdSense accounts and you need to set up a brand-spanking new AdSense account, here's what you need to do. From the AdSense setup page, follow these steps:
- If you're coming here from the previous section, you should be on the AdSense setup page. If not, enter https://www.youtube.com/account_monetization?action_adsense_connection into your web browser and click Next to go to AdSense setup.
You'll be presented with a page like the one shown in Figure 14-3.
If you're creating an AdSense account for the first time and it's associated with your YouTube channel, then you need to sign up for AdSense through YouTube, not directly through AdSense. Notice both the YouTube and AdSense logos at the top of Figure 14-3 — that's the sign you're in the right place. If you only see the AdSense logo, then you'll be given a warning to sign up for AdSense through YouTube.
- From the AdSense setup page, select the Google account that you want to associate with AdSense by clicking the blue button on the bottom left that either shows your account or asks you to sign in.
If you're just starting out, it's easier to use the same Google account for YouTube, AdSense, AdWords, Gmail, Google+, and other Google properties.
- Verify that your YouTube channel is listed and pick the content language using the Content language drop-down menu.
You should see your channel listed right next to the line that says “I will show ads on,” as in Figure 14-4. The Content Language drop-down should be right below it.
- Click the Continue button.
You see the AdSense application screen.
- Fill out the AdSense application and click the Submit My Application button.
You're redirected to your YouTube channel.
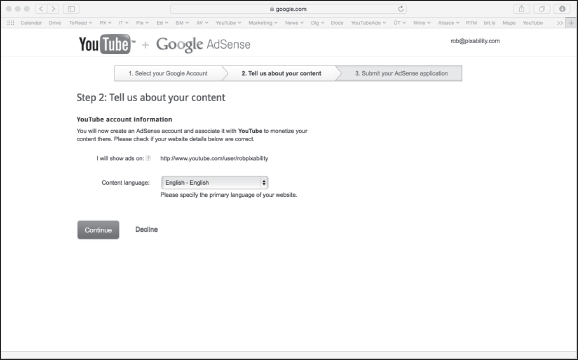
Figure 14-4: Verifying your YouTube channel for AdSense.
Your application needs to be reviewed by Google; you should hear back about your approval within a week.
After being approved, you'll receive an email from Google directing you to accept its terms of service. (Whenever money is involved, so is lots of paperwork.) With your AdSense account approved, your Monetization page under Creator Studio should look like the one shown in Figure 14-5. If necessary, you can change or remove the direct association between your YouTube channel and your AdSense account.
When you set up your AdSense account through YouTube, it's known as an AdSense-hosted account. If you want to incorporate AdSense into your website, you have to upgrade the account, which is pretty straightforward. If you already have an AdSense account that predates your YouTube integration, no conversion or upgrade is necessary; you can just use the older account.
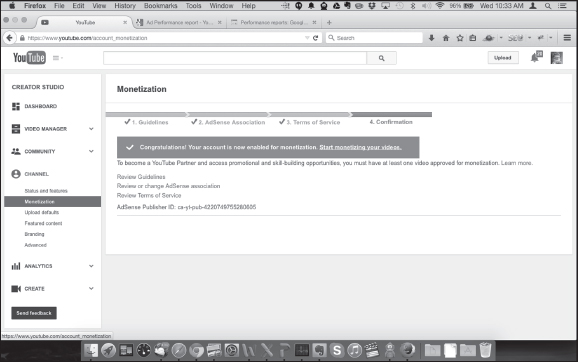
Figure 14-5: AdSense approval under YouTube monetization.
Setting up AdSense monetization
Linking your (approved) AdSense account to your YouTube account is a great first step, but you still have to jump through some configuration hoops in order to begin monetizing your channel and your video content. Here's what you still need to do:
- Log on to your AdSense account at http://adsense.google.com.
- Click the gear icon to the right of the Google account name.
- Choose Settings from the menu that appears.
Doing so brings up the AdSense Personal Settings page, where you set up contact information, email preferences, and default language.
- After specifying your contact information, email preferences, and default language, click the Save button.
- From the gear icon drop-down menu, select Status and verify that your account has no policy violations.
Many of the policy violations are centered on what are referred to as artificial clicks. Remember that the publisher gets paid whenever someone legitimately clicks on an ad. Clicking on your own ads or encouraging others to do so fraudulently doesn't result in legitimate clicks — they're fake (artificial) clicks. Artificial clicks are a no-no.
Be sure to address policy violations promptly; if your channel is considered to be in violation of AdSense policy, all ads will be disabled and any monetization that you may have enabled will be stopped. Instructions and advice on AdSense policy violations can be found at http://productforums.google.com/d/forum/adsense. - From the gear icon drop-down menu, select Payments.
Doing so brings up the Payments screen, which you use to handle all payment setup and reporting.
The Payments screen is an important administration section for channel managers, creators, and publishers. It consists of three parts:
- Payment history: This section shows your monthly transactions, which consist of costs, earnings, payments, adjustments, and taxes. You can pick the reporting period and export the data, if necessary.
- Payee profile: This section includes a special billing ID, tax reporting details, and billing contacts.
- Payment settings: Here's where you set up your payment schedule and configure your payment method, including banking information.
You can easily change any of the payment information if you choose to do so later.
Not everything is monetizable
If you're at all familiar with the ways of YouTube, you probably have already figured out that you can't just grab a copy of Korean entertainment artist Psy's “Gangnam Style” video, modify it slightly, and put it on your channel. Sure, everyone would love a few billion monetized views, but in the end it all comes down to content ownership and copyright. To monetize anything, you need to own the rights to both the audio and visual components of the content. You also have to be careful about some of the visual elements, such as logos and other graphics, which may also be protected by the rights holders.
YouTube keeps tabs on copyrighted content with a feature it calls ContentID, a database of files that YouTube uses to compare copyrighted content against new content being uploaded to the site. ContentID can be used to make claims against your content, which may affect your ability to monetize. Note that with ContentID, the rights holder may choose to monetize your content
Copyright is a tricky topic, and you can read more about it in Chapter 16. You can also check out https://support.google.com to find out more about the partner program and monetization. When in doubt, consult with a lawyer or watch a YouTube video on the subject, assuming that it's not blocked by copyright, of course.
Analyzing Ad Performance with YouTube Analytics
You may have figured out already that Google rewards you with more interesting data when you link various accounts. You may have seen it with Google+ for YouTube channel management and with AdWords for YouTube advertising. Well, making money on YouTube is no different. When you link your AdSense account with your YouTube channel, you get more detailed information about your earnings. The good part is that you can get lots of this information directly from YouTube Analytics.
YouTube Analytics is your go-to resource when you want to find out how your channel is performing with your audience. Chapter 11 gives you the whole YouTube Analytics story; this chapter concentrates on how YouTube Analytics can help you figure out your ad and earnings performances.
Getting your YouTube ad information
In YouTube Analytics, you'll find a section called Earnings Reports, a vital resource for channel managers responsible for monetization. Within the Earning Reports section are two important reports:
- Estimated Earnings: Includes the details about your earnings and which of your video is making you the most money.
- Ad Performance: Shows which ad types are most effective for driving revenue on your channel.
To get to the reports for your channel:
- Log on to your YouTube account.
- On your YouTube page, click your channel's icon and then choose Creator Studio from the menu that appears.
Doing so brings up the Creator Studio dashboard.
- Click the Analytics heading in the Navigation menu on the left.
By default, you should go directly to the Overview submenu.
- Under the Earnings Reports heading in the navigation menu on the left, click on either the Estimated Earnings link or the Ad Performance link.
Seeing which metrics are offered
YouTube Analytics is a truly robust feature. Looking at only the Ad Performance report, check out all the attributes you can measure:
- Impressions: The number of times an ad is presented to a viewer.
There can be multiple impressions per playback. If a viewer is served a TrueView instream pre-roll ad, a display ad, and an in-video overlay, it counts as three impressions, not one.
- Estimated monetized playbacks: A single playback occurs when your video is shown and one or more ads are presented. A playback also occurs whenever a viewer quits an in-stream ad.
- Playback-based CPM: This is the average gross revenue per thousand video playbacks (cost per mille in ad lingo) on which an ad was shown.
- Playback-based gross revenue: This is the total gross revenue for all ads that are placed against a video before any of the ad revenue is shared with YouTube and other partners. Remember that multiple ads may be shown against your video during a single viewing.
Revenue is different from earnings. Earnings remain after YouTube and other partners take their cut.
From the Estimated Earnings report, you find the following metrics:
- Total estimated earnings: Net earnings remain after partner allocations for Google-sold advertising.
- Ad earnings: These earnings are from AdSense auction and DoubleClick reserved buys.
- Transaction earnings: These include paid content, YouTube rentals, and Fan Funding.
It used to be the case that earnings data and playback information in YouTube Analytics were always estimates because there was an information lag of as many as seven days. That's no longer the case: You'll have your information within 24 hours after the close of the business day. Your transaction history as reported in AdSense will therefore contain accurate information, not mere estimates; just keep in mind that this information is reported after all the data has been collected. YouTube Analytics will show information — within reason — as it's occurring. Actual earnings will be visible and available for download within 24 hours on YouTube or AdSense.
As a publisher or creator, you need to calculate one critical metric on your own: revenue per mille, or RPM. RPM tells you how much you earn for every 1,000 ad impressions. You calculate RPM this way:
![]()
The time period for total estimated earnings and impressions has to be the same.
Analyzing your ad performance
A YouTube Analytics ad performance report, as mentioned in the previous section, can highlight tons of different metrics regarding your channel's gross revenue and performance by ad type. Accessing that ad performance report is easy:
- Log on to your YouTube account.
- On your YouTube page, click your channel's icon and then choose Creator Studio from the menu that appears.
Doing so brings up the Creator Studio dashboard.
- Click the Analytics heading in the Navigation menu on the left.
By default, you should go directly to the Overview submenu.
- In the analytics Navigation menu on the left, click the Ad Performance link under the Earnings Reports heading.
You see a line chart (see Figure 14-6) that highlights one of the three key ad-performance metrics (playback-based CPM, playback-based gross revenue, and estimated monetized playbacks) and graphs out the monetary performance of each ad type. (To switch between the three metrics, click the appropriate tab at the top of the chart area.)
You can change the analysis period and specify particular videos that you want to examine. (We tell you more about that in Chapter 11.) - Scroll down to the Details section under the chart to take a closer look at your channel's performance data.
Figure 14-7 shows how the monetized ad types perform across key metrics. By checking the box next to each type, you can determine what shows up on the graph for a more precise picture of which ads are working best (or worst) against your content.
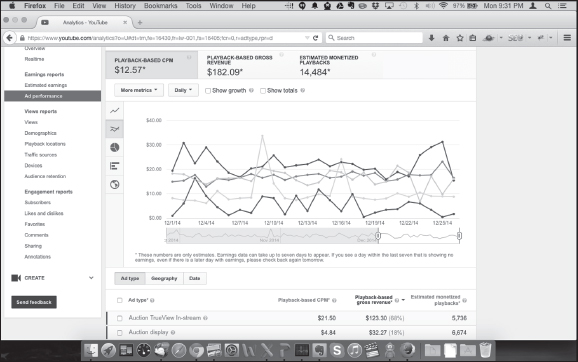
Figure 14-6: A YouTube Analytics Ad Performance report with metrics and graph.
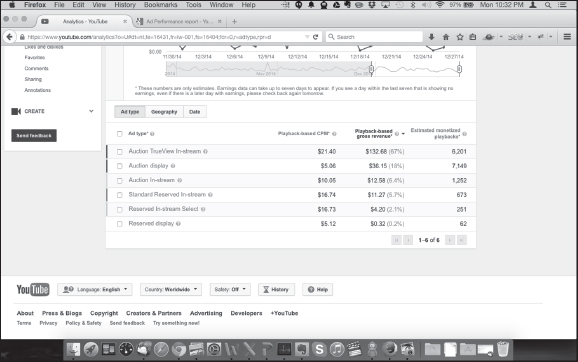
Figure 14-7: Looking at ad types and performance details.
By default, you're on the Ad Types tab in the Details section. You can also see where and when ads work best by clicking the Geography and Date tab.
If you're not seeing performance data for a specific ad type, go back and review the monetization setting you configured. You can find out more about configuring the monetization of existing videos a little later in this chapter. - Look for things that stand out in the charts, such as spikes or valleys in the data to determine what's working well and what may need improvement.
Use the Chart Type toolbar — that line of icons running down the left side of the Chart area — to try out different models. Sometimes, simply changing the chart type from a line chart to a bar chart gives you a much better look at ad type performance. (Figure 14-8 shows what we mean.)
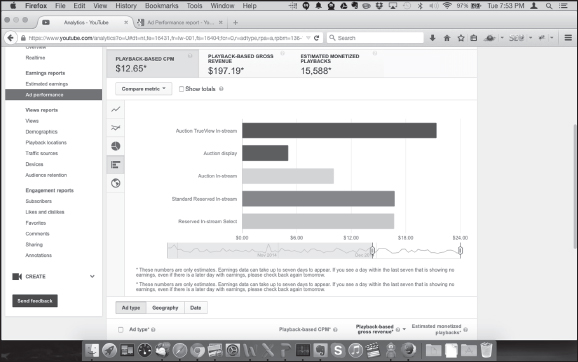
Figure 14-8: YouTube Analytics ad bar chart.
Determining your estimating earnings
It's time to look at the bottom line. The YouTube Analytics estimated earnings report shows your earnings, which some call net revenue. It's what remains after Google and its partners take their share. To find out your channel's estimated earnings, do the following:
- Log on to your YouTube account.
- On your YouTube page, click your channel's icon and then choose Creator Studio from the menu that appears.
Doing so brings up the Creator Studio dashboard.
- Click the Analytics heading in the Navigation menu on the left.
By default, you should go directly to the Overview submenu.
- On the Analytics Navigation menu on the left, click the Estimated Earnings link under the Earnings Reports heading.
You see a line chart (see Figure 14-9) that highlights one of three important earnings metrics (total estimated earnings, ad earnings, and transaction earnings) and graphs out the desired metric for the time period. Total estimated earnings is net revenue from all Google-sold ads. Ad earnings reflects net revenue from AdSense and DoubleClick, which is yet another Google property that can put ads against your content. Transaction earnings is paid content and fan funding. (To switch between the three metrics, click the appropriate tab at the top of the chart area.)
Again, you can change the analysis period and specify particular videos that you want to analyze. (We tell you more about that topic in Chapter 11.)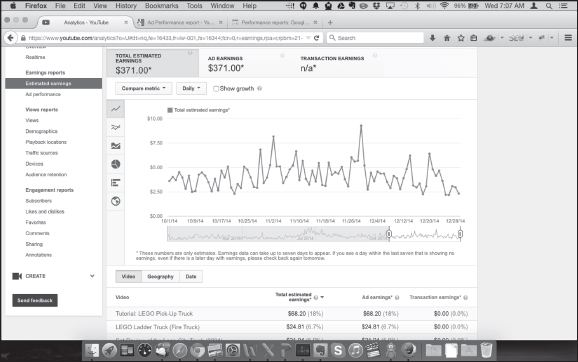
Figure 14-9: A YouTube Analytics Estimated Earnings report with metrics and graph.
- Scroll down to the Details section under the chart to take a closer look at your channel's performance data.
Figure 14-10 shows the earnings performance across monetized videos. You can click on an individual video entry to see earnings details by geography and date.
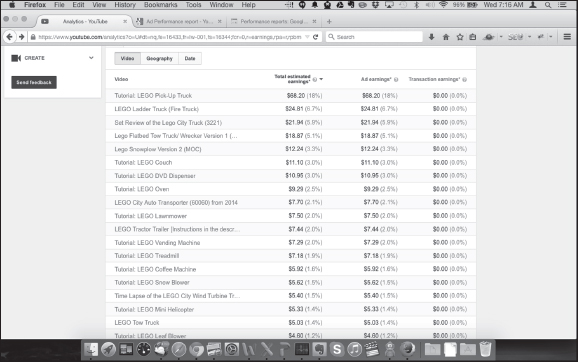
Figure 14-10: YouTube Analytics estimated earnings with video details.
Some important metrics, such as impressions, are not shown by default in estimated earnings or ad performance reports. If this is information you want to see, you need to customize your reports. To do that, do the following:
- In YouTube Analytics, click on either the Estimated Earnings link or the Ad Performance link under the Earnings Reports heading on the Navigation menu.
- Click the Compare Metric button in the top left corner of the Chart area.
- From the drop-down menu that appears, select More Metrics.
Doing so displays a Compare Metric screen listing your metric choices, like the one shown in Figure 14-11.
- Go to the Estimated Earnings section of the Compare Metric screen and click the metric you want to use. If you want to see impressions (always a good choice), then click the Impressions link.
The metric shows up on the graph and as a column header in the Details section under the graph.
If you're a YouTube partner in good standing and you have an integrated AdSense account, you can set up your channel so that your fans can make voluntary contributions to help finance your uploading of content to your channel. YouTube is quite strict about how you ask for funds, and it can't be used to fund future videos or outside activities. You can enable fan funding through your channel's status and features under Creative Studio. For detailed rules and information around fan funding, visit https://support.google.com/youtube.
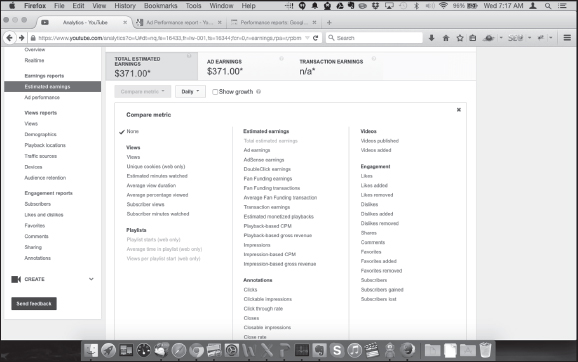
Figure 14-11: Looking at various metrics options.
Managing AdSense for YouTube
If you have your AdSense account approved, set up, and linked with your YouTube channel, give yourself a pat on the back. You have accomplished much, but is it truly time to go shopping for that new car with your expected pot of gold? Not just yet. Yes, YouTube can be both personally and financially rewarding, but you have to give it time to grow.
AdSense offers its own set of analytics data, distinct from YouTube analytics. You have to understand both to derive the right insights to make effective content and ad placement decisions. It isn't a one-shot deal. You need review all the reports and take action on an ongoing basis. That's the key to maximizing your YouTube channel's monetization potential.
Reconciling AdSense earnings data with YouTube Analytics
Deciding when it's important to look at YouTube Analytics earnings data versus when you need to look at AdSense earnings data is one of the biggest sources of misunderstanding for YouTube channel managers, creators, and publishers. Candidly, Google made the decision rather confusing because there were different earnings data in both. Your YouTube earnings often include income from multiple places. Making matters worse was the time delay in earnings updates in YouTube Analytics over AdSense.
In March 2013, important changes were made to eliminate the confusion. You still need your AdSense account, but your earning information is now reported through YouTube Analytics, which looks at not only YouTube Ads but also display ads bought via Google AdSense. Even better, all the combined data will is available within 24 hours of the end of the business day.
Adding AdSense controls and reporting
Though your earnings information now comes from YouTube, you need to know that AdSense continues to supply the following critical information, which isn't available in YouTube Analytics:
- Payments: You're still paid via AdSense, so keep all your contact, banking, and tax information current.
- Ad controls: As a YouTube channel manager, you have control over which AdSense display ads are presented. (More on that in the next section.)
- Ad performance: You can see analytics for ads served against your content, including number of clicks, click-through rates, cost-per-click, and RPM.
Controlling ads
AdSense gives you a great deal of control over what ads are served (or not) against your YouTube channel and content. To see how controls work, do the following:
- Log on to your AdSense account.
You can also get there by accessing the Monetization section of Creator Studio and clicking on AdSense Settings.
- Click Allow & Block Ads in the top menu bar.
- The Allow & Block Ads screen appears.
- To block specific advertisers, click Advertiser URLs tab.
You're taken to a page where you can enter target links to block.
- Click Block URLs.
- You can click on the other tabs on the Allow & Block Ads screen for additional ad control.
You can allow or restrict ads based on
- General categories (restrict broad topics for ads)
- Sensitive categories (block politics, magic, religion, and so on.)
- Ad networks (manage placements from specific ad networks)
- Ad serving (control new ad formats)
- Ad reviews (see ads before blocking)
You can find more details on AdSense ad controls at https://support.google.com/adsense.
Measuring ad performance
AdSense also lets you see how well ads are performing against your content. The click-through-rate (CTR) is an important metric that gives you a sense of how well viewers are responding to the ads against your content.
CTRs are measured using percentages and are frequently in the single digits. If your CTRs are very low and trending downward, something is likely wrong, and you may want to modify your ad controls so that something more suitable is presented to your viewers.
The types of ads placed against your channel and content impact your brand. Google does a great deal of work to ensure that only ads that make sense are placed against your content, but ultimately you have control, so use it when necessary.
To check out your ad performance using AdSense:
- Log in to your AdSense account.
You can also get there by accessing the Monetization section of Creator Studio and clicking on AdSense Settings.
- Click Performance Reports in the top menu bar.
- Select a time period filter in the top right by clicking the date and setting up a date range in the drop-down menu.
- Click Apply.
- Click on any of the tabbed items running along the top of the Graph area to add them to the graph.
Figure 14-12 shows what happens when you select Clicks. In this example, you can see an overall CTR of 4.72 percent for the selected period. Pay attention to the spike around the beginning of July, which indicates some seasonal component for the channel and content.
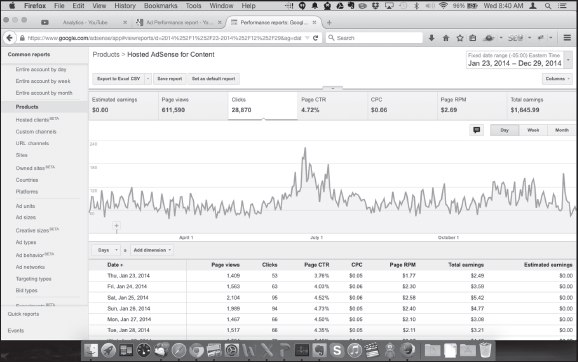
Figure 14-12: An AdSense performance report for a YouTube channel and its content.
Making Monetization Adjustments
A set-it-and-forget-it mentality doesn't fit into an effective YouTube channel-management strategy. If you want your channel to truly succeed, you need to commit to an ongoing series of adjustments to content, engagement, and advertising. How you manage ads served against your channel and content is no different from your other YouTube activities: You have to look at metrics and adjust accordingly.
Looking at key ad-serving metrics
In the earlier section “Analyzing Ad Performance with YouTube Analytics,” you can read about using AdSense reports to analyze trends in CTRs and making adjustments to ads served. You should also measure RPM trending — that's the revenue per mille, or how much you earn for each 1,000 ad impressions. Figure 14-13 shows a YouTube Analytics Estimated Earnings report with impressions added as a comparison metric. Using that information, you can make use of this handy RPM formula:
![]()
Plugging in the numbers from Figure 14-13 produces this result:
![]()
If you do the math, you see that it gives you an RPM of $4.06. In other words, you make just over 4 dollars for each 1,000 ad impressions against this video. Is that good? Is that bad? The only way you can find it is by analyzing how this compares with your other videos.
Managing monetizable ad inventory
Keep in mind that you don't have to monetize all the content on your channel all the time. You can pull videos in and out of the monetization mix. To control which videos are monetized, follow these steps:
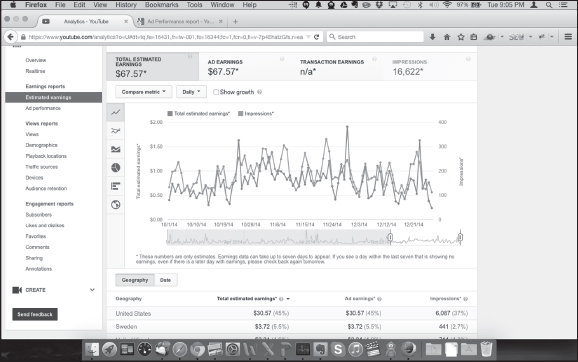
Figure 14-13: Estimated earnings used for RPM calculation.
- Log on to your YouTube account.
- On your YouTube page, click your channel's icon and then choose Creator Studio from the menu that appears.
Doing so brings up the Creator Studio dashboard.
- Click the Video Manager heading in the Navigation menu on the left.
By default, you should go directly to the Videos submenu.
You should see a dollar sign ($) icon next to each video if your channel is enabled for monetization.
- Click the $ icon for the video whose monetization settings you want to change.
You see a monetization page, similar to the one shown in Figure 14-14.
- Select (or deselect) the Monetize with Ads check box to enable (or disable) monetization for that video.
- If you're monetizing, pick your settings for ad formats, ad breaks, and product placements.

Figure 14-14: Monetizing your content and selecting ad and placement behavior.