Chapter 9
Preparing for Upload Day
In This Chapter
- Making sure your YouTube channel is ready for your video uploads
- Knowing why Video SEO drives discoverability and how to optimize it during upload
- Recognizing what's required to keep your channel in good standing
- Understanding YouTube's uploading options and setting appropriate defaults
It's hard to believe that, not that long ago, the whole concept of video production and distribution was the domain of specialized professionals. In those bad old days, the entire process was not only difficult but often also extremely expensive. Securing broader distribution rights required lawyers, which added another level of complexity and expense, all in the name of keeping great video work out of the domain of creative people and many business.
Fortunately, all that has changed. As computers, cameras, and applications became more powerful — and affordable and a lot less complex — creating a fabulous video could be accomplished relatively easily. So much for the miles of film and expensive production facilities that used to be standard operating procedure — now you could shoot an outstanding video on your mobile phone and then edit it on your laptop in the local coffee shop. The digital video revolution had begun.
Then along came YouTube, and suddenly you could get your video immediately distributed to, and in front of, millions of viewers without the aggravation of contracts, lawyers, and distribution partners. Overnight, you could become your own Hollywood studio. YouTube made it powerful and easy by making simplified, video self-publishing a reality. It eliminated nearly all the crazy video file format issues and removed the complicated conversion issues so that you could simply upload a file and people could watch it nearly everywhere without any special software.
Today, video is simpler than ever. But don't be deceived by the simplicity: YouTube gives you powerful tools to do great things with video uploading and distribution. So start off simple and hit the ground running, but be sure to leverage YouTube's additional distribution capabilities as your skills and your channel mature.
Preparing Your Channel for Uploads
Chapters 7 and 8 do a great job of guiding you through the process of capturing and editing great videos for your channel. If you've made your way through those chapters, you may be thinking that you're just a few clicks away from uploading a video, and you'd be absolutely right to think so. That's the great part about YouTube — it makes it easy to get your videos online. However, as Chapter 5 so forcefully puts it, being successful on YouTube requires a bit of planning, so don't rush. The time you invest now getting your channel ready for uploads not only makes your future work easier but also gives your channel much better watch time, subscription growth, and audience engagement.
Checking your YouTube account hygiene
YouTube certainly started a revolution in online video by making it amazingly easy to upload and share content. But there's something more: YouTube is also a community that abides by certain guidelines to maintain order and civility. These rules are divided into two categories:
- Community guidelines: YouTube is great place to share your work and do business, but just like your physical community, there are certain rules governing behavior — rules usually having something to do with the type of content you can upload. Just keep in mind that viewers can (and do) use the Watch page to flag what they consider to be community violations. Viewers don't have the last word here — YouTube reviewers will review the flag to make sure that the complaint is legitimate — but violations could lead to warnings, known as a community guidelines strike, being issued against your YouTube account.
- Copyright policies: Individuals or business are strongly encouraged to upload content that they own or have legal ownership of. This includes both audio and visual content. Uploading content you have no legal ownership of — or content where the legalities of ownership are murky — can be cause for more strikes against your account. Three copyright strikes will result in account termination (Copyright issues can be complicated; for a closer look at YouTube's take on copyright issues, check out www.youtube.com/yt/copyright. For our take on copyright, check out Chapter 16.)
Copyright violations can be flagged one of two ways:
- Copyright strike: A strike is a legal request by a copyright holder directing YouTube to take down the video and remove it from your channel.
- Content ID claim: YouTube will grant some users access to an automated copyright-verification system and database known as Content ID. Claims in Content ID don't result in a strike, because the system gives the copyright owner some control over what to do with violations, such as monetization or blocking.
 Simply removing videos with copyright strikes or other violations (if YouTube hasn't done so automatically) doesn't make the strike or claim go away. You can wait for the claim to expire in six months, get the owner to retract the claim, or dispute it with a counter notification. Be diligent in resolving the issue with YouTube or the claimant.
Your success at following these rules defines your account status in YouTube:
- Good Standing: This is where you want to be: no community guidelines strikes; no copyright strikes; and no more than one video blocked by a Content ID copyright claim.
- Bad Standing: If you have violations under community or copyright guidelines, you may be subject to channel customization restrictions as well as upload suspensions and limitations. Monetization and your YouTube Partner Program standing may be at risk, too. Though many issues can be resolved or appealed, continued problems while in bad standing can lead to the removal of your YouTube channel. (For more on monetization issues and the YouTube Partner Program, see Chapter 14.)
- Terminated: In particular circumstances, YouTube will terminate your channel and prevent you from establishing new ones. Repeated breaches of community guidelines or continued copyright infringement will get you booted off YouTube.
Checking your YouTube account status is simple:
- In your web browser, go to www.youtube.com.
- Log in to your YouTube account.
- Click the logged-in icon and then choose Creator Studio from the drop-down menu that appears.
The Creator Studio main menu should appear on the left side of the browser.
- Click the Channel section of the Creator Studio menu.
By default, it should go directly to the Status and Features submenu.
You can also bypass these steps by going directly to www.youtube.com/features.
- Select Status and Features, if it's not already showing.
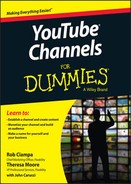
Doing so loads your account status on the right.
- Make sure that both the Community Guidelines and Copyright lines show a green status circle and the words Good Standing.
The top of Figure 9-1 shows an account in good standing.
If your account is not in good standing, for either community guidelines or copyright violations, you probably received an email explaining why. You can get more detail on the status of your channel when you follow these steps:
- In your web browser, go to www.youtube.com/yt/copyright.
- Log in to your YouTube account.
- Click the logged-in icon and then choose Creator Studio from the drop-down menu that appears.
The Creator Studio main menu should appear on the left side of the browser.
- Click the Video Manager section of the Creator Studio menu.
If your account is in bad standing, you see selections that aren't normally shown, such as Copyright Notices.
- If visible, click the Copyright Notices section of the Video Manager section.
You can also bypass these steps by going directly to www.youtube.com/my_videos_copyright.
 If your account is in good standing but you do have some copyright notices, you'll see those little notices next to your videos in the Videos section as well as in the Copyright Notices section. They are little blue hyperlinks next to the Edit button that generally say Matched Third Party content.
Maximizing the options for accounts in good standing
An account in good standing is much more than a merit badge and a nice pat on the back. It's the gateway to maximizing what you can do on your channel. With a channel in good standing, you're free to
- Customize your channel.
- Apply for the YouTube Partner Program. (More about that program in Chapter 2.)
- Control who can view your uploaded videos.
- Post videos longer than 15 minutes.
- Create custom video thumbnails to help get more views to watch.
- Extend your video licensing rights with Creative Commons. (More on Creative Commons and other copyright issues in Chapter 16.)
- Stream live events.
- Provide annotation links to external sites.
- Monetize your channel.
- Perform minor video edits on your YouTube channel.
- Provide a branded introduction to your video or an overlay branding watermark.
- Appeal Content ID disputes.
You want your YouTube account to be in good standing. Be sure to review the community guidelines and copyright policies every few months.
Enabling channel features
Now that your account is in good standing, be sure to check the rest of the fields on your channel's Status and Features page. Checking which YouTube features are enabled is straightforward:
- Log in to your YouTube account.
- Click the logged-in icon and then choose Creator Studio from the pull-down menu that appears.
The Creator Studio main menu should appear on the left side of the browser.
- Click the Channel section of the Creator Studio menu.
- Select Status and Features.
Doing so displays your account status on the right, as spelled out earlier in this section. Now cast your eye a bit below your account statuses and you'll see your YouTube features. More specifically, you'll see three distinct fields for each feature:
- The feature itself: This lists the name of the YouTube feature — one of the many built-in extensions to YouTube channel functionality that allows for greater channel control, monetization, and enhanced viewing features.
- The feature status: Your current ability to use these features. Each feature status is binary: Either you've enabled it or you haven't.
- The feature description: Details on what the feature does.
- Click to enable the feature you want to add to your channel.
For example, if you want ads on your channel, click the Enable button on the Monetization feature.
Tending to Video SEO Matters
In Chapter 5, we introduce the concept of discoverability — helping YouTube get your content in front of the right viewers through recommendations and search so they watch your content, rather than somebody else's. Though watch time is a critical part of YouTube's recommendation engine, a video's metadata — its title, description, and tags — plays an important role in getting the video found in the first place.
Video search engine optimization (video SEO, for short) is all about telling YouTube something about your video. For traditional web SEO, search engines such as Google, Bing, and Yahoo! would analyze the content on your site, figure out what was important, and then offer up your content to the most relevant searchers. Over time, these search engines factored in elements such as links, sharing, and clicks to determine how popular particular content ended up being on the web.
YouTube doesn't work like web SEO because it can't (yet) watch your content to determine what your video is about, so it has to rely on your metadata and how the community reacts by way of watch time, social media shares, and embedded links for the video on external sites.
It's a lot easier to get your video SEO house in order up front, rather than deal with it after you've published all your content.
So what exactly do we mean by optimization in search engine optimization? Optimization is about intelligently and systematically putting together description words so that
- YouTube understands what your content is about so it can better offer your video to the most appropriate searchers.
- Search engines such as Google, Bing, and Yahoo! understand your content and are thus in a position to add your videos to search engine results pages along with web content.
- Viewers are more likely to click on your content versus other search results offered.
These are the goals you want to achieve. The next few sections spell out how you can achieve them.
A bit later in this chapter, you'll find out where and when to enter information about titles, descriptions, and other important metadata associated with your video. It's important to understand the principles behind all these before you actually upload.
Titles
The video title is the most important piece of metadata that you'll create. As important as the title is to YouTube and the major search engines, you have to also ensure that it works for people. The trouble is that it can't look as though you're trying too hard to grab folks' attention. Fancy click-bait titles, such as “You won't believe what happens to the 12 kittens in this video,” may generate more clicks, but the search engines won't bite and they will likely ignore your content. Also avoid breathless wording such as “most epic” or “blow your mind.”
You need to strike a balance between attracting humans and attracting search engines when you create and optimize a title for a video.
Your title appears in many places:
- On the Watch page under the actual video
- In a YouTube search
- In Google, Bing, and Yahoo! searches
- As part of a playlist
- Under YouTube recommended videos
Selecting a title isn't complicated, but you must be somewhat methodical.
Only 100 characters of your video's title will show up in search results on a desktop computer, while some mobile devices will only show about 40, so you have to make the characters count. Suggested videos show about 75 characters maximum, with mobile being less. You can create a longer title, but it will be visible only on the Watch page. The goal of video SEO is to get viewers to the video in the first place. Being too short with the title is no good either because it may impair search algorithm matching.
Use the following approach to picking a title:
- Determine the keywords.
These are the important words that people will search for. Make sure they're part of your video content, as well as in the other metadata associated with your video, such as the Tag and Description fields. If you work for Acme Electric and you're marketing the new Z500 convection oven, your keywords would include Acme Electric, Z500, and convection oven.
- Add a descriptive phrase to the title.
Your keywords alone may not be enough. Determine why your viewers would be searching for your product or your video. They may want installation instructions or product reviews, for example. Terms such as how to install and product review will aid you in both search and views.
- Move branding keywords to the end of the title.
Viewers will search for your brands, but they need to see the descriptive information first.
- If your video is part of a series, include an episode number at the end of your title.
Even if your videos are part of a playlist, your viewers may end up searching separately, so make it easy and logical for them to find another episode.
Be sure to include your title keywords in the tag and description metadata.
Before you even upload anything to YouTube, it's good practice to rename the video file to a title that accurately represents its content. YouTube will keep the original reference file title on the asset no matter how many times you end up changing the title.
Descriptions
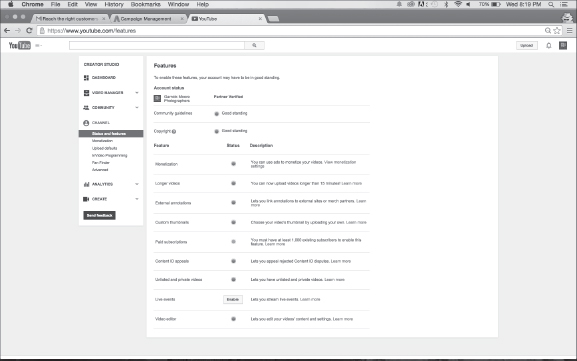
You'll want to make good use of the 5,000-character field that YouTube provides you for describing your video. It's a great place to add details about not only your video but also your channel, along with links for other videos, subscriptions, other channels, and web assets. In other words, it's a goldmine for both metadata and user guidance. (Figure 9-2 demonstrates what we mean.) The viewers who care about your video will read the description, so make it worth their while.
Going long on shortlinks
Chances are, you've seen so me rather interesting web names like bit.ly, owl.ly, goo.gl, pix.tv, and is.gd as you've made your way around the web. Often, these web names are combined with what appears to be a random string of characters to produce something that looks like this: http://bit.ly/1xUu7KB. Like any Internet address, this link can be clicked to take you anywhere on the web, including YouTube. You can even click one of these funny-looking strings to get to the Watch page of a specific video.
So what is this funky address? It's called a shortlink, and it replaces really long web addresses to preserve valuable space on sites such as Twitter and YouTube. How does this work? A shortlink has an associated target link. For example, in our link example, http://bit.ly/1xUu7KB, actually points to http://www.pixability.com. When clicking a shortlink, users end up at the associated target. Shortlinks are formally known as shortened Uniform Resource Locators (URLs). URL is a fancy way of referring to a web address.
Many free services are available for link shortening. One of the most popular ones is bit.ly, and you can quickly sign up for it at www.bit.ly. In seconds, you'll be creating shortlinks to your heart's content.
But there's much more to shortlinks than meets the eye. Services such as bit.ly track clicks so that you can see which shortlinks are the most popular. You can actually have different short-links point to the same target address so that you can test which tweets work better or which web pages may be most interesting.
The top YouTube channel managers use link shorteners extensively in YouTube descriptions, channel descriptions, and social media.
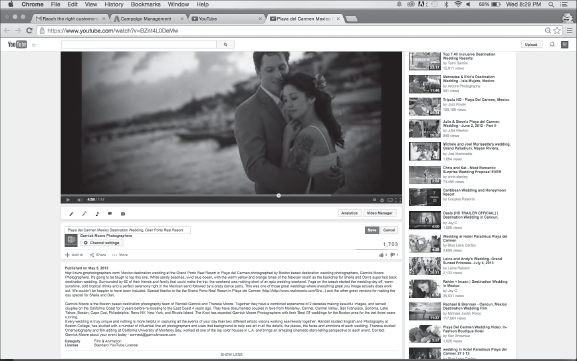
Figure 9-2: A well-constructed description field.
The video description should
- Explain in greater detail what your video and your channel are about.
- Extend the viewer's experience by providing additional detail around what is shown in the video. For example, if you have a video on cooking, the description field would be a great place to include a copy of the recipe.
- Trigger the viewer to do something. That could include watching another video, making a purchase, supporting your cause, and more.
- Entice people to view. The first couple of paragraphs of the description show up in search results, so you have to write compelling — and relevant — content so that the user somehow takes the next step of clicking and viewing. That's also true on the Watch page, where the first couple of sentences appear under the video, compelling the viewer (you hope!) to watch.
- Aid in discovery. A great description can include hundreds of keywords that will help with search. Be sure to use ones that are relevant to the video.
The description field isn't the place for a transcript of your video. YouTube has a special spot for that; we cover that spot a bit later in this chapter.
Include at the beginning of the description a shortlink that leads to a web page that has something to do with the video. Leading viewers to your home page is generally not advised, because they're looking for more detailed information around the video. Follow the shortlink with a clear and concise description, but make it interesting enough that people will feel like watching.
Always consider what information is visible in search results — by being well aware of which devices your audience is using to search. The first paragraph of the description will show up on a desktop search, whereas no description data is currently exposed in a mobile device search.
Two older terms from marketing and advertising are still quite relevant to today's YouTube description field: above the fold and below the fold. When people used to receive folded letters or advertisements, they often first looked at the top, which was “above the fold.” If the content was compelling, they'd read the rest of it “below the fold.” When viewers watch your video, they also see the first part of its description. If the description is compelling, they'll click “Show more” and see what's below the fold. Make what's above the fold in the video description count.
The description field should contain enough shortlinks to answer any questions your viewers might have about your video, your channel, and your business. The About page of your channel should contain links that complement your channel. It's okay to repeat some of these links in the video description as well. The shortlinks in the description field can point to
- Your channel
- Other videos
- Social media sites such as Facebook, Twitter, LinkedIn, Pinterest, or Instagram
- A website
- A landing page
Include only one link in the first paragraph if you want viewers to ultimately end up somewhere else. Include all the relevant social links or product page links in the second or lower paragraphs of the description.
Don't create a custom description field for each video. Put together a consistent framework or template that includes some repeatable information such as subscription information, social media links, programming schedule, and contact information. Customize only the data in your framework that relates to the video itself. Keep everything else consistent. Your audience will appreciate the consistent layout of your field as well.
 Everyone hates email spam — unsolicited advertisements filled with overdone and repeated buzzwords. If the description sounds at all “spammy,” you'll provoke a negative reaction. Instead, try to be informative by using a lot of descriptive words and appropriate shortlinks.
Tags
Tags are special descriptive keywords or short phrases that indicate what your video is about. They are used by search engines to help potential viewers discover your video. Tags also play an important role in helping YouTube make related video recommendations. (Your description field also has keywords, but tags are used by YouTube to help categorize your video.)
YouTube imposes a limit of 500 characters for the entire Tag field. A tag can contain one or more words, but each individual tag cannot be more than 30 characters long.
Without getting too deep into the math, you may end up with room for 10 to 30 tags. Use as many as you can.
What's the best approach to creating tags?
- Be both specific and broad. Everyone searches differently — some use broad terms like oven, whereas others use Acme Electric Z500 convection oven. Use both.
- Choose synonyms. Though you may use oven only in the description and video, it's okay to use the word stove in your tags.
- Add an action tag. Sure, people may be searching for video about the “Acme Electric Z500 convection oven.” Think about terms that are relevant, such as product review, how to install, and how to clean. Pick one around the video content.
- Combine and break up keywords. Language and people are imprecise, so take that into account and use both keywords, as in cook top and cooktop.
Tags can be modified. Just be sure that they reflect the essence of the content.
Don't use keywords to mislead or bait viewers. Viewers will realize that they've been misled and stop viewing. YouTube will detect that the watch time is bad and penalize your video and hurt its discoverability.
Thumbnails
Thumbnails are visual snapshots of your video, similar to a poster for a movie. They have a tremendous impact on a video's view rate, so you should choose a good one. Thumbnails by default are chosen by YouTube — three optional frames from the beginning, middle, and end of your video will be provided for every video asset that's uploaded. You can, however, create a custom thumbnail for each video. (See Figure 9-3 for some examples and check out the “Adding Custom Thumbnails” section, later in this chapter, for the specifics on creating custom thumbnails.) If you do decide to create custom thumbnails, it's best to choose a thumbnail that is illustrative of the content in the video. Thumbnails show up in the following areas:
- Channel page
- Watch page
- Playlists
- Suggested videos
- Channel guide
- Subscriber feed
- YouTube search
- Web search
- Mobile display
- Mobile search
Figure 9-3: Effective video thumbnails.
Keep the following key considerations in mind when deciding on a custom thumbnail:
- Incorporate boldness: You're competing for viewers, so you need to stand out among the many other thumbnails across YouTube and the web. Color contrast and image quality and visual layout matter.
- Add personification: Show the close-up view of faces, if possible. Viewers will click on faces more than anything else.
- Strive for accuracy: The thumbnail has to relate to the content of the video. Don't use the thumbnail as click bait.
Uploading Your Video
There's always a bit of excitement when you upload one or more videos to YouTube. The feeling is similar to what happens when you see the proverbial light at the end of the tunnel.
Uploading isn't the final step to getting your videos available for viewing by your growing fan base. You still need to publish an uploaded video in order to make it live.
Between uploading and publishing, you have several steps to consider. YouTube rewards you with higher search rankings and supplementary video recommendations based first and foremost on your channel and on individual video watch times. In addition, YouTube looks at characteristics like viewer engagement and video sharing rates. Your job in the planning process is to identify and coordinate each component so that you're in a position to keep your channel active.
Picking the source
Before you upload, your videos have to live somewhere. They might be on your desktop computer, laptop, game console, tablet, or smartphone. What's great about having so many choices for uploading is that you can capture and upload content to your channel anytime and anywhere. It's that easy!
Sign in using the same YouTube account from all your different computers, consoles, and mobile devices so that all your videos and channel settings stay synchronized.
The web browser interface to YouTube on your laptop or desktop will have the most complete set of YouTube capabilities for uploading, optimizing, annotating, and publishing. For iOS and Android devices, you can run applications such as YouTube and YouTube Creator Studio to upload videos and manage your channel. iOS even offers an additional application known as YouTube Capture. Though these applications are quite powerful and have most of the features of the computer-based versions, we focus here on the browser-based versions.
Going public about YouTube privacy
New YouTube channel managers and creators often ask, “How do I control who can see my videos?” This is controlled by YouTube's privacy settings, which can be found under Creator Studio's Channel and Video Manager sections. You need to know and understand the three types of privacy settings in YouTube:
- Public: This is the default setting in YouTube — everyone can view your video. Videos set to Public can also show up in all searches.
After you make a video public, you've officially published it. It will show up in your subscribers' feeds. Though you can readily change the privacy settings on your content, be sensitive to how your audience is using and sharing it, because changing settings may suddenly make your content unavailable to them with no warning.
- Private: This setting, the most restrictive one, prevents anyone but you from watching the video without your explicit permission. Private videos cannot be searched and are invisible on your YouTube channel. If your channel is linked to Google+, you can selectively share a private video with specific users on Google+ or within your Google+ circles. If you or your viewers don't have a Google+ account, private video cannot be shared. Video set to Private cannot show up in search results or be viewed by someone even if they have the video URL.
- Unlisted: Unlisted videos will not show up on your channel or YouTube search for viewers. However, anyone with the unlisted video URL can watch the video and share it freely anywhere on the web, including websites and on Facebook, Twitter, and other social sites. Unlisted videos can be included in playlists as well. A viewer does not need to have a Google+ account to view an unlisted video.
Use unlisted content as a way to share special or exclusive content with select fans or as part of a limited-time promotion or sale.
- Scheduled: This special setting is reserved for YouTube partners. It automatically sets the video to Private and then changes it to Public on the date and time you specify.
Use scheduled privacy settings for channel programming consistency to ensure that videos are available at a standard date and time, regardless of whether you have access to your YouTube channel.
Your privacy settings also signal to YouTube to begin its magic. When you publish a video, YouTube starts assessing your video by using its algorithms to determine what your video is about, how good it is, and where it should fall in search results. The best practice is to publish a video when your viewers are already on YouTube. Publish the video so that you get immediate views on it; this indicates to YouTube that this video is indeed hot stuff and that it may be a good candidate for YouTube search and recommendations.
Playlists have privacy settings, too. One of your options during the final stages of the upload process is to put your video content into a playlist. Chapter 3 covers playlists and their importance on your channel.
Don't underestimate the power of YouTube playlists, which have become increasingly popular because they not only show up in search results but can also be customized to greatly enhance the viewing experience.
Uploading to YouTube
You should have no problem finding the Upload button on YouTube — it's on every page! You'll find it in the top right corner, to the left of the Sign In button (if you're not logged in to YouTube), or to the left of the bell-shaped notification icon on the top right of the window (if you are logged in). To upload your video content:
- Sign in to your YouTube Account.
- Click the Upload button.
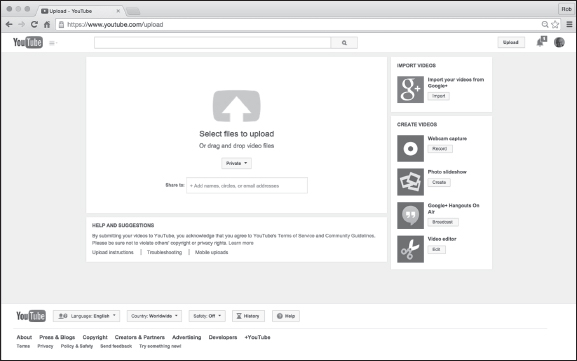
Doing so brings up the Upload window, shown in Figure 9-4.
- Select the video-upload privacy option that you want from the Privacy pull-down menu.
The menu is automatically populated with your default privacy setting. If you're happy with the default setting, you don't have to do a thing; just move on to the next step.
- Still in the Upload window, use one of the following three methods to select the video file you want to use:
- Select files to upload: Hover the mouse cursor over the big up-arrow button and click it when it turns red. Then use the Look In dialog box to navigate to — and then select — the file you want to upload.
- Drag and drop video files: This one's as simple as it sounds: Just drag a video file to the Upload window and drop it when the drag-and-drop video file's overlay turns green.
- Import your videos from Google+: This option is to the top right of the main Upload window. Start by clicking the Import button there, and then select and upload the video file from your Google+ account.
- If your method requires it, click OK to upload.
Your files are on their way to YouTube.
- Get ready to enter your metadata.
In the following section, you'll learn how to add that title, tags, descriptions, and video thumbnails.
With your videos selected and the upload under way, you'll be presented with a new Video Manager editor screen (Figure 9-5) that shows important details about the video. If you're uploading more than one video, YouTube will show you the progress for each upload.
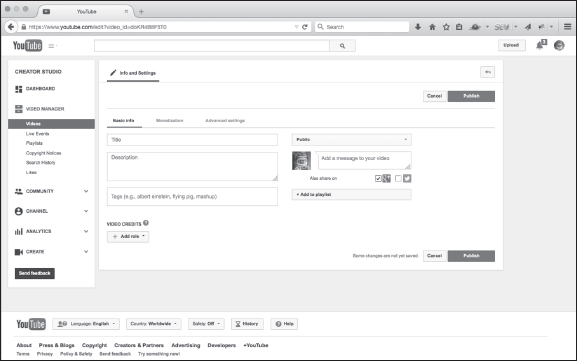
Figure 9-5: Entering metadata through Video Manager.
Keeping the upload train moving
Beth Le Manach is the vice president of programming at Kin Community, one of the world's leading online communities for women and lifestyle creators. At Kin, she is responsible for overseeing the original programming strategy for Kin's numerous online properties and the branded content created for its advertising partners.
Kin not only produces its own content for its hub channel (www.youtube.com/kincommunity) but also manages its extremely talented cast of YouTube creators, including baking sensation Rosanna Pansino (www.youtube.com/RosannaPansino).
Along with her full-time job at Kin Community, Beth hosts her own channel, “Entertaining with Beth” (www.youtube.com//EntertainingWithBeth), a channel nominated for three Taste awards; including Best Instructional Web Series. For her channel, Beth creates and shares elegant recipes that are perfect for entertaining guests but simple enough to prepare for a weeknight meal.
Coming from the TV business, Beth knows the importance of streamlining production and shoots several of her weekly episodes during one shoot session. She then edits the content and uploads it to YouTube with the scheduled privacy setting, ensuring that her audience has new content and recipes to try every Saturday. Her upload approach ties in perfectly with her programming strategy. Beth's excellent content is the frosting on the YouTube cake.
The Video Manager editor screen that you see during the upload process is the same one displayed under the Video Manager section of Creator Studio. Having the video manager editor screen here as well allows you to go back later and modify the video settings. This includes such tasks as changing the video description, tags, and shortlinks.
YouTube easily handles most encoding types. If YouTube is having any problems with your file, check out https://support.google.com/youtube for more information.
Entering information about your video
It doesn't matter whether your upload is a work in progress or a finished product; you can begin adding the metadata at any time. This process is known as “video optimization.” In the YouTube world, optimization involves dealing with three distinct areas:
- Basic Info: This is your most important information because it contains all the important fields for video SEO. This would include title, description, and tags.
- Monetization: Creators who've elected to make money from ads being placed against their video can use this section to specify what types of ad can be shown against the video. Chapter 14 covers this in more detail.
- Advanced Settings: This detailed bucket list contains some esoteric information, such as licensing and syndication, along with some important fields around category classification and distribution.
Edit the basic info first. (Refer to Figure 9-5 to see the layout of the Basic Info section.) Although it isn't rocket science, you'll still want to make sure to cross your i's and dot your t's. Follow these steps to edit your video's basic info:
- Make sure the Basic Info section in the Video Manager editor screen is selected.
The active section (refer to Figure 9-5) will have a red underline just below the section name. If Basic Info isn't selected, simply click on the name, and the section fields will appear.
- Using your newly acquired SEO knowledge, come up with an appropriate title for your video and enter it into the Title field.
- Enter an SEO-friendly description of your video into the Description field.
- Add SEO-appropriate tags in the Tags field.
YouTube imposes a limit of 500 characters for the entire Tag field. A tag can contain one or more words, but each individual tag cannot be more than 30 characters long. Depending on how you divvy up your 50 characters, you can end up with between 10 and 30 tags.
- Add your uploaded video to one or more playlists.
This step is optional. You can also create a new playlist here. Simply click the + Add To Playlist button and check the playlist you want the video included in. (You can check more than one playlist.)
- Add video credits.
Remember that this step applies only to partner channels. To give credit to your video contributors, click the + Add Role button, choose the title, and then add the person. The person will need a channel user name or URL.
- Set the privacy level or schedule your content for publication
Click the Privacy button which will show Published, Unlisted, or Private depending your default settings. Make changes, if desired. If you want to schedule a video so that it is made public at a specific time, choose Scheduled after you click the Privacy button and enter the publish date and time.
The best practice is to upload all your videos as Private and then schedule your content. This saves you from the mistake of publishing a video prematurely, often before you've had a chance to set up all the metadata. This has happened to all of us.
If you're part of the YouTube partner program, the Info and Settings page will have a Monetization tab in addition to the standard Basic Info tab, as shown in Figure 9-6. (If you're not bothering with monetization, you can skip this bit and jump right to the Advanced Settings discussion.)
The following steps show you how you can take advantage of monetization opportunities for your uploaded video.
- Click to select the Monetization section.
Doing so displays the fields in the Monetization section.
- Click to select the Monetize with Ads check box.
A menu appears, listing your ad-format options.
- Select one or more of the listed ad formats.
Chapter 14 covers monetization and ad formats in greater detail.
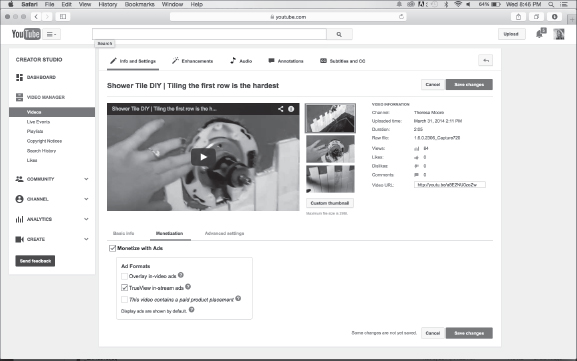
Figure 9-6: YouTube's upload monetization section.
You've probably figured out by now that YouTube does have a lot of bells and whistles. If you're just starting out, you don't need to mess around with all the settings, because most operations will work fine. As you advance, though, you'll probably want a bit more control. That's what the Advanced Settings page is for (as shown in Figure 9-7).
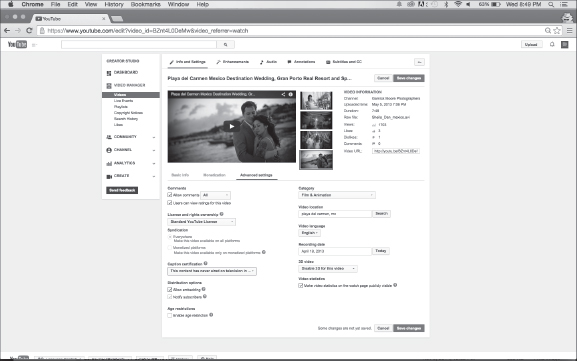
Figure 9-7: The YouTube Advanced Settings section.
To manage the advanced settings, do the following:
- Click to select the Advanced Settings section.
Doing so displays the Advanced Settings section fields.
- Modify the settings that are important to your video.
Pick and choose from the offerings in this list:
- Comments: Specify whether you want comments posted automatically or only after approval from the channel owner. Only you can decide what is best for your channel. YouTube viewers generally prefer to see their comments right away and will take note if you require approval.
You always have the option, as the content owner, of hiding bad comments. Users who posted bad comments can come back to your video and still see their own comments, but no other viewers can see comments you have removed. For more details on comment management, see Chapter 10.
Keep the Users Can View Ratings for This Video check box selected. That lets users see a video's likes and dislikes — the handy thumbs-up and thumbs-down images.
- License and Rights Ownership: You have ownership rights for what you create, but you can let other people use your content, even for commercial use. YouTube provides you with some flexibility through the standard YouTube license or Creative Commons. (For more on copyright and your rights options, check out Chapter 16.)
- Syndication: If you're monetizing your videos, you can control whether your content is shown everywhere or only on platforms that support ads. (Other platforms include mobile applications on iOS and Android, as well as gaming consoles such as PlayStation and Xbox.)
- Captions: Captions are important to people with disabilities or to others who don't speak the native language of the video. There's no rule that you have to add captions your videos; it depends on whether it's important to use it to connect with your audience. Chapter 10 provides more detail on adding captions.
If your content has been shown on American television, there may be FCC restrictions around the captions, and you'll need to let YouTube know about it.
- Distribution Options: Embedding allows people to include your video in their websites. YouTube will provide you with the HTML code for your website. To get the code, click the Share button under the video on the Watch Page, and then click the Embed tab. Just copy the highlighted HTML and add it to your website. You receive credit for all views, likes, and shares. You can also select the Notify Subscribers option so that subscribers are notified via either their YouTube page or email.
If you're releasing 20 videos in one day and you normally only release 1 video per week, deselect the Notify Subscribers option Your viewers may see your multiple offerings as spam if they aren't used to this level of activity for your channel.
- Age Restrictions: Certain content isn't appropriate for viewers under 18, and it's up to you as the channel owner to make that call. Selecting this box helps ensure that a video can only be viewed by signed-in viewers who are 18 years of age and older. Understand that this may impact monetization if you're a YouTube partner.
Even if viewing is restricted to audiences 18 and over, community guidelines are still in effect.
- Category: This is the big bucket that you'd put your video into if someone asked you to describe your video in the most general of terms. Think of it as a “super tag,” and choose a category that best suits your video. This helps YouTube categorize your video for its search and recommendation algorithms.
- Video Location: Both your users and YouTube may care where you shot your video. Add the location if you think it's important.
- Video Language: Set this to the language spoken in the video.
- Recording Date: Like your location selection, users and YouTube may be interested in when your content was shot.
- 3D Video: Some people like 3D content, and YouTube is more than happy to accommodate. Using the options in the Advanced Settings section, you can disable the 3D function for your video, make your video 3D, or upload a 3D video and choose the This Video Is Already 3D option. Viewers can view the video in 3D with HTML5, but they will need to configure the settings.
- Video Statistics: Some channel owners don't mind sharing information about views, time watched, subscriptions driven, and video shares. It's always interesting to see whether views grow slowly over time or have an initial spike and flatten out. It's an indication of whether your content has long-term value to viewers. Uncheck the box if you don't want to share this information. Doing so won't have any negative impact on either your video or your channel.
- Comments: Specify whether you want comments posted automatically or only after approval from the channel owner. Only you can decide what is best for your channel. YouTube viewers generally prefer to see their comments right away and will take note if you require approval.
Setting upload defaults
After you hit your groove and are uploading lots of content, you may tire of having to enter the same information over and over again into your upload screens or through Video Manager. Fortunately, YouTube allows you to set default values on the most common Basic Info, Monetization, and Advanced Settings tabs. Just select the Channel section in the Creator Studio menu on the left side of the screen and choose the Upload Defaults option. Figure 9-8 shows the kinds of things you can set as defaults using this option.
Defaults are simply preconfigured values. You can change values either during the upload process or through Video Manager.
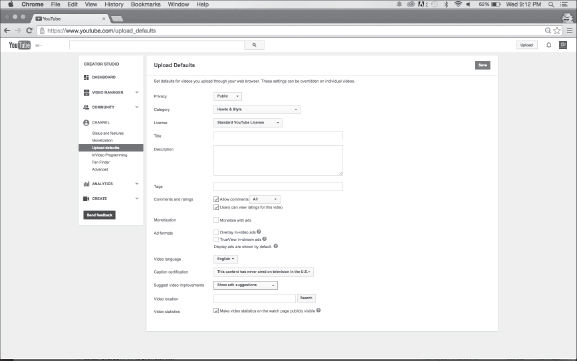
Figure 9-8: The YouTube Upload Defaults configuration.
Adding Custom Thumbnails
If your channel is in good standing, you can also provide a custom thumbnail instead of one of the default three images that YouTube recommends for your video. You can only add a custom thumbnail after your video has been uploaded. After the upload is completed, YouTube needs to analyze and process the video before you can add a custom thumbnail.
If you don't pick the thumbnail, YouTube will kindly do it for you. It's always better to pick it yourself or add a custom one.
The thumbnail is your billboard and will have a big influence on whether someone will watch your video.
To add a custom thumbnail to your video:
- Log in to your YouTube account.
- On your YouTube page, click your channel icon and then choose Creator Studio from the menu that appears.
- Click the Video Manager section of Creator Studio.
By default, it should go directly to the Videos submenu.
You can also bypass these steps by going to www.youtube.com/my_videos. - Find the video whose thumbnail you want to customize and click the Edit button next to it.
You're presented with page similar to the one shown in Figure 9-9. You'll see much of the information you saw during the upload, but you'll now have more stuff, including detailed video information and a visual representation of the thumbnails.
- Click on the Custom Thumbnail button shown under the three default thumbnails chosen by YouTube.
Choose the thumbnail from an image file.
- Click the Save Changes button.
You have a custom thumbnail!
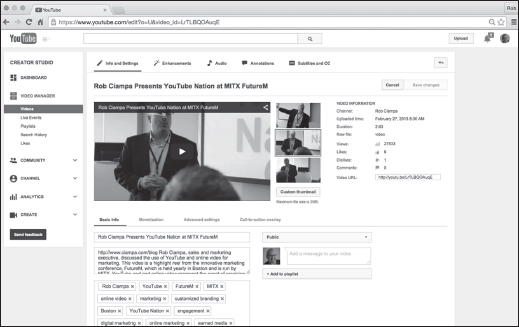
Figure 9-9: A YouTube video with no custom thumbnail.
Publishing and Unpublishing Videos
As a YouTube channel manager or content creator, your work may well be done when you've uploaded your videos and set the metadata. Publishing is all about configuring the privacy settings that are most appropriate for your users and clicking Save during the upload process or through Video Manager. For most channel managers, that means setting the video to Public at a specified time.
Always set your uploads to Private by default to avoid publishing before you've had the chance to set up metadata, shortlinks, and other parts of the video.
Before you publish, YouTube provides several additional features to help audience engagement, which we cover in greater detail in Chapter 10. You can
- Edit videos without having to upload again
- Add audio tracks
- Add annotations
- Set up captions and transcripts
After you've uploaded a video, you can't simply replace it with another one and use the same video URL. If you need to remove a video from general viewing, you have two choices:
- Unpublish it. Set it to Private and remove any Google+ shares.
- Delete the video. Remove it from YouTube permanently.
You can only delete videos that you own. To delete a video:
- Log in to your YouTube account.
- On your YouTube page, click your channel icon and then choose Creator Studio from the menu that appears.
- Click the Video Manager section of Creator Studio.
By default, it should go directly to the Videos submenu.
You can also bypass these steps by going to www.youtube.com/my_videos. - To delete one video, click the down arrow of the Edit menu to the right of thumbnail of the video, and select Delete from the submenu that appears.
You're presented with a confirmation dialog box.
- Select Yes if you want to delete, or Cancel if you've made a mistake or changed your mind.
- To delete multiple videos, select one or more check boxes to the left of the thumbnails of the videos you want to remove, and then click the down arrow on the Actions menu at the top of the Video page and select Delete from the menu that appears.
You're presented (again) with a confirmation dialog box.
- Select Yes if you want to delete, or Cancel if you've made a mistake or changed your mind.
Figure 9-10 shows multiple videos selected for deletion.
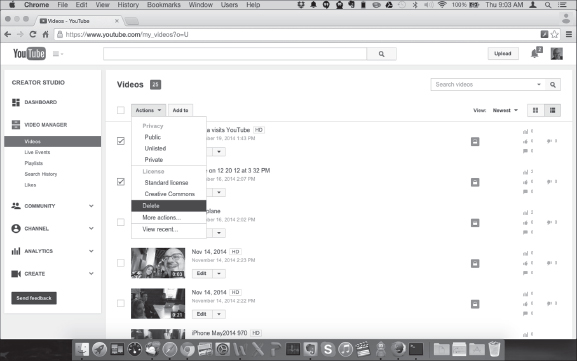
Figure 9-10: Deleting multiple videos from YouTube video manager.