
Lesson 7
Using RichTextBoxes
The TextBox control lets the user enter text and that's about it. It can display its text in different colors and fonts, but it cannot give different pieces of text different properties. The TextBox is intended to let the user enter a simple string, like a name or street address, and very little more.
The RichTextBox is a much more powerful control. It can display different pieces of text with different colors, fonts, and styles. It can adjust paragraph indentation and make bulleted lists. It can even include pictures. It's not as powerful as a full-featured word processor, such as Microsoft Word or OpenOffice's Writer, but it can produce a much more sophisticated result than the TextBox.
In this lesson you learn about the RichTextBox control and how to use it. You have a chance to experiment with the control, and you use it to add enough functionality to the SimpleEdit program to finally make the program useful.
Using RichTextBox Properties
To change the appearance of the text inside a RichTextBox, you first select the text that you want to change, and then you set one of the control's properties.
To select the text, you use the control's SelectionStart and SelectionLength properties to indicate where the text begins and how many letters it includes. Note that the letters are numbered starting with 0. (In fact, almost all numbering starts with 0 in C#.) For example, setting SelectionStart = 0 and SelectionLength = 1 selects the control's first letter.
After you select the text, you set one of the RichTextBox's properties to the value that you want the selected text to have.
For example, the following code makes the RichTextBox named contentRichTextBox display some text and colors the word “red”:
contentRichTextBox.Text = "Some red text";
contentRichTextBox.SelectionStart = 5;
contentRichTextBox.SelectionLength = 3;
contentRichTextBox.SelectionColor = Color.Red;
Table 7.1 lists properties that you can use to change the text's appearance.
| Property | Purpose |
SelectionAlignment |
Aligns the selection's paragraph on the left, center, or right. |
SelectionBackColor |
Sets the selection's background color. |
SelectionBullet |
Determines whether the selection's paragraph is bulleted. |
SelectionCharOffset |
Determines whether the selection is superscript (offset > 0), subscript (offset < 0), or normal (offset = 0). |
SelectionColor |
Sets the selection's color. |
SelectionFont |
Sets the selection's font. |
SelectionHangingIndent |
The first line in the selection's paragraph is indented normally and then subsequent lines in the paragraph are indented by this amount. |
SelectionIndent |
All lines are indented by this amount. |
SelectionProtected |
Marks the selected text as protected so the user cannot modify it. |
SelectionRightIndent |
All lines are indented on the right by this amount. |
The FontFeatures example program shown in Figure 7.1 demonstrates properties that change the appearance of text within a paragraph. These include the SelectionBackColor, SelectionCharOffset, SelectionColor, and SelectionFont.
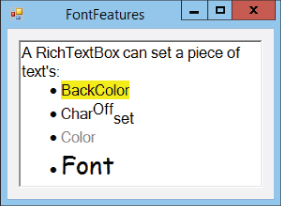
For example, the following code shows how the FontFeatures program sets the background color behind the word “BackColor”:
contentRichTextBox.SelectionStart = 41;
contentRichTextBox.SelectionLength = 9;
contentRichTextBox.SelectionBackColor = Color.Yellow;
The ParagraphFeatures program shown in Figure 7.2 demonstrates properties that change the way paragraphs are displayed. These include SelectionIndent, SelectionHangingIndent, SelectionRightIndent, SelectionBullet, and SelectionAlignment.

For example, the following code shows how the ParagraphFeatures program gives the second paragraph a 20 pixel hanging indent:
contentRichTextBox.SelectionStart = 82;
contentRichTextBox.SelectionLength = 1;
contentRichTextBox.SelectionHangingIndent = 20;
Table 7.2 summarizes four additional properties that change the text displayed by the control that deserve special mention.
| Property | Purpose |
Text |
Gets or sets the control's text without any formatting. |
Rtf |
Gets or sets the control's Rich Text Format (RTF) contents. This includes the text plus RTF formatting codes that define how the text should be displayed. |
SelectedText |
Gets or sets the selection's text. |
SelectedRtf |
Gets or sets the selection's text and RTF codes. |
Giving the User Control
Allowing the user to change text settings is easy. When the user selects text in the control, the RichTextBox sets its SelectionStart and SelectionLength properties accordingly. All you need to do is set the appropriate property (for example, SelectionColor) and the selected text is updated.
The SetTextProperties example program shown in Figure 7.3 uses this technique to let the user control text color, character offset, and paragraph alignment. Select some text and then click the tool strip buttons to change the text's properties.

For example, the following code shows how the SetTextProperties program changes the currently selected text to have a black background and white foreground:
private void reverseColorsButton_Click(object sender, EventArgs e)
{
    contentRichTextBox.SelectionBackColor = Color.Black;
    contentRichTextBox.SelectionColor = Color.White;
}
The program's other buttons work similarly.
Using RichTextBox Methods
Lesson 2 briefly described properties, methods, and events. Other lessons have also worked with many properties and events. In fact, most of the event handlers I've discussed in the lessons so far catch an event and change a property in response.
Although you've worked with many properties and events, the only method you've seen is the form's Close method, which makes the form go away. For example, the following code closes the form that executes it:
Close();The RichTextBox provides many new methods that are quite helpful for building a text editing program. Table 7.3 summarizes some of the most useful of those methods.
| Method | Purpose |
Clear |
Clears all text from the control. |
Copy |
Copies the current selection into the clipboard. |
Cut |
Cuts the current selection into the clipboard. |
DeselectAll |
Deselects all text by setting SelectionLength = 0. |
LoadFile |
Loads the control's text from a file with one of various formats such as RTF or plaintext. |
Paste |
Pastes whatever is in the clipboard into the current selection. This can be anything that the RichTextBox understands such as text, RTF formatted text, or an image. |
Redo |
Redoes the previously undone command. |
SaveFile |
Saves the control's text into a file in one of various formats such as RTF or plaintext. |
SelectAll |
Selects all of the control's text by setting SelectionStart = 0 and SelectionLength equal to the text's length. |
Undo |
Undoes the most recent change. |
The following code shows how a program can use the LoadFile method:
contentRichTextBox.LoadFile("Test.rtf", RichTextBoxStreamType.RichText);The first parameter passed into LoadFile gives the name of the file, which can be relative to the program's current directory or a full path.
The second parameter gives the type of file. The RichTextBoxStreamType enumeration lists file types that you can use. The choices you can use to load files are PlainText, RichText, and UnicodePlainText.
The following code shows how a program can use the SaveFile method. As with LoadFile, the first parameter gives the file's name and the second gives its type:
contentRichTextBox.SaveFile("Test.rtf", RichTextBoxStreamType.RichText);Using WPF Commands
A program can use commands to manipulate the contents of a RichTextBox. That control also provides commands that the user can invoke interactively. For example, the user can press Ctrl+E to center paragraphs.
Table 7.4 summarizes the most useful commands. The commands for the Windows Forms and WPF versions of the control differ slightly.
| Action | Windows Forms | WPF |
| Align centered | Ctrl+E | Ctrl+E |
| Align justified | Ctrl+J | |
| Align left | Ctrl+L | Ctrl+L |
| Align right | Ctrl+R | Ctrl+R |
| Bullet | 1 | Ctrl+Shift+L |
| Copy | Ctrl+C | Ctrl+C |
| Cut | Ctrl+X | Ctrl+X |
| Decrease font size | Ctrl+[ | |
| Delete | Delete | Delete |
| Delete next word | Ctrl+Delete | Ctrl+Delete |
| Delete previous word | Ctrl+Backspace | Ctrl+Backspace |
| Increase font size | Ctrl+] | |
| Numbering | 1 | Ctrl+Shift+N |
| Paste | Ctrl+V | Ctrl+V |
| Subscript 2 | Ctrl++ | Ctrl++ |
| Superscript 2 | Ctrl+Shift++ | Ctrl+Shift++ |
| Toggle bold | Ctrl+B | |
| Toggle insert | Insert | Insert |
| Toggle italic | Ctrl+I | |
| Toggle underline | Ctrl+U | Ctrl+U |
* In Windows Forms, Ctrl+Shift+L iterates through the available bullet and numbering styles.
** The subscript and superscript sequences are a bit confusing. For subscript, hold the Ctrl key and press +. For superscript, hold the Ctrl and Shift keys and press +. In WPF, those commands work only for OpenType fonts that come with subscript and superscript variants. Try the Palatino Linotype font. For more information on OpenType fonts, see msdn.microsoft.com/library/ms745109.aspx.
Both controls provide additional navigation commands. For example, Ctrl+Right Arrow moves one word to the right and Ctrl+Down Arrow moves one paragraph downward.
The WPF control also provides a context menu that contains the Copy, Cut, and Paste commands.
For more information on the WPF control's commands, including the navigation commands, see msdn.microsoft.com/library/system.windows.documents.editingcommands.aspx.
Try It
In this Try It, you add functionality to some of the SimpleEdit program's menu items and tool strip buttons. You use the RichTextBox properties and methods to implement the commands in the Edit menu: Undo, Redo, Copy, Cut, Paste, Delete, and Select All. (This also makes the corresponding buttons work at no extra charge.)
Lesson Requirements
In this lesson, you:
- Copy the SimpleEdit program you built in Lesson 6, Exercise 9.
- Replace the program's
TextBoxwith aRichTextBoxnamedcontentRichTextBox. - Add code to handle the Edit menu's commands.
- Add Undo code.
- Add Redo code.
- Add Copy code.
- Add Cut code.
- Add Paste code.
- Add Delete code.
- Add Select All code.
Hints
- For the Delete menu item, simply set the control's
SelectedTextproperty to an empty string:"".
Step-by-Step
- Copy the SimpleEdit program you built in Lesson 6, Exercise 9 (or download Lesson 6's version from the book's website).
- Replace the program's
TextBoxwith aRichTextBoxnamedcontentRichTextBox. - Add code to handle the Edit menu's commands.
- Open the program's form in the Form Designer. Click the
MenuStrip, expand the Edit menu, and double-click the Undo menu item. - Replace the placeholder call to
MessageBox.Showwith the following line of code so the event handler looks like this:private void editUndoMenuItem_Click(object sender, EventArgs e) { contentRichTextBox.Undo(); } - Repeat the previous two steps for the other Edit menu items. The following code shows the new event handlers:
private void editUndoMenuItem_Click(object sender, EventArgs e) { contentRichTextBox.Undo(); } private void editRedoMenuItem_Click(object sender, EventArgs e) { contentRichTextBox.Redo(); } private void editCopyMenuItem_Click(object sender, EventArgs e) { contentRichTextBox.Copy(); } private void editCutMenuItem_Click(object sender, EventArgs e) { contentRichTextBox.Cut(); } private void editPasteMenuItem_Click(object sender, EventArgs e) { contentRichTextBox.Paste(); } private void editDeleteMenuItem_Click(object sender, EventArgs e) { contentRichTextBox.SelectedText = ""; } private void editSelectAllMenuItem_Click(object sender, EventArgs e) { contentRichTextBox.SelectAll(); }
- Open the program's form in the Form Designer. Click the
When you finish, test the program's new features. One of the RichTextBox's more remarkable features is its ability to paste different kinds of items from the clipboard. For example, copy a picture to the clipboard and then use the program to paste it into the RichTextBox.
Exercises
- [WPF, SimpleEdit] Repeat the Try It using the WPF program you built for Lesson 6's Exercise 10. Hint: To delete the current selection, use the statement
contentRichTextBox.Selection.Text = "". - [SimpleEdit] Copy the program you built for the Try It and add simple code to handle the File menu's New, Open, Save, and Exit commands. For the New command, simply clear the
RichTextBox. (Hint: Use theClearmethod.)For the Open and Save commands, just load and save the file
Test.rtf. (The program will create the file the first time you save. If you try to open the file before it exists, the program will crash so don't use Open before you use Save.) Lesson 8 explains how to use file open and save dialogs to let the user pick the file that should be opened or saved. - [WPF, SimpleEdit] Repeat Exercise 2 using the program you built for Exercise 1. Hints:
- One way to clear the control's contents is to use the following code:
contentRichTextBox.SelectAll(); contentRichTextBox.Selection.Text = ""; - The preceding code works but is rather slow if the control contains a lot of text. The following code is more complicated but more efficient:
TextRange range = new TextRange( contentRichTextBox.Document.ContentStart, contentRichTextBox.Document.ContentEnd); range.Text = ""; - To load the saved file, use the following code (sorry, but WPF's version of the
RichTextBoxis a bit more complicated):TextRange range = new TextRange( contentRichTextBox.Document.ContentStart, contentRichTextBox.Document.ContentEnd); using (System.IO.Stream stream = new System.IO.FileStream("Test.rtf", System.IO.FileMode.Open)) { range.Load(stream, DataFormats.Rtf); } - To save text into a file, use the following code:
TextRange range = new TextRange(
    contentRichTextBox.Document.ContentStart,
    contentRichTextBox.Document.ContentEnd);
using (System.IO.Stream stream =
    new System.IO.FileStream("Test.rtf", System.IO.FileMode.Create))
{
    range.Save(stream, DataFormats.Rtf);
}
- One way to clear the control's contents is to use the following code:
- [SimpleEdit] Copy the SimpleEdit program you built for Exercise 2 and add code to handle the Format menu's commands (except for the Font command and color commands, which are covered in Lesson 8).
Hints:
- To turn bullets on and off, use the statement
contentRichTextBox.SelectionBullet = formatBulletMenuItem.Checked. - Make the indentation commands (None, Hanging, Left, Right, and Both) reset any other indentations. For example, the Hanging command should set the
SelectionIndentandSelectionRightIndentproperties to 0 as in the following code:contentRichTextBox.SelectionIndent = 0; contentRichTextBox.SelectionRightIndent = 0; contentRichTextBox.SelectionHangingIndent = 20;
- To turn bullets on and off, use the statement
- [WPF, SimpleEdit] Copy the WPF SimpleEdit program you built for Exercise 3 and add code to handle the Format menu's alignment and bullet commands. Hints:
- To turn bullets on and off, use the statement
EditingCommands.ToggleBullets.Execute(null, contentRichTextBox). - Use similar
EditingCommandsmethods for the alignment commands.
- To turn bullets on and off, use the statement
- 6 [SimpleEdit] Copy the SimpleEdit program you built for Exercise 4 and add code to handle the toolbar's color commands.
- The SimpleEdit program allows only the indentation styles None, Hanging, Left, Right, and Both. It doesn't allow other combinations such as Hanging plus Right. Build a program that uses tool strip buttons to let the user select each of the indentation properties (hanging, left, and right) individually. Provide a fourth button to clear all of the indentation properties.
- Make a program with two menus and a
RichTextBox. The File menu should contain the usual Exit command. The Font menu should contain the items Small, Medium, and Large and should use small, medium, and large fonts, respectively. When the user selects one of those items, the program should set theRichTextBox's selected text to use that item's font. - [Hard] Make a program with a
RichTextBoxand a toolbar containing Undo and Redo buttons. Initially disable the buttons. Whenever the user changes theRichTextBox's text (catch theTextChangedevent) or clicks one of the buttons, use theRichTextBoxcontrol'sCanUndoandCanRedoproperties to enable or disable the buttons. Verify that this works as expected when you click the buttons or press Ctrl+Z or Ctrl+Y. Also make sure it works if you press Ctrl+V to paste into theRichTextBox.