Chapter 23
Ten Tips, Tricks, and Shortcuts
In This Chapter
![]() Switching between apps
Switching between apps
![]() Using a computer to install apps
Using a computer to install apps
![]() Creating a panoramic shot
Creating a panoramic shot
![]() Monitoring data usage
Monitoring data usage
![]() Creating a mobile hotspot
Creating a mobile hotspot
![]() Watching the tablet dream
Watching the tablet dream
![]() Removing the vocal dirty word filter
Removing the vocal dirty word filter
![]() Building the tablet’s dictionary
Building the tablet’s dictionary
![]() Adding useful Home screen widgets
Adding useful Home screen widgets
![]() Creating a screen shot
Creating a screen shot
Atip is a small suggestion, a word of advice often spoken from bruising experience or knowledge passed along from someone with bruising experience. A trick, which is something not many know about, usually causes amazement or surprise. A shortcut is a quick way to get home, even though it crosses the old graveyard and you never quite know whether Old Man Witherspoon is the groundskeeper or a zombie.
I’d like to think that just about everything in this book is a tip, trick, or shortcut for using an Android tablet. Even so, I’ve distilled a list of items in this chapter that are definitely worthy of note.
Quickly Switch Apps
 Android apps don’t quit. Sure, some of them have a Quit or Sign Out command, but most apps lurk inside the tablet’s memory while you do other things. The Android operating system may eventually kill off a stale app. Before that happens, you can deftly and quickly switch between all running apps.
The key to making the switch is to use the Recent navigation icon, found at the bottom of the touchscreen. Figure 23-1 illustrates two popular representations of the Recent navigation icon.

Figure 23-1: Incarnations of the Recent navigation icon.
After tapping the Recent navigation icon, choose an app from the list. Swipe the list up or down to peruse what’s available. To dismiss the list, touch the Back icon or Home icon.
- On tablets that lack the Recent icon, long-press the Home navigation icon.
- To remove an app from the list of recent apps, swipe it left or right. This is effectively the same thing as quitting an app.
- Some tablets may feature a Task Manager. It’s usually a more technical representation of the items you find on the list of recent apps, with the addition of internal apps and services.
 The list of recent apps is called the Overview, although everyone I know calls it the List of Recent Apps.
Install Apps from a Computer
You don’t need to use an Android tablet to install apps. Using a computer, you can visit the Google Play website, browse for apps, and have that app installed remotely. It’s kind of cool yet kind of scary at the same time. Here’s how it works:
Use a computer’s web browser to visit the Google Play Store on the Internet:
play.google.com/store. Bookmark that site!
If necessary, click the Sign In button to log in to your Google account.
Use the same Google account you used when setting up your Android tablet. You need to have access to that account so that Google can remotely update your various Android devices.
Browse for something.
You can hunt down apps, books, music — the whole gamut. It works just like browsing the Play Store on your tablet.
- Click the Install button or Buy button.
Choose your Android tablet from the Choose a Device menu.
If your tablet isn’t listed, the app isn’t compatible. That happens. Also, the tablet may be listed using its technical name, not the brand name you’re used to.For a free app, click the Install button. For a paid app, click the Continue button, choose your payment source, and then click the Buy button.
Installation proceeds.
As if by magic, the app is installed on your Android tablet — even though you used a computer to do it. Heck, the tablet need not even be within sight of you, and the app still installs remotely.
Shooting a Panorama
Most variations of the Camera app sport a panoramic shooting mode. The panorama is a wide shot — it works by panning the tablet across a scene. The Camera app then stitches together several images to build the panoramic image.
To shoot a panoramic shot, follow these steps in the Camera app:
Choose the Camera app’s Panorama mode.
 For the stock Android Camera app, swipe your finger inward from the left side of the screen. Tap the Panorama icon, shown in the margin, to switch the app into Panorama mode.
- Hold the tablet steady, and then touch the Shutter icon.
Pivot in one direction as shown on the screen, following along with the animation.
Watch as the image is rendered and saved.
Panoramas work best for vistas, wide shots, or perhaps for a family gathering where not everyone likes each other.
Avoid Data Surcharges
An important issue for anyone using an LTE Android tablet is whether you’re about to burst through your monthly data quota. Mobile data surcharges can pinch the wallet, but your Android tablet has a handy tool to help you avoid data overages. It’s the Data Usage screen, shown in Figure 23-2.
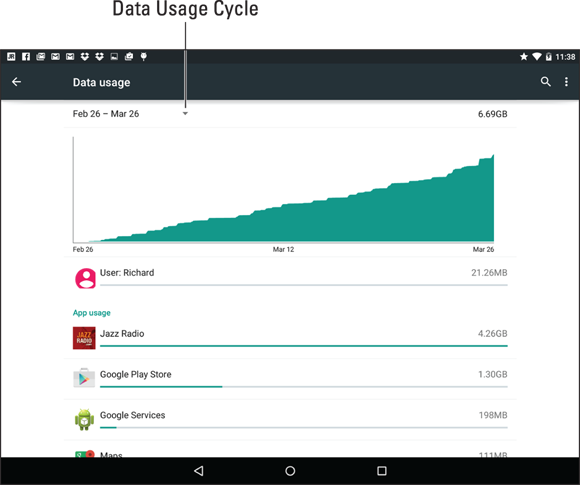
Figure 23-2: Data usage (Wi-Fi tablet version).
To access the Data Usage screen, follow these steps:
- Open the Settings app.
Choose Data Usage.
On some Samsung tablets, you’ll find the Data Usage item by choosing the Connections tab at the top of the Settings app screen.
The main screen is full of useful information and handy tools. The line chart (refer to Figure 23-2) informs you of your data usage over a specific period. You can touch the Data Usage Cycle action bar to set that timespan, for example, matching it up with your cellular provider’s monthly billing cycle.
Figure 23-2 shows the Wi-Fi tablet’s Data Usage screen. An LTE tablet’s screen features a Cellular tab, which lists options, a mobile data graph, and those apps that access the mobile data network.
To help avoid data surcharges, slide the master control by the item Set Cellular Data Limit to the On position. You can then adjust the red and black sliders on the chart to create a warning and cutoff values: When the black line is crossed, a warning appears. When the red line is crossed, the tablet ceases using the mobile data network.
- My monthly data plan is capped at 10GB. I set the limits (on all my Android devices) to 8GB for the warning (black bar) and 9.5GB for the stop (red bar).
- Keep in mind that the data usage shown on your tablet may not reflect the same values tracked by the cellular provider.
- To review access for a specific app, scroll down and choose it from those shown on the Data Usage screen. Only apps that access the network appear.
- If you notice that the app is using more data than it should, tap the App Settings button. You may be able to adjust some settings to curtail unintended Internet access.
Share Mobile Data
It’s marvelously convenient to have a cellular tablet and be able to use the Internet wherever you roam. If you’re feeling benevolent, you can share that mobile data connection in one of two ways: create a mobile hotspot or tether the connection to a single device, such as a laptop computer.
To create a mobile hotspot, heed these steps:
Turn off the tablet’s Wi-Fi radio.
There’s no point in creating a Wi-Fi hotspot where one is already available.
If possible, connect your Android tablet to a power source.
Running a mobile hotspot draws a lot of power.
Open the Settings app.
Some tablets may feature an app named Mobile Hotspot or 4G Hotspot. If so, open it instead.
- Tap the More item in the Wireless & Networks section.
Choose Tethering & Portable Hotspot.
The Tethering & Mobile Hotspot item might be found on the main Settings app screen. On some Samsung tablets, touch the Connections tab and then choose the command Tethering and Portable Hotspot.
You may see text describing the process. If so, dismiss the text.
Activate the Portable Wi-Fi Hotspot item.
The item might be titled Mobile Hotspot.
Choose the item Set Up Wi-Fi Hotspot or Portable Wi-Fi Hotspot.
Give the hotspot a name, or SSID, and review, change, or assign a password. You may need to tap a Configure button to set up these items.
- Touch the Save button or OK button to set your changes.
To deactivate the mobile hotspot, repeat these steps but deactivate the Portable Wi-Fi Hotspot item in Step 6.
A more direct way to share the mobile data network is to tether the tablet to a computer by using a USB cable. Follow these steps to set up Internet tethering:
- Connect the tablet to a computer or laptop by using the USB cable.
- Open the Settings app.
Choose the More item in the Wireless & Networks section.
On Samsung tablets, touch the Connections tab and then choose Tethering.
- Activate USB Tethering.
The other device should instantly recognize the Android tablet as a “modem” with Internet access. Further configuration may be required, which depends on the computer using the tethered connection. For example, you may have to accept the installation of new software when prompted by Windows.
To terminate your Internet tethering session, repeat Steps 2 through 4 to remove the check mark. You can then disconnect the USB cable.
- You can continue to use the tablet while it’s sharing the mobile data connection.
- Some cellular providers limit your tablet’s ability to create a mobile Wi-Fi hotspot unless you pay an extra fee.
- Sharing the mobile data network connection more rapidly consumes your cellular data quota. Be careful!
Make the Tablet Dream
Does your tablet lock, or does it fall asleep? I prefer to think that the tablet sleeps. That begs the question of whether or not it dreams.
Of course it does! You can even see the dreams, providing you activate the Daydream feature — and you keep the tablet connected to a power source. Heed these steps:
- Start the Settings app.
Choose Display and then Daydream.
The Display item is found on the Device tab on some Samsung tablets.
- Ensure that the Daydream master control is in the On position.
Choose which type of daydream you want displayed.
Clock is a popular item, though I’m fond of Colors.
 Some daydreams feature the Settings icon. Use it to customize how the daydream appears.
- Tap the Action Overflow and choose When to Daydream button.
- Choose the Either option.
The daydreaming begins when the screen would normally time-out and lock. So if you’ve set the tablet to lock after 1 minute of inactivity, it daydreams instead — as long as it’s plugged in or docked.
- To disrupt the dream, swipe the screen.
- The tablet doesn’t lock when it daydreams. To lock the tablet, press the Power/Lock key.
Add Spice to Dictation
I feel that too few people use dictation, despite how handy it can be. Anyway, if you’ve used dictation, you might notice that it occasionally censors some of the words you utter. Perhaps you’re the kind of person who doesn’t put up with that kind of s***.
Relax. You can lift the vocal censorship ban by following these steps:
- Start the Settings app.
Choose Language & Input.
On Samsung tablets, tap the General tab to locate the Language and Input item.
- Choose Google Voice Typing.
- Disable the option Block Offensive Words.
And just what are offensive words? I would think that censorship is an offensive word. But no, apparently only a few choice words fall into this category. I won’t print them here, because the tablet’s censor retains the initial letter and generally makes the foul language easy to guess. D***.
Add a Word to the Dictionary
Betcha didn’t know that your tablet sports a dictionary. The dictionary keeps track of words you type — words that may not be recognized as being spelled properly.
Words unknown to the tablet are highlighted on the screen. Sometimes the word is shown in a different color or on a different background, and sometimes it’s underlined. To add that word to the tablet’s dictionary, long-press it. You see the Add Word to Dictionary action, which sticks the word in the tablet’s dictionary.
To review or edit the tablet’s dictionary, follow these steps:
- Start the Settings app.
Choose Language & Input.
Tap the General tab on your Samsung tablet to locate this item.
Choose Personal Dictionary.
This action may not be obvious on some tablets: Try choosing the keyboard first, and then choose either the Dictionary or User Dictionary command.
With the dictionary visible, you can review words, edit them, remove them, or manually add new ones. To edit or delete a word, long-press it. To add a word, tap the Add icon.
Add Useful Widgets
Your tablet features a wide assortment of widgets with which to festoon the Home screen. They can be exceedingly handy, although you may not realize it because the sample widgets often included with the tablet are weak and unimpressive.
Good widgets to add include navigation, contact, eBook, and web page favorites. Adding any of these widgets starts out the same. Here are the brief directions, with more specifics offered in Chapter 18:
- Long-press the Home screen.
Choose Widgets.
Some tablets keep the widgets on a tab on the Apps drawer, so look for them there when the two preceding steps fail utterly.
- Drag a widget to the Home screen.
Complete the process.
The process is specific for each type of widget suggestion in this section.
Navigation widget
The Navigation widget allows you to quickly summon directions to a specific location from wherever you happen to be.
To add a navigation shortcut, select the Navigation widget. After you plop the widget on the Home screen, select a travelling method and destination. You can type a contact name, an address, a business name, and so on. Add a shortcut name, which is a brief description to fit under the widget on the Home screen. Tap the Save button.
Tap the Navigation widget to use it. Instantly, the Maps app starts and enters Navigation mode, steering you from wherever you are to the location referenced by the widget.
Contact widget
For your most popular contacts, consider adding a contact widget: Choose Contact widget, and then select the specific contact from the tablet’s address book. A widget representing the contact (with the contact’s picture, if available) appears on the Home screen. Tapping the widget displays information about the contact, along with an email link, a phone number, a map location, and other details supplied for that contact.
eBook widget
When you’re mired in the middle of that latest potboiler, put a Book shortcut on the Home screen: Choose the Book widget, and then select which eBooks in your digital library you want to access. Tap the widget to open the Play Books app and jump right into the book at the spot where you were last reading.
Web bookmark widget
For your favorite websites, consider adding a Home page widget. You can add the Bookmarks widget, found on the Widgets screen, but an easier shortcut is to open the web browser app, navigate to the page you desire, and then tap the Action Overflow and choose Add to Homescreen.
Take a Screen Shot
A screen shot, also called a screen cap (for capture), is a picture of your tablet's touchscreen. So if you see something interesting on the screen or you just want to take a quick pic of your tablet life, you take a screen shot.
The stock Android method of shooting the screen is to press and hold both the Volume Down and Power/Lock keys at the same time. Upon success, the touchscreen image reduces in size, you may hear a shutter sound, and the screen shot is saved.
- Screen shots are accessed through the Photos app. If your tablet uses the old Gallery app, you’ll find screen shots in their own album.
- Some Samsung tablets use a Motion command to capture the screen: Hold your hand perpendicular to the tablet, like you’re giving it a karate chop. Swipe the edge of your palm over the screen, right-to-left or left-to-right. Upon success, you hear a shutter sound.
- Internally, screen shots are stored in the Pictures/Screenshots folder. They’re created in the PNG graphics file format.