
Chapter 4
Understanding Basic Picture Options
IN THIS CHAPTER
Taking your pick of exposure modes
Looking at shutter-release options
Selecting the right resolution (pixel count)
Comparing file types: JPEG, Raw, and more
Getting advice on a few more basic setup options
Chapter 3 walks you through the steps of setting up your camera to shoot in your camera's fully automatic modes, relying on the default settings for most picture-taking options. When you're ready to take a bit more control, this chapter helps you make sense of four critical camera settings you should check before every shoot: exposure mode, shutter-release mode, image resolution, and image file type (JPEG or Raw). In addition, the end of the chapter provides advice about some common camera-customization features.
Choosing an Exposure Mode
Your selection of exposure mode, sometimes called shooting mode, determines which other camera settings you can access. Depending on your camera, you may be able to choose from the following exposure modes:
- Auto mode: This mode gives almost all control to the camera. You usually can adjust picture resolution, however, and select the other basic setup options outlined at the end of this chapter. See Chapter 3 for details on how to shoot in Auto mode.
-
Automatic scene modes: These modes enable you to tell the camera what type of picture you want to take — portrait, landscape, sports, and so on. The camera then selects settings designed to produce the traditional characteristics for that type of image. For example, Sports mode is designed to freeze action.
Most of the picture-taking process is the same as in Auto mode; see Chapter 3 for a few details about the most common scene modes.
- Advanced exposure modes: Typically not found on entry-level cameras, the following modes enable you to take control of two important exposure settings — f-stop and shutter speed — as well as all of your camera's other options:
- Programmed autoexposure (P): This mode selects the f-stop and shutter speed for you. On most cameras, though, you can choose different combinations of the two settings.
- Aperture-priority autoexposure (A or Av): You choose the aperture setting (f-stop), and the camera selects the shutter speed required for a good exposure. (Av stands for aperture value.)
- Shutter-priority autoexposure (S or Tv): You choose the shutter speed (length of exposure), and the camera dials in the f-stop for you. (Tv stands for time value, as in exposure time.)
-
Manual (M): You set both the f-stop and shutter speed, but the camera provides an exposure meter to help you gauge whether your settings are on target.
 If your camera offers manual and automatic focusing, don't confuse the M exposure mode with the control that invokes manual focusing (usually marked with the letters M or MF). You usually can choose automatic or manual focusing no matter which exposure mode you select.
 Although the first three advanced modes still rely on the camera to determine the “proper exposure,” you can override that decision by using such options as Exposure Compensation. See Chapter 5 for details on this feature as well as an explanation of f-stops, shutter speed, and other exposure-related settings.
Some cameras also offer specialty modes that enable you to create a panoramic image (a wide-and-short or tall-and-narrow photo), create brief animated video clips out of still photos, add special effects, and get step-by-step guidance for taking a photograph. Advanced models usually enable you to store one or two groups of picture settings as custom-user modes as well. Because these features vary so much in their use from camera to camera, I can't cover them in this book, but I encourage you to investigate them nonetheless.
How you select an exposure mode also depends on your camera. You may need to choose the setting from a dial similar to the ones in Figure 4-1, which show some of the common symbols used to indicate exposure modes. On small cameras, you may instead get a simplified dial that enables you to set the camera to still-photo mode (usually a camera icon) and then select a specific mode from a menu, as shown in Figure 4-2. On advanced cameras, you may instead see a Mode button; press that button to access the available exposure modes and then use another dial or control to choose the one you want to use. (Cameras this sophisticated usually don't offer Auto or scene modes.)
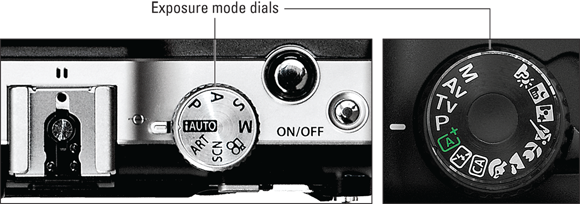
FIGURE 4-1: Some cameras offer access to a variety of exposure modes via an external dial.
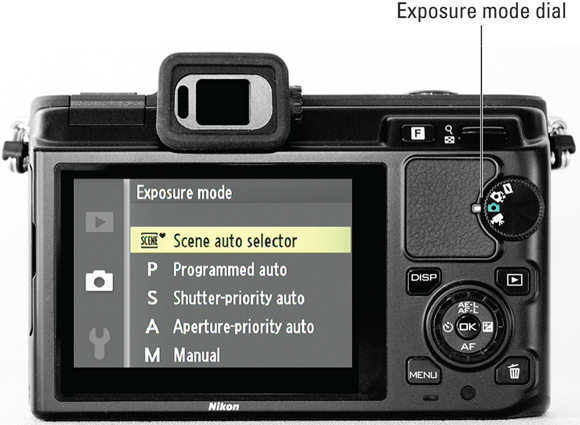
FIGURE 4-2: In other cases, you set the camera to still photo mode (indicated here by the camera symbol) and then select an exposure mode from a menu.
Setting the Shutter-Release Mode
Many cameras offer a choice of shutter-release modes, which controls what happens when you press the shutter button. The name of the option varies, but it's typically something like Drive mode or Release mode. Check your camera manual for that information and for details on how to select the mode you want to use. You may find the settings lurking on an external dial, as shown on the left in Figure 4-3, or accessible via a button that displays a screen where you choose a release mode, as shown on the right.
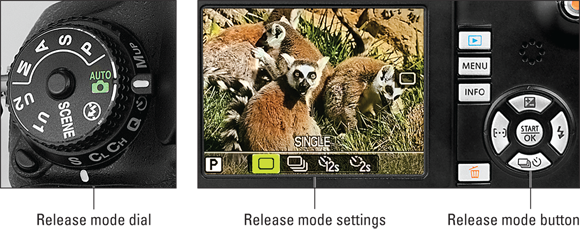
FIGURE 4-3: Although the controls used to adjust the shutter-release mode vary, most cameras offer a standard batch of settings and setting icons.
The following list describes the most common shutter-release modes. In the margins, you see the symbols that are typically used to represent these modes in camera displays. Note that which shutter-release modes you can select depends on your chosen exposure mode. You may need to step up to an advanced exposure mode to take advantage of all the various options.
 Single-shot mode: The camera records one image every time you fully depress the shutter button. In other words, this is normal photography mode. It is usually represented on camera screens as a single rectangle like the one shown here or by the letter S, as on the dial shown on the left in Figure 4-3.
-
 Continuous or burst mode: Designed to make capturing fast action easier, this mode records a continuous series of images — a burst of frames — as long as you hold down the shutter button. The standard symbol used for this mode is a stack of rectangles (representing multiple frames).
A few tips to know about this mode:
- How many frames per second you can capture depends on your camera and memory-card speed. Advanced cameras typically offer a faster shooting rate, which is important if your primary interest is photographing sports (or other fast-moving subjects, such as hummingbirds). As for the memory card, its read/write speed can affect whether the camera can actually achieve the fastest frame rate promised in its marketing specs. Before buying the fastest card on the market, though, be sure that your camera supports it. Some cameras can't communicate with the latest cards or may be able to store files on them but not at a faster rate than with slower cards.
- You don't always need to max out the frame rate. You also may be able to choose from a couple of continuous-frame rates, typically labeled Continuous High (maximum frames per second) and Continuous Low (typically around three frames per second). Although most people are tempted to always use the highest frames-per-second setting, I recommend that option only when shooting a subject that's moving at a really rapid pace. Otherwise, you wind up with lots of shots showing the exact same thing because not much actually changes between frames. And with the high resolution of today's cameras — which translates to huge files — that's a waste of valuable memory card space.
-
 You probably can't use flash. Most cameras disable flash when you select this shutter-release mode because there isn't enough time between frames for the flash to recycle. With some cameras, turning on the flash automatically changes the shutter-release mode to single-frame; with other models, the flash may fire once but then go to sleep.
-
 Self-timer mode: In this mode, you fully depress the shutter button, and the camera releases the shutter and captures the image several seconds later. The original purpose of this mode was to give the photographer enough time to press the shutter button and then run in front of the camera and be part of the picture. But savvy photographers also take advantage of this mode to eliminate any chance of camera shake (and resulting image blur) when shooting long exposures and using a tripod. Especially if you're using a long lens (telephoto lens), even the slight action of pushing the shutter button can move the camera enough to induce blur. So you set the camera to self-timer mode, press the shutter button, and then take your hands off the camera and wait for the shutter release. Of course, if your camera offers remote-control operation, that's an easier option, but if not, self-timer mode offers a convenient workaround.
On some cameras, self-timer mode offers some bells and whistles that make it even more helpful. You may be able to choose from two delay times for the shutter release — say, two seconds or ten seconds. The two-second delay is great when you're substituting self-timer mode for remote-control operation; waiting around for ten seconds between shots gets a bit annoying. Some cameras even enable you to set up a self-timer session that records multiple frames with each push of the shutter button. This feature is known as continuous self-timer mode.
-
 Remote-control mode: Some cameras enable you to trigger the shutter button with a corded or wireless remote control. You may need to choose a special shutter-release mode to take advantage of that option, so consult your camera manual about this issue. The icon shown in the margin is often used to label a special mode provided for wireless remote control, for example. As with self-timer mode, you may be able to tell the camera to release the shutter as soon as you press the button on the remote or to delay the release for a couple of seconds.
Many cameras offer the option to use a smartphone instead of a dedicated camera remote to trigger the shutter release. For example, the screen shot in Figure 4-4 shows an app used to trigger the shutter on some Nikon cameras. To take advantage of this option, you need to download the proper app from the manufacturer's website.
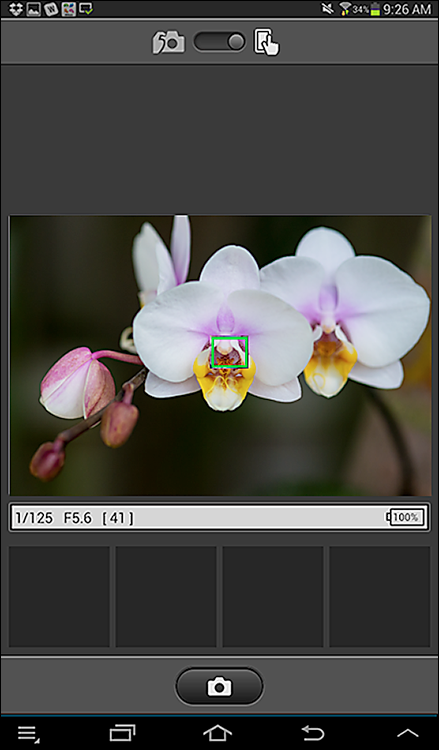
FIGURE 4-4: With cameras that offer wireless connectivity, you may be able to use an app on your smartphone or tablet to trigger the shutter release.
If you're shooting with an intermediate or advanced camera, also check out these additional shutter-release options, some of which may be buried somewhere in the camera's menus instead of being grouped with the other settings:
- Time-lapse shooting: Sometimes called interval or intervolametor shooting mode, this feature enables you to set the camera to automatically capture one or more frames over a period of time, with a specified interval between capture sessions. You set the camera on a tripod, focus the lens on your subject, enable the feature, and then walk away and let the camera take care of the rest. You might use this option to record the gradual opening of a flower bud over a couple of days, for example.
-
Mirror-lock up: One component of the optical system of a dSLR camera is a mirror that moves every time you press the shutter button. The small vibration caused by the action of the mirror can result in slight blurring of the image when you use a very slow shutter speed, shoot with a long telephoto lens, or take extreme close-up shots. To cope with that issue, some cameras offer mirror-lockup shooting, which delays opening the shutter until after the mirror movement is complete.
Situations that call for mirror lockup also call for a tripod: Even with the mirror locked up, the slightest jostle of the camera can cause blurring. Using a remote control or self-timer mode to trigger the shutter release is also a good idea. Note, too, that on some cameras, a mirror-lockup setting is provided only for the purposes of cleaning the image sensor (you have to move the mirror out of the way to reach the sensor) and not for picture taking. -
Quiet mode: This mode is another setting sometimes found on dSLR cameras and also has to do with mirror movement, which makes some noise when you take a picture. (You may hear photographers refer to this noise as mirror slap.) In Quiet mode, you can delay the sound by keeping the shutter button pressed down after the shutter is released. You still hear the mirror slap when you release the button — and you can't take another picture until you do. But if you're in a situation where the slightest noise is problematic, Quiet mode may be of some help. In addition to delaying mirror noise, this mode automatically silences the beep that most cameras make to let you know that autofocusing is complete.
If you need truly silent camera operation, some non-dSLR cameras provide that option. This feature is especially helpful when photographing babies and pets, who sometimes get spooked by normal camera sounds. Usually, you need to select a special setting to enjoy silent operation; by default, most cameras make some sort of noise to let you know that your picture has been recorded.
Setting Picture Resolution
Have you ever seen the painting A Sunday Afternoon on the Island of La Grande Jatte, by the French artist Georges Seurat? Seurat was a master of a technique known as pointillism, in which scenes are composed of thousands of tiny dots of paint, created by dabbing the canvas with the tip of a paintbrush. When you stand across the room from a pointillist painting, the dots blend together, forming a seamless image. Only when you get up close to the canvas can you distinguish the individual dots.
Digital images work something like pointillist paintings. Rather than being made up of dots of paint, however, digital images are composed of tiny squares of color known as pixels. Pixel is short for picture element. If you display an image in a photo-editing program and then use the program’s Zoom tool to magnify the view, you can see the individual pixels, as shown in the inset in Figure 4-5. Zoom out on the image, and the pixels seem to blend together, just as when you step back from a pointillist painting.
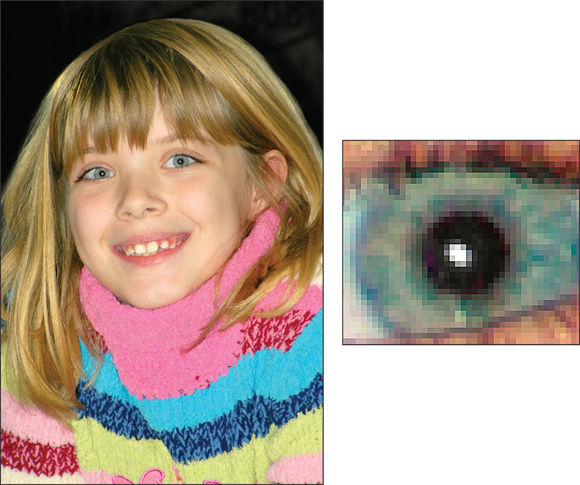
FIGURE 4-5: Zooming in on a digital photo enables you to see its individual pixels.
The number of pixels in an image is referred to as resolution. You can define resolution either in terms of the pixel dimensions — the number of horizontal pixels and vertical pixels — or total resolution, which you get by multiplying those two values. This number is usually stated in megapixels, or MP for short, with 1 megapixel equal to 1 million pixels.
Every digital photograph is born with a set number of pixels, which you control by using the capture settings on your digital camera. Check your camera manual to find out how to access the setting; it may be called Image Size, Resolution, Quality, or something similar. Note, too, that in some cases, you set the resolution separately from the file type (JPEG or Raw, covered later in this chapter). But on other models, the two are adjusted together.
Choosing the right resolution setting is critical because it affects three aspects of a digital photo:
- The maximum size at which you can produce good prints
- The display size of the picture when viewed on a computer monitor, a television, or another screen device
- The size of the image file, which in turn affects how much storage space is needed to hold the file
To help you determine the right pixel population for your photos, the following three sections explore each of these issues.
Pixels and print quality
Generating a good print from a digital photo requires that you feed the printer a certain number of pixels per linear inch, or ppi. So the pixel count of a photo determines how large you can print the image without noticing a loss of picture quality.
Figures 4-6 through 4-8 illustrate this issue. The first image has resolution of 300 ppi; the second, 150 ppi; and the third, 75 ppi. Why does the 75-ppi image look so much worse than its higher-resolution counterparts? Because at 75 ppi, the pixels are bigger, and the bigger the pixel, the more easily your eye can figure out that it’s really just looking at a bunch of squares. Areas that contain diagonal and curved lines, such as the edges of the coins and the handwritten lettering in the figure, take on a stair-stepped appearance.

FIGURE 4-6: A photo with an output resolution of 300 ppi looks terrific.
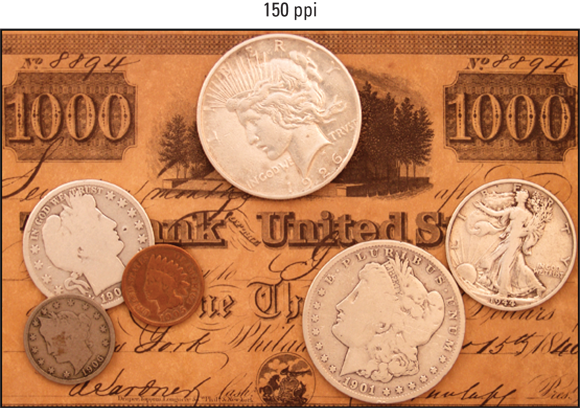
FIGURE 4-7: At 150 ppi, the picture loses some sharpness and detail.

FIGURE 4-8: Reducing the resolution to 75 ppi causes significant image degradation.
If you look closely at the black borders that surround Figures 4-6 through 4-8, you can get a clearer idea of how resolution affects pixel size. Each image sports a 2-pixel border. But the border in Figure 4-8 is twice as thick as the one in Figure 4-7 because a pixel at 75 ppi is twice as large as a pixel at 150 ppi. Similarly, the border around the 150-ppi image is twice as wide as the border around the 300-ppi image.
How many pixels are enough to guarantee great prints? Well, it depends in part on how close people will be when viewing the pictures. Consider a photo on a billboard, for example. If you could climb up for a close inspection, you would see that the picture doesn’t look very good because billboard photos are typically very low-resolution images, with few pixels per inch. But when you view them from far away, as most of us do, they look okay because our eyes blend all those big pixels together. Unless you’re doing billboard photography, however, people will be viewing your images at a much closer range, so a higher resolution is required.
The resolution you need to produce the best prints also varies depending on the printer, but I usually shoot for 300 ppi. For quick reference, Table 4-1 shows you the approximate pixel count you need in order to produce traditional print sizes at that resolution. The first set of pixel values represents the pixel dimensions (horizontal pixels by vertical pixels); the value in parentheses represents the total pixel count, in megapixels (MP). Your mileage may vary, however, so don't panic if an image you want to print has fewer than 300 ppi. You may be satisfied with prints made with a lower resolution — just don't go too low, for the reasons made obvious by Figures 4-7 and 4-8.
Chapter 9 provides an in-depth look at printing, talking more about the whole pixel-count issue and exploring other factors that affect print quality. In the meantime, keep these pixel pointers in mind:
-
Select the resolution that matches your print needs before you shoot. Yes, some photo programs enable you to change the number of pixels in an existing image, a process called resampling. But adding pixels — upsampling — isn’t a good idea. When you take this step, the photo-editing software simply makes its best guess as to what color and brightness to make the new pixels. And even high-end photo-editing programs don’t do a good job of pulling pixels out of thin air, as illustrated by Figure 4-9.
To create this figure, I started with the 75-ppi image shown in Figure 4-8 and resampled the image to 300 ppi in Adobe Photoshop, one of the best photo-editing programs available. Compare this new image with the 300-ppi version in Figure 4-6, and you can see just how poorly the computer adds pixels.
With some images, you can get away with minimal upsampling — say, 10 to 15 percent — but with other images, you notice a quality loss with even slight pixel infusions. Images with large, flat areas of color tend to survive upsampling better than pictures with lots of intricate details.
- Use the highest resolution setting for pictures you may want to crop later. The numbers in Table 4-1 assume that you’re printing the entire photo. If you crop the photo before printing, you need more original pixels to generate a given print size because you’re getting rid of a portion of the image. For example, the left image in Figure 4-10 shows the tightest framing I could achieve with my camera, given the distance between the bird and my lens. Because I captured the image at a resolution of 24 mp, I could crop to the better composition shown on the right and still have plenty of pixels to produce a good print. In fact, the cropped file contains about 5.3 mp, so I can output a much larger print than fits on this page.
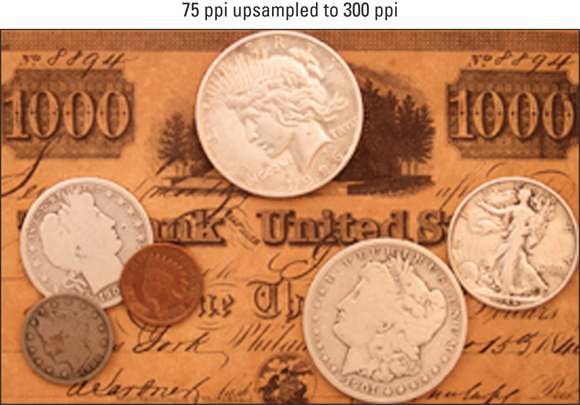
FIGURE 4-9: Here you see the result of upsampling the 75-ppi image in Figure 4-8 to 300 ppi.
TABLE 4-1 How Many Pixels for Good Prints?
Print Size (in Inches) |
Pixels for 300 ppi |
4 x 6 |
1200 x 1800 (2 mp) |
5 x 7 |
1500 x 2100 (3 mp) |
8 x 10 |
2400 x 3000 (7 mp) |
11 x 14 |
3300 x 4200 (14 mp) |
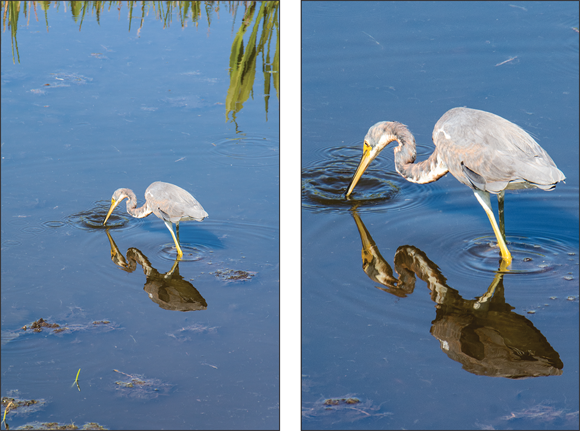
FIGURE 4-10: I used a high-resolution setting to capture the original (left), which enabled me to crop away excess background and still have enough pixels to produce a good print (right).
Pixels and screen images
Although resolution has a dramatic effect on the quality of printed photos, it’s irrelevant to the quality of pictures viewed on a monitor, a television, or another screen device. The number of pixels controls only the size at which the picture appears.
A bit of background to help you understand this issue: Like digital cameras, computer monitors (and other display devices) create everything you see on the screen out of pixels. When you display a digital photo, the monitor simply uses one screen pixel to display one image pixel.
For example, Figure 4-11 shows a screen capture taken from a 24-inch monitor that I use for a Windows computer. Windows enables you to adjust the resolution of the monitor (as does the Mac operating system), with each setting resulting in a different number of screen pixels. Usually, you get the best display when using the monitor's native (default) resolution, which on this monitor, is 1920 x 1200 pixels.
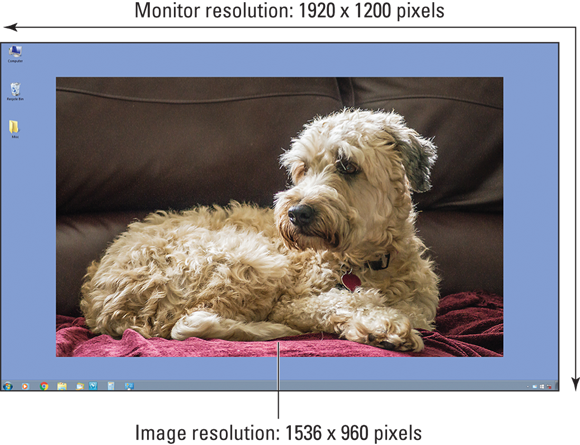
FIGURE 4-11: When the monitor screen resolution is set to 1920 x 1200 pixels, my 1536 x 960-pixel photo consumes most of the display.
After setting my monitor to that resolution, I used the Windows display-customization options to place a 1536 x 960-pixel photo of my office assistant and life coach in the center of the display. The picture consumes just that number of screen pixels, with the remaining screen area occupied by the various Windows desktop icons and the plain blue background I chose as the desktop background.
Of course, for most onscreen uses, you don't want the picture to take up the entire display area or even as much screen space as shown in my example. When you share pictures on Facebook, for example, post them in an online gallery, or include them in a presentation, you need to leave ample screen space for text and other page elements.
The upshot is that you need far fewer pixels for images destined for screen display purposes than you do to produce large prints. Which begs the question: What do you do if you want to be able to print your pictures and share them online or use them for other screen purposes? Always set the camera resolution to match the print size you have in mind. As illustrated in the preceding section, you can’t add pixels later successfully to achieve a good print. You can, however, dump pixels from a high-resolution original to create a copy that’s appropriately sized for the screen. Your camera may offer a built-in tool that creates a low-resolution copy; if it doesn't, you can get the job done in any photo editing program.
Chapter 9 has more details about preparing a picture for online use.
Pixels and file size
Many factors affect the size of the data file needed to store a digital picture, including the complexity of the scene (the level of detail, the number of colors, and so on). The file format in which the image is stored, usually either JPEG or Raw, explained later in this chapter, also affects file size. But all other things being equal, an image with lots of pixels has a larger file size than a low-resolution image.
Although more pixels translates to better prints, as outlined earlier in this chapter, the large files needed to contain those pixels create several problems:
- Large files require more storage space. When you’re shooting huge files, it doesn’t take too long to fill up a camera memory card, computer hard drive, or a cloud (online) storage account. And if you archive your files on DVD, which I recommend for your most treasured images, you can wind up with a huge disc collection in no time, given that the maximum storage capacity of a DVD is about 4.7GB, or gigabytes. (One GB equals 1,000MB.)
- Large files take longer for the camera to capture. The more pixels you ask your camera to capture, the longer it needs to process and record the picture file to your memory card. That additional capture time can be a hindrance if you’re trying to capture action shots at a fast pace.
- Large files strain your computer. Large files make bigger demands on your computer’s memory (RAM) when you edit them. You also need lots of empty hard drive space for editing because the computer uses that space as temporary storage while it’s processing your images. (This temporary storage is sometimes referred to as virtual memory or scratch disk space.)
- Large files are inappropriate for online use. When placed on a web page or sent via email, photos that contain bazillions of pixels are a major annoyance. First, the larger the file, the longer it takes to download. And if you send people a high-resolution image in an email, they may not be able to view the whole image without scrolling. Remember, most computer monitors can display only a limited number of pixels. (See the preceding section for details.)
All that said, large files are a fact of life if you want to capture images at your camera’s highest resolution and quality settings. But do consider whether you always need to max out the pixel count. Are you really going to want to print the picture of your grandma’s birthday cake or your new car at 8 x 10 inches or larger? If not, dialing down resolution a notch makes sense.
Setting the File Type
Your camera may offer a choice of file types, or file formats, in computer lingo. The format determines how the camera records and stores all the bits of data that comprise the photo, and the format you choose affects file size, picture quality, and types of computer programs you need to view and edit the photo.
Although many formats have been developed for digital images, most camera manufacturers have settled on just two: JPEG and Camera Raw. A handful of cameras also offer a third format, called TIFF, although that option has largely been replaced by Camera Raw.
Each of these formats has its pros and cons, and which one is best depends on your picture-taking needs. The next sections tell you what you need to know to make a file-format decision.
Do not confuse your camera’s file-format control with the one that formats your camera memory card. The latter erases all data on your card and sets it so that it's optimized for your camera. Don’t freak out about this possibility: When you choose the card format option, your camera displays a warning to let you know that you’re about to dump data. You get no such message for the file-format control.
As for how you select a file format, the process varies from camera to camera, so check the manual. On some cameras, you set the format and resolution together; on others, the two are controlled separately.
JPEG
 Pronounced “jay-peg,” this format is standard on every camera. JPEG stands for Joint Photographic Experts Group, the organization that developed the format.
JPEG is the leading camera format, for two important reasons:
- All web browsers, email programs, and mobile devices can display JPEG images. So you can share your pictures online seconds after you shoot them. Furthermore, every image-editing program for both the Mac and Windows supports working with JPEG photos.
- JPEG files are smaller than Raw or TIFF files. That means that you can store more pictures on your memory card as well as on your computer’s hard drive or whatever image-storage device you choose. Smaller files also take less time to transmit over the web.
The drawback to JPEG is that in order to trim file size, it applies lossy compression, a process that eliminates some original image data. (Many digital-imaging experts refer to this process as simply JPEG compression.) Heavy JPEG compression can significantly reduce image quality, especially when the image is printed or displayed at a large size.
Figure 4-12 offers an example of the bad things that can happen with excessive JPEG compression. The image takes on a parquet tile look and often exhibits random color defects — notice the bluish tinges around the eyelashes and near the jaw line. These defects are known collectively in the biz as JPEG artifacts, or simply artifacts.
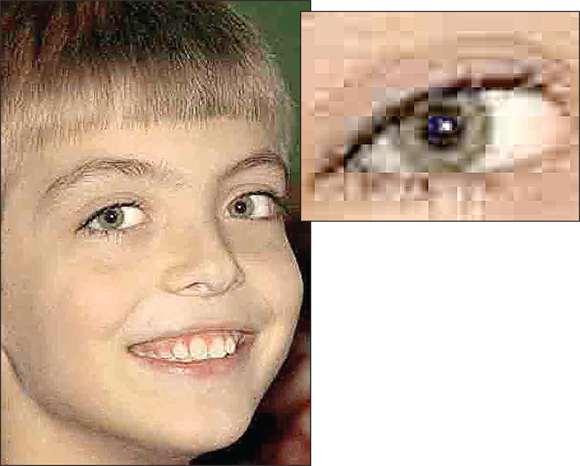
FIGURE 4-12: Too much JPEG compression destroys picture quality.
Now for the good news: Most cameras enable you to specify the level of JPEG compression that you want to apply, and at the highest-quality setting, the file undergoes only a little bit of compression. The result is a file that provides the benefits of the JPEG format with little, if any, noticeable damage to picture quality, as evidenced by the example in Figure 4-13. Sure, the file size is larger — the high-quality JPEG in Figure 4-13 has a file size of 400K (kilobytes) versus the 33K size of the low-quality version in Figure 4-12 — but what good does that small file size do you if the picture is lousy? Both pictures contain the same number of pixels, by the way, so the quality differences you see are purely a result of compression amounts.
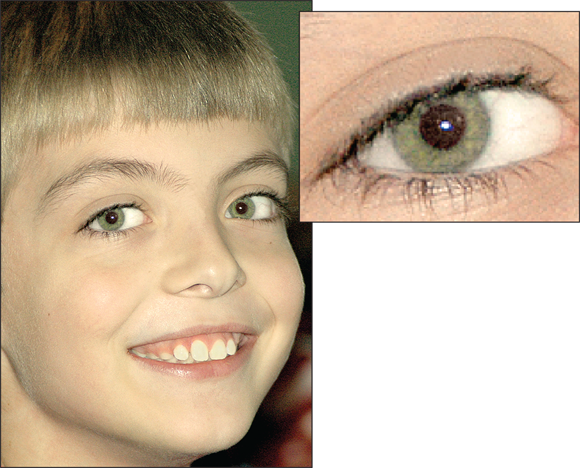
FIGURE 4-13: But a lightly compressed JPEG produces excellent images while keeping file sizes small.
To sum up, as long as you stick with the highest-quality JPEG file your camera can produce, this format is the right choice for all but the most demanding photographers. (If you fall in the latter camp, explore the Camera Raw format, explained in the next section.) And note that even if you choose your camera’s lowest-quality JPEG setting, it’s highly unlikely that you’ll see the level of destruction shown in Figure 4-12 — the defects in the picture are exaggerated so that you can more easily see what JPEG artifacts look like.
Figuring out which camera setting delivers the top-quality JPEG file requires a look at your camera manual because the options differ between models. Typically, compression settings are given vague monikers: Good/Better/Best or High/Normal/Basic, for example.
These names refer not to the amount of compression being applied, but to the resulting image quality. If you set your camera to the Best setting, for example, the image is compressed less than if you choose the Good setting. Also, some cameras may use similar names to refer to image-size (resolution) options rather than JPEG-quality options.
You should find a chart in your manual that indicates how many images you can fit into a certain amount of memory at different compression settings. But you need to experiment to find out exactly how each setting affects picture quality. Shoot the same image at all the different settings to get an idea of how much damage you do if you opt for a higher degree of compression.
If your camera offers several resolution settings, do the compression test for each resolution setting. Remember that resolution and compression work together to determine image quality. You can usually get away with more compression at a higher resolution. Low resolution combined with heavy compression yields results even a mother couldn’t love.
When you edit images in a photo editor, you can save the altered file in the JPEG format. If you do, though, you apply another round of lossy compression. Each pass through the JPEG compression machine does further damage, and if you edit and save to JPEG repeatedly, you can wind up with the level of artifacting shown in Figure 4-12. So you should instead save works in progress in a format such as TIFF (explained later in this chapter), which does a much better job of preserving picture quality. Should you want to share your edited photo online — which requires a JPEG image — you can create a copy of your final TIFF image and save the copy in the JPEG format.
Camera Raw
When you shoot in the JPEG format, your camera takes the data collected by the image sensor and then applies certain enhancements — exposure correction, color adjustments, sharpening, and so on — before recording the final image. These changes are based on the picture characteristics that the manufacturer believes its customers prefer.
The Camera Raw format, sometimes called simply Raw, was developed for photo purists who don’t want the camera manufacturer to make those decisions. Camera Raw records data straight from the sensor, without applying any post-capture processes. After transferring the files to a computer, you then use special software known as a raw converter to translate the sensor data into the actual photograph.
Unlike JPEG, Camera Raw isn't a standardized format. Each manufacturer uses different data specifications and names for its Raw format. Nikon Raw files are called NEF or NRW files, for example, while Canon’s versions go by the name CRW or CR2, depending on the camera model.
Whatever the specific name, Raw image capture offers the following advantages:
- No risk of JPEG compression artifacts: Raw files offer higher image quality because they don't undergo the kind of serious file compression that causes the defects associated with JPEG lossy compression. Again, though, as long as you stick with your camera’s highest-quality JPEG setting, you may have difficulty detecting much difference in quality between the JPEG and Raw version of an image unless you greatly enlarge the photo.
- Greater creative control: When you process your “uncooked” picture data in a raw converter, you can specify characteristics such as brightness, color saturation, sharpness, and so on, rather than dine on whatever the JPEG version might serve up. To keep up the cooking analogy, imagine that you put together a special dish and you realize after it comes out of the oven that you accidentally used cayenne pepper when your recipe didn’t call for any. If your dish were like a Raw file, you’d be able to go back to the beginning of your cooking session and remove the pepper. With JPEG, that pepper would be a done deal. And that’s what photographers like about Raw — files captured in this format give you much more control over the final look of your images.
- Greater latitude for editing the picture: Raw capture also gives you a bit of a photographic safety net. Suppose that you don’t get the exposure settings quite right, for example, when you shoot a picture. With JPEG, the camera decides how brightly to render the shadows and highlights, which can limit you in how much you can retouch that aspect of your picture later. With Raw, you can specify what brightness value should be white, what should be black, and so forth, giving you greater ability to achieve just the image brightness and contrast you want — a benefit that’s especially great for pictures taken in tricky light.
-
Higher bit depth: Bit depth is a measure of how many distinct color values an image file can contain. With JPEG, your pictures contain 8 bits each for the red, blue, and green color components, or channels, that make up a digital image, for a total of 24 bits. That translates to roughly 16.7 million possible colors.
On most cameras, choosing the Raw setting delivers a higher bit count. You may be able to set the camera to collect 12 or more bits per channel, for example. However, you may not really ever notice any difference in your photos — that 8-bit palette of 16.7 million values is more than enough for superb images. Where having the extra bits can come in handy is if you really need to adjust exposure, contrast, or color after the shot in your photo editing program. In cases where you apply extreme adjustments, having the extra original bits sometimes helps avoid a problem known as banding or posterization, which creates abrupt color breaks where you should see smooth, seamless transitions. (A higher bit depth doesn’t always prevent the problem, however, so don’t expect miracles.)
Of course, like most things in life, the benefits of Raw do come at a price. First, most low-priced cameras don’t offer the format. But Raw also costs you in the following ways, which may be enough for you to stick with JPEG even if your camera is dual-natured in terms of file format:
-
Raw files require some post-capture computer time. You can’t take a Raw image straight from the camera and share it online, use it in a screen presentation, retouch it in a photo editor, or, well, do much of anything with it until you process it in a Raw converter, which you can find in photo-editing programs such as Adobe Photoshop. Most camera manufacturers also provide a tool to do the job. As part of the conversion process, you specify critical image characteristics: color, sharpness, contrast, and so on. Then you save a copy of the processed Raw file in a standard file format, such as JPEG or TIFF (explained in the next section).
Processing Raw files isn't difficult, but it does take time that you may prefer to spend behind the camera. And if you have a hate-hate relationship with computers, Raw is definitely not for you. Some cameras do have a built-in “mini converter” — that is, you can create a JPEG copy of a Raw image right in the camera. That feature makes the process faster and simpler, but it's not ideal because you have to make judgments about the picture based on a small camera monitor and you typically can specify only a handful of image characteristics. In other words, it's all the inconvenience of Raw without the creative-control benefits.
-
You may not be able to view thumbnails of your images on your computer without converting them, either. You can still see the Raw filenames, but not image thumbnails.
However — and here’s some good news — most camera companies offer their own image-browsing software for free. (Look on the CD that came with your camera or check the manufacturer's online support site for a program download link.) You should be able to view and maybe even print Raw images by using those manufacturer-created programs — just not in most third-party programs.
- Raw files are larger than JPEG files. Again, Raw files aren’t compressed, so they can be significantly larger than JPEG files, even if you capture the JPEG image at the lowest possible amount of compression. So you can store fewer Raw files on a memory card than JPEG files. (If your camera offers the Raw format, the manual should provide details on the size of its Raw files versus JPEG versions.) In addition, because you probably want to hang on to your original Raw files after you convert them, just for safety’s sake, you ultimately wind up with at least two copies of each image — the Raw original and the one that you converted to a standard format.
In short, because of the added complication of working with Raw files, you’re better off sticking with JPEG if you’re a photo-editing novice, a computer novice, or both. Frankly, the in-camera processing that occurs with JPEG is likely to produce results that are at least as good as, if not better than, what you can do in your photo editor if you’re not skilled at the task. (Just remember the earlier warning about saving files that you edit in the TIFF format instead of JPEG.)
Some cameras offer a setting that creates both a Raw file and a JPEG file so that you have a version of the image that you can use immediately and another that you can use if you’re inclined to spend hours editing it. Of course, you consume even more camera memory with this option because you’re creating two files — and later, you’ll have yet one more file after you process the Raw file on your computer. Depending on the camera, you may be able to choose a different resolution for your JPEG photos than you use for the Raw versions. You also may be able to select the amount of JPEG compression that's applied to the JPEG version.
TIFF
The third player in the image file format game is TIFF, which stands for Tagged Image File Format. Like Camera Raw, TIFF also offers higher picture quality than JPEG because TIFF files don't go through the JPEG lossy-compression mill. TIFF has long been the standard format for images destined for professional printing, where the highest quality is required.
Before the emergence of Camera Raw, some high-end cameras offered TIFF as an alternative to JPEG. Most cameras, now, though, don’t offer the option to record images as TIFF files. Instead, TIFF is a destination format: You save an edited JPEG file in TIFF format, for example, so that no more compression and data loss occur. Or if your camera offers the ability to save files in the Camera Raw format, you can save them in TIFF format after you process them so that you preserve the best image quality.
TIFF does present two problems: First, TIFF files are much larger than JPEG files. In addition, web browsers and email programs can’t display TIFF photos. If you do want to share a TIFF file online, you need to open the file in a photo editor and save a copy of it in the JPEG format.
Looking at a Few Additional Setup Options
Along with the picture settings already discussed, take a few minutes to consider the following options, which affect overall camera operation. You find these options on most cameras, although you need to consult your camera manual to determine the specific option name and how to adjust the setting.
-
Date and time: Your camera records the current date and time in the image file, along with details about what other camera settings were in force when you shot the picture. In many photo editors and image browsers, you can view this information, known as metadata. (Meta, for extra, data.) Having the correct date and time in the image file enables you to have a permanent record of when each picture was taken. More importantly, in many photo programs, you can search for all pictures taken on a particular date.
Some cameras also have a time-stamp menu option that slaps a text label with the picture date and time on the image itself. Because this information is always stored in the image file, there's no need to permanently mar an image with the text label. You can always add a text label in a photo editor later, if you want, but you can't get rid of it if it's created as part of the original image file. - Auto shutoff: To conserve battery power, many cameras turn off automatically after a few minutes of inactivity. The drawback is that you can miss fleeting photographic opportunities — by the time you restart the camera, your subject may be gone. If you’re not happy with the way this option works, see whether you can adjust the length of time that the camera must be idle before auto shutdown occurs; some cameras also give you the option of turning the feature off entirely.
-
Shoot without memory card: When this feature is enabled, you can take a photo without a memory card installed in the camera. The image is stored in a tiny bit of internal camera memory but usually isn’t retained for more than a few minutes. The point of the function is to enable camera salespeople to demonstrate cameras without having to keep memory cards in all of them. To avoid any possibility that you'll shoot all day without a memory card, turn off this function. It may go by another name, such as Slot Empty Release, so check your manual for information.
- Instant review: After you take a picture, your camera may display it automatically for a few seconds. On some cameras, you can’t take another picture until the review period has passed, and if that’s the case with your model, you may want to turn off instant review when you’re trying to capture fast-paced subjects. And because monitors consume power, also turn off instant review if you’re worried about running out of battery juice. You may also be able to adjust the length of the instant-review period.
-
File numbering: Cameras assign filenames to photos, often beginning with a few letters and a symbol (for example, IMG_0023.JPG, DSCN0038.JPG, or something similar). You can often set up your camera to number files beginning with certain numbers, and some cameras actually let you put in a few of your own letters with the file numbers (although it’s usually very limited).
Some cameras have an option that automatically restarts the file-numbering sequence when you swap out a memory card. For example, if the current memory card contains a file named IMG_0001.JPG and you put in a new memory card, the camera assigns that same filename to the first picture you take. Obviously, this option can lead to trouble after you download pictures to your computer, because you can wind up with multiple pictures that share the same name. So check your manual to find out whether this option exists on your camera, and if so, avoid it. - Sound effects: Digital cameras are big on sounds: Some play a little ditty when the camera is turned on. Some beep to let you know that the camera’s autofocus or autoexposure mechanism has done its thing, and others emit a little “shutter” sound as you take the picture. Some cameras have even said “Goodbye” in this odd little digitized voice when you turned the camera off. Before heading to a wedding or any other event where your camera’s bells and whistles won’t be appreciated, check your camera menu to see whether you can silence them or at least turn down the volume.
- Shooting information display: Most cameras display some information about the current picture settings on the monitor, as shown on the left in Figure 4-14. If you find that data distracting, you may be able to hide it, as shown on the right. Usually, you alter the display type by pressing a button labeled Info or DISP (for display), but check your manual for details.
- Viewfinder and monitor alignment guides: On some cameras, you can display a grid in the viewfinder or monitor, as shown on the left in Figure 4-15. The grid comes in especially handy when you're shooting landscapes or other scenes where it's important to frame the shot so that the horizon is level. Depending on the camera, you may even be able to display a little digital level, as shown on the right in the figure, to let you know when the camera is level with the horizon.
-
Monitor brightness: Adjusting the monitor brightness can make pictures easier to view in bright light. But be careful: The monitor may then give you a false impression of the image exposure. Before you put your camera away, double-check your pictures in a setting where you can use the default brightness level. As another alternative, you may be able to display an exposure guide called a histogram; see Chapter 5 for details.
- Button customization: If you own a higher-end camera, you may also have the option to change the function of certain camera buttons. For example, some cameras have a Function (FN) button, which you can assign to perform any number of tasks, from turning on self-timer shooting to setting the image picture quality. These options are best left alone until you have a good grasp of all the camera's operations — if you start changing the button functions, instructions in the camera manual or any other camera guide won't work.
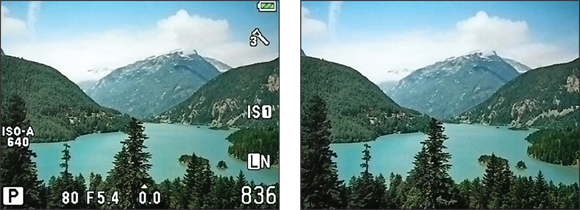
FIGURE 4-14: If the shooting data displayed on the monitor becomes distracting (left), you may be able to hide it (right).

FIGURE 4-15: You may be able to display alignment aids in the monitor or viewfinder.
That concludes my list of basic setup options to check; be sure to flip through your camera manual (or click through, if the manual is provided in electronic format) to find out other options.